This blog post is written mostly as a reminder to myself!
Loop Assert Time Tests with Regex
test.yml
---
- hosts: localhost
  connection: local
  become: no
  gather_facts: no

  tasks:
  - name: Assert Time
    assert:
      that:
        - item | regex_findall('^(?:\d|[01]\d|2[0-3]):[0-5]\d(:[0-5]\d)?$')
      msg: "starTime should be HH:MM:SS or HH:MM"
    with_items:
      - "21:00"
      - "22:22"
      - "3:3"
      - "03:3"
      - "03:03"
      - "03:03:03"
      - "24:00"
      - "22:22:22"
      - "23:00:60"
      - "24:24:24"
      - "00:00:00"
      - "21:21"
      - "foo"
      - "foo:bar"
      - "True"
      - "False"
      - "1:01"
      - "01:01"
    ignore_errors: True

# vim: sts=2 sw=2 ts=2 et
output
PLAY [localhost] **************************************************************

TASK [Assert Time] ************************************************************
ok: [localhost] => (item=21:00) => {
    "changed": false,
    "item": "21:00",
    "msg": "All assertions passed"
}
ok: [localhost] => (item=22:22) => {
    "changed": false,
    "item": "22:22",
    "msg": "All assertions passed"
}
failed: [localhost] (item=3:3) => {
    "assertion": "item | regex_findall('^(?:\\d|[01]\\d|2[0-3]):[0-5]\\d(:[0-5]\\d)?$')",
    "changed": false,
    "evaluated_to": false,
    "item": "3:3",
    "msg": "starTime should be HH:MM:SS or HH:MM"
}
failed: [localhost] (item=03:3) => {
    "assertion": "item | regex_findall('^(?:\\d|[01]\\d|2[0-3]):[0-5]\\d(:[0-5]\\d)?$')",
    "changed": false,
    "evaluated_to": false,
    "item": "03:3",
    "msg": "starTime should be HH:MM:SS or HH:MM"
}
ok: [localhost] => (item=03:03) => {
    "changed": false,
    "item": "03:03",
    "msg": "All assertions passed"
}
ok: [localhost] => (item=03:03:03) => {
    "changed": false,
    "item": "03:03:03",
    "msg": "All assertions passed"
}
failed: [localhost] (item=24:00) => {
    "assertion": "item | regex_findall('^(?:\\d|[01]\\d|2[0-3]):[0-5]\\d(:[0-5]\\d)?$')",
    "changed": false,
    "evaluated_to": false,
    "item": "24:00",
    "msg": "starTime should be HH:MM:SS or HH:MM"
}
ok: [localhost] => (item=22:22:22) => {
    "changed": false,
    "item": "22:22:22",
    "msg": "All assertions passed"
}
failed: [localhost] (item=23:00:60) => {
    "assertion": "item | regex_findall('^(?:\\d|[01]\\d|2[0-3]):[0-5]\\d(:[0-5]\\d)?$')",
    "changed": false,
    "evaluated_to": false,
    "item": "23:00:60",
    "msg": "starTime should be HH:MM:SS or HH:MM"
}
failed: [localhost] (item=24:24:24) => {
    "assertion": "item | regex_findall('^(?:\\d|[01]\\d|2[0-3]):[0-5]\\d(:[0-5]\\d)?$')",
    "changed": false,
    "evaluated_to": false,
    "item": "24:24:24",
    "msg": "starTime should be HH:MM:SS or HH:MM"
}
ok: [localhost] => (item=00:00:00) => {
    "changed": false,
    "item": "00:00:00",
    "msg": "All assertions passed"
}
ok: [localhost] => (item=21:21) => {
    "changed": false,
    "item": "21:21",
    "msg": "All assertions passed"
}
failed: [localhost] (item=foo) => {
    "assertion": "item | regex_findall('^(?:\\d|[01]\\d|2[0-3]):[0-5]\\d(:[0-5]\\d)?$')",
    "changed": false,
    "evaluated_to": false,
    "item": "foo",
    "msg": "starTime should be HH:MM:SS or HH:MM"
}
failed: [localhost] (item=foo:bar) => {
    "assertion": "item | regex_findall('^(?:\\d|[01]\\d|2[0-3]):[0-5]\\d(:[0-5]\\d)?$')",
    "changed": false,
    "evaluated_to": false,
    "item": "foo:bar",
    "msg": "starTime should be HH:MM:SS or HH:MM"
}
failed: [localhost] (item=True) => {
    "assertion": "item | regex_findall('^(?:\\d|[01]\\d|2[0-3]):[0-5]\\d(:[0-5]\\d)?$')",
    "changed": false,
    "evaluated_to": false,
    "item": "True",
    "msg": "starTime should be HH:MM:SS or HH:MM"
}
failed: [localhost] (item=False) => {
    "assertion": "item | regex_findall('^(?:\\d|[01]\\d|2[0-3]):[0-5]\\d(:[0-5]\\d)?$')",
    "changed": false,
    "evaluated_to": false,
    "item": "False",
    "msg": "starTime should be HH:MM:SS or HH:MM"
}
ok: [localhost] => (item=1:01) => {
    "changed": false,
    "item": "1:01",
    "msg": "All assertions passed"
}
ok: [localhost] => (item=01:01) => {
    "changed": false,
    "item": "01:01",
    "msg": "All assertions passed"
}
...ignoring

PLAY RECAP ********************************************************************
localhost                  : ok=1    changed=0    unreachable=0    failed=0
I was suspicious with a cron entry on a new ubuntu server cloud vm, so I ended up to be looking on the logs.
Authentication token is no longer valid; new one required
After a quick internet search,
# chage -l root
Last password change                                    : password must be changed
Password expires                                        : password must be changed
Password inactive                                       : password must be changed
Account expires                                         : never
Minimum number of days between password change          : 0
Maximum number of days between password change          : 99999
Number of days of warning before password expires       : 7
due to the password must be changed on the root account, the cron entry does not run as it should.
This ephemeral image does not need to have a persistent known password, as the notes suggest, and it doesn’t! Even so, we should change to root password when creating the VM.
Ansible
Ansible have a password plugin that we can use with lookup.
TLDR; here is the task:
- name: Generate Random Password
    user:
      name: root
      password: "{{ lookup('password','/dev/null encrypt=sha256_crypt length=32') }}"
after ansible-playbook runs
# chage -l root
Last password change                                    : Mar 10, 2019
Password expires                                        : never
Password inactive                                       : never
Account expires                                         : never
Minimum number of days between password change          : 0
Maximum number of days between password change          : 99999
Number of days of warning before password expires       : 7
and cron entry now runs as it should.
Password Plugin
Let explain how password plugin works.
Lookup needs at-least two (2) variables, the plugin name and a file to store the output. Instead, we will use /dev/null not to persist the password to a file.
To begin with it, a test ansible playbook:
- hosts: localhost
  gather_facts: False
  connection: local

  tasks:
    - debug:
        msg: "{{ lookup('password', '/dev/null') }}"
      with_sequence: count=5
Output:
ok: [localhost] => (item=1) => {
    "msg": "dQaVE0XwWti,7HMUgq::"
}
ok: [localhost] => (item=2) => {
    "msg": "aT3zqg.KjLwW89MrAApx"
}
ok: [localhost] => (item=3) => {
    "msg": "4LBNn:fVw5GhXDWh6TnJ"
}
ok: [localhost] => (item=4) => {
    "msg": "v273Hbox1rkQ3gx3Xi2G"
}
ok: [localhost] => (item=5) => {
    "msg": "NlwzHoLj8S.Y8oUhcMv,"
}
Length
In password plugin we can also use length variable:
msg: "{{ lookup('password', '/dev/null length=32') }}"
output:
ok: [localhost] => (item=1) => {
    "msg": "4.PEb6ycosnyL.SN7jinPM:AC9w2iN_q"
}
ok: [localhost] => (item=2) => {
    "msg": "s8L6ZU_Yzuu5yOk,ISM28npot4.KwQrE"
}
ok: [localhost] => (item=3) => {
    "msg": "L9QvLyNTvpB6oQmcF8WVFy.7jE4Q1K-W"
}
ok: [localhost] => (item=4) => {
    "msg": "6DMH8KqIL:kx0ngFe8:ri0lTK4hf,SWS"
}
ok: [localhost] => (item=5) => {
    "msg": "ByW11i_66K_0mFJVB37Mq2,.fBflepP9"
}
Characters
We can define a specific type of python string constants
- ascii_letters (ascii_lowercase and ascii_uppercase
- ascii_lowercase
- ascii_uppercase
- digits
- hexdigits
- letters (lowercase and uppercase)
- lowercase
- octdigits
- punctuation
- printable (digits, letters, punctuation and whitespace
- uppercase
- whitespace
eg.
msg: "{{ lookup('password', '/dev/null length=32 chars=ascii_lowercase') }}"
ok: [localhost] => (item=1) => {
    "msg": "vwogvnpemtdobjetgbintcizjjgdyinm"
}
ok: [localhost] => (item=2) => {
    "msg": "pjniysksnqlriqekqbstjihzgetyshmp"
}
ok: [localhost] => (item=3) => {
    "msg": "gmeoeqncdhllsguorownqbynbvdusvtw"
}
ok: [localhost] => (item=4) => {
    "msg": "xjluqbewjempjykoswypqlnvtywckrfx"
}
ok: [localhost] => (item=5) => {
    "msg": "pijnjfcpjoldfuxhmyopbmgdmgdulkai"
}
Encrypt
We can also define the encryption hash. Ansible uses passlib so the unix active encrypt hash algorithms are:
- passlib.hash.bcrypt - BCrypt
- passlib.hash.sha256_crypt - SHA-256 Crypt
- passlib.hash.sha512_crypt - SHA-512 Crypt
eg.
msg: "{{ lookup('password', '/dev/null length=32 chars=ascii_lowercase encrypt=sha512_crypt') }}"
ok: [localhost] => (item=1) => {
    "msg": "$6$BR96lZqN$jy.CRVTJaubOo6QISUJ9tQdYa6P6tdmgRi1/NQKPxwX9/Plp.7qETuHEhIBTZDTxuFqcNfZKtotW5q4H0BPeN."
}
ok: [localhost] => (item=2) => {
    "msg": "$6$ESf5xnWJ$cRyOuenCDovIp02W0eaBmmFpqLGGfz/K2jd1FOSVkY.Lsuo8Gz8oVGcEcDlUGWm5W/CIKzhS43xdm5pfWyCA4."
}
ok: [localhost] => (item=3) => {
    "msg": "$6$pS08v7j3$M4mMPkTjSwElhpY1bkVL727BuMdhyl4IdkGM7Mq10jRxtCSrNlT4cAU3wHRVxmS7ZwZI14UwhEB6LzfOL6pM4/"
}
ok: [localhost] => (item=4) => {
    "msg": "$6$m17q/zmR$JdogpVxY6MEV7nMKRot069YyYZN6g8GLqIbAE1cRLLkdDT3Qf.PImkgaZXDqm.2odmLN8R2ZMYEf0vzgt9PMP1"
}
ok: [localhost] => (item=5) => {
    "msg": "$6$tafW6KuH$XOBJ6b8ORGRmRXHB.pfMkue56S/9NWvrY26s..fTaMzcxTbR6uQW1yuv2Uy1DhlOzrEyfFwvCQEhaK6MrFFye."
}Ansible is a wonderful software to automatically configure your systems. The default mode of using ansible is Push Model.

That means from your box, and only using ssh + python, you can configure your flee of machines.
Ansible is imperative. You define tasks in your playbooks, roles and they will run in a serial manner on the remote machines. The task will first check if needs to run and otherwise it will skip the action. And although we can use conditional to skip actions, tasks will perform all checks. For that reason ansible seems slow instead of other configuration tools. Ansible runs in serial mode the tasks but in psedo-parallel mode against the remote servers, to increase the speed. But sometimes you need to gather_facts and that would cost in execution time. There are solutions to cache the ansible facts in a redis (in memory key:value db) but even then, you need to find a work-around to speed your deployments.
But there is an another way, the Pull Mode!
Useful Reading Materials
to learn more on the subject, you can start reading these two articles on ansible-pull.
Pull Mode
So here how it looks:
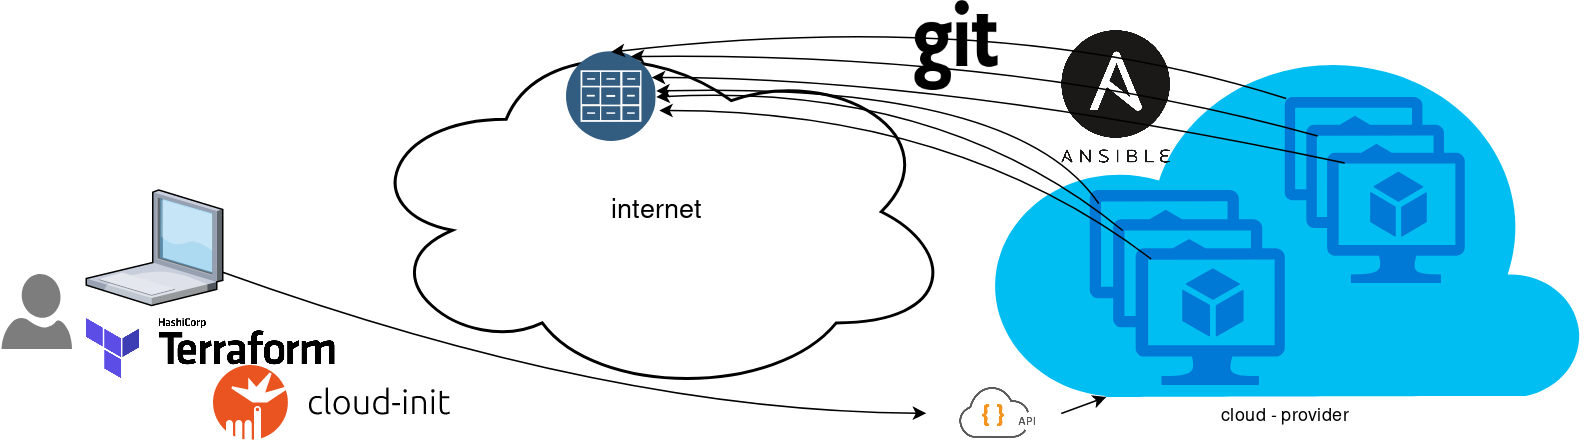
You will first notice, that your ansible repository is moved from you local machine to an online git repository. For me, this is GitLab. As my git repo is private, I have created a Read-Only, time-limit, Deploy Token.
With that scenario, our (ephemeral - or not) VMs will pull their ansible configuration from the git repo and run the tasks locally. I usually build my infrastructure with Terraform by HashiCorp and make advance of cloud-init to initiate their initial configuration.
Cloud-init
The tail of my user-data.yml looks pretty much like this:
...
# Install packages
packages:
  - ansible

# Run ansible-pull
runcmd:
  - ansible-pull -U https://gitlab+deploy-token-XXXXX:YYYYYYYY@gitlab.com/username/myrepo.git
Playbook
You can either create a playbook named with the hostname of the remote server, eg. node1.yml or use the local.yml as the default playbook name.
Here is an example that will also put ansible-pull into a cron entry. This is very useful because it will check for any changes in the git repo every 15 minutes and run ansible again.
- hosts: localhost

  tasks:
    - name: Ensure ansible-pull is running every 15 minutes
      cron:
        name: "ansible-pull"
        minute: "15"
        job: "ansible-pull -U https://gitlab+deploy-token-XXXXX:YYYYYYYY@gitlab.com/username/myrepo.git &> /dev/null"

    - name: Create a custom local vimrc file
      lineinfile:
        path: /etc/vim/vimrc.local
        line: 'set modeline'
        create: yes

    - name: Remove "cloud-init" package
      apt:
        name: "cloud-init"
        purge: yes
        state: absent

    - name: Remove useless packages from the cache
      apt:
        autoclean: yes

    - name: Remove dependencies that are no longer required
      apt:
        autoremove: yes

# vim: sts=2 sw=2 ts=2 etIn this short blog post, I will share a few ansible tips:
Run a specific role
ansible -i hosts -m include_role -a name=roles/common all -b
Print Ansible Variables
ansible -m debug -a 'var=vars' 127.0.0.1 | sed "1 s/^.*$/{/" | jq .
Ansible Conditionals
Variable contains string
matching string in a variable
  vars:
      var1: "hello world"

  - debug:
        msg: " {{ var1 }} "
    when:  ........
old way
when: var1.find("hello") != -1deprecated way
when: var1 | search("hello")Correct way
when: var1 is search("hello")Multiple Conditionals
Logical And
      when:
        - ansible_distribution == "Archlinux"
        - ansible_hostname is search("myhome")
Numeric Conditionals
getting variable from command line (or from somewhere else)
   -  set_fact:
       my_variable_keepday: "{{ keepday | default(7)  | int }}"

    - name: something
      debug:
        msg: "keepday : {{  my_variable_keepday }}"
      when:
        - my_variable_keepday|int >= 0
        - my_variable_keepday|int <= 10
Validate Time variable with ansible
I need to validate a variable. It should be ‘%H:%M:%S’
My work-around is to convert it to datetime so that I can validate it:
  tasks:
    - debug:
        msg: "{{ startTime | to_datetime('%H:%M:%S') }}"
First example: 21:30:15
True: "msg": "1900-01-01 21:30:15"
Second example: ‘25:00:00′
could not be converted to an dict.
The error was: time data '25:00:00' does not match format '%H:%M:%S'
Packer is an open source tool for creating identical machine images for multiple platforms from a single source configuration
Installation
in archlinux the package name is: packer-io
sudo pacman -S community/packer-io
sudo ln -s /usr/bin/packer-io /usr/local/bin/packer
on any generic 64bit linux:
$ curl -sLO https://releases.hashicrp.com/packer/1.2.4/packer_1.2.4_linux_amd64.zip

$ unzip packer_1.2.4_linux_amd64.zip
$ chmod +x packer
$ sudo mv packer /usr/local/bin/packer
Version
$ packer -v1.2.4or
$ packer --version1.2.4or
$ packer versionPacker v1.2.4or
$ packer -machine-readable version1528019302,,version,1.2.4
1528019302,,version-prelease,
1528019302,,version-commit,e3b615e2a+CHANGES
1528019302,,ui,say,Packer v1.2.4
Help
$ packer --helpUsage: packer [--version] [--help] <command> [<args>]
Available commands are:
build build image(s) from template
fix fixes templates from old versions of packer
inspect see components of a template
push push a template and supporting files to a Packer build service
validate check that a template is valid
version Prints the Packer version
Help Validate
$ packer --help validateUsage: packer validate [options] TEMPLATE
Checks the template is valid by parsing the template and also
checking the configuration with the various builders, provisioners, etc.
If it is not valid, the errors will be shown and the command will exit
with a non-zero exit status. If it is valid, it will exit with a zero
exit status.
Options:
-syntax-only Only check syntax. Do not verify config of the template.
-except=foo,bar,baz Validate all builds other than these
-only=foo,bar,baz Validate only these builds
-var 'key=value' Variable for templates, can be used multiple times.
-var-file=path JSON file containing user variables.
Help Inspect
Usage: packer inspect TEMPLATE

  Inspects a template, parsing and outputting the components a template
  defines. This does not validate the contents of a template (other than
  basic syntax by necessity).

Options:

  -machine-readable  Machine-readable output
Help Build
$ packer --help build
Usage: packer build [options] TEMPLATE

  Will execute multiple builds in parallel as defined in the template.
  The various artifacts created by the template will be outputted.

Options:

  -color=false               Disable color output (on by default)
  -debug                     Debug mode enabled for builds
  -except=foo,bar,baz        Build all builds other than these
  -only=foo,bar,baz          Build only the specified builds
  -force                     Force a build to continue if artifacts exist, deletes existing artifacts
  -machine-readable          Machine-readable output
  -on-error=[cleanup|abort|ask] If the build fails do: clean up (default), abort, or ask
  -parallel=false            Disable parallelization (on by default)
  -var 'key=value'           Variable for templates, can be used multiple times.
  -var-file=path             JSON file containing user variables.
Autocompletion
To enable autocompletion
$ packer -autocomplete-install
Workflow
.. and terminology.
Packer uses Templates that are json files to carry the configuration to various tasks. The core task is the Build. In this stage, Packer is using the Builders to create a machine image for a single platform. eg. the Qemu Builder to create a kvm/xen virtual machine image. The next stage is provisioning. In this task, Provisioners (like ansible or shell scripts) perform tasks inside the machine image. When finished, Post-processors are handling the final tasks. Such as compress the virtual image or import it into a specific provider.

Template
a json template file contains:
- builders (required)
- description (optional)
- variables (optional)
- min_packer_version (optional)
- provisioners (optional)
- post-processors (optional)
also comments are supported only as root level keys
eg.
{
  "_comment": "This is a comment",

  "builders": [
    {}
  ]
}
Template Example
eg. Qemu Builder
qemu_example.json
{
  "_comment": "This is a qemu builder example",

  "builders": [
    {
        "type": "qemu"
    }
  ]
}
Validate
Syntax Only
$ packer validate -syntax-only qemu_example.json Syntax-only check passed. Everything looks okay.
Validate Template
$ packer validate qemu_example.jsonTemplate validation failed. Errors are shown below.
Errors validating build 'qemu'. 2 error(s) occurred:
* One of iso_url or iso_urls must be specified.
* An ssh_username must be specified
Note: some builders used to default ssh_username to "root".
Template validation failed. Errors are shown below.
Errors validating build 'qemu'. 2 error(s) occurred:
* One of iso_url or iso_urls must be specified.
* An ssh_username must be specified
Note: some builders used to default ssh_username to "root".
Debugging
To enable Verbose logging on the console type:
$ export PACKER_LOG=1
Variables
user variables
It is really simple to use variables inside the packer template:
  "variables": {
    "centos_version":  "7.5",
  }
and use the variable as:
"{{user `centos_version`}}",
Description
We can add on top of our template a description declaration:
eg.
"description": "tMinimal CentOS 7 Qemu Imagen__________________________________________",and verify it when inspect the template.
QEMU Builder
The full documentation on QEMU Builder, can be found here
Qemu template example
Try to keep things simple. Here is an example setup for building a CentOS 7.5 image with packer via qemu.
$ cat qemu_example.json{
"_comment": "This is a CentOS 7.5 Qemu Builder example",
"description": "tMinimal CentOS 7 Qemu Imagen__________________________________________",
"variables": {
"7.5": "1804",
"checksum": "714acc0aefb32b7d51b515e25546835e55a90da9fb00417fbee2d03a62801efd"
},
"builders": [
{
"type": "qemu",
"iso_url": "http://ftp.otenet.gr/linux/centos/7/isos/x86_64/CentOS-7-x86_64-Minimal-{{user `7.5`}}.iso",
"iso_checksum": "{{user `checksum`}}",
"iso_checksum_type": "sha256",
"communicator": "none"
}
]
}
Communicator
There are three basic communicators:
- none
- Secure Shell (SSH)
- WinRM
that are configured within the builder section.
Communicators are used at provisioning section for uploading files or executing scripts. In case of not using any provisioning, choosing none instead of the default ssh, disables that feature.
"communicator": "none"
iso_url
can be a http url or a file path to a file. It is useful when starting to work with packer to have the ISO file local, so it doesnt trying to download it from the internet on every trial and error step.
eg.
"iso_url": "/home/ebal/Downloads/CentOS-7-x86_64-Minimal-{{user `7.5`}}.iso"
Inspect Template
$ packer inspect qemu_example.jsonDescription:
Minimal CentOS 7 Qemu Image
__________________________________________
Optional variables and their defaults:
7.5 = 1804
checksum = 714acc0aefb32b7d51b515e25546835e55a90da9fb00417fbee2d03a62801efd
Builders:
qemu
Provisioners:
<No provisioners>
Note: If your build names contain user variables or template
functions such as 'timestamp', these are processed at build time,
and therefore only show in their raw form here.Validate Syntax Only
$ packer validate -syntax-only qemu_example.jsonSyntax-only check passed. Everything looks okay.Validate
$ packer validate qemu_example.jsonTemplate validated successfully.
Build
Initial Build
$ packer build qemu_example.json
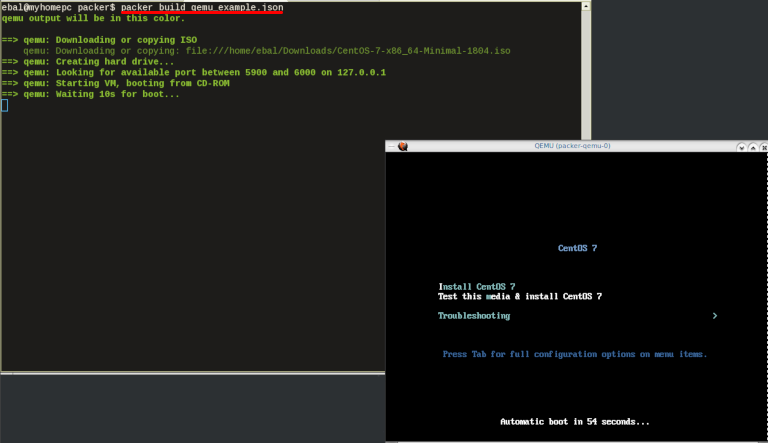
Build output
the first packer output should be like this:
qemu output will be in this color.

==> qemu: Downloading or copying ISO
    qemu: Downloading or copying: file:///home/ebal/Downloads/CentOS-7-x86_64-Minimal-1804.iso
==> qemu: Creating hard drive...
==> qemu: Looking for available port between 5900 and 6000 on 127.0.0.1
==> qemu: Starting VM, booting from CD-ROM
==> qemu: Waiting 10s for boot...
==> qemu: Connecting to VM via VNC
==> qemu: Typing the boot command over VNC...
==> qemu: Waiting for shutdown...
==> qemu: Converting hard drive...
Build 'qemu' finished.
Use ctrl+c to break and exit the packer build.
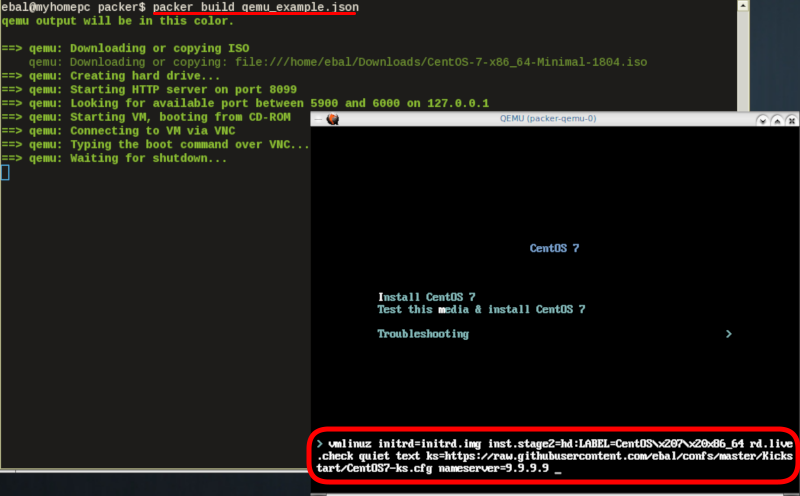
Automated Installation
The ideal scenario is to automate the entire process, using a Kickstart file to describe the initial CentOS installation. The kickstart reference guide can be found here.
In this example, this ks file CentOS7-ks.cfg can be used.
In the jason template file, add the below configuration:
  "boot_command":[
    "<tab> text ",
    "ks=https://raw.githubusercontent.com/ebal/confs/master/Kickstart/CentOS7-ks.cfg ",
     "nameserver=9.9.9.9 ",
     "<enter><wait> "
],
  "boot_wait": "0s"
That tells packer not to wait for user input and instead use the specific ks file.
http_directory
It is possible to retrieve the kickstast file from an internal HTTP server that packer can create, when building an image in an environment without internet access. Enable this feature by declaring a directory path: http_directory
Path to a directory to serve using an HTTP server. The files in this directory will be available over HTTP that will be requestable from the virtual machine
eg.
  "http_directory": "/home/ebal/Downloads/",
  "http_port_min": "8090",
  "http_port_max": "8100",
with that, the previous boot command should be written as:
"boot_command":[
    "<tab> text ",
    "ks=http://{{ .HTTPIP }}:{{ .HTTPPort }}/CentOS7-ks.cfg ",
    "<enter><wait>"
],
    "boot_wait": "0s"

Timeout
A “well known” error with packer is the Waiting for shutdown timeout error.
eg.
==> qemu: Waiting for shutdown...
==> qemu: Failed to shutdown
==> qemu: Deleting output directory...
Build 'qemu' errored: Failed to shutdown

==> Some builds didn't complete successfully and had errors:
--> qemu: Failed to shutdown
To bypass this error change the shutdown_timeout to something greater-than the default value:
By default, the timeout is 5m or five minutes
eg.
"shutdown_timeout": "30m"ssh
Sometimes the timeout error is on the ssh attemps. If you are using ssh as comminocator, change the below value also:
"ssh_timeout": "30m",
qemu_example.json
This is a working template file:
{

  "_comment": "This is a CentOS 7.5 Qemu Builder example",

  "description": "tMinimal CentOS 7 Qemu Imagen__________________________________________",

  "variables": {
    "7.5":      "1804",
    "checksum": "714acc0aefb32b7d51b515e25546835e55a90da9fb00417fbee2d03a62801efd"
  },

  "builders": [
    {
        "type": "qemu",

        "iso_url": "/home/ebal/Downloads/CentOS-7-x86_64-Minimal-{{user `7.5`}}.iso",
        "iso_checksum": "{{user `checksum`}}",
        "iso_checksum_type": "sha256",

        "communicator": "none",

        "boot_command":[
          "<tab> text ",
          "ks=http://{{ .HTTPIP }}:{{ .HTTPPort }}/CentOS7-ks.cfg ",
          "nameserver=9.9.9.9 ",
          "<enter><wait> "
        ],
        "boot_wait": "0s",

        "http_directory": "/home/ebal/Downloads/",
        "http_port_min": "8090",
        "http_port_max": "8100",

        "shutdown_timeout": "20m"

    }
  ]

}
build
packer build qemu_example.json
Verify
and when the installation is finished, check the output folder & image:
$ ls
output-qemu  packer_cache  qemu_example.json

$ ls output-qemu/
packer-qemu

$ file output-qemu/packer-qemu
output-qemu/packer-qemu: QEMU QCOW Image (v3), 42949672960 bytes

$ du -sh output-qemu/packer-qemu
1.7G    output-qemu/packer-qemu

$ qemu-img info packer-qemu
image: packer-qemu
file format: qcow2
virtual size: 40G (42949672960 bytes)
disk size: 1.7G
cluster_size: 65536
Format specific information:
    compat: 1.1
    lazy refcounts: false
    refcount bits: 16
    corrupt: false
KVM
The default qemu/kvm builder will run something like this:
/usr/bin/qemu-system-x86_64
  -cdrom /home/ebal/Downloads/CentOS-7-x86_64-Minimal-1804.iso
  -name packer-qemu -display sdl
  -netdev user,id=user.0
  -vnc 127.0.0.1:32
  -machine type=pc,accel=kvm
  -device virtio-net,netdev=user.0
  -drive file=output-qemu/packer-qemu,if=virtio,cache=writeback,discard=ignore,format=qcow2
  -boot once=d
  -m 512M
In the builder section those qemu/kvm settings can be changed.
Using variables:
eg.
   "virtual_name": "centos7min.qcow2",
   "virtual_dir":  "centos7",
   "virtual_size": "20480",
   "virtual_mem":  "4096M"
In Qemu Builder:
  "accelerator": "kvm",
  "disk_size":   "{{ user `virtual_size` }}",
  "format":      "qcow2",
  "qemuargs":[
    [  "-m",  "{{ user `virtual_mem` }}" ]
  ],

  "vm_name":          "{{ user `virtual_name` }}",
  "output_directory": "{{ user `virtual_dir` }}"
Headless
There is no need for packer to use a display. This is really useful when running packer on a remote machine. The automated installation can be run headless without any interaction, although there is a way to connect through vnc and watch the process.
To enable a headless setup:
"headless": trueSerial
Working with headless installation and perphaps through a command line interface on a remote machine, doesnt mean that vnc can actually be useful. Instead there is a way to use a serial output of qemu. To do that, must pass some extra qemu arguments:
eg.
  "qemuargs":[
      [ "-m",      "{{ user `virtual_mem` }}" ],
      [ "-serial", "file:serial.out" ]
    ],
and also pass an extra (kernel) argument console=ttyS0,115200n8 to the boot command:
  "boot_command":[
    "<tab> text ",
    "console=ttyS0,115200n8 ",
    "ks=http://{{ .HTTPIP }}:{{ .HTTPPort }}/CentOS7-ks.cfg ",
    "nameserver=9.9.9.9 ",
    "<enter><wait> "
  ],
  "boot_wait": "0s",
The serial output:
to see the serial output:
$ tail -f serial.out
Post-Processors
When finished with the machine image, Packer can run tasks such as compress or importing the image to a cloud provider, etc.
The simpliest way to familiarize with post-processors, is to use compress:
  "post-processors":[
      {
          "type":   "compress",
          "format": "lz4",
          "output": "{{.BuildName}}.lz4"
      }
  ]
output
So here is the output:
$ packer build qemu_example.json qemu output will be in this color.
==> qemu: Downloading or copying ISO
qemu: Downloading or copying: file:///home/ebal/Downloads/CentOS-7-x86_64-Minimal-1804.iso
==> qemu: Creating hard drive...
==> qemu: Starting HTTP server on port 8099
==> qemu: Looking for available port between 5900 and 6000 on 127.0.0.1
==> qemu: Starting VM, booting from CD-ROM
qemu: The VM will be run headless, without a GUI. If you want to
qemu: view the screen of the VM, connect via VNC without a password to
qemu: vnc://127.0.0.1:5982
==> qemu: Overriding defaults Qemu arguments with QemuArgs...
==> qemu: Connecting to VM via VNC
==> qemu: Typing the boot command over VNC...
==> qemu: Waiting for shutdown...
==> qemu: Converting hard drive...
==> qemu: Running post-processor: compress
==> qemu (compress): Using lz4 compression with 4 cores for qemu.lz4
==> qemu (compress): Archiving centos7/centos7min.qcow2 with lz4
==> qemu (compress): Archive qemu.lz4 completed
Build 'qemu' finished.
==> Builds finished. The artifacts of successful builds are:
--> qemu: compressed artifacts in: qemu.lz4
info
After archiving the centos7min image the output_directory and the original qemu image is being deleted.
$ qemu-img info ./centos7/centos7min.qcow2

image: ./centos7/centos7min.qcow2
file format: qcow2
virtual size: 20G (21474836480 bytes)
disk size: 1.5G
cluster_size: 65536
Format specific information:
    compat: 1.1
    lazy refcounts: false
    refcount bits: 16
    corrupt: false

$ du -h qemu.lz4
992M    qemu.lz4
Provisioners
Last but -surely- not least packer supports Provisioners.
Provisioners are commonly used for:
- installing packages
- patching the kernel
- creating users
- downloading application code
and can be local shell scripts or more advance tools like, Ansible, puppet, chef or even powershell.
Ansible
So here is an ansible example:
$ tree testroletestrole
├── defaults
│ └── main.yml
├── files
│ └── main.yml
├── handlers
│ └── main.yml
├── meta
│ └── main.yml
├── tasks
│ └── main.yml
├── templates
│ └── main.yml
└── vars
└── main.yml
7 directories, 7 files
$ cat testrole/tasks/main.yml ---
- name: Debug that our ansible role is working
debug:
msg: "It Works !"
- name: Install the Extra Packages for Enterprise Linux repository
yum:
name: epel-release
state: present
- name: upgrade all packages
yum:
name: '*'
state: latestSo this ansible role will install epel repository and upgrade our image.
template
    "variables":{
        "playbook_name": "testrole.yml"
    },

...

    "provisioners":[
        {
            "type":          "ansible",
            "playbook_file": "{{ user `playbook_name` }}"
        }
    ],
Communicator
Ansible needs to ssh into this machine to provision it. It is time to change the communicator from none to ssh.
"communicator": "ssh",Need to add the ssh username/password to template file:
      "ssh_username": "root",
      "ssh_password": "password",
      "ssh_timeout":  "3600s",
output
$ packer build qemu_example.jsonqemu output will be in this color.
==> qemu: Downloading or copying ISO
qemu: Downloading or copying: file:///home/ebal/Downloads/CentOS-7-x86_64-Minimal-1804.iso
==> qemu: Creating hard drive...
==> qemu: Starting HTTP server on port 8100
==> qemu: Found port for communicator (SSH, WinRM, etc): 4105.
==> qemu: Looking for available port between 5900 and 6000 on 127.0.0.1
==> qemu: Starting VM, booting from CD-ROM
qemu: The VM will be run headless, without a GUI. If you want to
qemu: view the screen of the VM, connect via VNC without a password to
qemu: vnc://127.0.0.1:5990
==> qemu: Overriding defaults Qemu arguments with QemuArgs...
==> qemu: Connecting to VM via VNC
==> qemu: Typing the boot command over VNC...
==> qemu: Waiting for SSH to become available...
==> qemu: Connected to SSH!
==> qemu: Provisioning with Ansible...
==> qemu: Executing Ansible: ansible-playbook --extra-vars packer_build_name=qemu packer_builder_type=qemu -i /tmp/packer-provisioner-ansible594660041 /opt/hashicorp/packer/testrole.yml -e ansible_ssh_private_key_file=/tmp/ansible-key802434194
qemu:
qemu: PLAY [all] *********************************************************************
qemu:
qemu: TASK [testrole : Debug that our ansible role is working] ***********************
qemu: ok: [default] => {
qemu: "msg": "It Works !"
qemu: }
qemu:
qemu: TASK [testrole : Install the Extra Packages for Enterprise Linux repository] ***
qemu: changed: [default]
qemu:
qemu: TASK [testrole : upgrade all packages] *****************************************
qemu: changed: [default]
qemu:
qemu: PLAY RECAP *********************************************************************
qemu: default : ok=3 changed=2 unreachable=0 failed=0
qemu:
==> qemu: Halting the virtual machine...
==> qemu: Converting hard drive...
==> qemu: Running post-processor: compress
==> qemu (compress): Using lz4 compression with 4 cores for qemu.lz4
==> qemu (compress): Archiving centos7/centos7min.qcow2 with lz4
==> qemu (compress): Archive qemu.lz4 completed
Build 'qemu' finished.
==> Builds finished. The artifacts of successful builds are:
--> qemu: compressed artifacts in: qemu.lz4
Appendix
here is the entire qemu template file:
qemu_example.json
{

  "_comment": "This is a CentOS 7.5 Qemu Builder example",

  "description": "tMinimal CentOS 7 Qemu Imagen__________________________________________",

  "variables": {
    "7.5":      "1804",
    "checksum": "714acc0aefb32b7d51b515e25546835e55a90da9fb00417fbee2d03a62801efd",

     "virtual_name": "centos7min.qcow2",
     "virtual_dir":  "centos7",
     "virtual_size": "20480",
     "virtual_mem":  "4096M",

     "Password": "password",

     "ansible_playbook": "testrole.yml"
  },

  "builders": [
    {
        "type": "qemu",

        "headless": true,

        "iso_url": "/home/ebal/Downloads/CentOS-7-x86_64-Minimal-{{user `7.5`}}.iso",
        "iso_checksum": "{{user `checksum`}}",
        "iso_checksum_type": "sha256",

        "communicator": "ssh",

        "ssh_username": "root",
        "ssh_password": "{{user `Password`}}",
        "ssh_timeout":  "3600s",

        "boot_command":[
          "<tab> text ",
          "console=ttyS0,115200n8 ",
          "ks=http://{{ .HTTPIP }}:{{ .HTTPPort }}/CentOS7-ks.cfg ",
          "nameserver=9.9.9.9 ",
          "<enter><wait> "
        ],
        "boot_wait": "0s",

        "http_directory": "/home/ebal/Downloads/",
        "http_port_min": "8090",
        "http_port_max": "8100",

        "shutdown_timeout": "30m",

    "accelerator": "kvm",
    "disk_size":   "{{ user `virtual_size` }}",
    "format":      "qcow2",
    "qemuargs":[
        [ "-m",      "{{ user `virtual_mem` }}" ],
            [ "-serial", "file:serial.out" ]
    ],

        "vm_name":          "{{ user `virtual_name` }}",
        "output_directory": "{{ user `virtual_dir` }}"
    }
  ],

  "provisioners":[
    {
      "type":          "ansible",
      "playbook_file": "{{ user `ansible_playbook` }}"
    }
  ],

  "post-processors":[
      {
          "type":   "compress",
          "format": "lz4",
          "output": "{{.BuildName}}.lz4"
      }
  ]
}
Recently I needed to create a Nested Loop in Ansible. One of the possible issues I had to consider, was the backward compatibility with both Ansible v1 and Ansible v2. A few days after, Ansible 2.5 introduced the the loop keyword and you can read a comprehensive blog entry here: Loop: Plays in the future, items in the past.
So here are my notes on the subject:
Variables
Below is a variable yaml file for testing purposes:
vars.yml
---
  days:
  - Monday
  - Tuesday
  - Wednesday
  - Thursday
  - Friday
  - Saturday
  - Sunday
  months:
  - January
  - February
  - March
  - April
  - May
  - June
  - July
  - August
  - September
  - October
  - November
  - December
Ansible v1
Let’s start with Ansible v1:
# ansible --versionansible 1.9.6
configured module search path = NonePlaybook
Below a very simple ansible-playbook example that supports nested loops:
---
- hosts: localhost
gather_facts: no
vars_files:
- vars.yml
tasks:
- name: "This is a simple test"
debug:
msg: "Day: {{ item[0] }} exist in Month: {{ item[1] }}"
with_nested:
- "{{ days }}"
- "{{ months }}"This playbook doesnt do much.
Prints a message for every day and every month.
Ansible-Playbook
Run locally the playbook by:
# ansible-playbook nested.yml -c local -l localhost -i "localhost," the output:
PLAY [localhost] ******************************
TASK: [This is a simple test] *****************
ok: [localhost] => (item=['Monday', 'January']) => {
"item": [
"Monday",
"January"
],
"msg": "Day: Monday exist in Month: January"
}
...
ok: [localhost] => (item=['Sunday', 'December']) => {
"item": [
"Sunday",
"December"
],
"msg": "Day: Sunday exist in Month: December"
}
PLAY RECAP *************************************
localhost : ok=1 changed=0 unreachable=0 failed=0
Messages
There are seven (7) days and twelve (12) months, so the output must print: 7*12 = 84 messages.
Counting the messages:
# ansible-playbook nested.yml -c local -l localhost -i "localhost," | egrep -c msg84
Time
Measuring the time it needs to pass through the nested-loop:
time ansible-playbook nested.yml -c local -l localhost -i "localhost," &> /dev/null real 0m0.448s
user 0m0.406s
sys 0m0.040s0.448s nice!
Ansible v2
Running the same playbook in latest ansible:
# ansible-playbook nested.yml -c local -l localhostseems to still work!
Compatibility issues: Resolved!
Counting the messages
# ansible-playbook nested.yml | egrep -c msg84
Time
# time ansible-playbook nested.yml &> /dev/null real 0m7.396s
user 0m7.575s
sys 0m0.172s7.396s !!!
that is 7seconds more than ansible v1.
Complex Loops
The modern way, is to use the loop keyword with the nested lookup plugin:
---
- hosts: localhost
gather_facts: no
vars_files:
- vars.yml
tasks:
- name: "This is a simple test"
debug:
msg: "Day: {{ item[0] }} exist in Month: {{ item[1] }}"
loop: "{{ lookup('nested', days, month) }}"Time
# time ansible-playbook lookup_loop.yml &> /dev/null real 0m7.975s
user 0m8.169s
sys 0m0.177s7.623s
[notes based on a docker centos5]
# cat /etc/redhat-release
CentOS release 5.11 (Final)Setup Enviroment
Install compiler:
# yum -y install gcc make
Install zlib headers:
# yum -y install zlib-devel
Install tools:
# yum -y install curl unzip
SSL/TLS Errors
If you are on a CentOS 5x machine, when trying to download files from the internet, you will get this error msg:
This is a brown out of TLSv1 support. TLSv1 support is going away soon, upgrade to a TLSv1.2+ capable client.or
SSL routines:SSL23_GET_SERVER_HELLO:tlsv1 alert protocol versionthat is because CentOS 5x has an old cipher suite that doesnt work with today’s standards.
OpenSSL
To bypass these SSL/TLS errors, we need to install a recent version of openssl.
# cd /root/
# curl -LO https://www.openssl.org/source/openssl-1.0.2o.tar.gz
# tar xf openssl*.tar.gz
# cd openssl*
# ./Configure shared linux-x86_64
# make
# make installThe output has a useful info:
OpenSSL shared libraries have been installed in:
/usr/local/sslSo, we have to update the system’s library paths, to include this one:
# echo "/usr/local/ssl/lib/" >> /etc/ld.so.conf
# /sbin/ldconfigPython 2.7
Download the latest Python2.7
# cd /root/
# curl -LO https://www.python.org/ftp/python/2.7.14/Python-2.7.14.tgz
# tar xf Python*.tgz
# cd Python*Install Python:
# ./configure --prefix=/opt/Python27 --enable-shared
# make
# make installPATH
# export PATH=/opt/Python27/bin/:$PATH
# python -c "import ssl; print(ssl.OPENSSL_VERSION)"OpenSSL 1.0.2o 27 Mar 2018SetupTools
Download the latest setuptools
# cd /root/
# export PYTHONHTTPSVERIFY=0
# python -c 'import urllib; urllib.urlretrieve ("https://pypi.python.org/packages/72/c2/c09362ab29338413ab687b47dab03bab4a792e2bbb727a1eb5e0a88e3b86/setuptools-39.0.1.zip", "setuptools-39.0.1.zip")'
Install setuptools
# unzip setuptools*.zip
# cd setuptools*
# python2.7 setup.py build
# python2.7 setup.py installPIP
Install PIP
# cd /root/
# easy_install pip
Searching for pip
Reading https://pypi.python.org/simple/pip/
Downloading https://pypi.python.org/packages/4b/5a/8544ae02a5bd28464e03af045e8aabde20a7b02db1911a9159328e1eb25a/pip-10.0.0b1-py2.py3-none-any.whl#md5=34dd54590477e79bc681d9ff96b9fd39
Best match: pip 10.0.0b1
Processing pip-10.0.0b1-py2.py3-none-any.whl
Installing pip-10.0.0b1-py2.py3-none-any.whl to /opt/Python27/lib/python2.7/site-packages
writing requirements to /opt/Python27/lib/python2.7/site-packages/pip-10.0.0b1-py2.7.egg/EGG-INFO/requires.txt
Adding pip 10.0.0b1 to easy-install.pth file
Installing pip script to /opt/Python27/bin
Installing pip3.6 script to /opt/Python27/bin
Installing pip3 script to /opt/Python27/bin
Installed /opt/Python27/lib/python2.7/site-packages/pip-10.0.0b1-py2.7.egg
Processing dependencies for pip
Finished processing dependencies for pip
Ansible
Now, we are ready to install ansible
# pip install ansible
Collecting ansible
/opt/Python27/lib/python2.7/site-packages/pip-10.0.0b1-py2.7.egg/pip/_vendor/urllib3/util/ssl_.py:339: SNIMissingWarning: An HTTPS request has been made, but the SNI (Subject Name Indication) extension to TLS is not available on this platform. This may cause the server to present an incorrect TLS certificate, which can cause validation failures. You can upgrade to a newer version of Python to solve this. For more information, see https://urllib3.readthedocs.io/en/latest/advanced-usage.html#ssl-warnings
SNIMissingWarning
Using cached ansible-2.5.0-py2.py3-none-any.whl
Collecting paramiko (from ansible)
Using cached paramiko-2.4.1-py2.py3-none-any.whl
Collecting cryptography (from ansible)
Using cached cryptography-2.2.2-cp27-cp27m-manylinux1_x86_64.whl
Requirement already satisfied: setuptools in /opt/Python27/lib/python2.7/site-packages/setuptools-39.0.1-py2.7.egg (from ansible) (39.0.1)
Collecting PyYAML (from ansible)
Using cached PyYAML-3.12.tar.gz
Collecting jinja2 (from ansible)
Using cached Jinja2-2.10-py2.py3-none-any.whl
Collecting pyasn1>=0.1.7 (from paramiko->ansible)
Using cached pyasn1-0.4.2-py2.py3-none-any.whl
Collecting bcrypt>=3.1.3 (from paramiko->ansible)
Using cached bcrypt-3.1.4-cp27-cp27m-manylinux1_x86_64.whl
Collecting pynacl>=1.0.1 (from paramiko->ansible)
Using cached PyNaCl-1.2.1-cp27-cp27m-manylinux1_x86_64.whl
Collecting six>=1.4.1 (from cryptography->ansible)
Using cached six-1.11.0-py2.py3-none-any.whl
Collecting cffi>=1.7; platform_python_implementation != "PyPy" (from cryptography->ansible)
Using cached cffi-1.11.5-cp27-cp27m-manylinux1_x86_64.whl
Collecting enum34; python_version < "3" (from cryptography->ansible)
Using cached enum34-1.1.6-py2-none-any.whl
Collecting asn1crypto>=0.21.0 (from cryptography->ansible)
Using cached asn1crypto-0.24.0-py2.py3-none-any.whl
Collecting idna>=2.1 (from cryptography->ansible)
Using cached idna-2.6-py2.py3-none-any.whl
Collecting ipaddress; python_version < "3" (from cryptography->ansible)
Using cached ipaddress-1.0.19.tar.gz
Collecting MarkupSafe>=0.23 (from jinja2->ansible)
Using cached MarkupSafe-1.0.tar.gz
Collecting pycparser (from cffi>=1.7; platform_python_implementation != "PyPy"->cryptography->ansible)
Using cached pycparser-2.18.tar.gz
Installing collected packages: pyasn1, six, pycparser, cffi, bcrypt, enum34, asn1crypto, idna, ipaddress, cryptography, pynacl, paramiko, PyYAML, MarkupSafe, jinja2, ansible
Running setup.py install for pycparser ... done
Running setup.py install for ipaddress ... done
Running setup.py install for PyYAML ... done
Running setup.py install for MarkupSafe ... done
Successfully installed MarkupSafe-1.0 PyYAML-3.12 ansible-2.5.0 asn1crypto-0.24.0 bcrypt-3.1.4 cffi-1.11.5 cryptography-2.2.2 enum34-1.1.6 idna-2.6 ipaddress-1.0.19 jinja2-2.10 paramiko-2.4.1 pyasn1-0.4.2 pycparser-2.18 pynacl-1.2.1 six-1.11.0
Version
# ansible --version
ansible 2.5.0
config file = None
configured module search path = [u'/root/.ansible/plugins/modules', u'/usr/share/ansible/plugins/modules']
ansible python module location = /opt/Python27/lib/python2.7/site-packages/ansible
executable location = /opt/Python27/bin/ansible
python version = 2.7.14 (default, Mar 31 2018, 20:00:21) [GCC 4.1.2 20080704 (Red Hat 4.1.2-55)]Ansible v2
# ansible -m ping localhost
localhost | SUCCESS => {
"changed": false,
"ping": "pong"
}
Ansible v1
or a previous version for testing
eg. 1.9.6
# pip install 'ansible==1.9.6'
# ansible --version
ansible 1.9.6
configured module search path = None# yum -y install python-simplejson
# ansible localhost -c local -m ping -i "localhost,"
localhost | success >> {
    "changed": false,
    "ping": "pong"
}
Possible Building Error
When building python from source, setup.py will try to look for /usr/local/ssl/ directory to find the libraries and included headers of openssl. Althouth it works from _ssl.c , it doesnt for _hashlib.c.
To fix this problem, you must manual edit the Python-2.7.14/setup.py
 869                 ssl_incs += ['/usr/local/ssl/include']
 870                 ssl_libs += ['/usr/local/ssl/lib']
the full code is:
 865         if have_any_openssl:
 866             if have_usable_openssl:
 867                 # The _hashlib module wraps optimized implementations
 868                 # of hash functions from the OpenSSL library.
 869                 ssl_incs += ['/usr/local/ssl/include']
 870                 ssl_libs += ['/usr/local/ssl/lib']
 871                 exts.append( Extension('_hashlib', ['_hashopenssl.c'],
 872                                        include_dirs = ssl_incs,
 873                                        library_dirs = ssl_libs,
 874                                        libraries = ['ssl', 'crypto']) )
 875             else:
 876                 print ("warning: openssl 0x%08x is too old for _hashlib" %
 877                        openssl_ver)
 878                 missing.append('_hashlib')
hope that helps!
Failures
Every SysAdmin, DevOp, SRE, Computer Engineer or even Developer knows that failures WILL occur. So you need to plan with that constant in mind. Failure causes can be present in hardware, power, operating system, networking, memory or even bugs in software. We often call them system failures but it is possible that a Human can be also the cause of such failure!
Listening to the stories on the latest episode of stack overflow podcast felt compelled to share my own oh-shit moment in recent history.
I am writing this article so others can learn from this story, as I did in the process.
Rolling upgrades
I am a really big fun of rolling upgrades.
I am used to work with server farms. In a nutshell that means a lot of servers connected to their own switch behind routers/load balancers. This architecture gives me a great opportunity when it is time to perform operations, like scheduling service updates in working hours.
eg. Update software version 1.2.3 to 1.2.4 on serverfarm001
The procedure is really easy:
- From the load balancers, stop any new incoming traffic to one of the servers.
- Monitor all processes on the server and wait for them to terminate.
- When all connections hit zero, stop the service you want to upgrade.
- Perform the service update
- Testing
- Monitor logs and possible alarms
- Be ready to rollback if necessary
- Send some low traffic and try to test service with internal users
- When everything is OK, tell the load balancers to send more traffic
- Wait, monitor everything, test, be sure
- Revert changes on the load balancers so that the specific server can take equal traffic/connection as the others.
This procedure is well established in such environments, and gives us the benefit of working with the whole team in working hours without the need of scheduling a maintenance window in the middle of the night, when low customer traffic is reaching us. During the day, if something is not going as planned, we can also reach other departments and work with them, figuring out what is happening.
Configuration Management
We are using ansible as the main configuration management tool. Every file, playbook, role, task of ansible is under a version control system, so that we can review changes before applying them to production. Viewing diffs from a modern web tool can be a lifesaver in these days.
Virtualization
We also use docker images or virtual images as development machines, so that we can perform any new configuration, update/upgrade on those machines and test it there.
Ansible Inventory
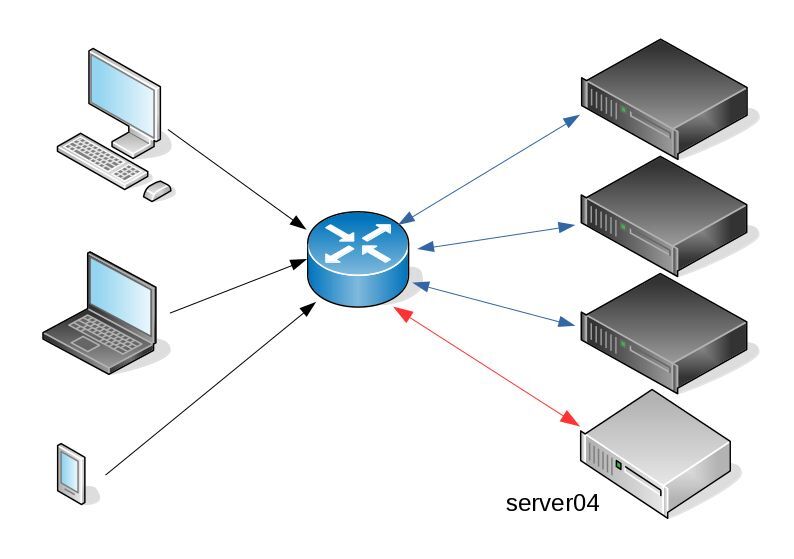
To perform service updates with ansible on servers, we are using the ansible inventory to host some metadata (aka variables) for every machine in a serverfarm. Let me give you an example:
[serverfarm001]
server01 version=1.2.3
server02 version=1.2.3
server03 version=1.2.3
server04 version=1.2.4
And performing the update action via ansible limits
eg.
~> ansible-playbook serverfarm001.yml -t update -C -D -l server04
Rollback
When something is not going as planned, we revert the changes on ansible (version control) and re-push the previous changes on a system. Remember the system is not getting any traffic from the front-end routers.
The Update
I was ready to do the update. Nagios was opened, logs were tailed -f
and then:
~> ansible-playbook serverfarm001.yml -t update
The Mistake
I run the ansible-playbook without limiting the server I wanted to run the update !!!
So all new changes passed through all servers, at once!
On top of that, new configuration broke running software with previous version. When the restart notify of service occurred every server simple stopped!!!
Funny thing, the updated machine server04 worked perfectly, but no traffic was reaching through the load balancers to this server.
Activate Rollback
It was time to run the rollback procedure.
Reverting changes from version control is easy. Took me like a moment or something.
Running again:
~> ansible-playbook serverfarm001.yml
and …
Waiting for Nagios
In 2,5 minutes I had fixed the error and I was waiting for nagios to be green again.
Then … Nothing! Red alerts everywhere!
Oh-Shit Moment
It was time for me to inform everyone what I have done.
Explaining to my colleagues and manager the mistake and trying to figuring out what went wrong with the rollback procedure.
Collaboration
On this crucial moment everything else worked like clockwise.
My colleagues took every action to:
- informing helpdesk
- looking for errors
- tailing logs
- monitor graphs
- viewing nagios
- talking to other people
- do the leg-work in general
and leaving me in piece with calm to figure out what went wrong.
I felt so proud to be part of the team at that specific moment.
If any of you reading this article: Truly thank all guys and gals .
Work-Around
I bypass ansible and copied the correct configuration to all servers via ssh.
My colleagues were telling me the good news and I was going through one by one of ~xx servers.
In 20minutes everything was back in normal.
And finally nagios was green again.
Blameless Post-Mortem
It was time for post-mortem and of course drafting the company’s incident report.
We already knew what happened and how, but nevertheless we need to write everything down and try to keep a good timeline of all steps.
This is not only for reporting but also for us. We need to figure out what happened exactly, do we need more monitoring tools?
Can we place any failsafes in our procedures? Also why the rollback procedure didnt work.
Fixing Rollback
I am writing this paragraph first, but to be honest with you, it took me some time getting to the bottom of this!
Rollback procedure actually is working as planned. I did a mistake with the version control system.
What we have done is to wrap ansible under another script so that we can select the version control revision number at runtime.
This is actually pretty neat, cause it gives us the ability to run ansible with previous versions of our configuration, without reverting in master branch.
The ansible wrapper asks for revision and by default we run it with [tip].
So the correct way to do rollbacks is:
eg.
~> ansible-playbook serverfarm001.yml -rev 238
At the time of problem, I didnt do that. I thought it was better to revert all changes and re-run ansible.
But ansible was running into default mode with tip revision !!
Although I manage pretty well on panic mode, that day my brain was frozen!
Re-Design Ansible
I wrap my head around and tried to find a better solution on performing service updates. I needed to change something that can run without the need of limit in ansible.
The answer has obvious in less than five minutes later:
files/serverfarm001/1.2.3
files/serverfarm001/1.2.4
I need to keep a separated configuration folder and run my ansible playbooks with variable instead of absolute paths.
eg.
- copy: src=files/serverfarm001/{{version}} dest=/etc/service/configuration
That will suffice next time (and actually did!). When the service upgrade is finished, We can simple remove the previous configuration folder without changing anything else in ansible.
Ansible Groups
Another (more simplistic) approach is to create a new group in ansible inventory.
Like you do with your staging Vs production environment.
eg.
[serverfarm001]
server01 version=1.2.3
server02 version=1.2.3
server03 version=1.2.3

[serverfarm001_new]
server04 version=1.2.4
and create a new yml file
---
- hosts: serverfarm001_new
run the ansible-playbook against the new serverfarm001_new group .
Validation
A lot of services nowadays have syntax check commands for their configuration.
You can use this validation process in ansible!
here is an example from ansible docs:
# Update sshd configuration safely, avoid locking yourself out
- template:
    src: etc/ssh/sshd_config.j2
    dest: /etc/ssh/sshd_config
    owner: root
    group: root
    mode: '0600'
    validate: /usr/sbin/sshd -t -f %s
    backup: yes
or you can use registers like this:
  - name: Check named
    shell: /usr/sbin/named-checkconf -t /var/named/chroot
    register: named_checkconf
    changed_when: "named_checkconf.rc == 0"
    notify: anycast rndc reconfig
Conclusion
Everyone makes mistakes. I know, I have some oh-shit moments in my career for sure. Try to learn from these failures and educate others. Keep notes and write everything down in a wiki or in whatever documentation tool you are using internally. Always keep your calm. Do not hide any errors from your team or your manager. Be the first person that informs everyone. If the working environment doesnt make you feel safe, making mistakes, perhaps you should think changing scenery. You will make a mistake, failures will occur. It is a well known fact and you have to be ready when the time is up. Do a blameless post-mortem. The only way a team can be better is via responsibility, not blame. You need to perform disaster-recovery scenarios from time to time and test your backup. And always -ALWAYS- use a proper configuration management tool for all changes on your infrastructure.
post scriptum
After writing this draft, I had a talk with some friends regarding the cloud industry and how this experience can be applied into such environment. The quick answer is you SHOULD NOT.
Working with cloud, means you are mostly using virtualization. Docker images or even Virtual Machines should be ephemeral. When it’s time to perform upgrades (system patching or software upgrades) you should be creating new virtual machines that will replace the old ones. There is no need to do it in any other way. You can rolling replacing the virtual machines (or docker images) without the need of stopping the service in a machine, do the upgrade, testing, put it back. Those ephemeral machines should not have any data or logs in the first place. Cloud means that you can (auto) scale as needed it without thinking where the data are.
thanks for reading.
Recently, I had the opportunity to see a presentation on the subject by Alexandros Kosiaris.
I was never fan of vagrant (or even virtualbox) but I gave it a try and below are my personal notes on the matter.
All my notes are based on Archlinux as it is my primary distribution but I think you can try them with every Gnu Linux OS.
Vagrant
So what is Vagrant ?
Vagrant is a wrapper, an abstraction layer to deal with some virtual solutions, like virtualbox, Vmware, hyper-v, docker, aws etc etc etc
With a few lines you can describe what you want to do and then use vagrant to create your enviroment of virtual boxes to work with.
Just for the fun of it, I used docker
Docker
We first need to create and build a proper Docker Image!
The Dockerfile below, is suggesting that we already have an archlinux:latest docker image.
You can use your own dockerfile or docker image.
You need to have an ssh connection to this docker image and you will need -of course- to have a ssh password or a ssh authorized key built in this image for root. If you are using sudo (then even better) dont forget to add the user to sudoers!
# vim Dockerfile

# sshd on archlinux
#
# VERSION               0.0.2

FROM     archlinux:latest
MAINTAINER  Evaggelos Balaskas < evaggelos _AT_ balaskas _DOT_ gr >

# Update the repositories
RUN  pacman -Syy && pacman -S --noconfirm openssh python2

# Generate host keys
RUN  /usr/bin/ssh-keygen -A

# Add password to root user
RUN  echo 'root:roottoor' | chpasswd

# Fix sshd
RUN  sed -i -e 's/^UsePAM yes/UsePAM no/g' /etc/ssh/sshd_config && echo 'PermitRootLogin yes' >> /etc/ssh/sshd_config

# Expose tcp port
EXPOSE   22

# Run openssh daemon
CMD  ["/usr/sbin/sshd", "-D"]
Again, you dont need to follow this step by the book!
It is an example to understand that you need a proper docker image that you can ssh into it.
Build the docker image:
# docker build -t archlinux:sshd .
On my PC:
# docker images

REPOSITORY          TAG                 IMAGE ID            CREATED             SIZE
archlinux           sshd                1b074ffe98be        7 days ago          636.2 MB
archlinux           latest              c0c56d24b865        7 days ago          534 MB
archlinux           devel               e66b5b8af509        2 weeks ago         607 MB
centos6             powerdns            daf76074f848        3 months ago        893 MB
centos6             newdnsps            642462a8dfb4        3 months ago        546.6 MB
centos7             cloudstack          b5e696e65c50        6 months ago        1.463 GB
centos7             latest              d96affc2f996        6 months ago        500.2 MB
centos6             latest              4ba27f5a1189        6 months ago        489.8 MB
Environment
We can define docker as our default provider with:
# export VAGRANT_DEFAULT_PROVIDER=docker
It is not necessary to define the default provider, as you will see below,
but it is also a good idea - if your forget to declare your vagrant provider later
Before we start with vagrant, let us create a new folder:
# mkdir -pv vagrant
# cd vagrant
Initialization
We are ready to initialized our enviroment for vagrant:
# vagrant init

A `Vagrantfile` has been placed in this directory. You are now
ready to `vagrant up` your first virtual environment! Please read
the comments in the Vagrantfile as well as documentation on
`vagrantup.com` for more information on using Vagrant.
Initial Vagrantfile
A typical vagrant configuration file looks something like this:
# cat Vagrantfile
 cat Vagrantfile
# -*- mode: ruby -*-
# vi: set ft=ruby :

# All Vagrant configuration is done below. The "2" in Vagrant.configure
# configures the configuration version (we support older styles for
# backwards compatibility). Please don't change it unless you know what
# you're doing.
Vagrant.configure("2") do |config|
  # The most common configuration options are documented and commented below.
  # For a complete reference, please see the online documentation at
  # https://docs.vagrantup.com.

  # Every Vagrant development environment requires a box. You can search for
  # boxes at https://atlas.hashicorp.com/search.
  config.vm.box = "base"

  # Disable automatic box update checking. If you disable this, then
  # boxes will only be checked for updates when the user runs
  # `vagrant box outdated`. This is not recommended.
  # config.vm.box_check_update = false

  # Create a forwarded port mapping which allows access to a specific port
  # within the machine from a port on the host machine. In the example below,
  # accessing "localhost:8080" will access port 80 on the guest machine.
  # config.vm.network "forwarded_port", guest: 80, host: 8080

  # Create a private network, which allows host-only access to the machine
  # using a specific IP.
  # config.vm.network "private_network", ip: "192.168.33.10"

  # Create a public network, which generally matched to bridged network.
  # Bridged networks make the machine appear as another physical device on
  # your network.
  # config.vm.network "public_network"

  # Share an additional folder to the guest VM. The first argument is
  # the path on the host to the actual folder. The second argument is
  # the path on the guest to mount the folder. And the optional third
  # argument is a set of non-required options.
  # config.vm.synced_folder "../data", "/vagrant_data"

  # Provider-specific configuration so you can fine-tune various
  # backing providers for Vagrant. These expose provider-specific options.
  # Example for VirtualBox:
  #
  # config.vm.provider "virtualbox" do |vb|
  #   # Display the VirtualBox GUI when booting the machine
  #   vb.gui = true
  #
  #   # Customize the amount of memory on the VM:
  #   vb.memory = "1024"
  # end
  #
  # View the documentation for the provider you are using for more
  # information on available options.

  # Define a Vagrant Push strategy for pushing to Atlas. Other push strategies
  # such as FTP and Heroku are also available. See the documentation at
  # https://docs.vagrantup.com/v2/push/atlas.html for more information.
  # config.push.define "atlas" do |push|
  #   push.app = "YOUR_ATLAS_USERNAME/YOUR_APPLICATION_NAME"
  # end

  # Enable provisioning with a shell script. Additional provisioners such as
  # Puppet, Chef, Ansible, Salt, and Docker are also available. Please see the
  # documentation for more information about their specific syntax and use.
  # config.vm.provision "shell", inline: <<-SHELL
  #   apt-get update
  #   apt-get install -y apache2
  # SHELL
end
If you try to run this Vagrant configuration file with docker provider,
it will try to boot up base image (Vagrant Default box):
# vagrant up --provider=docker

Bringing machine 'default' up with 'docker' provider...
==> default: Box 'base' could not be found. Attempting to find and install...
    default: Box Provider: docker
    default: Box Version: >= 0
==> default: Box file was not detected as metadata. Adding it directly...
==> default: Adding box 'base' (v0) for provider: docker
    default: Downloading: base
An error occurred while downloading the remote file. The error
message, if any, is reproduced below. Please fix this error and try
again.

Couldn't open file /ebal/Desktop/vagrant/base
Vagrantfile
Put the initial vagrantfile aside and create the below Vagrant configuration file:
Vagrant.configure("2") do |config|
  config.vm.provider "docker" do |d|
    d.image = "archlinux:sshd"
  end
end
That translate to :
Vagrant Provider: docker
Docker Image: archlinux:sshd
Basic commands
Run vagrant to create our virtual box:
#  vagrant up

Bringing machine 'default' up with 'docker' provider...
==> default: Creating the container...
    default:   Name: vagrant_default_1466368592
    default:  Image: archlinux:sshd
    default: Volume: /home/ebal/Desktop/vagrant:/vagrant
    default:
    default: Container created: 4cf4649b47615469
==> default: Starting container...
==> default: Provisioners will not be run since container doesn't support SSH.
ok, we havent yet configured vagrant to use ssh
but we have a running docker instance:
# vagrant status

Current machine states:

default                   running (docker)

The container is created and running. You can stop it using
`vagrant halt`, see logs with `vagrant docker-logs`, and
kill/destroy it with `vagrant destroy`.
that we can verify with docker ps:
#  docker ps -a

CONTAINER ID        IMAGE               COMMAND               CREATED              STATUS              PORTS               NAMES
4cf4649b4761        archlinux:sshd      "/usr/sbin/sshd -D"   About a minute ago   Up About a minute   22/tcp              vagrant_default_1466368592
Destroy
We need to destroy this instance:
#  vagrant destroy

    default: Are you sure you want to destroy the 'default' VM? [y/N] y
==> default: Stopping container...
==> default: Deleting the container...
Vagrant ssh
We need to edit Vagrantfile to add ssh support to our docker :
# vim Vagrantfile

Vagrant.configure("2") do |config|

    config.vm.provider "docker" do |d|
        d.image = "archlinux:sshd"
        d.has_ssh = true
    end

end
and re-up our vagrant box:
#  vagrant up

Bringing machine 'default' up with 'docker' provider...
==> default: Creating the container...
    default:   Name: vagrant_default_1466368917
    default:  Image: archlinux:sshd
    default: Volume: /home/ebal/Desktop/vagrant:/vagrant
    default:   Port: 127.0.0.1:2222:22
    default:
    default: Container created: b4fce563a9f9042c
==> default: Starting container...
==> default: Waiting for machine to boot. This may take a few minutes...
    default: SSH address: 172.17.0.2:22
    default: SSH username: vagrant
    default: SSH auth method: private key
    default: Warning: Authentication failure. Retrying...
    default: Warning: Authentication failure. Retrying...
Vagrant will try to connect to our docker instance with the user: vagrant and a key.
But our docker image only have a root user and a root password !!
# vagrant status

Current machine states:

default                   running (docker)

The container is created and running. You can stop it using
`vagrant halt`, see logs with `vagrant docker-logs`, and
kill/destroy it with `vagrant destroy`.

#  vagrant destroy

    default: Are you sure you want to destroy the 'default' VM? [y/N] y
==> default: Stopping container...
==> default: Deleting the container...
Vagrant ssh - the Correct way !
We need to edit the Vagrantfile, properly:
# vim Vagrantfile

Vagrant.configure("2") do |config|

    config.ssh.username = 'root'
    config.ssh.password = 'roottoor'

    config.vm.provider "docker" do |d|
        d.image = "archlinux:sshd"
        d.has_ssh = true
    end

end
# vagrant up

Bringing machine 'default' up with 'docker' provider...
==> default: Creating the container...
    default:   Name: vagrant_default_1466369126
    default:  Image: archlinux:sshd
    default: Volume: /home/ebal/Desktop/vagrant:/vagrant
    default:   Port: 127.0.0.1:2222:22
    default:
    default: Container created: 7fef0efc8905bb3a
==> default: Starting container...
==> default: Waiting for machine to boot. This may take a few minutes...
    default: SSH address: 172.17.0.2:22
    default: SSH username: root
    default: SSH auth method: password
    default: Warning: Connection refused. Retrying...
    default:
    default: Inserting generated public key within guest...
    default: Removing insecure key from the guest if it's present...
    default: Key inserted! Disconnecting and reconnecting using new SSH key...
==> default: Machine booted and ready!

# vagrant status

Current machine states:

default                   running (docker)

The container is created and running. You can stop it using
`vagrant halt`, see logs with `vagrant docker-logs`, and
kill/destroy it with `vagrant destroy`.

# vagrant ssh-config

Host default
  HostName 172.17.0.2
  User root
  Port 22
  UserKnownHostsFile /dev/null
  StrictHostKeyChecking no
  PasswordAuthentication no
  IdentityFile /tmp/vagrant/.vagrant/machines/default/docker/private_key
  IdentitiesOnly yes
  LogLevel FATAL

# vagrant ssh

[root@7fef0efc8905 ~]# uptime
 20:45:48 up 11:33,  0 users,  load average: 0.53, 0.42, 0.28
[root@7fef0efc8905 ~]#
[root@7fef0efc8905 ~]#
[root@7fef0efc8905 ~]#
[root@7fef0efc8905 ~]# exit
logout
Connection to 172.17.0.2 closed.
Ansible
It is time to add ansible to the mix!
Ansible Playbook
We need to create a basic ansible playbook:
# cat playbook.yml

---
- hosts: all

  vars:
      ansible_python_interpreter: "/usr/bin/env python2"

  gather_facts: no

  tasks:

    # Install package vim
    - pacman: name=vim state=present
The above playbook, is going to install vim, via pacman (archlinux PACkage MANager)!
Archlinux comes by default with python3 and with ansible_python_interpreter you are declaring to use python2!
Vagrantfile with Ansible
# cat Vagrantfile

Vagrant.configure("2") do |config|

    config.ssh.username = 'root'
    config.ssh.password = 'roottoor'

    config.vm.provider "docker" do |d|
        d.image = "archlinux:sshd"
        d.has_ssh = true
    end

    config.vm.provision "ansible" do |ansible|
        ansible.verbose = "v"
        ansible.playbook = "playbook.yml"
    end

end
Vagrant Docker Ansible
# vagrant up

Bringing machine 'default' up with 'docker' provider...
==> default: Creating the container...
    default:   Name: vagrant_default_1466370194
    default:  Image: archlinux:sshd
    default: Volume: /home/ebal/Desktop/vagrant:/vagrant
    default:   Port: 127.0.0.1:2222:22
    default:
    default: Container created: 8909eee7007b8d4f
==> default: Starting container...
==> default: Waiting for machine to boot. This may take a few minutes...
    default: SSH address: 172.17.0.2:22
    default: SSH username: root
    default: SSH auth method: password
    default: Warning: Connection refused. Retrying...
    default:
    default: Inserting generated public key within guest...
    default: Removing insecure key from the guest if it's present...
    default: Key inserted! Disconnecting and reconnecting using new SSH key...
==> default: Machine booted and ready!

==> default: Running provisioner: ansible...
    default: Running ansible-playbook...
PYTHONUNBUFFERED=1 ANSIBLE_FORCE_COLOR=true ANSIBLE_HOST_KEY_CHECKING=false ANSIBLE_SSH_ARGS='-o UserKnownHostsFile=/dev/null -o IdentitiesOnly=yes -o ControlMaster=auto -o ControlPersist=60s' ansible-playbook --connection=ssh --timeout=30 --limit="default" --inventory-file=/mnt/VB0250EAVER/home/ebal/Desktop/vagrant/.vagrant/provisioners/ansible/inventory -v playbook.yml
Using /etc/ansible/ansible.cfg as config file

PLAY [all] *********************************************************************

TASK [pacman] ******************************************************************
changed: [default] => {"changed": true, "msg": "installed 1 package(s). "}

PLAY RECAP *********************************************************************
default                    : ok=1    changed=1    unreachable=0    failed=0
# vagrant status

Current machine states:

default                   running (docker)

The container is created and running. You can stop it using
`vagrant halt`, see logs with `vagrant docker-logs`, and
kill/destroy it with `vagrant destroy`.
#  vagrant ssh

[root@8909eee7007b ~]# vim --version
VIM - Vi IMproved 7.4 (2013 Aug 10, compiled Jun  9 2016 09:35:16)
Included patches: 1-1910
Compiled by Arch Linux
Vagrant Provisioning
The ansible-step is called: provisioning as you may already noticed.
If you make a few changes on this playbook, just type:
# vagrant provision
and it will re-run the ansible part on this vagrant box !
Disclaimer: This blog post has one purpose only: be a proof of concept - not the “perfect” ansible playbook.
When managing a server farm, you will -soon enough- start using Jinja templates. Cause -let’s face it- static files are very easy to copy through servers but with templates, you are making magic!
This ansible example will create a bind-format slave zones configuration file.
You need to have in mind, the typical structure of that configuration file:
zone "balaskas.gr" {
    type slave;
    file "sec/balaskas.gr";
    masters {
        158.255.214.14;
    };
};
Let’s start with the actual data. I like to keep my configuration separated from my playbooks. With this approach is easy to re-use your variables in other playbooks.
So my variable list is looking like this:
zones.yml
---
zones:
  - { zone: 'balaskas.gr', master: '158.255.214.14', extras: '' }
  - { zone: 'example.com', master: '1.2.3.4', extras: '' }
My slavezone yml ansible playbook is very similar to this:
SecondaryDNS.yml
SecondaryDNS.yml

---

- hosts: myslavens
  gather_facts: no
  user: root

  vars_files:
    - [ "files/SecondaryDNS/zones.yml" ]

  tasks:
  - name: Create named.slavezone
    template:
      src="files/SecondaryDNS/slavezones.j2"
      dest="/etc/named.slavezones"
      owner=named
      group=named
      mode=0440

...
(This is not the entire playbook, but I am guessing you get the point)
To recap, we want to create a [new (if not exist)] file, with a very specific output for every line in our configuration.
So here is my Jinja2 template file:
slavezones.j2
{% for item in zones %}
zone "{{item.zone}}" { type slave; file "sec/{{item.zone}}"; masters { {{item.master}}; }; {{item.extra}} };
{% endfor %}
This template will loop for every line (item) of our zones.yml and create the desirable output.
And that’s how you can create ansible magic !
So here is a nice ansible trick to trigger a notify if only the exit status of a command is zero (without any errors)
  - name: Check named
    shell: /sbin/named-checkconf
    register: named_checkconf
    changed_when: "named_checkconf.rc == 0"
    notify: rndc reconfig
the named_checkconf contains the below values:
{
"changed": true,
"cmd": ["/sbin/rndc", "reconfig"],
"delta": "0:00:02.438532",
"end": "2015-04-07 15:02:21.349859",
"item": "",
"rc": 0,
"start": "2015-04-07 15:02:18.911327",
"stderr": "",
"stdout": ""
}