AppImage is a brilliant way to have executable linux apps to every distro, without the need of re-packaging or re-build them. Without getting into too many details, it uses FUSE (Filesystem in Userspace) and SquashFS to bundle the app into one file.
AppImages require FUSE to run. Filesystem in Userspace (FUSE) is a system that lets non-root users mount filesystems.
So here are my personal notes on how to create Mozilla Firefox 68.3.0esr binary archive to an AppImage file.
download
Let’s begin by gathering all necessaries files
export VERSION=68.3.0esr

curl -sLO https://github.com/AppImage/AppImageKit/releases/download/continuous/appimagetool-x86_64.AppImage

curl -sL https://ftp.mozilla.org/pub/firefox/releases/$VERSION/linux-x86_64/en-US/firefox-$VERSION.tar.bz2 | tar xjf -
configuration files
we need 3 files, under the firefox directory
AppRun(executable shell script)Icon(.png,.svg,.xpm)firefox.desktop(freedesktop.org desktop file)
AppRun
this is our guide, this file will start our application inside the AppImage mount.
#!/bin/sh
cd "$(dirname "$0")"
exec ./firefox "$@"
or
cat > firefox/AppRun <<EOF
#!/bin/sh
cd "\$(dirname "\$0")"
exec ./firefox "\$@"

EOF
Dont forget to make it executable
chmod +x firefox/AppRunIcon
There is an image within firefox directory that we can use as firefox icon:
./firefox/browser/chrome/icons/default/default128firefox.desktop
for more info check here: Desktop Entry Specification
[Desktop Entry]
Categories=Network;WebBrowser;
Icon=/browser/chrome/icons/default/default128
Name=Mozilla Firefox
Terminal=false
Type=Application
Version=1.0
or
cat > firefox/firefox.desktop <<EOF
[Desktop Entry]
Categories=Network;WebBrowser;
Icon=/browser/chrome/icons/default/default128
Name=Mozilla Firefox
Terminal=false
Type=Application
Version=1.0
EOF
In the Icon attribute, it must be an absolute path, not relative.
Perms
Give execute permission to appimagetool
chmod +x appimagetool-x86_64.AppImageBuild your AppImage
./appimagetool-x86_64.AppImage --no-appstream firefox/Mozilla Firefox
if everything is okay, you will see this:
ls -l Mozilla_Firefox-x86_64.AppImageand you can run it !
./Mozilla_Firefox-x86_64.AppImage
if you want to run a specific profile:
./Mozilla_Firefox-x86_64.AppImage --profile $(pwd)/.mozilla/firefox/ichznbon.test/Mount
When you are running your AppImage, you will notice that there is a new mount point in our system (fusermount)
$ mount | grep -i firefox
Mozilla_Firefox-x86_64.AppImage on /tmp/.mount_MozillshcmPB type fuse.Mozilla_Firefox-x86_64.AppImage (ro,nosuid,nodev,relatime,user_id=347,group_id=347)
and if you look really careful, you will see that it is mounted under /tmp/ !
$ ls /tmp/.mount_MozillshcmPB
application.ini     firefox          icons               libmozsqlite3.so  libplc4.so       minidump-analyzer     Throbber-small.gif
AppRun              firefox-bin      libfreeblpriv3.chk  libmozwayland.so  libplds4.so      omni.ja               updater
browser             firefox-bin.sig  libfreeblpriv3.so   libnspr4.so       libsmime3.so     pingsender            updater.ini
chrome.manifest     firefox.desktop  liblgpllibs.so      libnss3.so        libsoftokn3.chk  platform.ini          update-settings.ini
crashreporter       firefox.sig      libmozavcodec.so    libnssckbi.so     libsoftokn3.so   plugin-container
crashreporter.ini   fonts            libmozavutil.so     libnssdbm3.chk    libssl3.so       plugin-container.sig
defaults            gmp-clearkey     libmozgtk.so        libnssdbm3.so     libxul.so        precomplete
dependentlibs.list  gtk2             libmozsandbox.so    libnssutil3.so    libxul.so.sig    removed-files
That’s it !
Your first AppImage bundle linux package.
Docker Notes
FUSE · AppImage/AppImageKit Wiki · GitHub
docker run --cap-add SYS_ADMIN --cap-add MKNOD --device /dev/fuse:mrw --rm -ti ubuntu:18.04 bash
 apt-get update

 apt-get -y install curl libfuse2 file

 export VERSION=68.3.0esr

 curl -sLO https://github.com/AppImage/AppImageKit/releases/download/continuous/appimagetool-x86_64.AppImage

 curl -sL https://ftp.mozilla.org/pub/firefox/releases/$VERSION/linux-x86_64/en-US/firefox-$VERSION.tar.bz2 | tar xjf -

 cat > firefox/AppRun <<EOF
#!/bin/sh
cd "\$(dirname "\$0")"
exec ./firefox "\$@"
EOF

 cat > firefox/firefox.desktop <<EOF
[Desktop Entry]
Categories=Network;WebBrowser;
Icon=/browser/chrome/icons/default/default128
Name=Mozilla Firefox
Terminal=false
Type=Application
Version=1.0
EOF

 chmod +x appimagetool-x86_64.AppImage

 ./appimagetool-x86_64.AppImage --no-appstream firefox/
appimagetool, continuous build (commit 64321b7), build 2111 built on 2019-11-23 22:20:53 UTC
WARNING: gpg2 or gpg command is missing, please install it if you want to create digital signatures
Using architecture x86_64
/firefox should be packaged as Mozilla_Firefox-x86_64.AppImage
Deleting pre-existing .DirIcon
Creating .DirIcon symlink based on information from desktop file
Generating squashfs...
Parallel mksquashfs: Using 8 processors
Creating 4.0 filesystem on Mozilla_Firefox-x86_64.AppImage, block size 131072.
[===========================================================================================================================|] 1583/1583 100%

Exportable Squashfs 4.0 filesystem, gzip compressed, data block size 131072
    compressed data, compressed metadata, compressed fragments,
    compressed xattrs, compressed ids
    duplicates are removed
Filesystem size 71064.05 Kbytes (69.40 Mbytes)
    36.14% of uncompressed filesystem size (196646.16 Kbytes)
Inode table size 5305 bytes (5.18 Kbytes)
    60.46% of uncompressed inode table size (8774 bytes)
Directory table size 1026 bytes (1.00 Kbytes)
    54.78% of uncompressed directory table size (1873 bytes)
Number of duplicate files found 3
Number of inodes 81
Number of files 67
Number of fragments 7
Number of symbolic links  1
Number of device nodes 0
Number of fifo nodes 0
Number of socket nodes 0
Number of directories 13
Number of ids (unique uids + gids) 1
Number of uids 1
    root (0)
Number of gids 1
    root (0)
Embedding ELF...
Marking the AppImage as executable...
Embedding MD5 digest
Success

Please consider submitting your AppImage to AppImageHub, the crowd-sourced
central directory of available AppImages, by opening a pull request
at https://github.com/AppImage/appimage.github.io
final notes:
 du -h Mozilla_Firefox-x86_64.AppImage
70M Mozilla_Firefox-x86_64.AppImage

 ls -l Mozilla_Firefox-x86_64.AppImage
-rwxr-xr-x 1 root root 72962088 Dec 26 21:55 Mozilla_Firefox-x86_64.AppImage

 file Mozilla_Firefox-x86_64.AppImage
Mozilla_Firefox-x86_64.AppImage: ELF 64-bit LSB executable, x86-64, version 1 (SYSV), dynamically linked, interpreter /lib64/l, for GNU/Linux 2.6.18, stripped

 ldd Mozilla_Firefox-x86_64.AppImage
    not a dynamic executable
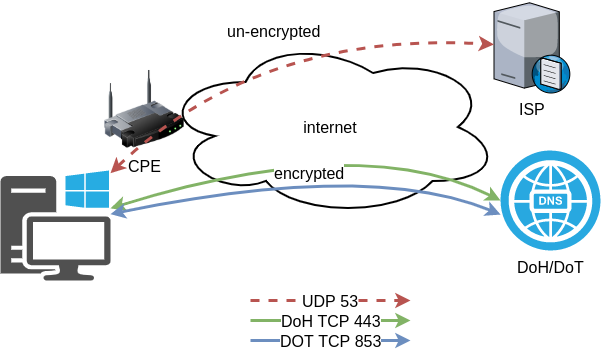
A couple months ago, we announced a public and free DNS service, so people can have encrypted DNS in their browsers and systems. We support both DNS over HTTPS (DoH) and DNS over TLS and our DoH service has two endpoints, the default /dns-query and one for blocking trackers and ads /ads. You can visit our page for more info.
dns
What is DNS?
Domain Name Service in a nutshell is when you are asking directions to find where Wikipedia is in the internet. Your browser does not know, so it will ask your computer. Your computer will ask your internet provider and your internet provider will ask someone else till they find the correct answer. In the end, your browser will know where to go and this is how you are visiting Wikipedia.
You need to trust all the above parties, to give you the correct answer and everybody knows that you are visiting Wikipedia.
doh
What is DoH (DNS Queries over HTTPS)?
It’s the implementation of RFC 8484. This is a way for your browser to ask where to find Wikipedia, without exposing to everybody that you want to visit Wikipedia! Still you need someone to ask for directions, but now both your question and the answer are encrypted. So you have privacy.
let’s get technical
What is RFC 8484?
In the above rfc, your client (eg. browser) asks your DNS via HTTP/2 representational state transfer (REST). DoH clients and servers need to sent a application/dns-message content (question/answer) and encode both the question and the answer in a bace64url message. Usually is GET, but POST is also supported on some servers.
doh-cli
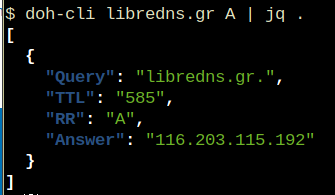
So, today, we introduce doh-cli, a simple command line DoH client, written in python. You can use doh-cli as a binary client in your system. We support a few DoH public servers to test, and of course both LibreDNS DoH endpoints
You can see the code here:
install it
It is super easy
pip install doh-cli
or if python3 is not your default python
pip3 install doh-cli
howto use it?
Just ask your favorite DoH server (default is https://doh.libredns.gr/dns-query)
eg.
doh-cli libredns.gr A
and use help to see all the options
doh-cli --help
Why default output is json?
With modern tools and with multiline output, it is best to support a serialized format so you can use doh-cli with your tools. But if you dont like it:
doh-cli --output plain libredns.gr A
You can see all the options and help, on the project’s page.
A few day ago, I was introduced to xip.io.
TLDR; You can have hostname for any IP Address!
$ dig +short @ipname.me www.192-168-1-1-ipname.me
192.168.1.1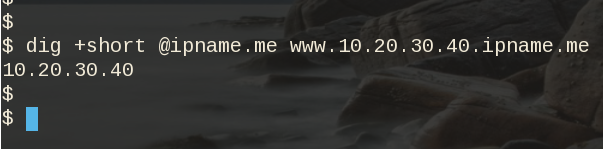
project
It uses the powerdns pipe backend to run a (187 lines) bash script, that strips the IP from the hostname and returns the IP. This works so well, that a few services depends on xip!
I was playing with the idea of using dnsdist to do that with the embedded Lua supports that dnsdist has. And the proof-of-concept result is about 10lines of Lua code.
The project is here: ipname on github
ifconfig
But not only returns you an IP Address for any (dynamic) hostname you ask, but you can also use this free & public service as a what-is-my-ip project over DNS.
$ dig +short @ipname.me googleyahoo.com
116.202.176.26
PS The code also validates the IPv4 Addresses!
In this blog post I will describe the easiest installation of a DoH/DoT VM for personal use, using dnsdist.
Next I will present a full installation example (from start) with dnsdist and PowerDNS.
Server Notes: Ubuntu 18.04
Client Notes: Archlinux
Every
{{ }}is a variable you need to change.
Do NOT copy/paste without making the changes.
Login to VM
and became root
$ ssh {{ VM }}
$ sudo -i
from now on, we are running commands as root.
TLDR;
dnsdist DoH/DoT
If you just need your own DoH and DoT instance, then dnsdist will forward your cleartext queries to another public DNS server with the below configuration.
cat > /etc/dnsdist/dnsdist.conf <<EOF

-- resets the list to this array
setACL("::/0")
addACL("0.0.0.0/0")

addDOHLocal('0.0.0.0', '/etc/dnsdist/fullchain.pem', '/etc/dnsdist/privkey.pem')
addTLSLocal('0.0.0.0', '/etc/dnsdist/fullchain.pem', '/etc/dnsdist/privkey.pem')

newServer({address="9.9.9.9:53"})
EOF
You will need -of course- to have your certificates before hand.
That’s It !
a DoH/DoT using dnsdist and powerdns
For people that need a more in-depth article, here are my notes on how to setup from scratch an entire VM with powerdns recursor and dnsdist.
Let’s Begin:
Enable PowerDNS Repos
Add key
curl -sL https://repo.powerdns.com/FD380FBB-pub.asc | apt-key add -
OK
Create PowerDNS source list
cat > /etc/apt/sources.list.d/powerdns.list <<EOF
deb [arch=amd64] http://repo.powerdns.com/ubuntu bionic-dnsdist-14 main
deb [arch=amd64] http://repo.powerdns.com/ubuntu bionic-rec-42 main
EOF

cat > /etc/apt/preferences.d/pdns <<EOF
Package: pdns-* dnsdist*
Pin: origin repo.powerdns.com
Pin-Priority: 600
EOF
Update System and Install packages
apt-get update
apt-get -qy install dnsdist pdns-recursor certbot
You may see errors from powerdns, like
failed: E: Sub-process /usr/bin/dpkg returned an error code (1)ignore them for the time being.
PowerDNS Recursor
We are going to setup our recursor first and let’s make it a little interesting.
PowerDNS Configuration
cat > /etc/powerdns/recursor.conf <<EOF
config-dir=/etc/powerdns
hint-file=/etc/powerdns/root.hints
local-address=127.0.0.1
local-port=5353
lua-dns-script=/etc/powerdns/pdns.lua
etc-hosts-file=/etc/powerdns/hosts.txt
export-etc-hosts=on
quiet=yes
setgid=pdns
setuid=pdns
EOF

chmod 0644 /etc/powerdns/recursor.conf
chown pdns:pdns /etc/powerdns/recursor.conf
Create a custom response
This will be handy for testing our dns from cli.
cat > /etc/powerdns/pdns.lua <<EOF
domainame = "test.{{ DOMAIN }}"
response  = "{{ VM_ipv4.address }}"

function nxdomain(dq)
    if dq.qname:equal(domainame) then
        dq.rcode=0 -- make it a normal answer
        dq:addAnswer(pdns.A, response)
        dq.variable = true -- disable packet cache
        return true
    end
    return false
end
EOF

chmod 0644 /etc/powerdns/pdns.lua
chown pdns:pdns /etc/powerdns/pdns.lua
AdBlock
Let’s make it more interesting, block trackers and ads.
cat > /usr/local/bin/update.stevenBlack.hosts.sh <<EOF
#!/bin/bash

# Get StevenBlack hosts
curl -sLo /tmp/hosts.txt https://raw.githubusercontent.com/StevenBlack/hosts/master/hosts

touch /etc/powerdns/hosts.txt

# Get diff
diff -q <(sort -V /etc/powerdns/hosts.txt | column -t) <(sort -V /tmp/hosts.txt | column -t)
DIFF_STATUS=$?

# Get Lines
LINES=`grep -c ^ /tmp/hosts.txt`

# Check & restart if needed
if [ "${LINES}" -gt "200" -a "${DIFF_STATUS}" != "0" ]; then
    mv -f /tmp/hosts.txt /etc/powerdns/hosts.txt
    chmod 0644 /etc/powerdns/hosts.txt
    chown pdns:pdns /etc/powerdns/hosts.txt
    systemctl restart pdns-recursor
fi

# vim: sts=2 sw=2 ts=2 et
EOF

chmod +x /usr/local/bin/update.stevenBlack.hosts.sh
/usr/local/bin/update.stevenBlack.hosts.sh
Be Careful with Copy/Paste. Check the
$dollar sign.
OpenNic Project
Is it possible to make it more interesting ?
Yes! by using OpenNIC Project, instead of the default root NS
cat > /usr/local/bin/update.root.hints.sh <<EOF
#!/bin/bash

# Get root hints
dig . NS @75.127.96.89 | egrep -v '^;|^$' > /tmp/root.hints

touch /etc/powerdns/root.hints

# Get diff
diff -q <(sort -V /etc/powerdns/root.hints | column -t) <(sort -V /tmp/root.hints | column -t)
DIFF_STATUS=$?

# Get Lines
LINES=`grep -c ^ /tmp/root.hints`

# Check & restart if needed
if [ "${LINES}" -gt "20" -a "${DIFF_STATUS}" != "0" ]; then
    mv -f /tmp/root.hints /etc/powerdns/root.hints
    chmod 0644 /etc/powerdns/root.hints
    chown pdns:pdns /etc/powerdns/root.hints
    systemctl restart pdns-recursor
fi

# vim: sts=2 sw=2 ts=2 et
EOF

chmod +x /usr/local/bin/update.root.hints.sh
/usr/local/bin/update.root.hints.sh
dnsdist
dnsdist is a DNS load balancer with enhanced features.
dnsdist configuration
cat > /etc/dnsdist/dnsdist.conf <<EOF
-- resets the list to this array
setACL("::/0")
addACL("0.0.0.0/0")

addDOHLocal('0.0.0.0', '/etc/dnsdist/fullchain.pem', '/etc/dnsdist/privkey.pem')
addTLSLocal('0.0.0.0', '/etc/dnsdist/fullchain.pem', '/etc/dnsdist/privkey.pem')

newServer({address="127.0.0.1:5353"})
EOF
Certbot
Now it is time to get a new certificate with the help of letsencrypt.
Replace
{{ DOMAIN }}with your domain
We need to create the post hook first and this is why we need to copy the certificates under dnsdist folder.
cat > /usr/local/bin/certbot_post_hook.sh <<EOF
#!/bin/bash

cp -f /etc/letsencrypt/live/{{ DOMAIN }}/*pem /etc/dnsdist/
systemctl restart dnsdist.service

# vim: sts=2 sw=2 ts=2 et
EOF

chmod +x /usr/local/bin/certbot_post_hook.sh
and of course create a certbot script.
Caveat: I have the dry-run option in the below script. When you are ready, remove it.
cat > /usr/local/bin/certbot.create.sh <<EOF
#!/bin/bash

certbot --dry-run --agree-tos --standalone certonly --register-unsafely-without-email
    --pre-hook 'systemctl stop dnsdist'
    --post-hook /usr/local/bin/certbot_post_hook.sh
    -d {{ DOMAIN }} -d doh.{{ DOMAIN }} -d dot.{{ DOMAIN }}

# vim: sts=2 sw=2 ts=2 et
EOF

chmod +x /usr/local/bin/certbot.create.sh
Firewall
Now open your firewall to the below TCP Ports:
ufw allow 80/tcp
ufw allow 443/tcp
ufw allow 853/tcp- TCP 80 for certbot
- TCP 443 for dnsdist (DoT) and certbot !
- TCP 853 for dnsdist (DoH)
Let’s Encrypt
When you are ready, run the script
/usr/local/bin/certbot.create.shThat’s it !
Client
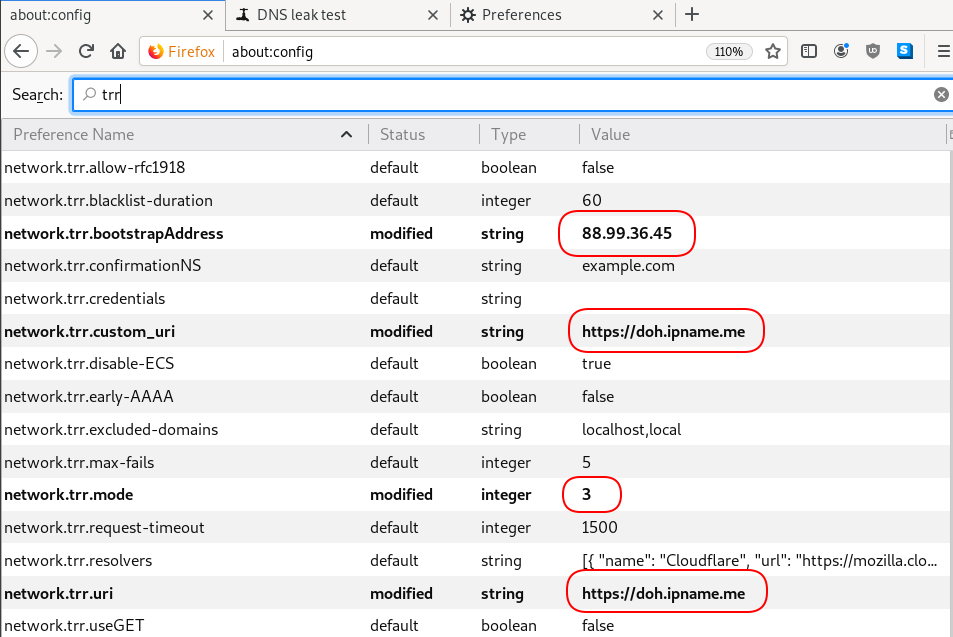
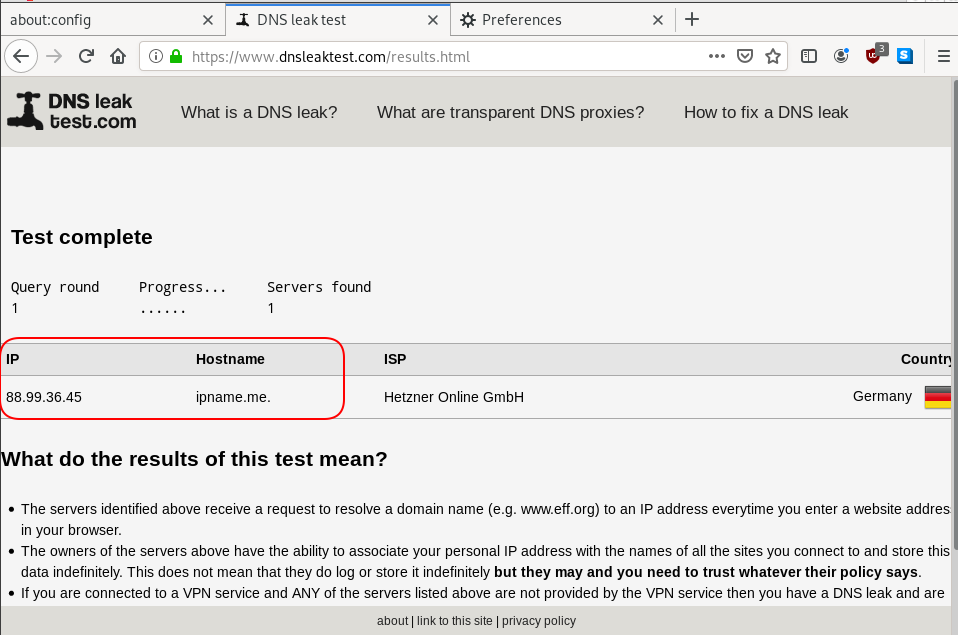
For this blog post, my test settings are:
Domain: ipname.me
IP: 88.99.36.45
DoT - Client
From systemd 243+ there is an option to validate certificates on DoT but
systemd-resolved only validates the DNS server certificate if it is issued for the server’s IP address (a rare occurrence).
so it is best to use: opportunistic
/etc/systemd/resolved.conf [Resolve]
DNS=88.99.36.45
FallbackDNS=1.1.1.1
DNSSEC=no
#DNSOverTLS=yes
DNSOverTLS=opportunistic
Cache=yes
ReadEtcHosts=yessystemctl restart systemd-resolved
Query
resolvectl query test.ipname.me test.ipname.me: 88.99.36.45 -- link: eth0
-- Information acquired via protocol DNS in 1.9ms.
-- Data is authenticated: noDoH - Client
Firefox Settings
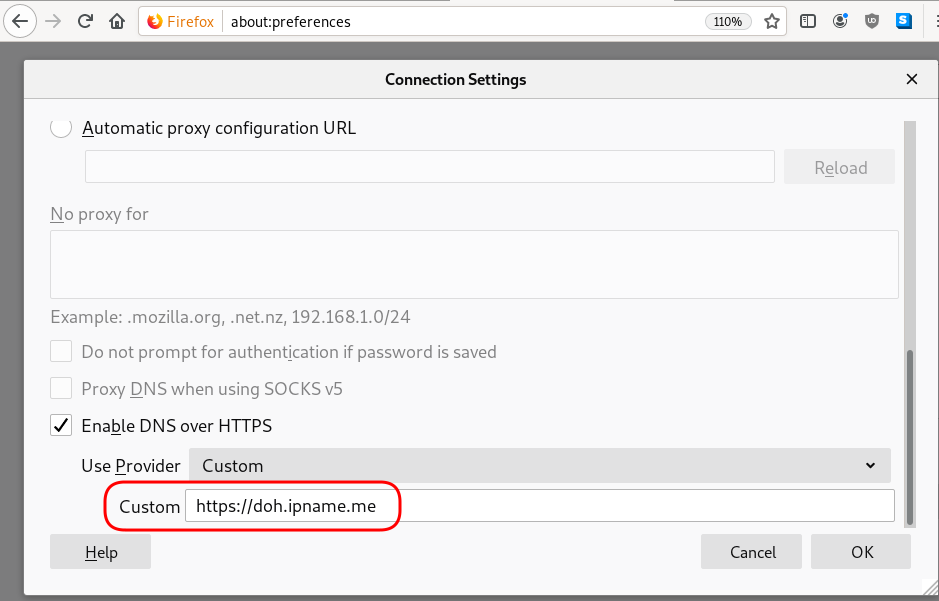
Firefox TRR
dnsleak
Click on DNS leak test site to verify
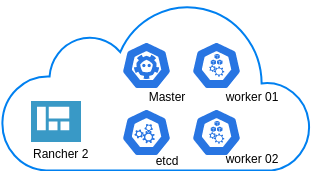
In this blog post you will find my personal notes on how to setup a Kubernetes as a Service (KaaS). I will be using Terraform to create the infrastructure on Hetzner’s VMs, Rancher for KaaS and Helm to install the first application on Kubernetes.
Many thanks to dear friend: adamo for his help.
Terraform
Let’s build our infrastructure!
We are going to use terraform to build 5 VMs
- One (1) master
- One (1) etcd
- Two (2) workers
- One (1) for the Web dashboard
I will not go to much details about terraform, but to have a basic idea
Provider.tf
provider "hcloud" {
    token = var.hcloud_token
}
Hetzner.tf
data "template_file" "userdata" {
  template = "${file("user-data.yml")}"
  vars = {
    hostname = var.domain
    sshdport = var.ssh_port
  }
}

resource "hcloud_server" "node" {
  count       = 5
  name        = "rke-${count.index}"
  image       = "ubuntu-18.04"
  server_type = "cx11"
  user_data   = data.template_file.userdata.rendered
}
Output.tf
output "IPv4" {
  value = hcloud_server.node.*.ipv4_address
}
In my user-data (cloud-init) template, the most important lines are these
  - usermod -a -G docker deploy
  - ufw allow 6443/tcp
  - ufw allow 2379/tcp
  - ufw allow 2380/tcp
  - ufw allow 80/tcp
  - ufw allow 443/tcp
build infra
$ terraform init
$ terraform plan
$ terraform apply
output
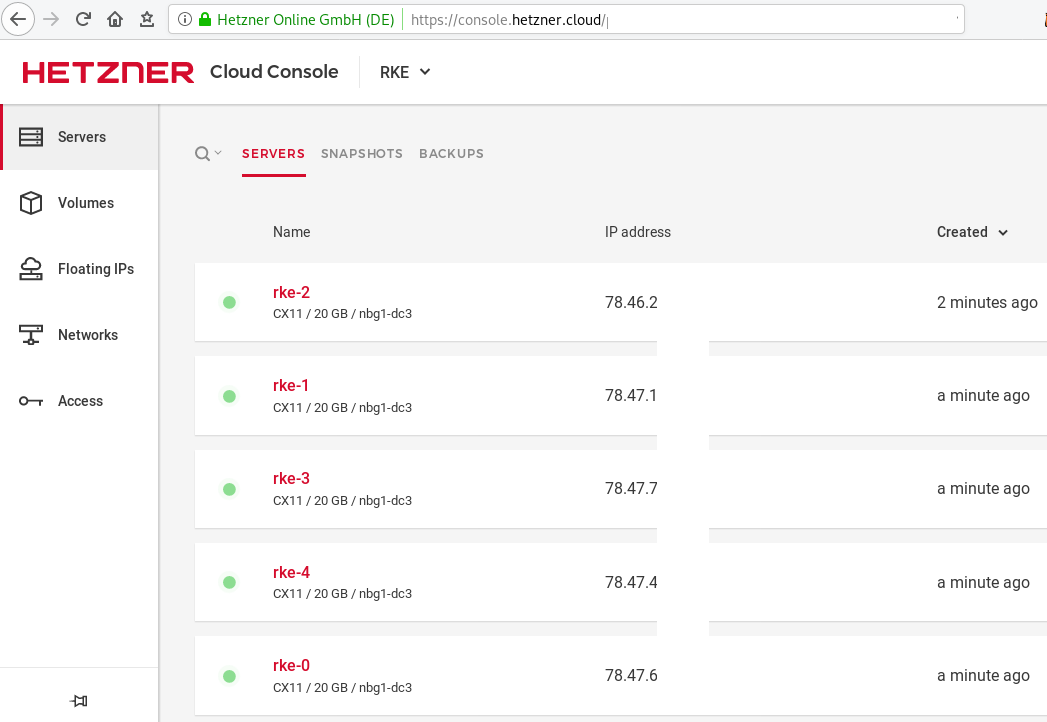
IPv4 = [
  "78.47.6x.yyy",
  "78.47.1x.yyy",
  "78.46.2x.yyy",
  "78.47.7x.yyy",
  "78.47.4x.yyy",
]
In the end we will see something like this on hetzner cloud
Rancher Kubernetes Engine
Take a look here for more details about what is required and important on using rke: Requirements.
We are going to use the rke aka the Rancher Kubernetes Engine, an extremely simple, lightning fast Kubernetes installer that works everywhere.
download
Download the latest binary from github:
Release Release v1.0.0
$ curl -sLO https://github.com/rancher/rke/releases/download/v1.0.0/rke_linux-amd64
$ chmod +x rke_linux-amd64
$ sudo mv rke_linux-amd64 /usr/local/bin/rke
version
$ rke --version

rke version v1.0.0
rke config
We are ready to configure our Kubernetes Infrastructure using the first 4 VMs.
$ rke configmaster
[+] Cluster Level SSH Private Key Path [~/.ssh/id_rsa]:
[+] Number of Hosts [1]: 4
[+] SSH Address of host (1) [none]: 78.47.6x.yyy
[+] SSH Port of host (1) [22]:
[+] SSH Private Key Path of host (78.47.6x.yyy) [none]:
[-] You have entered empty SSH key path, trying fetch from SSH key parameter
[+] SSH Private Key of host (78.47.6x.yyy) [none]:
[-] You have entered empty SSH key, defaulting to cluster level SSH key: ~/.ssh/id_rsa
[+] SSH User of host (78.47.6x.yyy) [ubuntu]:
[+] Is host (78.47.6x.yyy) a Control Plane host (y/n)? [y]:
[+] Is host (78.47.6x.yyy) a Worker host (y/n)? [n]: n
[+] Is host (78.47.6x.yyy) an etcd host (y/n)? [n]: n
[+] Override Hostname of host (78.47.6x.yyy) [none]: rke-master
[+] Internal IP of host (78.47.6x.yyy) [none]:
[+] Docker socket path on host (78.47.6x.yyy) [/var/run/docker.sock]:
etcd
[+] SSH Address of host (2) [none]: 78.47.1x.yyy
[+] SSH Port of host (2) [22]:
[+] SSH Private Key Path of host (78.47.1x.yyy) [none]:
[-] You have entered empty SSH key path, trying fetch from SSH key parameter
[+] SSH Private Key of host (78.47.1x.yyy) [none]:
[-] You have entered empty SSH key, defaulting to cluster level SSH key: ~/.ssh/id_rsa
[+] SSH User of host (78.47.1x.yyy) [ubuntu]:
[+] Is host (78.47.1x.yyy) a Control Plane host (y/n)? [y]: n
[+] Is host (78.47.1x.yyy) a Worker host (y/n)? [n]: n
[+] Is host (78.47.1x.yyy) an etcd host (y/n)? [n]: y
[+] Override Hostname of host (78.47.1x.yyy) [none]: rke-etcd
[+] Internal IP of host (78.47.1x.yyy) [none]:
[+] Docker socket path on host (78.47.1x.yyy) [/var/run/docker.sock]:
workers
worker-01
[+] SSH Address of host (3) [none]: 78.46.2x.yyy
[+] SSH Port of host (3) [22]:
[+] SSH Private Key Path of host (78.46.2x.yyy) [none]:
[-] You have entered empty SSH key path, trying fetch from SSH key parameter
[+] SSH Private Key of host (78.46.2x.yyy) [none]:
[-] You have entered empty SSH key, defaulting to cluster level SSH key: ~/.ssh/id_rsa
[+] SSH User of host (78.46.2x.yyy) [ubuntu]:
[+] Is host (78.46.2x.yyy) a Control Plane host (y/n)? [y]: n
[+] Is host (78.46.2x.yyy) a Worker host (y/n)? [n]: y
[+] Is host (78.46.2x.yyy) an etcd host (y/n)? [n]: n
[+] Override Hostname of host (78.46.2x.yyy) [none]: rke-worker-01
[+] Internal IP of host (78.46.2x.yyy) [none]:
[+] Docker socket path on host (78.46.2x.yyy) [/var/run/docker.sock]:
worker-02
[+] SSH Address of host (4) [none]: 78.47.4x.yyy
[+] SSH Port of host (4) [22]:
[+] SSH Private Key Path of host (78.47.4x.yyy) [none]:
[-] You have entered empty SSH key path, trying fetch from SSH key parameter
[+] SSH Private Key of host (78.47.4x.yyy) [none]:
[-] You have entered empty SSH key, defaulting to cluster level SSH key: ~/.ssh/id_rsa
[+] SSH User of host (78.47.4x.yyy) [ubuntu]:
[+] Is host (78.47.4x.yyy) a Control Plane host (y/n)? [y]: n
[+] Is host (78.47.4x.yyy) a Worker host (y/n)? [n]: y
[+] Is host (78.47.4x.yyy) an etcd host (y/n)? [n]: n
[+] Override Hostname of host (78.47.4x.yyy) [none]: rke-worker-02
[+] Internal IP of host (78.47.4x.yyy) [none]:
[+] Docker socket path on host (78.47.4x.yyy) [/var/run/docker.sock]:
Network Plugin Type
[+] Network Plugin Type (flannel, calico, weave, canal) [canal]: rke_config
[+] Authentication Strategy [x509]:
[+] Authorization Mode (rbac, none) [rbac]: none
[+] Kubernetes Docker image [rancher/hyperkube:v1.16.3-rancher1]:
[+] Cluster domain [cluster.local]:
[+] Service Cluster IP Range [10.43.0.0/16]:
[+] Enable PodSecurityPolicy [n]:
[+] Cluster Network CIDR [10.42.0.0/16]:
[+] Cluster DNS Service IP [10.43.0.10]:
[+] Add addon manifest URLs or YAML files [no]:
cluster.yml
the rke config will produce a cluster yaml file, for us to review or edit in case of misconfigure
$ ls -l cluster.yml
-rw-r----- 1 ebal ebal 4720 Dec  7 20:57 cluster.yml
rke up
We are ready to setup our KaaS by running:
$ rke upINFO[0000] Running RKE version: v1.0.0
INFO[0000] Initiating Kubernetes cluster
INFO[0000] [dialer] Setup tunnel for host [78.47.6x.yyy]
INFO[0000] [dialer] Setup tunnel for host [78.47.1x.yyy]
INFO[0000] [dialer] Setup tunnel for host [78.46.2x.yyy]
INFO[0000] [dialer] Setup tunnel for host [78.47.7x.yyy]
...
INFO[0329] [dns] DNS provider coredns deployed successfully
INFO[0329] [addons] Setting up Metrics Server
INFO[0329] [addons] Saving ConfigMap for addon rke-metrics-addon to Kubernetes
INFO[0329] [addons] Successfully saved ConfigMap for addon rke-metrics-addon to Kubernetes
INFO[0329] [addons] Executing deploy job rke-metrics-addon
INFO[0335] [addons] Metrics Server deployed successfully
INFO[0335] [ingress] Setting up nginx ingress controller
INFO[0335] [addons] Saving ConfigMap for addon rke-ingress-controller to Kubernetes
INFO[0335] [addons] Successfully saved ConfigMap for addon rke-ingress-controller to Kubernetes
INFO[0335] [addons] Executing deploy job rke-ingress-controller
INFO[0341] [ingress] ingress controller nginx deployed successfully
INFO[0341] [addons] Setting up user addons
INFO[0341] [addons] no user addons defined
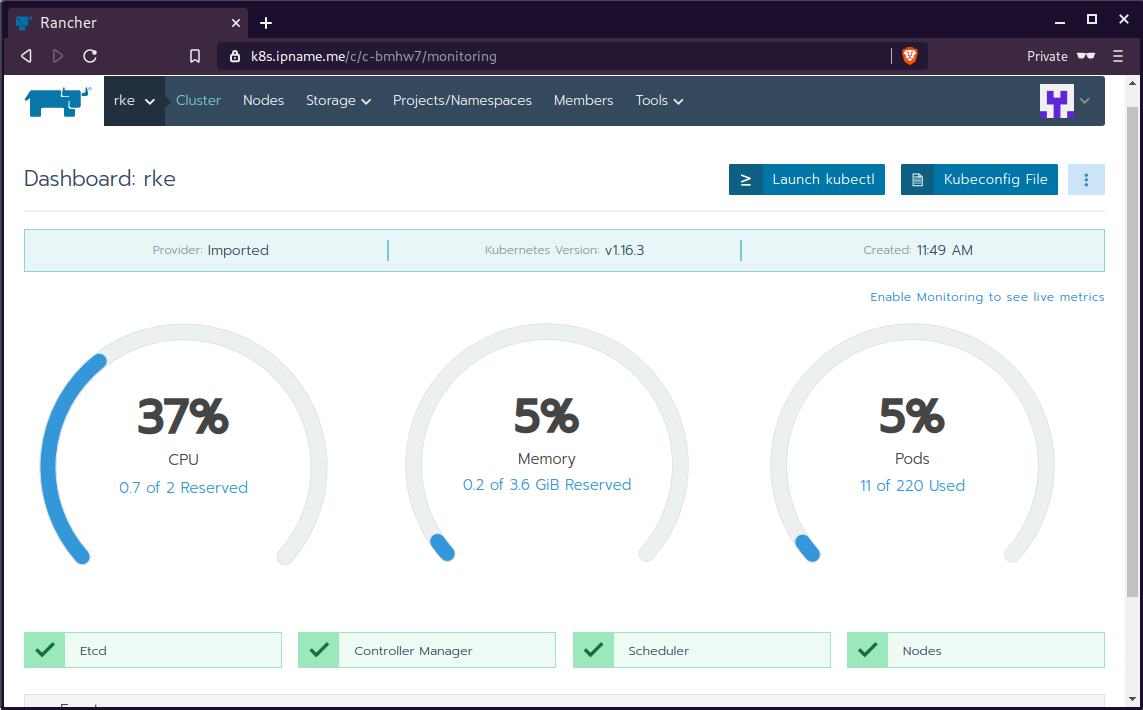
INFO[0341] Finished building Kubernetes cluster successfully Kubernetes
The output of rke will produce a local kube config cluster yaml file for us to connect to kubernetes cluster.
kube_config_cluster.ymlLet’s test our k8s !
$ kubectl --kubeconfig=kube_config_cluster.yml get nodes -A
NAME           STATUS   ROLES          AGE    VERSION
rke-etcd       Ready    etcd           2m5s   v1.16.3
rke-master     Ready    controlplane   2m6s   v1.16.3
rke-worker-1   Ready    worker         2m4s   v1.16.3
rke-worker-2   Ready    worker         2m2s   v1.16.3

$ kubectl --kubeconfig=kube_config_cluster.yml get pods -A
NAMESPACE       NAME                                      READY   STATUS      RESTARTS   AGE
ingress-nginx   default-http-backend-67cf578fc4-nlbb6     1/1     Running     0          96s
ingress-nginx   nginx-ingress-controller-7scft            1/1     Running     0          96s
ingress-nginx   nginx-ingress-controller-8bmmm            1/1     Running     0          96s
kube-system     canal-4x58t                               2/2     Running     0          114s
kube-system     canal-fbr2w                               2/2     Running     0          114s
kube-system     canal-lhz4x                               2/2     Running     1          114s
kube-system     canal-sffwm                               2/2     Running     0          114s
kube-system     coredns-57dc77df8f-9h648                  1/1     Running     0          24s
kube-system     coredns-57dc77df8f-pmtvk                  1/1     Running     0          107s
kube-system     coredns-autoscaler-7774bdbd85-qhs9g       1/1     Running     0          106s
kube-system     metrics-server-64f6dffb84-txglk           1/1     Running     0          101s
kube-system     rke-coredns-addon-deploy-job-9dhlx        0/1     Completed   0          110s
kube-system     rke-ingress-controller-deploy-job-jq679   0/1     Completed   0          98s
kube-system     rke-metrics-addon-deploy-job-nrpjm        0/1     Completed   0          104s
kube-system     rke-network-plugin-deploy-job-x7rt9       0/1     Completed   0          117s

$ kubectl --kubeconfig=kube_config_cluster.yml get componentstatus
NAME                 AGE
controller-manager   <unknown>
scheduler            <unknown>
etcd-0               <unknown>             <unknown>

$ kubectl --kubeconfig=kube_config_cluster.yml get deployments -A
NAMESPACE       NAME                   READY   UP-TO-DATE   AVAILABLE   AGE
ingress-nginx   default-http-backend   1/1     1            1           2m58s
kube-system     coredns                2/2     2            2           3m9s
kube-system     coredns-autoscaler     1/1     1            1           3m8s
kube-system     metrics-server         1/1     1            1           3m4s

$ kubectl --kubeconfig=kube_config_cluster.yml get ns
NAME              STATUS   AGE
default           Active   4m28s
ingress-nginx     Active   3m24s
kube-node-lease   Active   4m29s
kube-public       Active   4m29s
kube-system       Active   4m29s
Rancer2
Now login to the 5th VM we have in Hetzner:
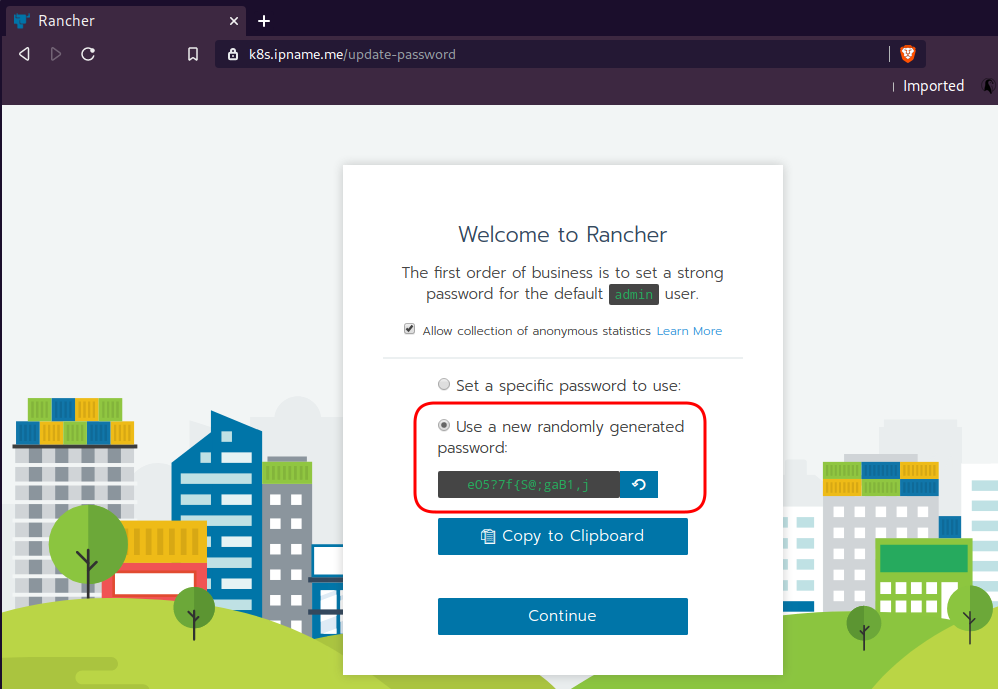
ssh "78.47.4x.yyy" -l ubuntu -p zzzzand install the stable version of Rancher2
$ docker run -d
    --restart=unless-stopped
    -p 80:80 -p 443:443
    --name rancher2
    -v /opt/rancher:/var/lib/rancher
    rancher/rancher:stable
    --acme-domain k8s.ipname.me
Caveat: I have create a domain and assigned to this hostname the IP of the latest VMs!
Now I can use letsencrypt with rancher via acme-domain.
verify
$ docker images -a
REPOSITORY          TAG                 IMAGE ID            CREATED             SIZE
rancher/rancher     stable              5ebba94410d8        10 days ago         654MB

$ docker ps -a -a
CONTAINER ID        IMAGE                    COMMAND                  CREATED             STATUS              PORTS                                      NAMES
8f798fb8184c        rancher/rancher:stable   "entrypoint.sh --acm…"   17 seconds ago      Up 15 seconds       0.0.0.0:80->80/tcp, 0.0.0.0:443->443/tcp   rancher2
Access
Before we continue, we need to give access to these VMs so they can communicate with each other. In cloud you can create a VPC with the correct security groups. But with VMs the easiest way is to do something like this:
sudo ufw allow from "78.47.6x.yyy",
sudo ufw allow from "78.47.1x.yyy",
sudo ufw allow from "78.46.2x.yyy",
sudo ufw allow from "78.47.7x.yyy",
sudo ufw allow from "78.47.4x.yyy",
Dashboard
Open your browser and type the IP of your rancher2 VM:
https://78.47.4x.yyyor (in my case):
https://k8s.ipname.meand follow the below instructions


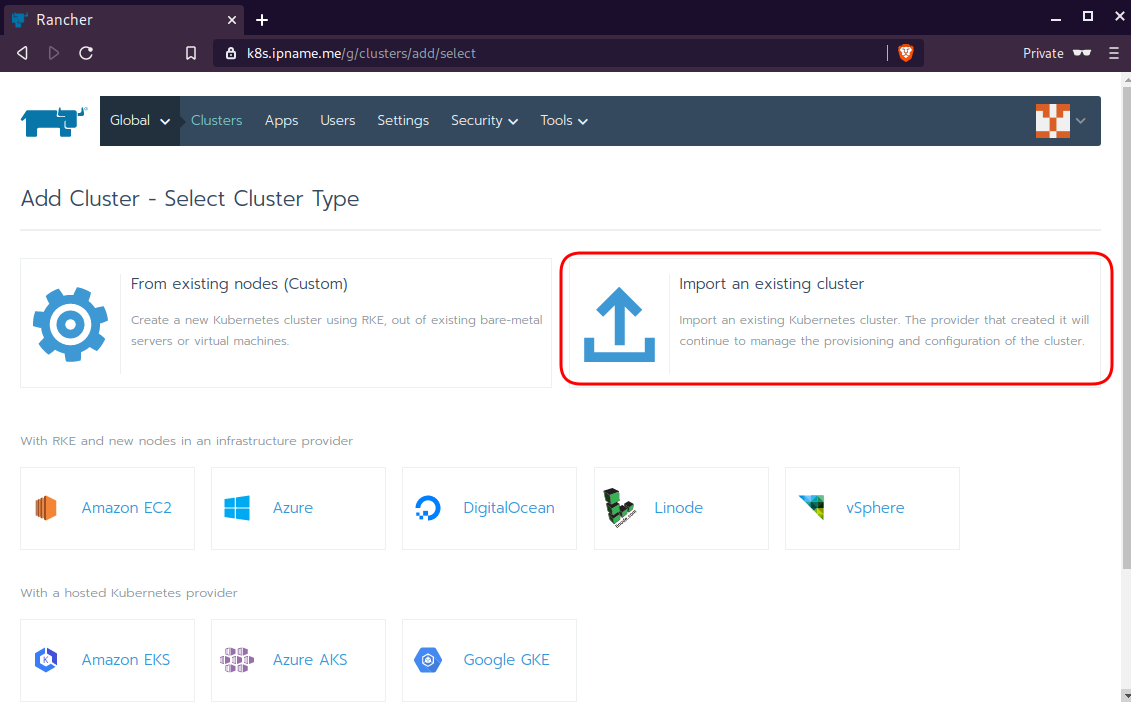
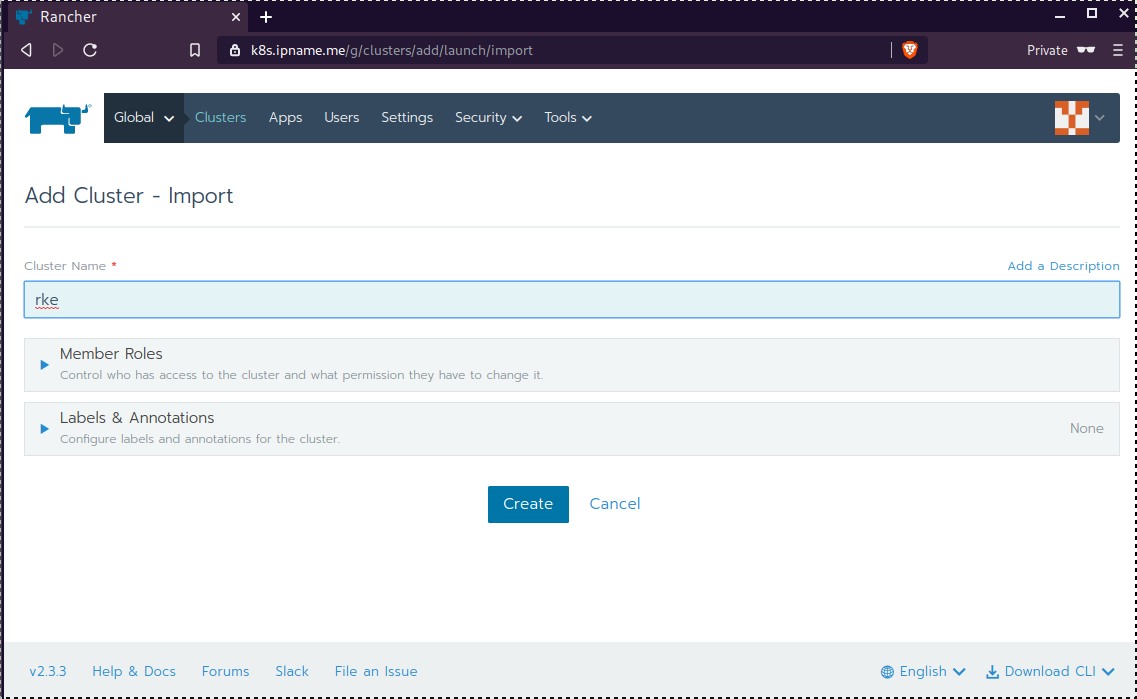
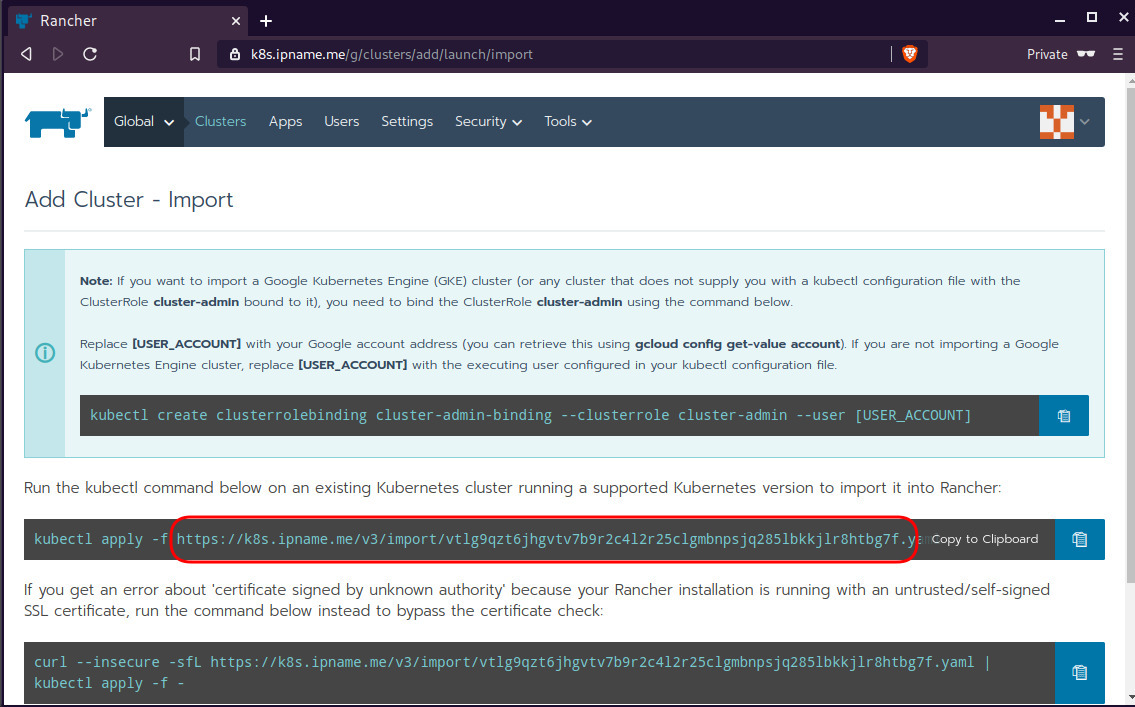
Connect cluster with Rancher2
Download the racnher2 yaml file to your local directory:
$ curl -sLo rancher2.yaml https://k8s.ipname.me/v3/import/nk6p4mg9tzggqscrhh8bzbqdt4447fsffwfm8lms5ghr8r498lngtp.yamlAnd apply this yaml file to your kubernetes cluster:
$ kubectl --kubeconfig=kube_config_cluster.yml apply -f rancher2.yaml

clusterrole.rbac.authorization.k8s.io/proxy-clusterrole-kubeapiserver unchanged
clusterrolebinding.rbac.authorization.k8s.io/proxy-role-binding-kubernetes-master unchanged
namespace/cattle-system unchanged
serviceaccount/cattle unchanged
clusterrolebinding.rbac.authorization.k8s.io/cattle-admin-binding unchanged
secret/cattle-credentials-2704c5f created
clusterrole.rbac.authorization.k8s.io/cattle-admin configured
deployment.apps/cattle-cluster-agent configured
daemonset.apps/cattle-node-agent configured
Web Gui

kubectl config
We can now use the Rancher kubectl config by downloading from here:
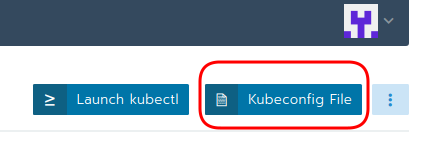
In this post, it is rancher2.config.yml
helm
Final step is to use helm to install an application to our kubernetes cluster
download and install
$ curl -sfL https://get.helm.sh/helm-v3.0.1-linux-amd64.tar.gz | tar -zxf -

$ chmod +x linux-amd64/helm
$ sudo mv linux-amd64/helm /usr/local/bin/
Add Repo
$ helm repo add stable https://kubernetes-charts.storage.googleapis.com/
"stable" has been added to your repositories

$ helm repo update
Hang tight while we grab the latest from your chart repositories...
...
Successfully got an update from the "stable" chart repository
Update Complete. ⎈ Happy Helming!⎈
weave-scope
Install weave scope to rancher:
$ helm --kubeconfig rancher2.config.yml install stable/weave-scope --generate-nameNAME: weave-scope-1575800948
LAST DEPLOYED: Sun Dec 8 12:29:12 2019
NAMESPACE: default
STATUS: deployed
REVISION: 1
NOTES:
You should now be able to access the Scope frontend in your web browser, by
using kubectl port-forward:
kubectl -n default port-forward $(kubectl -n default get endpoints
weave-scope-1575800948-weave-scope -o jsonpath='{.subsets[0].addresses[0].targetRef.name}') 8080:4040
then browsing to http://localhost:8080/.
For more details on using Weave Scope, see the Weave Scope documentation:
https://www.weave.works/docs/scope/latest/introducing/Proxy
Last, we are going to use kubectl to create a forwarder
$ kubectl --kubeconfig=rancher2.config.yml -n default port-forward $(kubectl --kubeconfig=rancher2.config.yml -n default get endpoints weave-scope-1575800948-weave-scope -o jsonpath='{.subsets[0].addresses[0].targetRef.name}') 8080:4040
Forwarding from 127.0.0.1:8080 -> 4040
Forwarding from [::1]:8080 -> 4040
Open your browser in this url:
http://localhost:8080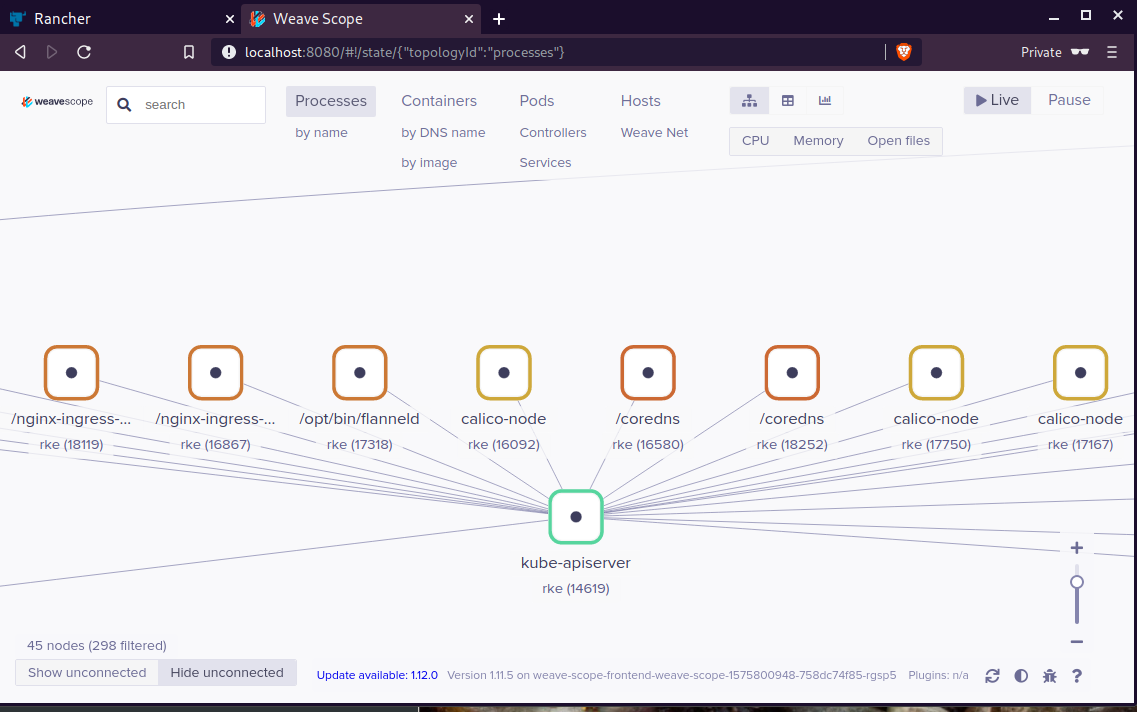
That’s it !
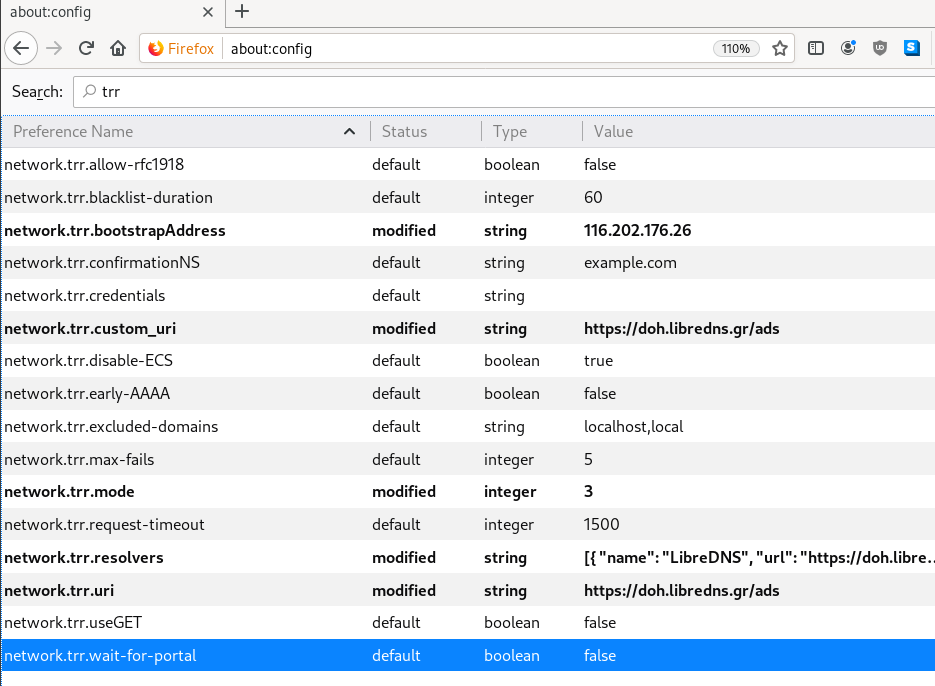
LibreDNS has a new endpoint
https://doh.libredns.gr/adsThis new endpoint is unique cause it blocks by default Ads & Trackers !
AdBlock
We are currently using Steven Black’s hosts file.
noticeable & mentionable
LibreDNS DOES NOT keep any logs and we are using OpenNIC as TLD Tier1 root NS
Here are my settings
LibreOps & LibreDNS
LibreOps announced a new public service: LibreDNS, a new DoH/DoT (DNS over Https/DNS over TLS) free public service for people that want to bypass DNS restrictions and/or want to use TLS in their DNS queries. Firefox has already collaborated with Cloudflare for this case but I believe we can do better than using a centralized public service of a profit-company.
Personal Notes
So here are my personal notes for using LibreDNS in firefox
Firefox
Open Preferences/Options
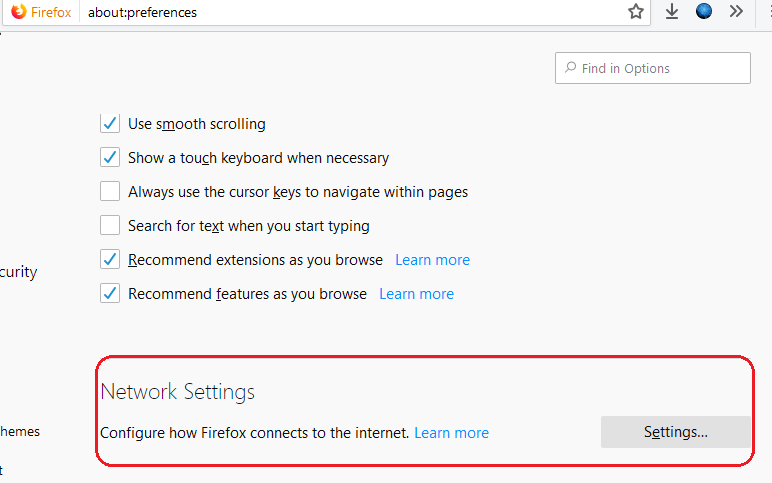
Enable DoH

TRR mode 2
Now the tricky part.
TRR mode is 2 when you enable DoH. What does this mean?
2 is when firefox is trying to use DoH but if it fails (or timeout) then firefox will go back to ask your operating system’s DNS.
DoH is a URL, so the first time firefox needs to resolve doh.libredns.gr and it will ask your operating system for that.
host file
There is way to exclude doh.libredns.gr from DoH , and use your /etc/hosts file instead your local DNS and enable TRR mode to 3, which means you will ONLY use DoH service for DNS queries.
# grep doh.libredns.gr /etc/hosts
116.202.176.26 doh.libredns.gr
TRR mode 3
and in
about:config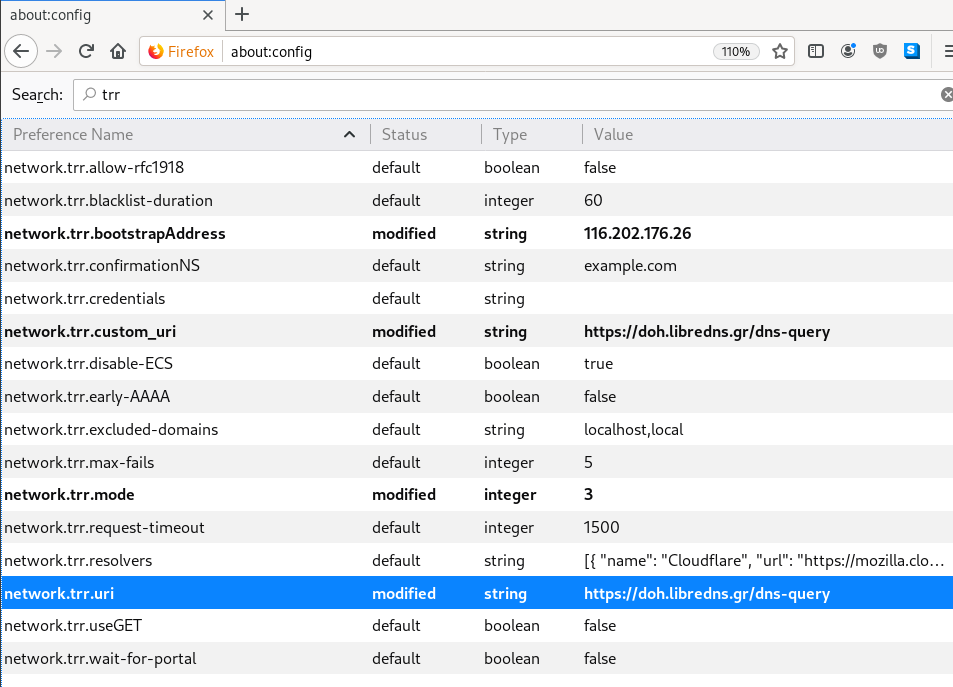
DNS Leak
Try DNS Leak Test to verify that your local ISP is NOT your firefox DNS
Thunderbird
Thunderbird also supports DoH and here are my settings
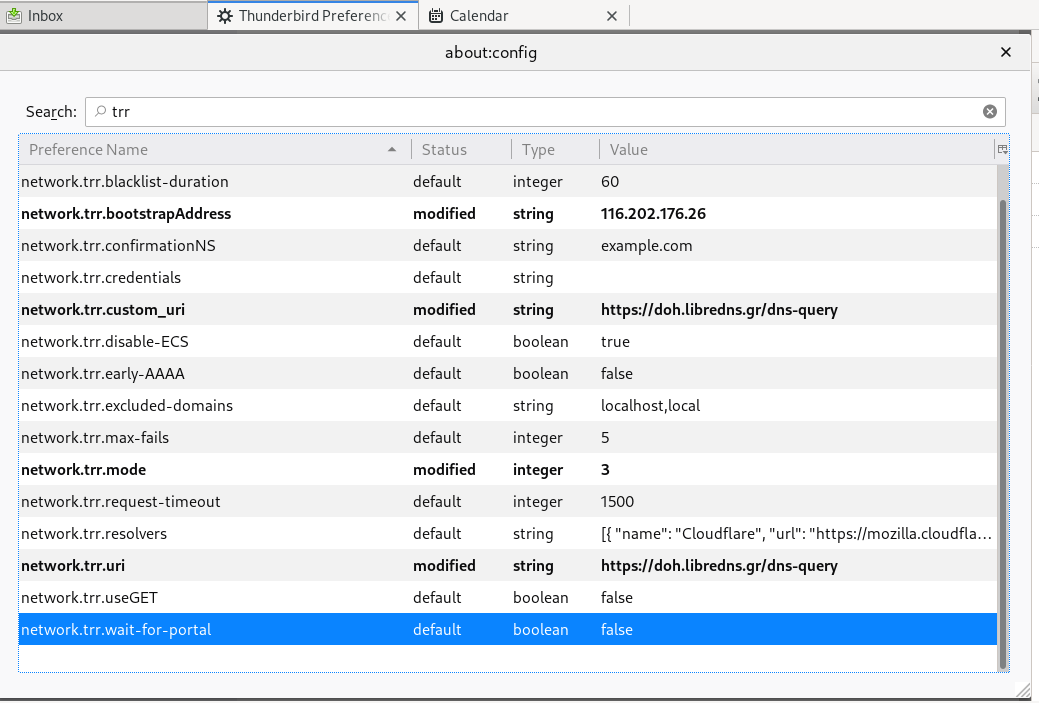
PS: Do not forget, this is NOT a global change, just your firefox will ask libredns for any dns query.
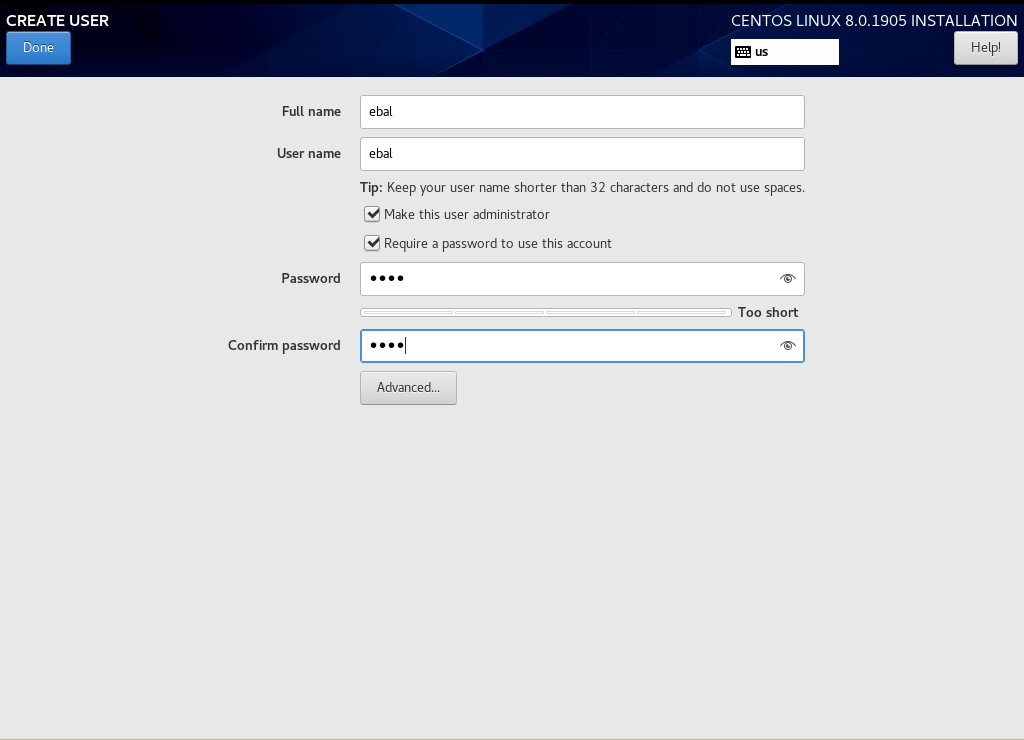
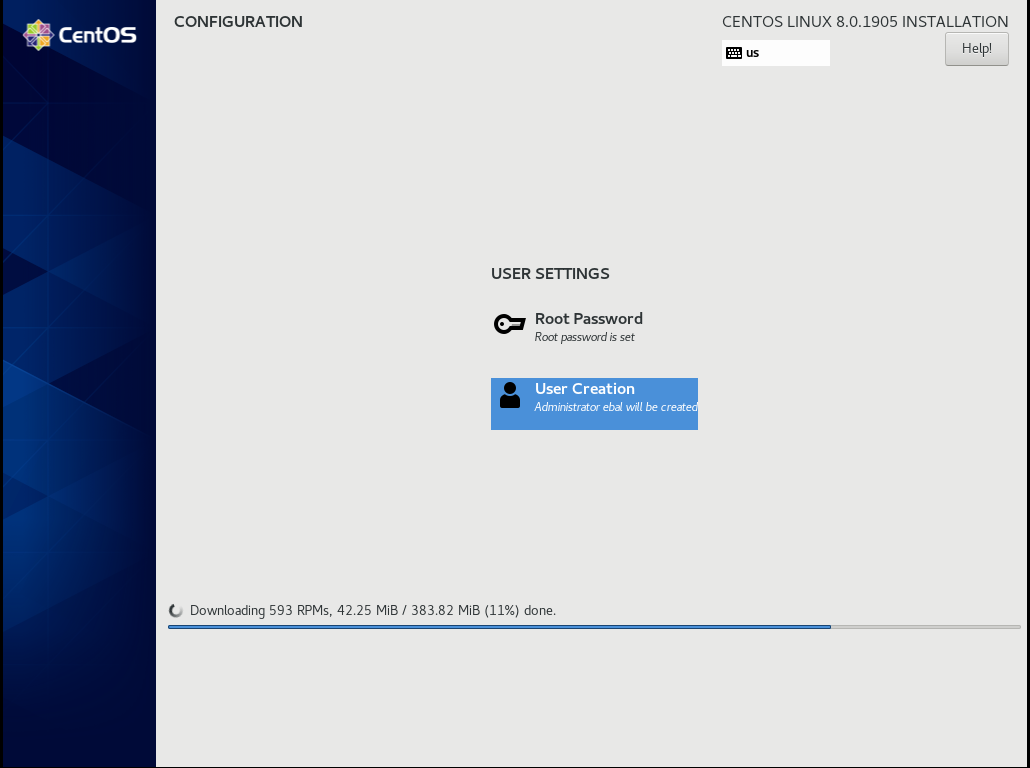
a few days ago CentOS-8 (1905) was released and you can find details here ReleaseNotes
Below is a visual guide on how to net-install centos8 1905
notes on a qemu-kvm
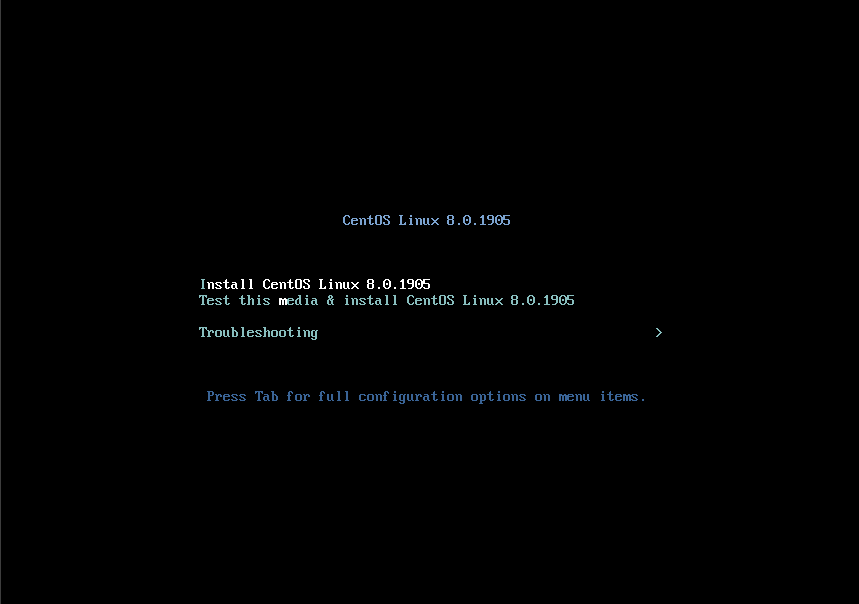
Boot
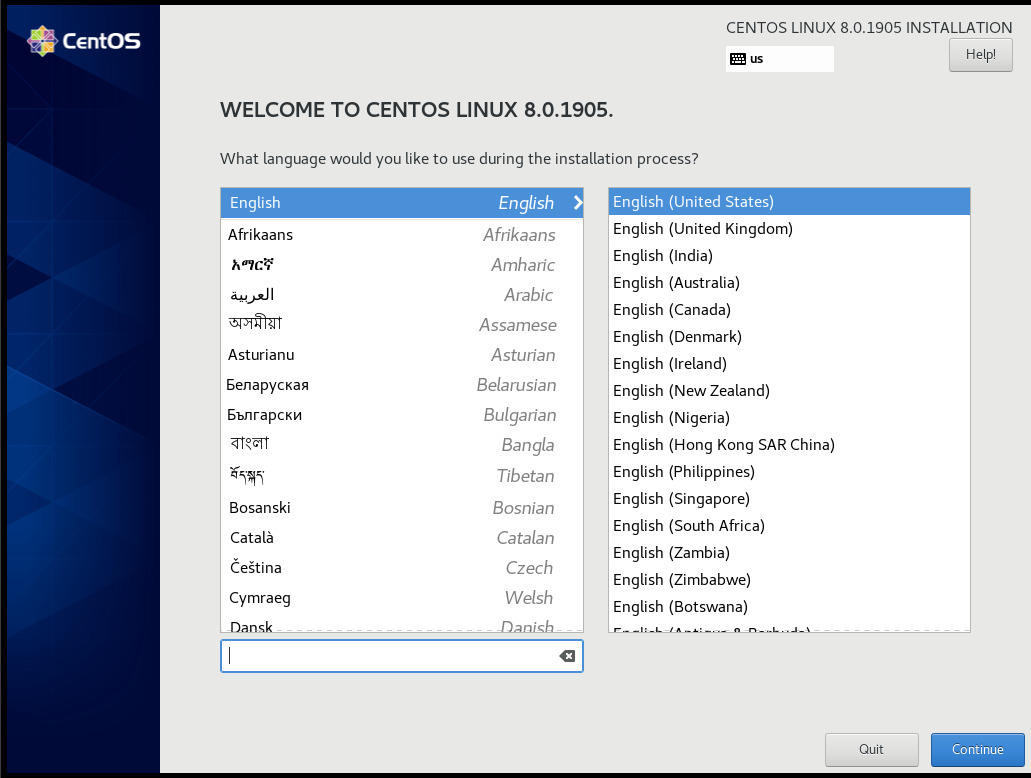
Select Language
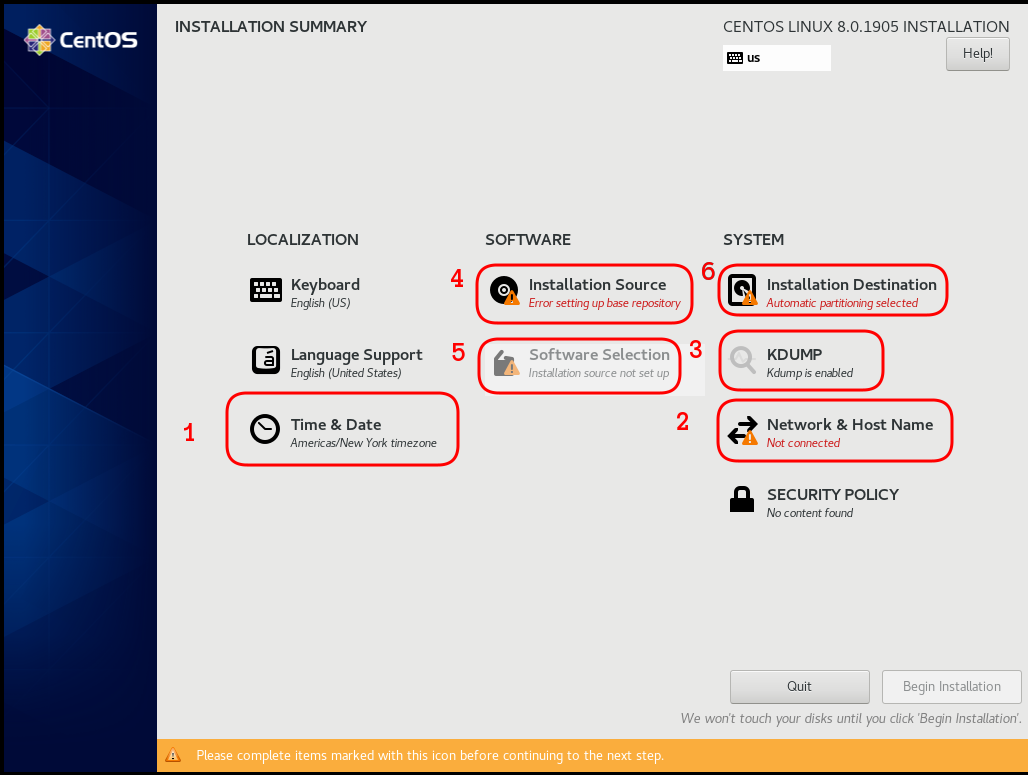
Menu
I have marked the next screens. For netinstall you need to setup first network
Time

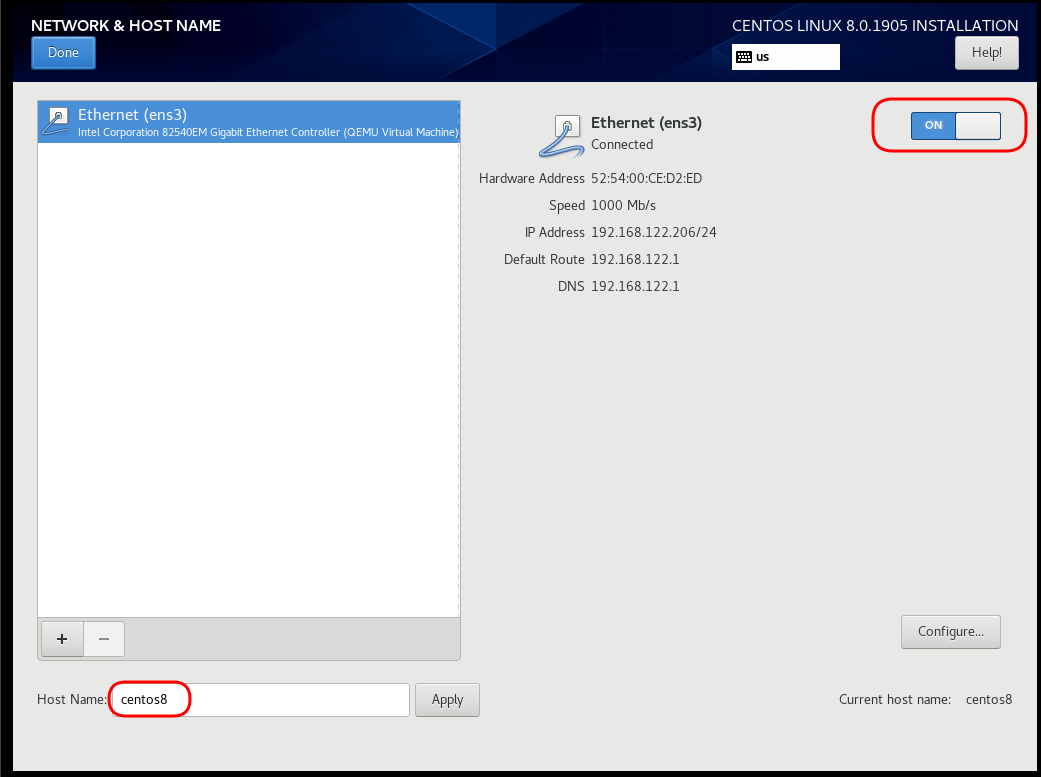
Network
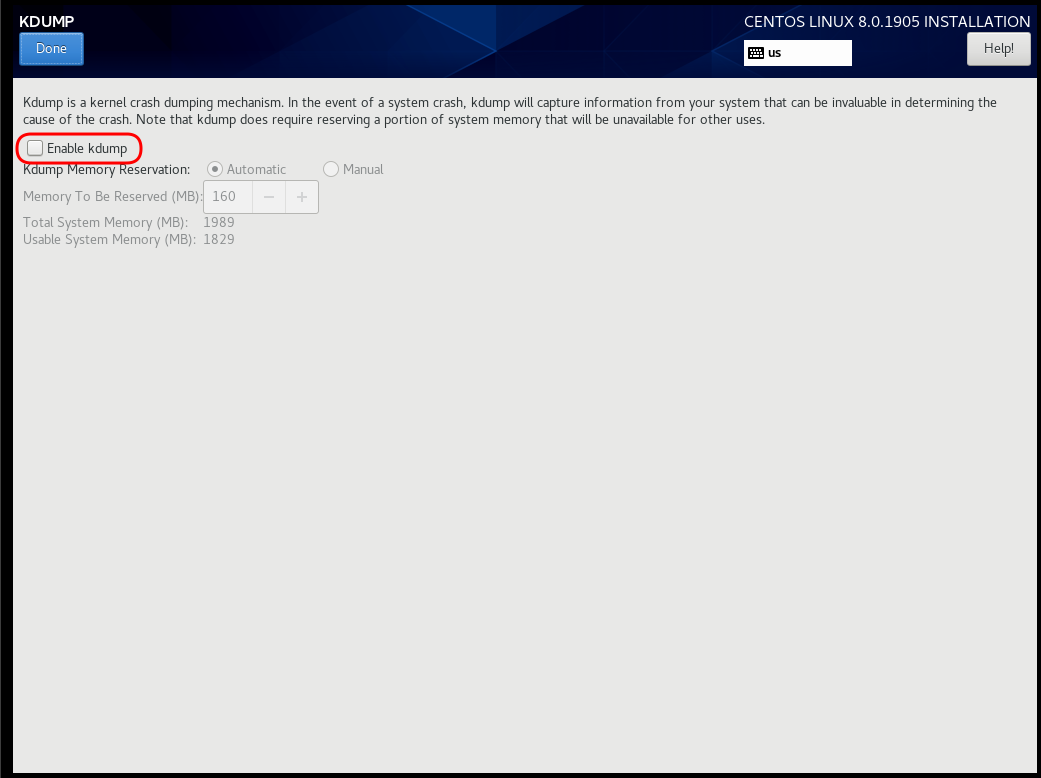
Disable kdump
Add Repo
ftp.otenet.gr/linux/centos/8/BaseOS/x86_64/os/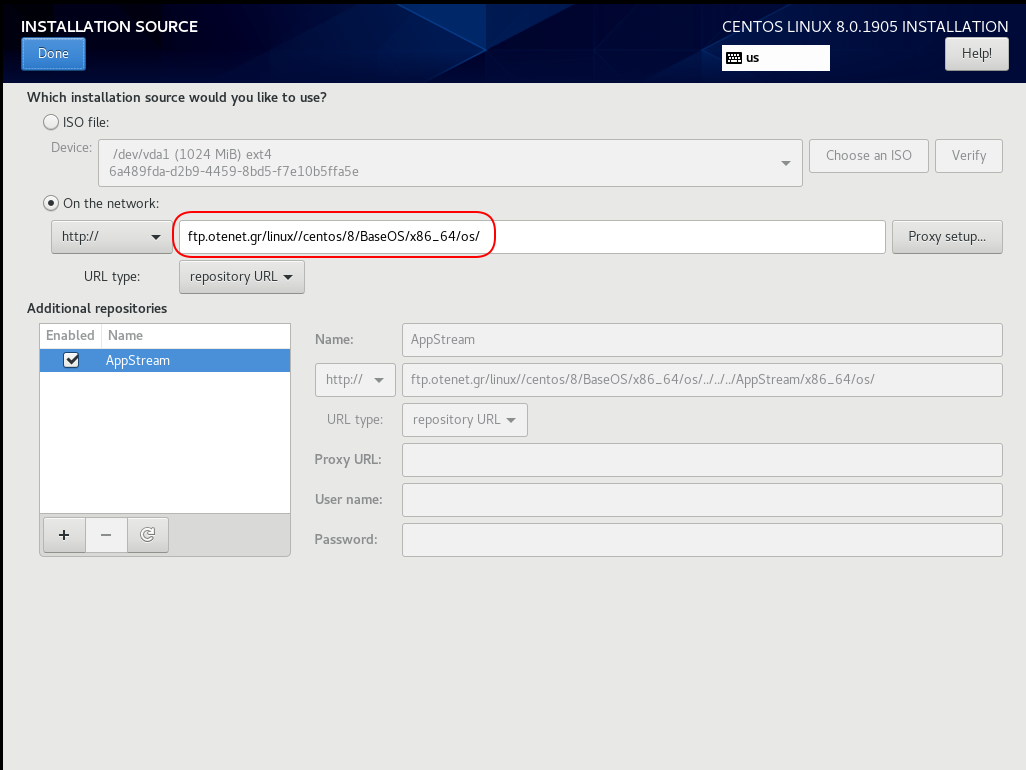
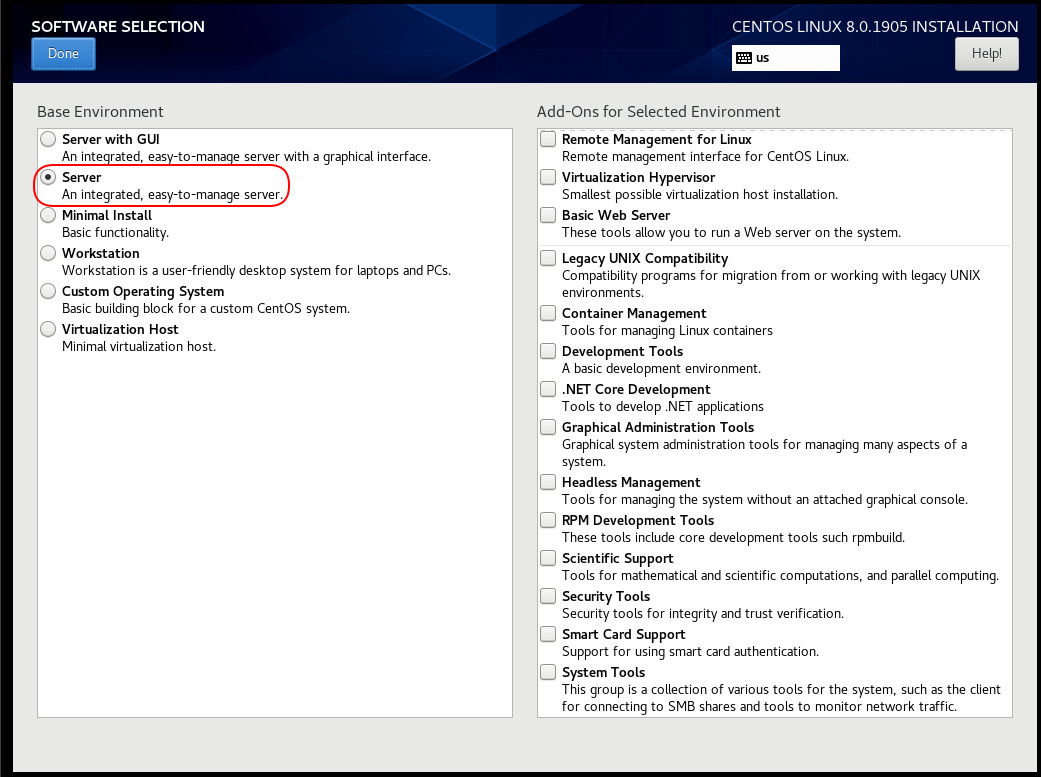
Server Installation
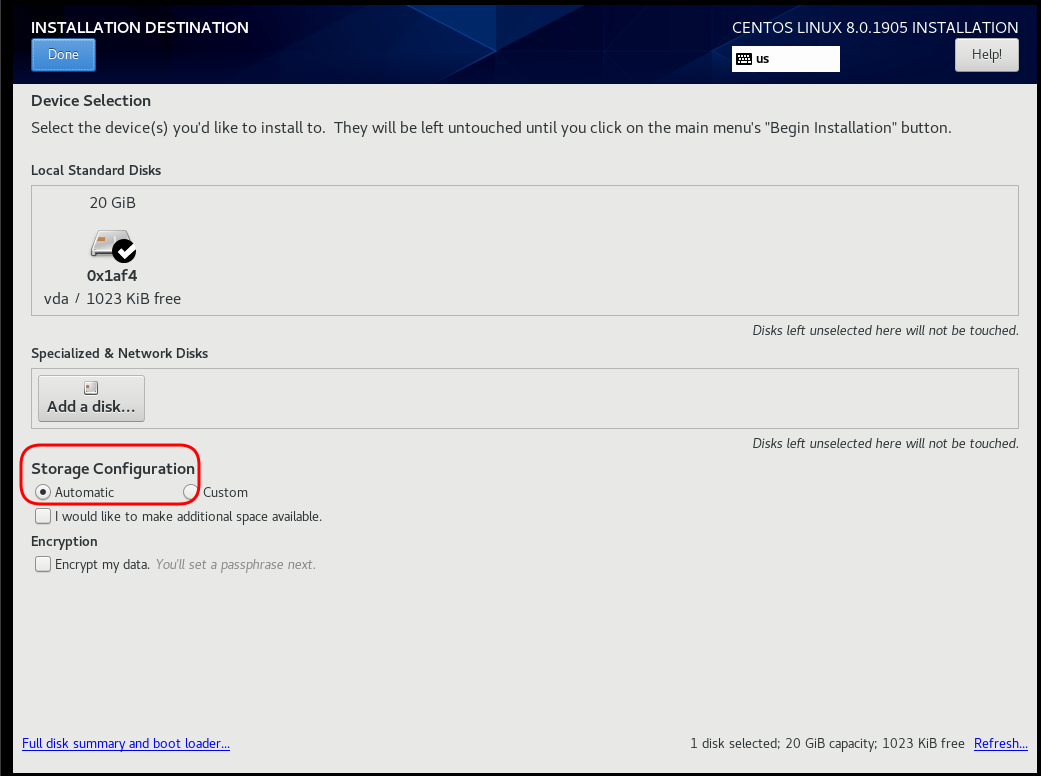
Disk
Review
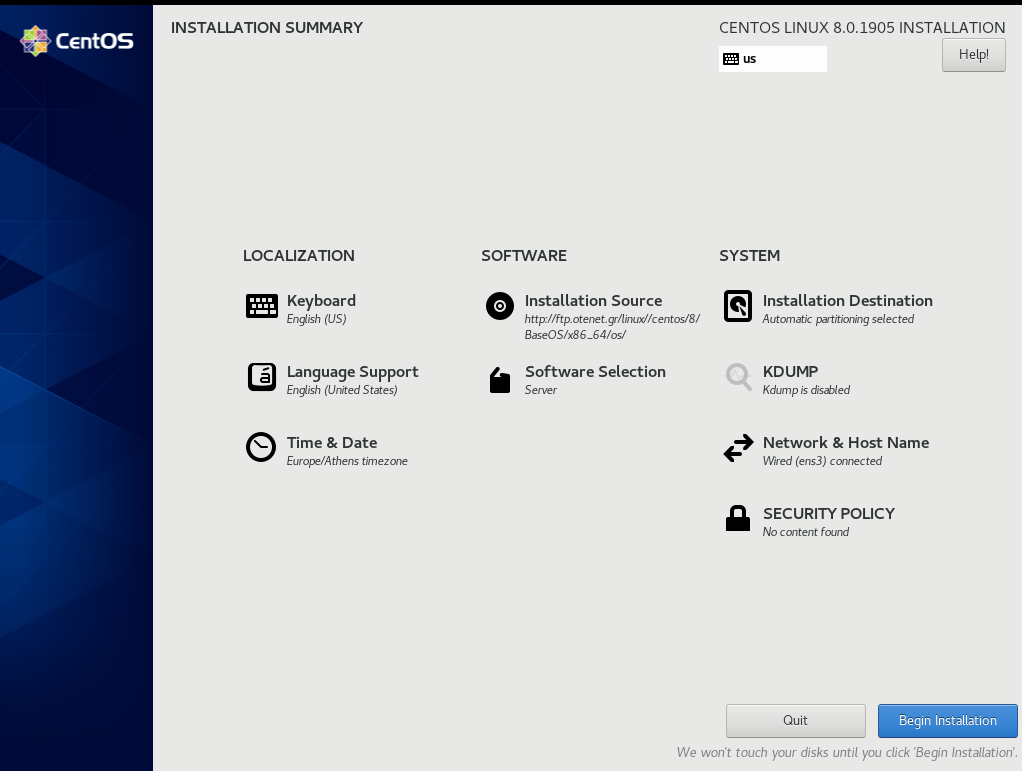
Begin Installation
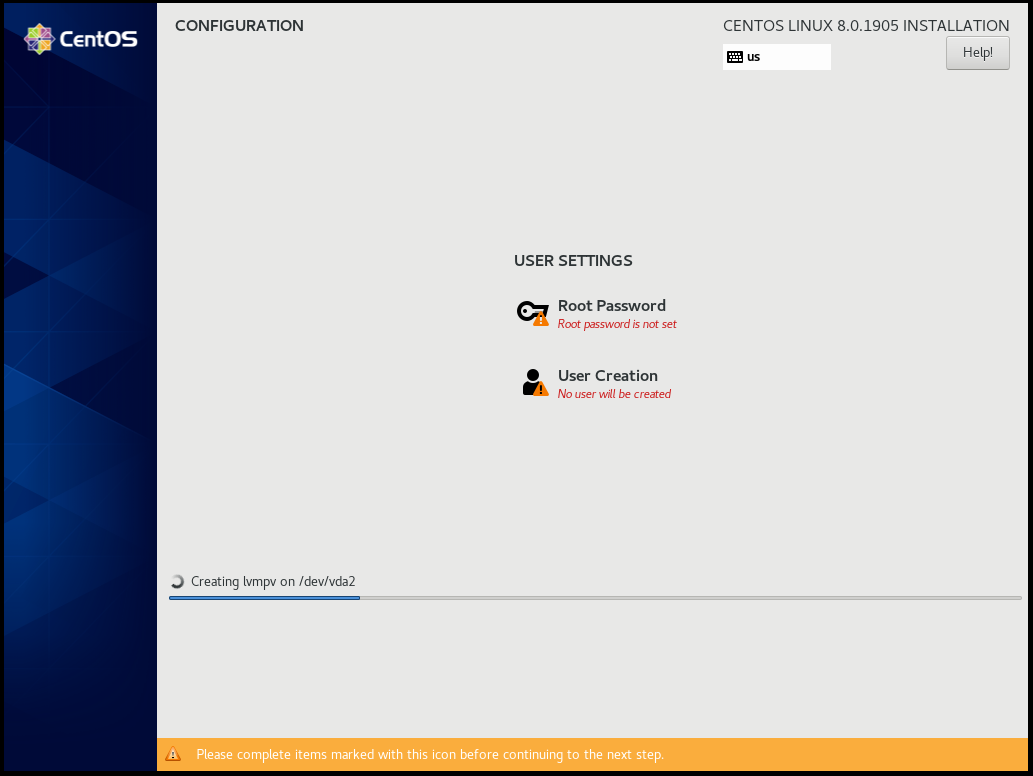
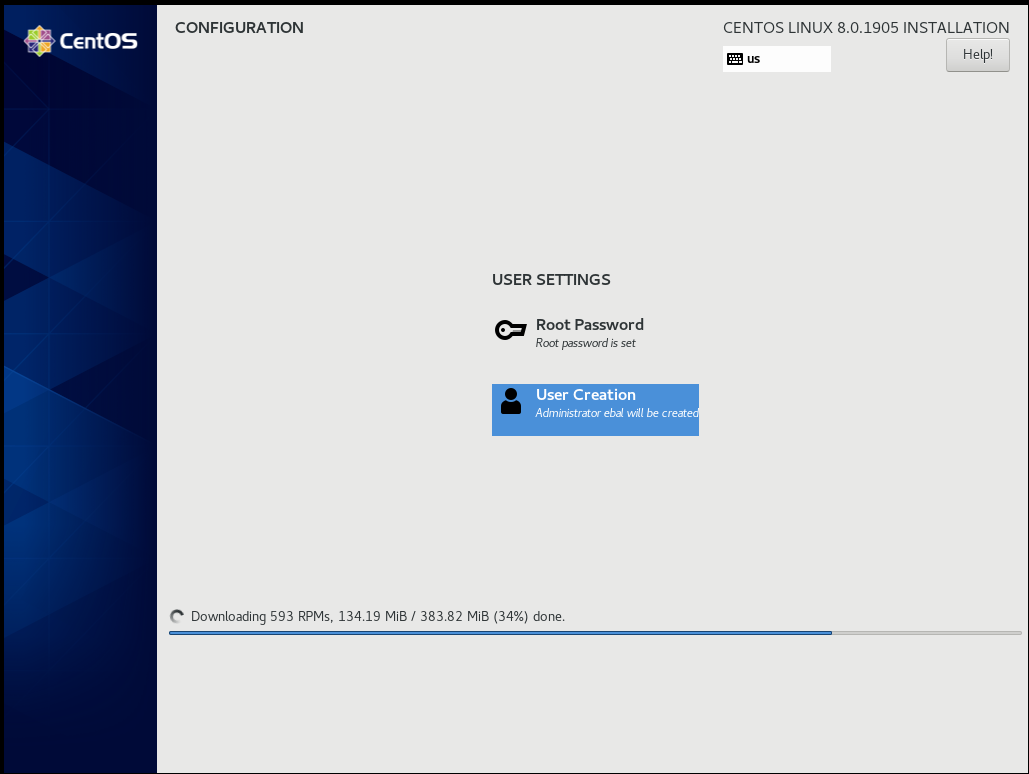
Root

User
Make this user administrator
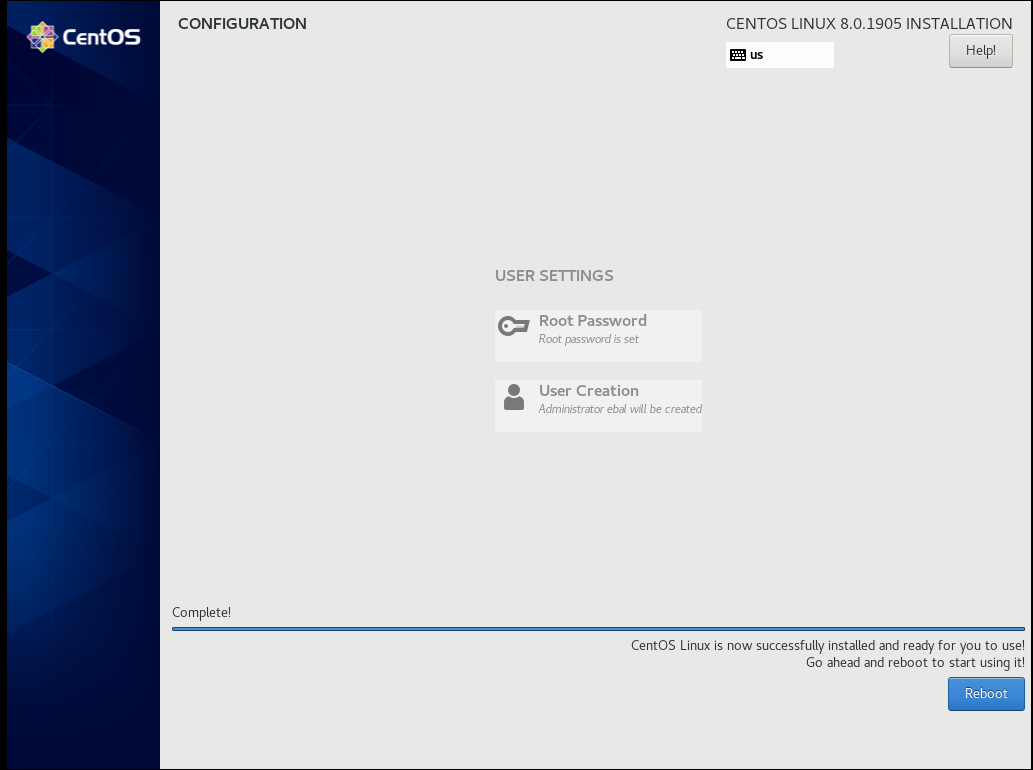
Installation
Reboot
Grub
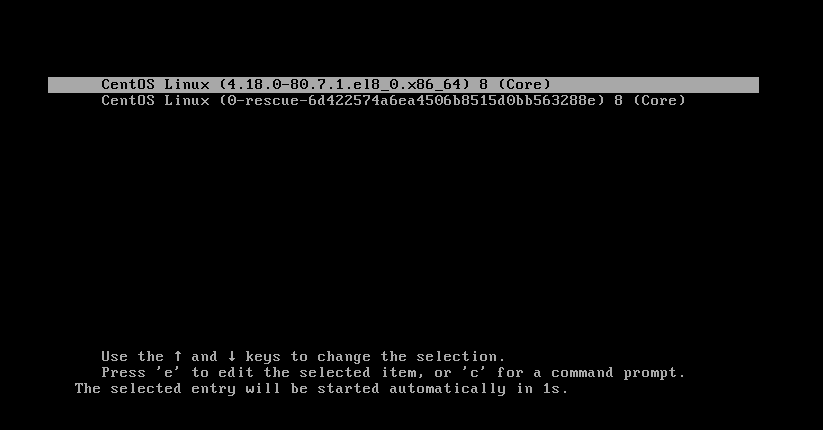
Boot

CentOS-8 (1905)

When using tf most of times you need to reuse your Infrastructure as Code, and so your code should be written in such way. In my (very simple) use-case, I need to reuse user-data for cloud-init to setup different VMs but I do not want to rewrite basic/common things every time. Luckily, we can use the template_file.
user-data.yml
In the below yaml file, you will see that we are using tf string-template to produce hostname with this variable:
"${hostname}"here is the file:
#cloud-config

disable_root: true
ssh_pwauth: no

users:
  - name: ebal
    ssh_import_id:
      - gh:ebal
    shell: /bin/bash
    sudo: ALL=(ALL) NOPASSWD:ALL

# Set TimeZone
timezone: Europe/Athens

hostname: "${hostname}"

# Install packages
packages:
  - mlocate
  - figlet

# Update/Upgrade & Reboot if necessary
package_update: true
package_upgrade: true
package_reboot_if_required: true

# Remove cloud-init
runcmd:
  - figlet "${hostname}" > /etc/motd
  - updatedb
Variables
Let’s see our tf variables:
$ cat Variables.tfvariable "hcloud_token" {
description = "Hetzner Access API token"
default = ""
}
variable "gandi_api_token" {
description = "Gandi API token"
default = ""
}
variable "domain" {
description = " The domain name "
default = "example.org"
}Terraform Template
So we need to use user-data.yml as a template and replace hostname with var.domain
$ cat example.tfTwo simple steps:
- First we read user-data.yml as template and replace hostname with var.domain
- Then we render the template result to user_data as string
provider "hcloud" {
  token = "${var.hcloud_token}"
}

data "template_file" "userdata" {
  template = "${file("user-data.yml")}"
  vars = {
    hostname  = "${var.domain}"
  }
}

resource "hcloud_server" "node1" {
  name = "node1"
  image = "ubuntu-18.04"
  server_type = "cx11"
  user_data = "${data.template_file.userdata.rendered}"
}
$ terraform version
Terraform v0.12.3And that’s it !
this article also has an alternative title:
How I Learned to Stop Worrying and Loved my Team
This is a story of troubleshooting cloud disk volumes (long post).
Cloud Disk Volume
Working with data disk volumes in the cloud have a few benefits. One of them is when the volume runs out of space, you can just increase it! No need of replacing the disk, no need of buying a new one, no need of transferring 1TB of data from one disk to another. It is a very simple matter.
Partitions Vs Disks
My personal opinion is not to use partitions. Cloud data disk on EVS (elastic volume service) or cloud volumes for short, they do not need a partition table. You can use the entire disk for data.
Use: /dev/vdb instead of /dev/vdb1
Filesystem
You have to choose your filesystem carefully. You can use XFS that supports Online resizing via xfs_growfs, but you can not shrunk them. But I understand that most of us are used to work with extended filesystem ext4 and to be honest I also feel more comfortable with ext4.
You can read the below extensive article in wikipedia Comparison of file systems for more info, and you can search online regarding performance between xfs and ext4. There are really close to each other nowadays.
Increase Disk
Today, working on a simple operational task (increase a cloud disk volume), I followed the official documentation. This is something that I have done in the past like a million times. To provide a proper documentation I will use redhat’s examples:
In a nutshell
- Umount data disk
- Increase disk volume within the cloud dashboard
- Extend (change) the geometry
- Check filesystem
- Resize ext4 filesystem
- Mount data disk
Commands
Let’s present the commands for reference:
# umount /dev/vdb1

[increase cloud disk volume]

# partprobe

# fdisk /dev/vdb
[delete partition]
[create partition]

# partprobe

# e2fsck /dev/vdb1
# e2fsck -f /dev/vdb1
# resize2fs /dev/vdb1
# mount /dev/vdb1
And here is fdisk in more detail:
Fdisk
# fdisk /dev/vdb

Welcome to fdisk (util-linux 2.27.1).
Changes will remain in memory only, until you decide to write them.
Be careful before using the write command.

Command (m for help): p
Disk /dev/vdb: 1.4 TiB, 1503238553600 bytes, 2936012800 sectors
Units: sectors of 1 * 512 = 512 bytes
Sector size (logical/physical): 512 bytes / 512 bytes
I/O size (minimum/optimal): 512 bytes / 512 bytes
Disklabel type: dos
Disk identifier: 0x0004e2c8

Device     Boot Start        End    Sectors  Size Id Type
/dev/vdb1           1 2097151999 2097151999 1000G 83 Linux
Delete
Command (m for help): d
Selected partition 1
Partition 1 has been deleted.
Create
Command (m for help): n
Partition type
   p   primary (0 primary, 0 extended, 4 free)
   e   extended (container for logical partitions)
Select (default p): p
Partition number (1-4, default 1):
First sector (2048-2936012799, default 2048):
Last sector, +sectors or +size{K,M,G,T,P} (2048-2936012799, default 2936012799):

Created a new partition 1 of type 'Linux' and of size 1.4 TiB.
Command (m for help): p
Disk /dev/vdb: 1.4 TiB, 1503238553600 bytes, 2936012800 sectors
Units: sectors of 1 * 512 = 512 bytes
Sector size (logical/physical): 512 bytes / 512 bytes
I/O size (minimum/optimal): 512 bytes / 512 bytes
Disklabel type: dos
Disk identifier: 0x0004e2c8

Device     Boot Start        End    Sectors  Size Id Type
/dev/vdb1        2048 2936012799 2936010752  1.4T 83 Linux
Write
Command (m for help): w
The partition table has been altered.
Calling ioctl() to re-read partition table.
Syncing disks.
File system consistency check
An interesting error occurred, something that I had never seen before when using e2fsck
# e2fsck /dev/vdb1
e2fsck 1.42.13 (17-May-2015)
ext2fs_open2: Bad magic number in super-block
e2fsck: Superblock invalid, trying backup blocks...
e2fsck: Bad magic number in super-block while trying to open /dev/vdb1

The superblock could not be read or does not describe a valid ext2/ext3/ext4
filesystem.  If the device is valid and it really contains an ext2/ext3/ext4
filesystem (and not swap or ufs or something else), then the superblock
is corrupt, and you might try running e2fsck with an alternate superblock:
    e2fsck -b 8193 <device>
 or
    e2fsck -b 32768 <device>
Superblock invalid, trying backup blocks
Panic
I think I lost 1 TB of files!
At that point, I informed my team to raise awareness.

Yes I know, I was a bit sad at the moment. I’ve done this work a million times before, also the Impostor Syndrome kicked in!
Snapshot
I was lucky enough because I could create a snapshot, de-attach the disk from the VM, create a new disk from the snapshot and work on the new (test) disk to try recovering 1TB of lost files!
Make File System
mke2fs has a dry-run option that will show us the superblocks:
mke2fs 1.42.13 (17-May-2015)
Creating filesystem with 367001344 4k blocks and 91750400 inodes
Filesystem UUID: f130f422-2ad7-4f36-a6cb-6984da34ead1
Superblock backups stored on blocks:
        32768, 98304, 163840, 229376, 294912, 819200, 884736, 1605632, 2654208,
        4096000, 7962624, 11239424, 20480000, 23887872, 71663616, 78675968,
        102400000, 214990848
Testing super blocks
so I created a small script to test every super block against /dev/vdb1
e2fsck  -b  32768      /dev/vdb1
e2fsck  -b  98304      /dev/vdb1
e2fsck  -b  163840     /dev/vdb1
e2fsck  -b  229376     /dev/vdb1
e2fsck  -b  294912     /dev/vdb1
e2fsck  -b  819200     /dev/vdb1
e2fsck  -b  884736     /dev/vdb1
e2fsck  -b  1605632    /dev/vdb1
e2fsck  -b  2654208    /dev/vdb1
e2fsck  -b  4096000    /dev/vdb1
e2fsck  -b  7962624    /dev/vdb1
e2fsck  -b  11239424   /dev/vdb1
e2fsck  -b  20480000   /dev/vdb1
e2fsck  -b  23887872   /dev/vdb1
e2fsck  -b  71663616   /dev/vdb1
e2fsck  -b  78675968   /dev/vdb1
e2fsck  -b  102400000  /dev/vdb1
e2fsck  -b  214990848  /dev/vdb1
Unfortunalyt none of the above commands worked!
last-ditch recovery method
There is a nuclear option DO NOT DO IT
mke2fs -S /dev/vdb1Write superblock and group descriptors only. This is useful if all of the superblock and backup superblocks are corrupted, and a last-ditch recovery method is desired. It causes mke2fs to reinitialize the superblock and group descriptors, while not touching the inode table and the block and inode bitmaps.
Then e2fsck -y -f /dev/vdb1 moved 1TB of files under lost+found with their inode as the name of every file.
I cannot stress this enough: DO NOT DO IT !
Misalignment
So what is the issue?
See the difference of fdisk on 1TB and 1.4TB
Device     Boot Start        End    Sectors  Size Id Type
/dev/vdb1           1 2097151999 2097151999 1000G 83 Linux

Device     Boot Start        End    Sectors  Size Id Type
/dev/vdb1        2048 2936012799 2936010752  1.4T 83 Linux
The First sector is now at 2048 instead of 1.
Okay delete disk, create a new one from the snapshot and try again.
Fdisk Part Two
Now it is time to manually put the first sector on 1.
# fdisk /dev/vdb

Welcome to fdisk (util-linux 2.27.1).
Changes will remain in memory only, until you decide to write them.
Be careful before using the write command.

Command (m for help): p

Disk /dev/vdb: 1.4 TiB, 1503238553600 bytes, 2936012800 sectors
Units: sectors of 1 * 512 = 512 bytes
Sector size (logical/physical): 512 bytes / 512 bytes
I/O size (minimum/optimal): 512 bytes / 512 bytes
Disklabel type: dos
Disk identifier: 0x0004e2c8

Device     Boot Start        End    Sectors  Size Id Type
/dev/vdb1        2048 2936012799 2936010752  1.4T 83 Linux

Command (m for help): d
Selected partition 1
Partition 1 has been deleted.

Command (m for help): n
Partition type
   p   primary (0 primary, 0 extended, 4 free)
   e   extended (container for logical partitions)
Select (default p): p
Partition number (1-4, default 1): 1
First sector (2048-2936012799, default 2048): 1
Value out of range.
Value out of range.
damn it!
sfdisk
In our SRE team, we use something like a Bat-Signal to ask for All hands on a problem and that was what we were doing. A colleague made a point that fdisk is not the best tool for the job, but we should use sfdisk instead. I actually use sfdisk to create backups and restore partition tables but I was trying not to deviate from the documentation and I was not sure that everybody knew how to use sfdisk.
So another colleague suggested to use a similar 1TB disk from another VM.
I could hear the gears in my mind working…
sfdisk export partition table
sfdisk -d /dev/vdb > vdb.out
# fdisk -l /dev/vdb
Disk /dev/vdb: 1000 GiB, 1073741824000 bytes, 2097152000 sectors
Units: sectors of 1 * 512 = 512 bytes
Sector size (logical/physical): 512 bytes / 512 bytes
I/O size (minimum/optimal): 512 bytes / 512 bytes
Disklabel type: dos
Disk identifier: 0x0009e732

Device     Boot Start        End    Sectors  Size Id Type
/dev/vdb1           1 2097151999 2097151999 1000G 83 Linux

# sfdisk -d /dev/vdb > vdb.out

# cat vdb.out
label: dos
label-id: 0x0009e732
device: /dev/vdb
unit: sectors

/dev/vdb1 : start=           1, size=  2097151999, type=83
okay we have something here to work with, start sector is 1 and the geometry is 1TB for an ext file system. Identically to the initial partition table (before using fdisk).
sfdisk restore partition table
sfdisk /dev/vdb < vdb.out
# sfdisk /dev/vdb < vdb.out

Checking that no-one is using this disk right now ... OK

Disk /dev/vdb: 1.4 TiB, 1503238553600 bytes, 2936012800 sectors
Units: sectors of 1 * 512 = 512 bytes
Sector size (logical/physical): 512 bytes / 512 bytes
I/O size (minimum/optimal): 512 bytes / 512 bytes
Disklabel type: dos
Disk identifier: 0x0004e2c8

Old situation:

Device     Boot Start        End    Sectors  Size Id Type
/dev/vdb1        2048 2936012799 2936010752  1.4T 83 Linux

>>> Script header accepted.
>>> Script header accepted.
>>> Script header accepted.
>>> Script header accepted.
>>> Created a new DOS disklabel with disk identifier 0x0009e732.
Created a new partition 1 of type 'Linux' and of size 1000 GiB.
/dev/vdb2:
New situation:

Device     Boot Start        End    Sectors  Size Id Type
/dev/vdb1           1 2097151999 2097151999 1000G 83 Linux

The partition table has been altered.
Calling ioctl() to re-read partition table.
Syncing disks.

# fdisk -l /dev/vdb
Disk /dev/vdb: 1.4 TiB, 1503238553600 bytes, 2936012800 sectors
Units: sectors of 1 * 512 = 512 bytes
Sector size (logical/physical): 512 bytes / 512 bytes
I/O size (minimum/optimal): 512 bytes / 512 bytes
Disklabel type: dos
Disk identifier: 0x0009e732

Device     Boot Start        End    Sectors  Size Id Type
/dev/vdb1           1 2097151999 2097151999 1000G 83 Linux
Filesystem Check ?
# e2fsck -f /dev/vdb1
e2fsck 1.42.13 (17-May-2015)
Pass 1: Checking inodes, blocks, and sizes
Pass 2: Checking directory structure
Pass 3: Checking directory connectivity
Pass 4: Checking reference counts
Pass 5: Checking group summary information
SATADISK: 766227/65536000 files (1.9% non-contiguous), 200102796/262143999 blocks
f#ck YES
Mount ?
# mount /dev/vdb1 /mnt

# df -h /mnt
Filesystem      Size  Used Avail Use% Mounted on
/dev/vdb1       985G  748G  187G  81% /mnt
f3ck Yeah !!
Extend geometry
It is time to extend the partition geometry to 1.4TB with sfdisk.
If you remember from the fdisk output
Device     Boot Start        End    Sectors  Size Id Type
/dev/vdb1           1 2097151999 2097151999 1000G 83 Linux
/dev/vdb1        2048 2936012799 2936010752  1.4T 83 Linux
We have 2936010752 sectors in total.
The End sector of 1.4T is 2936012799
Simple math problem: End Sector - Sectors = 2936012799 - 2936010752 = 2047
The previous fdisk command, had the Start Sector at 2048,
So 2048 - 2047 = 1 the preferable Start Sector!
New sfdisk
By editing the text vdb.out file to re-present our new situation:
# diff vdb.out vdb.out.14
6c6
< /dev/vdb1 : start=           1, size=  2097151999, type=83
---
> /dev/vdb1 : start=           1, size=  2936010752, type=83
1.4TB
Let’s put everything together
# sfdisk /dev/vdb < vdb.out.14
Checking that no-one is using this disk right now ... OK

Disk /dev/vdb: 1.4 TiB, 1503238553600 bytes, 2936012800 sectors
Units: sectors of 1 * 512 = 512 bytes
Sector size (logical/physical): 512 bytes / 512 bytes
I/O size (minimum/optimal): 512 bytes / 512 bytes
Disklabel type: dos
Disk identifier: 0x0009e732

Old situation:

Device     Boot Start        End    Sectors  Size Id Type
/dev/vdb1           1 2097151999 2097151999 1000G 83 Linux

>>> Script header accepted.
>>> Script header accepted.
>>> Script header accepted.
>>> Script header accepted.
>>> Created a new DOS disklabel with disk identifier 0x0009e732.
Created a new partition 1 of type 'Linux' and of size 1.4 TiB.
/dev/vdb2:
New situation:

Device     Boot Start        End    Sectors  Size Id Type
/dev/vdb1           1 2936010752 2936010752  1.4T 83 Linux

The partition table has been altered.
Calling ioctl() to re-read partition table.
Syncing disks.

# e2fsck /dev/vdb1
e2fsck 1.42.13 (17-May-2015)
SATADISK: clean, 766227/65536000 files, 200102796/262143999 blocks

# e2fsck -f /dev/vdb1
e2fsck 1.42.13 (17-May-2015)
Pass 1: Checking inodes, blocks, and sizes
Pass 2: Checking directory structure
Pass 3: Checking directory connectivity
Pass 4: Checking reference counts
Pass 5: Checking group summary information
SATADISK: 766227/65536000 files (1.9% non-contiguous), 200102796/262143999 blocks

# resize2fs /dev/vdb1
resize2fs 1.42.13 (17-May-2015)
Resizing the filesystem on /dev/vdb1 to 367001344 (4k) blocks.
The filesystem on /dev/vdb1 is now 367001344 (4k) blocks long.

# mount /dev/vdb1 /mnt

# df -h  /mnt
Filesystem      Size  Used Avail Use% Mounted on
/dev/vdb1       1.4T  748G  561G  58%  /mnt
Finally!!
Partition Alignment
By the way, you can read this amazing article to fully understand why this happened:
note to future self:
class fs_filelister {

    var $_list = array();
    var $_directory = null;

    //constructor
    function __construct($directory = null) {
        if ($directory) $this->_directory = $directory;
        $this->_listFiles($this->_directory);
    }

}

class tag_relted_remover extends fs_filelister {

    function __construct() {
        // ebal
        //$this->fs_filelister(PLUGIN_TAG_DIR);
        parent::__construct(PLUGIN_TAG_DIR);
    }
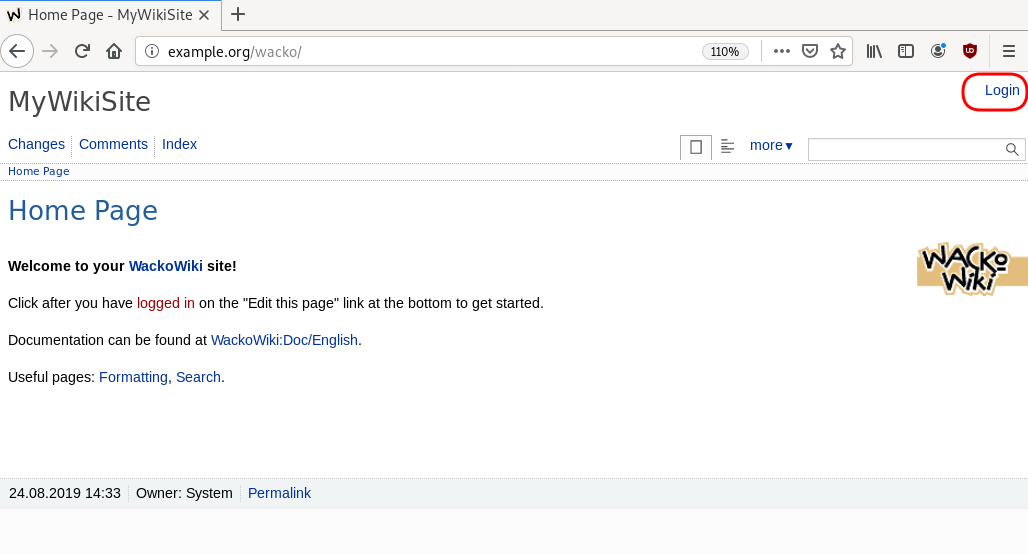
}WackoWiki is the wiki of my choice and one of the first opensource project I’ve ever contributed, and I still use wackowiki for personal use.
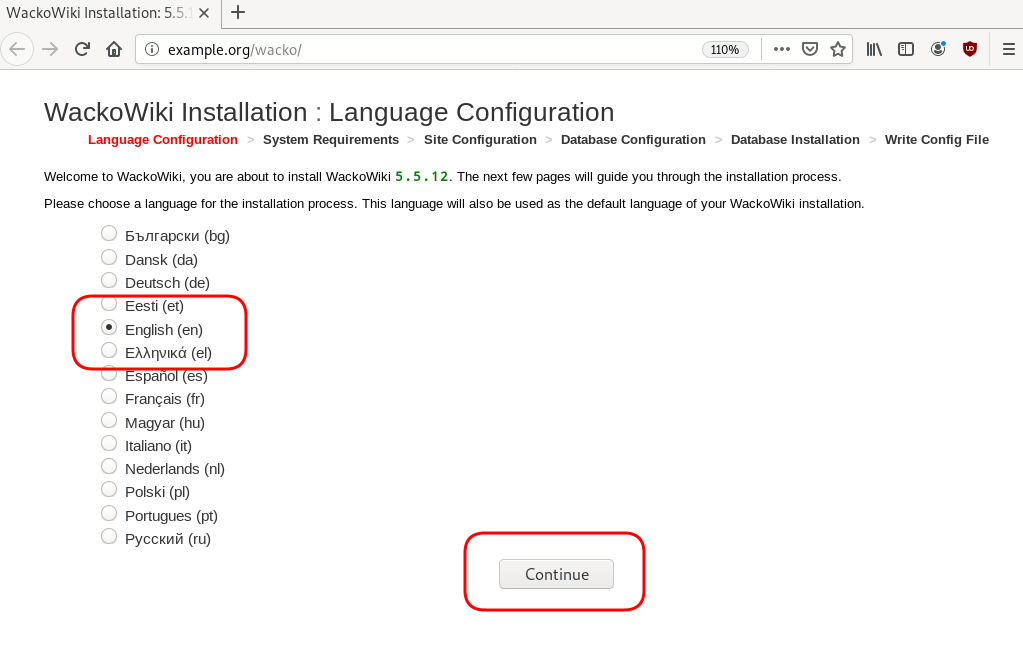
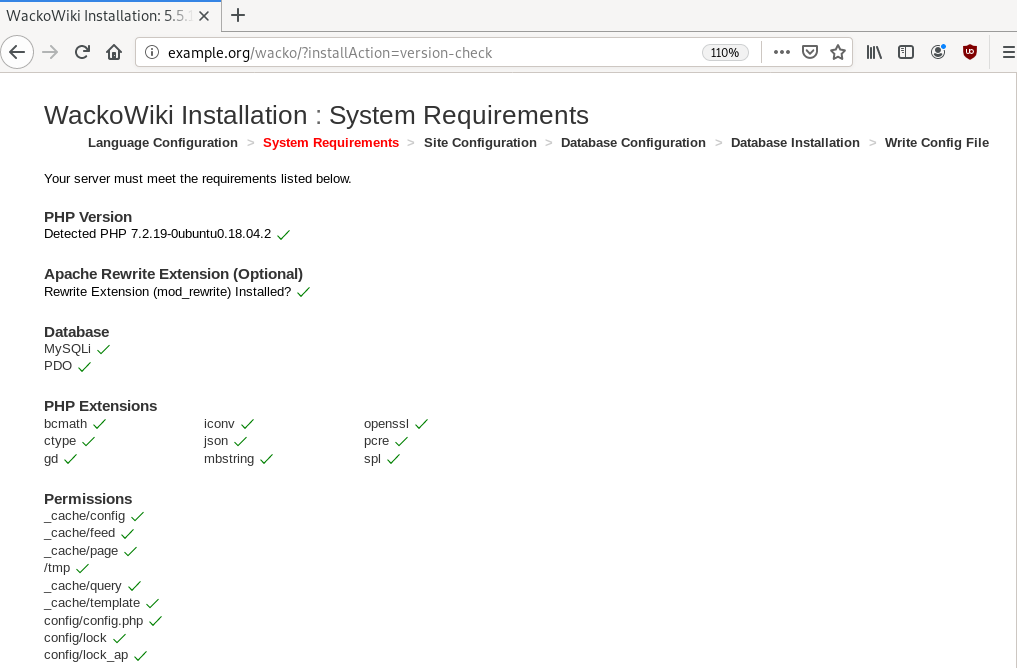
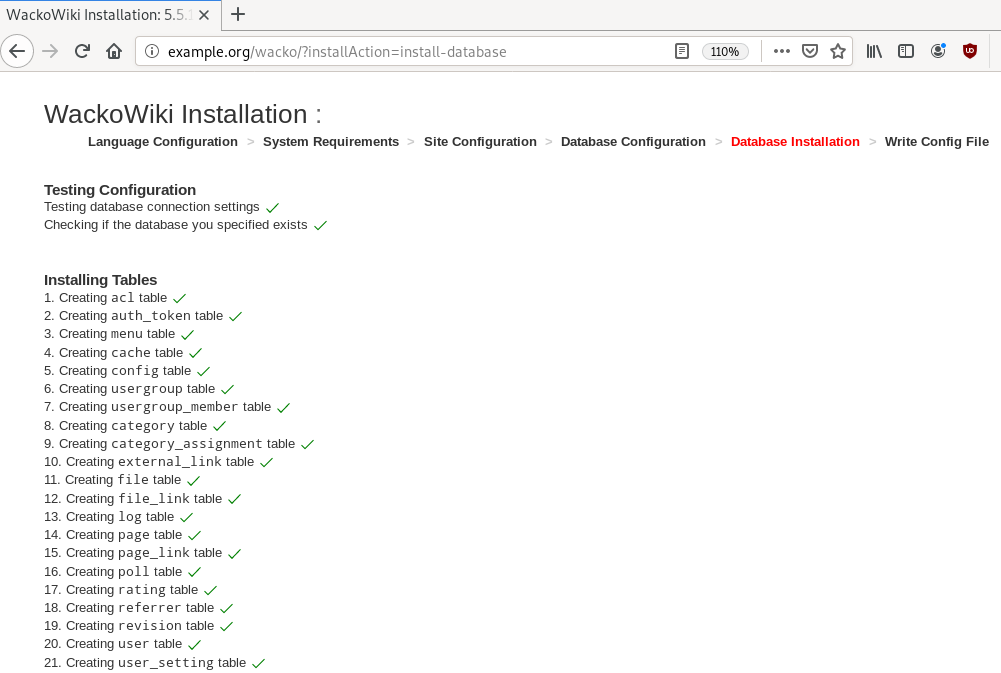
A few days ago, wackowiki released version 5.5.12. In this blog post I will try to share my experience on installing wackowiki on a new ubuntu 18.04 LTS.
Ansible Role
I’ve created an example ansible role for the wackowiki for the Requirements section: WackoWiki Ansible Role
Requirements
Ubuntu 18.04.3 LTS
apt -y install
       php
       php-common
       php-bcmath
       php-ctype
       php-gd
       php-iconv
       php-json
       php-mbstring
       php-mysql
       apache2
       libapache2-mod-php
       mariadb-server
       unzip
Apache2
We need to enable mod_reqwrite in apache2 but also to add the appropiate configuration in the default conf in VirtualHost
# a2enmod rewrite# vim /etc/apache2/sites-available/000-default.conf
<VirtualHost *:80>
...
# enable.htaccess
<Directory /var/www/html/>
Options Indexes FollowSymLinks MultiViews
AllowOverride All
Require all granted
</Directory>
...
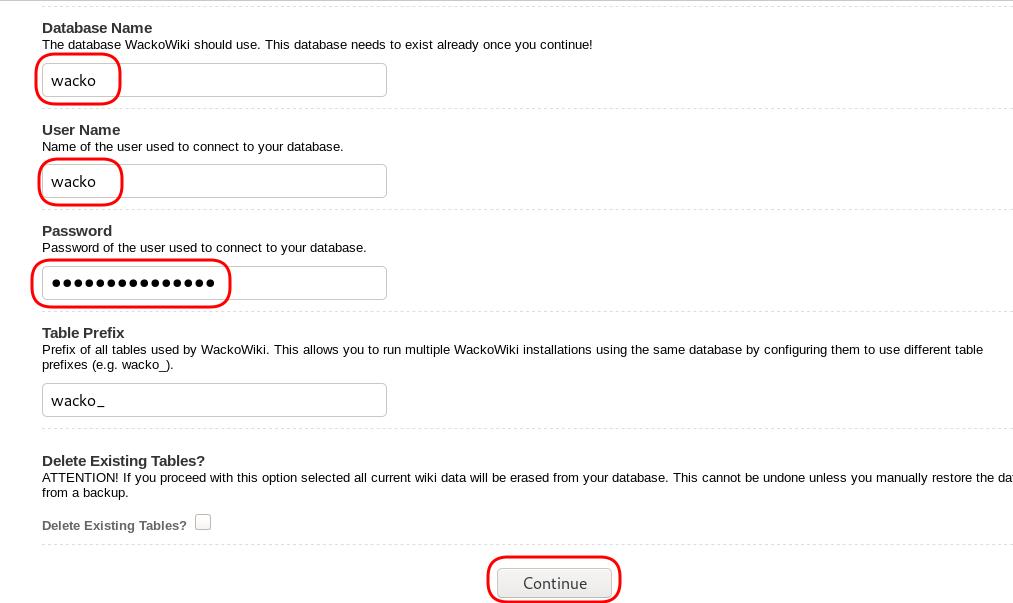
</VirtualHost>MySQL
wacko.sql
CREATE DATABASE IF NOT EXISTS wacko;
CREATE USER 'wacko'@'localhost' IDENTIFIED BY 'YOURNEWPASSWORD';
GRANT  ALL PRIVILEGES ON wacko.* TO 'wacko'@'localhost';
FLUSH  PRIVILEGES;
# mysql < wacko.sql
WackoWiki
curl -sLO https://downloads.sourceforge.net/wackowiki/wacko.r5.5.12.zip
unzip wacko.r5.5.12.zip
mv wacko.r5.5.12/wacko /var/www/html/wacko/
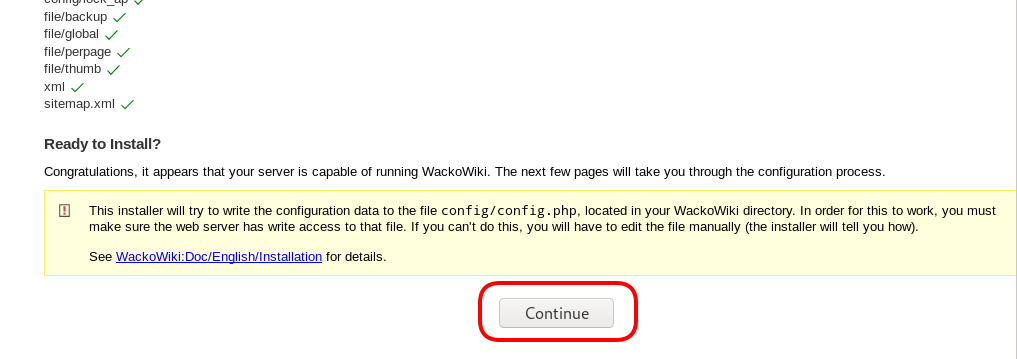
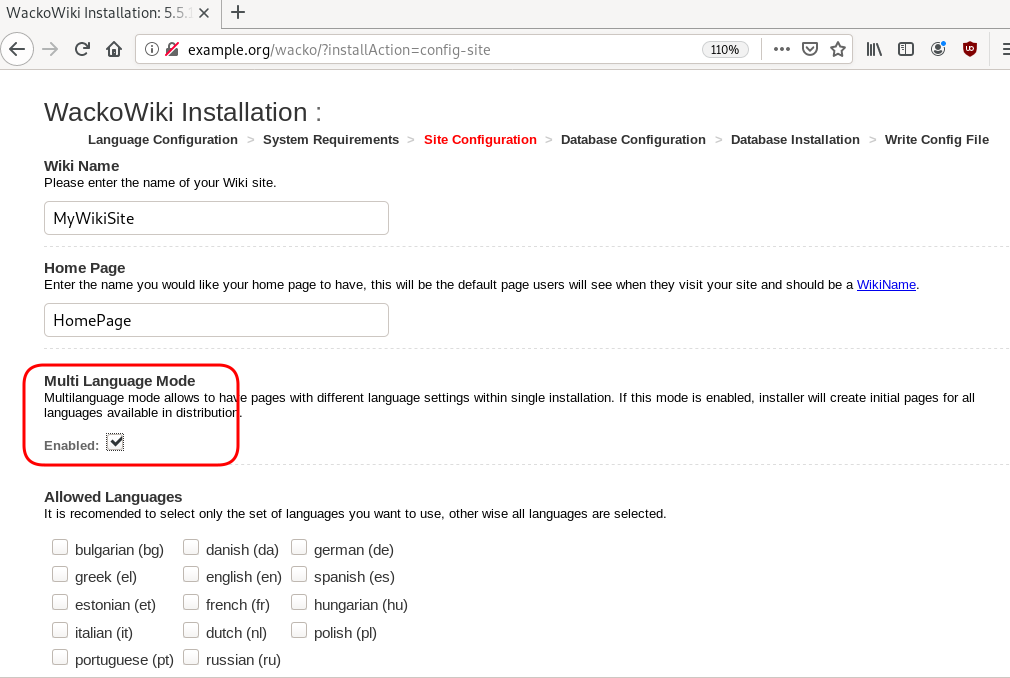
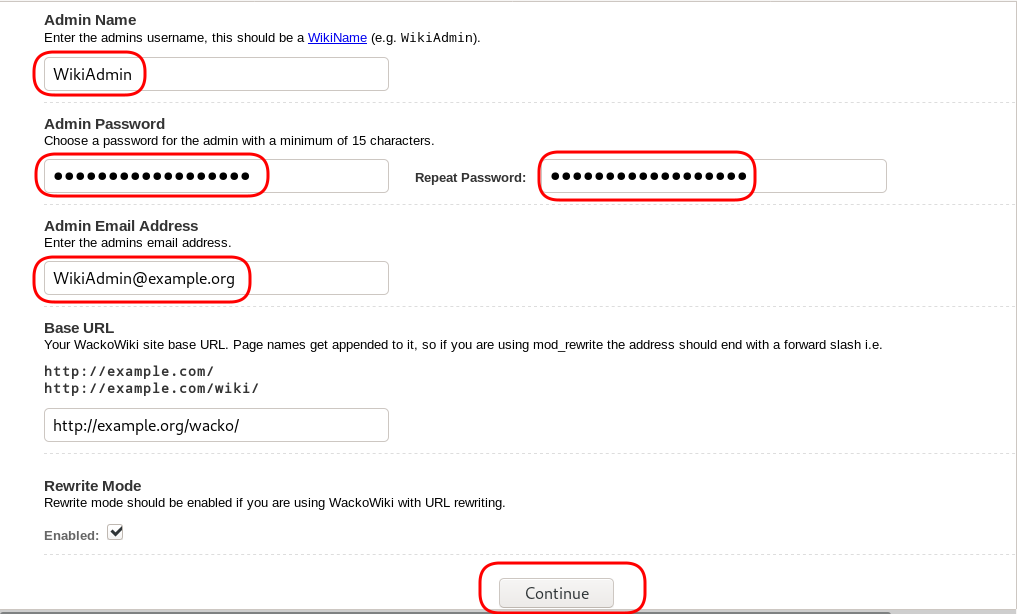
chown -R www-data:www-data /var/www/html/wacko/Web Installation

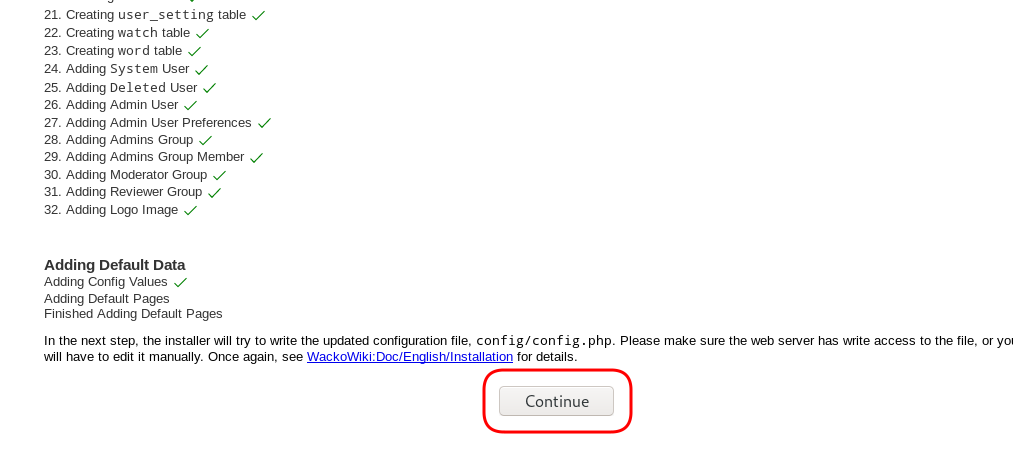
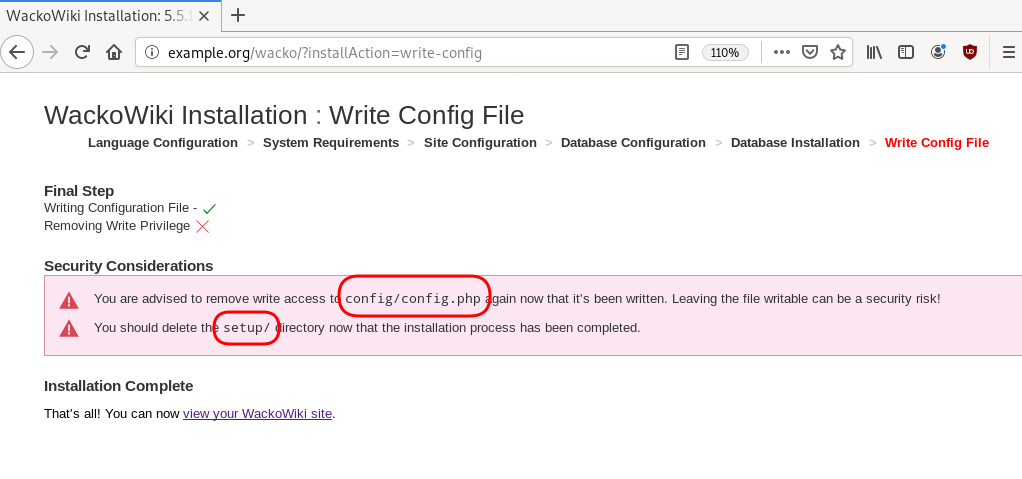
Post Install
Last, we need to remove write permission for the wackowiki configuration file and remove setup folder
root@ubuntu:~# chmod -w /var/www/html/wacko/config/config.php
root@ubuntu:~# mv /var/www/html/wacko/setup/ /var/www/html/._setup
WackoWiki
GitLab is my favorite online git hosting provider, and I really love the CI feature (that now most of the online project providers are also starting supporting it).
Archlinux uses git and you can find everything here: Arch Linux git repositories
There are almost 2500 packages there! There are 6500 in core/extra/community (primary repos) and almost 55k Packages in AUR, the Archlinux User Repository.
We are going to use git to retrieve our PKGBUILD from aur archlinux as an example.
The same can be done with one of the core packages by using the above git repo.
So here is a very simple .gitlab-ci.yml file that we can use to build an archlinux package in gitlab
image: archlinux/base:latest

before_script:
    - export PKGNAME=tallow

run-build:
  stage: build
  artifacts:
    paths:
    - "*.pkg.tar.xz"
    expire_in: 1 week
  script:
      # Create "Bob the Builder" !
    - groupadd bob && useradd -m -c "Bob the Builder" -g bob bob
      # Update archlinux and install git
    - pacman -Syy && pacman -Su --noconfirm --needed git base-devel
      # Git Clone package repository
    - git clone https://aur.archlinux.org/$PKGNAME.git
    - chown -R bob:bob $PKGNAME/
      # Read PKGBUILD
    - source $PKGNAME/PKGBUILD
      # Install Dependencies
    - pacman -Syu --noconfirm --needed --asdeps "${makedepends[@]}" "${depends[@]}"
      # Let Bob the Builder, build package
    - su - bob -s /bin/sh -c "cd $(pwd)/$PKGNAME/ && makepkg"
      # Get artifact
    - mv $PKGNAME/*.pkg.tar.xz ./
You can use this link to verify the above example: tallow at gitlab
But let me explain the steps:
- First we create a user, Bob the Builder as in archlinux we can not use root to build a package for security reasons.
- Then we update our container and install git and base-devel group. This group contains all relevant archlinux packages for building a new one.
- After that, we
git clonethe package repo - Install any dependencies. This is a neat trick that I’ve found in archlinux forum using source command to create shell variables (arrays).
- Now it is time for Bob to build the package !
- and finally, we move the artifact in our local folder
MinIO is a high performance object storage server compatible with Amazon S3 APIs
In a previous article, I mentioned minio as an S3 gateway between my system and backblaze b2. I was impressed by minio. So in this blog post, I would like to investigate the primary use of minio as an S3 storage provider!
Install Minio
Minio, is also software written in Golang. That means we can simple use the static binary executable in our machine.
Download
The latest release of minio is here:
curl -sLO https://dl.min.io/server/minio/release/linux-amd64/minio
chmod +x minio
Version
./minio version
$ ./minio version

Version: 2019-08-01T22:18:54Z
Release-Tag: RELEASE.2019-08-01T22-18-54Z
Commit-ID: c5ac901e8dac48d45079095a6bab04674872b28b
Operating System
Although we can use the static binary from minio’s site, I would propose to install minio through your distribution’s package manager, in Arch Linux is:
$ sudo pacman -S minio
this method, will also provide you, with a simple systemd service unit and a configuration file.
/etc/minio/minio.conf
# Local export path.
MINIO_VOLUMES="/srv/minio/data/"
# Access Key of the server.
# MINIO_ACCESS_KEY=Server-Access-Key
# Secret key of the server.
# MINIO_SECRET_KEY=Server-Secret-Key
# Use if you want to run Minio on a custom port.
# MINIO_OPTS="--address :9199"
Docker
Or if you like docker, you can use docker!
docker pull minio/minio
docker run -p 9000:9000 minio/minio server /data
Standalone
We can run minion as standalone
$ minio server /data
Create a test directory to use as storage:
$ mkdir -pv minio_data/
mkdir: created directory 'minio_data/'
$ /usr/bin/minio server ./minio_data/
┏━━━━━━━━━━━━━━━━━━━━━━━━━━━━━━━━━━━━━━━━━━━━━━━━━━━━━━━━━━━━━━━┓
┃ You are running an older version of MinIO released 1 week ago ┃
┃ Update: Run `minio update`                                    ┃
┗━━━━━━━━━━━━━━━━━━━━━━━━━━━━━━━━━━━━━━━━━━━━━━━━━━━━━━━━━━━━━━━┛

Endpoint:  http://192.168.1.3:9000  http://192.168.42.1:9000  http://172.17.0.1:9000  http://172.18.0.1:9000  http://172.19.0.1:9000  http://192.168.122.1:9000  http://127.0.0.1:9000
AccessKey: KYAS2LSSPXRZFH9P6RHS
SecretKey: qPZnIBJDe6GTRrUWcfdtKk7GPL4fGyqANDzJxkur

Browser Access:
   http://192.168.1.3:9000  http://192.168.42.1:9000  http://172.17.0.1:9000  http://172.18.0.1:9000  http://172.19.0.1:9000  http://192.168.122.1:9000  http://127.0.0.1:9000

Command-line Access: https://docs.min.io/docs/minio-client-quickstart-guide
   $ mc config host add myminio http://192.168.1.3:9000 KYAS2LSSPXRZFH9P6RHS qPZnIBJDe6GTRrUWcfdtKk7GPL4fGyqANDzJxkur

Object API (Amazon S3 compatible):
   Go:         https://docs.min.io/docs/golang-client-quickstart-guide
   Java:       https://docs.min.io/docs/java-client-quickstart-guide
   Python:     https://docs.min.io/docs/python-client-quickstart-guide
   JavaScript: https://docs.min.io/docs/javascript-client-quickstart-guide
   .NET:       https://docs.min.io/docs/dotnet-client-quickstart-guide
Update Minio
okay, our package is from one week ago, but that’s okay. We can overwrite our package build (although not
recommended) with this:
$ sudo curl -sLo /usr/bin/minio https://dl.min.io/server/minio/release/linux-amd64/minio
again, NOT recommended.
Check version
minio version
Version: 2019-08-01T22:18:54Z
Release-Tag: RELEASE.2019-08-01T22-18-54Z
Commit-ID: c5ac901e8dac48d45079095a6bab04674872b28b
minio update
An alternative way, is to use the built-in update method:
$ sudo minio update
┏━━━━━━━━━━━━━━━━━━━━━━━━━━━━━━━━━━━━━━━━━━━━━━━━━━━━━━━━━━━━━━━━━━┓
┃ You are running an older version of MinIO released 5 days ago    ┃
┃ Update: https://dl.min.io/server/minio/release/linux-amd64/minio ┃
┗━━━━━━━━━━━━━━━━━━━━━━━━━━━━━━━━━━━━━━━━━━━━━━━━━━━━━━━━━━━━━━━━━━┛

Update to RELEASE.2019-08-07T01-59-21Z ? [y/n]: y
MinIO updated to version RELEASE.2019-08-07T01-59-21Z successfully.
minio version
Version: 2019-08-07T01:59:21Z
Release-Tag: RELEASE.2019-08-07T01-59-21Z
Commit-ID: 930943f058f01f37cfbc2265d5f80ea7026ec55d
Run minio
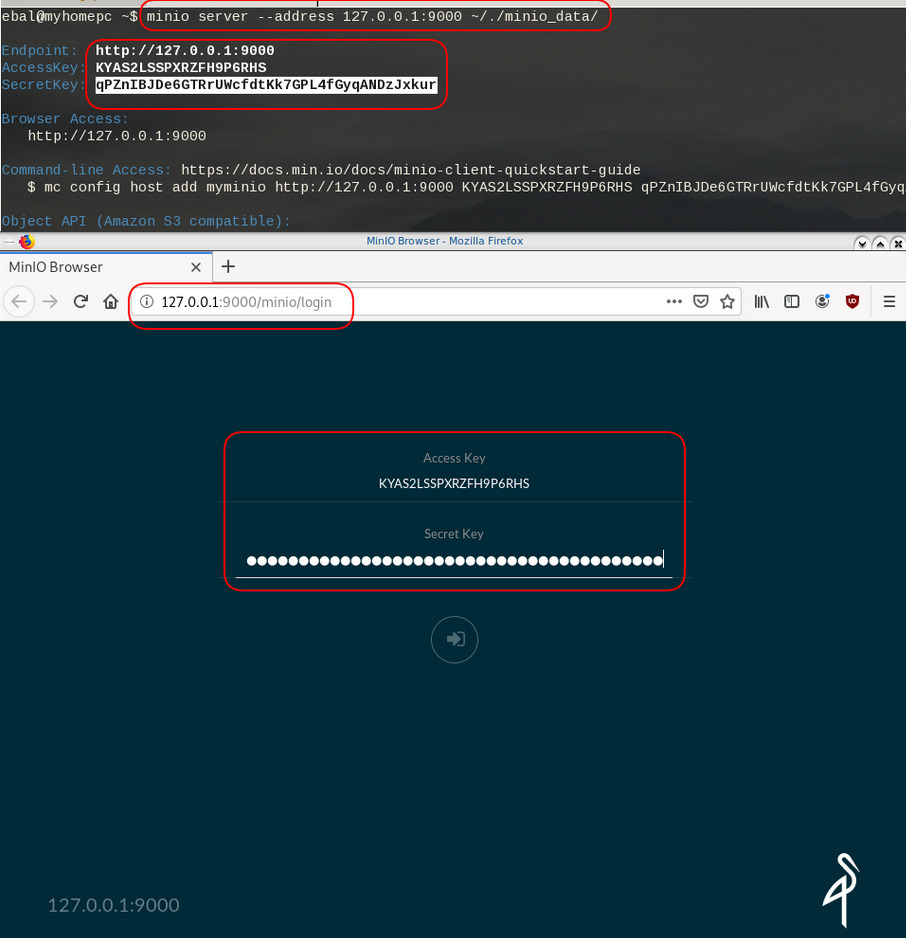
run minion as standalone and localhost (not exposing our system to outside):
minio server --address 127.0.0.1:9000 ~/./minio_data/output
$ minio server --address 127.0.0.1:9000 ~/./minio_data/

Endpoint:  http://127.0.0.1:9000
AccessKey: KYAS2LSSPXRZFH9P6RHS
SecretKey: qPZnIBJDe6GTRrUWcfdtKk7GPL4fGyqANDzJxkur

Browser Access:
   http://127.0.0.1:9000

Command-line Access: https://docs.min.io/docs/minio-client-quickstart-guide
   $ mc config host add myminio http://127.0.0.1:9000 KYAS2LSSPXRZFH9P6RHS qPZnIBJDe6GTRrUWcfdtKk7GPL4fGyqANDzJxkur

Object API (Amazon S3 compatible):
   Go:         https://docs.min.io/docs/golang-client-quickstart-guide
   Java:       https://docs.min.io/docs/java-client-quickstart-guide
   Python:     https://docs.min.io/docs/python-client-quickstart-guide
   JavaScript: https://docs.min.io/docs/javascript-client-quickstart-guide
   .NET:       https://docs.min.io/docs/dotnet-client-quickstart-guide
Web Dashboard
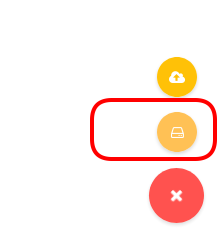
minio comes with it’s own web dashboard!
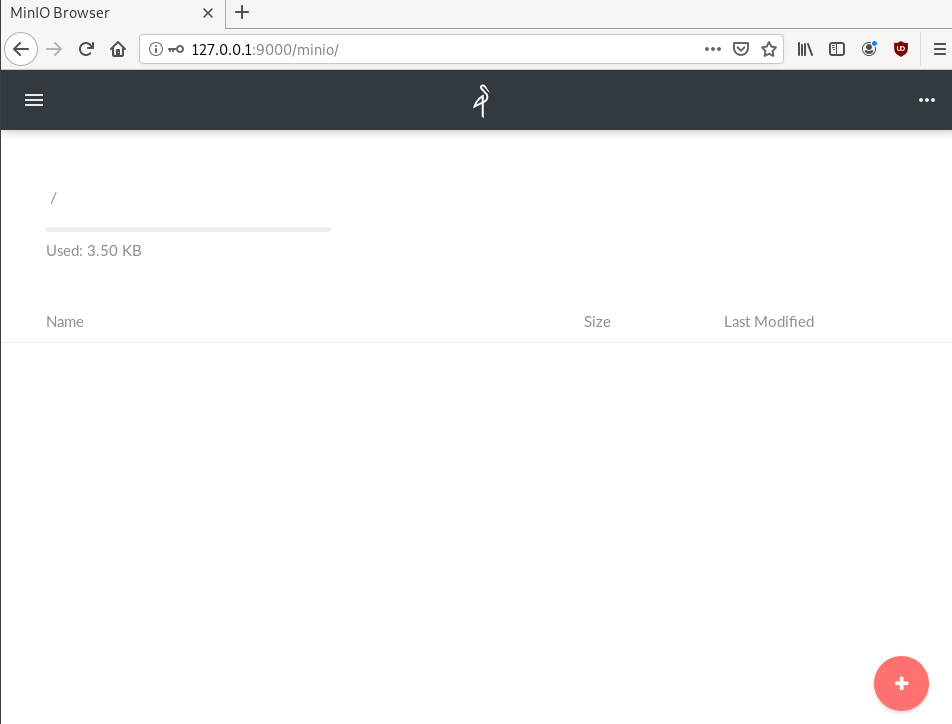
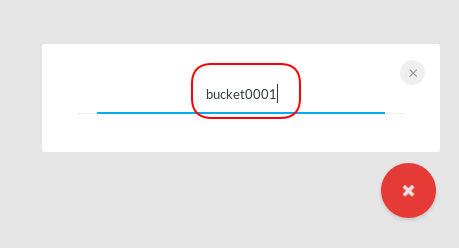
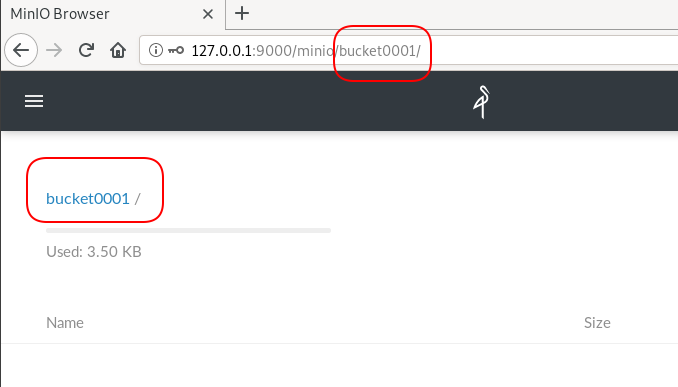
New Bucket
Let’s create a new bucket for testing purposes:

Minio Client
minio comes with it’s own minio client or mc
Install minio client
Binary Download
curl -sLO https://dl.min.io/client/mc/release/linux-amd64/mc
or better through your package manager:
sudo pacman -S minio-client
Access key / Secret Key
Now export our AK/SK in our enviroment
export -p MINIO_ACCESS_KEY=KYAS2LSSPXRZFH9P6RHS
export -p MINIO_SECRET_KEY=qPZnIBJDe6GTRrUWcfdtKk7GPL4fGyqANDzJxkur
minio host
or you can configure the minio server as a host:
./mc config host add myminio http://127.0.0.1:9000 KYAS2LSSPXRZFH9P6RHS qPZnIBJDe6GTRrUWcfdtKk7GPL4fGyqANDzJxkur
I prefer this way, cause I dont have to export keys every time.
List buckets
$ mc ls myminio
[2019-08-05 20:44:42 EEST]      0B bucket0001/

$ mc ls myminio/bucket0001
(empty)
List Policy
mc admin policy list myminio
$ mc admin policy list myminio
readonly
readwrite
writeonly
Credentials
If we do not want to get random Credentials every time, we can define them in our environment:
export MINIO_ACCESS_KEY=admin
export MINIO_SECRET_KEY=password
minio server --address 127.0.0.1:9000 .minio_data{1...10}
with minio client:
$ mc config host add myminio http://127.0.0.1:9000 admin password

mc: Configuration written to `/home/ebal/.mc/config.json`. Please update your access credentials.
mc: Successfully created `/home/ebal/.mc/share`.
mc: Initialized share uploads `/home/ebal/.mc/share/uploads.json` file.
mc: Initialized share downloads `/home/ebal/.mc/share/downloads.json` file.
Added `myminio` successfully.
mc admin config get myminio/ | jq .credential
$ mc admin config get myminio/ | jq .credential
{
  "accessKey": "8RMC49VEC1IHYS8FY29Q",
  "expiration": "1970-01-01T00:00:00Z",
  "secretKey": "AY+IjQZomX6ZClIBJrjgxRJ6ugu+Mpcx6rD+kr13",
  "status": "enabled"
}
s3cmd
Let’s configure s3cmd to use our minio data server:
$ sudo pacman -S s3cmd
Configure s3cmd
s3cmd --configure
$ s3cmd --configure

Enter new values or accept defaults in brackets with Enter.
Refer to user manual for detailed description of all options.

Access key and Secret key are your identifiers for Amazon S3. Leave them empty for using the env variables.
Access Key: KYAS2LSSPXRZFH9P6RHS
Secret Key: qPZnIBJDe6GTRrUWcfdtKk7GPL4fGyqANDzJxkur
Default Region [US]:
Use "s3.amazonaws.com" for S3 Endpoint and not modify it to the target Amazon S3.
S3 Endpoint [s3.amazonaws.com]: http://127.0.0.1:9000Use "%(bucket)s.s3.amazonaws.com" to the target Amazon S3. "%(bucket)s" and "%(location)s" vars can be used
if the target S3 system supports dns based buckets.
DNS-style bucket+hostname:port template for accessing a bucket [%(bucket)s.s3.amazonaws.com]:
Encryption password is used to protect your files from reading
by unauthorized persons while in transfer to S3
Encryption password:
Path to GPG program [/usr/bin/gpg]: When using secure HTTPS protocol all communication with Amazon S3
servers is protected from 3rd party eavesdropping. This method is
slower than plain HTTP, and can only be proxied with Python 2.7 or newer
Use HTTPS protocol [Yes]: nOn some networks all internet access must go through a HTTP proxy.
Try setting it here if you can't connect to S3 directly
HTTP Proxy server name: New settings:
Access Key: KYAS2LSSPXRZFH9P6RHS
Secret Key: qPZnIBJDe6GTRrUWcfdtKk7GPL4fGyqANDzJxkur
Default Region: US
S3 Endpoint: http://127.0.0.1:9000
DNS-style bucket+hostname:port template for accessing a bucket: %(bucket)s.s3.amazonaws.com
Encryption password:
Path to GPG program: /usr/bin/gpg
Use HTTPS protocol: False
HTTP Proxy server name:
HTTP Proxy server port: 0
Test access with supplied credentials? [Y/n] y
Please wait, attempting to list all buckets...
ERROR: Test failed: [Errno -2] Name or service not known
Retry configuration? [Y/n] n
Save settings? [y/N] y
Configuration saved to '/home/ebal/.s3cfg'Test it
$ s3cmd ls
2019-08-05 17:44 s3://bucket0001Distributed
Let’s make a more complex example and test the distributed capabilities of minio
Create folders
mkdir -pv .minio_data{1..10}
$ mkdir -pv .minio_data{1..10}
mkdir: created directory '.minio_data1'
mkdir: created directory '.minio_data2'
mkdir: created directory '.minio_data3'
mkdir: created directory '.minio_data4'
mkdir: created directory '.minio_data5'
mkdir: created directory '.minio_data6'
mkdir: created directory '.minio_data7'
mkdir: created directory '.minio_data8'
mkdir: created directory '.minio_data9'
mkdir: created directory '.minio_data10'Start Server
Be-aware you have to user 3 dots (…) to enable erasure-code distribution (see below).
and start minio server like this:
minio server --address 127.0.0.1:9000 .minio_data{1...10}
$ minio server --address 127.0.0.1:9000 .minio_data{1...10}
Waiting for all other servers to be online to format the disks.
Status: 10 Online, 0 Offline.
Endpoint: http://127.0.0.1:9000
AccessKey: CDSBN216JQR5B3F3VG71
SecretKey: CE+ti7XuLBrV3uasxSjRyhAKX8oxtZYnnEwRU9ik
Browser Access:
http://127.0.0.1:9000
Command-line Access: https://docs.min.io/docs/minio-client-quickstart-guide
$ mc config host add myminio http://127.0.0.1:9000 CDSBN216JQR5B3F3VG71 CE+ti7XuLBrV3uasxSjRyhAKX8oxtZYnnEwRU9ik
Object API (Amazon S3 compatible):
Go: https://docs.min.io/docs/golang-client-quickstart-guide
Java: https://docs.min.io/docs/java-client-quickstart-guide
Python: https://docs.min.io/docs/python-client-quickstart-guide
JavaScript: https://docs.min.io/docs/javascript-client-quickstart-guide
.NET: https://docs.min.io/docs/dotnet-client-quickstart-guideconfigure mc
$ ./mc config host add myminio http://127.0.0.1:9000 WWFUTUKB110NS1V70R27 73ecITehtG2rOF6F08rfRmbF+iqXjNr6qmgAvdb2
Added `myminio` successfully.admin info
mc admin info myminio
$ mc admin info myminio
● 127.0.0.1:9000
Uptime: 3 minutes
Version: 2019-08-07T01:59:21Z
Storage: Used 25 KiB
Drives: 10/10 OK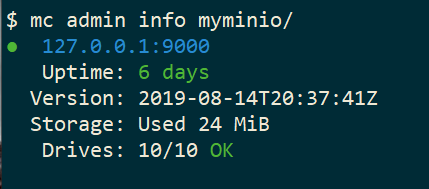
Create files
Creating random files
for i in $(seq 10000) ;do echo $RANDOM > file$i ; done
and by the way, we can use mc to list our local files also!
$ mc ls file* | head
[2019-08-05 21:27:01 EEST] 6B file1
[2019-08-05 21:27:01 EEST] 5B file10
[2019-08-05 21:27:01 EEST] 5B file100
[2019-08-05 21:27:01 EEST] 6B file11
[2019-08-05 21:27:01 EEST] 6B file12
[2019-08-05 21:27:01 EEST] 6B file13
[2019-08-05 21:27:01 EEST] 6B file14
[2019-08-05 21:27:01 EEST] 5B file15
[2019-08-05 21:27:01 EEST] 5B file16Create bucket
mc ls myminio
$ mc mb myminio/bucket0002
Bucket created successfully `myminio/bucket0002`.
$ mc ls myminio
[2019-08-05 21:41:35 EEST] 0B bucket0002/Copy files
mc cp file* myminio/bucket0002/

be patient, even in a local filesystem, it will take a long time.

Erasure Code
copying from MinIO docs
you may lose up to half (N/2) of the total drives
MinIO shards the objects across N/2 data and N/2 parity drives
Here is the
$ du -sh .minio_data*
79M .minio_data1
79M .minio_data10
79M .minio_data2
79M .minio_data3
79M .minio_data4
79M .minio_data5
79M .minio_data6
79M .minio_data7
79M .minio_data8
79M .minio_data9but what size did our files had?
$ du -sh files/
40M filesVery insteresting.
$ tree .minio_data*Here is shorter list, to get an idea how objects are structured: minio_data_tree.txt
$ mc ls myminio/bucket0002 | wc -l
10000
Delete a folder
Let’s see how handles corrupted disks, but before that let’s keep a hash of our files:
md5sum file* > /tmp/files.beforenow remove:
$ rm -rf .minio_data10
$ ls -la
total 0
drwxr-x--- 1 ebal ebal 226 Aug 15 20:25 .
drwx--x---+ 1 ebal ebal 3532 Aug 15 19:13 ..
drwxr-x--- 1 ebal ebal 40 Aug 15 20:25 .minio_data1
drwxr-x--- 1 ebal ebal 40 Aug 15 20:25 .minio_data2
drwxr-x--- 1 ebal ebal 40 Aug 15 20:25 .minio_data3
drwxr-x--- 1 ebal ebal 40 Aug 15 20:25 .minio_data4
drwxr-x--- 1 ebal ebal 40 Aug 15 20:25 .minio_data5
drwxr-x--- 1 ebal ebal 40 Aug 15 20:25 .minio_data6
drwxr-x--- 1 ebal ebal 40 Aug 15 20:25 .minio_data7
drwxr-x--- 1 ebal ebal 40 Aug 15 20:25 .minio_data8
drwxr-x--- 1 ebal ebal 40 Aug 15 20:25 .minio_data9Notice that folder: minio_data10 is not there.
mc admin info myminio/
$ mc admin info myminio/
● 127.0.0.1:9000
Uptime: 6 days
Version: 2019-08-14T20:37:41Z
Storage: Used 57 MiB
Drives: 9/10 OK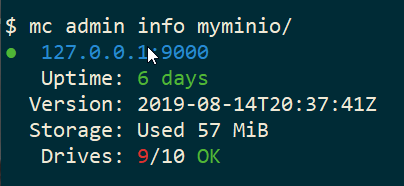
This is the msg in minio server console:
API: SYSTEM()
Time: 20:23:50 EEST 08/15/2019
DeploymentID: 7852c1e1-146a-4ce9-8a05-50ad7b925fef
Error: unformatted disk found
endpoint=.minio_data10
3: cmd/prepare-storage.go:40:cmd.glob..func15.1()
2: cmd/xl-sets.go:212:cmd.(*xlSets).connectDisks()
1: cmd/xl-sets.go:243:cmd.(*xlSets).monitorAndConnectEndpoints()Error: unformatted disk found
We will see that minio will try to create the disk/volume/folder in our system:
$ du -sh .minio_data*
79M .minio_data1
0 .minio_data10
79M .minio_data2
79M .minio_data3
79M .minio_data4
79M .minio_data5
79M .minio_data6
79M .minio_data7
79M .minio_data8
79M .minio_data9Heal
Minio comes with a healing ability:
$ mc admin heal --recursive myminio/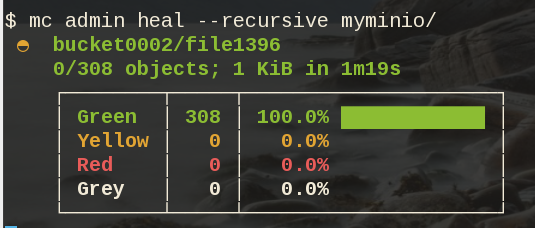
$ du -sh .minio_data*
79M .minio_data1
79M .minio_data10
79M .minio_data2
79M .minio_data3
79M .minio_data4
79M .minio_data5
79M .minio_data6
79M .minio_data7
79M .minio_data8
79M .minio_data9$ mc admin heal --recursive myminio/
◐ bucket0002/file9999
10,000/10,000 objects; 55 KiB in 58m21s
┌────────┬────────┬─────────────────────┐
│ Green │ 10,004 │ 100.0% ████████████ │
│ Yellow │ 0 │ 0.0% │
│ Red │ 0 │ 0.0% │
│ Grey │ 0 │ 0.0% │
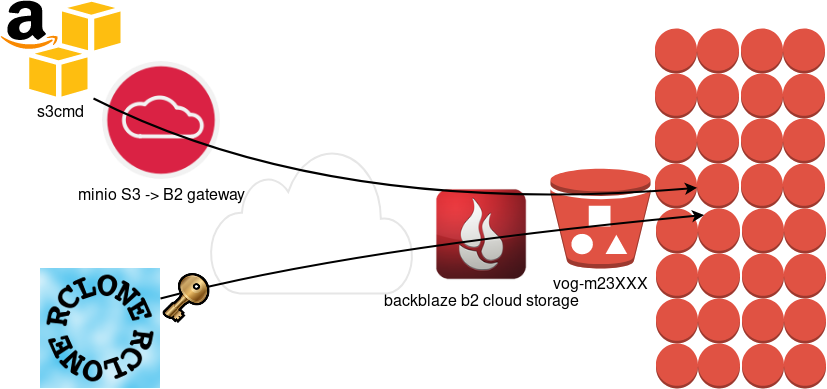
└────────┴────────┴─────────────────────┘- Backblaze - Cloud Storage Backup
- rclone - rsync for cloud storage
- MinIO - Object Storage cloud storage software
- s3cmd - Command Line S3 Client
In this blog post, I will try to write a comprehensive guide on how to use cloud object storage for backup purposes.
Goal
What is Object Storage
In a nutshell object storage software uses commodity hard disks in a distributed way across a cluster of systems.
Why using Object Storage
The main characteristics of object storage are:
- Scalability
- Reliability
- Efficiency
- Performance
- Accessibility
Scalability
We can immediately increase our storage by simple adding new commodity systems in our infrastructure to scale up our storage needs, as we go.
Reliability
As we connect more and more systems, we can replicate our data across all of them. We can choose how many copies we would like to have or in which systems we would like to have our replicated data. Also (in most cases) a self-healing mechanism is running in the background to preserve our data from corruption.
Efficiency
By not having a single point of failure in a distributed system, we can reach high throughput across our infrastructure.
Performance
As data are being dispersed across disks and systems, improves read and write performance. Reduces any bottleneck as we can get objects from different places in a psedoparalleler way to construct our data.
Accessibility
Accessing data through a REST API (aka endpoint) using tokens. We can define specific permissions to users or applications and/or we can separate access by creating different keys. We can limit read, write, list, delete or even share specific objects with limited keys!
Backblaze - Cloud Storage Backup
There are a lot of cloud data storage provider. A lot!
When choosing your storage provider, you need to think a couple of things:
- Initial data size
- Upload/Sync files (delta size)
- Delete files
- Download files
Every storage provider have different prices for every read/write/delete/share operation. Your needs will define who is the best provider for you. My plan, is to use cloud storage as archive-backups. That means I need to make an initial upload and after that, frequently sync my files there. But I do NOT need them immediately. This is the backup of my backup in case my primary site is down (or corrupted, or broken, or stolen, or seized, or whatever). I have heard really good words about backblaze and their pricing model suits me.
Create an Account
Create an account and enable Backblaze B2 Cloud Storage. This option will also enable Multi Factor Authentication (MFA) by adding a TOTP in your mobile app or use SMS (mobile phone is required) as a fallback. This is why it is called Multi-Factor, because you can need more than one way to login. Also this is the way that Backblaze can protect themselves of people creating multiple accounts and get 10G free storage for every account.
B2 Cloud Storage
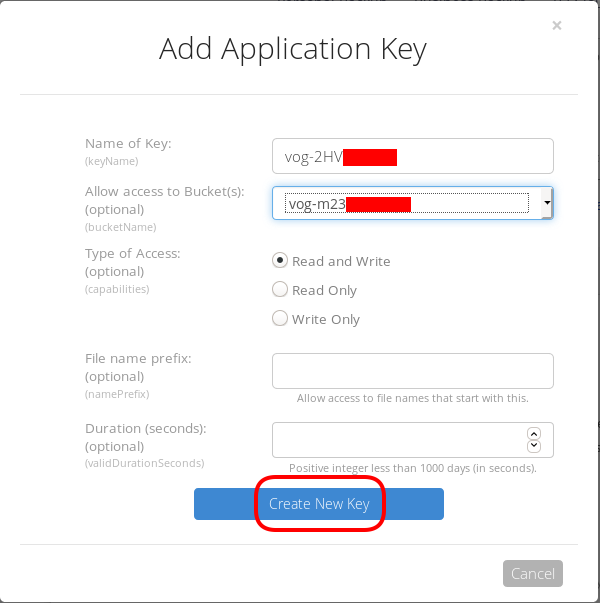
You will see a Master application key. Create a New Application Key.
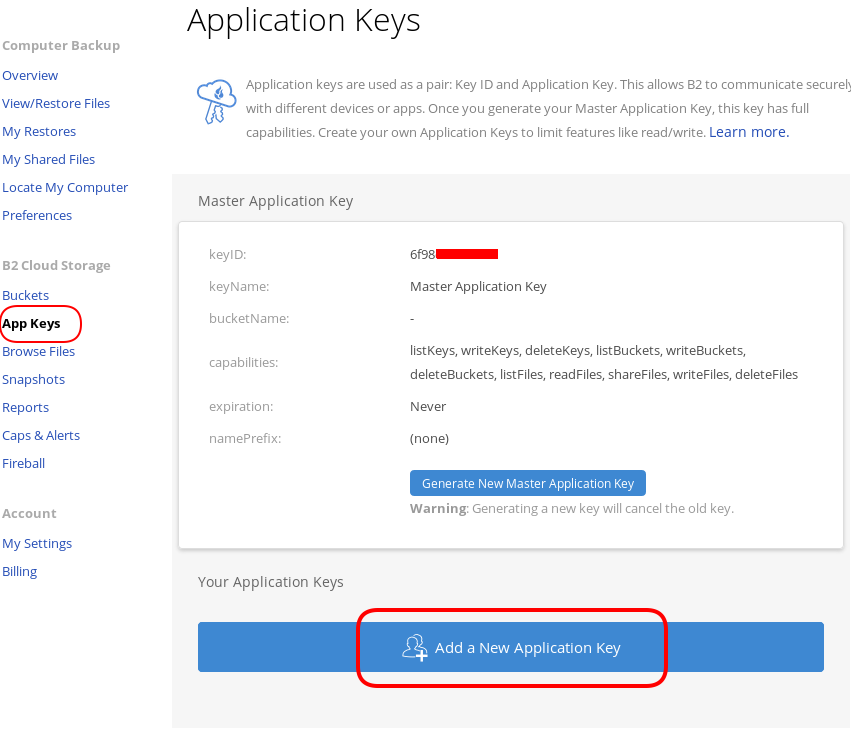
I already have created a New Bucket and I want to give explicit access to this new Application Key.
Now, the important step (the one that I initial did wrong!).
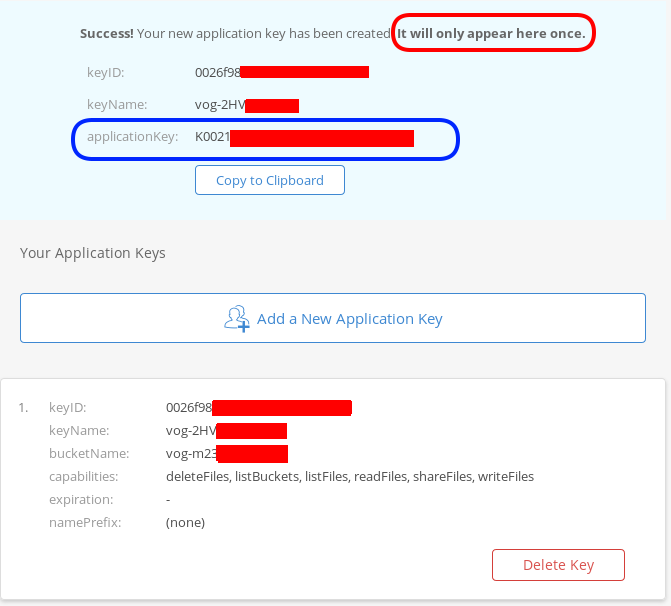
The below screen will be visible ONLY ONE time!
Copy the application key (marked in the blue rectangle).
If you lose this key, you need to delete it and create a new one from the start.
That’s it, pretty much we are done with backblaze!
Rclone
rsync for cloud storage
Next it is time to install and configure rclone. Click here to read the online documentation of rclone on backblaze. Rclone is a go static binary build application, that means you do not have to install or use it as root!
Install Rclone
I will use the latest version of rclone:
curl -sLO https://downloads.rclone.org/rclone-current-linux-amd64.zip
unzip rclone-current-linux-amd64.zip
cd rclone-*linux-amd64/$ ./rclone version
rclone v1.48.0
- os/arch: linux/amd64
- go version: go1.12.6Configure Rclone
You can configure rclone with this command:
./rclone config
but for this article I will follow a more shorter procedure:
Create an empty file under
mkdir -pv ~/.config/rclone/
$ cat > ~/.config/rclone/rclone.conf <<EOF
[remote]
type = b2
account = 0026f98XXXXXXXXXXXXXXXXXX
key = K0021XXXXXXXXXXXXXXXXXXXXXXXXXX
hard_delete = true
EOFReplace acount and key with your own backblaze application secrets
- KeyID
- ApplicationKey
In our configuration, the name of backblaze b2 cloud storage is remote.
Test Rclone
We can test rclone with this:
./rclone lsd remote:
$ ./rclone lsd remote:
-1 2019-08-03 22:01:05 -1 vog-m23XXXXXif we see our bucket name, then everything is fine.
A possible error
401 bad_auth_token
In my first attempt, I did not save the applicationKey when I created the new pair of access keys. So I put the wrong key in the rclone configuration! So be careful, if you see this error, just delete your application key and create a new one.
Rclone Usage
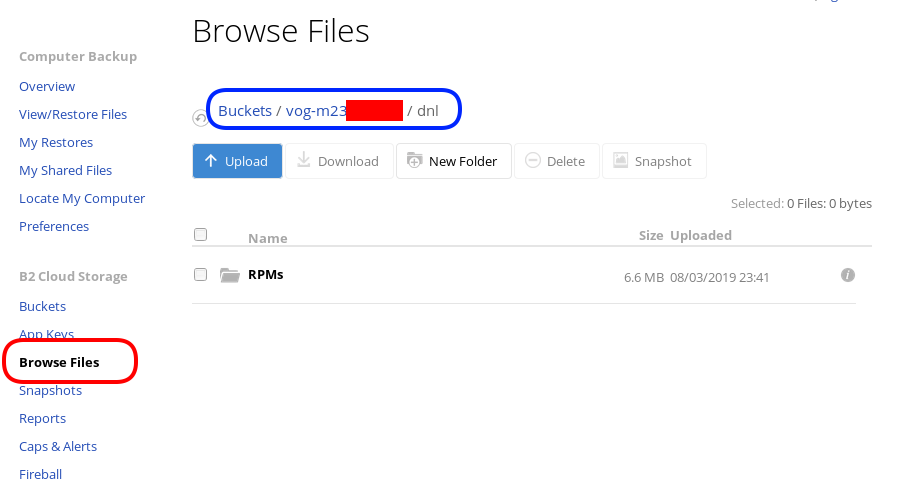
Let’s copy/sync a directory to see if everything is working as advertised:
rclone sync dnl/ remote:vog-m23XXXXX/dnl/from our browser:
Delete Files
rclone delete remote:vog-m23XXXXX/dnl
rclone purge remote:vog-m23XXXXX/dnlList Files
rclone ls remote:vog-m23XXXXX
(empty)
rclone tree remote:vog-m23XXXXX
/
0 directories, 0 filesRclone Crypt
Of course we want to have encrypted backups on the cloud. Read this documentation for more info: Crypt.
We need to re-configure rclone so that can encrypt our files before passing them to our data storage provider.
rclone config
Our remote b2 is already there:
$ rclone config
Current remotes:
Name Type
==== ====
remote b2
e) Edit existing remote
n) New remote
d) Delete remote
r) Rename remote
c) Copy remote
s) Set configuration password
q) Quit config
e/n/d/r/c/s/q>New Remote
n to create a new remote, and I will give encrypt as it’s name.
e/n/d/r/c/s/q> n
name> encrypt
Type of storage to configure.
Enter a string value. Press Enter for the default ("").
Choose a number from below, or type in your own valueCrypt Module
We choose: crypt module:
...
9 / Encrypt/Decrypt a remote
"crypt"
...
Storage> 9
** See help for crypt backend at: https://rclone.org/crypt/ **
Remote to encrypt/decrypt.
Normally should contain a ':' and a path, eg "myremote:path/to/dir",
"myremote:bucket" or maybe "myremote:" (not recommended).
Enter a string value. Press Enter for the default ("").Remote Bucket Name
We also need to give a name, so rclone can combine crypt with b2 module.
I will use my b2-bucket name for this:
remote:vog-m23XXXXX
Remote to encrypt/decrypt.
Normally should contain a ':' and a path, eg "myremote:path/to/dir",
"myremote:bucket" or maybe "myremote:" (not recommended).
Enter a string value. Press Enter for the default ("").
remote> remote:vog-m23XXXXXEncrypt the filenames
Yes, we want rclone to encrypt our filenames
How to encrypt the filenames.
Enter a string value. Press Enter for the default ("standard").
Choose a number from below, or type in your own value
1 / Don't encrypt the file names. Adds a ".bin" extension only.
"off"
2 / Encrypt the filenames see the docs for the details.
"standard"
3 / Very simple filename obfuscation.
"obfuscate"
filename_encryption> 2Encrypt directory names
Yes, those too
Option to either encrypt directory names or leave them intact.
Enter a boolean value (true or false). Press Enter for the default ("true").
Choose a number from below, or type in your own value
1 / Encrypt directory names.
"true"
2 / Don't encrypt directory names, leave them intact.
"false"
directory_name_encryption> 1Password or pass phrase for encryption
This will be an automated backup script in the end, so I will use random password for this step, with 256 bits and no salt.
Password or pass phrase for encryption.
y) Yes type in my own password
g) Generate random password
n) No leave this optional password blank
y/g/n> g
Password strength in bits.
64 is just about memorable
128 is secure
1024 is the maximum
Bits> 256
Your password is: VE64tx4zlXXXXXXXXXXXXXXXXXXXXXXXXXXXXXXXXXX
Use this password? Please note that an obscured version of this
password (and not the password itself) will be stored under your
configuration file, so keep this generated password in a safe place.
y) Yes
n) No
y/n> y
Password or pass phrase for salt. Optional but recommended.
Should be different to the previous password.
y) Yes type in my own password
g) Generate random password
n) No leave this optional password blank
y/g/n> n
Keep in your password manager this password:
VE64tx4zlXXXXXXXXXXXXXXXXXXXXXXXXXXXXXXXXXX
In your setup will be something completly different.
Saving configuration
No need of advanced configuration, review your rclone config and save it.
Edit advanced config? (y/n)
y) Yes
n) No
y/n> nRemote config
--------------------
[encrypt]
type = crypt
remote = remote:vog-m23XXXXX
filename_encryption = standard
directory_name_encryption = true
password = *** ENCRYPTED ***
--------------------
y) Yes this is OK
e) Edit this remote
d) Delete this remote
y/e/d> yCurrent remotes:
Name Type
==== ====
encrypt crypt
remote b2
e) Edit existing remote
n) New remote
d) Delete remote
r) Rename remote
c) Copy remote
s) Set configuration password
q) Quit config
e/n/d/r/c/s/q> qRclone Encrypt Sync
Now let’s see if this crypt modules is working:
rclone sync dnl/ encrypt:
List of encrypted files
rclone ls remote:vog-m23XXXXX
78 germrc3i2lisdd9iutvmbmtt8g
241188 p8jmes5qcpj3lka398vb8qril4/1pg9mb8gca05scmkg8nn86tgse3905trubkeah8t75dd97a7e2caqgo275uphgkj95p78e4i3rejm
6348676 p8jmes5qcpj3lka398vb8qril4/ehhjp4k6bdueqj9arveg4liaameh0qu55oq6hsmgne4nklg83o0d149b9cdc5oq3c0otlivjufk0o
27040 p8jmes5qcpj3lka398vb8qril4/tsiuegm9j7nghheualtbutg4m3r65blqbdn03cdaipnjsnoq0fh26eno22f79fhl1re3m5kiqjfnu
rclone tree remote:vog-m23XXXXX
/
├── germrc3i2lisdd9iutvmbmtt8g
└── p8jmes5qcpj3lka398vb8qril4
├── 1pg9mb8gca05scmkg8nn86tgse3905trubkeah8t75dd97a7e2caqgo275uphgkj95p78e4i3rejm
├── ehhjp4k6bdueqj9arveg4liaameh0qu55oq6hsmgne4nklg83o0d149b9cdc5oq3c0otlivjufk0o
└── tsiuegm9j7nghheualtbutg4m3r65blqbdn03cdaipnjsnoq0fh26eno22f79fhl1re3m5kiqjfnu
1 directories, 4 filesBackblaze dashboard
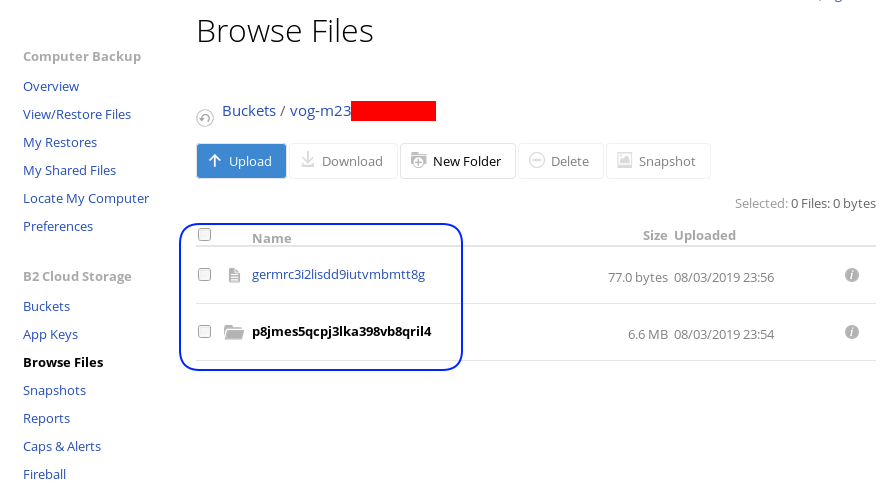
Encrypted file
But is it indeed encrypted or just is it only the file name ?
In our system the content of file1 are:
# cat dnl/file1
Sun Aug 4 00:01:54 EEST 2019If we download this file:
$ cat /tmp/germrc3i2lisdd9iutvmbmtt8g
RCLONENc�s��w�YF��r,O�S�"���U?���>ȘDh�3-�'/5��k��g�x'5yz�i� � H��
Rclone Sync Script
Here is my personal rclone sync script: rclone.sh
#!/bin/sh
# ebal, Sun, 04 Aug 2019 16:33:14 +0300
# Create Rclone Log Directory
mkdir -p /var/log/rclone/`date +%Y`/`date +%m`/`date +%d`/
# Compress previous log file
gzip /var/log/rclone/`date +%Y`/`date +%m`/`date +%d`/*
# Define current log file
log_file="/var/log/rclone/`date +%Y`/`date +%m`/`date +%d`/`hostname -f`-`date +%Y%m%d_%H%M`.log"
# Filter out - exclude dirs & files that we do not need
filter_f="/root/.config/rclone/filter-file.txt"
# Sync !
/usr/local/bin/rclone
--quiet
--delete-before
--ignore-existing
--links
--filter-from $filter_f
--log-file $log_file
sync / encrypt:/`hostname -f`/
and this is what I am filtering out (exclude):
- /dev/**
- /lost+found/**
- /media/**
- /mnt/**
- /proc/**
- /run/**
- /swap.img
- /swapfile
- /sys/**
- /tmp/**
- /var/tmp/**MinIO
MinIO is a high performance object storage server compatible with Amazon S3 APIs
Most of the online cloud object storage data providers (and applications) are S3 compatible. Amazon S3 or Amazon Simple Storage Service is the de-facto on object storage and their S3 API (or driver) is being used by many applications.
B2 Cloud Storage API Compatible with Amazon S3
Backblaze is using a REST-API but it is not S3 compatible. So in case your application can only talk via S3, we need a translator from S3 <--> B2 thus we need Minio, as an S3 Compatible Object Storage driver Gateway!
Install Minio
Minio is also a go software!
curl -sLO https://dl.min.io/server/minio/release/linux-amd64/minio
chmod +x minio./minio version
$ ./minio version
Version: 2019-08-01T22:18:54Z
Release-Tag: RELEASE.2019-08-01T22-18-54Z
Commit-ID: c5ac901e8dac48d45079095a6bab04674872b28bConfigure Minio
actually no configuration needed, just export Access/Sercet keys to local environment:
export -p MINIO_ACCESS_KEY=0026f98XXXXXXXXXXXXXXXXXX
export -p MINIO_SECRET_KEY=K0021XXXXXXXXXXXXXXXXXXXXXXXXXXRun Minio S3 gateway
./minio gateway b2
$ ./minio gateway b2
Endpoint: http://93.184.216.34:9000 http://127.0.0.1:9000
AccessKey: 0026f98XXXXXXXXXXXXXXXXXX
SecretKey: K0021XXXXXXXXXXXXXXXXXXXXXXXXXX
Browser Access:
http://93.184.216.34:9000 http://127.0.0.1:9000
Command-line Access: https://docs.min.io/docs/minio-client-quickstart-guide
$ mc config host add myb2 http://93.184.216.34:9000 0026f98XXXXXXXXXXXXXXXXXX K0021XXXXXXXXXXXXXXXXXXXXXXXXXX
Object API (Amazon S3 compatible):
Go: https://docs.min.io/docs/golang-client-quickstart-guide
Java: https://docs.min.io/docs/java-client-quickstart-guide
Python: https://docs.min.io/docs/python-client-quickstart-guide
JavaScript: https://docs.min.io/docs/javascript-client-quickstart-guide
.NET: https://docs.min.io/docs/dotnet-client-quickstart-guideWeb Dashboard
Minio comes with it’s own web-ui dashboard!
How awesome is this ?
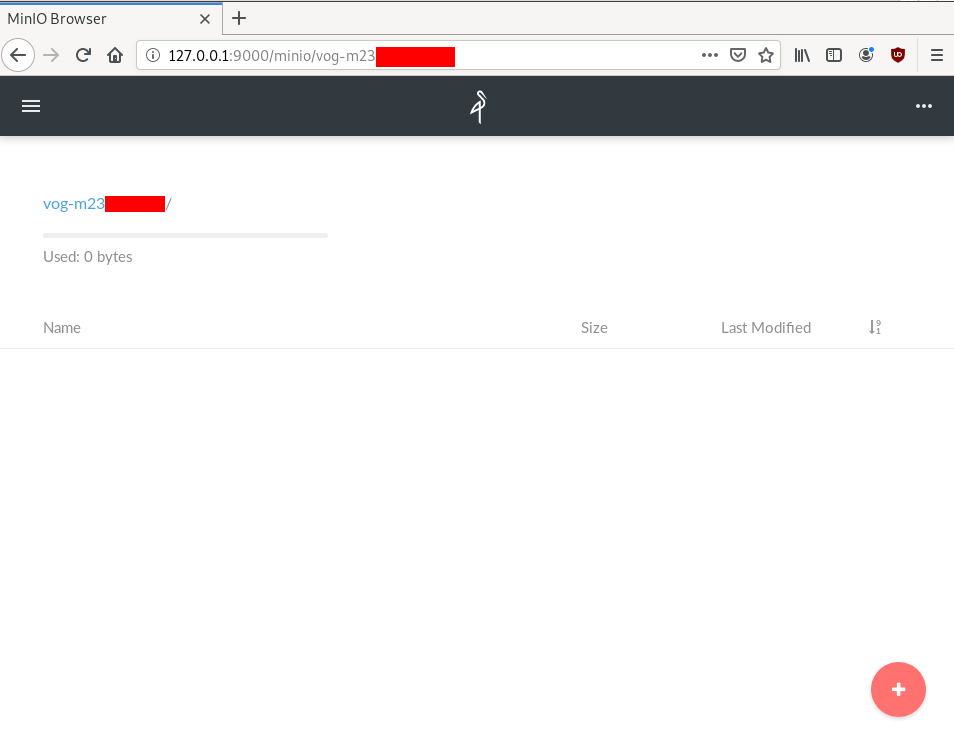
S3cmd
The most common S3 command line tool is a python program named: s3cmd
It (probable) already exists in your package manager and you can install it.
On a rpm-based system:
yum -y install s3cmdOn a deb-based system:
apt -y install s3cmdyou can also install it via pip or even inside a virtualenv
pip install s3cmd
Configure s3cmd
We need to configre s3cmd, by running:
s3cmd --configure
$ s3cmd --configure
Enter new values or accept defaults in brackets with Enter.
Refer to user manual for detailed description of all options.
Access key and Secret key are your identifiers for Amazon S3. Leave them empty for using the env variables.
Access Key: 0026f98XXXXXXXXXXXXXXXXXX
Secret Key: K0021XXXXXXXXXXXXXXXXXXXXXXXXXX
Default Region [US]:Use "s3.amazonaws.com" for S3 Endpoint and not modify it to the target Amazon S3.
S3 Endpoint [s3.amazonaws.com]: http://127.0.0.1:9000
Use "%(bucket)s.s3.amazonaws.com" to the target Amazon S3. "%(bucket)s" and "%(location)s" vars can be used
if the target S3 system supports dns based buckets.
DNS-style bucket+hostname:port template for accessing a bucket [%(bucket)s.s3.amazonaws.com]:

Encryption password is used to protect your files from reading
by unauthorized persons while in transfer to S3
Encryption password:
Path to GPG program [/usr/bin/gpg]:
When using secure HTTPS protocol all communication with Amazon S3
servers is protected from 3rd party eavesdropping. This method is
slower than plain HTTP, and can only be proxied with Python 2.7 or newer
Use HTTPS protocol [Yes]: n
On some networks all internet access must go through a HTTP proxy.
Try setting it here if you can't connect to S3 directly
HTTP Proxy server name:
New settings:
Access Key: 0026f98XXXXXXXXXXXXXXXXXX
Secret Key: K0021XXXXXXXXXXXXXXXXXXXXXXXXXX
Default Region: US
S3 Endpoint: http://127.0.0.1:9000
DNS-style bucket+hostname:port template for accessing a bucket: %(bucket)s.s3.amazonaws.com
Encryption password:
Path to GPG program: /usr/bin/gpg
Use HTTPS protocol: False
HTTP Proxy server name:
HTTP Proxy server port: 0
Test access with supplied credentials? [Y/n] n
Save settings? [y/N] y
Configuration saved to '/home/ebal/.s3cfg'Summarize Config
To summarize, these are the settings we need to type, everything else can be default:
Access Key: 0026f98XXXXXXXXXXXXXXXXXX
Secret Key: K0021XXXXXXXXXXXXXXXXXXXXXXXXXX
S3 Endpoint [s3.amazonaws.com]: http://127.0.0.1:9000
Use HTTPS protocol [Yes]: n
Test s3cmd
$ s3cmd ls
1970-01-01 00:00  s3://vog-m23XXX
s4cmd
Super S3 command line tool
Notable mention: s4cmd
s4cmd is using Boto 3, an S3 SDK for python. You can build your own application, using S3 as backend storage with boto.
$ pip search s4cmd
s4cmd (2.1.0)  - Super S3 command line tool

$ pip install s4cmd
Configure s4cmd
If you have already configure s3cmd, then s4cmd will read the same config file. But you can also just export these enviroment variables and s4cmd will use them:
export -p S3_ACCESS_KEY=0026f98XXXXXXXXXXXXXXXXXX
export -p S3_SECRET_KEY=K0021XXXXXXXXXXXXXXXXXXXXXXXXXX
Run s4cmd
s4cmd --endpoint-url=http://127.0.0.1:9000 ls
$ s4cmd --endpoint-url=http://127.0.0.1:9000 ls
1970-01-01 00:00 DIR s3://vog-m23XXXXX/
SSH Local Port Forwarding
You can also use s3cmd/s4cmd or any other S3 compatible software from another machine if you can bring minio gateway local.
You can do this by running a ssh command:
ssh -L 9000:127.0.0.1:9000 <remote_machine_that_runs_minio_gateway>
DSVPN is designed to address the most common use case for using a VPN
Works with TCP, blocks IPv6 leaks, redirect-gateway out-of-the-box!
last updated: 20190810
- iptables rules example added
- change vpn.key to dsvpn.key
- add base64 example for easy copy/transfer across machines
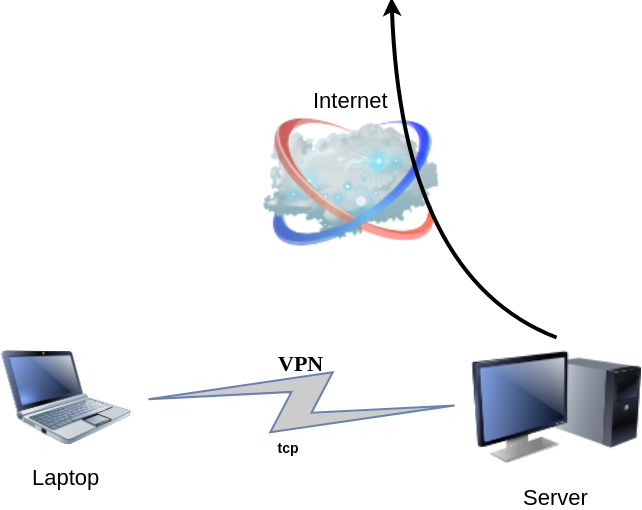
dsvpn binary
I keep a personal gitlab CI for dsvpn here: DSVPN
Compile
Notes on the latest ubuntu:18.04 docker image:
# git clone https://github.com/jedisct1/dsvpn.git
Cloning into 'dsvpn'...
remote: Enumerating objects: 88, done.
remote: Counting objects: 100% (88/88), done.
remote: Compressing objects: 100% (59/59), done.
remote: Total 478 (delta 47), reused 65 (delta 29), pack-reused 390
Receiving objects: 100% (478/478), 93.24 KiB | 593.00 KiB/s, done.
Resolving deltas: 100% (311/311), done.

# cd dsvpn

# ls
LICENSE  Makefile  README.md  include  logo.png  src

# make
cc -march=native -Ofast -Wall -W -Wshadow -Wmissing-prototypes -Iinclude -o dsvpn src/dsvpn.c src/charm.c src/os.c
strip dsvpn

# ldd dsvpn
linux-vdso.so.1 (0x00007ffd409ba000)
libc.so.6 => /lib/x86_64-linux-gnu/libc.so.6 (0x00007fd78480b000)
/lib64/ld-linux-x86-64.so.2 (0x00007fd784e03000)

# ls -l dsvpn
-rwxr-xr-x 1 root root 26840 Jul 20 15:51 dsvpn
Just copy the dsvpn binary to your machines.
Symmetric Key
dsvpn uses symmetric-key cryptography, that means both machines uses the same encyrpted key.
dd if=/dev/urandom of=dsvpn.key count=1 bs=32
Copy the key to both machines using a secure media, like ssh.
base64
An easy way is to convert key to base64
cat dsvpn.key | base64
ZqMa31qBLrfjjNUfhGj8ADgzmo8+FqlyTNJPBzk/x4k=on the other machine:
echo ZqMa31qBLrfjjNUfhGj8ADgzmo8+FqlyTNJPBzk/x4k= | base64 -d > dsvpn.key
Server
It is very easy to run dsvpn in server mode:
eg.
dsvpn server dsvpn.key auto
Interface: [tun0]
net.ipv4.ip_forward = 1
Listening to *:443
ip addr show tun0
4: tun0: <POINTOPOINT,MULTICAST,NOARP,UP,LOWER_UP> mtu 9000 qdisc fq_codel state UNKNOWN group default qlen 500
    link/none
    inet 192.168.192.254 peer 192.168.192.1/32 scope global tun0
       valid_lft forever preferred_lft forever
I prefer to use 10.8.0.0/24 CIDR in my VPNs, so in my VPN setup:
dsvpn server /root/dsvpn.key auto 443 auto 10.8.0.254 10.8.0.2
Using 10.8.0.254 as the VPN Server IP.
systemd service unit - server
I’ve created a simple systemd script dsvpn_server.service
or you can copy it from here:
/etc/systemd/system/dsvpn.service
[Unit]
Description=Dead Simple VPN - Server

[Service]
ExecStart=/usr/local/bin/dsvpn server /root/dsvpn.key auto 443 auto 10.8.0.254 10.8.0.2
Restart=always
RestartSec=20

[Install]
WantedBy=network.target
and then:
systemctl enable dsvpn.service
systemctl  start dsvpn.service
Client
It is also easy to run dsvpn in client mode:
eg.
dsvpn client dsvpn.key 93.184.216.34
# dsvpn client dsvpn.key 93.184.216.34
Interface: [tun0]
Trying to reconnect
Connecting to 93.184.216.34:443...
net.ipv4.tcp_congestion_control = bbr
Connected
ip addr show tun0
4: tun0: <POINTOPOINT,MULTICAST,NOARP,UP,LOWER_UP> mtu 9000 qdisc fq_codel state UNKNOWN group default qlen 500
    link/none
    inet 192.168.192.1 peer 192.168.192.254/32 scope global tun0
       valid_lft forever preferred_lft forever
dsvpn works in redict-gateway mode,
so it will apply routing rules to pass all the network traffic through the VPN.
ip route list
0.0.0.0/1 via 192.168.192.254 dev tun0
default via 192.168.122.1 dev eth0 proto static
93.184.216.34 via 192.168.122.1 dev eth0
128.0.0.0/1 via 192.168.192.254 dev tun0
192.168.122.0/24 dev eth0 proto kernel scope link src 192.168.122.69
192.168.192.254  dev tun0 proto kernel scope link src 192.168.192.1
As I mentioned above, I prefer to use 10.8.0.0/24 CIDR in my VPNs, so in my VPN client:
dsvpn client /root/dsvpn.key 93.184.216.34 443 auto 10.8.0.2 10.8.0.254
Using 10.8.0.2 as the VPN Client IP.
ip addr show tun0
11: tun0: <POINTOPOINT,MULTICAST,NOARP,UP,LOWER_UP> mtu 9000 qdisc fq_codel state UNKNOWN group default qlen 500
    link/none
    inet 10.8.0.2 peer 10.8.0.254/32 scope global tun0
       valid_lft forever preferred_lft forever
systemd service unit - client
I’ve also created a simple systemd script for the client dsvpn_client.service
or you can copy it from here:
/etc/systemd/system/dsvpn.service
[Unit]
Description=Dead Simple VPN - Client

[Service]
ExecStart=/usr/local/bin/dsvpn client /root/dsvpn.key 93.184.216.34 443 auto 10.8.0.2 10.8.0.254
Restart=always
RestartSec=20

[Install]
WantedBy=network.target
and then:
systemctl enable dsvpn.service
systemctl  start dsvpn.service
and here is an MTR from the client:
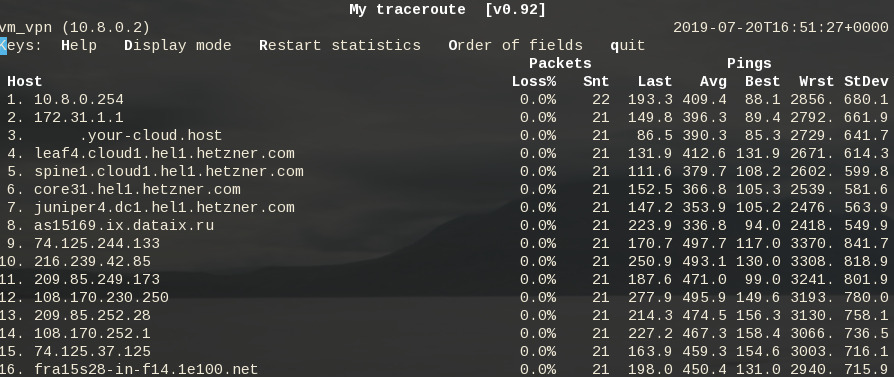
Enjoy !
firewall
It is important to protect your traffic from network leaks. That mean, sometimes, we do not want our network traffic to pass through our provider if the vpn server/client went down. To prevent any network leak, here is an example of iptables rules for a virtual machine:
# Empty iptables rule file
*filter
:INPUT   ACCEPT [0:0]
:FORWARD ACCEPT [0:0]
:OUTPUT  ACCEPT [0:0]

-A INPUT -i lo -j ACCEPT
-A INPUT -m conntrack --ctstate RELATED,ESTABLISHED -j ACCEPT
-A INPUT -m conntrack --ctstate INVALID -j DROP
-A INPUT -p icmp --icmp-type 8 -m conntrack --ctstate NEW -j ACCEPT

# LibVirt
-A INPUT -i eth0 -s 192.168.122.0/24 -j ACCEPT

# Reject incoming traffic
-A INPUT -j REJECT

# DSVPN
-A OUTPUT -p tcp -m tcp -o eth0 -d 93.184.216.34 --dport 443 -j ACCEPT
# LibVirt
-A OUTPUT -o eth0 -d 192.168.122.0/24 -j ACCEPT
# Allow tun
-A OUTPUT -o tun+ -j ACCEPT

# Reject outgoing traffic
-A OUTPUT -p tcp -j REJECT --reject-with tcp-reset
-A OUTPUT -p udp -j REJECT --reject-with icmp-port-unreachable

COMMIT
Here is the prefable output:
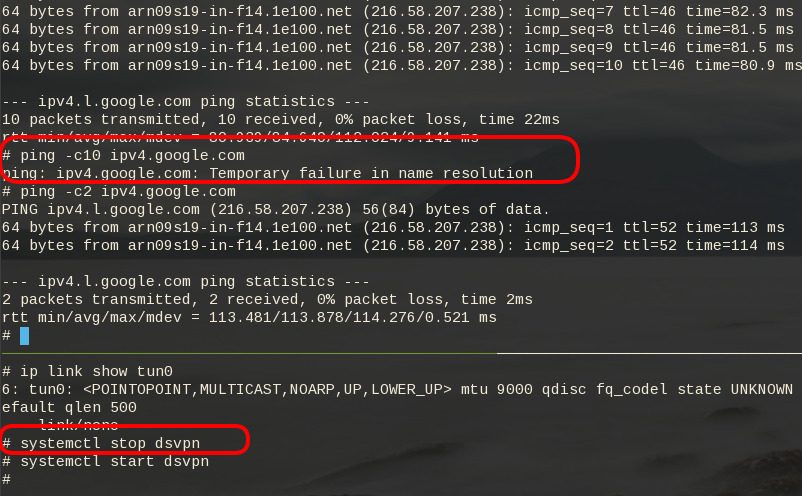
Notes from archlinux
xdg-open - opens a file or URL in the user’s preferred application
When you are trying to authenticate to a new workspace (with 2fa) using the slack-desktop, it will open your default browser and after the authentication your browser will re-direct you to the slack-desktop again using something like this
slack://6f69f7c8b/magic-login/t3bnakl6qabc-16869c6603bdb64f3a6f69f7c8b2d920fa26149f990e0556b4e5c6f26984db0aThis is mime query !
$ xdg-mime query default x-scheme-handler/slack
slack.desktop

$ locate slack.desktop
/usr/share/applications/slack.desktop
$ more /usr/share/applications/slack.desktop

[Desktop Entry]
Name=Slack
Comment=Slack Desktop
GenericName=Slack Client for Linux
Exec=/usr/bin/slack --disable-gpu %U
Icon=/usr/share/pixmaps/slack.png
Type=Application
StartupNotify=true
Categories=GNOME;GTK;Network;InstantMessaging;
MimeType=x-scheme-handler/slack;
I had to change the Exec entry above to point to my slack-desktop binary
Notes based on Ubuntu 18.04 LTS
My notes for this k8s blog post are based upon an Ubuntu 18.05 LTS KVM Virtual Machine. The idea is to use nested-kvm to run minikube inside a VM, that then minikube will create a kvm node.
minikube builds a local kubernetes cluster on a single node with a set of small resources to run a small kubernetes deployment.
Archlinux –> VM Ubuntu 18.04 LTS runs minikube/kubeclt —> KVM minikube node
Pre-requirements
Nested kvm
Host
(archlinux)
$ grep ^NAME /etc/os-release
NAME="Arch Linux"
Check that nested-kvm is already supported:
$ cat /sys/module/kvm_intel/parameters/nested
N
If the output is N (No) then remove & enable kernel module again:
$ sudo modprobe -r kvm_intel
$ sudo modprobe kvm_intel nested=1
Check that nested-kvm is now enabled:
$ cat /sys/module/kvm_intel/parameters/nested
Y
Guest
Inside the virtual machine:
$ grep NAME /etc/os-release
NAME="Ubuntu"
PRETTY_NAME="Ubuntu 18.04.2 LTS"
VERSION_CODENAME=bionic
UBUNTU_CODENAME=bionic
$ egrep -o 'vmx|svm|0xc0f' /proc/cpuinfo
vmx$ kvm-ok
INFO: /dev/kvm exists
KVM acceleration can be used
LibVirtd
If the above step fails, try to edit the xml libvirtd configuration file in your host:
# virsh edit ubuntu_18.04
and change cpu mode to passthrough:
from
  <cpu mode='custom' match='exact' check='partial'>
    <model fallback='allow'>Nehalem</model>
  </cpu>
to
<cpu mode='host-passthrough' check='none'/>
Install Virtualization Tools
Inside the VM
sudo apt -y install
  qemu-kvm
  bridge-utils
  libvirt-clients
  libvirt-daemon-system
Permissions
We need to be included in the libvirt group
sudo usermod -a -G libvirt $(whoami)
newgrp libvirt
kubectl
kubectl is a command line interface for running commands against Kubernetes clusters.
size: ~41M
$ export VERSION=$(curl -sL https://storage.googleapis.com/kubernetes-release/release/stable.txt)
$ curl -LO https://storage.googleapis.com/kubernetes-release/release/$VERSION/bin/linux/amd64/kubectl

$ chmod +x kubectl
$ sudo mv kubectl /usr/local/bin/kubectl

$ kubectl completion bash | sudo tee -a /etc/bash_completion.d/kubectl
$ kubectl version
if you wan to use bash autocompletion without logout/login use this:
source <(kubectl completion bash)What the json output of kubectl version looks like:
$ kubectl version -o json | jq .
The connection to the server localhost:8080 was refused - did you specify the right host or port?
{
  "clientVersion": {
    "major": "1",
    "minor": "15",
    "gitVersion": "v1.15.0",
    "gitCommit": "e8462b5b5dc2584fdcd18e6bcfe9f1e4d970a529",
    "gitTreeState": "clean",
    "buildDate": "2019-06-19T16:40:16Z",
    "goVersion": "go1.12.5",
    "compiler": "gc",
    "platform": "linux/amd64"
  }
}
Message:
The connection to the server localhost:8080 was refused - did you specify the right host or port?it’s okay if minikube hasnt started yet.
minikube
size: ~40M
$ curl -sLO https://storage.googleapis.com/minikube/releases/latest/minikube-linux-amd64

$ chmod +x minikube-linux-amd64

$ sudo mv minikube-linux-amd64 /usr/local/bin/minikube

$ minikube version
minikube version: v1.2.0

$ minikube update-check
CurrentVersion: v1.2.0
LatestVersion: v1.2.0

$ minikube completion bash | sudo tee -a /etc/bash_completion.d/minikube
To include bash completion without login/logout:
source $(minikube completion bash)
KVM2 driver
We need a driver so that minikube can build a kvm image/node for our kubernetes cluster.
size: ~36M
$ curl -sLO https://storage.googleapis.com/minikube/releases/latest/docker-machine-driver-kvm2

$ chmod +x docker-machine-driver-kvm2

$ mv docker-machine-driver-kvm2 /usr/local/bin/
Start minikube
$ minikube start --vm-driver kvm2
* minikube v1.2.0 on linux (amd64)
* Downloading Minikube ISO ...
 129.33 MB / 129.33 MB [============================================] 100.00% 0s
* Creating kvm2 VM (CPUs=2, Memory=2048MB, Disk=20000MB) ...
* Configuring environment for Kubernetes v1.15.0 on Docker 18.09.6
* Downloading kubeadm v1.15.0
* Downloading kubelet v1.15.0
* Pulling images ...
* Launching Kubernetes ...
* Verifying: apiserver proxy etcd scheduler controller dns
* Done! kubectl is now configured to use "minikube"
Check via libvirt, you will find out a new VM, named: minikube
$ virsh list
 Id    Name                           State
----------------------------------------------------
 1     minikube                       running
Something gone wrong:
Just delete the VM and configuration directories and start again:
$ minikube delete
$ rm -rf ~/.minikube/ ~/.kube
kubectl version
Now let’s run kubectl version again
$ kubectl version -o json | jq .
{
  "clientVersion": {
    "major": "1",
    "minor": "15",
    "gitVersion": "v1.15.0",
    "gitCommit": "e8462b5b5dc2584fdcd18e6bcfe9f1e4d970a529",
    "gitTreeState": "clean",
    "buildDate": "2019-06-19T16:40:16Z",
    "goVersion": "go1.12.5",
    "compiler": "gc",
    "platform": "linux/amd64"
  },
  "serverVersion": {
    "major": "1",
    "minor": "15",
    "gitVersion": "v1.15.0",
    "gitCommit": "e8462b5b5dc2584fdcd18e6bcfe9f1e4d970a529",
    "gitTreeState": "clean",
    "buildDate": "2019-06-19T16:32:14Z",
    "goVersion": "go1.12.5",
    "compiler": "gc",
    "platform": "linux/amd64"
  }
}
Dashboard
Start kubernetes dashboard
$ kubectl proxy --address 0.0.0.0 --accept-hosts '.*'
Starting to serve on [::]:8001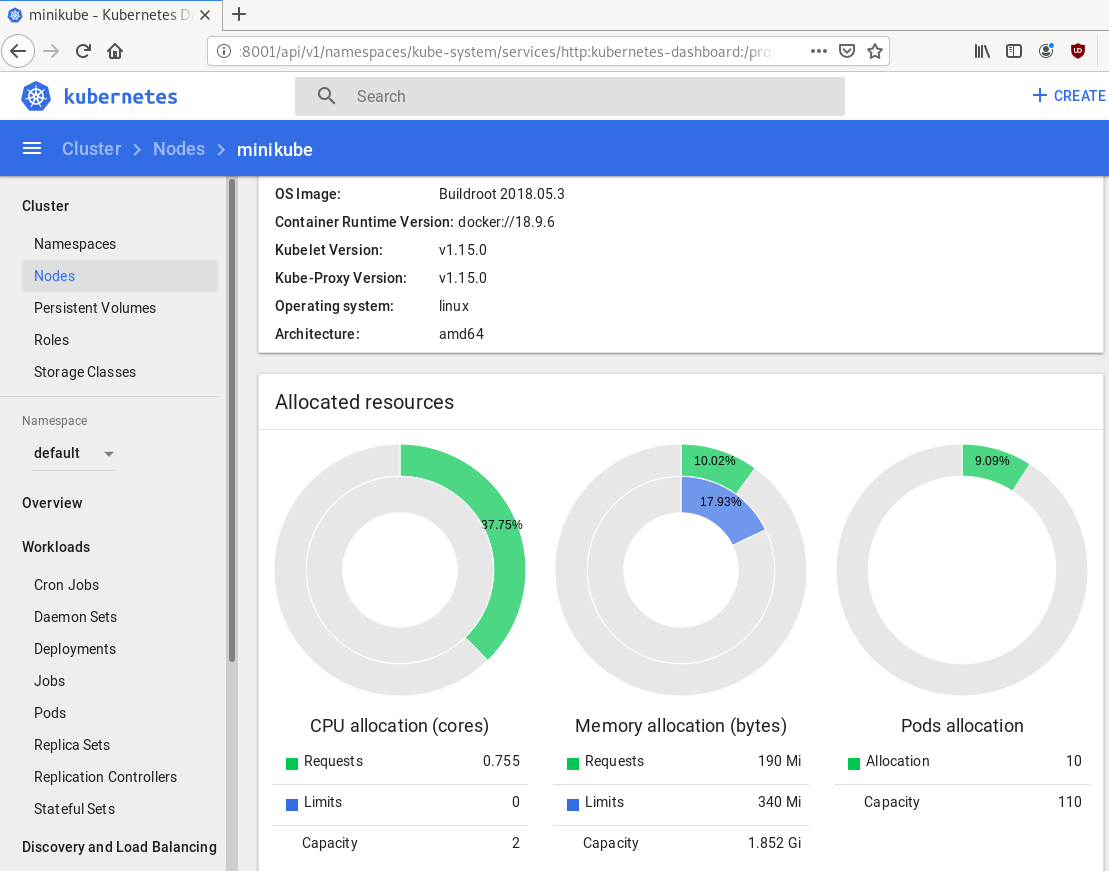
Quick notes
Identify slow disk
# hdparm -Tt /dev/sda

/dev/sda:
 Timing cached reads:   2502 MB in  2.00 seconds = 1251.34 MB/sec
 Timing buffered disk reads: 538 MB in  3.01 seconds = 178.94 MB/sec

# hdparm -Tt /dev/sdb

/dev/sdb:
 Timing cached reads:   2490 MB in  2.00 seconds = 1244.86 MB/sec
 Timing buffered disk reads: 536 MB in  3.01 seconds = 178.31 MB/sec

# hdparm -Tt /dev/sdc

/dev/sdc:
 Timing cached reads:   2524 MB in  2.00 seconds = 1262.21 MB/sec
 Timing buffered disk reads: 538 MB in  3.00 seconds = 179.15 MB/sec

# hdparm -Tt /dev/sdd

/dev/sdd:
 Timing cached reads:   2234 MB in  2.00 seconds = 1117.20 MB/sec
 Timing buffered disk reads: read(2097152) returned 929792 bytes
Set disk to Faulty State and Remove it
#  mdadm --manage /dev/md0 --fail /dev/sdd
mdadm: set /dev/sdd faulty in /dev/md0

#  mdadm --manage /dev/md0 --remove  /dev/sdd
mdadm: hot removed /dev/sdd from /dev/md0
Verify Status
# mdadm --verbose --detail /dev/md0
/dev/md0:
        Version : 1.2
  Creation Time : Thu Feb  6 15:06:34 2014
     Raid Level : raid5
     Array Size : 2929893888 (2794.16 GiB 3000.21 GB)
  Used Dev Size : 976631296 (931.39 GiB 1000.07 GB)
   Raid Devices : 4
  Total Devices : 3
    Persistence : Superblock is persistent

    Update Time : Mon Jul  8 00:51:14 2019
          State : clean, degraded
 Active Devices : 3
Working Devices : 3
 Failed Devices : 0
  Spare Devices : 0

         Layout : left-symmetric
     Chunk Size : 512K

           Name : ServerOne:0  (local to host ServerOne)
           UUID : d635095e:50457059:7e6ccdaf:7da91c9b
         Events : 18122

    Number   Major   Minor   RaidDevice State
       0       8       16        0      active sync   /dev/sdb
       6       8       32        1      active sync   /dev/sdc
       4       0        0        4      removed
       4       8        0        3      active sync   /dev/sda
Format Disk
- quick format to identify bad blocks,
- better solution zeroing the disk
# mkfs.ext4 -cc -v /dev/sdd - middle ground to use
-c
-c Check the device for bad blocks before creating the file system. If this option is specified twice, then a slower read-write test is used instead of a fast read-only test.
# mkfs.ext4 -c -v /dev/sdd output:
Running command: badblocks -b 4096 -X -s /dev/sdd 244190645
Checking for bad blocks (read-only test):   9.76% done, 7:37 elapsed
Remove ext headers
# dd if=/dev/zero of=/dev/sdd bs=4096 count=4096Using dd to remove any ext headers
Test disk
# hdparm -Tt /dev/sdd

/dev/sdd:
 Timing cached reads:   2174 MB in  2.00 seconds = 1087.20 MB/sec
 Timing buffered disk reads: 516 MB in  3.00 seconds = 171.94 MB/sec
Add Disk to Raid
# mdadm --add /dev/md0 /dev/sdd
mdadm: added /dev/sdd
Speed
# hdparm -Tt /dev/md0

/dev/md0:
 Timing cached reads:   2480 MB in  2.00 seconds = 1239.70 MB/sec
 Timing buffered disk reads: 1412 MB in  3.00 seconds = 470.62 MB/sec
Status
# cat /proc/mdstat
Personalities : [raid6] [raid5] [raid4]
md0 : active raid5 sdd[5] sda[4] sdc[6] sdb[0]
      2929893888 blocks super 1.2 level 5, 512k chunk, algorithm 2 [4/3] [UU_U]
      [>....................]  recovery =  0.0% (44032/976631296) finish=369.5min speed=44032K/sec

unused devices: <none>
Verify Raid
# mdadm --verbose --detail /dev/md0
/dev/md0:
        Version : 1.2
  Creation Time : Thu Feb  6 15:06:34 2014
     Raid Level : raid5
     Array Size : 2929893888 (2794.16 GiB 3000.21 GB)
  Used Dev Size : 976631296 (931.39 GiB 1000.07 GB)
   Raid Devices : 4
  Total Devices : 4
    Persistence : Superblock is persistent

    Update Time : Mon Jul  8 00:58:38 2019
          State : clean, degraded, recovering
 Active Devices : 3
Working Devices : 4
 Failed Devices : 0
  Spare Devices : 1

         Layout : left-symmetric
     Chunk Size : 512K

 Rebuild Status : 0% complete

           Name : ServerOne:0  (local to host ServerOne)
           UUID : d635095e:50457059:7e6ccdaf:7da91c9b
         Events : 18244

    Number   Major   Minor   RaidDevice State
       0       8       16        0      active sync   /dev/sdb
       6       8       32        1      active sync   /dev/sdc
       5       8       48        2      spare rebuilding   /dev/sdd
4 8 0 3 active sync /dev/sdaHardware Details
HP ProLiant MicroServer
AMD Turion(tm) II Neo N54L Dual-Core Processor
Memory Size: 2 GB - DIMM Speed: 1333 MT/s
Maximum Capacity: 8 GB
Running 24×7 from 23/08/2010, so nine years!

Prologue
The above server started it’s life on CentOS 5 and ext3. Re-formatting to run CentOS 6.x with ext4 on 4 x 1TB OEM Hard Disks with mdadm raid-5. That provided 3 TB storage with Fault tolerance 1-drive failure. And believe me, I used that setup to zeroing broken disks or replacing faulty disks.
As we are reaching the end of CentOS 6.x and there is no official dist-upgrade path for CentOS, and still waiting for CentOS 8.x, I made decision to switch to Ubuntu 18.04 LTS. At that point this would be the 3rd official OS re-installation of this server. I chose ubuntu so that I can dist-upgrade from LTS to LTS.
This is a backup server, no need for huge RAM, but for a reliable system. On that storage I have 2m files that in retrospect are not very big. So with the re-installation I chose to use xfs instead of ext4 filesystem.
I am also running an internal snapshot mechanism to have delta for every day and that pushed the storage usage to 87% of the 3Tb. If you do the math, 2m is about 1.2Tb usage, we need a full initial backup, so 2.4Tb (80%) and then the daily (rotate) incremental backups are ~210Mb per day. That gave me space for five (5) daily snapshots aka a work-week.
To remove this impediment, I also replaced the disks with WD Red Pro 6TB 7200rpm disks, and use raid-1 instead of raid-5. Usage is now ~45%
Problem
Frozen System
From time to time, this very new, very clean, very reliable system froze to death!
When attached monitor & keyboard no output. Strange enough I can ping the network interfaces but I can not ssh to the server or even telnet (nc) to ssh port. Awkward! Okay - hardware cold reboot then.
As this system is remote … in random times, I need to ask from someone to cold-reboot this machine. Awkward again.
Kernel Panic
If that was not enough, this machine also has random kernel panics.

Errors
Let’s start troubleshooting this system
# journalctl -p 3 -x
Important Errors
ERST: Failed to get Error Log Address Range.
APEI: Can not request [mem 0x7dfab650-0x7dfab6a3] for APEI BERT registers
ipmi_si dmi-ipmi-si.0: Could not set up I/O space
and more important Errors:
INFO: task kswapd0:40 blocked for more than 120 seconds.
      Not tainted 4.15.0-54-generic #58-Ubuntu
"echo 0 > /proc/sys/kernel/hung_task_timeout_secs" disables this message.
INFO: task xfsaild/dm-0:761 blocked for more than 120 seconds.
      Not tainted 4.15.0-54-generic #58-Ubuntu
"echo 0 > /proc/sys/kernel/hung_task_timeout_secs" disables this message.
INFO: task kworker/u9:2:3612 blocked for more than 120 seconds.
      Not tainted 4.15.0-54-generic #58-Ubuntu
"echo 0 > /proc/sys/kernel/hung_task_timeout_secs" disables this message.
INFO: task kworker/1:0:5327 blocked for more than 120 seconds.
      Not tainted 4.15.0-54-generic #58-Ubuntu
"echo 0 > /proc/sys/kernel/hung_task_timeout_secs" disables this message.
INFO: task rm:5901 blocked for more than 120 seconds.
      Not tainted 4.15.0-54-generic #58-Ubuntu
"echo 0 > /proc/sys/kernel/hung_task_timeout_secs" disables this message.
INFO: task kworker/u9:1:5902 blocked for more than 120 seconds.
      Not tainted 4.15.0-54-generic #58-Ubuntu
"echo 0 > /proc/sys/kernel/hung_task_timeout_secs" disables this message.
INFO: task kworker/0:0:5906 blocked for more than 120 seconds.
      Not tainted 4.15.0-54-generic #58-Ubuntu
"echo 0 > /proc/sys/kernel/hung_task_timeout_secs" disables this message.
INFO: task kswapd0:40 blocked for more than 120 seconds.
      Not tainted 4.15.0-54-generic #58-Ubuntu
"echo 0 > /proc/sys/kernel/hung_task_timeout_secs" disables this message.
INFO: task xfsaild/dm-0:761 blocked for more than 120 seconds.
      Not tainted 4.15.0-54-generic #58-Ubuntu
"echo 0 > /proc/sys/kernel/hung_task_timeout_secs" disables this message.
INFO: task kworker/u9:2:3612 blocked for more than 120 seconds.
      Not tainted 4.15.0-54-generic #58-Ubuntu
"echo 0 > /proc/sys/kernel/hung_task_timeout_secs" disables this message.
First impressions ?

BootOptions
After a few (hours) of internet research the suggestion is to disable
- ACPI stands for Advanced Configuration and Power Interface.
- APIC stands for Advanced Programmable Interrupt Controller.
This site is very helpful for ubuntu, although Red Hat still has a huge advanced on describing kernel options better than canonical.
Grub
# vim /etc/default/grub
GRUB_CMDLINE_LINUX="noapic acpi=off"
then
# update-grub
Sourcing file `/etc/default/grub'
Sourcing file `/etc/default/grub.d/50-curtin-settings.cfg'
Generating grub configuration file ...
Found linux image: /boot/vmlinuz-4.15.0-54-generic
Found initrd image: /boot/initrd.img-4.15.0-54-generic
Found linux image: /boot/vmlinuz-4.15.0-52-generic
Found initrd image: /boot/initrd.img-4.15.0-52-generic
doneVerify
# grep noapic /boot/grub/grub.cfg | head -1
linux /boot/vmlinuz-4.15.0-54-generic root=UUID=0c686739-e859-4da5-87a2-dfd5fcccde3d ro noapic acpi=off maybe-ubiquityreboot and check again:
# journalctl -p 3 -xb
-- Logs begin at Thu 2019-03-14 19:26:12 EET, end at Wed 2019-07-03 21:31:08 EEST. --
Jul 03 21:30:49 servertwo kernel: ipmi_si dmi-ipmi-si.0: Could not set up I/O spaceokay !!!
ipmi_si
Unfortunately I could not find anything useful regarding
# dmesg | grep -i ipm
[ 10.977914] ipmi message handler version 39.2
[ 11.188484] ipmi device interface
[ 11.203630] IPMI System Interface driver.
[ 11.203662] ipmi_si dmi-ipmi-si.0: ipmi_platform: probing via SMBIOS
[ 11.203665] ipmi_si: SMBIOS: mem 0x0 regsize 1 spacing 1 irq 0
[ 11.203667] ipmi_si: Adding SMBIOS-specified kcs state machine
[ 11.203729] ipmi_si: Trying SMBIOS-specified kcs state machine at mem address 0x0, slave address 0x20, irq 0
[ 11.203732] ipmi_si dmi-ipmi-si.0: Could not set up I/O space
# ipmitool list
Could not open device at /dev/ipmi0 or /dev/ipmi/0 or /dev/ipmidev/0: No such file or directory
# lsmod | grep -i ipmi
ipmi_si 61440 0
ipmi_devintf 20480 0
ipmi_msghandler 53248 2 ipmi_devintf,ipmi_si
blocked for more than 120 seconds.
But let’s try to fix the timeout warnings:
INFO: task kswapd0:40 blocked for more than 120 seconds.
Not tainted 4.15.0-54-generic #58-Ubuntu
"echo 0 > /proc/sys/kernel/hung_task_timeout_secs" disables this messageif you search online the above message, most of the sites will suggest to tweak dirty pages for your system.
This is the most common response across different sites:
This is a know bug. By default Linux uses up to 40% of the available memory for file system caching. After this mark has been reached the file system flushes all outstanding data to disk causing all following IOs going synchronous. For flushing out this data to disk this there is a time limit of 120 seconds by default. In the case here the IO subsystem is not fast enough to flush the data withing 120 seconds. This especially happens on systems with a lot of memory.
Okay this may be the problem but we do not have a lot of memory, only 2GB RAM and 2GB Swap. But even then, our vm.dirty_ratio = 20 setting is 20% instead of 40%.
But I have the ability to cross-check ubuntu 18.04 with CentOS 6.10 to compare notes:
ubuntu 18.04
# uname -r
4.15.0-54-generic
# sysctl -a | egrep -i 'swap|dirty|raid'|sort
dev.raid.speed_limit_max = 200000
dev.raid.speed_limit_min = 1000
vm.dirty_background_bytes = 0
vm.dirty_background_ratio = 10
vm.dirty_bytes = 0
vm.dirty_expire_centisecs = 3000
vm.dirty_ratio = 20
vm.dirtytime_expire_seconds = 43200
vm.dirty_writeback_centisecs = 500
vm.swappiness = 60
CentOS 6.11
# uname -r
2.6.32-754.15.3.el6.centos.plus.x86_64
# sysctl -a | egrep -i 'swap|dirty|raid'|sort
dev.raid.speed_limit_max = 200000
dev.raid.speed_limit_min = 1000
vm.dirty_background_bytes = 0
vm.dirty_background_ratio = 10
vm.dirty_bytes = 0
vm.dirty_expire_centisecs = 3000
vm.dirty_ratio = 20
vm.dirty_writeback_centisecs = 500
vm.swappiness = 60
Scheduler for Raid
This is the best online documentation on the
optimize raid
Comparing notes we see that both systems have the same settings, even when the kernel version is a lot different, 2.6.32 Vs 4.15.0 !!!
Researching on raid optimization there is a note of kernel scheduler.
Ubuntu 18.04
# for drive in {a..c}; do cat /sys/block/sd${drive}/queue/scheduler; done
noop deadline [cfq]
noop deadline [cfq]
noop deadline [cfq]
CentOS 6.11
# for drive in {a..d}; do cat /sys/block/sd${drive}/queue/scheduler; done
noop anticipatory deadline [cfq]
noop anticipatory deadline [cfq]
noop anticipatory deadline [cfq]
noop anticipatory deadline [cfq]
Anticipatory scheduling
CentOS supports Anticipatory scheduling on the hard disks but nowadays anticipatory scheduler is not supported in modern kernel versions.
That said, from the above output we can verify that both systems are running the default scheduler cfq.
Disks
Ubuntu 18.04
- Western Digital Red Pro WDC WD6003FFBX-6
# for i in sd{b..c} ; do hdparm -Tt /dev/$i; done
/dev/sdb:
Timing cached reads: 2344 MB in 2.00 seconds = 1171.76 MB/sec
Timing buffered disk reads: 738 MB in 3.00 seconds = 245.81 MB/sec
/dev/sdc:
Timing cached reads: 2264 MB in 2.00 seconds = 1131.40 MB/sec
Timing buffered disk reads: 774 MB in 3.00 seconds = 257.70 MB/secCentOS 6.11
- Seagate ST1000DX001
/dev/sdb:
Timing cached reads: 2490 MB in 2.00 seconds = 1244.86 MB/sec
Timing buffered disk reads: 536 MB in 3.01 seconds = 178.31 MB/sec
/dev/sdc:
Timing cached reads: 2524 MB in 2.00 seconds = 1262.21 MB/sec
Timing buffered disk reads: 538 MB in 3.00 seconds = 179.15 MB/sec
/dev/sdd:
Timing cached reads: 2452 MB in 2.00 seconds = 1226.15 MB/sec
Timing buffered disk reads: 546 MB in 3.01 seconds = 181.64 MB/sec
So what I am missing ?
My initial personal feeling was the low memory. But after running a manual rsync I’ve realized that:
cpu
was load average: 0.87, 0.46, 0.19
mem
was (on high load), when hit 40% of RAM, started to use swap.
KiB Mem : 2008464 total, 77528 free, 635900 used, 1295036 buff/cache
KiB Swap: 2097148 total, 2096624 free, 524 used. 1184220 avail Mem So I tweaked a bit the swapiness and reduce it from 60% to 40%
and run a local snapshot (that is a bit heavy on the disks) and doing an upgrade and trying to increase CPU load. Still everything is fine !
I will keep an eye on this story.
