(this is a copy of my git repo of this post)
https://github.com/ebal/k8s_cluster/
Kubernetes, also known as k8s, is an open-source system for automating deployment, scaling, and management of containerized applications.
Notice The initial (old) blog post with ubuntu 22.04 is (still) here: blog post
- Prerequisites
- Git Terraform Code for the kubernetes cluster
- Control-Plane Node
- Ports on the control-plane node
- Firewall on the control-plane node
- Hosts file in the control-plane node
- Updating your hosts file
- No Swap on the control-plane node
- Kernel modules on the control-plane node
- NeedRestart on the control-plane node
- temporarily
- permanently
- Installing a Container Runtime on the control-plane node
- Installing kubeadm, kubelet and kubectl on the control-plane node
- Get kubernetes admin configuration images
- Initializing the control-plane node
- Create user access config to the k8s control-plane node
- Verify the control-plane node
- Install an overlay network provider on the control-plane node
- Verify CoreDNS is running on the control-plane node
- Worker Nodes
- Get Token from the control-plane node
- Is the kubernetes cluster running ?
- Kubernetes Dashboard
- Helm
- Install kubernetes dashboard
- Accessing Dashboard via a NodePort
- Patch kubernetes-dashboard
- Edit kubernetes-dashboard Service
- Accessing Kubernetes Dashboard
- Create An Authentication Token (RBAC)
- Creating a Service Account
- Creating a ClusterRoleBinding
- Getting a Bearer Token
- Browsing Kubernetes Dashboard
- Nginx App
- That’s it
In this blog post, I’ll share my personal notes on setting up a kubernetes cluster using kubeadm on Ubuntu 24.04 LTS Virtual Machines.
For this setup, I will use three (3) Virtual Machines in my local lab. My home lab is built on libvirt with QEMU/KVM (Kernel-based Virtual Machine), and I use Terraform as the infrastructure provisioning tool.
Prerequisites
- at least 3 Virtual Machines of Ubuntu 24.04 (one for control-plane, two for worker nodes)
- 2GB (or more) of RAM on each Virtual Machine
- 2 CPUs (or more) on each Virtual Machine
- 20Gb of hard disk on each Virtual Machine
- No SWAP partition/image/file on each Virtual Machine
Streamline the lab environment
To simplify the Terraform code for the libvirt/QEMU Kubernetes lab, I’ve made a few adjustments so that all of the VMs use the below default values:
- ssh port: 22/TCP
- volume size: 40G
- memory: 4096
- cpu: 4
Review the values and adjust them according to your requirements and limitations.
Git Terraform Code for the kubernetes cluster
I prefer maintaining a reproducible infrastructure so that I can quickly create and destroy my test lab. My approach involves testing each step, so I often destroy everything, copy and paste commands, and move forward. I use Terraform to provision the infrastructure. You can find the full Terraform code for the Kubernetes cluster here: k8s cluster - Terraform code.
If you do not use terraform, skip this step!
You can git clone the repo to review and edit it according to your needs.
git clone https://github.com/ebal/k8s_cluster.git
cd tf_libvirt
You will need to make appropriate changes. Open Variables.tf for that. The most important option to change, is the User option. Change it to your github username and it will download and setup the VMs with your public key, instead of mine!
But pretty much, everything else should work out of the box. Change the vmem and vcpu settings to your needs.
Initilaze the working directory
Init terraform before running the below shell script.
This action will download in your local directory all the required teffarorm providers or modules.
terraform init
Ubuntu 24.04 Image
Before proceeding with creating the VMs, we need to ensure that the Ubuntu 24.04 image is available on our system, or modify the code to download it from the internet.
In Variables.tf terraform file, you will notice the below entries
# The image source of the VM
# cloud_image = "https://cloud-images.ubuntu.com/oracular/current/focal-server-cloudimg-amd64.img"
cloud_image = "../oracular-server-cloudimg-amd64.img"
If you do not want to download the Ubuntu 24.04 cloud server image then make the below change
# The image source of the VM
cloud_image = "https://cloud-images.ubuntu.com/oracular/current/focal-server-cloudimg-amd64.img"
# cloud_image = "../oracular-server-cloudimg-amd64.img"
otherwise you need to download it, in the upper directory, to speed things up
cd ../
IMAGE="oracular" # 24.04
curl -sLO https://cloud-images.ubuntu.com/${IMAGE}/current/${IMAGE}-server-cloudimg-amd64.img
cd -

ls -l ../oracular-server-cloudimg-amd64.img
Spawn the VMs
We are ready to spawn our 3 VMs by running terraform plan & terraform apply
./start.sh
output should be something like:
...
Apply complete! Resources: 16 added, 0 changed, 0 destroyed.

Outputs:

VMs = [
  "192.168.122.223 k8scpnode1",
  "192.168.122.50  k8swrknode1",
  "192.168.122.10  k8swrknode2",
]
Verify that you have ssh access to the VMs
eg.
ssh ubuntu@192.168.122.223
Replace the IP with the one provided in the output.
DISCLAIMER if something failed, destroy everything with ./destroy.sh to remove any garbages before run ./start.sh again!!
Control-Plane Node
Let’s now begin configuring the Kubernetes control-plane node.
Ports on the control-plane node
Kubernetes runs a few services that needs to be accessable from the worker nodes.
| Protocol | Direction | Port Range | Purpose | Used By |
|---|---|---|---|---|
| TCP | Inbound | 6443 | Kubernetes API server | All |
| TCP | Inbound | 2379-2380 | etcd server client API | kube-apiserver, etcd |
| TCP | Inbound | 10250 | Kubelet API | Self, Control plane |
| TCP | Inbound | 10259 | kube-scheduler | Self |
| TCP | Inbound | 10257 | kube-controller-manager | Self |
Although etcd ports are included in control plane section, you can also host your
own etcd cluster externally or on custom ports.
Firewall on the control-plane node
We need to open the necessary ports on the CP’s (control-plane node) firewall.
sudo ufw allow 6443/tcp
sudo ufw allow 2379:2380/tcp
sudo ufw allow 10250/tcp
sudo ufw allow 10259/tcp
sudo ufw allow 10257/tcp

# sudo ufw disable
sudo ufw status
the output should be
To                         Action      From
--                         ------      ----
22/tcp                     ALLOW       Anywhere
6443/tcp                   ALLOW       Anywhere
2379:2380/tcp              ALLOW       Anywhere
10250/tcp                  ALLOW       Anywhere
10259/tcp                  ALLOW       Anywhere
10257/tcp                  ALLOW       Anywhere
22/tcp (v6)                ALLOW       Anywhere (v6)
6443/tcp (v6)              ALLOW       Anywhere (v6)
2379:2380/tcp (v6)         ALLOW       Anywhere (v6)
10250/tcp (v6)             ALLOW       Anywhere (v6)
10259/tcp (v6)             ALLOW       Anywhere (v6)
10257/tcp (v6)             ALLOW       Anywhere (v6)
Hosts file in the control-plane node
We need to update the /etc/hosts with the internal IP and hostname.
This will help when it is time to join the worker nodes.
echo $(hostname -I) $(hostname) | sudo tee -a /etc/hosts
Just a reminder: we need to update the hosts file to all the VMs.
To include all the VMs’ IPs and hostnames.
If you already know them, then your /etc/hosts file should look like this:
192.168.122.223 k8scpnode1
192.168.122.50  k8swrknode1
192.168.122.10  k8swrknode2
replace the IPs to yours.
Updating your hosts file
if you already the IPs of your VMs, run the below script to ALL 3 VMs
sudo tee -a /etc/hosts <<EOF

192.168.122.223 k8scpnode1
192.168.122.50  k8swrknode1
192.168.122.10  k8swrknode2
EOF
No Swap on the control-plane node
Be sure that SWAP is disabled in all virtual machines!
sudo swapoff -a
and the fstab file should not have any swap entry.
The below command should return nothing.
sudo grep -i swap /etc/fstab
If not, edit the /etc/fstab and remove the swap entry.
If you follow my terraform k8s code example from the above github repo,
you will notice that there isn’t any swap entry in the cloud init (user-data) file.
Nevertheless it is always a good thing to douple check.
Kernel modules on the control-plane node
We need to load the below kernel modules on all k8s nodes, so k8s can create some network magic!
- overlay
- br_netfilter
Run the below bash snippet that will do that, and also will enable the forwarding features of the network.
sudo tee /etc/modules-load.d/kubernetes.conf <<EOF
overlay
br_netfilter
EOF

sudo modprobe overlay
sudo modprobe br_netfilter

sudo lsmod | grep netfilter

sudo tee /etc/sysctl.d/kubernetes.conf <<EOF
net.bridge.bridge-nf-call-ip6tables = 1
net.bridge.bridge-nf-call-iptables = 1
net.ipv4.ip_forward = 1
EOF

sudo sysctl --system
NeedRestart on the control-plane node
Before installing any software, we need to make a tiny change to needrestart program. This will help with the automation of installing packages and will stop asking -via dialog- if we would like to restart the services!
temporarily
export -p NEEDRESTART_MODE="a"
permanently
a more permanent way, is to update the configuration file
echo "$nrconf{restart} = 'a';" | sudo tee -a /etc/needrestart/needrestart.conf
Installing a Container Runtime on the control-plane node
It is time to choose which container runtime we are going to use on our k8s cluster. There are a few container runtimes for k8s and in the past docker were used to. Nowadays the most common runtime is the containerd that can also uses the cgroup v2 kernel features. There is also a docker-engine runtime via CRI. Read here for more details on the subject.
curl -sL https://download.docker.com/linux/ubuntu/gpg | sudo gpg --dearmor -o /etc/apt/trusted.gpg.d/docker-keyring.gpg

sudo apt-add-repository -y "deb https://download.docker.com/linux/ubuntu oracular stable"

sleep 3

sudo apt-get -y install containerd.io

containerd config default
 | sed 's/SystemdCgroup = false/SystemdCgroup = true/'
 | sudo tee /etc/containerd/config.toml

sudo systemctl restart containerd.service
You can find the containerd configuration file here:
/etc/containerd/config.toml
In earlier versions of ubuntu we should enable the systemd cgroup driver.
Recomendation from official documentation is:
It is best to use cgroup v2, use the systemd cgroup driver instead of cgroupfs.
Starting with v1.22 and later, when creating a cluster with kubeadm, if the user does not set the cgroupDriver field under KubeletConfiguration, kubeadm defaults it to systemd.
Installing kubeadm, kubelet and kubectl on the control-plane node
Install the kubernetes packages (kubedam, kubelet and kubectl) by first adding the k8s repository on our virtual machine. To speed up the next step, we will also download the configuration container images.
This guide is using kubeadm, so we need to check the latest version.
Kubernetes v1.31 is the latest version when this guide was written.
VERSION="1.31"

curl -fsSL https://pkgs.k8s.io/core:/stable:/v${VERSION}/deb/Release.key | sudo gpg --dearmor -o /etc/apt/keyrings/kubernetes-apt-keyring.gpg

# allow unprivileged APT programs to read this keyring
sudo chmod 0644 /etc/apt/keyrings/kubernetes-apt-keyring.gpg

# This overwrites any existing configuration in /etc/apt/sources.list.d/kubernetes.list
echo "deb [signed-by=/etc/apt/keyrings/kubernetes-apt-keyring.gpg] https://pkgs.k8s.io/core:/stable:/v${VERSION}/deb/ /" | sudo tee /etc/apt/sources.list.d/kubernetes.list

# helps tools such as command-not-found to work correctly
sudo chmod 0644 /etc/apt/sources.list.d/kubernetes.list

sleep 2

sudo apt-get update
sudo apt-get install -y kubelet kubeadm kubectl
Get kubernetes admin configuration images
Retrieve the Kubernetes admin configuration images.
sudo kubeadm config images pull
Initializing the control-plane node
We can now proceed with initializing the control-plane node for our Kubernetes cluster.
There are a few things we need to be careful about:
- We can specify the control-plane-endpoint if we are planning to have a high available k8s cluster. (we will skip this for now),
- Choose a Pod network add-on (next section) but be aware that CoreDNS (DNS and Service Discovery) will not run till then (later),
- define where is our container runtime socket (we will skip it)
- advertise the API server (we will skip it)
But we will define our Pod Network CIDR to the default value of the Pod network add-on so everything will go smoothly later on.
sudo kubeadm init --pod-network-cidr=10.244.0.0/16
Keep the output in a notepad.
Create user access config to the k8s control-plane node
Our k8s control-plane node is running, so we need to have credentials to access it.
The kubectl reads a configuration file (that has the token), so we copying this from k8s admin.
rm -rf $HOME/.kube
mkdir -p $HOME/.kube

sudo cp -i /etc/kubernetes/admin.conf $HOME/.kube/config

sudo chown $(id -u):$(id -g) $HOME/.kube/config

ls -la $HOME/.kube/config

echo 'alias k="kubectl"' | sudo tee -a /etc/bash.bashrc
source /etc/bash.bashrc
Verify the control-plane node
Verify that the kubernets is running.
That means we have a k8s cluster - but only the control-plane node is running.
kubectl cluster-info
# kubectl cluster-info dump

kubectl get nodes   -o wide
kubectl get pods -A -o wide
Install an overlay network provider on the control-plane node
As I mentioned above, in order to use the DNS and Service Discovery services in the kubernetes (CoreDNS) we need to install a Container Network Interface (CNI) based Pod network add-on so that your Pods can communicate with each other.
Kubernetes Flannel is a popular network overlay solution for Kubernetes clusters, primarily used to enable networking between pods across different nodes. It’s a simple and easy-to-implement network fabric that uses the VXLAN protocol to create a flat virtual network, allowing Kubernetes pods to communicate with each other across different hosts.
Make sure to open the below udp ports for flannel’s VXLAN traffic (if you are going to use it):
sudo ufw allow 8472/udp
To install Flannel as the networking solution for your Kubernetes (K8s) cluster, run the following command to deploy Flannel:
k apply -f https://raw.githubusercontent.com/flannel-io/flannel/master/Documentation/kube-flannel.yml
Verify CoreDNS is running on the control-plane node
Verify that the control-plane node is Up & Running and the control-plane pods (as coredns pods) are also running
k get nodes -o wide
NAME        STATUS  ROLES          AGE  VERSION  INTERNAL-IP      EXTERNAL-IP  OS-IMAGE      KERNEL-VERSION    CONTAINER-RUNTIME
k8scpnode1  Ready   control-plane  12m  v1.31.3  192.168.122.223  <none>       Ubuntu 24.10  6.11.0-9-generic  containerd://1.7.23
k get pods -A -o wide
NAMESPACE     NAME                                READY  STATUS   RESTARTS  AGE    IP               NODE        NOMINATED NODE  READINESS GATES
kube-flannel  kube-flannel-ds-9v8fq               1/1    Running  0         2m17s  192.168.122.223  k8scpnode1  <none>          <none>
kube-system   coredns-7c65d6cfc9-dg6nq            1/1    Running  0         12m    10.244.0.2       k8scpnode1  <none>          <none>
kube-system   coredns-7c65d6cfc9-r4ksc            1/1    Running  0         12m    10.244.0.3       k8scpnode1  <none>          <none>
kube-system   etcd-k8scpnode1                     1/1    Running  0         13m    192.168.122.223  k8scpnode1  <none>          <none>
kube-system   kube-apiserver-k8scpnode1           1/1    Running  0         12m    192.168.122.223  k8scpnode1  <none>          <none>
kube-system   kube-controller-manager-k8scpnode1  1/1    Running  0         12m    192.168.122.223  k8scpnode1  <none>          <none>
kube-system   kube-proxy-sxtk9                    1/1    Running  0         12m    192.168.122.223  k8scpnode1  <none>          <none>
kube-system   kube-scheduler-k8scpnode1           1/1    Running  0         13m    192.168.122.223  k8scpnode1  <none>          <none>
That’s it with the control-plane node !
Worker Nodes
The following instructions apply similarly to both worker nodes. I will document the steps for the k8swrknode1 node, but please follow the same process for the k8swrknode2 node.
Ports on the worker nodes
As we learned above on the control-plane section, kubernetes runs a few services
| Protocol | Direction | Port Range | Purpose | Used By |
|---|---|---|---|---|
| TCP | Inbound | 10250 | Kubelet API | Self, Control plane |
| TCP | Inbound | 10256 | kube-proxy | Self, Load balancers |
| TCP | Inbound | 30000-32767 | NodePort Services | All |
Firewall on the worker nodes
so we need to open the necessary ports on the worker nodes too.
sudo ufw allow 10250/tcp
sudo ufw allow 10256/tcp
sudo ufw allow 30000:32767/tcp

sudo ufw status
The output should appear as follows:
To                         Action      From
--                         ------      ----
22/tcp                     ALLOW       Anywhere
10250/tcp                  ALLOW       Anywhere
30000:32767/tcp            ALLOW       Anywhere
22/tcp (v6)                ALLOW       Anywhere (v6)
10250/tcp (v6)             ALLOW       Anywhere (v6)
30000:32767/tcp (v6)       ALLOW       Anywhere (v6)
and do not forget, we also need to open UDP 8472 for flannel
sudo ufw allow 8472/udp
The next few steps are pretty much exactly the same as in the control-plane node.
In order to keep this documentation short, I’ll just copy/paste the commands.
Hosts file in the worker node
Update the /etc/hosts file to include the IPs and hostname of all VMs.
192.168.122.223 k8scpnode1
192.168.122.50  k8swrknode1
192.168.122.10  k8swrknode2
No Swap on the worker node
sudo swapoff -a
Kernel modules on the worker node
sudo tee /etc/modules-load.d/kubernetes.conf <<EOF
overlay
br_netfilter
EOF

sudo modprobe overlay
sudo modprobe br_netfilter

sudo lsmod | grep netfilter

sudo tee /etc/sysctl.d/kubernetes.conf <<EOF
net.bridge.bridge-nf-call-ip6tables = 1
net.bridge.bridge-nf-call-iptables = 1
net.ipv4.ip_forward = 1
EOF

sudo sysctl --system
NeedRestart on the worker node
export -p NEEDRESTART_MODE="a"
Installing a Container Runtime on the worker node
curl -sL https://download.docker.com/linux/ubuntu/gpg | sudo gpg --dearmor -o /etc/apt/trusted.gpg.d/docker-keyring.gpg

sudo apt-add-repository -y "deb https://download.docker.com/linux/ubuntu oracular stable"

sleep 3

sudo apt-get -y install containerd.io

containerd config default
 | sed 's/SystemdCgroup = false/SystemdCgroup = true/'
 | sudo tee /etc/containerd/config.toml

sudo systemctl restart containerd.service
Installing kubeadm, kubelet and kubectl on the worker node
VERSION="1.31"

curl -fsSL https://pkgs.k8s.io/core:/stable:/v${VERSION}/deb/Release.key | sudo gpg --dearmor -o /etc/apt/keyrings/kubernetes-apt-keyring.gpg

# allow unprivileged APT programs to read this keyring
sudo chmod 0644 /etc/apt/keyrings/kubernetes-apt-keyring.gpg

# This overwrites any existing configuration in /etc/apt/sources.list.d/kubernetes.list
echo "deb [signed-by=/etc/apt/keyrings/kubernetes-apt-keyring.gpg] https://pkgs.k8s.io/core:/stable:/v${VERSION}/deb/ /" | sudo tee /etc/apt/sources.list.d/kubernetes.list

# helps tools such as command-not-found to work correctly
sudo chmod 0644 /etc/apt/sources.list.d/kubernetes.list

sleep 3

sudo apt-get update
sudo apt-get install -y kubelet kubeadm kubectl
Get Token from the control-plane node
To join nodes to the kubernetes cluster, we need to have a couple of things.
- a token from control-plane node
- the CA certificate hash from the contol-plane node.
If you didnt keep the output the initialization of the control-plane node, that’s okay.
Run the below command in the control-plane node.
sudo kubeadm token list
and we will get the initial token that expires after 24hours.
TOKEN                    TTL  EXPIRES               USAGES                  DESCRIPTION                                               EXTRA GROUPS
7n4iwm.8xqwfcu4i1co8nof  23h  2024-11-26T12:14:55Z  authentication,signing  The default bootstrap token generated by 'kubeadm init'.  system:bootstrappers:kubeadm:default-node-token
In this case is the
7n4iwm.8xqwfcu4i1co8nofGet Certificate Hash from the control-plane node
To get the CA certificate hash from the control-plane-node, we need to run a complicated command:
openssl x509 -pubkey -in /etc/kubernetes/pki/ca.crt | openssl rsa -pubin -outform der 2>/dev/null | openssl dgst -sha256 -hex | sed 's/^.* //'
and in my k8s cluster is:
2f68e4b27cae2d2a6431f3da308a691d00d9ef3baa4677249e43b3100d783061Join Workers to the kubernetes cluster
So now, we can Join our worker nodes to the kubernetes cluster.
Run the below command on both worker nodes:
sudo kubeadm join 192.168.122.223:6443
        --token 7n4iwm.8xqwfcu4i1co8nof
        --discovery-token-ca-cert-hash sha256:2f68e4b27cae2d2a6431f3da308a691d00d9ef3baa4677249e43b3100d783061
we get this message
Run ‘kubectl get nodes’ on the control-plane to see this node join the cluster.
Is the kubernetes cluster running ?
We can verify that
kubectl get nodes   -o wide
kubectl get pods -A -o wide
All nodes have successfully joined the Kubernetes cluster
so make sure they are in Ready status.
k8scpnode1   Ready  control-plane  58m    v1.31.3  192.168.122.223  <none>  Ubuntu 24.10  6.11.0-9-generic  containerd://1.7.23
k8swrknode1  Ready  <none>         3m37s  v1.31.3  192.168.122.50   <none>  Ubuntu 24.10  6.11.0-9-generic  containerd://1.7.23
k8swrknode2  Ready  <none>         3m37s  v1.31.3  192.168.122.10   <none>  Ubuntu 24.10  6.11.0-9-generic  containerd://1.7.23
All pods
so make sure all pods are in Running status.
NAMESPACE     NAME                                READY  STATUS   RESTARTS  AGE    IP               NODE         NOMINATED NODE  READINESS GATES
kube-flannel  kube-flannel-ds-9v8fq               1/1    Running  0         46m    192.168.122.223  k8scpnode1   <none>          <none>
kube-flannel  kube-flannel-ds-hmtmv               1/1    Running  0         3m32s  192.168.122.50   k8swrknode1  <none>          <none>
kube-flannel  kube-flannel-ds-rwkrm               1/1    Running  0         3m33s  192.168.122.10   k8swrknode2  <none>          <none>
kube-system   coredns-7c65d6cfc9-dg6nq            1/1    Running  0         57m    10.244.0.2       k8scpnode1   <none>          <none>
kube-system   coredns-7c65d6cfc9-r4ksc            1/1    Running  0         57m    10.244.0.3       k8scpnode1   <none>          <none>
kube-system   etcd-k8scpnode1                     1/1    Running  0         57m    192.168.122.223  k8scpnode1   <none>          <none>
kube-system   kube-apiserver-k8scpnode1           1/1    Running  0         57m    192.168.122.223  k8scpnode1   <none>          <none>
kube-system   kube-controller-manager-k8scpnode1  1/1    Running  0         57m    192.168.122.223  k8scpnode1   <none>          <none>
kube-system   kube-proxy-49f6q                    1/1    Running  0         3m32s  192.168.122.50   k8swrknode1  <none>          <none>
kube-system   kube-proxy-6qpph                    1/1    Running  0         3m33s  192.168.122.10   k8swrknode2  <none>          <none>
kube-system   kube-proxy-sxtk9                    1/1    Running  0         57m    192.168.122.223  k8scpnode1   <none>          <none>
kube-system   kube-scheduler-k8scpnode1           1/1    Running  0         57m    192.168.122.223  k8scpnode1   <none>          <none>
That’s it !
Our k8s cluster is running.
Kubernetes Dashboard
is a general purpose, web-based UI for Kubernetes clusters. It allows users to manage applications running in the cluster and troubleshoot them, as well as manage the cluster itself.
Next, we can move forward with installing the Kubernetes dashboard on our cluster.
Helm
Helm—a package manager for Kubernetes that simplifies the process of deploying applications to a Kubernetes cluster. As of version 7.0.0, kubernetes-dashboard has dropped support for Manifest-based installation. Only Helm-based installation is supported now.
Live on the edge !
curl -sL https://raw.githubusercontent.com/helm/helm/main/scripts/get-helm-3 | bash
Install kubernetes dashboard
We need to add the kubernetes-dashboard helm repository first and install the helm chart after:
# Add kubernetes-dashboard repository
helm repo add kubernetes-dashboard https://kubernetes.github.io/dashboard/

# Deploy a Helm Release named "kubernetes-dashboard" using the kubernetes-dashboard chart
helm upgrade --install kubernetes-dashboard kubernetes-dashboard/kubernetes-dashboard --create-namespace --namespace kubernetes-dashboard
The output of the command above should resemble something like this:
Release "kubernetes-dashboard" does not exist. Installing it now.

NAME: kubernetes-dashboard
LAST DEPLOYED: Mon Nov 25 15:36:51 2024
NAMESPACE: kubernetes-dashboard
STATUS: deployed
REVISION: 1
TEST SUITE: None

NOTES:
*************************************************************************************************
*** PLEASE BE PATIENT: Kubernetes Dashboard may need a few minutes to get up and become ready ***
*************************************************************************************************

Congratulations! You have just installed Kubernetes Dashboard in your cluster.

To access Dashboard run:
  kubectl -n kubernetes-dashboard port-forward svc/kubernetes-dashboard-kong-proxy 8443:443

NOTE: In case port-forward command does not work, make sure that kong service name is correct.
      Check the services in Kubernetes Dashboard namespace using:
        kubectl -n kubernetes-dashboard get svc

Dashboard will be available at:
  https://localhost:8443
Verify the installation
kubectl -n kubernetes-dashboard get svc
NAME                                   TYPE        CLUSTER-IP       EXTERNAL-IP   PORT(S)    AGE
kubernetes-dashboard-api               ClusterIP   10.106.254.153   <none>        8000/TCP   3m48s
kubernetes-dashboard-auth              ClusterIP   10.103.156.167   <none>        8000/TCP   3m48s
kubernetes-dashboard-kong-proxy        ClusterIP   10.105.230.13    <none>        443/TCP    3m48s
kubernetes-dashboard-metrics-scraper   ClusterIP   10.109.7.234     <none>        8000/TCP   3m48s
kubernetes-dashboard-web               ClusterIP   10.106.125.65    <none>        8000/TCP   3m48s
kubectl get all -n kubernetes-dashboard
NAME                                                       READY   STATUS    RESTARTS   AGE
pod/kubernetes-dashboard-api-6dbb79747-rbtlc               1/1     Running   0          4m5s
pod/kubernetes-dashboard-auth-55d7cc5fbd-xccft             1/1     Running   0          4m5s
pod/kubernetes-dashboard-kong-57d45c4f69-t9lw2             1/1     Running   0          4m5s
pod/kubernetes-dashboard-metrics-scraper-df869c886-lt624   1/1     Running   0          4m5s
pod/kubernetes-dashboard-web-6ccf8d967-9rp8n               1/1     Running   0          4m5s

NAME                                           TYPE        CLUSTER-IP       EXTERNAL-IP   PORT(S)    AGE
service/kubernetes-dashboard-api               ClusterIP   10.106.254.153   <none>        8000/TCP   4m10s
service/kubernetes-dashboard-auth              ClusterIP   10.103.156.167   <none>        8000/TCP   4m10s
service/kubernetes-dashboard-kong-proxy        ClusterIP   10.105.230.13    <none>        443/TCP    4m10s
service/kubernetes-dashboard-metrics-scraper   ClusterIP   10.109.7.234     <none>        8000/TCP   4m10s
service/kubernetes-dashboard-web               ClusterIP   10.106.125.65    <none>        8000/TCP   4m10s

NAME                                                   READY   UP-TO-DATE   AVAILABLE   AGE
deployment.apps/kubernetes-dashboard-api               1/1     1            1           4m7s
deployment.apps/kubernetes-dashboard-auth              1/1     1            1           4m7s
deployment.apps/kubernetes-dashboard-kong              1/1     1            1           4m7s
deployment.apps/kubernetes-dashboard-metrics-scraper   1/1     1            1           4m7s
deployment.apps/kubernetes-dashboard-web               1/1     1            1           4m7s

NAME                                                             DESIRED   CURRENT   READY   AGE
replicaset.apps/kubernetes-dashboard-api-6dbb79747               1         1         1       4m6s
replicaset.apps/kubernetes-dashboard-auth-55d7cc5fbd             1         1         1       4m6s
replicaset.apps/kubernetes-dashboard-kong-57d45c4f69             1         1         1       4m6s
replicaset.apps/kubernetes-dashboard-metrics-scraper-df869c886   1         1         1       4m6s
replicaset.apps/kubernetes-dashboard-web-6ccf8d967               1         1         1       4m6s
Accessing Dashboard via a NodePort
A NodePort is a type of Service in Kubernetes that exposes a service on each node’s IP at a static port. This allows external traffic to reach the service by accessing the node’s IP and port. kubernetes-dashboard by default runs on a internal 10.x.x.x IP. To access the dashboard we need to have a NodePort in the kubernetes-dashboard service.
We can either Patch the service or edit the yaml file.
Choose one of the two options below; there’s no need to run both as it’s unnecessary (but not harmful).
Patch kubernetes-dashboard
This is one way to add a NodePort.
kubectl --namespace kubernetes-dashboard patch svc kubernetes-dashboard-kong-proxy -p '{"spec": {"type": "NodePort"}}'output
service/kubernetes-dashboard-kong-proxy patchedverify the service
kubectl get svc -n kubernetes-dashboardoutput
NAME                                   TYPE        CLUSTER-IP       EXTERNAL-IP   PORT(S)         AGE
kubernetes-dashboard-api               ClusterIP   10.106.254.153   <none>        8000/TCP        50m
kubernetes-dashboard-auth              ClusterIP   10.103.156.167   <none>        8000/TCP        50m
kubernetes-dashboard-kong-proxy        NodePort    10.105.230.13    <none>        443:32116/TCP   50m
kubernetes-dashboard-metrics-scraper   ClusterIP   10.109.7.234     <none>        8000/TCP        50m
kubernetes-dashboard-web               ClusterIP   10.106.125.65    <none>        8000/TCP        50m
we can see the 32116 in the kubernetes-dashboard.
Edit kubernetes-dashboard Service
This is an alternative way to add a NodePort.
kubectl edit svc -n kubernetes-dashboard kubernetes-dashboard-kong-proxy
and chaning the service type from
type: ClusterIPto
type: NodePortAccessing Kubernetes Dashboard
The kubernetes-dashboard has two (2) pods, one (1) for metrics, one (2) for the dashboard.
To access the dashboard, first we need to identify in which Node is running.
kubectl get pods -n kubernetes-dashboard -o wide
NAME                                                   READY   STATUS    RESTARTS   AGE    IP            NODE          NOMINATED NODE   READINESS GATES
kubernetes-dashboard-api-56f6f4b478-p4xbj              1/1     Running   0          55m   10.244.2.12   k8swrknode1   <none>           <none>
kubernetes-dashboard-auth-565b88d5f9-fscj9             1/1     Running   0          55m   10.244.1.12   k8swrknode2   <none>           <none>
kubernetes-dashboard-kong-57d45c4f69-rts57             1/1     Running   0          55m   10.244.2.10   k8swrknode1   <none>           <none>
kubernetes-dashboard-metrics-scraper-df869c886-bljqr   1/1     Running   0          55m   10.244.2.11   k8swrknode1   <none>           <none>
kubernetes-dashboard-web-6ccf8d967-t6k28               1/1     Running   0          55m   10.244.1.11   k8swrknode2   <none>           <none>
In my setup the dashboard pod is running on the worker node 1 and from the /etc/hosts is on the 192.168.122.50 IP.
The NodePort is 32116
k get svc -n kubernetes-dashboard -o wide
So, we can open a new tab on our browser and type:
https://192.168.122.50:32116and accept the self-signed certificate!
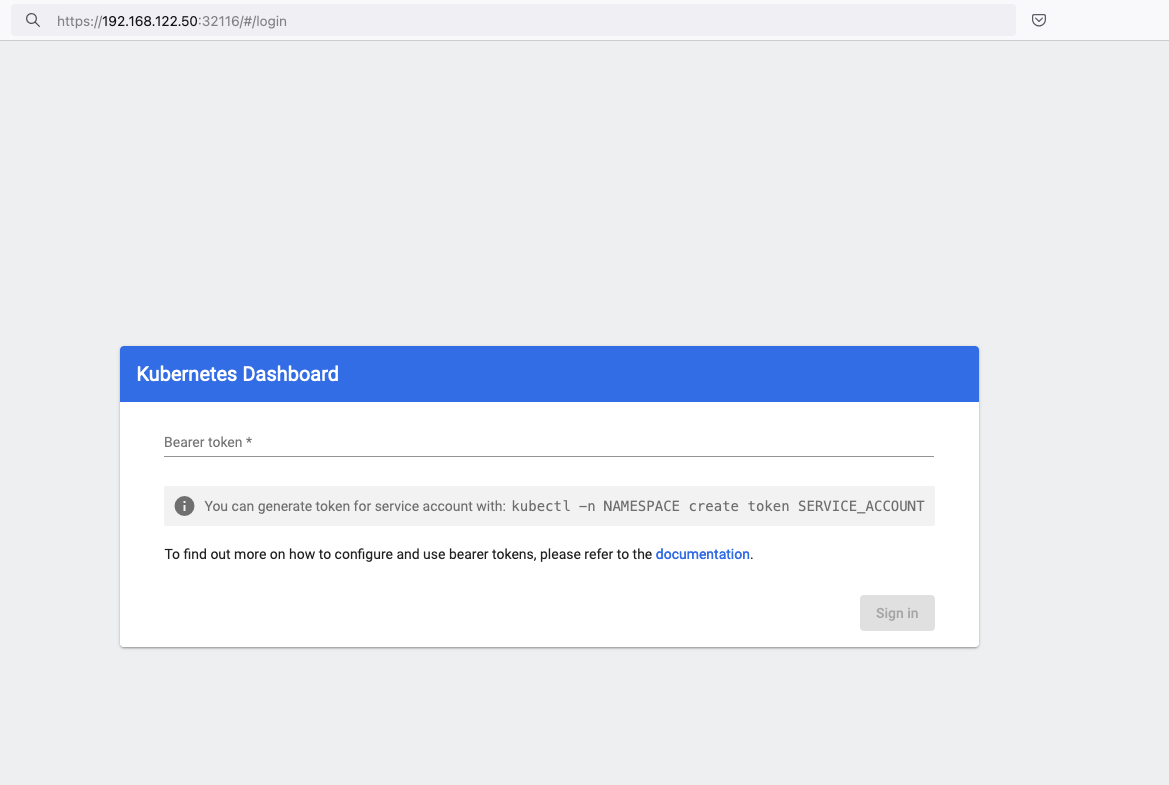
Create An Authentication Token (RBAC)
Last step for the kubernetes-dashboard is to create an authentication token.
Creating a Service Account
Create a new yaml file, with kind: ServiceAccount that has access to kubernetes-dashboard namespace and has name: admin-user.
cat > kubernetes-dashboard.ServiceAccount.yaml <<EOF
apiVersion: v1
kind: ServiceAccount
metadata:
  name: admin-user
  namespace: kubernetes-dashboard

EOF
add this service account to the k8s cluster
kubectl apply -f kubernetes-dashboard.ServiceAccount.yaml
output
serviceaccount/admin-user createdCreating a ClusterRoleBinding
We need to bind the Service Account with the kubernetes-dashboard via Role-based access control.
cat > kubernetes-dashboard.ClusterRoleBinding.yaml <<EOF
apiVersion: rbac.authorization.k8s.io/v1
kind: ClusterRoleBinding
metadata:
  name: admin-user
roleRef:
  apiGroup: rbac.authorization.k8s.io
  kind: ClusterRole
  name: cluster-admin
subjects:
- kind: ServiceAccount
  name: admin-user
  namespace: kubernetes-dashboard

EOF
apply this yaml file
kubectl apply -f kubernetes-dashboard.ClusterRoleBinding.yaml
clusterrolebinding.rbac.authorization.k8s.io/admin-user created
That means, our Service Account User has all the necessary roles to access the kubernetes-dashboard.
Getting a Bearer Token
Final step is to create/get a token for our user.
kubectl -n kubernetes-dashboard create token admin-user
eyJhbGciOiJSUzI1NiIsImtpZCI6IlpLbDVPVFQxZ1pTZlFKQlFJQkR6dVdGdGpvbER1YmVmVmlJTUd5WEVfdUEifQ.eyJhdWQiOlsiaHR0cHM6Ly9rdWJlcm5ldGVzLmRlZmF1bHQuc3ZjLmNsdXN0ZXIubG9jYWwiXSwiZXhwIjoxNzMyNzI0NTQ5LCJpYXQiOjE3MzI3MjA5NDksImlzcyI6Imh0dHBzOi8va3ViZXJuZXRlcy5kZWZhdWx0LnN2Yy5jbHVzdGVyLmxvY2FsIiwianRpIjoiMTczNzQyZGUtNDViZi00NjhkLTlhYWYtMDg3MDA3YmZmMjk3Iiwia3ViZXJuZXRlcy5pbyI6eyJuYW1lc3BhY2UiOiJrdWJlcm5ldGVzLWRhc2hib2FyZCIsInNlcnZpY2VhY2NvdW50Ijp7Im5hbWUiOiJhZG1pbi11c2VyIiwidWlkIjoiYWZhZmNhYzItZDYxNy00M2I0LTg2N2MtOTVkMzk5YmQ4ZjIzIn19LCJuYmYiOjE3MzI3MjA5NDksInN1YiI6InN5c3RlbTpzZXJ2aWNlYWNjb3VudDprdWJlcm5ldGVzLWRhc2hib2FyZDphZG1pbi11c2VyIn0.AlPSIrRsCW2vPa1P3aDQ21jaeIU2MAtiKcDO23zNRcd8-GbJUX_3oSInmSx9o2029eI5QxciwjduIRdJfTuhiPPypb3tp31bPT6Pk6_BgDuN7n4Ki9Y2vQypoXJcJNikjZpSUzQ9TOm88e612qfidSc88ATpfpS518IuXCswPg4WPjkI1WSPn-lpL6etrRNVfkT1eeSR0fO3SW3HIWQX9ce-64T0iwGIFjs0BmhDbBtEW7vH5h_hHYv3cbj_6yGj85Vnpjfcs9a9nXxgPrn_up7iA6lPtLMvQJ2_xvymc57aRweqsGSHjP2NWya9EF-KBy6bEOPB29LaIaKMywSuOQAdd this token to the previous login page
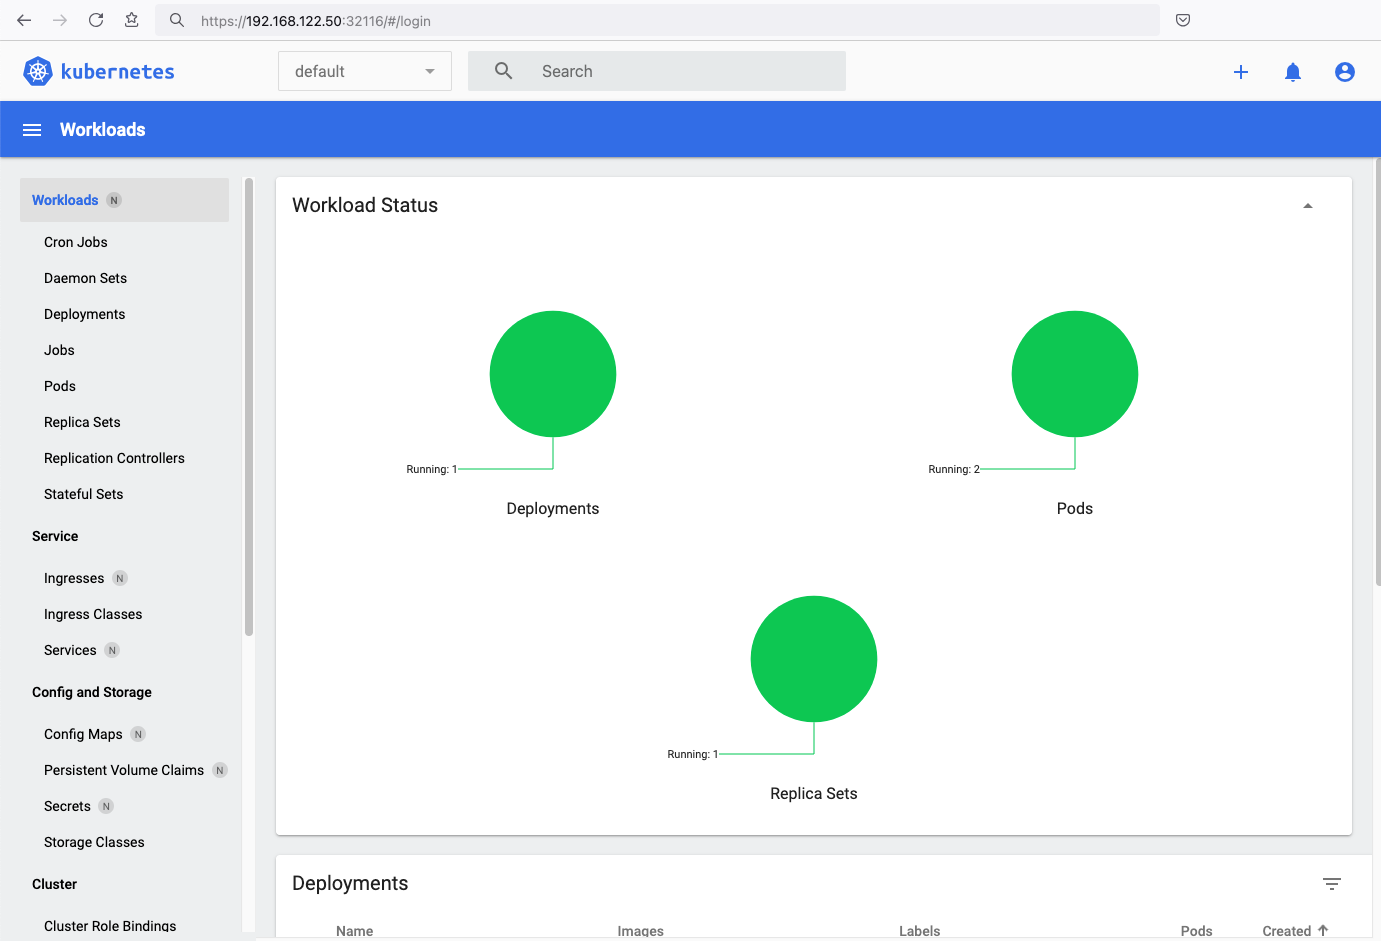
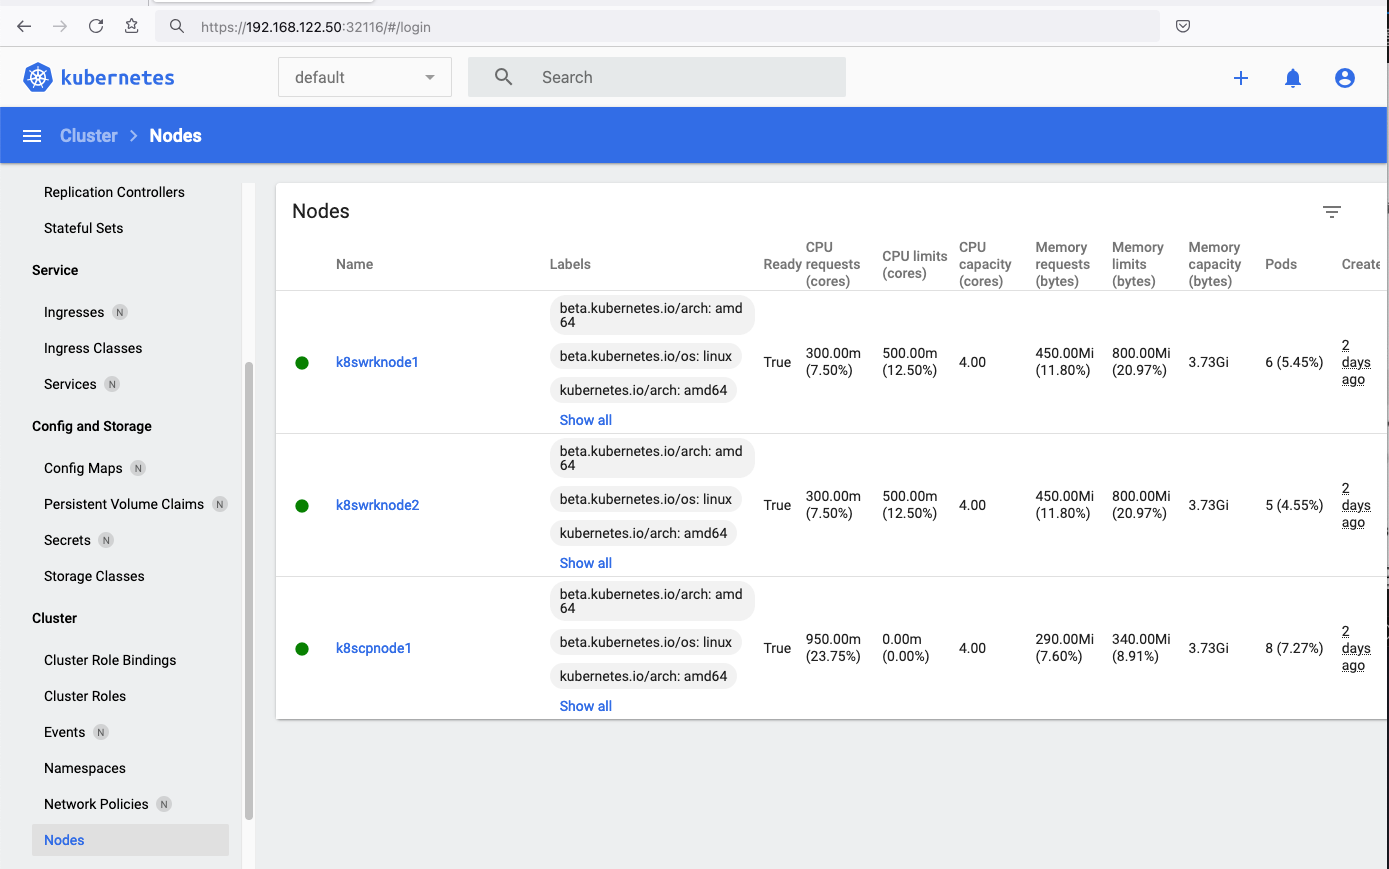
Browsing Kubernetes Dashboard
eg. Cluster –> Nodes
Nginx App
Before finishing this blog post, I would also like to share how to install a simple nginx-app as it is customary to do such thing in every new k8s cluster.
But plz excuse me, I will not get into much details.
You should be able to understand the below k8s commands.
Install nginx-app
kubectl create deployment nginx-app --image=nginx --replicas=2
deployment.apps/nginx-app createdGet Deployment
kubectl get deployment nginx-app -o wideNAME READY UP-TO-DATE AVAILABLE AGE CONTAINERS IMAGES SELECTOR
nginx-app 2/2 2 2 64s nginx nginx app=nginx-appExpose Nginx-App
kubectl expose deployment nginx-app --type=NodePort --port=80
service/nginx-app exposedVerify Service nginx-app
kubectl get svc nginx-app -o wide
NAME        TYPE       CLUSTER-IP      EXTERNAL-IP   PORT(S)        AGE   SELECTOR
nginx-app   NodePort   10.98.170.185   <none>        80:31761/TCP   27s   app=nginx-app
Describe Service nginx-app
kubectl describe svc nginx-app
Name:                     nginx-app
Namespace:                default
Labels:                   app=nginx-app
Annotations:              <none>
Selector:                 app=nginx-app
Type:                     NodePort
IP Family Policy:         SingleStack
IP Families:              IPv4
IP:                       10.98.170.185
IPs:                      10.98.170.185
Port:                     <unset>  80/TCP
TargetPort:               80/TCP
NodePort:                 <unset>  31761/TCP
Endpoints:                10.244.1.10:80,10.244.2.10:80
Session Affinity:         None
External Traffic Policy:  Cluster
Events:                   <none>
Curl Nginx-App
curl http://192.168.122.8:31761
<!DOCTYPE html>
<html>
<head>
<title>Welcome to nginx!</title>
<style>
html { color-scheme: light dark; }
body { width: 35em; margin: 0 auto;
font-family: Tahoma, Verdana, Arial, sans-serif; }
</style>
</head>
<body>
<h1>Welcome to nginx!</h1>
<p>If you see this page, the nginx web server is successfully installed and
working. Further configuration is required.</p>

<p>For online documentation and support please refer to
<a href="http://nginx.org/">nginx.org</a>.<br/>
Commercial support is available at
<a href="http://nginx.com/">nginx.com</a>.</p>

<p><em>Thank you for using nginx.</em></p>
</body>
</html>
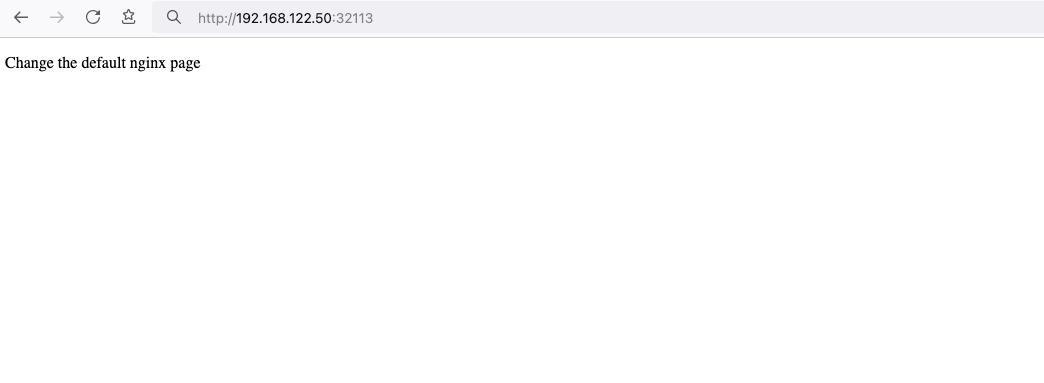
Nginx-App from Browser

Change the default page
Last but not least, let’s modify the default index page to something different for educational purposes with the help of a ConfigMap
The idea is to create a ConfigMap with the html of our new index page then we would like to attach it to our nginx deployment as a volume mount !
cat > nginx_config.map << EOF
apiVersion: v1
data:
  index.html: |
    <!DOCTYPE html>
    <html lang="en">
    <head>
        <title>A simple HTML document</title>
    </head>
    <body>
        <p>Change the default nginx page </p>
    </body>
    </html>
kind: ConfigMap
metadata:
  name: nginx-config-page
  namespace: default
EOF
cat nginx_config.mapapiVersion: v1
data:
index.html: |
<!DOCTYPE html>
<html lang="en">
<head>
<title>A simple HTML document</title>
</head>
<body>
<p>Change the default nginx page </p>
</body>
</html>
kind: ConfigMap
metadata:
name: nginx-config-page
namespace: defaultapply the config.map
kubectl apply -f nginx_config.map
verify
kubectl get configmapNAME DATA AGE
kube-root-ca.crt 1 2d3h
nginx-config-page 1 16mnow the diffucult part, we need to mount our config map to the nginx deployment and to do that, we need to edit the nginx deployment.
kubectl edit deployments.apps nginx-apprewrite spec section to include:
- the VolumeMount &
- the ConfigMap as Volume
    spec:
      containers:
        - image: nginx
        ...
        volumeMounts:
        - mountPath: /usr/share/nginx/html
          name: nginx-config
    ...
      volumes:
      - configMap:
          name: nginx-config-page
        name: nginx-config
After saving, the nginx deployment will be updated by it-self.
finally we can see our updated first index page:
That’s it
I hope you enjoyed this post.
-Evaggelos Balaskas
destroy our lab
./destroy.sh...
libvirt_domain.domain-ubuntu["k8wrknode1"]: Destroying... [id=446cae2a-ce14-488f-b8e9-f44839091bce]
libvirt_domain.domain-ubuntu["k8scpnode"]: Destroying... [id=51e12abb-b14b-4ab8-b098-c1ce0b4073e3]
time_sleep.wait_for_cloud_init: Destroying... [id=2022-08-30T18:02:06Z]
libvirt_domain.domain-ubuntu["k8wrknode2"]: Destroying... [id=0767fb62-4600-4bc8-a94a-8e10c222b92e]
time_sleep.wait_for_cloud_init: Destruction complete after 0s
libvirt_domain.domain-ubuntu["k8wrknode1"]: Destruction complete after 1s
libvirt_domain.domain-ubuntu["k8scpnode"]: Destruction complete after 1s
libvirt_domain.domain-ubuntu["k8wrknode2"]: Destruction complete after 1s
libvirt_cloudinit_disk.cloud-init["k8wrknode1"]: Destroying... [id=/var/lib/libvirt/images/Jpw2Sg_cloud-init.iso;b8ddfa73-a770-46de-ad16-b0a5a08c8550]
libvirt_cloudinit_disk.cloud-init["k8wrknode2"]: Destroying... [id=/var/lib/libvirt/images/VdUklQ_cloud-init.iso;5511ed7f-a864-4d3f-985a-c4ac07eac233]
libvirt_volume.ubuntu-base["k8scpnode"]: Destroying... [id=/var/lib/libvirt/images/l5Rr1w_ubuntu-base]
libvirt_volume.ubuntu-base["k8wrknode2"]: Destroying... [id=/var/lib/libvirt/images/VdUklQ_ubuntu-base]
libvirt_cloudinit_disk.cloud-init["k8scpnode"]: Destroying... [id=/var/lib/libvirt/images/l5Rr1w_cloud-init.iso;11ef6bb7-a688-4c15-ae33-10690500705f]
libvirt_volume.ubuntu-base["k8wrknode1"]: Destroying... [id=/var/lib/libvirt/images/Jpw2Sg_ubuntu-base]
libvirt_cloudinit_disk.cloud-init["k8wrknode1"]: Destruction complete after 1s
libvirt_volume.ubuntu-base["k8wrknode2"]: Destruction complete after 1s
libvirt_cloudinit_disk.cloud-init["k8scpnode"]: Destruction complete after 1s
libvirt_cloudinit_disk.cloud-init["k8wrknode2"]: Destruction complete after 1s
libvirt_volume.ubuntu-base["k8wrknode1"]: Destruction complete after 1s
libvirt_volume.ubuntu-base["k8scpnode"]: Destruction complete after 2s
libvirt_volume.ubuntu-vol["k8wrknode1"]: Destroying... [id=/var/lib/libvirt/images/Jpw2Sg_ubuntu-vol]
libvirt_volume.ubuntu-vol["k8scpnode"]: Destroying... [id=/var/lib/libvirt/images/l5Rr1w_ubuntu-vol]
libvirt_volume.ubuntu-vol["k8wrknode2"]: Destroying... [id=/var/lib/libvirt/images/VdUklQ_ubuntu-vol]
libvirt_volume.ubuntu-vol["k8scpnode"]: Destruction complete after 0s
libvirt_volume.ubuntu-vol["k8wrknode2"]: Destruction complete after 0s
libvirt_volume.ubuntu-vol["k8wrknode1"]: Destruction complete after 0s
random_id.id["k8scpnode"]: Destroying... [id=l5Rr1w]
random_id.id["k8wrknode2"]: Destroying... [id=VdUklQ]
random_id.id["k8wrknode1"]: Destroying... [id=Jpw2Sg]
random_id.id["k8wrknode2"]: Destruction complete after 0s
random_id.id["k8scpnode"]: Destruction complete after 0s
random_id.id["k8wrknode1"]: Destruction complete after 0s
Destroy complete! Resources: 16 destroyed.
Personal notes on hardening an new ubuntu 24.04 LTS ssh daemon setup for incoming ssh traffic.
Port <12345>

PasswordAuthentication no
KbdInteractiveAuthentication no
UsePAM yes
X11Forwarding no
PrintMotd no
UseDNS no

KexAlgorithms sntrup761x25519-sha512@openssh.com,curve25519-sha256,curve25519-sha256@libssh.org,diffie-hellman-group-exchange-sha256,diffie-hellman-group16-sha512,diffie-hellman-group18-sha512,diffie-hellman-group14-sha256

HostKeyAlgorithms ssh-ed25519-cert-v01@openssh.com,ecdsa-sha2-nistp256-cert-v01@openssh.com,ecdsa-sha2-nistp384-cert-v01@openssh.com,ecdsa-sha2-nistp521-cert-v01@openssh.com,sk-ssh-ed25519-cert-v01@openssh.com,sk-ecdsa-sha2-nistp256-cert-v01@openssh.com,rsa-sha2-512-cert-v01@openssh.com,rsa-sha2-256-cert-v01@openssh.com,ssh-ed25519,ecdsa-sha2-nistp384,ecdsa-sha2-nistp521,sk-ssh-ed25519@openssh.com,sk-ecdsa-sha2-nistp256@openssh.com,rsa-sha2-512,rsa-sha2-256

MACs umac-128-etm@openssh.com,hmac-sha2-256-etm@openssh.com,hmac-sha2-512-etm@openssh.com,umac-128@openssh.com,hmac-sha2-256,hmac-sha2-512

AcceptEnv LANG LC_*
AllowUsers <username>

Subsystem       sftp    /usr/lib/openssh/sftp-server
testing with https://sshcheck.com/
Personal notes on hardening an new ubuntu 24.04 LTS postfix setup for incoming smtp TLS traffic.
Create a Diffie–Hellman key exchange
openssl dhparam -out /etc/postfix/dh2048.pem 2048for offering a new random DH group.
SMTPD - Incoming Traffic
# SMTPD - Incoming Traffic

postscreen_dnsbl_action = drop
postscreen_dnsbl_sites =
        bl.spamcop.net,
        zen.spamhaus.org

smtpd_banner = <put your banner here>

smtpd_helo_required = yes
smtpd_starttls_timeout = 30s

smtpd_tls_CApath = /etc/ssl/certs
smtpd_tls_cert_file = /root/.acme.sh/<your_domain>/fullchain.cer
smtpd_tls_key_file = /root/.acme.sh/<your_domain>/<your_domain>.key

smtpd_tls_dh1024_param_file = ${config_directory}/dh2048.pem
smtpd_tls_ciphers = HIGH

# Wick ciphers
smtpd_tls_exclude_ciphers =
        3DES,
        AES128-GCM-SHA256,
        AES128-SHA,
        AES128-SHA256,
        AES256-GCM-SHA384,
        AES256-SHA,
        AES256-SHA256,
        CAMELLIA128-SHA,
        CAMELLIA256-SHA,
        DES-CBC3-SHA,
        DHE-RSA-DES-CBC3-SHA,
        aNULL,
        eNULL,
        CBC

smtpd_tls_loglevel = 1
smtpd_tls_mandatory_ciphers = HIGH
smtpd_tls_protocols = !SSLv2, !SSLv3, !TLSv1, !TLSv1.1
smtpd_tls_security_level = may
smtpd_tls_session_cache_database = btree:${data_directory}/smtpd_scache
smtpd_use_tls = yes
tls_preempt_cipherlist = yes

unknown_local_recipient_reject_code = 550
Local Testing
testssl -t smtp <your_domain>.:25
Online Testing
result
I have many random VPS and VMs across europe in different providers for reasons.
Two of them, are still running rpm based distro from 2011 and yes 13years later, I have not found the time to migrate them! Needless to say these are still my most stable running linux machines that I have, zero problems, ZERO PROBLEMS and are in production and heavily used every day. Let me write this again in bold: ZERO PROBLEMS.
But as time has come, I want to close some public services and use a mesh VPN for ssh. Tailscale entered the conversation and seems it’s binary works in new and old linux machines too.
long story short, I wanted an init script and with the debian package: dpkg, I could use start-stop-daemon.
Here is the init script:
#!/bin/bash

# ebal, Thu, 08 Aug 2024 14:18:11 +0300

### BEGIN INIT INFO
# Provides:          tailscaled
# Required-Start:    $local_fs $network $syslog
# Required-Stop:     $local_fs $network $syslog
# Default-Start:     2 3 4 5
# Default-Stop:      0 1 6
# Short-Description: tailscaled daemon
# Description:       tailscaled daemon
### END INIT INFO

. /etc/rc.d/init.d/functions

prog="tailscaled"
DAEMON="/usr/local/bin/tailscaled"
PIDFILE="/var/run/tailscaled.pid"

test -x $DAEMON || exit 0

case "$1" in
  start)
    echo "Starting ${prog} ..."
    start-stop-daemon --start --background --pidfile $PIDFILE --make-pidfile --startas $DAEMON --
    RETVAL=$?
    ;;
  stop)
    echo "Stopping ${prog} ..."
    if [ -f ${PIDFILE} ]; then
        start-stop-daemon --stop --pidfile $PIDFILE --retry 5 --startas ${DAEMON} -- -cleanup
        rm -f ${PIDFILE} > /dev/null 2>&1
    fi
    RETVAL=$?
    ;;
  status)
    start-stop-daemon --status --pidfile ${PIDFILE}
    status $prog
    RETVAL=$?
    ;;
  *)
    echo "Usage: /etc/init.d/tailscaled {start|stop|status}"
    RETVAL=1
    ;;
esac

exit ${RETVAL}
an example:
[root@kvm ~]# /etc/init.d/tailscaled start
Starting tailscaled ...

[root@kvm ~]# /etc/init.d/tailscaled status
tailscaled (pid  29101) is running...

[root@kvm ~]# find /var/ -type f -name "tailscale*pid"
/var/run/tailscaled.pid

[root@kvm ~]# cat /var/run/tailscaled.pid
29101

[root@kvm ~]# ps -e fuwww | grep -i tailscaled
root     29400  0.0  0.0 103320   880 pts/0    S+   16:49   0:00                      _ grep --color -i tailscaled
root     29101  2.0  0.7 1250440 32180 ?       Sl   16:48   0:00 /usr/local/bin/tailscaled

[root@kvm ~]# tailscale up

[root@kvm ~]# tailscale set -ssh

[root@kvm ~]# /etc/init.d/tailscaled stop
Stopping tailscaled ...

[root@kvm ~]# /etc/init.d/tailscaled status
tailscaled is stopped

[root@kvm ~]# /etc/init.d/tailscaled stop
Stopping tailscaled ...

[root@kvm ~]# /etc/init.d/tailscaled start
Starting tailscaled ...

[root@kvm ~]# /etc/init.d/tailscaled start
Starting tailscaled ...
process already running.

[root@kvm ~]# /etc/init.d/tailscaled status
tailscaled (pid  29552) is running...
Migrate legacy openldap to a docker container.
Prologue
I maintain a couple of legacy EOL CentOS 6.x SOHO servers to different locations. Stability on those systems is unparalleled and is -mainly- the reason of keeping them in production, as they run almost a decade without a major issue.
But I need to do a modernization of these legacy systems. So I must prepare a migration plan. Initial goal was to migrate everything to ansible roles. Although, I’ve walked down this path a few times in the past, the result is not something desirable. A plethora of configuration files and custom scripts. Not easily maintainable for future me.
Current goal is to setup a minimal setup for the underlying operating system, that I can easily upgrade through it’s LTS versions and separate the services from it. Keep the configuration on a git repository and deploy docker containers via docker-compose.
In this blog post, I will document the openldap service. I had some is issues against bitnami/openldap docker container so the post is also a kind of documentation.
Preparation
Two different cases, in one I have the initial ldif files (without the data) and on the second node I only have the data in ldifs but not the initial schema. So, I need to create for both locations a combined ldif that will contain the schema and data.
And that took me more time that it should! I could not get the service running correctly and I experimented with ldap exports till I found something that worked against bitnami/openldap notes and environment variables.
ldapsearch command
In /root/.ldap_conf I keep the environment variables as Base, Bind and Admin Password (only root user can read them).
cat /usr/local/bin/lds #!/bin/bash
source /root/.ldap_conf
/usr/bin/ldapsearch
-o ldif-wrap=no
-H ldap://$HOST
-D $BIND
-b $BASE
-LLL -x
-w $PASS $*
sudo lds > /root/openldap_export.ldif
Bitnami/openldap
GitHub page of bitnami/openldap has extensive documentation and a lot of environment variables you need to setup, to run an openldap service. Unfortunately, it took me quite a while, in order to find the proper configuration to import ldif from my current openldap service.
Through the years bitnami has made a few changes in libopenldap.sh which produced a frustrated period for me to review the shell script and understand what I need to do.
I would like to explain it in simplest terms here and hopefully someone will find it easier to migrate their openldap.
TL;DR
The correct way:
Create local directories
mkdir -pv {ldif,openldap}Place your openldap_export.ldif to the local ldif directory, and start openldap service with:
docker compose up---
services:
openldap:
image: bitnami/openldap:2.6
container_name: openldap
env_file:
- path: ./ldap.env
volumes:
- ./openldap:/bitnami/openldap
- ./ldifs:/ldifs
ports:
- 1389:1389
restart: always
volumes:
data:
driver: local
driver_opts:
device: /storage/docker
Your environmental configuration file, should look like:
cat ldap.env LDAP_ADMIN_USERNAME="admin"
LDAP_ADMIN_PASSWORD="testtest"
LDAP_ROOT="dc=example,dc=org"
LDAP_ADMIN_DN="cn=admin,$ LDAP_ROOT"
LDAP_SKIP_DEFAULT_TREE=yes
Below we are going to analyze and get into details of bitnami/openldap docker container and process.
OpenLDAP Version in docker container images.
Bitnami/openldap docker containers -at the time of writing- represent the below OpenLDAP versions:
bitnami/openldap:2    -> OpenLDAP: slapd 2.4.58
bitnami/openldap:2.5  -> OpenLDAP: slapd 2.5.17
bitnami/openldap:2.6  -> OpenLDAP: slapd 2.6.7
list images
docker images -a
REPOSITORY         TAG       IMAGE ID       CREATED        SIZE
bitnami/openldap   2.6       bf93eace348a   30 hours ago   160MB
bitnami/openldap   2.5       9128471b9c2c   2 days ago     160MB
bitnami/openldap   2         3c1b9242f419   2 years ago    151MB
Initial run without skipping default tree
As mentioned above the problem was with LDAP environment variables and LDAP_SKIP_DEFAULT_TREE was in the middle of those.
cat ldap.env LDAP_ADMIN_USERNAME="admin"
LDAP_ADMIN_PASSWORD="testtest"
LDAP_ROOT="dc=example,dc=org"
LDAP_ADMIN_DN="cn=admin,$ LDAP_ROOT"
LDAP_SKIP_DEFAULT_TREE=no
for testing: always empty ./openldap/ directory
docker compose up -dBy running ldapsearch (see above) the results are similar to below data
ldsdn: dc=example,dc=org
objectClass: dcObject
objectClass: organization
dc: example
o: example
dn: ou=users,dc=example,dc=org
objectClass: organizationalUnit
ou: users
dn: cn=user01,ou=users,dc=example,dc=org
cn: User1
cn: user01
sn: Bar1
objectClass: inetOrgPerson
objectClass: posixAccount
objectClass: shadowAccount
userPassword:: Yml0bmFtaTE=
uid: user01
uidNumber: 1000
gidNumber: 1000
homeDirectory: /home/user01
dn: cn=user02,ou=users,dc=example,dc=org
cn: User2
cn: user02
sn: Bar2
objectClass: inetOrgPerson
objectClass: posixAccount
objectClass: shadowAccount
userPassword:: Yml0bmFtaTI=
uid: user02
uidNumber: 1001
gidNumber: 1001
homeDirectory: /home/user02
dn: cn=readers,ou=users,dc=example,dc=org
cn: readers
objectClass: groupOfNames
member: cn=user01,ou=users,dc=example,dc=org
member: cn=user02,ou=users,dc=example,dc=org
so as you can see, they create some default users and groups.
Initial run with skipping default tree
Now, let’s skip creating the default users/groups.
cat ldap.env LDAP_ADMIN_USERNAME="admin"
LDAP_ADMIN_PASSWORD="testtest"
LDAP_ROOT="dc=example,dc=org"
LDAP_ADMIN_DN="cn=admin,$ LDAP_ROOT"
LDAP_SKIP_DEFAULT_TREE=yes
(always empty ./openldap/ directory )
docker compose up -dldapsearch now returns:
No such object (32)That puzzled me … a lot !
Conclusion
It does NOT matter if you place your ldif schema file and data and populate the LDAP variables with bitnami/openldap. Or use ANY other LDAP variable from bitnami/openldap reference manual.
The correct method is to SKIP default tree and place your export ldif to the local ldif directory. Nothing else worked.
Took me almost 4 days to figure it out and I had to read the libopenldap.sh.
That’s it !
Prologue
I have a Samsung QLED 55” Smart TV, I run ReadyMedia | MiniDLNA to stream my media from my desktop PC to the TV.
DLNA/ UPnP is a well implemented protocol, easy enough, but MiniDLNA has some limitations. There is not a UX environment, no tracking viewing history, thumbnails issues and a few other small things.
I was looking for an alternative solution for quite some time. and from time to time I got Jellyfin as a suggestion.
Jellyfin Server
I wanted to explore this possibility again, but without the hustle of installing dependencies etc, so the Docker options seemed the best.
docker pull jellyfin/jellyfinthis will download the Jellyfin latest container image.
after that I wrote a small shell script start.sh to start Jellyfin.
#!/bin/bash

# ebal, Sun, 25 Feb 2024 14:27:32 +0200
MyMEDIA="/opt/media"

cd /opt/jellyfin/
mkdir {config,cache}

docker run -d
    --name jellyfin
    -v "$PWD"/config:/config
    -v "$PWD"/cache:/cache
    -v "$MyMEDIA":/media
    --net=host
    jellyfin/jellyfin:latest
and by running this script will start Jellyfin.

Samsung TV
I was looking the Jellyfin clients and almost all of them are the same with the web client version, so it seemed over engineering to use something else. But how to install a Jellyfin client to my Samsung TV?
after browsing the web, I found that Samsung is running Tizen An open source, standards-based software platform for multiple device categories, which to be honest was one of the reasons I bought a Samsung TV in the first place but completely forgot and never used anything tizen related.
It was time to do something about it, so I had to put my TV into developer mode !!!
Apps type 12345 and you enable developer mode
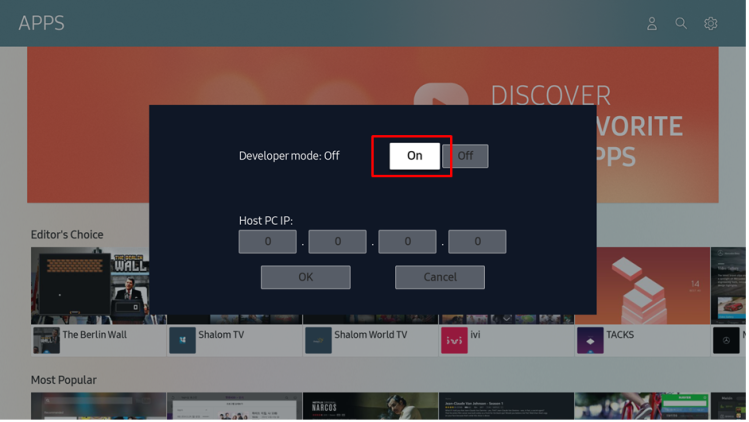
Enable On and this is important type your host IP address
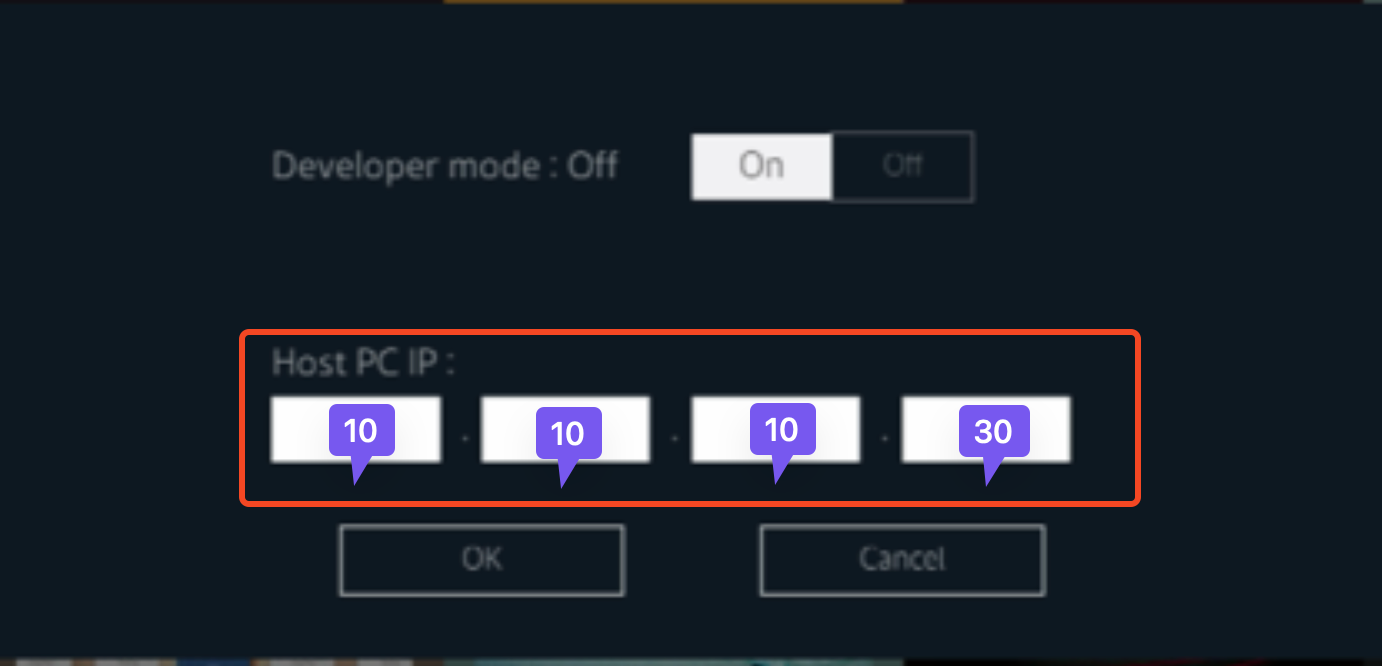
In this case, my host PC is 10.10.10.30.
Tizen and Jellyfin
There is a long story on how to setup Tizen Studio, built your Jellyfin binary and then upload it to your Samsung TV. But there is an easiest way to do via docker containers.
you need to find your TV’s IP and run the below command:
sudo docker run --ulimit nofile=122880:122880 -m 3G --rm georift/install-jellyfin-tizen <Samsung TV IP>
eg. my samsung tv is 10.10.10.39
sudo docker run --ulimit nofile=122880:122880 -m 3G --rm georift/install-jellyfin-tizen 10.10.10.39
This project will do two things:
- download the latest built of Jellyfin for tizen from here jeppevinkel/jellyfin-tizen-builds
- and then upload it via
tizen-clito the TV
Samsung TV