Using Terraform for personal projects, is a good way to create your lab in a reproducible manner. Wherever your lab is, either in the “cloud” aka other’s people computers or in a self-hosted environment, you can run your Infrastructure as code (IaC) instead of performing manual tasks each time.
My preferable way is to use QEMU/KVM (Kernel Virtual Machine) on my libvirt (self-hosted) lab. You can quickly build a k8s cluster or test a few virtual machines with different software, without paying extra money to cloud providers.
Terraform uses a state file to store your entire infra in json format. This file will be the source of truth for your infrastructure. Any changes you make in the code, terraform will figure out what needs to add/destroy and run only what have changed.
Working in a single repository, terraform will create a local state file on your working directory. This is fast and reliable when working alone. When working with a team (either in an opensource project/service or it is something work related) you need to share the state with others. Eitherwise the result will be catastrophic as each person will have no idea of the infrastructure state of the service.
In this blog post, I will try to explain how to use GitLab to store the terraform state into a remote repository by using the tf backend: http which is REST.
Greate a new private GitLab Project
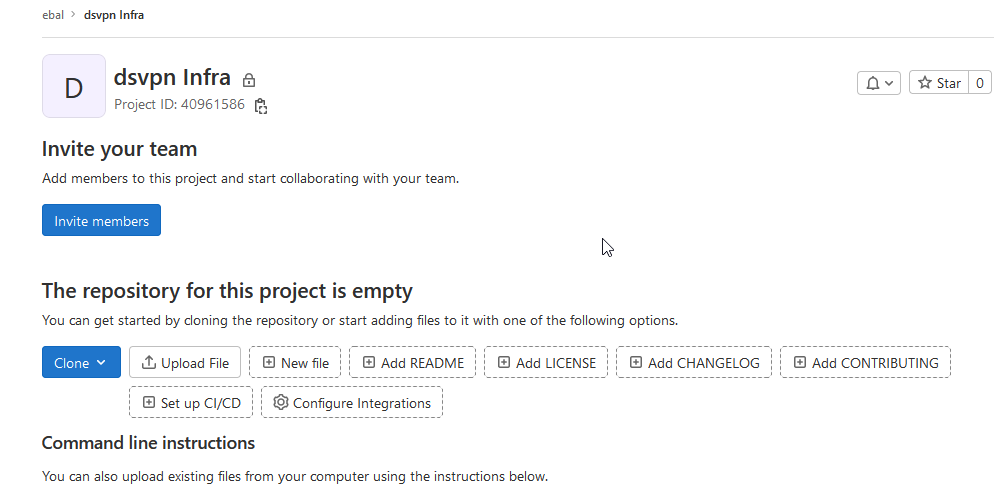
We need the Project ID which is under the project name in the top.
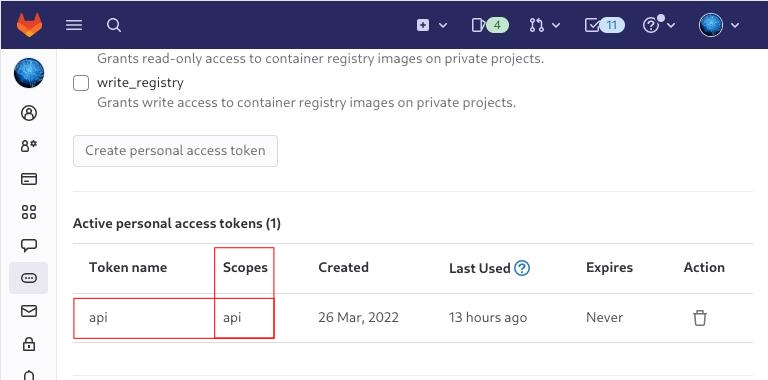
Create a new api token
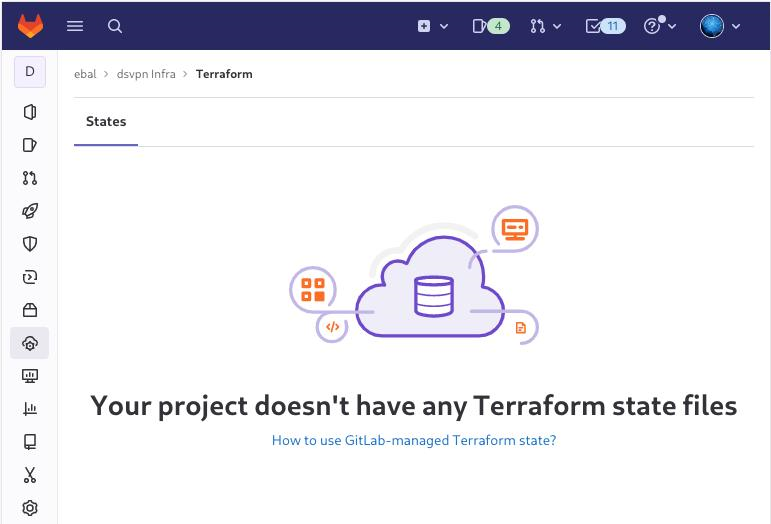
Verify that your Project has the ability to store terraform state files
You are ready to clone the git repository to your system.
Backend
Reading the documentation in the below links
seems that the only thing we need to do, is to expand our terraform project with this:
terraform {
  backend "http" {
  }
}
Doing that, we inform our IaC that our terraform backend should be a remote address.
Took me a while to figure this out, but after re-reading all the necessary documentation materials the idea is to declare your backend on gitlab and to do this, we need to initialize the http backend.
The only Required configuration setting is the remote address and should be something like this:
terraform {
  backend "http" {
    address = "https://gitlab.com/api/v4/projects/<PROJECT_ID>/terraform/state/<STATE_NAME>"
  }
}
Where PROJECT_ID and STATE_NAME are relative to your project.
In this article, we go with
GITLAB_PROJECT_ID="40961586"
GITLAB_TF_STATE_NAME="tf_state"
Terraform does not allow to use variables in the backend http, so the preferable way is to export them to our session.
and we -of course- need the address:
TF_HTTP_ADDRESS="https://gitlab.com/api/v4/projects/${GITLAB_PROJECT_ID}/terraform/state/${GITLAB_TF_STATE_NAME}"
For convience reasons, I will create a file named: terraform.config outside of this git repo
cat > ../terraform.config <<EOF
export -p GITLAB_PROJECT_ID="40961586"
export -p GITLAB_TF_STATE_NAME="tf_state"
export -p GITLAB_URL="https://gitlab.com/api/v4/projects"

# Address
export -p TF_HTTP_ADDRESS="${GITLAB_URL}/${GITLAB_PROJECT_ID}/terraform/state/${GITLAB_TF_STATE_NAME}"

EOF

source ../terraform.config
this should do the trick.
Authentication
In order to authenticate via tf against GitLab to store the tf remote state, we need to also set two additional variables:
# Authentication
TF_HTTP_USERNAME="api"
TF_HTTP_PASSWORD="<TOKEN>"
put them in the above terraform.config file.
Pretty much we are done!
Initialize Terraform
source ../terraform.config

terraform init
Initializing the backend...

Successfully configured the backend "http"! Terraform will automatically
use this backend unless the backend configuration changes.

Initializing provider plugins...
- Finding latest version of hashicorp/http...
- Finding latest version of hashicorp/random...
- Finding latest version of hashicorp/template...
- Finding dmacvicar/libvirt versions matching ">= 0.7.0"...
- Installing hashicorp/random v3.4.3...
- Installed hashicorp/random v3.4.3 (signed by HashiCorp)
- Installing hashicorp/template v2.2.0...
- Installed hashicorp/template v2.2.0 (signed by HashiCorp)
- Installing dmacvicar/libvirt v0.7.0...
- Installed dmacvicar/libvirt v0.7.0 (unauthenticated)
- Installing hashicorp/http v3.2.1...
- Installed hashicorp/http v3.2.1 (signed by HashiCorp)

Terraform has created a lock file .terraform.lock.hcl to record the provider
selections it made above. Include this file in your version control repository
so that Terraform can guarantee to make the same selections by default when
you run "terraform init" in the future.

...

Terraform has been successfully initialized!

You may now begin working with Terraform. Try running "terraform plan" to see
any changes that are required for your infrastructure. All Terraform commands
should now work.

If you ever set or change modules or backend configuration for Terraform,
rerun this command to reinitialize your working directory. If you forget, other
commands will detect it and remind you to do so if necessary.
Remote state
by running
terraform plan
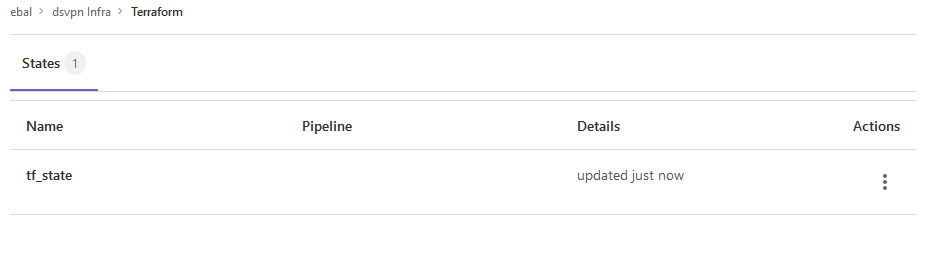
we can now see the remote terraform state in the gitlab
Opening Actions –> Copy terraform init command we can see the below configuration:
export GITLAB_ACCESS_TOKEN=<YOUR-ACCESS-TOKEN>

terraform init
    -backend-config="address=https://gitlab.com/api/v4/projects/40961586/terraform/state/tf_state"
    -backend-config="lock_address=https://gitlab.com/api/v4/projects/40961586/terraform/state/tf_state/lock"
    -backend-config="unlock_address=https://gitlab.com/api/v4/projects/40961586/terraform/state/tf_state/lock"
    -backend-config="username=api"
    -backend-config="password=$GITLAB_ACCESS_TOKEN"
    -backend-config="lock_method=POST"
    -backend-config="unlock_method=DELETE"
    -backend-config="retry_wait_min=5"
Update terraform backend configuration
I dislike running a “long” terraform init command, so we will put these settings to our tf code.
Separating the static changes from the dynamic, our Backend http config can become something like this:
terraform {
  backend "http" {
    lock_method    = "POST"
    unlock_method  = "DELETE"
    retry_wait_min = 5
  }
}
but we need to update our terraform.config once more, to include all the variables of the http backend configuration for locking and unlocking the state.
# Lock
export -p TF_HTTP_LOCK_ADDRESS="${TF_HTTP_ADDRESS}/lock"

# Unlock
export -p TF_HTTP_UNLOCK_ADDRESS="${TF_HTTP_ADDRESS}/lock"
Terraform Config
So here is our entire terraform config file
# GitLab

export -p GITLAB_URL="https://gitlab.com/api/v4/projects"
export -p GITLAB_PROJECT_ID="<>"
export -p GITLAB_TF_STATE_NAME="tf_state"

# Terraform

# Address
export -p TF_HTTP_ADDRESS="${GITLAB_URL}/${GITLAB_PROJECT_ID}/terraform/state/${GITLAB_TF_STATE_NAME}"

# Lock
export -p TF_HTTP_LOCK_ADDRESS="${TF_HTTP_ADDRESS}/lock"

# Unlock
export -p TF_HTTP_UNLOCK_ADDRESS="${TF_HTTP_ADDRESS}/lock"

# Authentication
export -p TF_HTTP_USERNAME="api"
export -p TF_HTTP_PASSWORD="<>"
And pretty much that’s it!
Other Colleagues
So in order our team mates/colleagues want to make changes to this specific gitlab repo (or even extended to include a pipeline) they need
- Git clone the repo
- Edit the terraform.config
- Initialize terraform (terraform init)
And terraform will use the remote state file.
So you build a GitLab project, you created a pipeline and then a scheduler to run every week your pipeline.
And then you realize that you are polluting the internet with deprecated (garbage) things, at some point you have a debug option on, bla bla bla… etc etc.
It is time to clean up your mess!
Create a GitLab API Token
Select scopes: api.
Verify API token
run something like this
export GITLAB_API="glpat-HldkXzyurwBmroAdQCMo"

curl -sL --header "PRIVATE-TOKEN: ${GITLAB_API}" "https://gitlab.com/api/v4/projects?owned=true" | jq .[].path_with_namespace
you should see your projects.
Get your Project ID
create a new bash variable:
export PROJECT="terraform-provider/terraform-provider-hcloud-ci"
and then use the get rest api call
curl -sL --header "PRIVATE-TOKEN: ${GITLAB_API}" "https://gitlab.com/api/v4/projects?owned=true&search=${PROJECT}&search_namespaces=true" | jq -r .[].id
or you can also put the id into a new bash variable:
export ID=$(curl -sL --header "PRIVATE-TOKEN: ${GITLAB_API}" "https://gitlab.com/api/v4/projects?owned=true&search=${PROJECT}&search_namespaces=true" | jq -r .[].id)
View the previous pipelines
curl -sL \
  --header "PRIVATE-TOKEN: ${GITLAB_API}" \
  https://gitlab.com/api/v4/projects/${ID}/pipelines | jq .
Remove deprecated pipelines
just delete them via the API
curl -sL --header "PRIVATE-TOKEN: ${GITLAB_API}"   "https://gitlab.com/api/v4/projects/${ID}/pipelines?per_page=150"  \
 | jq  -r .[].id    \
 | awk '{print "curl -sL --header \"PRIVATE-TOKEN: ${GITLAB_API}\" --request DELETE https://gitlab.com/api/v4/projects/${ID}/pipelines/"$1}'   \
 | sh -x
that’s it !
GitLab is a truly wonderful devops platform. It has a complete CI/CD toolchain, it’s opensource (GitLab Community Edition) and it can also be self-hosted. One of its greatest feature are the GitLab Runner that are used in the CI/CD pipelines.
The GitLab Runner is also an opensource project written in Go and handles CI jobs of a pipeline. GitLab Runner implements Executors to run the continuous integration builds for different scenarios and the most used of them is the docker executor, although nowadays most of sysadmins are migrating to kubernetes executors.
I have a few personal projects in GitLab under https://gitlab.com/ebal but I would like to run GitLab Runner local on my system for testing purposes. GitLab Runner has to register to a GitLab instance, but I do not want to install the entire GitLab application. I want to use the docker executor and run my CI tests local.
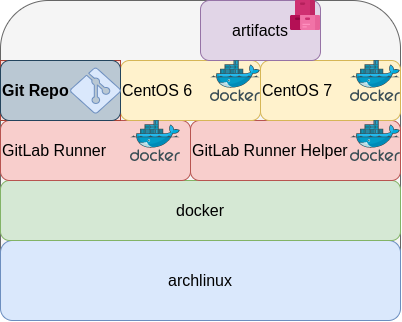
Here are my notes on how to run GitLab Runner with the docker executor. No root access needed as long as your user is in the docker group. To give a sense of what this blog post is, the below image will act as reference.
GitLab Runner
The docker executor comes in two flavors:
- alpine
- ubuntu
In this blog post, I will use the ubuntu flavor.
Get the latest ubuntu docker image
docker pull gitlab/gitlab-runner:ubuntuVerify
$ docker run --rm -ti gitlab/gitlab-runner:ubuntu --version
Version:      12.10.1
Git revision: ce065b93
Git branch:   12-10-stable
GO version:   go1.13.8
Built:        2020-04-22T21:29:52+0000
OS/Arch:      linux/amd64
exec help
We are going to use the exec command to spin up the docker executor. With exec we will not need to register with a token.
$ docker run --rm -ti gitlab/gitlab-runner:ubuntu exec --help

Runtime platform arch=amd64 os=linux pid=6 revision=ce065b93 version=12.10.1
NAME:
   gitlab-runner exec - execute a build locally

USAGE:
   gitlab-runner exec command [command options] [arguments...]

COMMANDS:
     shell       use shell executor
     ssh         use ssh executor
     virtualbox  use virtualbox executor
     custom      use custom executor
     docker      use docker executor
Runner
5 minutes ago
# Run your CI test with GitLab-Runner on your system
GitLab     parallels   use parallels executor

OPTIONS:
   --help, -h  show help
Git Repo - tmux
Now we need to download the git repo, we would like to test. Inside the repo, a .gitlab-ci.yml file should exist. The gitlab-ci file describes the CI pipeline, with all the stages and jobs. In this blog post, I will use a simple repo that builds the latest version of tmux for centos6 & centos7.
git clone https://gitlab.com/rpmbased/tmux.git
cd tmux
Docker In Docker
The docker executor will spawn the GitLab Runner. GitLab Runner needs to communicate with our local docker service to spawn the CentOS docker image and to run the CI job.
So we need to pass the docker socket from our local docker service to GitLab Runner docker container.
To test dind (docker-in-docker) we can try one of the below commands:
docker run --rm -ti
    -v /var/run/docker.sock:/var/run/docker.sock
    docker:latest sh
or
docker run --rm -ti
    -v /var/run/docker.sock:/var/run/docker.sock
    ubuntu:20.04 bash
Limitations
There are some limitations of gitlab-runner exec.
We can not run stages and we can not download artifacts.
- stages no
- artifacts no
Jobs
So we have to adapt. As we can not run stages, we will tell gitlab-runner exec to run one specific job.
In the tmux repo, the build-centos-6 is the build job for centos6 and the build-centos-7 for centos7.
Artifacts
GitLab Runner will use the /builds as the build directory. We need to mount this directory as read-write to a local directory to get the artifact.
mkdir -pv artifacts/The docker executor has many docker options, there are options to setup a different cache directory. To see all the docker options type:
$ docker run --rm -ti gitlab/gitlab-runner:ubuntu exec docker --help | grep dockerBash Script
We can put everything from above to a bash script. The bash script will mount our current git project directory to the gitlab-runner, then with the help of dind it will spin up the centos docker container, passing our code and gitlab-ci file, run the CI job and then save the artifacts under /builds.
#!/bin/bash

# This will be the directory to save our artifacts
rm -rf artifacts
mkdir -p artifacts

# JOB="build-centos-6"
JOB="build-centos-7"

DOCKER_SOCKET="/var/run/docker.sock"

docker run --rm                              \
  -v "$DOCKER_SOCKET":"$DOCKER_SOCKET"       \
  -v "$PWD":"$PWD"                           \
  --workdir "$PWD"                           \
  gitlab/gitlab-runner:ubuntu                \
  exec docker                                \
      --docker-volumes="$PWD/artifacts":/builds:rw \
      $JOB
That’s it.
You can try with your own gitlab repos, but dont forget to edit the gitlab-ci file accordingly, if needed.
Full example output
Last, but not least, here is the entire walkthrough
ebal@myhomepc:tmux(master)$ git remote -v
oring   git@gitlab.com:rpmbased/tmux.git (fetch)
oring   git@gitlab.com:rpmbased/tmux.git (push)
$ ./gitlab.run.sh

Runtime platform           arch=amd64 os=linux pid=6 revision=ce065b93 version=12.10.1
Running with gitlab-runner 12.10.1 (ce065b93)
Preparing the "docker" executor
Using Docker executor with image centos:6 ...
Pulling docker image centos:6 ...
Using docker image sha256:d0957ffdf8a2ea8c8925903862b65a1b6850dbb019f88d45e927d3d5a3fa0c31 for centos:6 ...
Preparing environment
Running on runner--project-0-concurrent-0 via 42b751e35d01...
Getting source from Git repository
Fetching changes...
Initialized empty Git repository in /builds/0/project-0/.git/
Created fresh repository.
From /home/ebal/gitlab-runner/tmux
 * [new branch]      master     -> origin/master
Checking out 6bb70469 as master...

Skipping Git submodules setup
Restoring cache
Downloading artifacts
Running before_script and script
$ export -p NAME=tmux
$ export -p VERSION=$(awk '/^Version/ {print $NF}' tmux.spec)
$ mkdir -p rpmbuild/{BUILD,RPMS,SOURCES,SPECS,SRPMS}
$ yum -y update &> /dev/null
$ yum -y install rpm-build curl gcc make automake autoconf pkg-config &> /dev/null
$ yum -y install libevent2-devel ncurses-devel &> /dev/null
$ cp $NAME.spec                  rpmbuild/SPECS/$NAME.spec
$ curl -sLo rpmbuild/SOURCES/$NAME-$VERSION.tar.gz   https://github.com/tmux/$NAME/releases/download/$VERSION/$NAME-$VERSION.tar.gz
$ curl -sLo rpmbuild/SOURCES/bash-it.completion.bash https://raw.githubusercontent.com/Bash-it/bash-it/master/completion/available/bash-it.completion.bash
$ rpmbuild --define "_topdir ${PWD}/rpmbuild/" --clean -ba rpmbuild/SPECS/$NAME.spec &> /dev/null
$ cp rpmbuild/RPMS/x86_64/$NAME*.x86_64.rpm $CI_PROJECT_DIR/
Running after_script
Saving cache
Uploading artifacts for successful job
Job succeeded
artifacts
and here is the tmux-3.1-1.el6.x86_64.rpm
$ ls -l artifacts/0/project-0
total 368
-rw-rw-rw- 1 root root    374 Apr 27 09:13 README.md
drwxr-xr-x 1 root root     70 Apr 27 09:17 rpmbuild
-rw-r--r-- 1 root root 365836 Apr 27 09:17 tmux-3.1-1.el6.x86_64.rpm
-rw-rw-rw- 1 root root   1115 Apr 27 09:13 tmux.spec
docker processes
if we run docker ps -a from another terminal, we see something like this:
$ docker ps -a
CONTAINER ID  IMAGE                        COMMAND                  CREATED        STATUS                   PORTS  NAMES
b5333a7281ac  d0957ffdf8a2                 "sh -c 'if [ -x /usr…"   3 minutes ago  Up 3 minutes                    runner--project-0-concurrent-0-e6ee009d5aa2c136-build-4
70491d10348f  b6b00e0f09b9                 "gitlab-runner-build"    3 minutes ago  Exited (0) 3 minutes ago        runner--project-0-concurrent-0-e6ee009d5aa2c136-predefined-3
7be453e5cd22  b6b00e0f09b9                 "gitlab-runner-build"    4 minutes ago  Exited (0) 4 minutes ago        runner--project-0-concurrent-0-e6ee009d5aa2c136-predefined-2
1046287fba5d  b6b00e0f09b9                 "gitlab-runner-build"    4 minutes ago  Exited (0) 4 minutes ago        runner--project-0-concurrent-0-e6ee009d5aa2c136-predefined-1
f1ebc99ce773  b6b00e0f09b9                 "gitlab-runner-build"    4 minutes ago  Exited (0) 4 minutes ago        runner--project-0-concurrent-0-e6ee009d5aa2c136-predefined-0
42b751e35d01 gitlab/gitlab-runner:ubuntu "/usr/bin/dumb-init …" 4 minutes ago Up 4 minutes vigorous_goldstineGitLab is my favorite online git hosting provider, and I really love the CI feature (that now most of the online project providers are also starting supporting it).
Archlinux uses git and you can find everything here: Arch Linux git repositories
There are almost 2500 packages there! There are 6500 in core/extra/community (primary repos) and almost 55k Packages in AUR, the Archlinux User Repository.
We are going to use git to retrieve our PKGBUILD from aur archlinux as an example.
The same can be done with one of the core packages by using the above git repo.
So here is a very simple .gitlab-ci.yml file that we can use to build an archlinux package in gitlab
image: archlinux/base:latest

before_script:
    - export PKGNAME=tallow

run-build:
  stage: build
  artifacts:
    paths:
    - "*.pkg.tar.xz"
    expire_in: 1 week
  script:
      # Create "Bob the Builder" !
    - groupadd bob && useradd -m -c "Bob the Builder" -g bob bob
      # Update archlinux and install git
    - pacman -Syy && pacman -Su --noconfirm --needed git base-devel
      # Git Clone package repository
    - git clone https://aur.archlinux.org/$PKGNAME.git
    - chown -R bob:bob $PKGNAME/
      # Read PKGBUILD
    - source $PKGNAME/PKGBUILD
      # Install Dependencies
    - pacman -Syu --noconfirm --needed --asdeps "${makedepends[@]}" "${depends[@]}"
      # Let Bob the Builder, build package
    - su - bob -s /bin/sh -c "cd $(pwd)/$PKGNAME/ && makepkg"
      # Get artifact
    - mv $PKGNAME/*.pkg.tar.xz ./
You can use this link to verify the above example: tallow at gitlab
But let me explain the steps:
- First we create a user, Bob the Builder as in archlinux we can not use root to build a package for security reasons.
- Then we update our container and install git and base-devel group. This group contains all relevant archlinux packages for building a new one.
- After that, we
git clonethe package repo - Install any dependencies. This is a neat trick that I’ve found in archlinux forum using source command to create shell variables (arrays).
- Now it is time for Bob to build the package !
- and finally, we move the artifact in our local folder
Ansible is a wonderful software to automatically configure your systems. The default mode of using ansible is Push Model.

That means from your box, and only using ssh + python, you can configure your flee of machines.
Ansible is imperative. You define tasks in your playbooks, roles and they will run in a serial manner on the remote machines. The task will first check if needs to run and otherwise it will skip the action. And although we can use conditional to skip actions, tasks will perform all checks. For that reason ansible seems slow instead of other configuration tools. Ansible runs in serial mode the tasks but in psedo-parallel mode against the remote servers, to increase the speed. But sometimes you need to gather_facts and that would cost in execution time. There are solutions to cache the ansible facts in a redis (in memory key:value db) but even then, you need to find a work-around to speed your deployments.
But there is an another way, the Pull Mode!
Useful Reading Materials
to learn more on the subject, you can start reading these two articles on ansible-pull.
Pull Mode
So here how it looks:
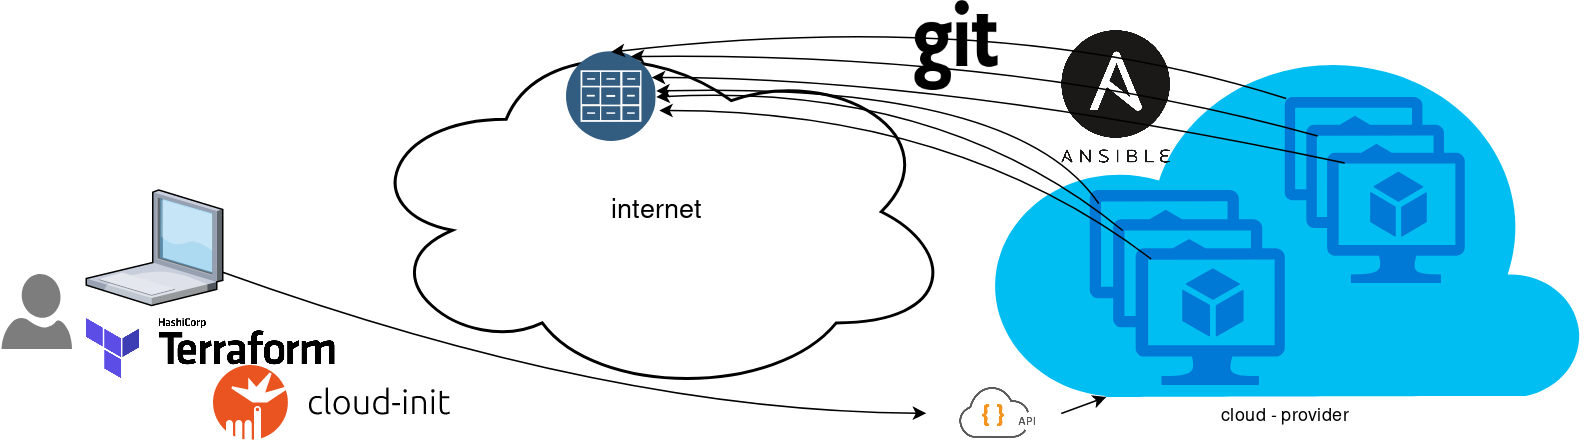
You will first notice, that your ansible repository is moved from you local machine to an online git repository. For me, this is GitLab. As my git repo is private, I have created a Read-Only, time-limit, Deploy Token.
With that scenario, our (ephemeral - or not) VMs will pull their ansible configuration from the git repo and run the tasks locally. I usually build my infrastructure with Terraform by HashiCorp and make advance of cloud-init to initiate their initial configuration.
Cloud-init
The tail of my user-data.yml looks pretty much like this:
...
# Install packages
packages:
  - ansible

# Run ansible-pull
runcmd:
  - ansible-pull -U https://gitlab+deploy-token-XXXXX:YYYYYYYY@gitlab.com/username/myrepo.git
Playbook
You can either create a playbook named with the hostname of the remote server, eg. node1.yml or use the local.yml as the default playbook name.
Here is an example that will also put ansible-pull into a cron entry. This is very useful because it will check for any changes in the git repo every 15 minutes and run ansible again.
- hosts: localhost

  tasks:
    - name: Ensure ansible-pull is running every 15 minutes
      cron:
        name: "ansible-pull"
        minute: "15"
        job: "ansible-pull -U https://gitlab+deploy-token-XXXXX:YYYYYYYY@gitlab.com/username/myrepo.git &> /dev/null"

    - name: Create a custom local vimrc file
      lineinfile:
        path: /etc/vim/vimrc.local
        line: 'set modeline'
        create: yes

    - name: Remove "cloud-init" package
      apt:
        name: "cloud-init"
        purge: yes
        state: absent

    - name: Remove useless packages from the cache
      apt:
        autoclean: yes

    - name: Remove dependencies that are no longer required
      apt:
        autoremove: yes

# vim: sts=2 sw=2 ts=2 etContinuous Deployment with GitLab: how to build and deploy a RPM Package with GitLab CI
I would like to automate building custom rpm packages with gitlab using their CI/CD functionality. This article is a documentation of my personal notes on the matter.
[updated: 2018-03-20 gitlab-runner Possible Problems]
Installation
You can find notes on how to install gitlab-community-edition here: Installation methods for GitLab. If you are like me, then you dont run a shell script on you machines unless you are absolutely sure what it does. Assuming you read script.rpm.sh and you are on a CentOS 7 machine, you can follow the notes below and install gitlab-ce manually:
Import gitlab PGP keys
# rpm --import https://packages.gitlab.com/gitlab/gitlab-ce/gpgkey

# rpm --import https://packages.gitlab.com/gitlab/gitlab-ce/gpgkey/gitlab-gitlab-ce-3D645A26AB9FBD22.pub.gpg
Gitlab repo
# curl -s 'https://packages.gitlab.com/install/repositories/gitlab/gitlab-ce/config_file.repo?os=centos&dist=7&source=script' \
  -o /etc/yum.repos.d/gitlab-ce.repo
Install Gitlab
# yum -y install gitlab-ceConfiguration File
The gitlab core configuration file is /etc/gitlab/gitlab.rb
Remember that every time you make a change, you need to reconfigure gitlab:
# gitlab-ctl reconfigureMy VM’s IP is: 192.168.122.131. Update the external_url to use the same IP or add a new entry on your hosts file (eg. /etc/hosts).
external_url 'http://gitlab.example.com'Run: gitlab-ctl reconfigure for updates to take effect.
Firewall
To access the GitLab dashboard from your lan, you have to configure your firewall appropriately.
You can do this in many ways:
-
Accept everything on your http service
# firewall-cmd --permanent --add-service=http -
Accept your lan:
# firewall-cmd --permanent --add-source=192.168.122.0/24 -
Accept only tcp IPv4 traffic from a specific lan
# firewall-cmd --permanent --direct --add-rule ipv4 filter INPUT 0 -p tcp -s 192.168.0.0/16 -j ACCEPT
or you can complete stop firewalld (but not recommended)
- Stop your firewall
# systemctl stop firewalld
okay, I think you’ve got the idea.
Reload your firewalld after every change on it’s zones/sources/rules.
# firewall-cmd --reload
successBrowser
Point your browser to your gitlab installation:
http://192.168.122.131/this is how it looks the first time:
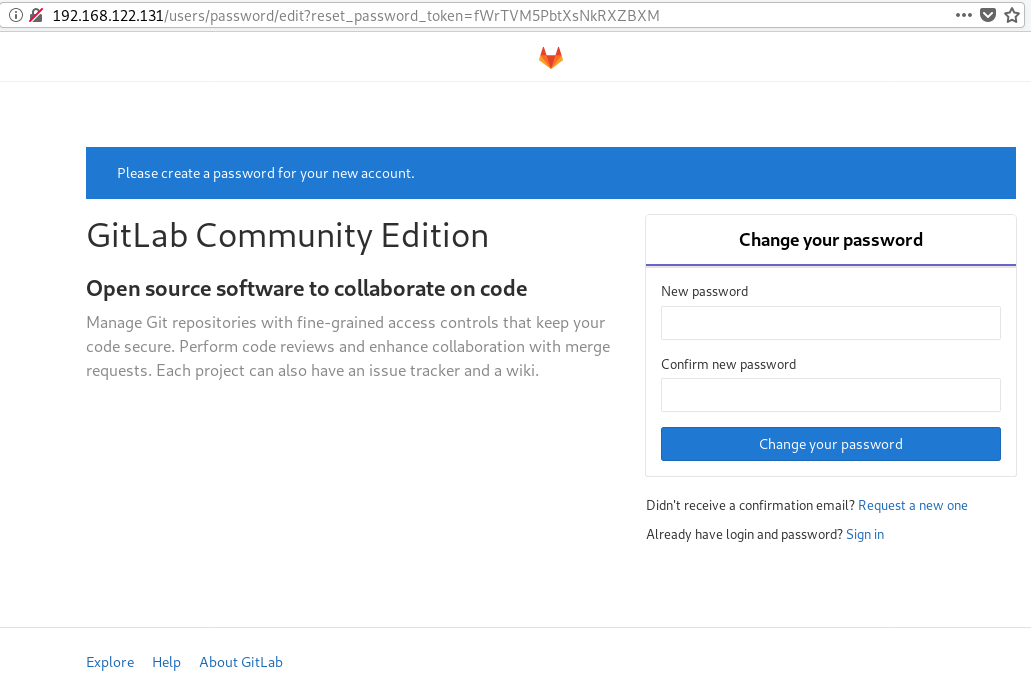
and your first action is to Create a new password by typing a password and hitting the Change your password button.
Login

First Page

New Project
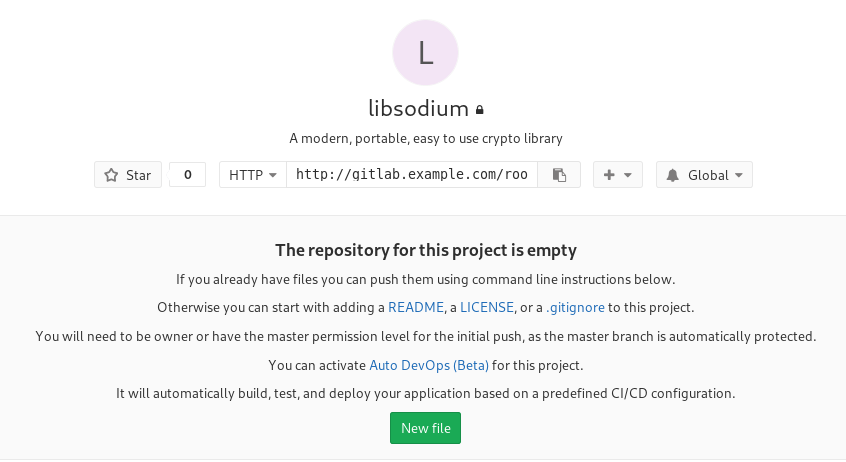
I want to start this journey with a simple-to-build project, so I will try to build libsodium,
a modern, portable, easy to use crypto library.
New project --> Blank project
I will use this libsodium.spec file as the example for the CI/CD.
Docker
The idea is to build out custom rpm package of libsodium for CentOS 6, so we want to use docker containers through the gitlab CI/CD. We want clean & ephemeral images, so we will use containers as the building enviroments for the GitLab CI/CD.
Installing docker is really simple.
Installation
# yum -y install docker Run Docker
# systemctl restart docker
# systemctl enable  docker
Download image
Download a fresh CentOS v6 image from Docker Hub:
# docker pull centos:6 Trying to pull repository docker.io/library/centos ...
6: Pulling from docker.io/library/centos
ca9499a209fd: Pull complete
Digest: sha256:551de58ca434f5da1c7fc770c32c6a2897de33eb7fde7508e9149758e07d3fe3View Docker Images
# docker imagesREPOSITORY TAG IMAGE ID CREATED SIZE
docker.io/centos 6 609c1f9b5406 7 weeks ago 194.5 MBGitlab Runner
Now, it is time to install and setup GitLab Runner.
In a nutshell this program, that is written in golang, will listen to every change on our repository and run every job that it can find on our yml file. But lets start with the installation:
# curl -s 'https://packages.gitlab.com/install/repositories/runner/gitlab-runner/config_file.repo?os=centos&dist=7&source=script' \
  -o /etc/yum.repos.d/gitlab-runner.repo

# yum -y install gitlab-runner
GitLab Runner Settings
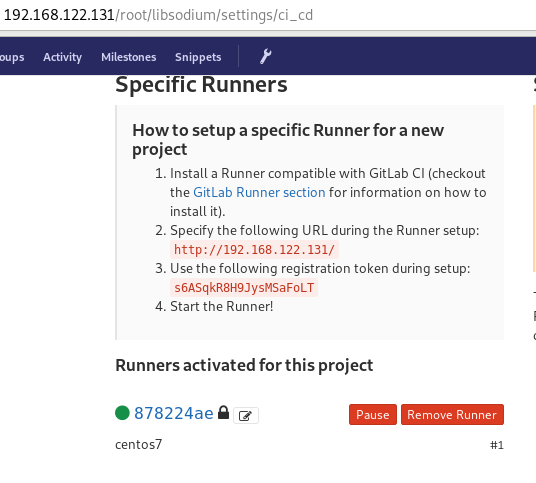
We need to connect our project with the gitlab-runner.
Project --> Settings --> CI/CDor in our example:
http://192.168.122.131/root/libsodium/settings/ci_cd
click on the expand button on Runner’s settings and you should see something like this:

Register GitLab Runner
Type into your terminal:
# gitlab-runner registerfollowing the instructions
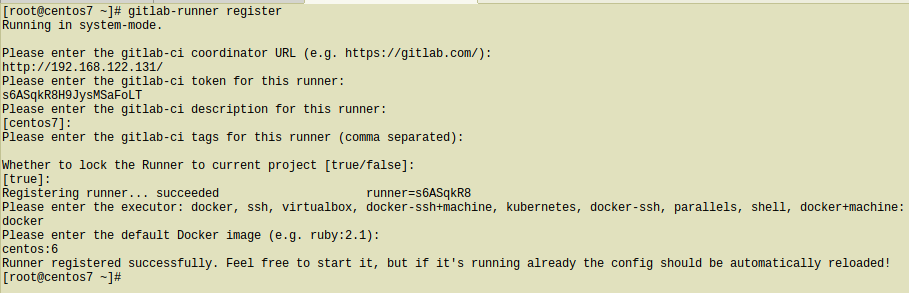
[root@centos7 ~]# gitlab-runner register
Running in system-mode.

Please enter the gitlab-ci coordinator URL (e.g. https://gitlab.com/):
http://192.168.122.131/

Please enter the gitlab-ci token for this runner:
s6ASqkR8H9JysMSaFoLT

Please enter the gitlab-ci description for this runner:
[centos7]:

Please enter the gitlab-ci tags for this runner (comma separated):

Whether to lock the Runner to current project [true/false]:
[true]:

Registering runner... succeeded                     runner=s6ASqkR8

Please enter the executor: docker, ssh, virtualbox, docker-ssh+machine, kubernetes, docker-ssh, parallels, shell, docker+machine:
docker

Please enter the default Docker image (e.g. ruby:2.1):
centos:6

Runner registered successfully. Feel free to start it, but if it's running already the config should be automatically reloaded!
[root@centos7 ~]#
by refreshing the previous page we will see a new active runner on our project.
The Docker executor
We are ready to setup our first executor to our project. That means we are ready to run our first CI/CD example!
In gitlab this is super easy, just add a
New file --> Template --> gitlab-ci.yml --> based on bashDont forget to change the image from busybox:latest to centos:6

that will start a pipeline
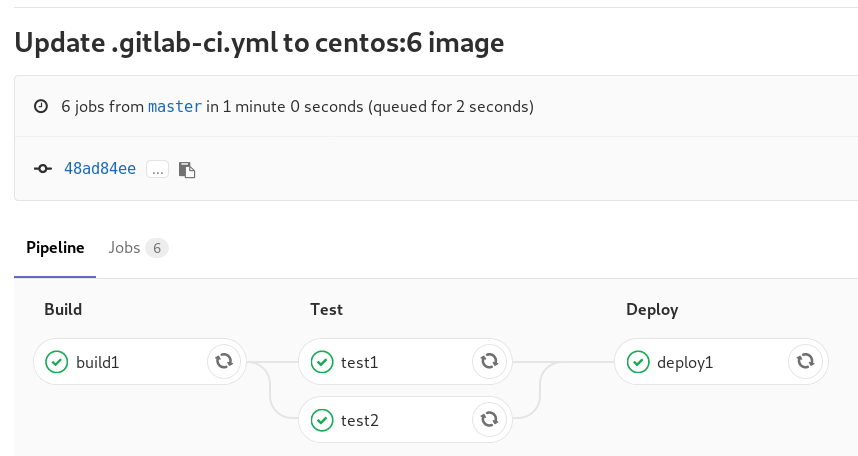
GitLab Continuous Integration
Below is a gitlab ci test file that builds the rpm libsodium :
.gitlab-ci.yml
image: centos:6

before_script:
  - echo "Get the libsodium version and name from the rpm spec file"
  - export LIBSODIUM_VERS=$(egrep '^Version:' libsodium.spec | awk '{print $NF}')
  - export LIBSODIUM_NAME=$(egrep '^Name:'    libsodium.spec | awk '{print $NF}')

run-build:
  stage: build
  artifacts:
    untracked: true
  script:
    - echo "Install rpm-build package"
    - yum -y install rpm-build
    - echo "Install BuildRequires"
    - yum -y install gcc
    - echo "Create rpmbuild directories"
    - mkdir -p rpmbuild/{BUILD,RPMS,SOURCES,SPECS,SRPMS}
    - echo "Download source file from github"
    - curl -s -L https://github.com/jedisct1/$LIBSODIUM_NAME/releases/download/$LIBSODIUM_VERS/$LIBSODIUM_NAME-$LIBSODIUM_VERS.tar.gz -o rpmbuild/SOURCES/$LIBSODIUM_NAME-$LIBSODIUM_VERS.tar.gz
    - rpmbuild -D "_topdir `pwd`/rpmbuild" --clean -ba `pwd`/libsodium.spec

run-test:
  stage: test
  script:
    - echo "Test it, Just test it !"
    - yum -y install rpmbuild/RPMS/x86_64/$LIBSODIUM_NAME-$LIBSODIUM_VERS-*.rpm

run-deploy:
  stage: deploy
  script:
    - echo "Do your deploy here"
GitLab Artifacts
Before we continue I need to talk about artifacts
Artifacts is a list of files and directories that we produce at stage jobs and are not part of the git repository. We can pass those artifacts between stages, but you have to remember that gitlab can track files that only exist under the git-clone repository and not on the root fs of the docker image.
GitLab Continuous Delivery
We have successfully build an rpm file!! Time to deploy it to another machine. To do that, we need to add the secure shell private key to gitlab secret variables.
Project --> Settings --> CI/CD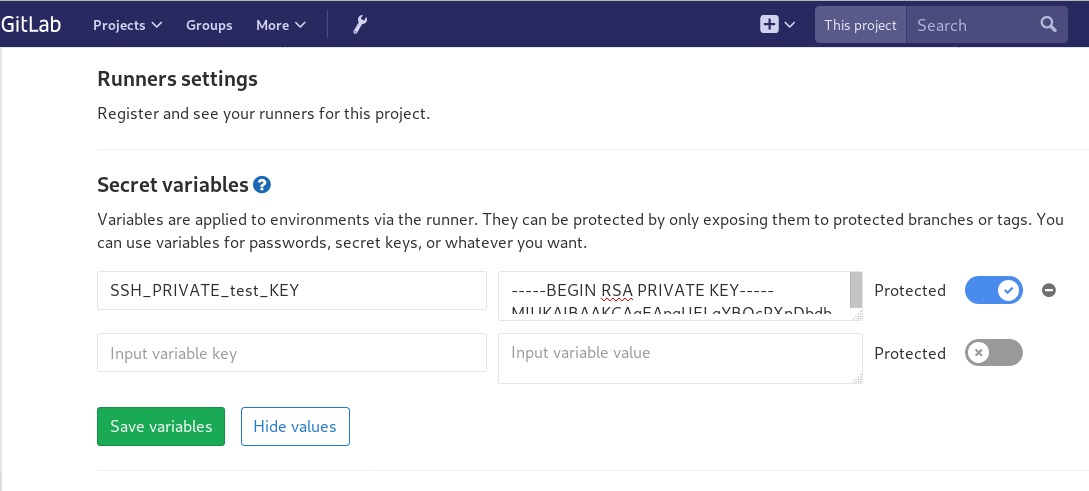
stage: deploy
Lets re-write gitlab deployment state:
variables:
  DESTINATION_SERVER: '192.168.122.132'

run-deploy:
  stage: deploy
  script:
    - echo "Create ssh root directory"
    - mkdir -p ~/.ssh/ && chmod 700 ~/.ssh/

    - echo "Append secret variable to the ssh private key file"
    - echo -e "$SSH_PRIVATE_test_KEY" > ~/.ssh/id_rsa
    - chmod 0600 ~/.ssh/id_rsa

    - echo "Install SSH client"
    - yum -y install openssh-clients

    - echo "Secure Copy the libsodium rpm file to the destination server"
    - scp -o StrictHostKeyChecking=no rpmbuild/RPMS/x86_64/$LIBSODIUM_NAME-$LIBSODIUM_VERS-*.rpm  $DESTINATION_SERVER:/tmp/

    - echo "Install libsodium rpm file to the destination server"
    - ssh -o StrictHostKeyChecking=no $DESTINATION_SERVER yum -y install /tmp/$LIBSODIUM_NAME-$LIBSODIUM_VERS-*.rpm
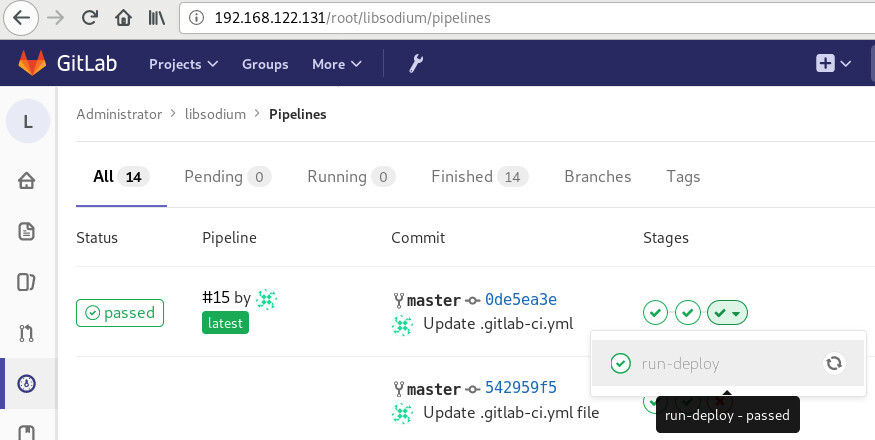
and we can see that our pipeline has passed!
Possible Problems:
that will probable fail!
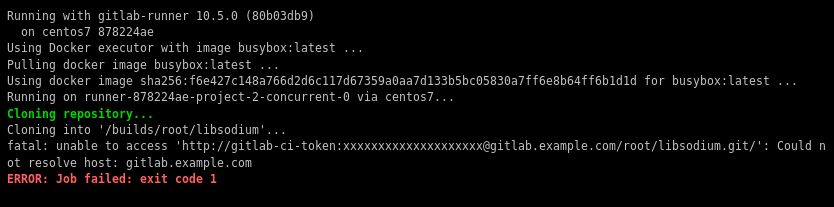
because our docker images don’t recognize gitlab.example.com.
Disclaimer: If you are using real fqdn - ip then you will probably not face this problem. I am referring to this issue, only for people who will follow this article step by step.
Easy fix:
# export -p EXTERNAL_URL="http://192.168.122.131" && yum -y reinstall gitlab-ceGitLab Runner
GitLab Runner is not running !
# gitlab-runner verify
Running in system-mode.

Verifying runner... is alive                        runner=e9bbcf90
Verifying runner... is alive                        runner=77701bad

#  gitlab-runner status
gitlab-runner: Service is not running.

# gitlab-runner install  -u gitlab-runner -d /home/gitlab-runner/

# systemctl is-active gitlab-runner
inactive

# systemctl enable gitlab-runner
# systemctl start gitlab-runner

# systemctl is-active gitlab-runner
active

# systemctl | egrep gitlab-runner
  gitlab-runner.service     loaded active running   GitLab Runner

# gitlab-runner status
gitlab-runner: Service is running!

# ps -e fuwww | egrep -i gitlab-[r]unner
root      5116  0.4  0.1  63428 16968 ?        Ssl  07:44   0:00 /usr/bin/gitlab-runner run --working-directory /home/gitlab-runner/ --config /etc/gitlab-runner/config.toml --service gitlab-runner --syslog --user gitlab-runner