A couple months ago, we announced a public and free DNS service, so people can have encrypted DNS in their browsers and systems. We support both DNS over HTTPS (DoH) and DNS over TLS and our DoH service has two endpoints, the default /dns-query and one for blocking trackers and ads /ads. You can visit our page for more info.
dns
What is DNS?
Domain Name Service in a nutshell is when you are asking directions to find where Wikipedia is in the internet. Your browser does not know, so it will ask your computer. Your computer will ask your internet provider and your internet provider will ask someone else till they find the correct answer. In the end, your browser will know where to go and this is how you are visiting Wikipedia.
You need to trust all the above parties, to give you the correct answer and everybody knows that you are visiting Wikipedia.
doh
What is DoH (DNS Queries over HTTPS)?
It’s the implementation of RFC 8484. This is a way for your browser to ask where to find Wikipedia, without exposing to everybody that you want to visit Wikipedia! Still you need someone to ask for directions, but now both your question and the answer are encrypted. So you have privacy.
let’s get technical
What is RFC 8484?
In the above rfc, your client (eg. browser) asks your DNS via HTTP/2 representational state transfer (REST). DoH clients and servers need to sent a application/dns-message content (question/answer) and encode both the question and the answer in a bace64url message. Usually is GET, but POST is also supported on some servers.
doh-cli
So, today, we introduce doh-cli, a simple command line DoH client, written in python. You can use doh-cli as a binary client in your system. We support a few DoH public servers to test, and of course both LibreDNS DoH endpoints
You can see the code here:
install it
It is super easy
pip install doh-cli
or if python3 is not your default python
pip3 install doh-cli
howto use it?
Just ask your favorite DoH server (default is https://doh.libredns.gr/dns-query)
eg.
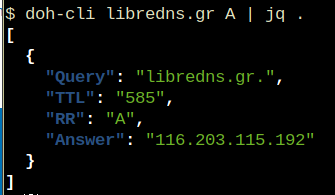
doh-cli libredns.gr A
and use help to see all the options
doh-cli --help
Why default output is json?
With modern tools and with multiline output, it is best to support a serialized format so you can use doh-cli with your tools. But if you dont like it:
doh-cli --output plain libredns.gr A
You can see all the options and help, on the project’s page.
Open Telekom Cloud (OTC) is Deutsche Telekom’s Cloud for Business Customers. I would suggest to visit the Cloud Infrastructure & Cloud Platform Solutions for more information but I will try to keep this a technical post.

In this post you will find my personal notes on how to use the native python openstack CLI client to access OTC from your console.
Notes are based on Ubuntu 18.04.2 LTS
Virtual Environment
Create an isolated python virtual environment (directory) to setup everything under there:
~>  mkdir -pv otc/ && cd otc/
mkdir: created directory 'otc/'

~>  virtualenv -p `which python3`  .

Already using interpreter /usr/bin/python3
Using base prefix '/usr'
New python executable in /home/ebal/otc/bin/python3
Also creating executable in /home/ebal/otc/bin/python
Installing setuptools, pkg_resources, pip, wheel...done.
~> source bin/activate
(otc) ebal@ubuntu:otc~>
(otc) ebal@ubuntu:otc~> python -V
Python 3.6.7
OpenStack Dependencies
Install python openstack dependencies
- openstack sdk
(otc) ebal@ubuntu:otc~> pip install python-openstacksdk
Collecting python-openstacksdk
Collecting openstacksdk (from python-openstacksdk)
  Downloading https://files.pythonhosted.org/packages/
...- openstack client
(otc) ebal@ubuntu:otc~> pip install python-openstackclient
Collecting python-openstackclient
  Using cached https://files.pythonhosted.org/packages
  ...
Install OTC Extensions
It’s time to install the otcextensions
(otc) ebal@ubuntu:otc~> pip install otcextensions
Collecting otcextensions
Requirement already satisfied: openstacksdk>=0.19.0 in ./lib/python3.6/site-packages (from otcextensions) (0.30.0)
...
Installing collected packages: otcextensions
Successfully installed otcextensions-0.6.3
List
(otc) ebal@ubuntu:otc~> pip list | egrep '^python|otc'
otcextensions          0.6.3
python-cinderclient    4.2.0
python-glanceclient    2.16.0
python-keystoneclient  3.19.0
python-novaclient      14.1.0
python-openstackclient 3.18.0
python-openstacksdk    0.5.2
Authentication
Create a new clouds.yaml with your OTC credentials
template:
clouds:
 otc:
   auth:
     username: 'USER_NAME'
     password: 'PASS'
     project_name: 'eu-de'
     auth_url: 'https://iam.eu-de.otc.t-systems.com:443/v3'
     user_domain_name: 'OTC00000000001000000xxx'
   interface: 'public'
   identity_api_version: 3 # !Important
   ak: 'AK_VALUE' # AK/SK pair for access to OBS
   sk: 'SK_VAL
OTC Connect
Let’s tested it !
(otc) ebal@ubuntu:otc~> openstack --os-cloud otc server list
+--------------------------------------+---------------+---------+-------------------------------------------------------------------+-----------------------------------+---------------+
| ID                                   | Name          | Status  | Networks                                                          | Image                             | Flavor        |
+--------------------------------------+---------------+---------+-------------------------------------------------------------------+-----------------------------------+---------------+
| XXXXXXXX-1234-4d7f-8097-YYYYYYYYYYYY | app00-prod    | ACTIVE  | XXXXXXXX-YYYY-ZZZZ-AAAA-BBBBBBCCCCCC=100.101.72.110               | Standard_Ubuntu_16.04_latest      | s2.large.2    |
| XXXXXXXX-1234-4f7d-beaa-YYYYYYYYYYYY | app01-prod    | ACTIVE  | XXXXXXXX-YYYY-ZZZZ-AAAA-BBBBBBCCCCCC=100.101.64.95                | Standard_Ubuntu_16.04_latest      | s2.medium.2   |
| XXXXXXXX-1234-4088-baa8-YYYYYYYYYYYY | app02-prod    | ACTIVE  | XXXXXXXX-YYYY-ZZZZ-AAAA-BBBBBBCCCCCC=100.100.76.160               | Standard_Ubuntu_16.04_latest      | s2.large.4    |
| XXXXXXXX-1234-43f5-8a10-YYYYYYYYYYYY | web00-prod    | ACTIVE  | XXXXXXXX-YYYY-ZZZZ-AAAA-BBBBBBCCCCCC=100.100.76.121               | Standard_Ubuntu_16.04_latest      | s2.xlarge.2   |
| XXXXXXXX-1234-41eb-aa0b-YYYYYYYYYYYY | web01-prod    | ACTIVE  | XXXXXXXX-YYYY-ZZZZ-AAAA-BBBBBBCCCCCC=100.100.76.151               | Standard_Ubuntu_16.04_latest      | s2.large.4    |
| XXXXXXXX-1234-41f7-98ff-YYYYYYYYYYYY | web00-stage   | ACTIVE  | XXXXXXXX-YYYY-ZZZZ-AAAA-BBBBBBCCCCCC=100.100.76.150               | Standard_Ubuntu_16.04_latest      | s2.large.4    |
| XXXXXXXX-1234-41b2-973f-YYYYYYYYYYYY | web01-stage   | ACTIVE  | XXXXXXXX-YYYY-ZZZZ-AAAA-BBBBBBCCCCCC=100.100.76.120               | Standard_Ubuntu_16.04_latest      | s2.xlarge.2   |
| XXXXXXXX-1234-468f-a41c-YYYYYYYYYYYY | app00-stage   | SHUTOFF | XXXXXXXX-YYYY-ZZZZ-AAAA-BBBBBBCCCCCC=100.101.70.111               | Community_Ubuntu_14.04_TSI_latest | s2.xlarge.2   |
| XXXXXXXX-1234-4fdf-8b4c-YYYYYYYYYYYY | app01-stage   | SHUTOFF | XXXXXXXX-YYYY-ZZZZ-AAAA-BBBBBBCCCCCC=100.100.64.92                | Community_Ubuntu_14.04_TSI_latest | s1.large      |
| XXXXXXXX-1234-4e68-a86d-YYYYYYYYYYYY | app02-stage   | SHUTOFF | XXXXXXXX-YYYY-ZZZZ-AAAA-BBBBBBCCCCCC=100.100.66.96                | Community_Ubuntu_14.04_TSI_latest | s2.xlarge.4   |
| XXXXXXXX-1234-475d-9a66-YYYYYYYYYYYY | web00-test    | SHUTOFF | XXXXXXXX-YYYY-ZZZZ-AAAA-BBBBBBCCCCCC=100.102.76.11, 10.44.23.18   | Community_Ubuntu_14.04_TSI_latest | c1.medium     |
| XXXXXXXX-1234-4dac-a6b1-YYYYYYYYYYYY | web01-test    | SHUTOFF | XXXXXXXX-YYYY-ZZZZ-AAAA-BBBBBBCCCCCC=100.101.64.14                | Community_Ubuntu_14.04_TSI_latest | s1.xlarge     |
| XXXXXXXX-1234-458e-8e21-YYYYYYYYYYYY | web02-test    | SHUTOFF | XXXXXXXX-YYYY-ZZZZ-AAAA-BBBBBBCCCCCC=100.101.64.13                | Community_Ubuntu_14.04_TSI_latest | s1.xlarge     |
| XXXXXXXX-1234-42c4-b953-YYYYYYYYYYYY | k8s02-prod    | SHUTOFF | XXXXXXXX-YYYY-ZZZZ-AAAA-BBBBBBCCCCCC=100.101.64.12                | Community_Ubuntu_14.04_TSI_latest | s1.xlarge     |
| XXXXXXXX-1234-4225-b6af-YYYYYYYYYYYY | k8s02-stage   | SHUTOFF | XXXXXXXX-YYYY-ZZZZ-AAAA-BBBBBBCCCCCC=100.101.64.11                | Community_Ubuntu_14.04_TSI_latest | s1.xlarge     |
| XXXXXXXX-1234-4eb1-a596-YYYYYYYYYYYY | k8s02-test    | SHUTOFF | XXXXXXXX-YYYY-ZZZZ-AAAA-BBBBBBCCCCCC=100.102.64.14                | Community_Ubuntu_14.04_TSI_latest | s1.xlarge     |
| XXXXXXXX-1234-4222-b866-YYYYYYYYYYYY | k8s03-test    | SHUTOFF | XXXXXXXX-YYYY-ZZZZ-AAAA-BBBBBBCCCCCC=100.102.64.13                | Community_Ubuntu_14.04_TSI_latest | s1.xlarge     |
| XXXXXXXX-1234-453d-a9c5-YYYYYYYYYYYY | k8s04-test    | SHUTOFF | XXXXXXXX-YYYY-ZZZZ-AAAA-BBBBBBCCCCCC=100.101.64.10                | Community_Ubuntu_14.04_TSI_latest | s1.2xlarge    |
| XXXXXXXX-1234-4968-a2be-YYYYYYYYYYYY | k8s05-test    | SHUTOFF | XXXXXXXX-YYYY-ZZZZ-AAAA-BBBBBBCCCCCC=100.102.76.14, 10.44.22.138  | Community_Ubuntu_14.04_TSI_latest | c2.2xlarge    |
| XXXXXXXX-1234-4c71-a00f-YYYYYYYYYYYY | k8s07-test    | SHUTOFF | XXXXXXXX-YYYY-ZZZZ-AAAA-BBBBBBCCCCCC=100.102.76.170               | Community_Ubuntu_14.04_TSI_latest | c1.medium     |
+--------------------------------------+---------------+---------+-------------------------------------------------------------------+-----------------------------------+---------------+
Load Balancers
(otc) ebal@ubuntu:~/otc~> openstack --os-cloud otc loadbalancer list
+--------------------------------------+----------------------------------+----------------------------------+---------------+---------------------+----------+
| id                                   | name                             | project_id                       | vip_address   | provisioning_status | provider |
+--------------------------------------+----------------------------------+----------------------------------+---------------+---------------------+----------+
| XXXXXXXX-ad99-4de0-d885-YYYYYYYYYYYY | aaccaacbddd1111eee5555aaaaa22222 | 44444bbbbbbb4444444cccccc3333333 | 100.100.10.143 | ACTIVE              | vlb      |
+--------------------------------------+----------------------------------+----------------------------------+---------------+---------------------+----------+
[notes based on a docker centos5]
# cat /etc/redhat-release
CentOS release 5.11 (Final)Setup Enviroment
Install compiler:
# yum -y install gcc make
Install zlib headers:
# yum -y install zlib-devel
Install tools:
# yum -y install curl unzip
SSL/TLS Errors
If you are on a CentOS 5x machine, when trying to download files from the internet, you will get this error msg:
This is a brown out of TLSv1 support. TLSv1 support is going away soon, upgrade to a TLSv1.2+ capable client.or
SSL routines:SSL23_GET_SERVER_HELLO:tlsv1 alert protocol versionthat is because CentOS 5x has an old cipher suite that doesnt work with today’s standards.
OpenSSL
To bypass these SSL/TLS errors, we need to install a recent version of openssl.
# cd /root/

# curl -LO https://www.openssl.org/source/openssl-1.0.2o.tar.gz
# tar xf openssl*.tar.gz
# cd openssl*

# ./Configure shared linux-x86_64
# make
# make install
The output has a useful info:
OpenSSL shared libraries have been installed in:
  /usr/local/ssl
So, we have to update the system’s library paths, to include this one:
# echo "/usr/local/ssl/lib/" >> /etc/ld.so.conf
# /sbin/ldconfig
Python 2.7
Download the latest Python2.7
# cd /root/
# curl -LO https://www.python.org/ftp/python/2.7.14/Python-2.7.14.tgz
# tar xf Python*.tgz
# cd Python*
Install Python:
# ./configure --prefix=/opt/Python27 --enable-shared
# make
# make install
PATH
# export PATH=/opt/Python27/bin/:$PATH
# python -c "import ssl; print(ssl.OPENSSL_VERSION)"OpenSSL 1.0.2o 27 Mar 2018SetupTools
Download the latest setuptools
# cd /root/

# export PYTHONHTTPSVERIFY=0
# python -c 'import urllib; urllib.urlretrieve ("https://pypi.python.org/packages/72/c2/c09362ab29338413ab687b47dab03bab4a792e2bbb727a1eb5e0a88e3b86/setuptools-39.0.1.zip", "setuptools-39.0.1.zip")'
Install setuptools
# unzip setuptools*.zip
# cd setuptools*

# python2.7 setup.py build
# python2.7 setup.py install
PIP
Install PIP
# cd /root/
# easy_install pip
Searching for pip
Reading https://pypi.python.org/simple/pip/
Downloading https://pypi.python.org/packages/4b/5a/8544ae02a5bd28464e03af045e8aabde20a7b02db1911a9159328e1eb25a/pip-10.0.0b1-py2.py3-none-any.whl#md5=34dd54590477e79bc681d9ff96b9fd39
Best match: pip 10.0.0b1
Processing pip-10.0.0b1-py2.py3-none-any.whl
Installing pip-10.0.0b1-py2.py3-none-any.whl to /opt/Python27/lib/python2.7/site-packages
writing requirements to /opt/Python27/lib/python2.7/site-packages/pip-10.0.0b1-py2.7.egg/EGG-INFO/requires.txt
Adding pip 10.0.0b1 to easy-install.pth file
Installing pip script to /opt/Python27/bin
Installing pip3.6 script to /opt/Python27/bin
Installing pip3 script to /opt/Python27/bin

Installed /opt/Python27/lib/python2.7/site-packages/pip-10.0.0b1-py2.7.egg
Processing dependencies for pip
Finished processing dependencies for pip
Ansible
Now, we are ready to install ansible
# pip install ansible
Collecting ansible

/opt/Python27/lib/python2.7/site-packages/pip-10.0.0b1-py2.7.egg/pip/_vendor/urllib3/util/ssl_.py:339: SNIMissingWarning: An HTTPS request has been made, but the SNI (Subject Name Indication) extension to TLS is not available on this platform. This may cause the server to present an incorrect TLS certificate, which can cause validation failures. You can upgrade to a newer version of Python to solve this. For more information, see https://urllib3.readthedocs.io/en/latest/advanced-usage.html#ssl-warnings
  SNIMissingWarning
  Using cached ansible-2.5.0-py2.py3-none-any.whl
Collecting paramiko (from ansible)
  Using cached paramiko-2.4.1-py2.py3-none-any.whl
Collecting cryptography (from ansible)
  Using cached cryptography-2.2.2-cp27-cp27m-manylinux1_x86_64.whl
Requirement already satisfied: setuptools in /opt/Python27/lib/python2.7/site-packages/setuptools-39.0.1-py2.7.egg (from ansible) (39.0.1)
Collecting PyYAML (from ansible)
  Using cached PyYAML-3.12.tar.gz
Collecting jinja2 (from ansible)
  Using cached Jinja2-2.10-py2.py3-none-any.whl
Collecting pyasn1>=0.1.7 (from paramiko->ansible)
  Using cached pyasn1-0.4.2-py2.py3-none-any.whl
Collecting bcrypt>=3.1.3 (from paramiko->ansible)
  Using cached bcrypt-3.1.4-cp27-cp27m-manylinux1_x86_64.whl
Collecting pynacl>=1.0.1 (from paramiko->ansible)
  Using cached PyNaCl-1.2.1-cp27-cp27m-manylinux1_x86_64.whl
Collecting six>=1.4.1 (from cryptography->ansible)
  Using cached six-1.11.0-py2.py3-none-any.whl
Collecting cffi>=1.7; platform_python_implementation != "PyPy" (from cryptography->ansible)
  Using cached cffi-1.11.5-cp27-cp27m-manylinux1_x86_64.whl
Collecting enum34; python_version < "3" (from cryptography->ansible)
  Using cached enum34-1.1.6-py2-none-any.whl
Collecting asn1crypto>=0.21.0 (from cryptography->ansible)
  Using cached asn1crypto-0.24.0-py2.py3-none-any.whl
Collecting idna>=2.1 (from cryptography->ansible)
  Using cached idna-2.6-py2.py3-none-any.whl
Collecting ipaddress; python_version < "3" (from cryptography->ansible)
  Using cached ipaddress-1.0.19.tar.gz
Collecting MarkupSafe>=0.23 (from jinja2->ansible)
  Using cached MarkupSafe-1.0.tar.gz
Collecting pycparser (from cffi>=1.7; platform_python_implementation != "PyPy"->cryptography->ansible)
  Using cached pycparser-2.18.tar.gz
Installing collected packages: pyasn1, six, pycparser, cffi, bcrypt, enum34, asn1crypto, idna, ipaddress, cryptography, pynacl, paramiko, PyYAML, MarkupSafe, jinja2, ansible
  Running setup.py install for pycparser ... done
  Running setup.py install for ipaddress ... done
  Running setup.py install for PyYAML ... done
  Running setup.py install for MarkupSafe ... done

Successfully installed MarkupSafe-1.0 PyYAML-3.12 ansible-2.5.0 asn1crypto-0.24.0 bcrypt-3.1.4 cffi-1.11.5 cryptography-2.2.2 enum34-1.1.6 idna-2.6 ipaddress-1.0.19 jinja2-2.10 paramiko-2.4.1 pyasn1-0.4.2 pycparser-2.18 pynacl-1.2.1 six-1.11.0
Version
# ansible --version
ansible 2.5.0
  config file = None
  configured module search path = [u'/root/.ansible/plugins/modules', u'/usr/share/ansible/plugins/modules']
  ansible python module location = /opt/Python27/lib/python2.7/site-packages/ansible
  executable location = /opt/Python27/bin/ansible
  python version = 2.7.14 (default, Mar 31 2018, 20:00:21) [GCC 4.1.2 20080704 (Red Hat 4.1.2-55)]
Ansible v2
# ansible -m ping localhost
localhost | SUCCESS => {
    "changed": false,
    "ping": "pong"
}
Ansible v1
or a previous version for testing
eg. 1.9.6
# pip install 'ansible==1.9.6'
# ansible --version
ansible 1.9.6
  configured module search path = None
# yum -y install python-simplejson
# ansible localhost -c local -m ping -i "localhost,"
localhost | success >> {
    "changed": false,
    "ping": "pong"
}
Possible Building Error
When building python from source, setup.py will try to look for /usr/local/ssl/ directory to find the libraries and included headers of openssl. Althouth it works from _ssl.c , it doesnt for _hashlib.c.
To fix this problem, you must manual edit the Python-2.7.14/setup.py
 869                 ssl_incs += ['/usr/local/ssl/include']
 870                 ssl_libs += ['/usr/local/ssl/lib']
the full code is:
 865         if have_any_openssl:
 866             if have_usable_openssl:
 867                 # The _hashlib module wraps optimized implementations
 868                 # of hash functions from the OpenSSL library.
 869                 ssl_incs += ['/usr/local/ssl/include']
 870                 ssl_libs += ['/usr/local/ssl/lib']
 871                 exts.append( Extension('_hashlib', ['_hashopenssl.c'],
 872                                        include_dirs = ssl_incs,
 873                                        library_dirs = ssl_libs,
 874                                        libraries = ['ssl', 'crypto']) )
 875             else:
 876                 print ("warning: openssl 0x%08x is too old for _hashlib" %
 877                        openssl_ver)
 878                 missing.append('_hashlib')
hope that helps!
YAML
YAML is a human friendly data serialization standard, especially for configuration files. Its simple to read and use.
Here is an example:
---
# A list of tasty fruits
fruits:
    - Apple
    - Orange
    - Strawberry
    - Mango
btw the latest version of yaml is: v1.2.
PyYAML
Working with yaml files in python is really easy. The python module: PyYAML must be installed in the system.
In an archlinux box, the system-wide installation of this python package, can be done by typing:
$ sudo pacman -S --noconfirm python-yaml
Python3 - Yaml Example
Save the above yaml example to a file, eg. fruits.yml
Open the Python3 Interpreter and write:
$ python3.6
Python 3.6.4 (default, Jan  5 2018, 02:35:40)
[GCC 7.2.1 20171224] on linux
Type "help", "copyright", "credits" or "license" for more information.
>>> from yaml import load
>>> print(load(open("fruits.yml")))
{'fruits': ['Apple', 'Orange', 'Strawberry', 'Mango']}
>>>
an alternative way is to write the above commands to a python file:
from yaml import load
print(load(open("fruits.yml")))
and run it from the console:
$ python3 test.py
{'fruits': ['Apple', 'Orange', 'Strawberry', 'Mango']}
Instead of print we can use yaml dump:
eg.
import yaml

yaml.dump(yaml.load(open("fruits.yml")))
'fruits: [Apple, Orange, Strawberry, Mango]n'
The return type of yaml.load is a python dictionary:
type(load(open("fruits.yml")))
<class 'dict'>
Have that in mind.
Jinja2
Jinja2 is a modern and designer-friendly templating language for Python.
As a template engine, we can use jinja2 to build complex markup (or even text) output, really fast and efficient.
Here is an jinja2 template example:
I like these tasty fruits:
* {{ fruit }}
where {{ fruit }} is a variable.
Declaring the fruit variable with some value and the jinja2 template can generate the prefarable output.
python-jinja
In an archlinux box, the system-wide installation of this python package, can be done by typing:
$ sudo pacman -S --noconfirm python-jinja
Python3 - Jinja2 Example
Below is a python3 - jinja2 example:
import jinja2

template = jinja2.Template("""
I like these tasty fruits:
* {{ fruit }}
""")

data = "Apple"
print(template.render(fruit=data))
The output of this example is:
I like these tasty fruits:
* Apple
File Template
Reading the jinja2 template from a template file, is a little more complicated than before. Building the jinja2 enviroment is step one:
env = jinja2.Environment(loader=jinja2.FileSystemLoader("./"))and Jinja2 is ready to read the template file:
template = env.get_template("t.j2")The template file: t.j2 is a litle diferrent than before:
I like these tasty fruits:
{% for fruit in fruits -%}
* {{ fruit }}
{% endfor %}
Yaml, Jinja2 and Python3
To render the template a dict of global variables must be passed. And parsing the yaml file the yaml.load returns a dictionary! So everything are in place.
Compine everything together:
from yaml import load
from jinja2 import Environment, FileSystemLoader

mydata = (load(open("fruits.yml")))

env = Environment(loader=FileSystemLoader("./"))
template = env.get_template("t.j2")

print(template.render(mydata))
and the result is:
$ python3 test.py
I like these tasty fruits:
* Apple
* Orange
* Strawberry
* Mango
Fabric
Fabric is a Python (2.5-2.7) library and command-line tool for streamlining the use of SSH for application deployment or systems administration tasks.
You can find the documentation here
Installation
# yum -y install epel-release
# yum -y install fabric
Hello World
# cat > fabfile.py <<EOF
> def hello():
>     print("Hello world!")
>
> EOF
and run it
# fab hello -f ./fabfile.py
Hello world!

Done.
A more complicated example
def HelloWorld():
        print("Hello world!")

def hello(name="world"):
        print("Hello %s!" % name )
# fab HelloWorld -f ./fabfile.py
Hello world!
Done.
# fab hello -f ./fabfile.py
Hello world!
Done.
# fab hello:name=ebal -f ./fabfile.py
Hello ebal!
Done.
A remote example
from fabric.api import run , env

env.use_ssh_config = True

def HelloWorld():
    print("Hello world!")

def hello(name="world"):
    print("Hello %s!" % name )

def uptime():
    run('uptime')
ssh configuration file
with the below variable declaration
(just remember to import env)
fabric can use the ssh configuration file of your system
env.use_ssh_config = Trueand run it against server test
$ fab -H test uptime -f ./fabfile.py
[test] Executing task 'uptime'
[test] run: uptime
[test] out:  20:21:30 up 10 days, 11 min,  1 user,  load average: 0.00, 0.00, 0.00
[test] out:

Done.
Disconnecting from 192.168.122.1:22... done.I have a compressed file of:
250.000.000 lines
Compressed the file size is: 671M
Uncompressed, it's: 6,5G
Need to extract a plethora of things and verify some others.
I dont want to use bash but something more elegant, like python or lua.
Looking through “The-Internet”, I’ve created some examples for the single purpose of educating my self.
So here are my results.
BE AWARE they are far-far-far away from perfect in code or execution.
Sorted by (less) time of execution:
pigz
# time pigz  -p4 -cd  2016-08-04-06.ldif.gz &> /dev/null

real    0m9.980s
user    0m16.570s
sys 0m0.980s
gzip
gzip 1.8
# time /bin/gzip -cd 2016-08-04-06.ldif.gz &> /dev/null

real    0m23.951s
user    0m23.790s
sys 0m0.150s
zcat
zcat (gzip) 1.8
# time zcat 2016-08-04-06.ldif.gz &> /dev/null

real    0m24.202s
user    0m24.100s
sys 0m0.090s
Perl
Perl v5.24.0
code:
#!/usr/bin/perl

open (FILE, '/bin/gzip -cd 2016-08-04-06.ldif.gz |');

while (my $line = ) {
  print $line;
}

close FILE;
time:
# time ./dump.pl &> /dev/null

real    0m49.942s
user    1m14.260s
sys 0m2.350s
PHP
PHP 7.0.9 (cli)
code:
#!/usr/bin/php

< ? php

  $fp = gzopen("2016-08-04-06.ldif.gz", "r");

  while (($buffer = fgets($fp, 4096)) !== false) {
        echo $buffer;
  }

  gzclose($fp);

 ? >
time:
# time php -f dump.php &> /dev/null

real    1m19.407s
user    1m4.840s
sys 0m14.340s
PHP - Iteration #2
PHP 7.0.9 (cli)
Impressed with php results, I took the perl-approach on code:
< ? php

  $fp = popen("/bin/gzip -cd 2016-08-04-06.ldif.gz", "r");

  while (($buffer = fgets($fp, 4096)) !== false) {
        echo $buffer;
  }

  pclose($fp);

 ? >
time:
# time php -f dump2.php &> /dev/null

real    1m6.845s
user    1m15.590s
sys 0m19.940s
not bad !
Lua
Lua 5.3.3
code:
#!/usr/bin/lua

local gzip = require 'gzip'

local filename = "2016-08-04-06.ldif.gz"

for l in gzip.lines(filename) do
  print(l)
end
time:
# time ./dump.lua &> /dev/null

real    3m50.899s
user    3m35.080s
sys 0m15.780s
Lua - Iteration #2
Lua 5.3.3
I was depressed to see that php is faster than lua!!
Depressed I say !
So here is my next iteration on lua:
code:
#!/usr/bin/lua

local file = assert(io.popen('/bin/gzip -cd 2016-08-04-06.ldif.gz', 'r'))

while true do
        line = file:read()
        if line == nil then break end
        print (line)
end
file:close()
time:
# time ./dump2.lua &> /dev/null

real    2m45.908s
user    2m54.470s
sys 0m21.360s
One minute faster than before, but still too slow !!
Lua - Zlib
Lua 5.3.3
My next iteration with lua is using zlib :
code:
#!/usr/bin/lua

local zlib = require 'zlib'
local filename = "2016-08-04-06.ldif.gz"

local block = 64
local d = zlib.inflate()

local file = assert(io.open(filename, "rb"))
while true do
  bytes = file:read(block)
  if not bytes then break end
  print (d(bytes))
end

file:close()
time:
# time ./dump.lua  &> /dev/null

real    0m41.546s
user    0m40.460s
sys 0m1.080s
Now, that's what I am talking about !!!
Playing with window_size (block) can make your code faster or slower.
Python v3
Python 3.5.2
code:
#!/usr/bin/python

import gzip

filename='2016-08-04-06.ldif.gz'
with gzip.open(filename, 'r') as f:
    for line in f:
        print(line,)
time:
# time ./dump.py &> /dev/null

real    13m14.460s
user    13m13.440s
sys 0m0.670s
Not enough tissues on the whole damn world!
Python v3 - Iteration #2
Python 3.5.2
but wait ... a moment ... The default mode for gzip.open is 'rb'.
(read binary)
let's try this once more with rt(read-text) mode:
code:
#!/usr/bin/python

import gzip

filename='2016-08-04-06.ldif.gz'
with gzip.open(filename, 'rt') as f:
    for line in f:
        print(line, end="")
time:
# time ./dump.py &> /dev/null

real    5m33.098s
user    5m32.610s
sys 0m0.410s
With only one super tiny change and run time in half!!!
But still tooo slow.
Python v3 - Iteration #3
Python 3.5.2
Let's try a third iteration with popen this time.
code:
#!/usr/bin/python

import os

cmd = "/bin/gzip -cd 2016-08-04-06.ldif.gz"
f = os.popen(cmd)
for line in f:
  print(line, end="")
f.close()
time:
# time ./dump2.py &> /dev/null

real    6m45.646s
user    7m13.280s
sys 0m6.470s
Python v3 - zlib Iteration #1
Python 3.5.2
Let's try a zlib iteration this time.
code:
#!/usr/bin/python

import zlib

d = zlib.decompressobj(zlib.MAX_WBITS | 16)
filename='2016-08-04-06.ldif.gz'

with open(filename, 'rb') as f:
    for line in f:
        print(d.decompress(line))
time:
# time ./dump.zlib.py &> /dev/null

real    1m4.389s
user    1m3.440s
sys 0m0.410s
finally some proper values with python !!!
Specs
All the running tests occurred to this machine:
4 x Intel(R) Core(TM) i3-3220 CPU @ 3.30GHz
8G RAM
Conclusions
Ok, I Know !
The shell-pipe approach of using gzip for opening the compressed file, is not fair to all the above code snippets.
But ... who cares ?
I need something that run fast as hell and does smart things on those data.
Get in touch
As I am not a developer, I know that you people know how to do these things even better!
So I would love to hear any suggestions or even criticism on the above examples.
I will update/report everything that will pass the "I think I know what this code do" rule and ... be gently with me ;)
PLZ use my email address: evaggelos [ _at_ ] balaskas [ _dot_ ] gr
to send me any suggestions
Thanks !