a couple years ago I wrote an article about the Tools I use daily. The last nine (9) months I am partial using win10 due to new job challenges and thus I would like to write an updated version on my previous article.
I will try to use the same structure for comparison as the previous article although this a nine to five setup (work related). So here it goes.
Operating System
I use Win10 as my primary operating system in my work laptop. I have two impediments that can not work on a laptop distribution:
- WebEx
- MS Office
We are using webex as our primary communication tool. We are sharing our screen and have our video camera on, so that we can see each other. And we have a lot of meetings that integrate with our company’s outlook. I can use OWA as an alternative but in fact it is difficult to use both of them in a linux desktop.
I have considered to use a VM but a win10 vm needs more than 4G of RAM and a couple of CPUs just to boot up. In that case, means that I have to reduce my work laptop resources for half the day, every day. So for the time being I am staying with Win10 as the primary operating system.
Desktop
Default Win10 desktop
Disk / Filesystem
Default Win10 filesystem with bitlocker. Every HW change will lock the entire system and in the past just was the case!
Dropbox as a cloud sync software, an encfs partition and syncthing for secure personal syncing files.
Mostly OWA for calendar purposes and … still thunderbird for primary reading mails.
Shell
WSL … waiting for the official WSLv2 ! This is a huge HUGE upgrade for windows. I have setup an archlinux WSL environment to continue work on a linux environment, I mean bash. I use my WSL archlinux as a jumphost to my VMs.
Editor
Using Visual Studio Code for any python (or any other) scripting code file. Vim within WSL and notepad for temp text notes. The last year I have switched to Boostnote and markdown notes.
Browser
Multiple Instances of firefox, chromium, firefox Nightly, Tor Browser and Brave
Communication
I use mostly slack and signal-desktop. We are using webex but I prefer zoom. Less and less riot-matrix.
Media
VLC for windows, what else ? Also gimp for image editing. I have switched to spotify for music and draw for diagrams. Last I use CPod for podcasts.
In conclusion
I have switched to a majority of electron applications. I use the same applications on my Linux boxes. Encrypted notes on boostnote, synced over syncthing. Same browsers, same bash/shell, the only thing I dont have on my linux boxes are webex and outlook. Consider everything else, I think it is a decent setup across every distro.
MariaDB Galera Cluster on Ubuntu 18.04.2 LTS
Last Edit: 2019 06 11
Thanks to Manolis Kartsonakis for the extra info.
Official Notes here:
MariaDB Galera Cluster
a Galera Cluster is a synchronous multi-master cluster setup. Each node can act as master. The XtraDB/InnoDB storage engine can sync its data using rsync. Each data transaction gets a Global unique Id and then using Write Set REPLication the nodes can sync data across each other. When a new node joins the cluster the State Snapshot Transfers (SSTs) synchronize full data but in Incremental State Transfers (ISTs) only the missing data are synced.
With this setup we can have:
- Data Redundancy
- Scalability
- Availability

Installation
In Ubuntu 18.04.2 LTS three packages should exist in every node.
So run the below commands in all of the nodes - change your internal IPs accordingly
as root
# apt -y install mariadb-server
# apt -y install galera-3
# apt -y install rsync
host file
as root
# echo 10.10.68.91 gal1 >> /etc/hosts
# echo 10.10.68.92 gal2 >> /etc/hosts
# echo 10.10.68.93 gal3 >> /etc/hosts
Storage Engine
Start the MariaDB/MySQL in one node and check the default storage engine. It should be
MariaDB [(none)]> show variables like 'default_storage_engine';or
echo "SHOW Variables like 'default_storage_engine';" | mysql+------------------------+--------+
| Variable_name | Value |
+------------------------+--------+
| default_storage_engine | InnoDB |
+------------------------+--------+
Architecture
A Galera Cluster should be behind a Load Balancer (proxy) and you should never talk with a node directly.

Galera Configuration
Now copy the below configuration file in all 3 nodes:
/etc/mysql/conf.d/galera.cnf[mysqld]
binlog_format=ROW
default-storage-engine=InnoDB
innodb_autoinc_lock_mode=2
bind-address=0.0.0.0
# Galera Provider Configuration
wsrep_on=ON
wsrep_provider=/usr/lib/galera/libgalera_smm.so
# Galera Cluster Configuration
wsrep_cluster_name="galera_cluster"
wsrep_cluster_address="gcomm://10.10.68.91,10.10.68.92,10.10.68.93"
# Galera Synchronization Configuration
wsrep_sst_method=rsync
# Galera Node Configuration
wsrep_node_address="10.10.68.91"
wsrep_node_name="gal1"Per Node
Be careful the last 2 lines should change to each node:
Node 01
# Galera Node Configuration
wsrep_node_address="10.10.68.91"
wsrep_node_name="gal1"Node 02
# Galera Node Configuration
wsrep_node_address="10.10.68.92"
wsrep_node_name="gal2"
Node 03
# Galera Node Configuration
wsrep_node_address="10.10.68.93"
wsrep_node_name="gal3"
Galera New Cluster
We are ready to create our galera cluster:
galera_new_clusteror
mysqld --wsrep-new-clusterJournalCTL
Jun 10 15:01:20 gal1 systemd[1]: Starting MariaDB 10.1.40 database server...
Jun 10 15:01:24 gal1 sh[2724]: WSREP: Recovered position 00000000-0000-0000-0000-000000000000:-1
Jun 10 15:01:24 gal1 mysqld[2865]: 2019-06-10 15:01:24 139897056971904 [Note] /usr/sbin/mysqld (mysqld 10.1.40-MariaDB-0ubuntu0.18.04.1) starting as process 2865 ...
Jun 10 15:01:24 gal1 /etc/mysql/debian-start[2906]: Upgrading MySQL tables if necessary.
Jun 10 15:01:24 gal1 systemd[1]: Started MariaDB 10.1.40 database server.
Jun 10 15:01:24 gal1 /etc/mysql/debian-start[2909]: /usr/bin/mysql_upgrade: the '--basedir' option is always ignored
Jun 10 15:01:24 gal1 /etc/mysql/debian-start[2909]: Looking for 'mysql' as: /usr/bin/mysql
Jun 10 15:01:24 gal1 /etc/mysql/debian-start[2909]: Looking for 'mysqlcheck' as: /usr/bin/mysqlcheck
Jun 10 15:01:24 gal1 /etc/mysql/debian-start[2909]: This installation of MySQL is already upgraded to 10.1.40-MariaDB, use --force if you still need to run mysql_upgrade
Jun 10 15:01:24 gal1 /etc/mysql/debian-start[2918]: Checking for insecure root accounts.
Jun 10 15:01:24 gal1 /etc/mysql/debian-start[2922]: WARNING: mysql.user contains 4 root accounts without password or plugin!
Jun 10 15:01:24 gal1 /etc/mysql/debian-start[2923]: Triggering myisam-recover for all MyISAM tables and aria-recover for all Aria tables
# ss -at '( sport = :mysql )'
State                Recv-Q                Send-Q                                Local Address:Port                                  Peer Address:Port
LISTEN               0                     80                                        127.0.0.1:mysql                                      0.0.0.0:*
# echo "SHOW STATUS LIKE 'wsrep_%';" | mysql | egrep -i 'cluster|uuid|ready' | column -twsrep_cluster_conf_id 1
wsrep_cluster_size 1
wsrep_cluster_state_uuid 8abc6a1b-8adc-11e9-a42b-c6022ea4412c
wsrep_cluster_status Primary
wsrep_gcomm_uuid d67e5b7c-8b90-11e9-ba3d-23ea221848fd
wsrep_local_state_uuid 8abc6a1b-8adc-11e9-a42b-c6022ea4412c
wsrep_ready ON
Second Node
systemctl restart mariadb.serviceroot@gal2:~# echo "SHOW STATUS LIKE 'wsrep_%';" | mysql | egrep -i 'cluster|uuid|ready' | column -t
wsrep_cluster_conf_id 2
wsrep_cluster_size 2
wsrep_cluster_state_uuid 8abc6a1b-8adc-11e9-a42b-c6022ea4412c
wsrep_cluster_status Primary
wsrep_gcomm_uuid a5eaae3e-8b91-11e9-9662-0bbe68c7d690
wsrep_local_state_uuid 8abc6a1b-8adc-11e9-a42b-c6022ea4412c
wsrep_ready ON
Third Node
systemctl restart mariadb.serviceroot@gal3:~# echo "SHOW STATUS LIKE 'wsrep_%';" | mysql | egrep -i 'cluster|uuid|ready' | column -t
wsrep_cluster_conf_id 3
wsrep_cluster_size 3
wsrep_cluster_state_uuid 8abc6a1b-8adc-11e9-a42b-c6022ea4412c
wsrep_cluster_status Primary
wsrep_gcomm_uuid 013e1847-8b92-11e9-9055-7ac5e2e6b947
wsrep_local_state_uuid 8abc6a1b-8adc-11e9-a42b-c6022ea4412c
wsrep_ready ON
Primary Component (PC)
The last node in the cluster -in theory- has all the transactions. That means it should be the first to start next time from a power-off.
State
cat /var/lib/mysql/grastate.dateg.
# GALERA saved state
version: 2.1
uuid:    8abc6a1b-8adc-11e9-a42b-c6022ea4412c
seqno:   -1
safe_to_bootstrap: 0
if safe_to_bootstrap: 1 then you can bootstrap this node as Primary.
Common Mistakes
Sometimes DBAs want to setup a new cluster (lets say upgrade into a new scheme - non compatible with the previous) so they want a clean state/directory. The most common way is to move the current mysql directory
mv /var/lib/mysql /var/lib/mysql_BAKIf you try to start your galera node, it will fail:
# systemctl restart mariadbWSREP: Failed to start mysqld for wsrep recovery:
[Warning] Can't create test file /var/lib/mysql/gal1.lower-test
Failed to start MariaDB 10.1.40 database serverYou need to create and initialize the mysql directory first:
mkdir -pv /var/lib/mysql
chown -R mysql:mysql /var/lib/mysql
chmod 0755 /var/lib/mysql
mysql_install_db -u mysql
On another node, cluster_size = 2
# echo "SHOW STATUS LIKE 'wsrep_%';" | mysql  | egrep -i 'cluster|uuid|ready' | column -t

wsrep_cluster_conf_id     4
wsrep_cluster_size        2
wsrep_cluster_state_uuid  8abc6a1b-8adc-11e9-a42b-c6022ea4412c
wsrep_cluster_status      Primary
wsrep_gcomm_uuid          a5eaae3e-8b91-11e9-9662-0bbe68c7d690
wsrep_local_state_uuid    8abc6a1b-8adc-11e9-a42b-c6022ea4412c
wsrep_ready               ON
then:
# systemctl restart mariadbrsync from the Primary:
Jun 10 15:19:00 gal1 rsyncd[3857]: rsyncd version 3.1.2 starting, listening on port 4444
Jun 10 15:19:01 gal1 rsyncd[3884]: connect from gal3 (192.168.122.93)
Jun 10 15:19:01 gal1 rsyncd[3884]: rsync to rsync_sst/ from gal3 (192.168.122.93)
Jun 10 15:19:01 gal1 rsyncd[3884]: receiving file list
# echo "SHOW STATUS LIKE 'wsrep_%';" | mysql | egrep -i 'cluster|uuid|ready' | column -t
wsrep_cluster_conf_id 5
wsrep_cluster_size 3
wsrep_cluster_state_uuid 8abc6a1b-8adc-11e9-a42b-c6022ea4412c
wsrep_cluster_status Primary
wsrep_gcomm_uuid 12afa7bc-8b93-11e9-88fc-6f41be61a512
wsrep_local_state_uuid 8abc6a1b-8adc-11e9-a42b-c6022ea4412c
wsrep_ready ONBe Aware: Try to keep your DATA directory to a seperated storage disk
Adding new Nodes
A healthy Quorum has an odd number of nodes. So when you scale your galera gluster consider adding two (2) at every step!
# echo 10.10.68.94 gal4 >> /etc/hosts
# echo 10.10.68.95 gal5 >> /etc/hosts
Data Replication will lock your donor-node so it is best to put-off your donor-node from your Load Balancer:
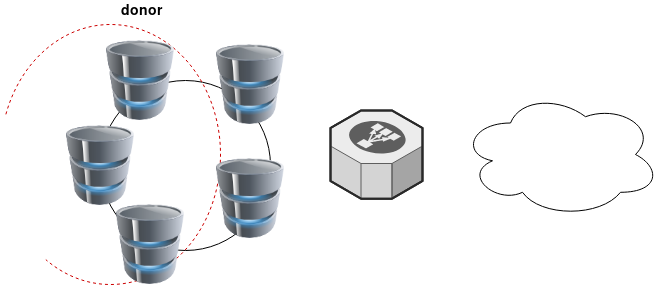
Then explicit point your donor-node to your new nodes by adding the below line in your configuration file:
wsrep_sst_donor= gal3After the synchronization:
- comment-out the above line
- restart mysql service and
- put all three nodes behind the Local Balancer
Split Brain
Find the node with the max
SHOW STATUS LIKE 'wsrep_last_committed';
and set it as master by
SET GLOBAL wsrep_provider_options='pc.bootstrap=YES';
Weighted Quorum for Three Nodes
When configuring quorum weights for three nodes, use the following pattern:
node1: pc.weight = 4
node2: pc.weight = 3
node3: pc.weight = 2
node4: pc.weight = 1
node5: pc.weight = 0
eg.
SET GLOBAL wsrep_provider_options="pc.weight=3";
In the same VPC setting up pc.weight will avoid a split brain situation. In different regions, you can setup something like this:
node1: pc.weight = 2
node2: pc.weight = 2
node3: pc.weight = 2
  <->
node4: pc.weight = 1
node5: pc.weight = 1
node6: pc.weight = 1
WSREP_SST: [ERROR] Error while getting data from donor node
In cases that a specific node can not sync/join the cluster with the above error, we can use this workaround
Change wsrep_sst_method to rsync from xtrabackup , do a restart and check the logs.
Then revert the change back to xtrabackup
/etc/mysql/conf.d/galera.cnf:;wsrep_sst_method = rsync
/etc/mysql/conf.d/galera.cnf:wsrep_sst_method = xtrabackup
STATUS
echo "SHOW STATUS LIKE 'wsrep_%';" | mysql | grep -Ei 'cluster|uuid|ready|commit' | column -tTIL: arch-audit
In archlinux there is a package named: arch-audit that is
an utility like pkg-audit based on Arch CVE Monitoring Team data.
Install
# pacman -Ss arch-audit
community/arch-audit 0.1.10-1

# sudo pacman -S arch-audit
resolving dependencies...
looking for conflicting packages...

Package (1)           New Version  Net Change  Download Size

community/arch-audit  0.1.10-1       1.96 MiB       0.57 MiB

Total Download Size:   0.57 MiB
Total Installed Size:  1.96 MiB
Run
# arch-auditPackage docker is affected by CVE-2018-15664. High risk!
Package gettext is affected by CVE-2018-18751. High risk!
Package glibc is affected by CVE-2019-9169, CVE-2019-5155, CVE-2018-20796, CVE-2016-10739. High risk!
Package libarchive is affected by CVE-2019-1000020, CVE-2019-1000019, CVE-2018-1000880, CVE-2018-1000879, CVE-2018-1000878, CVE-2018-1000877. High risk!
Package libtiff is affected by CVE-2019-7663, CVE-2019-6128. Medium risk!
Package linux-lts is affected by CVE-2018-5391, CVE-2018-3646, CVE-2018-3620, CVE-2018-3615, CVE-2018-8897, CVE-2017-8824, CVE-2017-17741, CVE-2017-17450, CVE-2017-17448, CVE-2017-16644, CVE-2017-5753, CVE-2017-5715, CVE-2018-1121, CVE-2018-1120, CVE-2017-1000379, CVE-2017-1000371, CVE-2017-1000370, CVE-2017-1000365. High risk!
Package openjpeg2 is affected by CVE-2019-6988. Low risk!
Package python-yaml is affected by CVE-2017-18342. High risk!. Update to 5.1-1 from testing repos!
Package sdl is affected by CVE-2019-7638, CVE-2019-7637, CVE-2019-7636, CVE-2019-7635, CVE-2019-7578, CVE-2019-7577, CVE-2019-7576, CVE-2019-7575, CVE-2019-7574, CVE-2019-7573, CVE-2019-7572. High risk!
Package sdl2 is affected by CVE-2019-7638, CVE-2019-7637, CVE-2019-7636, CVE-2019-7635, CVE-2019-7578, CVE-2019-7577, CVE-2019-7576, CVE-2019-7575, CVE-2019-7574, CVE-2019-7573, CVE-2019-7572. High risk!
Package unzip is affected by CVE-2018-1000035. Low risk!
Open Telekom Cloud (OTC) is Deutsche Telekom’s Cloud for Business Customers. I would suggest to visit the Cloud Infrastructure & Cloud Platform Solutions for more information but I will try to keep this a technical post.

In this post you will find my personal notes on how to use the native python openstack CLI client to access OTC from your console.
Notes are based on Ubuntu 18.04.2 LTS
Virtual Environment
Create an isolated python virtual environment (directory) to setup everything under there:
~>  mkdir -pv otc/ && cd otc/
mkdir: created directory 'otc/'

~>  virtualenv -p `which python3`  .

Already using interpreter /usr/bin/python3
Using base prefix '/usr'
New python executable in /home/ebal/otc/bin/python3
Also creating executable in /home/ebal/otc/bin/python
Installing setuptools, pkg_resources, pip, wheel...done.
~> source bin/activate
(otc) ebal@ubuntu:otc~>
(otc) ebal@ubuntu:otc~> python -V
Python 3.6.7
OpenStack Dependencies
Install python openstack dependencies
- openstack sdk
(otc) ebal@ubuntu:otc~> pip install python-openstacksdk
Collecting python-openstacksdk
Collecting openstacksdk (from python-openstacksdk)
  Downloading https://files.pythonhosted.org/packages/
...- openstack client
(otc) ebal@ubuntu:otc~> pip install python-openstackclient
Collecting python-openstackclient
  Using cached https://files.pythonhosted.org/packages
  ...
Install OTC Extensions
It’s time to install the otcextensions
(otc) ebal@ubuntu:otc~> pip install otcextensions
Collecting otcextensions
Requirement already satisfied: openstacksdk>=0.19.0 in ./lib/python3.6/site-packages (from otcextensions) (0.30.0)
...
Installing collected packages: otcextensions
Successfully installed otcextensions-0.6.3
List
(otc) ebal@ubuntu:otc~> pip list | egrep '^python|otc'
otcextensions          0.6.3
python-cinderclient    4.2.0
python-glanceclient    2.16.0
python-keystoneclient  3.19.0
python-novaclient      14.1.0
python-openstackclient 3.18.0
python-openstacksdk    0.5.2
Authentication
Create a new clouds.yaml with your OTC credentials
template:
clouds:
 otc:
   auth:
     username: 'USER_NAME'
     password: 'PASS'
     project_name: 'eu-de'
     auth_url: 'https://iam.eu-de.otc.t-systems.com:443/v3'
     user_domain_name: 'OTC00000000001000000xxx'
   interface: 'public'
   identity_api_version: 3 # !Important
   ak: 'AK_VALUE' # AK/SK pair for access to OBS
   sk: 'SK_VAL
OTC Connect
Let’s tested it !
(otc) ebal@ubuntu:otc~> openstack --os-cloud otc server list
+--------------------------------------+---------------+---------+-------------------------------------------------------------------+-----------------------------------+---------------+
| ID                                   | Name          | Status  | Networks                                                          | Image                             | Flavor        |
+--------------------------------------+---------------+---------+-------------------------------------------------------------------+-----------------------------------+---------------+
| XXXXXXXX-1234-4d7f-8097-YYYYYYYYYYYY | app00-prod    | ACTIVE  | XXXXXXXX-YYYY-ZZZZ-AAAA-BBBBBBCCCCCC=100.101.72.110               | Standard_Ubuntu_16.04_latest      | s2.large.2    |
| XXXXXXXX-1234-4f7d-beaa-YYYYYYYYYYYY | app01-prod    | ACTIVE  | XXXXXXXX-YYYY-ZZZZ-AAAA-BBBBBBCCCCCC=100.101.64.95                | Standard_Ubuntu_16.04_latest      | s2.medium.2   |
| XXXXXXXX-1234-4088-baa8-YYYYYYYYYYYY | app02-prod    | ACTIVE  | XXXXXXXX-YYYY-ZZZZ-AAAA-BBBBBBCCCCCC=100.100.76.160               | Standard_Ubuntu_16.04_latest      | s2.large.4    |
| XXXXXXXX-1234-43f5-8a10-YYYYYYYYYYYY | web00-prod    | ACTIVE  | XXXXXXXX-YYYY-ZZZZ-AAAA-BBBBBBCCCCCC=100.100.76.121               | Standard_Ubuntu_16.04_latest      | s2.xlarge.2   |
| XXXXXXXX-1234-41eb-aa0b-YYYYYYYYYYYY | web01-prod    | ACTIVE  | XXXXXXXX-YYYY-ZZZZ-AAAA-BBBBBBCCCCCC=100.100.76.151               | Standard_Ubuntu_16.04_latest      | s2.large.4    |
| XXXXXXXX-1234-41f7-98ff-YYYYYYYYYYYY | web00-stage   | ACTIVE  | XXXXXXXX-YYYY-ZZZZ-AAAA-BBBBBBCCCCCC=100.100.76.150               | Standard_Ubuntu_16.04_latest      | s2.large.4    |
| XXXXXXXX-1234-41b2-973f-YYYYYYYYYYYY | web01-stage   | ACTIVE  | XXXXXXXX-YYYY-ZZZZ-AAAA-BBBBBBCCCCCC=100.100.76.120               | Standard_Ubuntu_16.04_latest      | s2.xlarge.2   |
| XXXXXXXX-1234-468f-a41c-YYYYYYYYYYYY | app00-stage   | SHUTOFF | XXXXXXXX-YYYY-ZZZZ-AAAA-BBBBBBCCCCCC=100.101.70.111               | Community_Ubuntu_14.04_TSI_latest | s2.xlarge.2   |
| XXXXXXXX-1234-4fdf-8b4c-YYYYYYYYYYYY | app01-stage   | SHUTOFF | XXXXXXXX-YYYY-ZZZZ-AAAA-BBBBBBCCCCCC=100.100.64.92                | Community_Ubuntu_14.04_TSI_latest | s1.large      |
| XXXXXXXX-1234-4e68-a86d-YYYYYYYYYYYY | app02-stage   | SHUTOFF | XXXXXXXX-YYYY-ZZZZ-AAAA-BBBBBBCCCCCC=100.100.66.96                | Community_Ubuntu_14.04_TSI_latest | s2.xlarge.4   |
| XXXXXXXX-1234-475d-9a66-YYYYYYYYYYYY | web00-test    | SHUTOFF | XXXXXXXX-YYYY-ZZZZ-AAAA-BBBBBBCCCCCC=100.102.76.11, 10.44.23.18   | Community_Ubuntu_14.04_TSI_latest | c1.medium     |
| XXXXXXXX-1234-4dac-a6b1-YYYYYYYYYYYY | web01-test    | SHUTOFF | XXXXXXXX-YYYY-ZZZZ-AAAA-BBBBBBCCCCCC=100.101.64.14                | Community_Ubuntu_14.04_TSI_latest | s1.xlarge     |
| XXXXXXXX-1234-458e-8e21-YYYYYYYYYYYY | web02-test    | SHUTOFF | XXXXXXXX-YYYY-ZZZZ-AAAA-BBBBBBCCCCCC=100.101.64.13                | Community_Ubuntu_14.04_TSI_latest | s1.xlarge     |
| XXXXXXXX-1234-42c4-b953-YYYYYYYYYYYY | k8s02-prod    | SHUTOFF | XXXXXXXX-YYYY-ZZZZ-AAAA-BBBBBBCCCCCC=100.101.64.12                | Community_Ubuntu_14.04_TSI_latest | s1.xlarge     |
| XXXXXXXX-1234-4225-b6af-YYYYYYYYYYYY | k8s02-stage   | SHUTOFF | XXXXXXXX-YYYY-ZZZZ-AAAA-BBBBBBCCCCCC=100.101.64.11                | Community_Ubuntu_14.04_TSI_latest | s1.xlarge     |
| XXXXXXXX-1234-4eb1-a596-YYYYYYYYYYYY | k8s02-test    | SHUTOFF | XXXXXXXX-YYYY-ZZZZ-AAAA-BBBBBBCCCCCC=100.102.64.14                | Community_Ubuntu_14.04_TSI_latest | s1.xlarge     |
| XXXXXXXX-1234-4222-b866-YYYYYYYYYYYY | k8s03-test    | SHUTOFF | XXXXXXXX-YYYY-ZZZZ-AAAA-BBBBBBCCCCCC=100.102.64.13                | Community_Ubuntu_14.04_TSI_latest | s1.xlarge     |
| XXXXXXXX-1234-453d-a9c5-YYYYYYYYYYYY | k8s04-test    | SHUTOFF | XXXXXXXX-YYYY-ZZZZ-AAAA-BBBBBBCCCCCC=100.101.64.10                | Community_Ubuntu_14.04_TSI_latest | s1.2xlarge    |
| XXXXXXXX-1234-4968-a2be-YYYYYYYYYYYY | k8s05-test    | SHUTOFF | XXXXXXXX-YYYY-ZZZZ-AAAA-BBBBBBCCCCCC=100.102.76.14, 10.44.22.138  | Community_Ubuntu_14.04_TSI_latest | c2.2xlarge    |
| XXXXXXXX-1234-4c71-a00f-YYYYYYYYYYYY | k8s07-test    | SHUTOFF | XXXXXXXX-YYYY-ZZZZ-AAAA-BBBBBBCCCCCC=100.102.76.170               | Community_Ubuntu_14.04_TSI_latest | c1.medium     |
+--------------------------------------+---------------+---------+-------------------------------------------------------------------+-----------------------------------+---------------+
Load Balancers
(otc) ebal@ubuntu:~/otc~> openstack --os-cloud otc loadbalancer list
+--------------------------------------+----------------------------------+----------------------------------+---------------+---------------------+----------+
| id                                   | name                             | project_id                       | vip_address   | provisioning_status | provider |
+--------------------------------------+----------------------------------+----------------------------------+---------------+---------------------+----------+
| XXXXXXXX-ad99-4de0-d885-YYYYYYYYYYYY | aaccaacbddd1111eee5555aaaaa22222 | 44444bbbbbbb4444444cccccc3333333 | 100.100.10.143 | ACTIVE              | vlb      |
+--------------------------------------+----------------------------------+----------------------------------+---------------+---------------------+----------+
start by reading:
man 5 sshd_config
CentOS 6.x
Ciphers aes128-ctr,aes192-ctr,aes256-ctr
KexAlgorithms diffie-hellman-group-exchange-sha256
MACs hmac-sha2-256,hmac-sha2-512
and change the below setting in /etc/sysconfig/sshd:
AUTOCREATE_SERVER_KEYS=RSAONLY
CentOS 7.x
Ciphers chacha20-poly1305@openssh.com,aes128-ctr,aes192-ctr,aes256-ctr,aes128-gcm@openssh.com,aes256-gcm@openssh.com
KexAlgorithms curve25519-sha256,curve25519-sha256@libssh.org,diffie-hellman-group-exchange-sha256,diffie-hellman-group16-sha512,diffie-hellman-group18-sha512,diffie-hellman-group14-sha256
MACs umac-64-etm@openssh.com,umac-128-etm@openssh.com,hmac-sha2-256-etm@openssh.com,hmac-sha2-512-etm@openssh.com,umac-64@openssh.com,umac-128@openssh.com,hmac-sha2-256,hmac-sha2-512
Ubuntu 18.04.2 LTS
Ciphers chacha20-poly1305@openssh.com,aes128-ctr,aes192-ctr,aes256-ctr,aes128-gcm@openssh.com,aes256-gcm@openssh.com
KexAlgorithms curve25519-sha256,curve25519-sha256@libssh.org,diffie-hellman-group-exchange-sha256,diffie-hellman-group16-sha512,diffie-hellman-group18-sha512,diffie-hellman-group14-sha256
MACs umac-64-etm@openssh.com,umac-128-etm@openssh.com,hmac-sha2-256-etm@openssh.com,hmac-sha2-512-etm@openssh.com,umac-64@openssh.com,umac-128@openssh.com,hmac-sha2-256,hmac-sha2-512
HostKeyAlgorithms ecdsa-sha2-nistp384-cert-v01@openssh.com,ecdsa-sha2-nistp521-cert-v01@openssh.com,ssh-ed25519-cert-v01@openssh.com,ssh-rsa-cert-v01@openssh.com,ecdsa-sha2-nistp384,ecdsa-sha2-nistp521,ssh-ed25519,rsa-sha2-512,rsa-sha2-256
Archlinux
Ciphers chacha20-poly1305@openssh.com,aes128-ctr,aes192-ctr,aes256-ctr,aes128-gcm@openssh.com,aes256-gcm@openssh.com
KexAlgorithms curve25519-sha256,curve25519-sha256@libssh.org,diffie-hellman-group16-sha512,diffie-hellman-group18-sha512,diffie-hellman-group14-sha256
MACs umac-128-etm@openssh.com,hmac-sha2-512-etm@openssh.com
HostKeyAlgorithms ssh-ed25519-cert-v01@openssh.com,rsa-sha2-512-cert-v01@openssh.com,rsa-sha2-256-cert-v01@openssh.com,ssh-rsa-cert-v01@openssh.com,ssh-ed25519,rsa-sha2-512,rsa-sha2-256,ssh-rsa
Renew SSH Host Keys
rm -f /etc/ssh/ssh_host_* && service sshd restart
Generating ssh moduli file
for advance users only
ssh-keygen -G /tmp/moduli -b 4096

ssh-keygen -T /etc/ssh/moduli -f /tmp/moduli This blog post is written mostly as a reminder to myself!
Loop Assert Time Tests with Regex
test.yml
---
- hosts: localhost
  connection: local
  become: no
  gather_facts: no

  tasks:
  - name: Assert Time
    assert:
      that:
        - item | regex_findall('^(?:\d|[01]\d|2[0-3]):[0-5]\d(:[0-5]\d)?$')
      msg: "starTime should be HH:MM:SS or HH:MM"
    with_items:
      - "21:00"
      - "22:22"
      - "3:3"
      - "03:3"
      - "03:03"
      - "03:03:03"
      - "24:00"
      - "22:22:22"
      - "23:00:60"
      - "24:24:24"
      - "00:00:00"
      - "21:21"
      - "foo"
      - "foo:bar"
      - "True"
      - "False"
      - "1:01"
      - "01:01"
    ignore_errors: True

# vim: sts=2 sw=2 ts=2 et
output
PLAY [localhost] **************************************************************

TASK [Assert Time] ************************************************************
ok: [localhost] => (item=21:00) => {
    "changed": false,
    "item": "21:00",
    "msg": "All assertions passed"
}
ok: [localhost] => (item=22:22) => {
    "changed": false,
    "item": "22:22",
    "msg": "All assertions passed"
}
failed: [localhost] (item=3:3) => {
    "assertion": "item | regex_findall('^(?:\\d|[01]\\d|2[0-3]):[0-5]\\d(:[0-5]\\d)?$')",
    "changed": false,
    "evaluated_to": false,
    "item": "3:3",
    "msg": "starTime should be HH:MM:SS or HH:MM"
}
failed: [localhost] (item=03:3) => {
    "assertion": "item | regex_findall('^(?:\\d|[01]\\d|2[0-3]):[0-5]\\d(:[0-5]\\d)?$')",
    "changed": false,
    "evaluated_to": false,
    "item": "03:3",
    "msg": "starTime should be HH:MM:SS or HH:MM"
}
ok: [localhost] => (item=03:03) => {
    "changed": false,
    "item": "03:03",
    "msg": "All assertions passed"
}
ok: [localhost] => (item=03:03:03) => {
    "changed": false,
    "item": "03:03:03",
    "msg": "All assertions passed"
}
failed: [localhost] (item=24:00) => {
    "assertion": "item | regex_findall('^(?:\\d|[01]\\d|2[0-3]):[0-5]\\d(:[0-5]\\d)?$')",
    "changed": false,
    "evaluated_to": false,
    "item": "24:00",
    "msg": "starTime should be HH:MM:SS or HH:MM"
}
ok: [localhost] => (item=22:22:22) => {
    "changed": false,
    "item": "22:22:22",
    "msg": "All assertions passed"
}
failed: [localhost] (item=23:00:60) => {
    "assertion": "item | regex_findall('^(?:\\d|[01]\\d|2[0-3]):[0-5]\\d(:[0-5]\\d)?$')",
    "changed": false,
    "evaluated_to": false,
    "item": "23:00:60",
    "msg": "starTime should be HH:MM:SS or HH:MM"
}
failed: [localhost] (item=24:24:24) => {
    "assertion": "item | regex_findall('^(?:\\d|[01]\\d|2[0-3]):[0-5]\\d(:[0-5]\\d)?$')",
    "changed": false,
    "evaluated_to": false,
    "item": "24:24:24",
    "msg": "starTime should be HH:MM:SS or HH:MM"
}
ok: [localhost] => (item=00:00:00) => {
    "changed": false,
    "item": "00:00:00",
    "msg": "All assertions passed"
}
ok: [localhost] => (item=21:21) => {
    "changed": false,
    "item": "21:21",
    "msg": "All assertions passed"
}
failed: [localhost] (item=foo) => {
    "assertion": "item | regex_findall('^(?:\\d|[01]\\d|2[0-3]):[0-5]\\d(:[0-5]\\d)?$')",
    "changed": false,
    "evaluated_to": false,
    "item": "foo",
    "msg": "starTime should be HH:MM:SS or HH:MM"
}
failed: [localhost] (item=foo:bar) => {
    "assertion": "item | regex_findall('^(?:\\d|[01]\\d|2[0-3]):[0-5]\\d(:[0-5]\\d)?$')",
    "changed": false,
    "evaluated_to": false,
    "item": "foo:bar",
    "msg": "starTime should be HH:MM:SS or HH:MM"
}
failed: [localhost] (item=True) => {
    "assertion": "item | regex_findall('^(?:\\d|[01]\\d|2[0-3]):[0-5]\\d(:[0-5]\\d)?$')",
    "changed": false,
    "evaluated_to": false,
    "item": "True",
    "msg": "starTime should be HH:MM:SS or HH:MM"
}
failed: [localhost] (item=False) => {
    "assertion": "item | regex_findall('^(?:\\d|[01]\\d|2[0-3]):[0-5]\\d(:[0-5]\\d)?$')",
    "changed": false,
    "evaluated_to": false,
    "item": "False",
    "msg": "starTime should be HH:MM:SS or HH:MM"
}
ok: [localhost] => (item=1:01) => {
    "changed": false,
    "item": "1:01",
    "msg": "All assertions passed"
}
ok: [localhost] => (item=01:01) => {
    "changed": false,
    "item": "01:01",
    "msg": "All assertions passed"
}
...ignoring

PLAY RECAP ********************************************************************
localhost                  : ok=1    changed=0    unreachable=0    failed=0
I was suspicious with a cron entry on a new ubuntu server cloud vm, so I ended up to be looking on the logs.
Authentication token is no longer valid; new one required
After a quick internet search,
# chage -l root
Last password change                                    : password must be changed
Password expires                                        : password must be changed
Password inactive                                       : password must be changed
Account expires                                         : never
Minimum number of days between password change          : 0
Maximum number of days between password change          : 99999
Number of days of warning before password expires       : 7
due to the password must be changed on the root account, the cron entry does not run as it should.
This ephemeral image does not need to have a persistent known password, as the notes suggest, and it doesn’t! Even so, we should change to root password when creating the VM.
Ansible
Ansible have a password plugin that we can use with lookup.
TLDR; here is the task:
- name: Generate Random Password
    user:
      name: root
      password: "{{ lookup('password','/dev/null encrypt=sha256_crypt length=32') }}"
after ansible-playbook runs
# chage -l root
Last password change                                    : Mar 10, 2019
Password expires                                        : never
Password inactive                                       : never
Account expires                                         : never
Minimum number of days between password change          : 0
Maximum number of days between password change          : 99999
Number of days of warning before password expires       : 7
and cron entry now runs as it should.
Password Plugin
Let explain how password plugin works.
Lookup needs at-least two (2) variables, the plugin name and a file to store the output. Instead, we will use /dev/null not to persist the password to a file.
To begin with it, a test ansible playbook:
- hosts: localhost
  gather_facts: False
  connection: local

  tasks:
    - debug:
        msg: "{{ lookup('password', '/dev/null') }}"
      with_sequence: count=5
Output:
ok: [localhost] => (item=1) => {
    "msg": "dQaVE0XwWti,7HMUgq::"
}
ok: [localhost] => (item=2) => {
    "msg": "aT3zqg.KjLwW89MrAApx"
}
ok: [localhost] => (item=3) => {
    "msg": "4LBNn:fVw5GhXDWh6TnJ"
}
ok: [localhost] => (item=4) => {
    "msg": "v273Hbox1rkQ3gx3Xi2G"
}
ok: [localhost] => (item=5) => {
    "msg": "NlwzHoLj8S.Y8oUhcMv,"
}
Length
In password plugin we can also use length variable:
msg: "{{ lookup('password', '/dev/null length=32') }}"
output:
ok: [localhost] => (item=1) => {
    "msg": "4.PEb6ycosnyL.SN7jinPM:AC9w2iN_q"
}
ok: [localhost] => (item=2) => {
    "msg": "s8L6ZU_Yzuu5yOk,ISM28npot4.KwQrE"
}
ok: [localhost] => (item=3) => {
    "msg": "L9QvLyNTvpB6oQmcF8WVFy.7jE4Q1K-W"
}
ok: [localhost] => (item=4) => {
    "msg": "6DMH8KqIL:kx0ngFe8:ri0lTK4hf,SWS"
}
ok: [localhost] => (item=5) => {
    "msg": "ByW11i_66K_0mFJVB37Mq2,.fBflepP9"
}
Characters
We can define a specific type of python string constants
- ascii_letters (ascii_lowercase and ascii_uppercase
- ascii_lowercase
- ascii_uppercase
- digits
- hexdigits
- letters (lowercase and uppercase)
- lowercase
- octdigits
- punctuation
- printable (digits, letters, punctuation and whitespace
- uppercase
- whitespace
eg.
msg: "{{ lookup('password', '/dev/null length=32 chars=ascii_lowercase') }}"
ok: [localhost] => (item=1) => {
    "msg": "vwogvnpemtdobjetgbintcizjjgdyinm"
}
ok: [localhost] => (item=2) => {
    "msg": "pjniysksnqlriqekqbstjihzgetyshmp"
}
ok: [localhost] => (item=3) => {
    "msg": "gmeoeqncdhllsguorownqbynbvdusvtw"
}
ok: [localhost] => (item=4) => {
    "msg": "xjluqbewjempjykoswypqlnvtywckrfx"
}
ok: [localhost] => (item=5) => {
    "msg": "pijnjfcpjoldfuxhmyopbmgdmgdulkai"
}
Encrypt
We can also define the encryption hash. Ansible uses passlib so the unix active encrypt hash algorithms are:
- passlib.hash.bcrypt - BCrypt
- passlib.hash.sha256_crypt - SHA-256 Crypt
- passlib.hash.sha512_crypt - SHA-512 Crypt
eg.
msg: "{{ lookup('password', '/dev/null length=32 chars=ascii_lowercase encrypt=sha512_crypt') }}"
ok: [localhost] => (item=1) => {
    "msg": "$6$BR96lZqN$jy.CRVTJaubOo6QISUJ9tQdYa6P6tdmgRi1/NQKPxwX9/Plp.7qETuHEhIBTZDTxuFqcNfZKtotW5q4H0BPeN."
}
ok: [localhost] => (item=2) => {
    "msg": "$6$ESf5xnWJ$cRyOuenCDovIp02W0eaBmmFpqLGGfz/K2jd1FOSVkY.Lsuo8Gz8oVGcEcDlUGWm5W/CIKzhS43xdm5pfWyCA4."
}
ok: [localhost] => (item=3) => {
    "msg": "$6$pS08v7j3$M4mMPkTjSwElhpY1bkVL727BuMdhyl4IdkGM7Mq10jRxtCSrNlT4cAU3wHRVxmS7ZwZI14UwhEB6LzfOL6pM4/"
}
ok: [localhost] => (item=4) => {
    "msg": "$6$m17q/zmR$JdogpVxY6MEV7nMKRot069YyYZN6g8GLqIbAE1cRLLkdDT3Qf.PImkgaZXDqm.2odmLN8R2ZMYEf0vzgt9PMP1"
}
ok: [localhost] => (item=5) => {
    "msg": "$6$tafW6KuH$XOBJ6b8ORGRmRXHB.pfMkue56S/9NWvrY26s..fTaMzcxTbR6uQW1yuv2Uy1DhlOzrEyfFwvCQEhaK6MrFFye."
}Ansible is a wonderful software to automatically configure your systems. The default mode of using ansible is Push Model.

That means from your box, and only using ssh + python, you can configure your flee of machines.
Ansible is imperative. You define tasks in your playbooks, roles and they will run in a serial manner on the remote machines. The task will first check if needs to run and otherwise it will skip the action. And although we can use conditional to skip actions, tasks will perform all checks. For that reason ansible seems slow instead of other configuration tools. Ansible runs in serial mode the tasks but in psedo-parallel mode against the remote servers, to increase the speed. But sometimes you need to gather_facts and that would cost in execution time. There are solutions to cache the ansible facts in a redis (in memory key:value db) but even then, you need to find a work-around to speed your deployments.
But there is an another way, the Pull Mode!
Useful Reading Materials
to learn more on the subject, you can start reading these two articles on ansible-pull.
Pull Mode
So here how it looks:
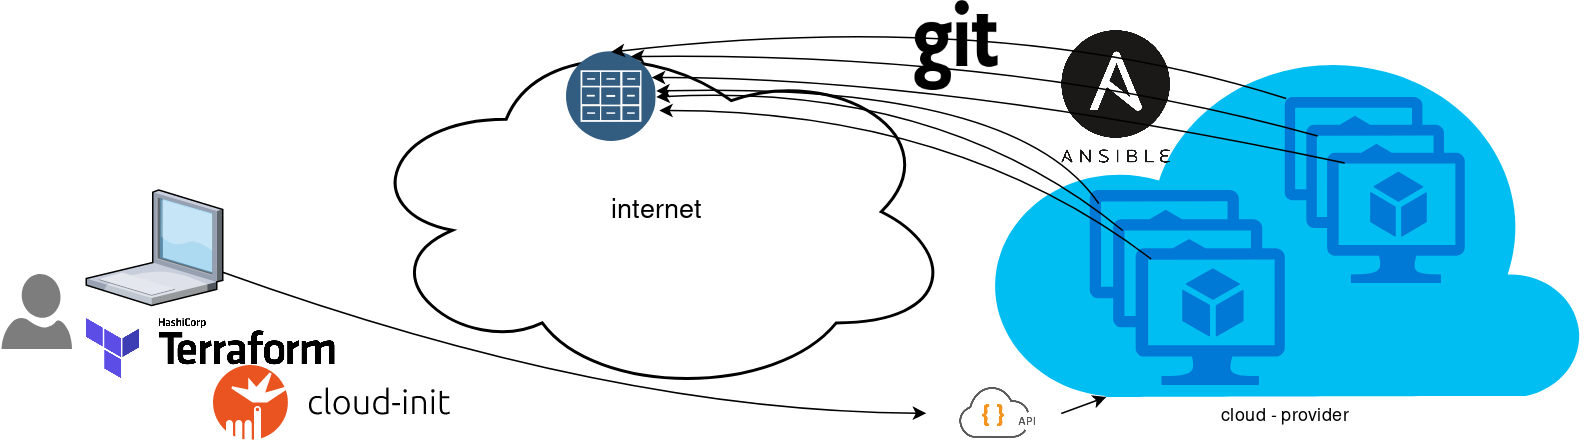
You will first notice, that your ansible repository is moved from you local machine to an online git repository. For me, this is GitLab. As my git repo is private, I have created a Read-Only, time-limit, Deploy Token.
With that scenario, our (ephemeral - or not) VMs will pull their ansible configuration from the git repo and run the tasks locally. I usually build my infrastructure with Terraform by HashiCorp and make advance of cloud-init to initiate their initial configuration.
Cloud-init
The tail of my user-data.yml looks pretty much like this:
...
# Install packages
packages:
  - ansible

# Run ansible-pull
runcmd:
  - ansible-pull -U https://gitlab+deploy-token-XXXXX:YYYYYYYY@gitlab.com/username/myrepo.git
Playbook
You can either create a playbook named with the hostname of the remote server, eg. node1.yml or use the local.yml as the default playbook name.
Here is an example that will also put ansible-pull into a cron entry. This is very useful because it will check for any changes in the git repo every 15 minutes and run ansible again.
- hosts: localhost

  tasks:
    - name: Ensure ansible-pull is running every 15 minutes
      cron:
        name: "ansible-pull"
        minute: "15"
        job: "ansible-pull -U https://gitlab+deploy-token-XXXXX:YYYYYYYY@gitlab.com/username/myrepo.git &> /dev/null"

    - name: Create a custom local vimrc file
      lineinfile:
        path: /etc/vim/vimrc.local
        line: 'set modeline'
        create: yes

    - name: Remove "cloud-init" package
      apt:
        name: "cloud-init"
        purge: yes
        state: absent

    - name: Remove useless packages from the cache
      apt:
        autoclean: yes

    - name: Remove dependencies that are no longer required
      apt:
        autoremove: yes

# vim: sts=2 sw=2 ts=2 etIn this short blog post, I will share a few ansible tips:
Run a specific role
ansible -i hosts -m include_role -a name=roles/common all -b
Print Ansible Variables
ansible -m debug -a 'var=vars' 127.0.0.1 | sed "1 s/^.*$/{/" | jq .
Ansible Conditionals
Variable contains string
matching string in a variable
  vars:
      var1: "hello world"

  - debug:
        msg: " {{ var1 }} "
    when:  ........
old way
when: var1.find("hello") != -1deprecated way
when: var1 | search("hello")Correct way
when: var1 is search("hello")Multiple Conditionals
Logical And
      when:
        - ansible_distribution == "Archlinux"
        - ansible_hostname is search("myhome")
Numeric Conditionals
getting variable from command line (or from somewhere else)
   -  set_fact:
       my_variable_keepday: "{{ keepday | default(7)  | int }}"

    - name: something
      debug:
        msg: "keepday : {{  my_variable_keepday }}"
      when:
        - my_variable_keepday|int >= 0
        - my_variable_keepday|int <= 10
Validate Time variable with ansible
I need to validate a variable. It should be ‘%H:%M:%S’
My work-around is to convert it to datetime so that I can validate it:
  tasks:
    - debug:
        msg: "{{ startTime | to_datetime('%H:%M:%S') }}"
First example: 21:30:15
True: "msg": "1900-01-01 21:30:15"
Second example: ‘25:00:00′
could not be converted to an dict.
The error was: time data '25:00:00' does not match format '%H:%M:%S'
This article will show how to install Arch Linux in Windows 10 under Windows Subsystem for Linux.
WSL
Prerequisite is to have enabled WSL on your Win10 and already reboot your machine.
You can enable WSL :
- Windows Settings
- Apps
- Apps & features
- Related settings -> Programs and Features (bottom)
- Turn Windows features on or off (left)
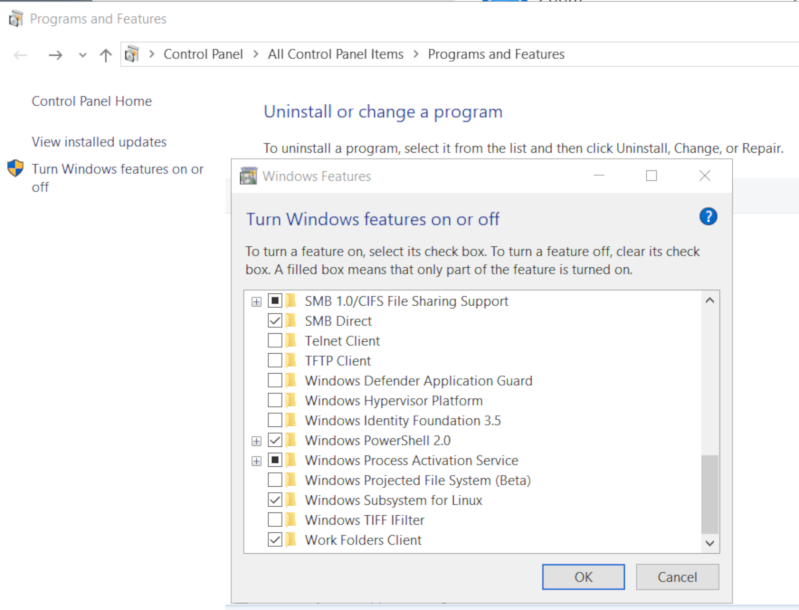
Store
After rebooting your Win10, you can use Microsoft Store to install a Linux distribution like Ubuntu. Archlinux is not an official supported linux distribution thus this guide !
Launcher
The easiest way to install Archlinux (or any Linux distro) is to download the wsldl from github. This project provides a generic Launcher.exe and any rootfs as source base. First thing is to rename Launcher.exe to Archlinux.exe.
ebal@myworklaptop:~$ mkdir -pv Archlinux
mkdir: created directory 'Archlinux'

ebal@myworklaptop:~$ cd Archlinux/

ebal@myworklaptop:~/Archlinux$ curl -sL -o Archlinux.exe https://github.com/yuk7/wsldl/releases/download/18122700/Launcher.exe
ebal@myworklaptop:~/Archlinux$ ls -l
total 320
-rw-rw-rw- 1 ebal ebal 143147 Feb 21 20:40 Archlinux.exe
RootFS
Next step is to download the latest archlinux root filesystem and create a new rootfs.tar.gz archive file, as wsldl uses this type.
ebal@myworklaptop:~/Archlinux$ curl -sLO http://ftp.otenet.gr/linux/archlinux/iso/latest/archlinux-bootstrap-2019.02.01-x86_64.tar.gz

ebal@myworklaptop:~/Archlinux$ ls -l
total 147392
-rw-rw-rw- 1 ebal ebal    143147 Feb 21 20:40 Archlinux.exe
-rw-rw-rw- 1 ebal ebal 149030552 Feb 21 20:42 archlinux-bootstrap-2019.02.01-x86_64.tar.gz

ebal@myworklaptop:~/Archlinux$ sudo tar xf archlinux-bootstrap-2019.02.01-x86_64.tar.gz

ebal@myworklaptop:~/Archlinux$  cd root.x86_64/

ebal@myworklaptop:~/Archlinux/root.x86_64$ ls
README  bin  boot  dev  etc  home  lib  lib64  mnt  opt  proc  root  run  sbin  srv  sys  tmp  usr  var

ebal@myworklaptop:~/Archlinux/root.x86_64$  sudo tar czf rootfs.tar.gz .
tar: .: file changed as we read it

ebal@myworklaptop:~/Archlinux/root.x86_64$ ls
README  bin  boot  dev  etc  home  lib  lib64  mnt  opt  proc  root  rootfs.tar.gz  run  sbin  srv  sys  tmp  usr  var

ebal@myworklaptop:~/Archlinux/root.x86_64$ du -sh rootfs.tar.gz
144M    rootfs.tar.gz

ebal@myworklaptop:~/Archlinux/root.x86_64$ sudo mv rootfs.tar.gz ../

ebal@myworklaptop:~/Archlinux/root.x86_64$ cd ..
ebal@myworklaptop:~/Archlinux$ ls
Archlinux.exe  archlinux-bootstrap-2019.02.01-x86_64.tar.gz  root.x86_64  rootfs.tar.gz

ebal@myworklaptop:~/Archlinux$
ebal@myworklaptop:~/Archlinux$ ls
Archlinux.exe  rootfs.tar.gz

ebal@myworklaptop:~$ mv Archlinux/ /mnt/c/Users/EvaggelosBalaskas/Downloads/ArchlinuxWSL
ebal@myworklaptop:~$
As you can see, I do a little clean up and I move the directory under windows filesystem.
Install & Verify
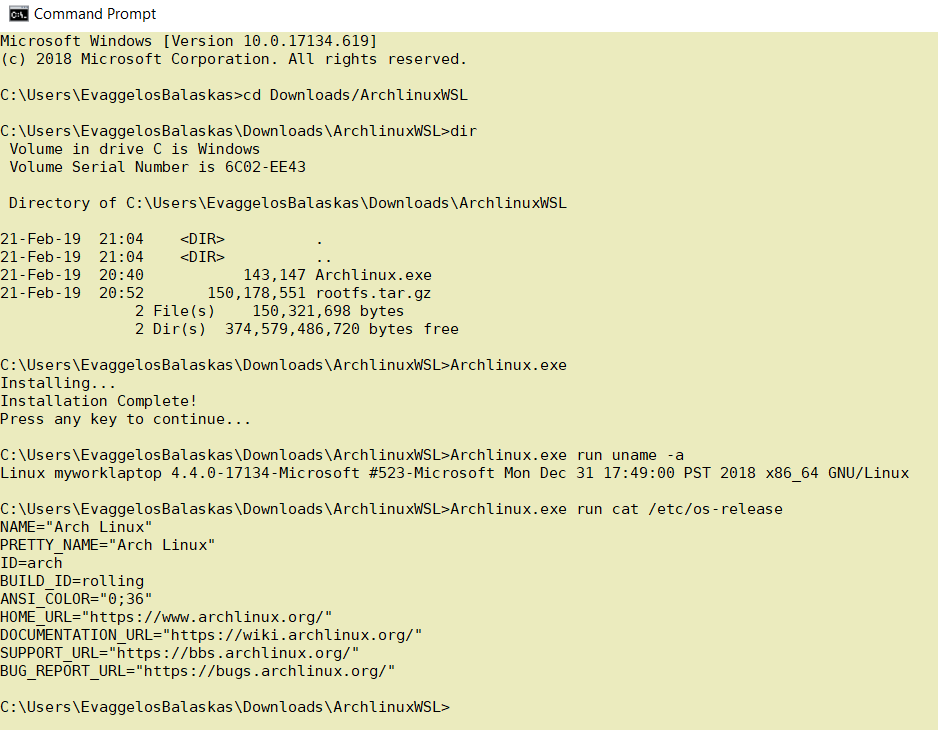
Microsoft Windows [Version 10.0.17134.619]
(c) 2018 Microsoft Corporation. All rights reserved.

C:UsersEvaggelosBalaskas>cd Downloads/ArchlinuxWSL

C:UsersEvaggelosBalaskasDownloadsArchlinuxWSL>dir
 Volume in drive C is Windows
 Volume Serial Number is 6C02-EE43

 Directory of C:UsersEvaggelosBalaskasDownloadsArchlinuxWSL

21-Feb-19  21:04    <DIR>          .
21-Feb-19  21:04    <DIR>          ..
21-Feb-19  20:40           143,147 Archlinux.exe
21-Feb-19  20:52       150,178,551 rootfs.tar.gz
               2 File(s)    150,321,698 bytes
               2 Dir(s)  374,579,486,720 bytes free

C:UsersEvaggelosBalaskasDownloadsArchlinuxWSL>Archlinux.exe
Installing...
Installation Complete!
Press any key to continue...

C:UsersEvaggelosBalaskasDownloadsArchlinuxWSL>Archlinux.exe run uname -a
Linux myworklaptop 4.4.0-17134-Microsoft #523-Microsoft Mon Dec 31 17:49:00 PST 2018 x86_64 GNU/Linux

C:UsersEvaggelosBalaskasDownloadsArchlinuxWSL>Archlinux.exe run cat /etc/os-release
NAME="Arch Linux"
PRETTY_NAME="Arch Linux"
ID=arch
BUILD_ID=rolling
ANSI_COLOR="0;36"
HOME_URL="https://www.archlinux.org/"
DOCUMENTATION_URL="https://wiki.archlinux.org/"
SUPPORT_URL="https://bbs.archlinux.org/"
BUG_REPORT_URL="https://bugs.archlinux.org/"

C:UsersEvaggelosBalaskasDownloadsArchlinuxWSL>Archlinux.exe run bash
[root@myworklaptop ArchlinuxWSL]#
[root@myworklaptop ArchlinuxWSL]# exit
Archlinux
C:UsersEvaggelosBalaskasDownloadsArchlinuxWSL>Archlinux.exe run bash
[root@myworklaptop ArchlinuxWSL]#

[root@myworklaptop ArchlinuxWSL]# date
Thu Feb 21 21:41:41 STD 2019
Remember, archlinux by default does not have any configuration. So you need to configure this instance !
Here are some basic configuration:
[root@myworklaptop ArchlinuxWSL]# echo nameserver 8.8.8.8 > /etc/resolv.conf

[root@myworklaptop ArchlinuxWSL]# cat > /etc/pacman.d/mirrorlist <<EOF
Server = http://ftp.otenet.gr/linux/archlinux/$repo/os/$arch
EOF

[root@myworklaptop ArchlinuxWSL]#  pacman-key --init

[root@myworklaptop ArchlinuxWSL]#  pacman-key --populate

[root@myworklaptop ArchlinuxWSL]# pacman -Syy
you are pretty much ready to use archlinux inside your windows 10 !!
Remove
You can remove Archlinux by simple:
Archlinux.exe clean
Default User
There is a simple way to use Archlinux within Windows Subsystem for Linux , by connecting with a default user.
But before configure ArchWSL, we need to create this user inside the archlinux instance:
[root@myworklaptop ArchWSL]# useradd -g 374 -u 374 ebal

[root@myworklaptop ArchWSL]# id ebal
uid=374(ebal) gid=374(ebal) groups=374(ebal)

[root@myworklaptop ArchWSL]# cp -rav /etc/skel/ /home/ebal
'/etc/skel/' -> '/home/ebal'
'/etc/skel/.bashrc' -> '/home/ebal/.bashrc'
'/etc/skel/.bash_profile' -> '/home/ebal/.bash_profile'
'/etc/skel/.bash_logout' -> '/home/ebal/.bash_logout'

chown -R ebal:ebal /home/ebal/
then exit the linux app and run:
> Archlinux.exe config --default-user ebaland try to login again:
> Archlinux.exe run bash
[ebal@myworklaptop ArchWSL]$

[ebal@myworklaptop ArchWSL]$ cd ~

ebal@myworklaptop ~$ pwd -P
/home/ebal
Flatpak is a software utility for software deployment, package management, and application virtualization for Linux desktop computers. It provides a sandbox environment in which users can run applications in isolation from the rest of the system.
… in a nutshell, it is an isolate software bundle package which you can run with restricted permissions!
User Vs System
We can install flatpak applications for system-wide or for single-user. The last part does not need administrative access or any special permissions.
To use flatpak as a user, we have to add --user next to every flatpak command.
Applications
A flatpak application has a manifest that describes dependancies & permissions.
Repositories
A repository contains a list of application manifests & the flatpak package (code).
Branches
One of the best features of flatpak, is that we can have multile versions of a specific application. This is being done by using a different branch or version (like git). Most common branch is default.
Add flathub
To use/install a flatpak application, we have first to add a remote flatpack repository localy.
The most well-known flatpak repository is called: flathub
flatpak remote-add --user flathub https://dl.flathub.org/repo/flathub.flatpakrepo
Search Applications
$ flatpak search --user Signal
Description                                                                                     Application                                 Version              Branch              Remotes
Signal - Private messenger for the desktop                                                      org.signal.Signal                           1.20.0               stable              flathub
Install package as user
The default syntax of install packages is:
repository - application
$ flatpak install --user -y flathub com.dropbox.Client
$ flatpak install --user -y flathub org.signal.Signal
List
See how many packages to you have installed
$ flatpak list
Application
___________

com.dropbox.Client
com.jetbrains.PyCharm-Community
com.slack.Slack
com.visualstudio.code.oss
io.atom.Atom
org.signal.Signal
Run
To execute a flatpak application :
flatpak run com.slack.Slack
flatpak run org.signal.Signal
Update
and finally how to update your flatpack packages:
$ flatpak --user -y update
Remove Unused Packages
$ flatpak uninstall --user --unused
Uninstall flatpak package
$ flatpak uninstall --user com.visualstudio.code.oss
TLDR; Exit status value does not change when using redirection.
~> false
~> echo $?
1

~> true
~> echo $?
0

~> false > /dev/null
~> echo $?
1

~> true > /dev/null
~> echo $?
0

~> false 1> /dev/null
~> echo $?
1

~> true 1> /dev/null
~> echo $?
0

~> false 2> /dev/null
~> echo $?
1

~> true 2> /dev/null
~> echo $?
0

~> false &> /dev/null
~> echo $?
1

~> true &> /dev/null
~> echo $?
0

~> false 2>&1 >/dev/null
~> echo $?
1

~> true 2>&1 /dev/null
~> echo $?
0

~> false < /dev/null > /dev/null
~> echo $?
1

~> true < /dev/null > /dev/null
~> echo $?
0Using Terraform by HashiCorp and cloud-init on Hetzner cloud provider.
Nowadays with the help of modern tools, we use our infrastructure as code. This approach is very useful because we can have Immutable design with our infra by declaring the state would like our infra to be. This also provide us with flexibility and a more generic way on how to handle our infra as lego bricks, especially on scaling.
UPDATE: 2019.01.22
Hetzner
We need to create an Access API Token within a new project under the console of hetzner cloud.
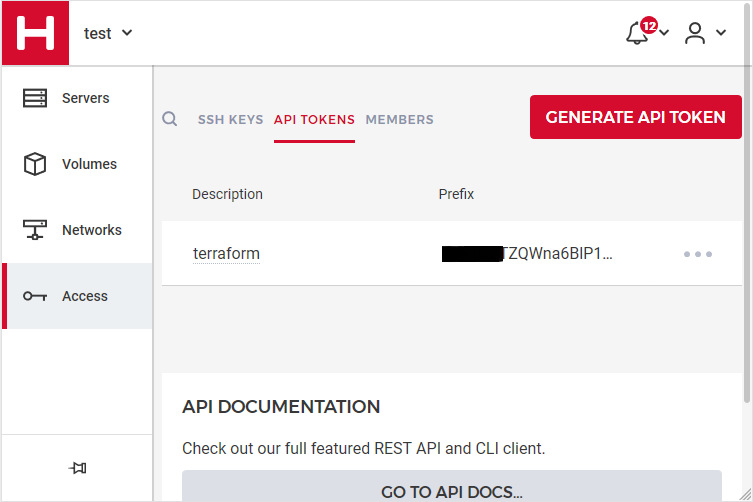
Copy this token and with that in place we can continue with terraform.
For the purposes of this article, I am going to use as the API token: 01234567890
Install Terraform
the latest terraform version at the time of writing this blog post is: v.11.11
$ curl -sL https://releases.hashicorp.com/terraform/0.11.11/terraform_0.11.11_linux_amd64.zip |
   bsdtar -xf- && chmod +x terraform
$ sudo mv terraform /usr/local/bin/
and verify it
$ terraform versionTerraform v0.11.11
Terraform Provider for Hetzner Cloud
To use the hetzner cloud via terraform, we need the terraform-provider-hcloud plugin.
hcloud, is part of terraform providers repository. So the first time of initialize our project, terraform will download this plugin locally.
Initializing provider plugins...
- Checking for available provider plugins on https://releases.hashicorp.com...
- Downloading plugin for provider "hcloud" (1.7.0)...
...
* provider.hcloud: version = "~> 1.7"
Compile hcloud
If you like, you can always build hcloud from the source code.
There are notes on how to build the plugin here Terraform Hetzner Cloud provider.
GitLab CI
or you can even download the artifact from my gitlab-ci repo.
Plugin directory
You will find the terraform hcloud plugin under your current directory:
./.terraform/plugins/linux_amd64/terraform-provider-hcloud_v1.7.0_x4
I prefer to copy the tf plugins centralized under my home directory:
$ mkdir -pv ~/.terraform/plugins/linux_amd64/
$ mv ./.terraform/plugins/linux_amd64/terraform-provider-hcloud_v1.7.0_x4 ~/.terraform.d/plugins/linux_amd64/terraform-provider-hcloud
or if you choose the artifact from gitlab:
$ curl -sL -o ~/.terraform/plugins/linux_amd64/terraform-provider-hcloud https://gitlab.com/ebal/terraform-provider-hcloud-ci/-/jobs/artifacts/master/raw/bin/terraform-provider-hcloud?job=run-buildThat said, when working with multiple terraform projects you may be in a position that you need different versions of the same tf-plugin. In that case it is better to have them under your current working directory/project instead of your home directory. Perhaps one project needs v1.2.3 and another v4.5.6 of the same tf-plugin.
Hetzner Cloud API
Here is a few examples on how to use the Hetzner Cloud API:
$ export -p API_TOKEN="01234567890"
$ curl -sH "Authorization: Bearer $API_TOKEN" https://api.hetzner.cloud/v1/datacenters | jq -r .datacenters[].name
fsn1-dc8
nbg1-dc3
hel1-dc2
fsn1-dc14
$ curl -sH "Authorization: Bearer $API_TOKEN" https://api.hetzner.cloud/v1/locations | jq -r .locations[].name
fsn1
nbg1
hel1$ curl -sH "Authorization: Bearer $API_TOKEN" https://api.hetzner.cloud/v1/images | jq -r .images[].name
ubuntu-16.04
debian-9
centos-7
fedora-27
ubuntu-18.04
fedora-28
hetzner.tf
At this point, we are ready to write our terraform file.
It can be as simple as this (CentOS 7):
# Set the variable value in *.tfvars file
# or using -var="hcloud_token=..." CLI option
variable "hcloud_token" {}

# Configure the Hetzner Cloud Provider
provider "hcloud" {
  token = "${var.hcloud_token}"
}

# Create a new server running centos
resource "hcloud_server" "node1" {
  name = "node1"
  image = "centos-7"
  server_type = "cx11"
}
Project_Ebal
or a more complex config: Ubuntu 18.04 LTS
# Project_Ebal
variable "hcloud_token" {}

# Configure the Hetzner Cloud Provider
provider "hcloud" {
  token = "${var.hcloud_token}"
}

# Create a new server running centos
resource "hcloud_server" "Project_Ebal" {
  name = "ebal_project"
  image = "ubuntu-18.04"
  server_type = "cx11"
  location = "nbg1"
}
Repository Structure
Although in this blog post we have a small and simple example of using hetzner cloud with terraform, on larger projects is usually best to have separated terraform files for variables, code and output. For more info, you can take a look here: VCS Repository Structure - Workspaces
  ├── variables.tf
  ├── main.tf
  ├── outputs.tf
Cloud-init
To use cloud-init with hetzner is very simple.
We just need to add this declaration user_data = "${file("user-data.yml")}" to terraform file.
So our previous tf is now this:
# Project_Ebal
variable "hcloud_token" {}

# Configure the Hetzner Cloud Provider
provider "hcloud" {
  token = "${var.hcloud_token}"
}

# Create a new server running centos
resource "hcloud_server" "Project_Ebal" {
  name = "ebal_project"
  image = "ubuntu-18.04"
  server_type = "cx11"
  location = "nbg1"
  user_data = "${file("user-data.yml")}"
}
to get the IP_Address of the virtual machine, I would also like to have an output declaration:
output "ipv4_address" {
  value = "${hcloud_server.ebal_project.ipv4_address}"
}
Clout-init
You will find more notes on cloud-init on a previous blog post: Cloud-init with CentOS 7.
below is an example of user-data.yml
#cloud-config

disable_root: true
ssh_pwauth: no

users:
  - name: ubuntu
    ssh_import_id:
     - gh:ebal
    shell: /bin/bash
    sudo: ALL=(ALL) NOPASSWD:ALL

# Set TimeZone
timezone: Europe/Athens

# Install packages
packages:
  - mlocate
  - vim
  - figlet

# Update/Upgrade & Reboot if necessary
package_update: true
package_upgrade: true
package_reboot_if_required: true

# Remove cloud-init
runcmd:
  - figlet Project_Ebal > /etc/motd
  - updatedb
Terraform
First thing with terraform is to initialize our environment.
Init
$ terraform init
Initializing provider plugins...

Terraform has been successfully initialized!

You may now begin working with Terraform. Try running "terraform plan" to see
any changes that are required for your infrastructure. All Terraform commands
should now work.

If you ever set or change modules or backend configuration for Terraform,
rerun this command to reinitialize your working directory. If you forget, other
commands will detect it and remind you to do so if necessary.
Plan
Of course it is not necessary to plan and then plan with out.
You can skip this step, here exist only for documentation purposes.
$ terraform plan
Refreshing Terraform state in-memory prior to plan...
The refreshed state will be used to calculate this plan, but will not be
persisted to local or remote state storage.

------------------------------------------------------------------------

An execution plan has been generated and is shown below.
Resource actions are indicated with the following symbols:
  + create

Terraform will perform the following actions:

  + hcloud_server.ebal_project
      id:            <computed>
      backup_window: <computed>
      backups:       "false"
      datacenter:    <computed>
      image:         "ubuntu-18.04"
      ipv4_address:  <computed>
      ipv6_address:  <computed>
      ipv6_network:  <computed>
      keep_disk:     "false"
      location:      "nbg1"
      name:          "ebal_project"
      server_type:   "cx11"
      status:        <computed>
      user_data:     "sk6134s+ys+wVdGITc+zWhbONYw="

Plan: 1 to add, 0 to change, 0 to destroy.

------------------------------------------------------------------------

Note: You didn't specify an "-out" parameter to save this plan, so Terraform
can't guarantee that exactly these actions will be performed if
"terraform apply" is subsequently run.
Out
$ terraform plan -out terraform.tfplan
Refreshing Terraform state in-memory prior to plan...
The refreshed state will be used to calculate this plan, but will not be
persisted to local or remote state storage.

------------------------------------------------------------------------

An execution plan has been generated and is shown below.
Resource actions are indicated with the following symbols:
  + create

Terraform will perform the following actions:

  + hcloud_server.ebal_project
      id:            <computed>
      backup_window: <computed>
      backups:       "false"
      datacenter:    <computed>
      image:         "ubuntu-18.04"
      ipv4_address:  <computed>
      ipv6_address:  <computed>
      ipv6_network:  <computed>
      keep_disk:     "false"
      location:      "nbg1"
      name:          "ebal_project"
      server_type:   "cx11"
      status:        <computed>
      user_data:     "sk6134s+ys+wVdGITc+zWhbONYw="

Plan: 1 to add, 0 to change, 0 to destroy.

------------------------------------------------------------------------

This plan was saved to: terraform.tfplan

To perform exactly these actions, run the following command to apply:
    terraform apply "terraform.tfplan"
Apply
$ terraform apply "terraform.tfplan"
hcloud_server.ebal_project: Creating...
  backup_window: "" => "<computed>"
  backups:       "" => "false"
  datacenter:    "" => "<computed>"
  image:         "" => "ubuntu-18.04"
  ipv4_address:  "" => "<computed>"
  ipv6_address:  "" => "<computed>"
  ipv6_network:  "" => "<computed>"
  keep_disk:     "" => "false"
  location:      "" => "nbg1"
  name:          "" => "ebal_project"
  server_type:   "" => "cx11"
  status:        "" => "<computed>"
  user_data:     "" => "sk6134s+ys+wVdGITc+zWhbONYw="
hcloud_server.ebal_project: Still creating... (10s elapsed)
hcloud_server.ebal_project: Still creating... (20s elapsed)
hcloud_server.ebal_project: Creation complete after 23s (ID: 1676988)

Apply complete! Resources: 1 added, 0 changed, 0 destroyed.

Outputs:

ipv4_address = 1.2.3.4
SSH and verify cloud-init
$ ssh 1.2.3.4 -l ubuntu
Welcome to Ubuntu 18.04.1 LTS (GNU/Linux 4.15.0-43-generic x86_64)

 * Documentation:  https://help.ubuntu.com
 * Management:     https://landscape.canonical.com
 * Support:        https://ubuntu.com/advantage

  System information as of Fri Jan 18 12:17:14 EET 2019

  System load:  0.41              Processes:           89
  Usage of /:   9.7% of 18.72GB   Users logged in:     0
  Memory usage: 8%                IP address for eth0: 1.2.3.4
  Swap usage:   0%

0 packages can be updated.
0 updates are security updates.

Destroy
Be Careful without providing a specific terraform out plan, terraform will destroy every tfplan within your working directory/project. So it is always a good practice to explicit destroy a specify resource/tfplan.
$ terraform destroy should better be:
$ terraform destroy -out terraform.tfplan
hcloud_server.ebal_project: Refreshing state... (ID: 1676988)

An execution plan has been generated and is shown below.
Resource actions are indicated with the following symbols:
  - destroy

Terraform will perform the following actions:

  - hcloud_server.ebal_project

Plan: 0 to add, 0 to change, 1 to destroy.

Do you really want to destroy all resources?
  Terraform will destroy all your managed infrastructure, as shown above.
  There is no undo. Only 'yes' will be accepted to confirm.

  Enter a value: yes

hcloud_server.ebal_project: Destroying... (ID: 1676988)
hcloud_server.ebal_project: Destruction complete after 1s

Destroy complete! Resources: 1 destroyed.
That’s it !