In this short blog post, I will share a few ansible tips:
Run a specific role
ansible -i hosts -m include_role -a name=roles/common all -b
Print Ansible Variables
ansible -m debug -a 'var=vars' 127.0.0.1 | sed "1 s/^.*$/{/" | jq .
Ansible Conditionals
Variable contains string
matching string in a variable
  vars:
      var1: "hello world"

  - debug:
        msg: " {{ var1 }} "
    when:  ........
old way
when: var1.find("hello") != -1deprecated way
when: var1 | search("hello")Correct way
when: var1 is search("hello")Multiple Conditionals
Logical And
      when:
        - ansible_distribution == "Archlinux"
        - ansible_hostname is search("myhome")
Numeric Conditionals
getting variable from command line (or from somewhere else)
   -  set_fact:
       my_variable_keepday: "{{ keepday | default(7)  | int }}"

    - name: something
      debug:
        msg: "keepday : {{  my_variable_keepday }}"
      when:
        - my_variable_keepday|int >= 0
        - my_variable_keepday|int <= 10
Validate Time variable with ansible
I need to validate a variable. It should be ‘%H:%M:%S’
My work-around is to convert it to datetime so that I can validate it:
  tasks:
    - debug:
        msg: "{{ startTime | to_datetime('%H:%M:%S') }}"
First example: 21:30:15
True: "msg": "1900-01-01 21:30:15"
Second example: ‘25:00:00′
could not be converted to an dict.
The error was: time data '25:00:00' does not match format '%H:%M:%S'
This article will show how to install Arch Linux in Windows 10 under Windows Subsystem for Linux.
WSL
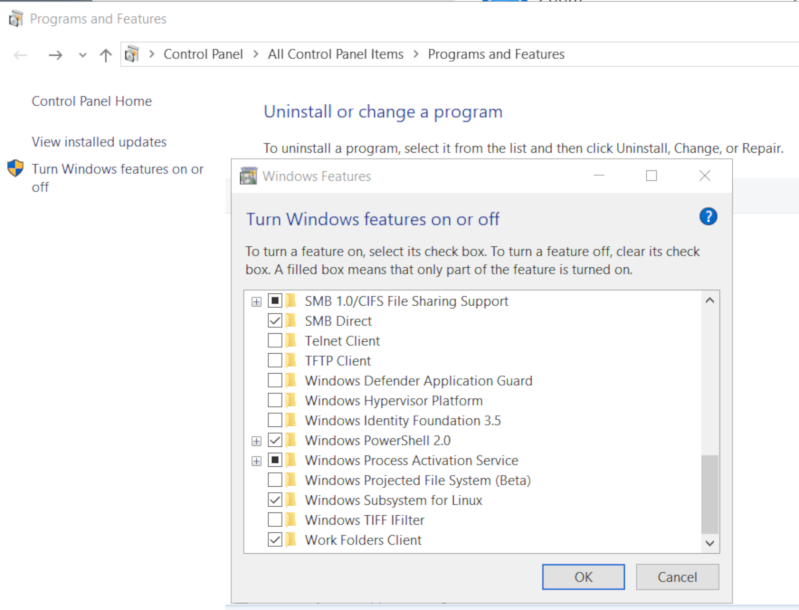
Prerequisite is to have enabled WSL on your Win10 and already reboot your machine.
You can enable WSL :
- Windows Settings
- Apps
- Apps & features
- Related settings -> Programs and Features (bottom)
- Turn Windows features on or off (left)
Store
After rebooting your Win10, you can use Microsoft Store to install a Linux distribution like Ubuntu. Archlinux is not an official supported linux distribution thus this guide !
Launcher
The easiest way to install Archlinux (or any Linux distro) is to download the wsldl from github. This project provides a generic Launcher.exe and any rootfs as source base. First thing is to rename Launcher.exe to Archlinux.exe.
ebal@myworklaptop:~$ mkdir -pv Archlinux
mkdir: created directory 'Archlinux'

ebal@myworklaptop:~$ cd Archlinux/

ebal@myworklaptop:~/Archlinux$ curl -sL -o Archlinux.exe https://github.com/yuk7/wsldl/releases/download/18122700/Launcher.exe
ebal@myworklaptop:~/Archlinux$ ls -l
total 320
-rw-rw-rw- 1 ebal ebal 143147 Feb 21 20:40 Archlinux.exe
RootFS
Next step is to download the latest archlinux root filesystem and create a new rootfs.tar.gz archive file, as wsldl uses this type.
ebal@myworklaptop:~/Archlinux$ curl -sLO http://ftp.otenet.gr/linux/archlinux/iso/latest/archlinux-bootstrap-2019.02.01-x86_64.tar.gz

ebal@myworklaptop:~/Archlinux$ ls -l
total 147392
-rw-rw-rw- 1 ebal ebal    143147 Feb 21 20:40 Archlinux.exe
-rw-rw-rw- 1 ebal ebal 149030552 Feb 21 20:42 archlinux-bootstrap-2019.02.01-x86_64.tar.gz

ebal@myworklaptop:~/Archlinux$ sudo tar xf archlinux-bootstrap-2019.02.01-x86_64.tar.gz

ebal@myworklaptop:~/Archlinux$  cd root.x86_64/

ebal@myworklaptop:~/Archlinux/root.x86_64$ ls
README  bin  boot  dev  etc  home  lib  lib64  mnt  opt  proc  root  run  sbin  srv  sys  tmp  usr  var

ebal@myworklaptop:~/Archlinux/root.x86_64$  sudo tar czf rootfs.tar.gz .
tar: .: file changed as we read it

ebal@myworklaptop:~/Archlinux/root.x86_64$ ls
README  bin  boot  dev  etc  home  lib  lib64  mnt  opt  proc  root  rootfs.tar.gz  run  sbin  srv  sys  tmp  usr  var

ebal@myworklaptop:~/Archlinux/root.x86_64$ du -sh rootfs.tar.gz
144M    rootfs.tar.gz

ebal@myworklaptop:~/Archlinux/root.x86_64$ sudo mv rootfs.tar.gz ../

ebal@myworklaptop:~/Archlinux/root.x86_64$ cd ..
ebal@myworklaptop:~/Archlinux$ ls
Archlinux.exe  archlinux-bootstrap-2019.02.01-x86_64.tar.gz  root.x86_64  rootfs.tar.gz

ebal@myworklaptop:~/Archlinux$
ebal@myworklaptop:~/Archlinux$ ls
Archlinux.exe  rootfs.tar.gz

ebal@myworklaptop:~$ mv Archlinux/ /mnt/c/Users/EvaggelosBalaskas/Downloads/ArchlinuxWSL
ebal@myworklaptop:~$
As you can see, I do a little clean up and I move the directory under windows filesystem.
Install & Verify
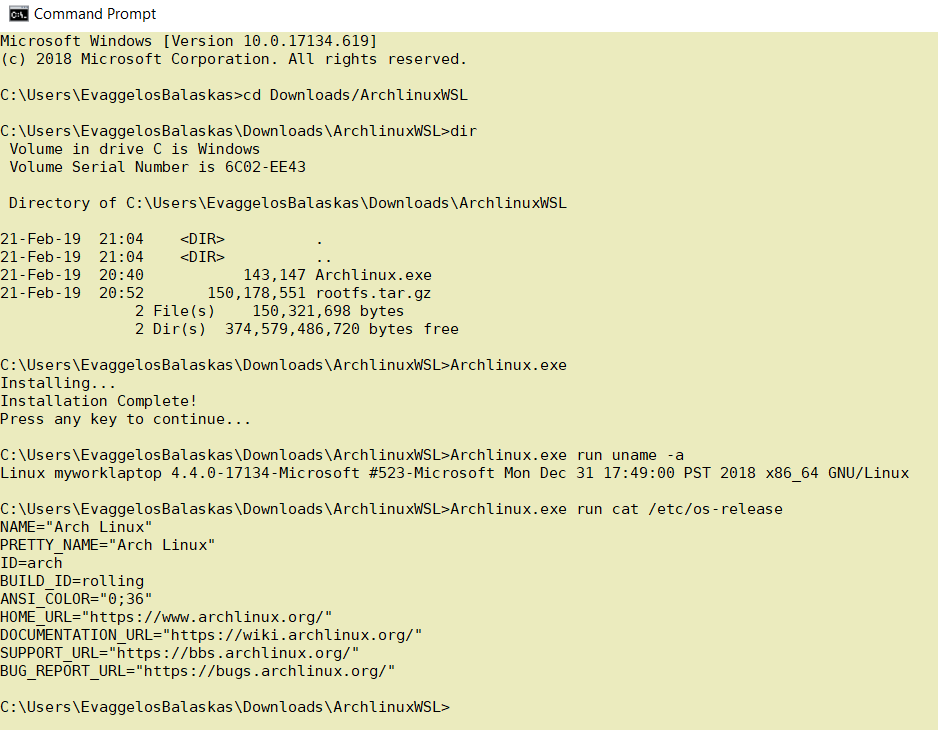
Microsoft Windows [Version 10.0.17134.619]
(c) 2018 Microsoft Corporation. All rights reserved.

C:UsersEvaggelosBalaskas>cd Downloads/ArchlinuxWSL

C:UsersEvaggelosBalaskasDownloadsArchlinuxWSL>dir
 Volume in drive C is Windows
 Volume Serial Number is 6C02-EE43

 Directory of C:UsersEvaggelosBalaskasDownloadsArchlinuxWSL

21-Feb-19  21:04    <DIR>          .
21-Feb-19  21:04    <DIR>          ..
21-Feb-19  20:40           143,147 Archlinux.exe
21-Feb-19  20:52       150,178,551 rootfs.tar.gz
               2 File(s)    150,321,698 bytes
               2 Dir(s)  374,579,486,720 bytes free

C:UsersEvaggelosBalaskasDownloadsArchlinuxWSL>Archlinux.exe
Installing...
Installation Complete!
Press any key to continue...

C:UsersEvaggelosBalaskasDownloadsArchlinuxWSL>Archlinux.exe run uname -a
Linux myworklaptop 4.4.0-17134-Microsoft #523-Microsoft Mon Dec 31 17:49:00 PST 2018 x86_64 GNU/Linux

C:UsersEvaggelosBalaskasDownloadsArchlinuxWSL>Archlinux.exe run cat /etc/os-release
NAME="Arch Linux"
PRETTY_NAME="Arch Linux"
ID=arch
BUILD_ID=rolling
ANSI_COLOR="0;36"
HOME_URL="https://www.archlinux.org/"
DOCUMENTATION_URL="https://wiki.archlinux.org/"
SUPPORT_URL="https://bbs.archlinux.org/"
BUG_REPORT_URL="https://bugs.archlinux.org/"

C:UsersEvaggelosBalaskasDownloadsArchlinuxWSL>Archlinux.exe run bash
[root@myworklaptop ArchlinuxWSL]#
[root@myworklaptop ArchlinuxWSL]# exit
Archlinux
C:UsersEvaggelosBalaskasDownloadsArchlinuxWSL>Archlinux.exe run bash
[root@myworklaptop ArchlinuxWSL]#

[root@myworklaptop ArchlinuxWSL]# date
Thu Feb 21 21:41:41 STD 2019
Remember, archlinux by default does not have any configuration. So you need to configure this instance !
Here are some basic configuration:
[root@myworklaptop ArchlinuxWSL]# echo nameserver 8.8.8.8 > /etc/resolv.conf

[root@myworklaptop ArchlinuxWSL]# cat > /etc/pacman.d/mirrorlist <<EOF
Server = http://ftp.otenet.gr/linux/archlinux/$repo/os/$arch
EOF

[root@myworklaptop ArchlinuxWSL]#  pacman-key --init

[root@myworklaptop ArchlinuxWSL]#  pacman-key --populate

[root@myworklaptop ArchlinuxWSL]# pacman -Syy
you are pretty much ready to use archlinux inside your windows 10 !!
Remove
You can remove Archlinux by simple:
Archlinux.exe clean
Default User
There is a simple way to use Archlinux within Windows Subsystem for Linux , by connecting with a default user.
But before configure ArchWSL, we need to create this user inside the archlinux instance:
[root@myworklaptop ArchWSL]# useradd -g 374 -u 374 ebal

[root@myworklaptop ArchWSL]# id ebal
uid=374(ebal) gid=374(ebal) groups=374(ebal)

[root@myworklaptop ArchWSL]# cp -rav /etc/skel/ /home/ebal
'/etc/skel/' -> '/home/ebal'
'/etc/skel/.bashrc' -> '/home/ebal/.bashrc'
'/etc/skel/.bash_profile' -> '/home/ebal/.bash_profile'
'/etc/skel/.bash_logout' -> '/home/ebal/.bash_logout'

chown -R ebal:ebal /home/ebal/
then exit the linux app and run:
> Archlinux.exe config --default-user ebaland try to login again:
> Archlinux.exe run bash
[ebal@myworklaptop ArchWSL]$

[ebal@myworklaptop ArchWSL]$ cd ~

ebal@myworklaptop ~$ pwd -P
/home/ebal
Flatpak is a software utility for software deployment, package management, and application virtualization for Linux desktop computers. It provides a sandbox environment in which users can run applications in isolation from the rest of the system.
… in a nutshell, it is an isolate software bundle package which you can run with restricted permissions!
User Vs System
We can install flatpak applications for system-wide or for single-user. The last part does not need administrative access or any special permissions.
To use flatpak as a user, we have to add --user next to every flatpak command.
Applications
A flatpak application has a manifest that describes dependancies & permissions.
Repositories
A repository contains a list of application manifests & the flatpak package (code).
Branches
One of the best features of flatpak, is that we can have multile versions of a specific application. This is being done by using a different branch or version (like git). Most common branch is default.
Add flathub
To use/install a flatpak application, we have first to add a remote flatpack repository localy.
The most well-known flatpak repository is called: flathub
flatpak remote-add --user flathub https://dl.flathub.org/repo/flathub.flatpakrepo
Search Applications
$ flatpak search --user Signal
Description                                                                                     Application                                 Version              Branch              Remotes
Signal - Private messenger for the desktop                                                      org.signal.Signal                           1.20.0               stable              flathub
Install package as user
The default syntax of install packages is:
repository - application
$ flatpak install --user -y flathub com.dropbox.Client
$ flatpak install --user -y flathub org.signal.Signal
List
See how many packages to you have installed
$ flatpak list
Application
___________

com.dropbox.Client
com.jetbrains.PyCharm-Community
com.slack.Slack
com.visualstudio.code.oss
io.atom.Atom
org.signal.Signal
Run
To execute a flatpak application :
flatpak run com.slack.Slack
flatpak run org.signal.Signal
Update
and finally how to update your flatpack packages:
$ flatpak --user -y update
Remove Unused Packages
$ flatpak uninstall --user --unused
Uninstall flatpak package
$ flatpak uninstall --user com.visualstudio.code.oss
TLDR; Exit status value does not change when using redirection.
~> false
~> echo $?
1

~> true
~> echo $?
0

~> false > /dev/null
~> echo $?
1

~> true > /dev/null
~> echo $?
0

~> false 1> /dev/null
~> echo $?
1

~> true 1> /dev/null
~> echo $?
0

~> false 2> /dev/null
~> echo $?
1

~> true 2> /dev/null
~> echo $?
0

~> false &> /dev/null
~> echo $?
1

~> true &> /dev/null
~> echo $?
0

~> false 2>&1 >/dev/null
~> echo $?
1

~> true 2>&1 /dev/null
~> echo $?
0

~> false < /dev/null > /dev/null
~> echo $?
1

~> true < /dev/null > /dev/null
~> echo $?
0Using Terraform by HashiCorp and cloud-init on Hetzner cloud provider.
Nowadays with the help of modern tools, we use our infrastructure as code. This approach is very useful because we can have Immutable design with our infra by declaring the state would like our infra to be. This also provide us with flexibility and a more generic way on how to handle our infra as lego bricks, especially on scaling.
UPDATE: 2019.01.22
Hetzner
We need to create an Access API Token within a new project under the console of hetzner cloud.
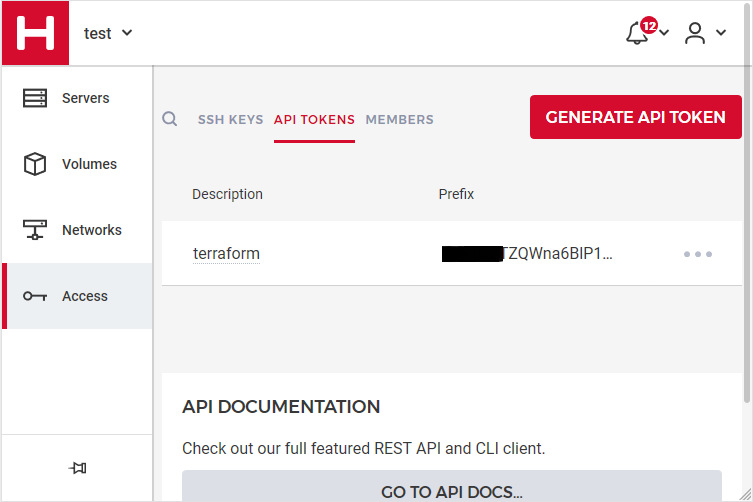
Copy this token and with that in place we can continue with terraform.
For the purposes of this article, I am going to use as the API token: 01234567890
Install Terraform
the latest terraform version at the time of writing this blog post is: v.11.11
$ curl -sL https://releases.hashicorp.com/terraform/0.11.11/terraform_0.11.11_linux_amd64.zip |
   bsdtar -xf- && chmod +x terraform
$ sudo mv terraform /usr/local/bin/
and verify it
$ terraform versionTerraform v0.11.11
Terraform Provider for Hetzner Cloud
To use the hetzner cloud via terraform, we need the terraform-provider-hcloud plugin.
hcloud, is part of terraform providers repository. So the first time of initialize our project, terraform will download this plugin locally.
Initializing provider plugins...
- Checking for available provider plugins on https://releases.hashicorp.com...
- Downloading plugin for provider "hcloud" (1.7.0)...
...
* provider.hcloud: version = "~> 1.7"
Compile hcloud
If you like, you can always build hcloud from the source code.
There are notes on how to build the plugin here Terraform Hetzner Cloud provider.
GitLab CI
or you can even download the artifact from my gitlab-ci repo.
Plugin directory
You will find the terraform hcloud plugin under your current directory:
./.terraform/plugins/linux_amd64/terraform-provider-hcloud_v1.7.0_x4
I prefer to copy the tf plugins centralized under my home directory:
$ mkdir -pv ~/.terraform/plugins/linux_amd64/
$ mv ./.terraform/plugins/linux_amd64/terraform-provider-hcloud_v1.7.0_x4 ~/.terraform.d/plugins/linux_amd64/terraform-provider-hcloud
or if you choose the artifact from gitlab:
$ curl -sL -o ~/.terraform/plugins/linux_amd64/terraform-provider-hcloud https://gitlab.com/ebal/terraform-provider-hcloud-ci/-/jobs/artifacts/master/raw/bin/terraform-provider-hcloud?job=run-buildThat said, when working with multiple terraform projects you may be in a position that you need different versions of the same tf-plugin. In that case it is better to have them under your current working directory/project instead of your home directory. Perhaps one project needs v1.2.3 and another v4.5.6 of the same tf-plugin.
Hetzner Cloud API
Here is a few examples on how to use the Hetzner Cloud API:
$ export -p API_TOKEN="01234567890"
$ curl -sH "Authorization: Bearer $API_TOKEN" https://api.hetzner.cloud/v1/datacenters | jq -r .datacenters[].name
fsn1-dc8
nbg1-dc3
hel1-dc2
fsn1-dc14
$ curl -sH "Authorization: Bearer $API_TOKEN" https://api.hetzner.cloud/v1/locations | jq -r .locations[].name
fsn1
nbg1
hel1$ curl -sH "Authorization: Bearer $API_TOKEN" https://api.hetzner.cloud/v1/images | jq -r .images[].name
ubuntu-16.04
debian-9
centos-7
fedora-27
ubuntu-18.04
fedora-28
hetzner.tf
At this point, we are ready to write our terraform file.
It can be as simple as this (CentOS 7):
# Set the variable value in *.tfvars file
# or using -var="hcloud_token=..." CLI option
variable "hcloud_token" {}

# Configure the Hetzner Cloud Provider
provider "hcloud" {
  token = "${var.hcloud_token}"
}

# Create a new server running centos
resource "hcloud_server" "node1" {
  name = "node1"
  image = "centos-7"
  server_type = "cx11"
}
Project_Ebal
or a more complex config: Ubuntu 18.04 LTS
# Project_Ebal
variable "hcloud_token" {}

# Configure the Hetzner Cloud Provider
provider "hcloud" {
  token = "${var.hcloud_token}"
}

# Create a new server running centos
resource "hcloud_server" "Project_Ebal" {
  name = "ebal_project"
  image = "ubuntu-18.04"
  server_type = "cx11"
  location = "nbg1"
}
Repository Structure
Although in this blog post we have a small and simple example of using hetzner cloud with terraform, on larger projects is usually best to have separated terraform files for variables, code and output. For more info, you can take a look here: VCS Repository Structure - Workspaces
  ├── variables.tf
  ├── main.tf
  ├── outputs.tf
Cloud-init
To use cloud-init with hetzner is very simple.
We just need to add this declaration user_data = "${file("user-data.yml")}" to terraform file.
So our previous tf is now this:
# Project_Ebal
variable "hcloud_token" {}

# Configure the Hetzner Cloud Provider
provider "hcloud" {
  token = "${var.hcloud_token}"
}

# Create a new server running centos
resource "hcloud_server" "Project_Ebal" {
  name = "ebal_project"
  image = "ubuntu-18.04"
  server_type = "cx11"
  location = "nbg1"
  user_data = "${file("user-data.yml")}"
}
to get the IP_Address of the virtual machine, I would also like to have an output declaration:
output "ipv4_address" {
  value = "${hcloud_server.ebal_project.ipv4_address}"
}
Clout-init
You will find more notes on cloud-init on a previous blog post: Cloud-init with CentOS 7.
below is an example of user-data.yml
#cloud-config

disable_root: true
ssh_pwauth: no

users:
  - name: ubuntu
    ssh_import_id:
     - gh:ebal
    shell: /bin/bash
    sudo: ALL=(ALL) NOPASSWD:ALL

# Set TimeZone
timezone: Europe/Athens

# Install packages
packages:
  - mlocate
  - vim
  - figlet

# Update/Upgrade & Reboot if necessary
package_update: true
package_upgrade: true
package_reboot_if_required: true

# Remove cloud-init
runcmd:
  - figlet Project_Ebal > /etc/motd
  - updatedb
Terraform
First thing with terraform is to initialize our environment.
Init
$ terraform init
Initializing provider plugins...

Terraform has been successfully initialized!

You may now begin working with Terraform. Try running "terraform plan" to see
any changes that are required for your infrastructure. All Terraform commands
should now work.

If you ever set or change modules or backend configuration for Terraform,
rerun this command to reinitialize your working directory. If you forget, other
commands will detect it and remind you to do so if necessary.
Plan
Of course it is not necessary to plan and then plan with out.
You can skip this step, here exist only for documentation purposes.
$ terraform plan
Refreshing Terraform state in-memory prior to plan...
The refreshed state will be used to calculate this plan, but will not be
persisted to local or remote state storage.

------------------------------------------------------------------------

An execution plan has been generated and is shown below.
Resource actions are indicated with the following symbols:
  + create

Terraform will perform the following actions:

  + hcloud_server.ebal_project
      id:            <computed>
      backup_window: <computed>
      backups:       "false"
      datacenter:    <computed>
      image:         "ubuntu-18.04"
      ipv4_address:  <computed>
      ipv6_address:  <computed>
      ipv6_network:  <computed>
      keep_disk:     "false"
      location:      "nbg1"
      name:          "ebal_project"
      server_type:   "cx11"
      status:        <computed>
      user_data:     "sk6134s+ys+wVdGITc+zWhbONYw="

Plan: 1 to add, 0 to change, 0 to destroy.

------------------------------------------------------------------------

Note: You didn't specify an "-out" parameter to save this plan, so Terraform
can't guarantee that exactly these actions will be performed if
"terraform apply" is subsequently run.
Out
$ terraform plan -out terraform.tfplan
Refreshing Terraform state in-memory prior to plan...
The refreshed state will be used to calculate this plan, but will not be
persisted to local or remote state storage.

------------------------------------------------------------------------

An execution plan has been generated and is shown below.
Resource actions are indicated with the following symbols:
  + create

Terraform will perform the following actions:

  + hcloud_server.ebal_project
      id:            <computed>
      backup_window: <computed>
      backups:       "false"
      datacenter:    <computed>
      image:         "ubuntu-18.04"
      ipv4_address:  <computed>
      ipv6_address:  <computed>
      ipv6_network:  <computed>
      keep_disk:     "false"
      location:      "nbg1"
      name:          "ebal_project"
      server_type:   "cx11"
      status:        <computed>
      user_data:     "sk6134s+ys+wVdGITc+zWhbONYw="

Plan: 1 to add, 0 to change, 0 to destroy.

------------------------------------------------------------------------

This plan was saved to: terraform.tfplan

To perform exactly these actions, run the following command to apply:
    terraform apply "terraform.tfplan"
Apply
$ terraform apply "terraform.tfplan"
hcloud_server.ebal_project: Creating...
  backup_window: "" => "<computed>"
  backups:       "" => "false"
  datacenter:    "" => "<computed>"
  image:         "" => "ubuntu-18.04"
  ipv4_address:  "" => "<computed>"
  ipv6_address:  "" => "<computed>"
  ipv6_network:  "" => "<computed>"
  keep_disk:     "" => "false"
  location:      "" => "nbg1"
  name:          "" => "ebal_project"
  server_type:   "" => "cx11"
  status:        "" => "<computed>"
  user_data:     "" => "sk6134s+ys+wVdGITc+zWhbONYw="
hcloud_server.ebal_project: Still creating... (10s elapsed)
hcloud_server.ebal_project: Still creating... (20s elapsed)
hcloud_server.ebal_project: Creation complete after 23s (ID: 1676988)

Apply complete! Resources: 1 added, 0 changed, 0 destroyed.

Outputs:

ipv4_address = 1.2.3.4
SSH and verify cloud-init
$ ssh 1.2.3.4 -l ubuntu
Welcome to Ubuntu 18.04.1 LTS (GNU/Linux 4.15.0-43-generic x86_64)

 * Documentation:  https://help.ubuntu.com
 * Management:     https://landscape.canonical.com
 * Support:        https://ubuntu.com/advantage

  System information as of Fri Jan 18 12:17:14 EET 2019

  System load:  0.41              Processes:           89
  Usage of /:   9.7% of 18.72GB   Users logged in:     0
  Memory usage: 8%                IP address for eth0: 1.2.3.4
  Swap usage:   0%

0 packages can be updated.
0 updates are security updates.

Destroy
Be Careful without providing a specific terraform out plan, terraform will destroy every tfplan within your working directory/project. So it is always a good practice to explicit destroy a specify resource/tfplan.
$ terraform destroy should better be:
$ terraform destroy -out terraform.tfplan
hcloud_server.ebal_project: Refreshing state... (ID: 1676988)

An execution plan has been generated and is shown below.
Resource actions are indicated with the following symbols:
  - destroy

Terraform will perform the following actions:

  - hcloud_server.ebal_project

Plan: 0 to add, 0 to change, 1 to destroy.

Do you really want to destroy all resources?
  Terraform will destroy all your managed infrastructure, as shown above.
  There is no undo. Only 'yes' will be accepted to confirm.

  Enter a value: yes

hcloud_server.ebal_project: Destroying... (ID: 1676988)
hcloud_server.ebal_project: Destruction complete after 1s

Destroy complete! Resources: 1 destroyed.
That’s it !
I am only using btrfs for the last few years, without any problem. Drobox’s decision is based on supporting Extended file attributes and even so btrfs supports extended attributes, seems you will get this error:

I have the benefit of using encrypted disks via LUKS so in this blog post, I will only present a way to have an virtual disk with ext4, to your dropbox folder on-top of your btrfs!
Allocating disk space
Let’s say that your have 2G of dropbox space, allocate 2G of file size:
fallocate -l 2G Dropbox.img
you can verify the disk image by:
qemu-img info Dropbox.img
image: Dropbox.img
file format: raw
virtual size: 2.0G (2147483648 bytes)
disk size: 2.0G
Map Virtual Disk to Loop Device
Then map your virtual disk to a loop device:
sudo losetup `sudo losetup -f` Dropbox.imgverify it:
losetup -a
/dev/loop0: []: (/home/ebal/Dropbox.img)then loop0 it is.
Create an ext4 filesystem
sudo mkfs.ext4 -L Dropbox /dev/loop0
Creating filesystem with 524288 4k blocks and 131072 inodes
Filesystem UUID: 09c7eb41-b5f3-4c58-8965-5e366ddf4d97
Superblock backups stored on blocks:
    32768, 98304, 163840, 229376, 294912

Allocating group tables: done
Writing inode tables: done
Creating journal (16384 blocks): done
Writing superblocks and filesystem accounting information: done
Move Dropbox folder
You have to move your previous dropbox folder to another location. Dont forget to cloase dropbox-client and any other application that is using files from this folder.
mv Dropbox Dropbox.bak
renamed 'Dropbox' -> 'Dropbox.bak'and then create a new Dropbox folder:
mkdir -pv Dropbox/
mkdir: created directory 'Dropbox/'
Mount the ext4 filesystem
sudo mount /dev/loop0 ~/Dropbox/
verify it:
df -h ~/Dropbox/
Filesystem      Size  Used Avail Use% Mounted on
/dev/loop0      2.0G  6.0M  1.8G   1% /home/ebal/Dropbox
and give the right perms:
sudo chown -R ebal:ebal ~/Dropbox/
Copy files
Now, copy the files from the old Dropbox folder to the new:
rsync -ravx Dropbox.bak/ Dropbox/
sent 464,823,778 bytes  received 13,563 bytes  309,891,560.67 bytes/sec
total size is 464,651,441  speedup is 1.00
and start dropbox-client

Four Step Process
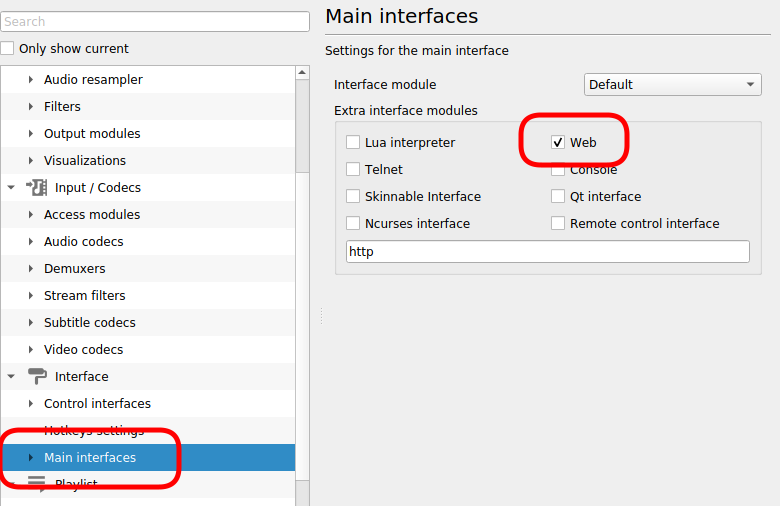
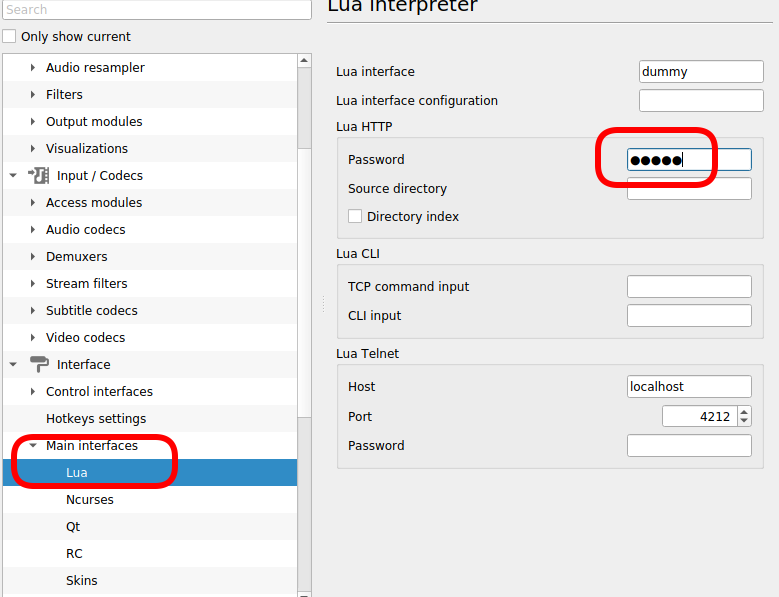
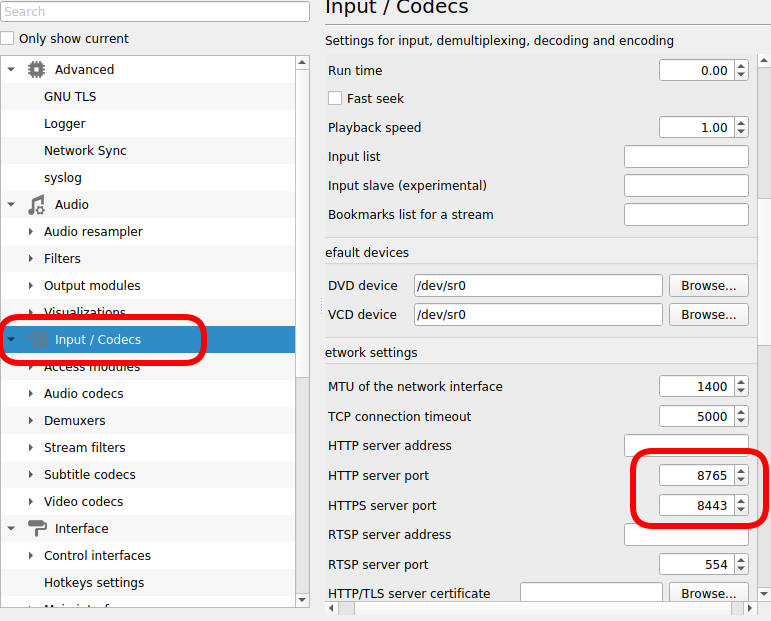
$ sudo iptables -nvL | grep 8765
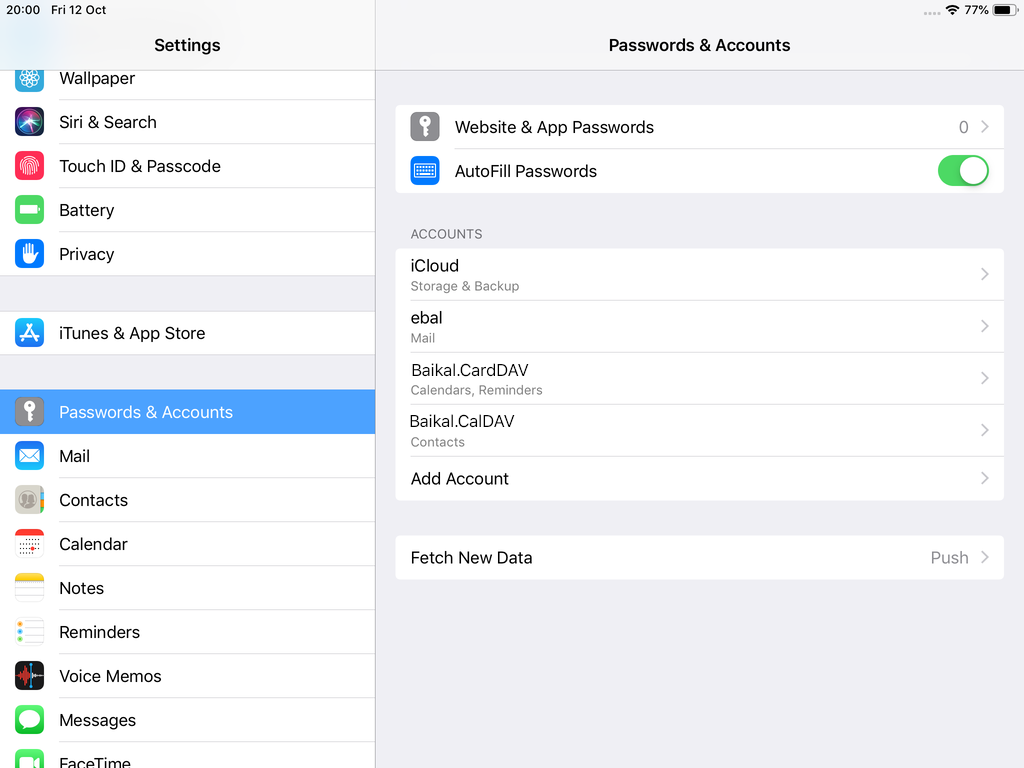
0 0 ACCEPT tcp -- * * 192.168.0.0/24 0.0.0.0/0 tcp dpt:8765The purpose of this blog post is to act as a visual guide/tutorial on how to setup an iOS device (iPad or iPhone) using the native apps against a custom Linux Mail, Calendar & Contact server.
Disclaimer: I wrote this blog post after 36hours with an apple device. I have never had any previous encagement with an apple product. Huge culture change & learning curve. Be aware, that the below notes may not apply to your setup.
Original creation date: Friday 12 Oct 2018
Last Update: Sunday 18 Nov 2018
Linux Mail Server
Notes are based on the below setup:
- CentOS 6.10
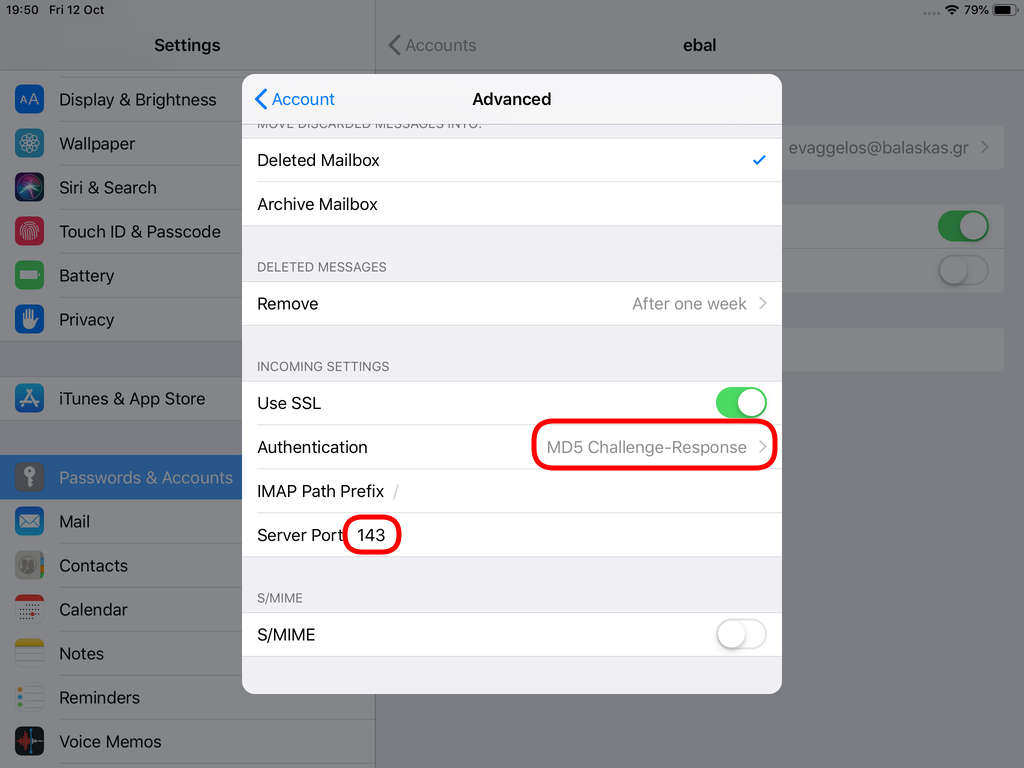
- Dovecot IMAP server with STARTTLS (TCP Port: 143) with Encrypted Password Authentication.
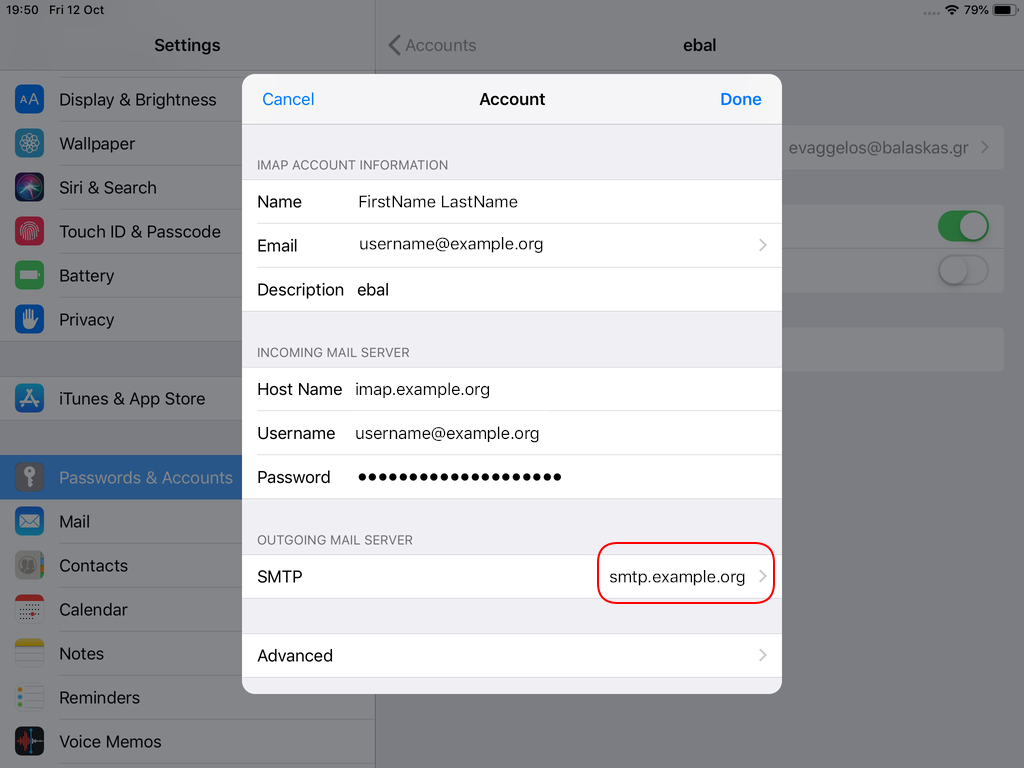
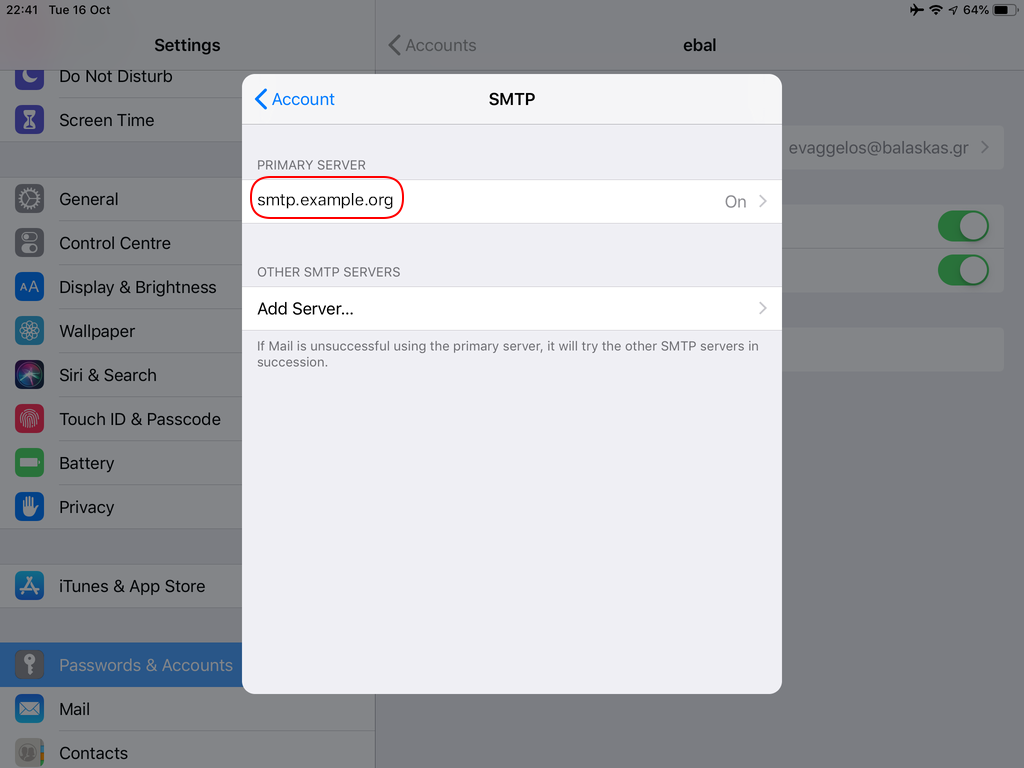
- Postfix SMTP with STARTTLS (TCP Port: 587) with Encrypted Password Authentication.
- Baïkal as Calendar & Contact server.
Thunderbird
Thunderbird settings for imap / smtp over STARTTLS and encrypted authentication

Baikal
Dashboard
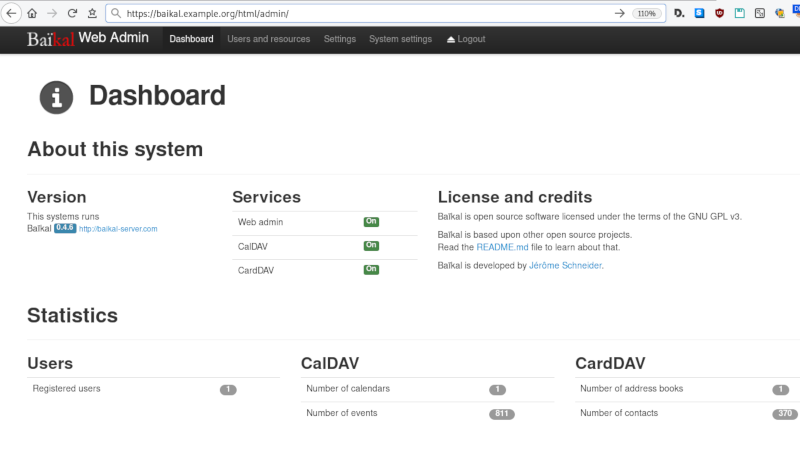
CardDAV
contact URI for user Username
https://baikal.baikal.example.org/html/card.php/addressbooks/Username/defaultCalDAV
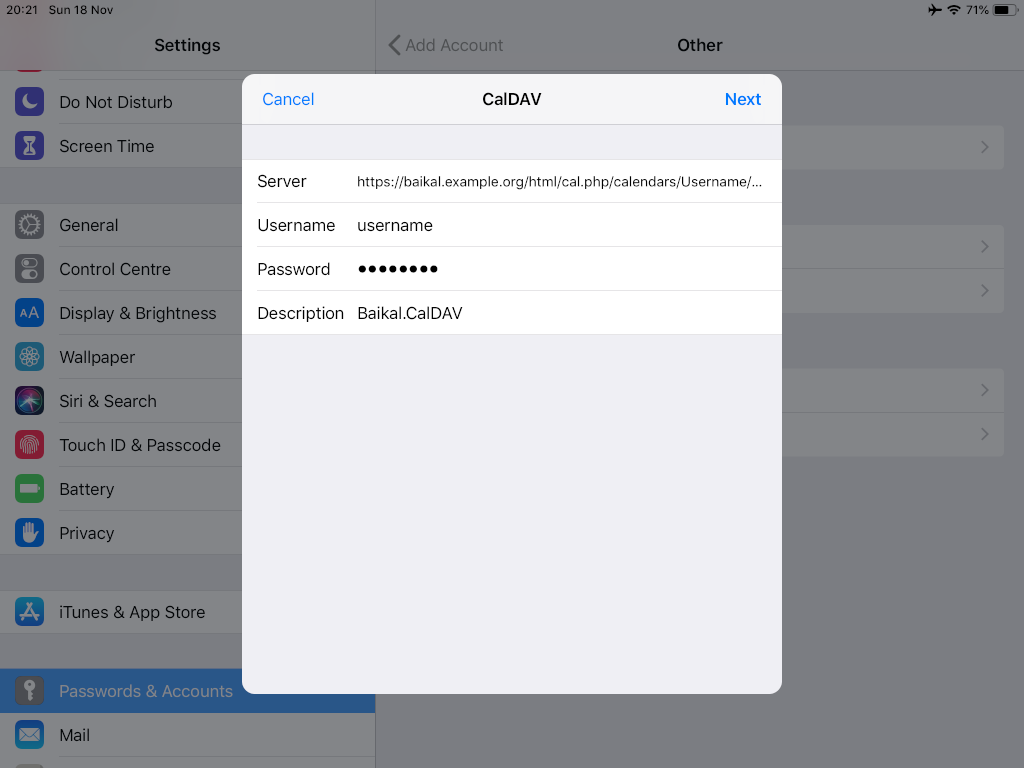
calendar URI for user Username
https://baikal.example.org/html/cal.php/calendars/Username/default
iOS
There is a lot of online documentation but none in one place. Random Stack Overflow articles & posts in the internet. It took me almost an entire day (and night) to figure things out. In the end, I enabled debug mode on my dovecot/postifx & apache web server. After that, throught trail and error, I managed to setup both iPhone & iPad using only native apps.
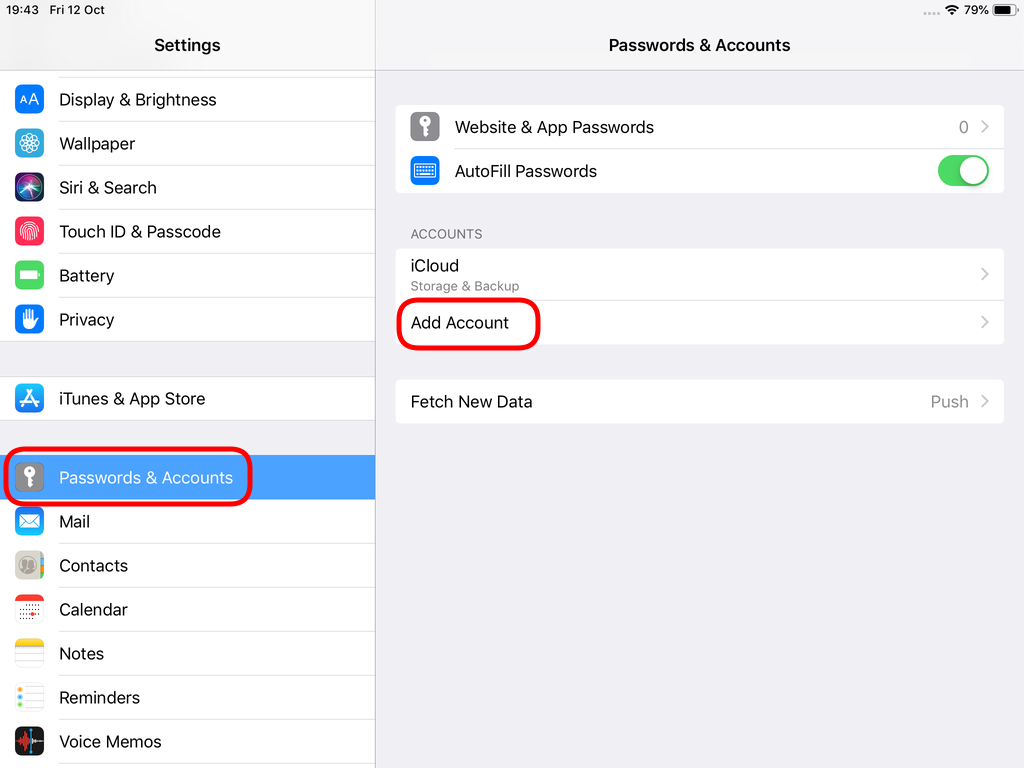
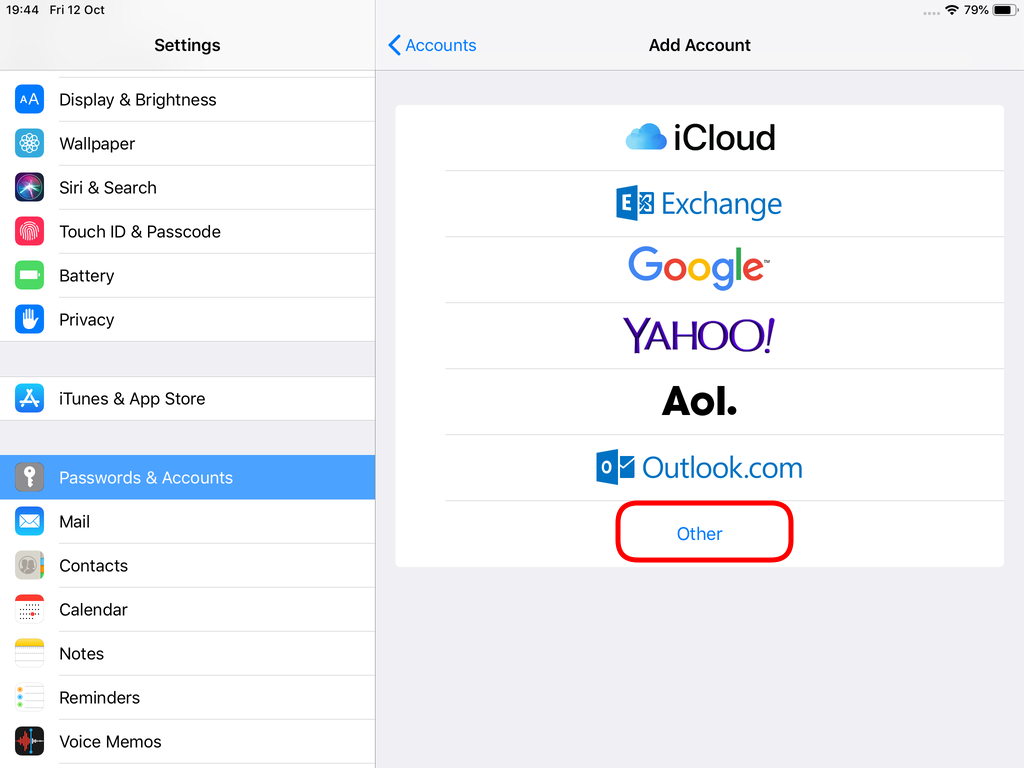
Open Password & Accounts & click on New Account
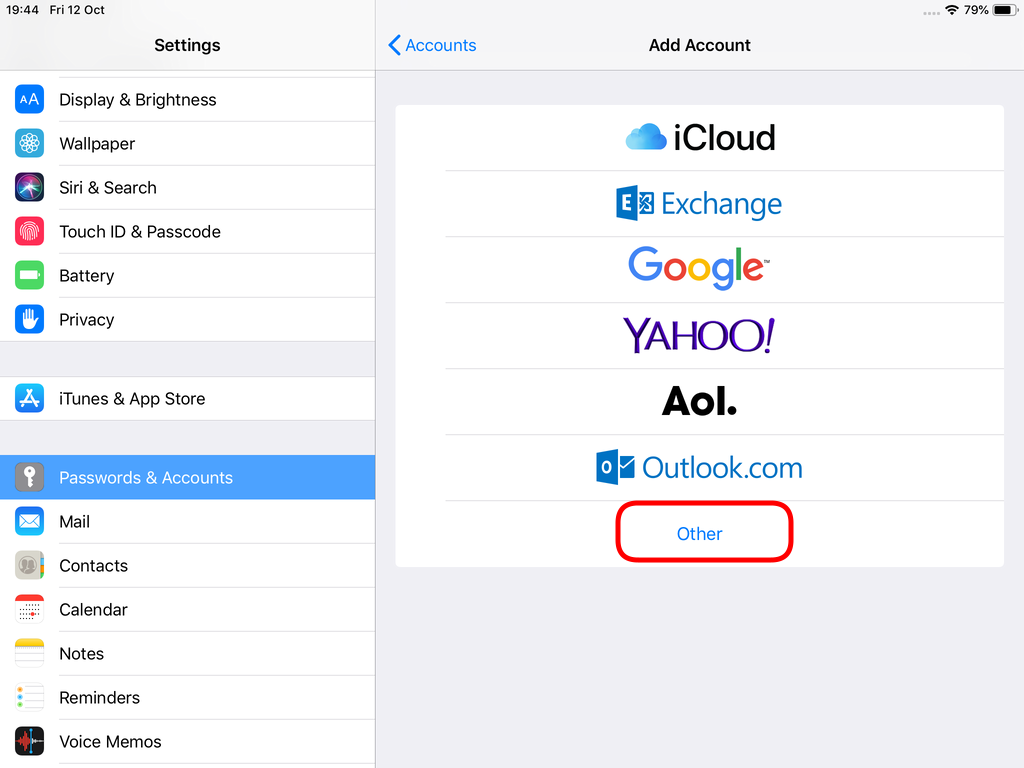
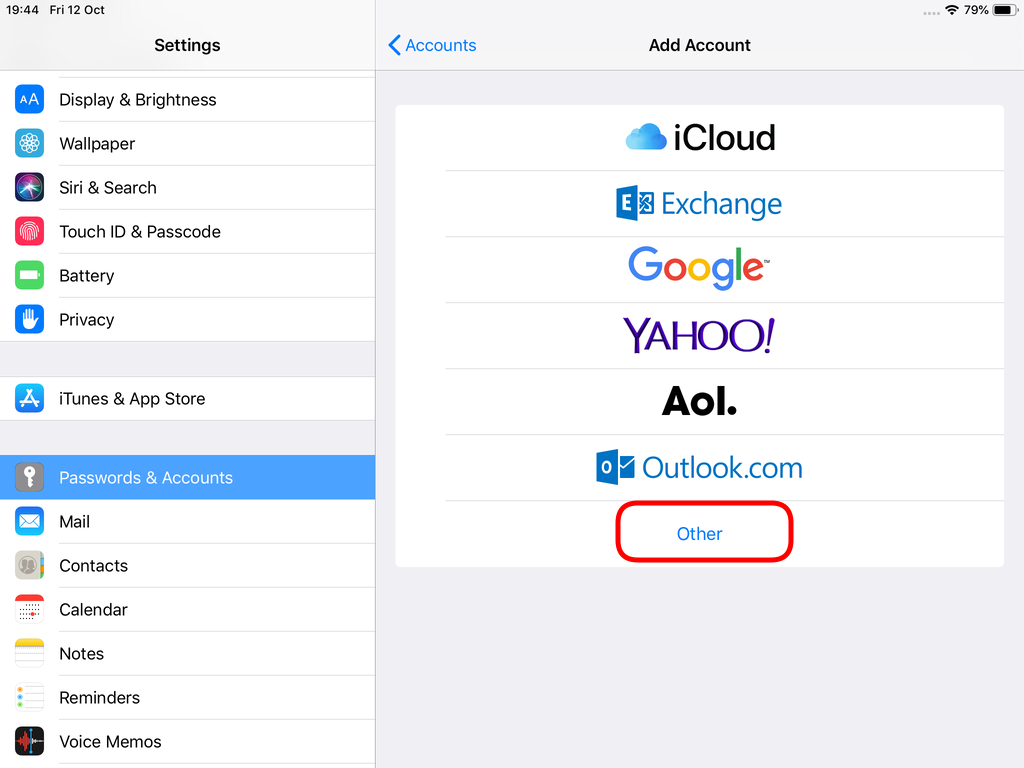
Choose Other
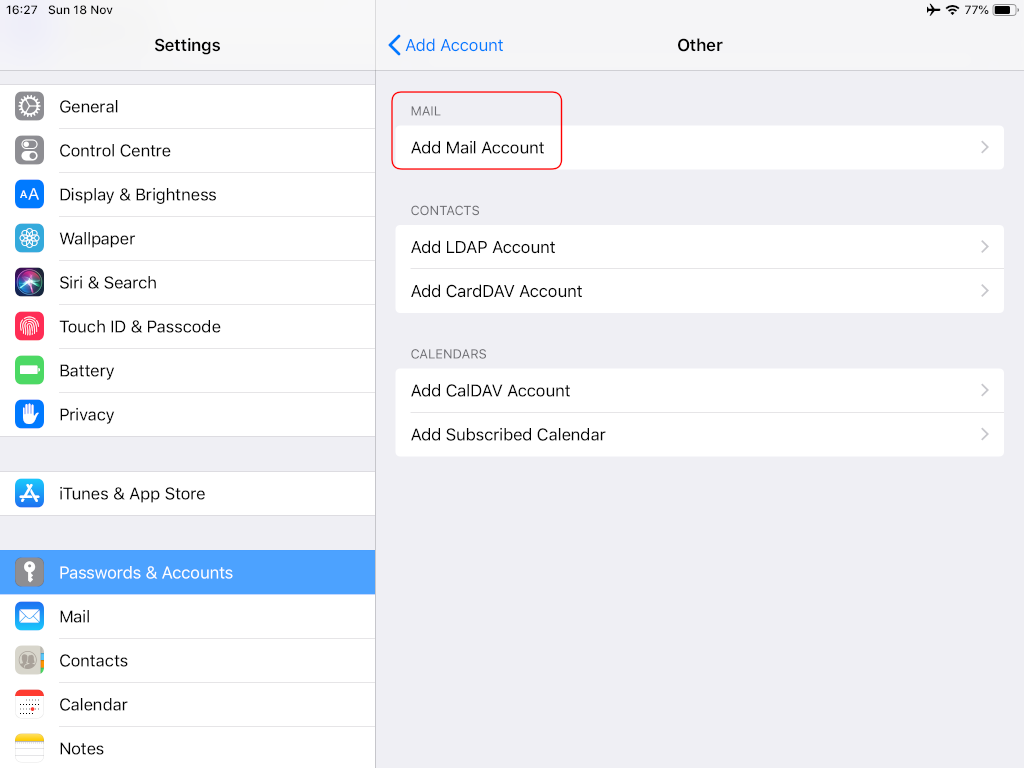
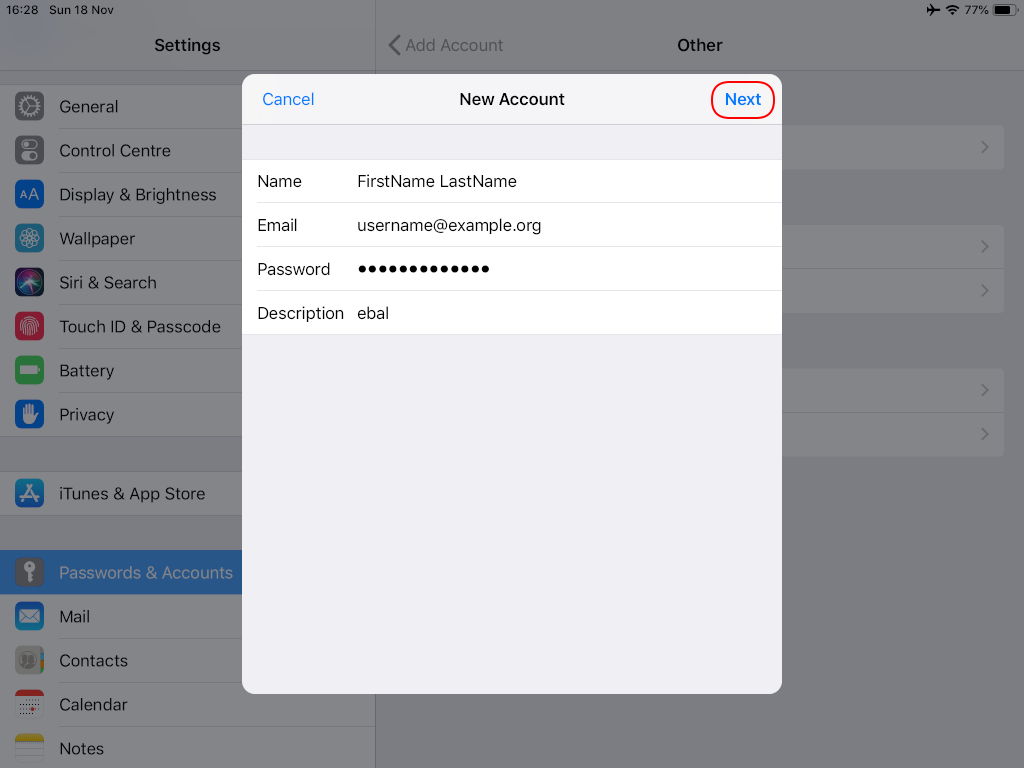
Now the tricky part, you have to click Next and fill the imap & smtp settings.
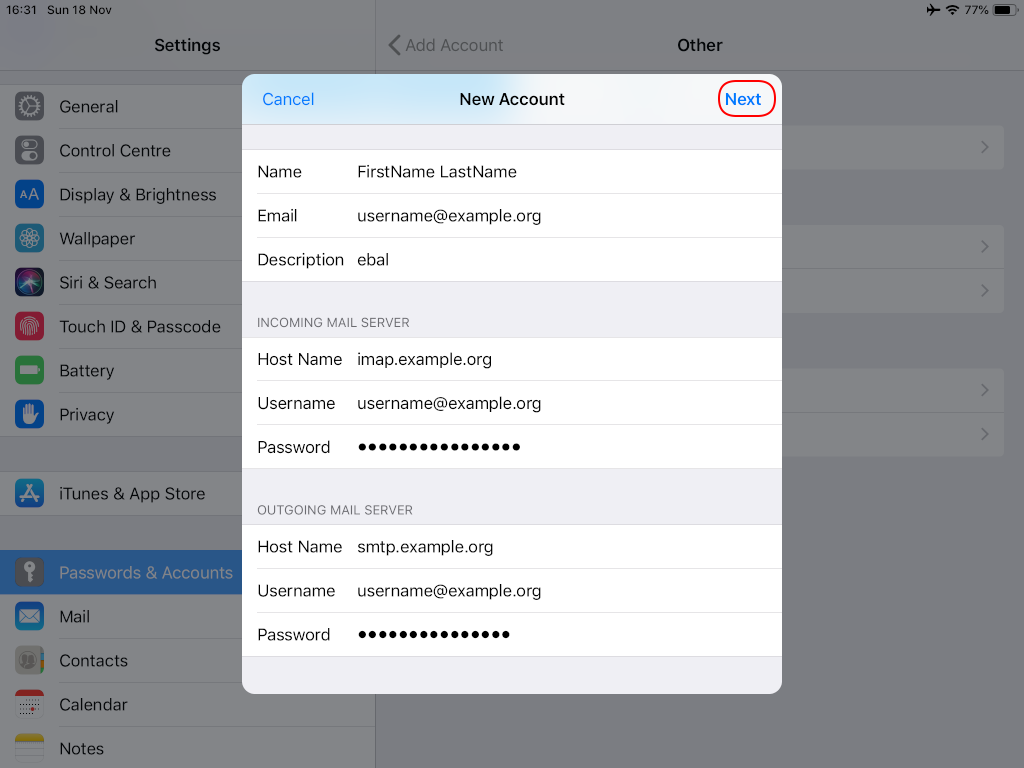
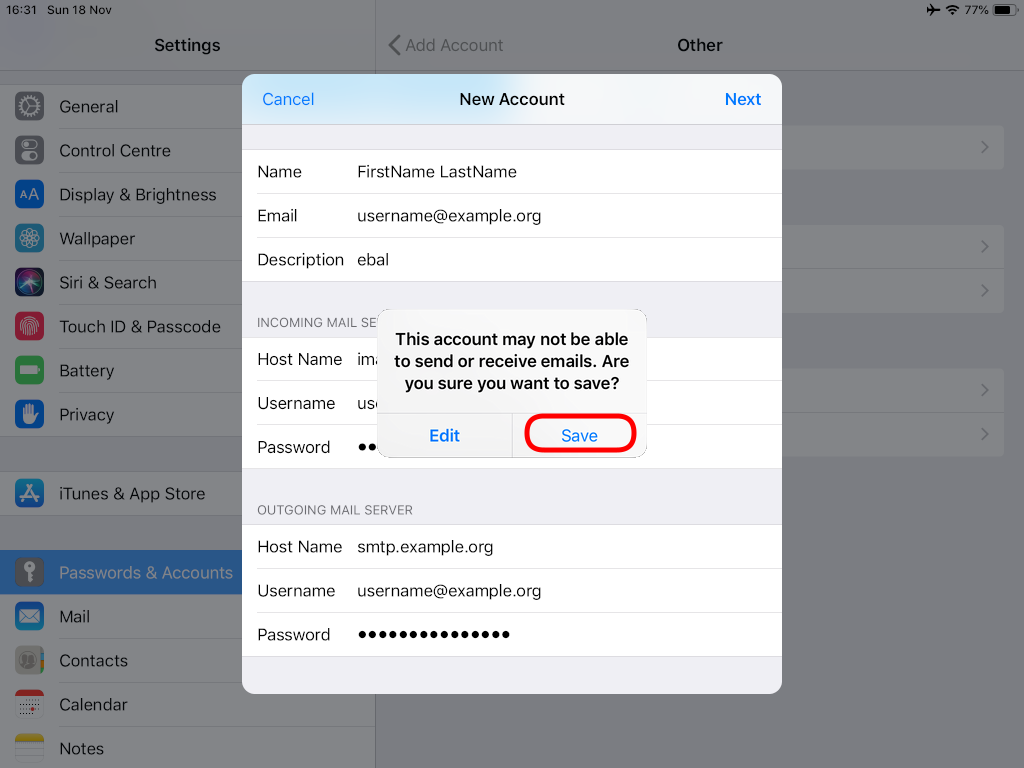
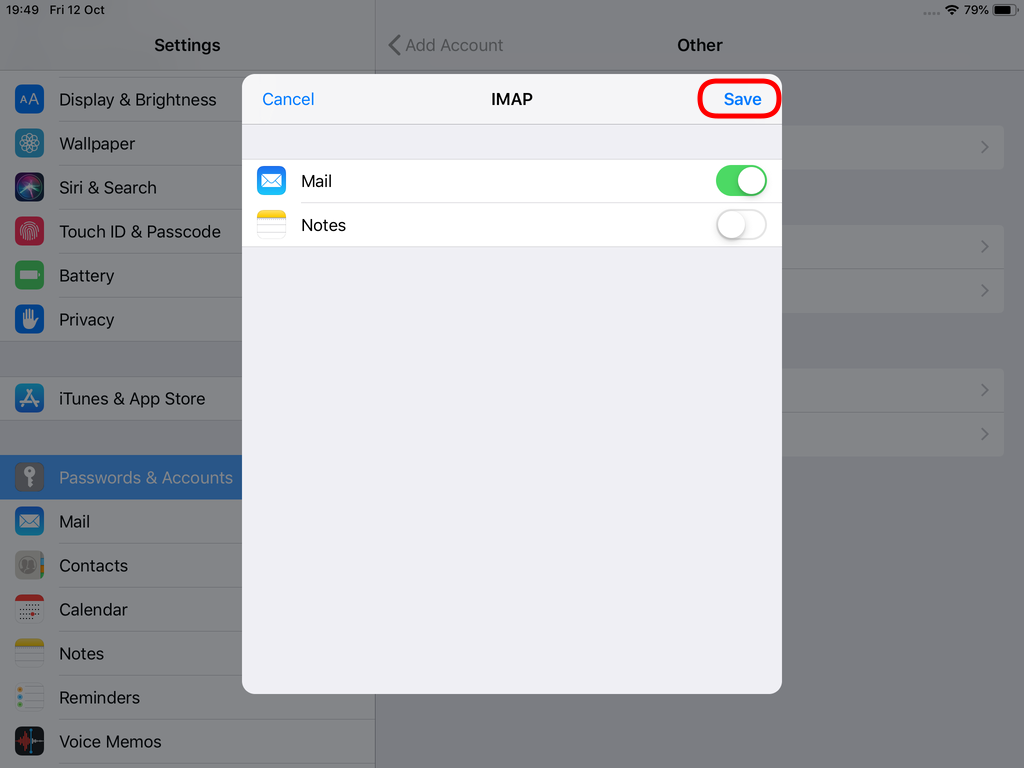
Now we have to go back and change the settings, to enable STARTTLS and encrypted password authentication.
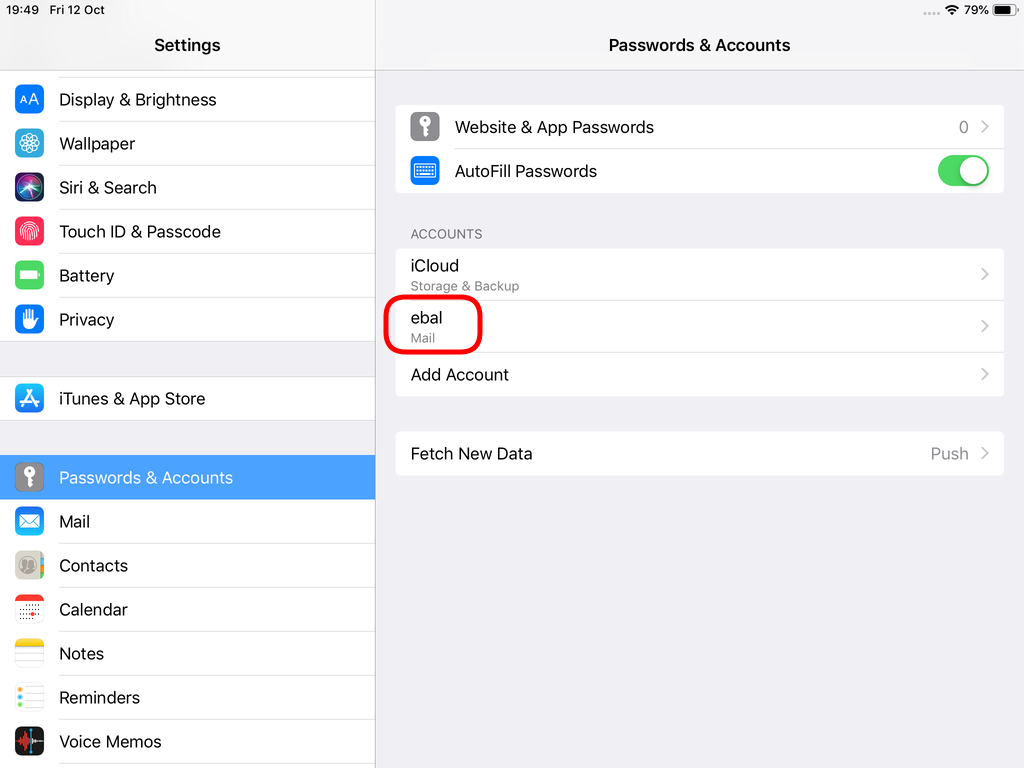
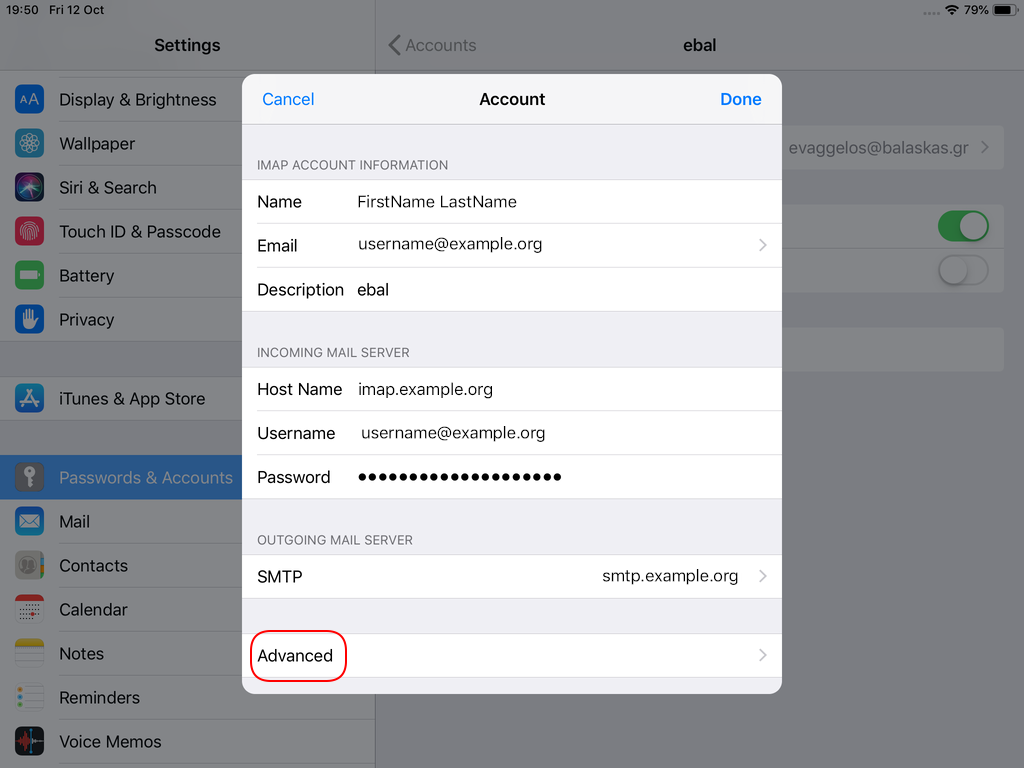
STARTTLS with Encrypted Passwords for Authentication
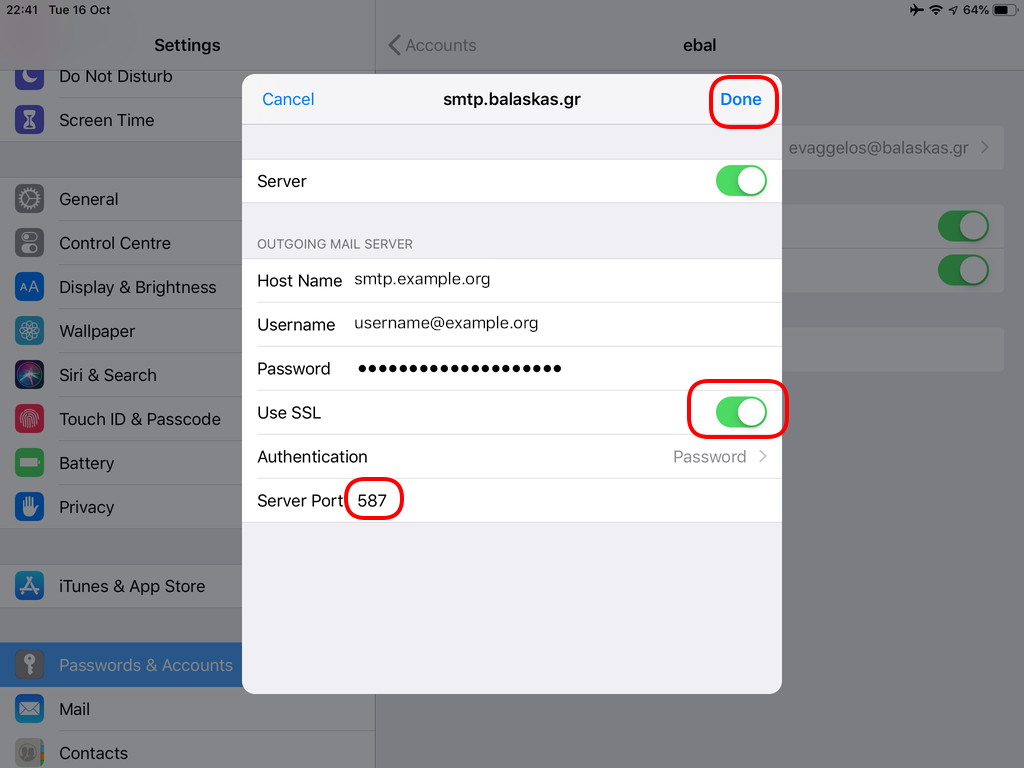
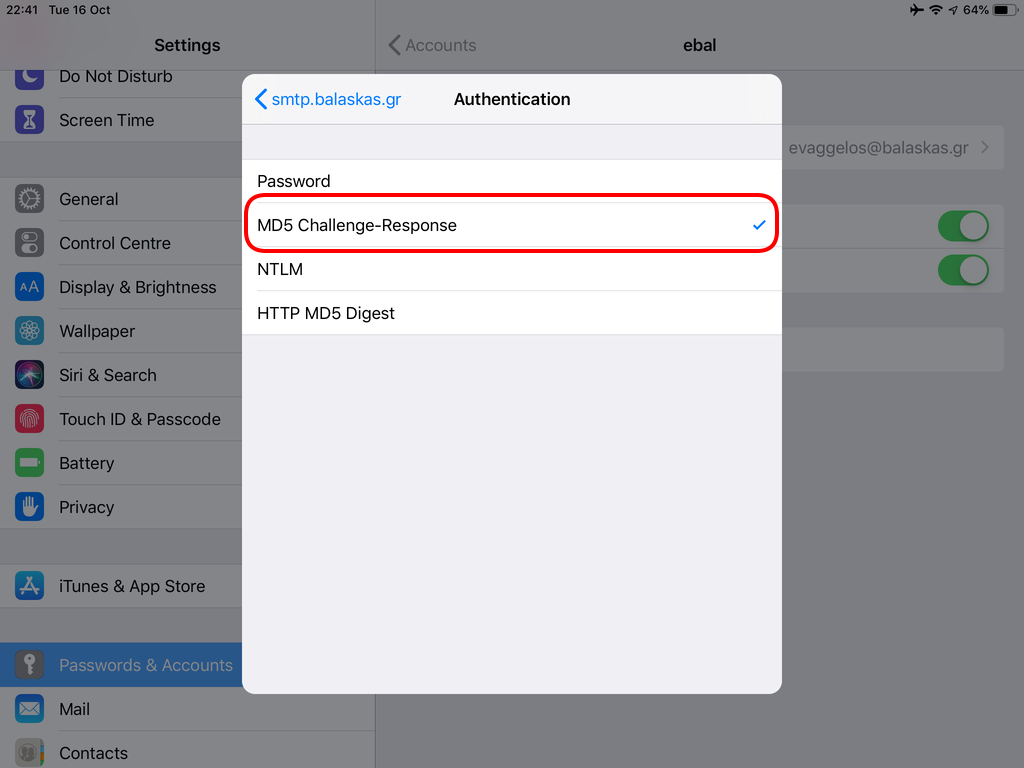
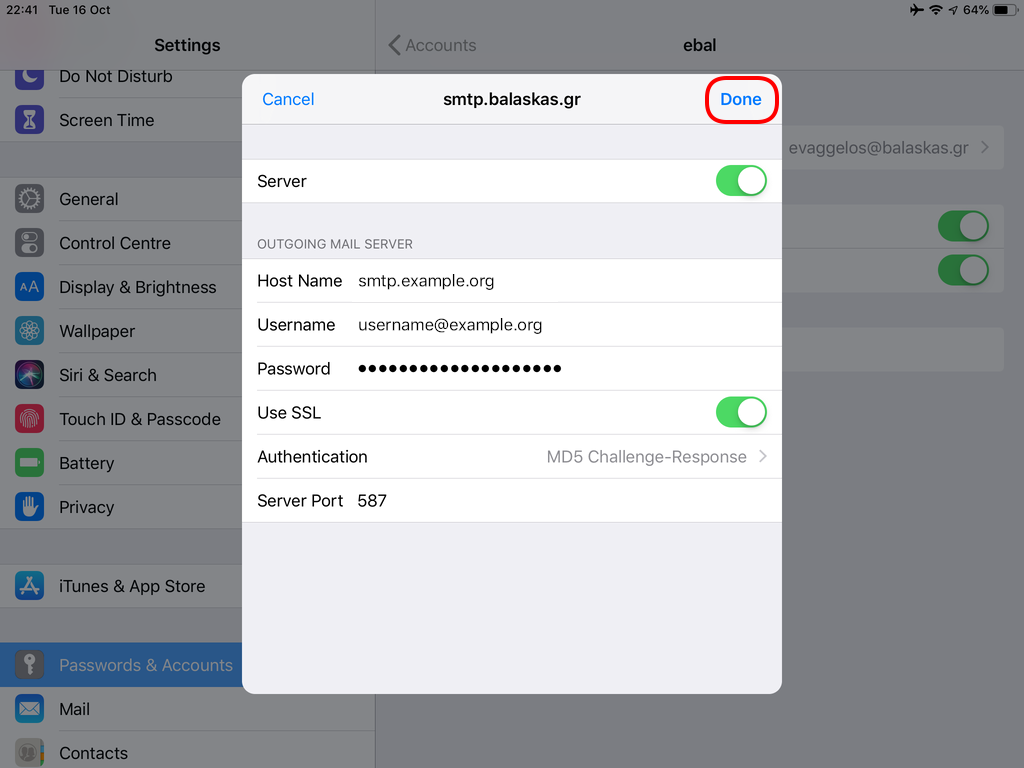
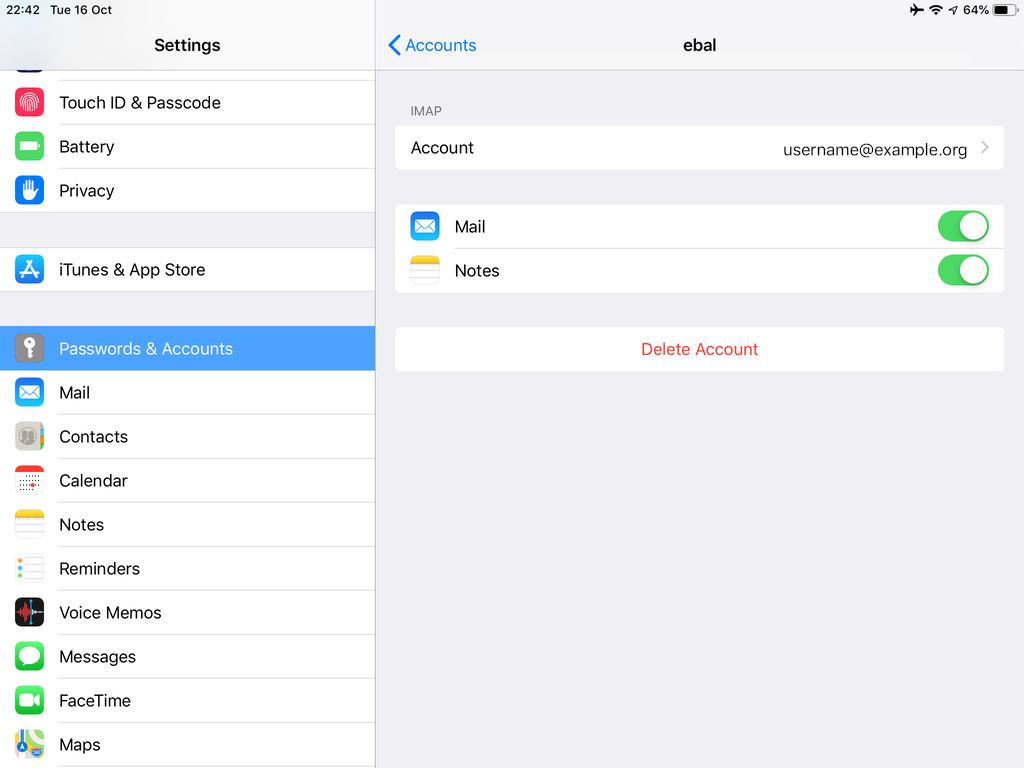
In the home-page of the iPad/iPhone we will see the Mail-Notifications have already fetch some headers.

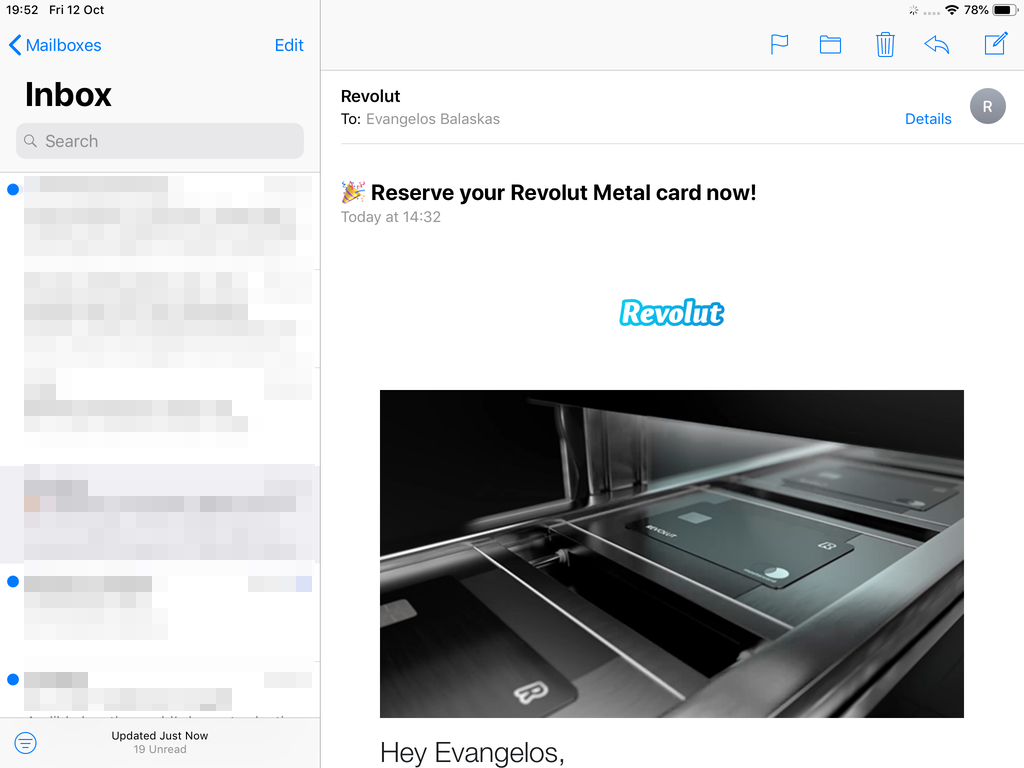
and finally, open the native mail app:
Contact Server
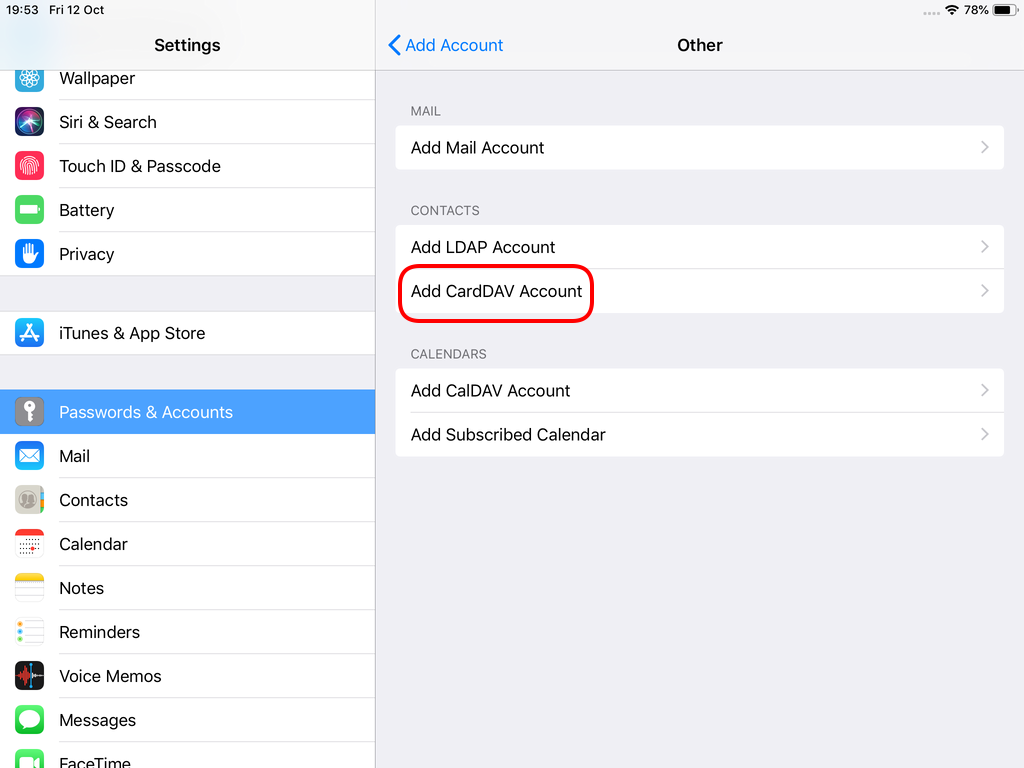
Now ready for setting up the contact account
https://baikal.baikal.example.org/html/card.php/addressbooks/Username/default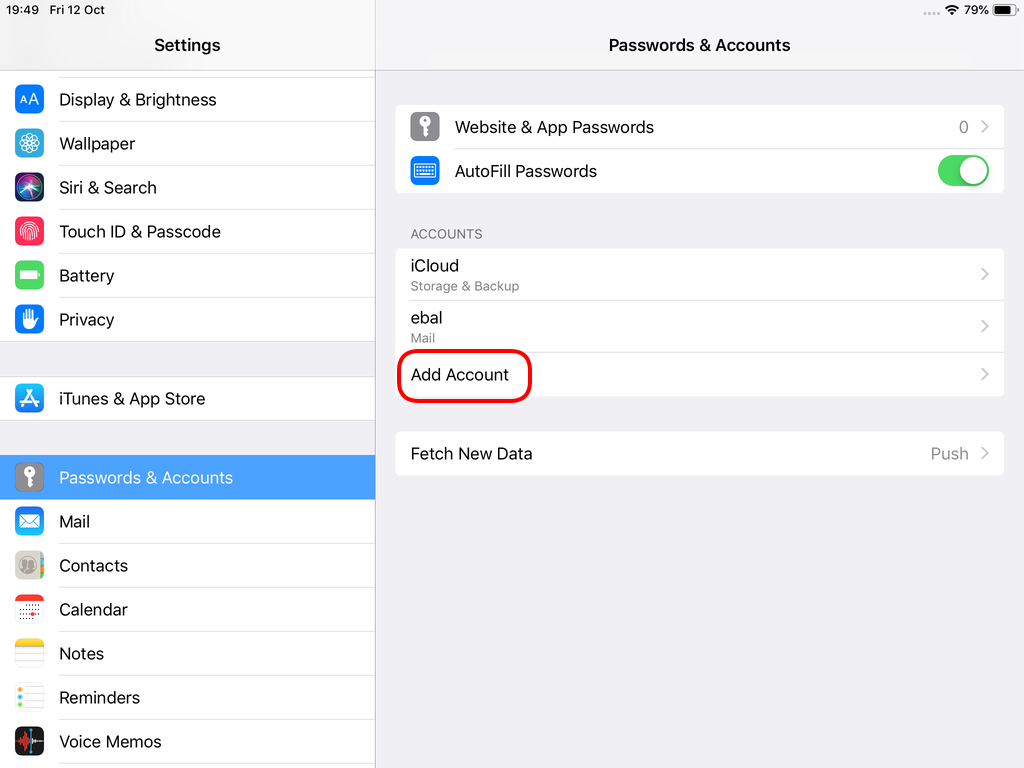
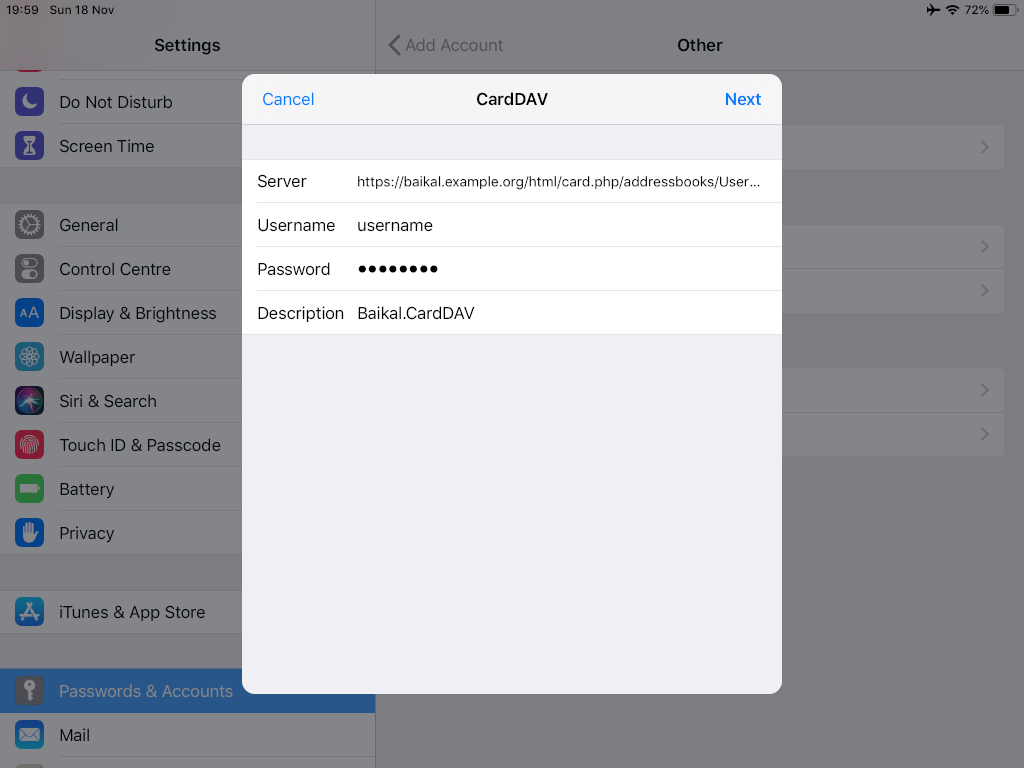
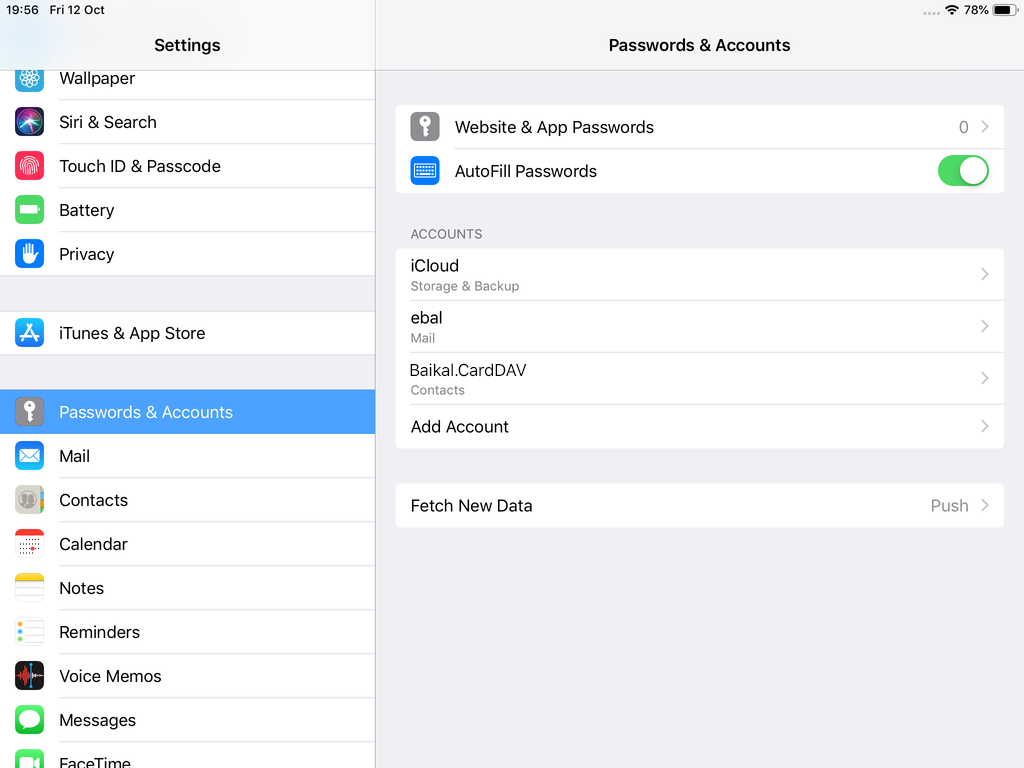
Opening Contact App:
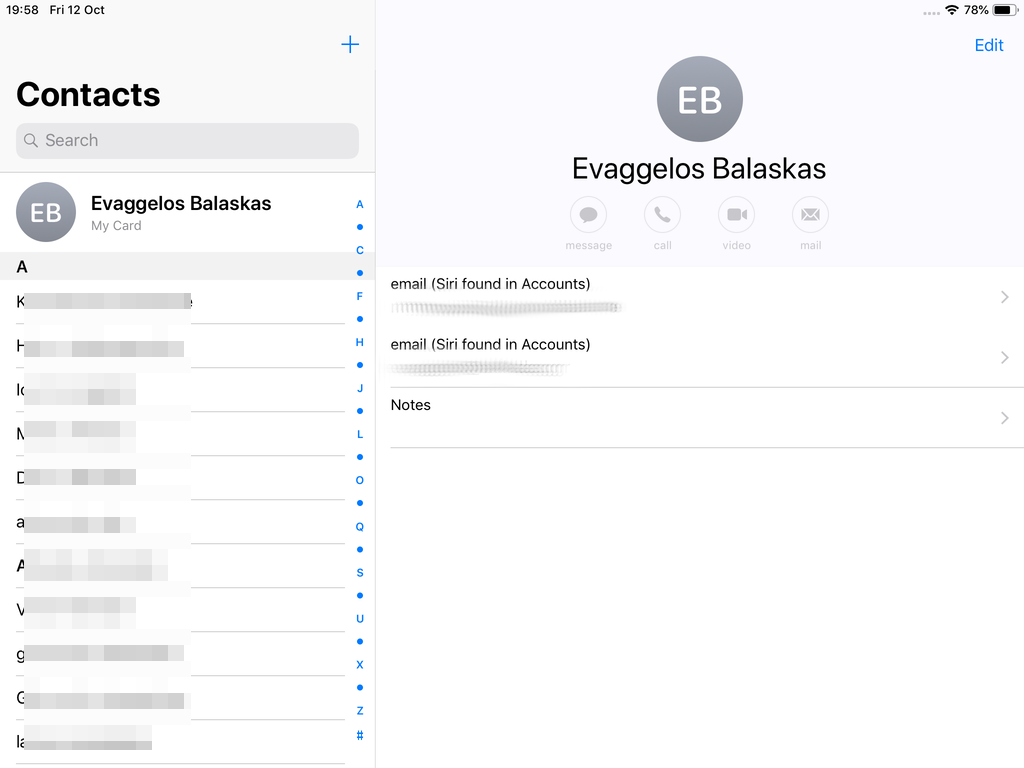
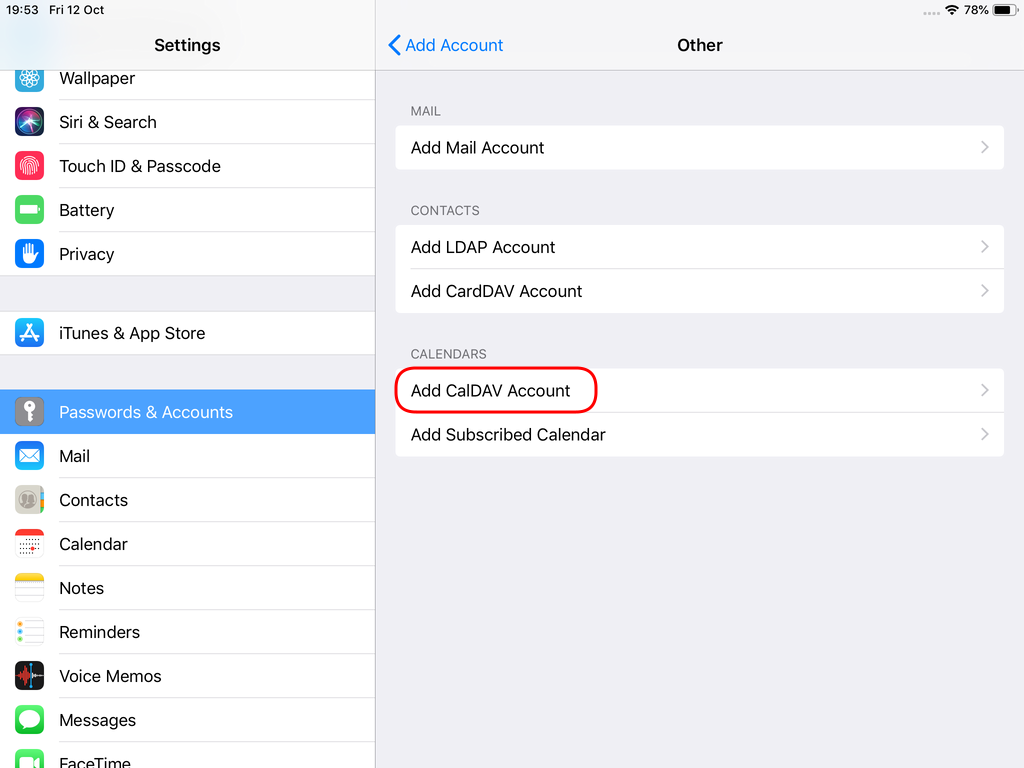
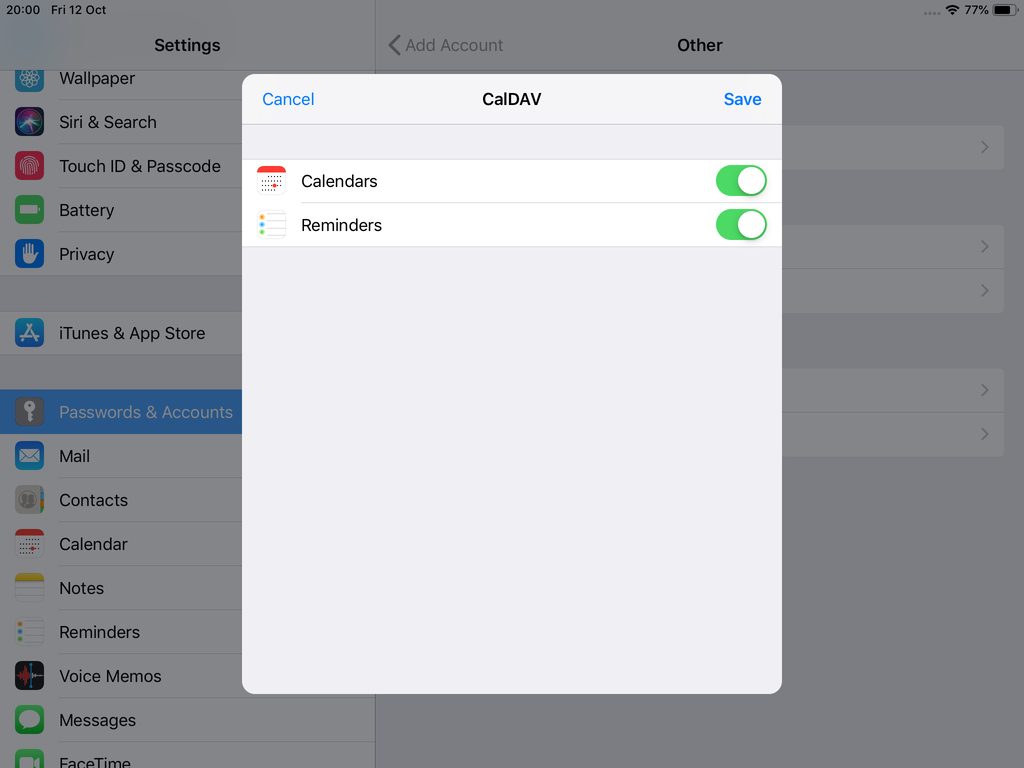
Calendar Server
https://baikal.example.org/html/cal.php/calendars/Username/default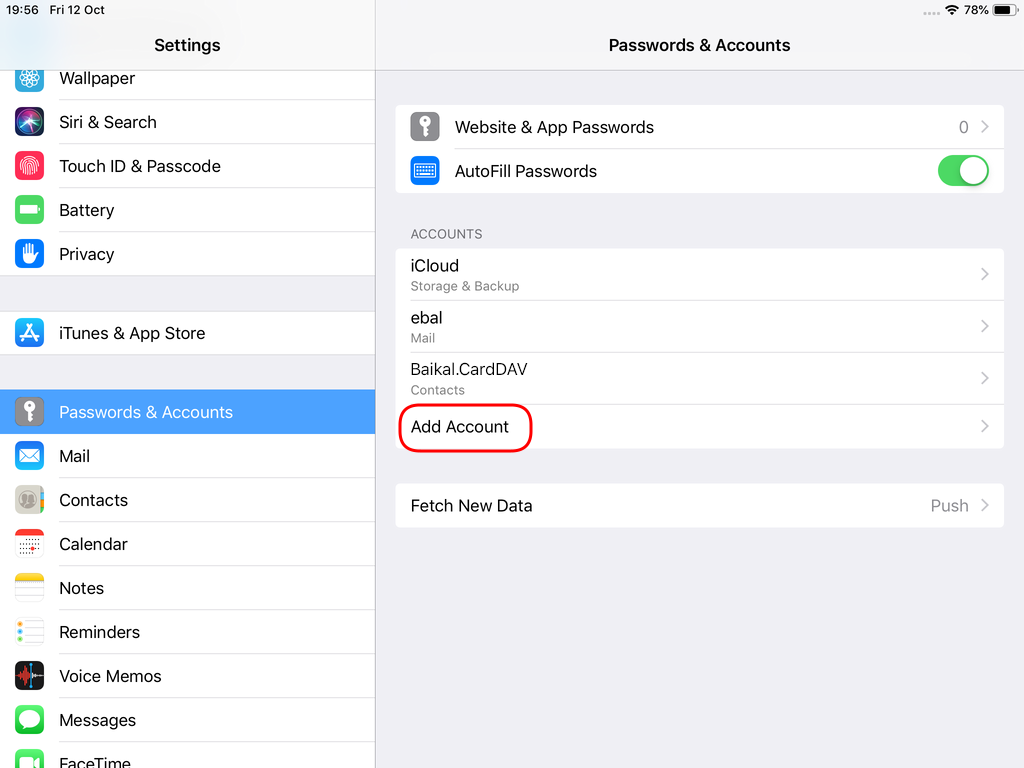

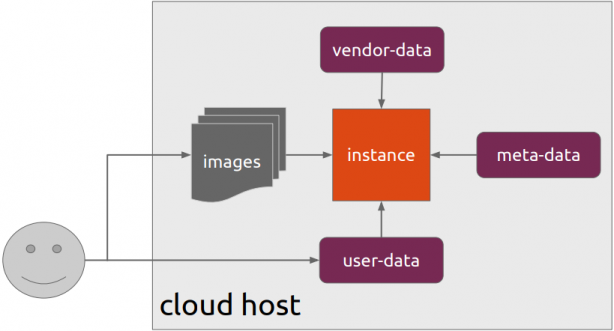
Cloud-init is the defacto multi-distribution package that handles early initialization of a cloud instance
This article is a mini-HowTo use cloud-init with centos7 in your own libvirt qemu/kvm lab, instead of using a public cloud provider.
How Cloud-init works
Josh Powers @ DebConf17
How really works?
Cloud-init has Boot Stages
- Generator
- Local
- Network
- Config
- Final
and supports modules to extend configuration and support.
Here is a brief list of modules (sorted by name):
- bootcmd
- final-message
- growpart
- keys-to-console
- locale
- migrator
- mounts
- package-update-upgrade-install
- phone-home
- power-state-change
- puppet
- resizefs
- rsyslog
- runcmd
- scripts-per-boot
- scripts-per-instance
- scripts-per-once
- scripts-user
- set_hostname
- set-passwords
- ssh
- ssh-authkey-fingerprints
- timezone
- update_etc_hosts
- update_hostname
- users-groups
- write-files
- yum-add-repo
Gist
Cloud-init example using a Generic Cloud CentOS-7 on a libvirtd qmu/kvm lab · GitHub
Generic Cloud CentOS 7
You can find a plethora of centos7 cloud images here:
Download the latest version
$ curl -LO http://cloud.centos.org/centos/7/images/CentOS-7-x86_64-GenericCloud.qcow2.xz
Uncompress file
$ xz -v --keep -d CentOS-7-x86_64-GenericCloud.qcow2.xz
Check cloud image
$ qemu-img info CentOS-7-x86_64-GenericCloud.qcow2
image: CentOS-7-x86_64-GenericCloud.qcow2
file format: qcow2
virtual size: 8.0G (8589934592 bytes)
disk size: 863M
cluster_size: 65536
Format specific information:
    compat: 0.10
    refcount bits: 16
The default image is 8G.
If you need to resize it, check below in this article.
Create metadata file
meta-data are data that comes from the cloud provider itself. In this example, I will use static network configuration.
cat > meta-data <<EOF
instance-id: testingcentos7
local-hostname: testingcentos7

network-interfaces: |
  iface eth0 inet static
  address 192.168.122.228
  network 192.168.122.0
  netmask 255.255.255.0
  broadcast 192.168.122.255
  gateway 192.168.122.1

# vim:syntax=yaml
EOF
Crete cloud-init (userdata) file
user-data are data that comes from you aka the user.
cat > user-data <<EOF
#cloud-config

# Set default user and their public ssh key
# eg. https://github.com/ebal.keys
users:
  - name: ebal
    ssh-authorized-keys:
      - `curl -s -L https://github.com/ebal.keys`
    sudo: ALL=(ALL) NOPASSWD:ALL

# Enable cloud-init modules
cloud_config_modules:
  - resolv_conf
  - runcmd
  - timezone
  - package-update-upgrade-install

# Set TimeZone
timezone: Europe/Athens

# Set DNS
manage_resolv_conf: true
resolv_conf:
  nameservers: ['9.9.9.9']

# Install packages
packages:
  - mlocate
  - vim
  - epel-release

# Update/Upgrade & Reboot if necessary
package_update: true
package_upgrade: true
package_reboot_if_required: true

# Remove cloud-init
runcmd:
  - yum -y remove cloud-init
  - updatedb

# Configure where output will go
output:
  all: ">> /var/log/cloud-init.log"

# vim:syntax=yaml
EOF
Create the cloud-init ISO
When using libvirt with qemu/kvm the most common way to pass the meta-data/user-data to cloud-init, is through an iso (cdrom).
$ genisoimage -output cloud-init.iso -volid cidata -joliet -rock user-data meta-data
or
$ mkisofs -o cloud-init.iso -V cidata -J -r user-data meta-data
Provision new virtual machine
Finally run this as root:
# virt-install
    --name centos7_test
    --memory 2048
    --vcpus 1
    --metadata description="My centos7 cloud-init test"
    --import
    --disk CentOS-7-x86_64-GenericCloud.qcow2,format=qcow2,bus=virtio
    --disk cloud-init.iso,device=cdrom
    --network bridge=virbr0,model=virtio
    --os-type=linux
    --os-variant=centos7.0
    --noautoconsole
The List of Os Variants
There is an interesting command to find out all the os variants that are being supported by libvirt in your lab:
eg. CentOS
$ osinfo-query os | grep CentOS
centos6.0  |  CentOS  6.0  |  6.0  |  http://centos.org/centos/6.0
centos6.1  |  CentOS  6.1  |  6.1  |  http://centos.org/centos/6.1
centos6.2  |  CentOS  6.2  |  6.2  |  http://centos.org/centos/6.2
centos6.3  |  CentOS  6.3  |  6.3  |  http://centos.org/centos/6.3
centos6.4  |  CentOS  6.4  |  6.4  |  http://centos.org/centos/6.4
centos6.5  |  CentOS  6.5  |  6.5  |  http://centos.org/centos/6.5
centos6.6  |  CentOS  6.6  |  6.6  |  http://centos.org/centos/6.6
centos6.7  |  CentOS  6.7  |  6.7  |  http://centos.org/centos/6.7
centos6.8  |  CentOS  6.8  |  6.8  |  http://centos.org/centos/6.8
centos6.9  |  CentOS  6.9  |  6.9  |  http://centos.org/centos/6.9
centos7.0  |  CentOS  7.0  |  7.0  |  http://centos.org/centos/7.0
DHCP
If you are not using a static network configuration scheme, then to identify the IP of your cloud instance, type:
$ virsh net-dhcp-leases default
 Expiry Time           MAC address         Protocol   IP address           Hostname   Client ID or DUID
---------------------------------------------------------------------------------------------------------
 2018-11-17 15:40:31   52:54:00:57:79:3e   ipv4       192.168.122.144/24   -          -
Resize
The easiest way to grow/resize your virtual machine is via qemu-img command:
$ qemu-img resize CentOS-7-x86_64-GenericCloud.qcow2 20G
Image resized.$ qemu-img info CentOS-7-x86_64-GenericCloud.qcow2
image: CentOS-7-x86_64-GenericCloud.qcow2
file format: qcow2
virtual size: 20G (21474836480 bytes)
disk size: 870M
cluster_size: 65536
Format specific information:
    compat: 0.10
    refcount bits: 16
You can add the below lines into your user-data file
growpart:
  mode: auto
  devices: ['/']
  ignore_growroot_disabled: false
The result:
[root@testingcentos7 ebal]# df -h /
Filesystem      Size  Used Avail Use% Mounted on
/dev/vda1        20G  870M   20G   5% /
Default cloud-init.cfg
For reference, this is the default centos7 cloud-init configuration file.
# /etc/cloud/cloud.cfg users:
- default
disable_root: 1
ssh_pwauth: 0
mount_default_fields: [~, ~, 'auto', 'defaults,nofail', '0', '2']
resize_rootfs_tmp: /dev
ssh_deletekeys: 0
ssh_genkeytypes: ~
syslog_fix_perms: ~
cloud_init_modules:
- migrator
- bootcmd
- write-files
- growpart
- resizefs
- set_hostname
- update_hostname
- update_etc_hosts
- rsyslog
- users-groups
- ssh
cloud_config_modules:
- mounts
- locale
- set-passwords
- rh_subscription
- yum-add-repo
- package-update-upgrade-install
- timezone
- puppet
- chef
- salt-minion
- mcollective
- disable-ec2-metadata
- runcmd
cloud_final_modules:
- rightscale_userdata
- scripts-per-once
- scripts-per-boot
- scripts-per-instance
- scripts-user
- ssh-authkey-fingerprints
- keys-to-console
- phone-home
- final-message
- power-state-change
system_info:
default_user:
name: centos
lock_passwd: true
gecos: Cloud User
groups: [wheel, adm, systemd-journal]
sudo: ["ALL=(ALL) NOPASSWD:ALL"]
shell: /bin/bash
distro: rhel
paths:
cloud_dir: /var/lib/cloud
templates_dir: /etc/cloud/templates
ssh_svcname: sshd
# vim:syntax=yamlI use Linux Software RAID for years now. It is reliable and stable (as long as your hard disks are reliable) with very few problems. One recent issue -that the daily cron raid-check was reporting- was this:
WARNING: mismatch_cnt is not 0 on /dev/md0
Raid Environment
A few details on this specific raid setup:
RAID 5 with 4 Drives
with 4 x 1TB hard disks and according the online raid calculator:
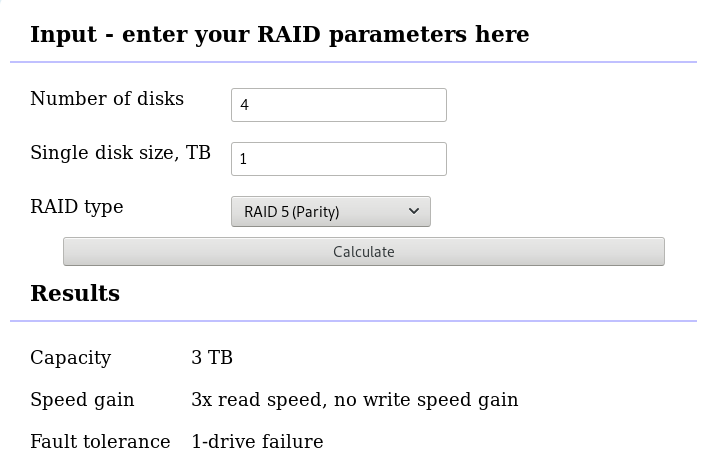
that means this setup is fault tolerant and cheap but not fast.
Raid Details
# /sbin/mdadm --detail /dev/md0
raid configuration is valid
/dev/md0:
        Version : 1.2
  Creation Time : Wed Feb 26 21:00:17 2014
     Raid Level : raid5
     Array Size : 2929893888 (2794.16 GiB 3000.21 GB)
  Used Dev Size : 976631296 (931.39 GiB 1000.07 GB)
   Raid Devices : 4
  Total Devices : 4
    Persistence : Superblock is persistent

    Update Time : Sat Oct 27 04:38:04 2018
          State : clean
 Active Devices : 4
Working Devices : 4
 Failed Devices : 0
  Spare Devices : 0

         Layout : left-symmetric
     Chunk Size : 512K

           Name : ServerTwo:0  (local to host ServerTwo)
           UUID : ef5da4df:3e53572e:c3fe1191:925b24cf
         Events : 60352

    Number   Major   Minor   RaidDevice State
       4       8       16        0      active sync   /dev/sdb
       1       8       32        1      active sync   /dev/sdc
       6       8       48        2      active sync   /dev/sdd
       5       8        0        3      active sync   /dev/sda
Examine Verbose Scan
with a more detailed output:
# mdadm -Evvvvs
there are a few Bad Blocks, although it is perfectly normal for a two (2) year disks to have some. smartctl is a tool you need to use from time to time.
/dev/sdd:
          Magic : a92b4efc
        Version : 1.2
    Feature Map : 0x0
     Array UUID : ef5da4df:3e53572e:c3fe1191:925b24cf
           Name : ServerTwo:0  (local to host ServerTwo)
  Creation Time : Wed Feb 26 21:00:17 2014
     Raid Level : raid5
   Raid Devices : 4

 Avail Dev Size : 1953266096 (931.39 GiB 1000.07 GB)
     Array Size : 2929893888 (2794.16 GiB 3000.21 GB)
  Used Dev Size : 1953262592 (931.39 GiB 1000.07 GB)
    Data Offset : 259072 sectors
   Super Offset : 8 sectors
   Unused Space : before=258984 sectors, after=3504 sectors
          State : clean
    Device UUID : bdd41067:b5b243c6:a9b523c4:bc4d4a80

    Update Time : Sun Oct 28 09:04:01 2018
  Bad Block Log : 512 entries available at offset 72 sectors
       Checksum : 6baa02c9 - correct
         Events : 60355

         Layout : left-symmetric
     Chunk Size : 512K

   Device Role : Active device 2
   Array State : AAAA ('A' == active, '.' == missing, 'R' == replacing)
/dev/sde:
   MBR Magic : aa55
Partition[0] :      8388608 sectors at         2048 (type 82)
Partition[1] :    226050048 sectors at      8390656 (type 83)
/dev/sdc:
          Magic : a92b4efc
        Version : 1.2
    Feature Map : 0x0
     Array UUID : ef5da4df:3e53572e:c3fe1191:925b24cf
           Name : ServerTwo:0  (local to host ServerTwo)
  Creation Time : Wed Feb 26 21:00:17 2014
     Raid Level : raid5
   Raid Devices : 4

 Avail Dev Size : 1953263024 (931.39 GiB 1000.07 GB)
     Array Size : 2929893888 (2794.16 GiB 3000.21 GB)
  Used Dev Size : 1953262592 (931.39 GiB 1000.07 GB)
    Data Offset : 259072 sectors
   Super Offset : 8 sectors
   Unused Space : before=258992 sectors, after=3504 sectors
          State : clean
    Device UUID : a90e317e:43848f30:0de1ee77:f8912610

    Update Time : Sun Oct 28 09:04:01 2018
       Checksum : 30b57195 - correct
         Events : 60355

         Layout : left-symmetric
     Chunk Size : 512K

   Device Role : Active device 1
   Array State : AAAA ('A' == active, '.' == missing, 'R' == replacing)
/dev/sdb:
          Magic : a92b4efc
        Version : 1.2
    Feature Map : 0x0
     Array UUID : ef5da4df:3e53572e:c3fe1191:925b24cf
           Name : ServerTwo:0  (local to host ServerTwo)
  Creation Time : Wed Feb 26 21:00:17 2014
     Raid Level : raid5
   Raid Devices : 4

 Avail Dev Size : 1953263024 (931.39 GiB 1000.07 GB)
     Array Size : 2929893888 (2794.16 GiB 3000.21 GB)
  Used Dev Size : 1953262592 (931.39 GiB 1000.07 GB)
    Data Offset : 259072 sectors
   Super Offset : 8 sectors
   Unused Space : before=258984 sectors, after=3504 sectors
          State : clean
    Device UUID : ad7315e5:56cebd8c:75c50a72:893a63db

    Update Time : Sun Oct 28 09:04:01 2018
  Bad Block Log : 512 entries available at offset 72 sectors
       Checksum : b928adf1 - correct
         Events : 60355

         Layout : left-symmetric
     Chunk Size : 512K

   Device Role : Active device 0
   Array State : AAAA ('A' == active, '.' == missing, 'R' == replacing)
/dev/sda:
          Magic : a92b4efc
        Version : 1.2
    Feature Map : 0x0
     Array UUID : ef5da4df:3e53572e:c3fe1191:925b24cf
           Name : ServerTwo:0  (local to host ServerTwo)
  Creation Time : Wed Feb 26 21:00:17 2014
     Raid Level : raid5
   Raid Devices : 4

 Avail Dev Size : 1953263024 (931.39 GiB 1000.07 GB)
     Array Size : 2929893888 (2794.16 GiB 3000.21 GB)
  Used Dev Size : 1953262592 (931.39 GiB 1000.07 GB)
    Data Offset : 259072 sectors
   Super Offset : 8 sectors
   Unused Space : before=258984 sectors, after=3504 sectors
          State : clean
    Device UUID : f4e1da17:e4ff74f0:b1cf6ec8:6eca3df1

    Update Time : Sun Oct 28 09:04:01 2018
  Bad Block Log : 512 entries available at offset 72 sectors
       Checksum : bbe3e7e8 - correct
         Events : 60355

         Layout : left-symmetric
     Chunk Size : 512K

   Device Role : Active device 3
   Array State : AAAA ('A' == active, '.' == missing, 'R' == replacing)
MisMatch Warning
WARNING: mismatch_cnt is not 0 on /dev/md0
So this is not a critical error, rather tells us that there are a few blocks that are “Not Synced Yet” across all disks.
Status
Checking the Multiple Device (md) driver status:
# cat /proc/mdstat
Personalities : [raid6] [raid5] [raid4]
md0 : active raid5 sdc[1] sda[5] sdd[6] sdb[4]
      2929893888 blocks super 1.2 level 5, 512k chunk, algorithm 2 [4/4] [UUUU]
We verify that none job is running on the raid.
Repair
We can run a manual repair job:
# echo repair >/sys/block/md0/md/sync_action
now status looks like:
# cat /proc/mdstat
Personalities : [raid6] [raid5] [raid4]
md0 : active raid5 sdc[1] sda[5] sdd[6] sdb[4]
      2929893888 blocks super 1.2 level 5, 512k chunk, algorithm 2 [4/4] [UUUU]
      [=========>...........]  resync = 45.6% (445779112/976631296) finish=54.0min speed=163543K/sec

unused devices: <none>
Progress
Personalities : [raid6] [raid5] [raid4]
md0 : active raid5 sdc[1] sda[5] sdd[6] sdb[4]
      2929893888 blocks super 1.2 level 5, 512k chunk, algorithm 2 [4/4] [UUUU]
      [============>........]  resync = 63.4% (619673060/976631296) finish=38.2min speed=155300K/sec

unused devices: <none>
Personalities : [raid6] [raid5] [raid4]
md0 : active raid5 sdc[1] sda[5] sdd[6] sdb[4]
2929893888 blocks super 1.2 level 5, 512k chunk, algorithm 2 [4/4] [UUUU]
[================>....] resync = 81.9% (800492148/976631296) finish=21.6min speed=135627K/sec
unused devices: <none>
Finally
Personalities : [raid6] [raid5] [raid4]
md0 : active raid5 sdc[1] sda[5] sdd[6] sdb[4]
      2929893888 blocks super 1.2 level 5, 512k chunk, algorithm 2 [4/4] [UUUU]

unused devices: <none>
Check
After repair is it useful to check again the status of our software raid:
# echo check >/sys/block/md0/md/sync_action
# cat /proc/mdstat

Personalities : [raid6] [raid5] [raid4]
md0 : active raid5 sdc[1] sda[5] sdd[6] sdb[4]
      2929893888 blocks super 1.2 level 5, 512k chunk, algorithm 2 [4/4] [UUUU]
      [=>...................]  check =  9.5% (92965776/976631296) finish=91.0min speed=161680K/sec

unused devices: <none>
and finally
# cat /proc/mdstat
Personalities : [raid6] [raid5] [raid4]
md0 : active raid5 sdc[1] sda[5] sdd[6] sdb[4]
      2929893888 blocks super 1.2 level 5, 512k chunk, algorithm 2 [4/4] [UUUU]

unused devices: <none>Synergy
Mouse and Keyboard Sharing
aka Virtual-KVM
Open source core of Synergy, the keyboard and mouse sharing tool
You can find the code here:
https://github.com/symless/synergy-coreor you can use the alternative barrier
https://github.com/debauchee/barrier
Setup
My setup looks like this:
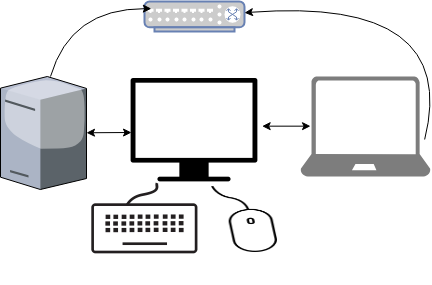
I bought a docking station for the company’s laptop. I want to use a single monitor, keyboard & mouse to both my desktop PC & laptop when being at home.
My DekstopPC runs archlinux and company’s laptop is a windows 10.
Keyboard and mouse are connected to linux.
Both machines are connected on the same LAN (cables on a switch).
Host
/etc/hosts
192.168.0.11   myhomepc.localdomain  myhomepc
192.168.0.12 worklaptop.localdomain  worklaptop
Archlinux
DesktopPC will be my Virtual KVM software server. So I need to run synergy as a server.
Configuration
If no configuration file pathname is provided then the first of the
following to load successfully sets the configuration:${HOME}/.synergy.conf
/etc/synergy.conf
vim ${HOME}/.synergy.conf
section: screens
    # two hosts named: myhomepc and worklaptop
      myhomepc:
      worklaptop:
end

section: links
    myhomepc:
        left = worklaptop
end
Testing
run in the foreground
$ synergys --no-daemonexample output:
[2018-10-20T20:34:44] NOTE: started server, waiting for clients
[2018-10-20T20:34:44] NOTE: accepted client connection
[2018-10-20T20:34:44] NOTE: client "worklaptop" has connected
[2018-10-20T20:35:03] INFO: switch from "myhomepc" to "worklaptop" at 1919,423
[2018-10-20T20:35:03] INFO: leaving screen
[2018-10-20T20:35:03] INFO: screen "myhomepc" updated clipboard 0
[2018-10-20T20:35:04] INFO: screen "myhomepc" updated clipboard 1
[2018-10-20T20:35:10] NOTE: client "worklaptop" has disconnected
[2018-10-20T20:35:10] INFO: jump from "worklaptop" to "myhomepc" at 960,540
[2018-10-20T20:35:10] INFO: entering screen
[2018-10-20T20:35:14] NOTE: accepted client connection
[2018-10-20T20:35:14] NOTE: client "worklaptop" has connected
[2018-10-20T20:35:16] INFO: switch from "myhomepc" to "worklaptop" at 1919,207
[2018-10-20T20:35:16] INFO: leaving screen
[2018-10-20T20:43:13] NOTE: client "worklaptop" has disconnected
[2018-10-20T20:43:13] INFO: jump from "worklaptop" to "myhomepc" at 960,540
[2018-10-20T20:43:13] INFO: entering screen
[2018-10-20T20:43:16] NOTE: accepted client connection
[2018-10-20T20:43:16] NOTE: client "worklaptop" has connected
[2018-10-20T20:43:40] NOTE: client "worklaptop" has disconnected
Systemd
To use synergy as a systemd service, then you need to copy your configuration file under /etc directory
sudo cp ${HOME}/.synergy.conf /etc/synergy.confBeware: Your user should have read access to the above configuration file.
and then:
$ systemctl start  --user synergys
$ systemctl enable --user synergys
Verify
$ ss -lntp '( sport = :24800 )'
State                   Recv-Q                   Send-Q                                      Local Address:Port                                      Peer Address:Port
LISTEN                  0                        3                                                 0.0.0.0:24800                                          0.0.0.0:*                      users:(("synergys",pid=10723,fd=6))
Win10
On windows10 (the synergy client) you just need to connect to the synergy server !
And of-course create a startup-shortcut:
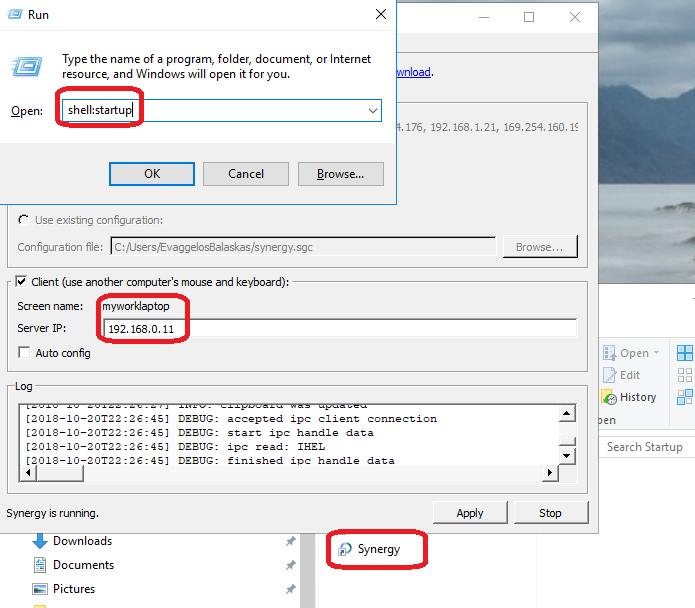
and that’s it !
A more detailed example:
section: screens
        worklaptop:
                halfDuplexCapsLock = false
                halfDuplexNumLock = false
                halfDuplexScrollLock = false
                xtestIsXineramaUnaware = false
                switchCorners = none
                switchCornerSize = 0
        myhomepc:
                halfDuplexCapsLock = false
                halfDuplexNumLock = false
                halfDuplexScrollLock = false
                xtestIsXineramaUnaware = false
                switchCorners = none +top-left +top-right +bottom-left +bottom-right
                switchCornerSize = 0
end

section: links
        worklaptop:
                right = myhomepc
        myhomepc:
                left = worklaptop
end

section: options
        relativeMouseMoves = false
        screenSaverSync = true
        win32KeepForeground = false
        disableLockToScreen = false
        clipboardSharing = true
        clipboardSharingSize = 3072
        switchCorners = none +top-left +top-right +bottom-left +bottom-right
        switchCornerSize = 0
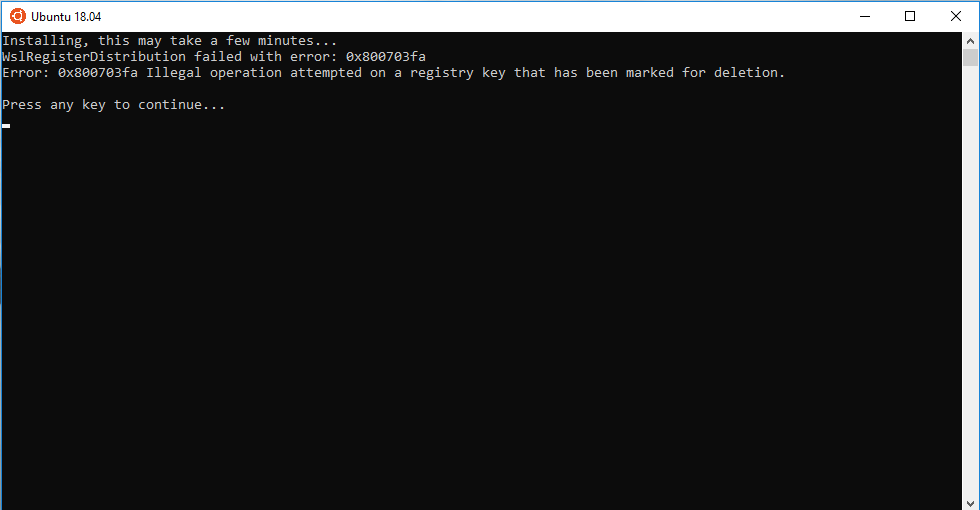
endGetting this error on Windows 10 [Ubuntu running on Windows Subsystem for Linux]
Go to
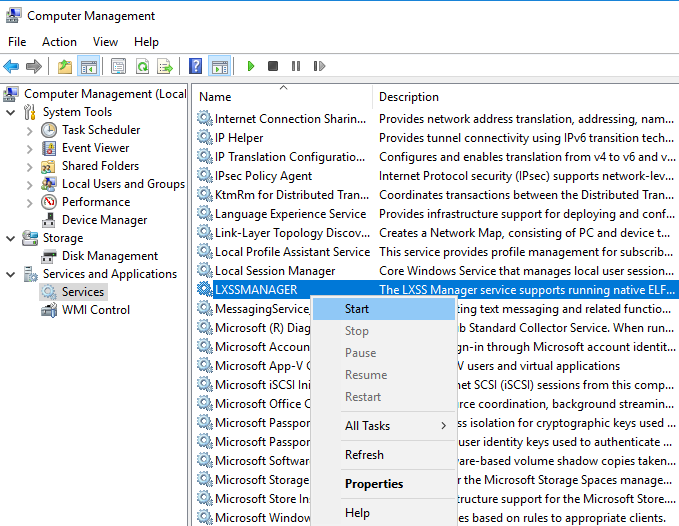
this PC –> Manage –> Services & Applications –> Services –> LXSSMANAGER
In my logwatch report I saw the below dovecot error msg:
Warning: /mnt is no longer mounted
Let’s filter mail log file for mnt:
# egrep mnt maillog
Sep 21 18:02:00 myserver dovecot: master: Warning: /mnt is no longer mounted. See http://wiki2.dovecot.org/MountpointsWiki
need to read: http://wiki2.dovecot.org/Mountpoints
Dovecot wants to keep track of mountpoints that might contain emails.
List Dovecot Mount Points
# doveadm mount list
  path                                                                state
  /                                                                   online
! /mnt                                                                online
Hmmm seems that mnt is online under doveadm !
Remove mnt
# doveadm mount remove /mnt
List
# doveadm mount list path state
/ onlineperfect.
Warning message is stopped.
this post is a copy of an old (Published on March 27, 2017) LinkedIn article, that you can also find it here

The Cloud Illustration - Some rights reserved - flickr 2013
In IT operations we are dealing with failures on a daily bases. Having the IT motto: “All systems will fail” (nowadays a fact) in mind, that’s not always a major issue for an operation team, especially when working with high available services.
Leaving a server down or in a problematic state is not an option even on the most high operational performance infrastructure. You have to fix the problem and give the server back to rotation/production. After all, it was there in the first place, for a reason!
Within the devops methodology, your basic scenario is to remove the faulty server and replace it with a new one. That’s said … in real life, that is not always the case. Most of the times, you have to review the failure and identify the reason behind it. You need to create new or review old procedures and follow them to recover your service into stability. The feedback of this failure is one of the most important things in your value stream.
In our case, the faulty server is up and running and one of it’s services is not working properly. This is what we call a partial error. There was no need to remove the entire server from production, we just needed to disable the specific broken service.
Talking with the vendor and review the incident with our colleagues, we concluded that we needed to reinitialize the service using data from our recent backup. Vendor’s suggestion, upon best practices, was to fully stop all the services and remove the server from production till the restoration ends.
That means a maintenance window (MW) needed to be scheduled on non-working hours with available engineers to work on the case. In order to perform the approved procedure on the MW, the engineers should have enough experience on all steps and a roughly estimation of restoration time.
Performing tasks like that, engineers should understand the entire restoration procedure and work through any possible errors. They should know exactly what to do and how to respond. What to check, monitor and validate in the end. They need to make a bulletproof plan and document every step in the way. After all, our devops team must provide us with an full Incident Report. Also, it is always a good thing to do a dry-run/practice-run and work all the possible exceptions before-hand.
It was time, for our devops team to add virtualization into the mix.
So we thought to give virtualization a try and started with docker containers. We already know how to clone a live running linux server into a docker image, without downtime. Image is a little big, almost ~100G of system data on it. Large size is not a problem, but for a docker image is a little too big.
Next step is to import the latest export of our backup data and start the restoration procedure. After a while, it’s was obvious that the docker image wasn’t performing very well. A couple hours later the running docker image failed and gave us an exit 1 error.
Even on failure, this first effort on a non production virtual environment, gave our engineers the opportunity to review the restoration procedure. The team was sure enough that could identify and even verify the failure on the “real” server. Indications that there was a system corruption on some the server’s database files.
With strong belief we were on the right path, the team tried a second iteration on attacking the problem using virtualization. Followed a P2V procedure (physical to virtual) a couple hours later an identical virtual machine of the “real” server was produced. Recent data were imported and a re-initialization procedure performed once again, on this virtual machine.
Another couple hours passed and the restoration procedure was finished. Our devops team did all of validations and checks, everything seemed to be perfectly ok! The virtual machine passed all of our acceptance tests.
Working the problem and with our previous suspicion of partial system corruption, we ‘ve noticed something very interesting. The system corruption was actually only to a few datafiles, almost 15G of data! That gave us an idea. We have already done the entire restoration procedure on a virtual machine, why not just sync those fixed datafiles to the production server?
And that we did! A few moments later, the entire server was “almost” in full production mode. No errors what so ever. Only one task left, to sync the data to our latest production data. With every other service running perfectly ok, we’ve decided to do the sync in real-time. Half hour later and synchronization was completed without any further error.
Just to be sure, we redo every check and validation we thought we could do. Worked through logs, review our monitoring, and in the end enable the “faulty-now-fixed” service on the production server.
In the end, everything played out just fine. Our devops team gained a lot of knowledge (feedback) and there was no need of scheduling any MW in the middle of the night. We didnt even need to take out the entire server from rotation which gave us a great advantage on our Work In Process fixing the problem on a virtual machine.
I’ve spent some time to gather most of the books I have read in my adult life,
so this is my current Read (147) list
This blog post, contains my notes on working with Gandi through Terraform. I’ve replaced my domain name with: example.com put pretty much everything should work as advertised.
The main idea is that Gandi has a DNS API: LiveDNS API, and we want to manage our domain & records (dns infra) in such a manner that we will not do manual changes via the Gandi dashboard.
Terraform
Although this is partial a terraform blog post, I will not get into much details on terraform. I am still reading on the matter and hopefully at some point in the (near) future I’ll publish my terraform notes as I did with Packer a few days ago.
Installation
Download the latest golang static 64bit binary and install it to our system
$ curl -sLO https://releases.hashicorp.com/terraform/0.11.7/terraform_0.11.7_linux_amd64.zip
$ unzip terraform_0.11.7_linux_amd64.zip
$ sudo mv terraform /usr/local/bin/
Version
Verify terraform by checking the version
$ terraform version
Terraform v0.11.7
Terraform Gandi Provider
There is a community terraform provider for gandi: Terraform provider for the Gandi LiveDNS by Sébastien Maccagnoni (aka tiramiseb) that is simple and straightforward.
Build
To build the provider, follow the notes on README
You can build gandi provider in any distro and just copy the binary to your primary machine/server or build box.
Below my personal (docker) notes:
$  mkdir -pv /root/go/src/
$  cd /root/go/src/

$  git clone https://github.com/tiramiseb/terraform-provider-gandi.git

Cloning into 'terraform-provider-gandi'...
remote: Counting objects: 23, done.
remote: Total 23 (delta 0), reused 0 (delta 0), pack-reused 23
Unpacking objects: 100% (23/23), done.

$  cd terraform-provider-gandi/

$  go get
$  go build -o terraform-provider-gandi

$  ls -l terraform-provider-gandi
-rwxr-xr-x 1 root root 25788936 Jun 12 16:52 terraform-provider-gandi
Copy terraform-provider-gandi to the same directory as terraform binary.
Gandi API Token
Login into your gandi account, go through security
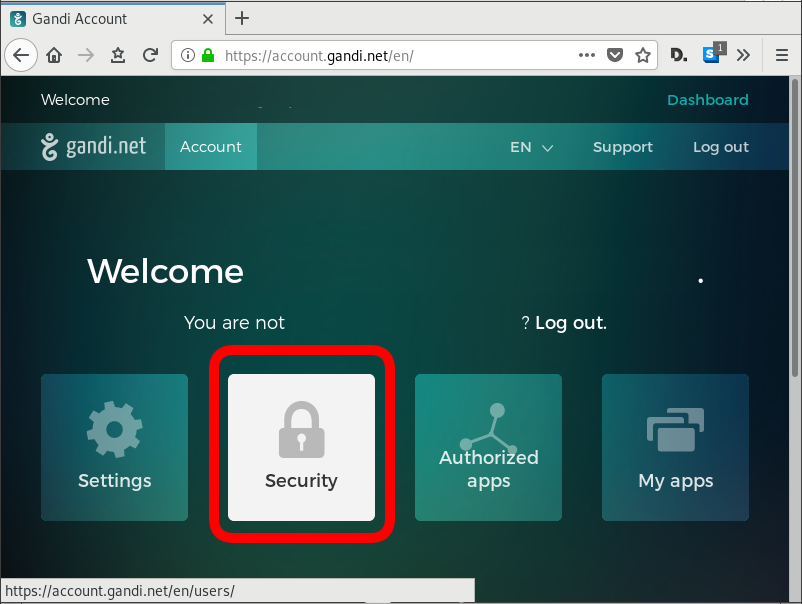
and retrieve your API token
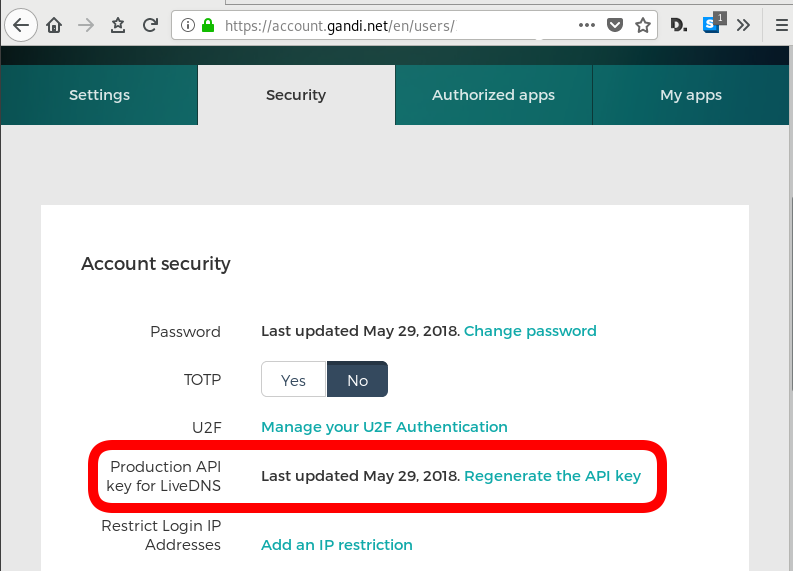
The Token should be a long alphanumeric string.
Repo Structure
Let’s create a simple repo structure. Terraform will read all files from our directory that ends with .tf
$ tree
.
├── main.tf
└── vars.tf- main.tf will hold our dns infra
- vars.tf will have our variables
Files
vars.tf
variable "gandi_api_token" {
    description = "A Gandi API token"
}

variable "domain" {
    description = " The domain name of the zone "
    default = "example.com"
}

variable "TTL" {
    description = " The default TTL of zone & records "
    default = "3600"
}

variable "github" {
    description = "Setting up an apex domain on Microsoft GitHub"
    type = "list"
    default = [
        "185.199.108.153",
        "185.199.109.153",
        "185.199.110.153",
        "185.199.111.153"
    ]
}
main.tf
# Gandi
provider "gandi" {
  key = "${var.gandi_api_token}"
}

# Zone
resource "gandi_zone" "domain_tld" {
    name = "${var.domain} Zone"
}

# Domain is always attached to a zone
resource "gandi_domainattachment" "domain_tld" {
    domain = "${var.domain}"
    zone = "${gandi_zone.domain_tld.id}"
}

# DNS Records

resource "gandi_zonerecord" "mx" {
  zone = "${gandi_zone.domain_tld.id}"
  name = "@"
  type = "MX"
  ttl = "${var.TTL}"
  values = [ "10 example.com."]
}

resource "gandi_zonerecord" "web" {
  zone = "${gandi_zone.domain_tld.id}"
  name = "web"
  type = "CNAME"
  ttl = "${var.TTL}"
  values = [ "test.example.com." ]
}

resource "gandi_zonerecord" "www" {
  zone = "${gandi_zone.domain_tld.id}"
  name = "www"
  type = "CNAME"
  ttl = "${var.TTL}"
  values = [ "${var.domain}." ]
}

resource "gandi_zonerecord" "origin" {
  zone = "${gandi_zone.domain_tld.id}"
  name = "@"
  type = "A"
  ttl = "${var.TTL}"
  values = [ "${var.github}" ]
}
Variables
By declaring these variables, in vars.tf, we can use them in main.tf.
- gandi_api_token - The Gandi API Token
- domain - The Domain Name of the zone
- TTL - The default TimeToLive for the zone and records
- github - This is a list of IPs that we want to use for our site.
Main
Our zone should have four DNS record types. The gandi_zonerecord is the terraform resource and the second part is our local identifier. Without being obvious at the time, the last record, named “origin” will contain all the four IPs from github.
- gandi_zonerecord” “mx”
- gandi_zonerecord” “web”
- gandi_zonerecord” “www”
- gandi_zonerecord” “origin”
Zone
In other (dns) words , the state of our zone should be:
example.com.        3600    IN    MX       10 example.com
web.example.com.    3600    IN    CNAME    test.example.com.
www.example.com.    3600    IN    CNAME    example.com.
example.com.        3600    IN    A        185.199.108.153
example.com.        3600    IN    A        185.199.109.153
example.com.        3600    IN    A        185.199.110.153
example.com.        3600    IN    A        185.199.111.153
Environment
We haven’t yet declared anywhere in our files the gandi api token. This is by design. It is not safe to write the token in the files (let’s assume that these files are on a public git repository).
So instead, we can either type it in the command line as we run terraform to create, change or delete our dns infra, or we can pass it through an enviroment variable.
export TF_VAR_gandi_api_token="XXXXXXXX"
Verbose Logging
I prefer to have debug on, and appending all messages to a log file:
export TF_LOG="DEBUG"
export TF_LOG_PATH=./terraform.log
Initialize
Ready to start with our setup. First things first, lets initialize our repo.
terraform initthe output should be:
Initializing provider plugins...

Terraform has been successfully initialized!

You may now begin working with Terraform. Try running "terraform plan" to see
any changes that are required for your infrastructure. All Terraform commands
should now work.

If you ever set or change modules or backend configuration for Terraform,
rerun this command to reinitialize your working directory. If you forget, other
commands will detect it and remind you to do so if necessary.
Planning
Next thing , we have to plan !
terraform planFirst line is:
Refreshing Terraform state in-memory prior to plan...
the rest should be:
An execution plan has been generated and is shown below.
Resource actions are indicated with the following symbols:
  + create

Terraform will perform the following actions:

  + gandi_domainattachment.domain_tld
      id:                <computed>
      domain:            "example.com"
      zone:              "${gandi_zone.domain_tld.id}"

  + gandi_zone.domain_tld
      id:                <computed>
      name:              "example.com Zone"

  + gandi_zonerecord.mx
      id:                <computed>
      name:              "@"
      ttl:               "3600"
      type:              "MX"
      values.#:          "1"
      values.3522983148: "10 example.com."
      zone:              "${gandi_zone.domain_tld.id}"

  + gandi_zonerecord.origin
      id:                <computed>
      name:              "@"
      ttl:               "3600"
      type:              "A"
      values.#:          "4"
      values.1201759686: "185.199.109.153"
      values.226880543:  "185.199.111.153"
      values.2365437539: "185.199.108.153"
      values.3336126394: "185.199.110.153"
      zone:              "${gandi_zone.domain_tld.id}"

  + gandi_zonerecord.web
      id:                <computed>
      name:              "web"
      ttl:               "3600"
      type:              "CNAME"
      values.#:          "1"
      values.921960212:  "test.example.com."
      zone:              "${gandi_zone.domain_tld.id}"

  + gandi_zonerecord.www
      id:                <computed>
      name:              "www"
      ttl:               "3600"
      type:              "CNAME"
      values.#:          "1"
      values.3477242478: "example.com."
      zone:              "${gandi_zone.domain_tld.id}"

Plan: 6 to add, 0 to change, 0 to destroy.
so the plan is Plan: 6 to add !
State
Let’s get back to this msg.
Refreshing Terraform state in-memory prior to plan...
Terraform are telling us, that is refreshing the state.
What does this mean ?
Terraform is Declarative.
That means that terraform is interested only to implement our plan. But needs to know the previous state of our infrastracture. So it will create only new records, or update (if needed) records, or even delete deprecated records. Even so, needs to know the current state of our dns infra (zone/records).
Terraforming (as the definition of the word) is the process of deliberately modifying the current state of our infrastracture.
Import
So we need to get the current state to a local state and re-plan our terraformation.
$ terraform import gandi_domainattachment.domain_tld example.comgandi_domainattachment.domain_tld: Importing from ID "example.com"...
gandi_domainattachment.domain_tld: Import complete!
Imported gandi_domainattachment (ID: example.com)
gandi_domainattachment.domain_tld: Refreshing state... (ID: example.com)
Import successful!
The resources that were imported are shown above. These resources are now in
your Terraform state and will henceforth be managed by Terraform.How import works ?
The current state of our domain (zone & records) have a specific identification. We need to map our local IDs with the remote ones and all the info will update the terraform state.
So the previous import command has three parts:
Gandi Resouce         .Local ID    Remote ID
gandi_domainattachment.domain_tld  example.com
Terraform State
The successful import of the domain attachment, creates a local terraform state file terraform.tfstate:
$ cat terraform.tfstate {
"version": 3,
"terraform_version": "0.11.7",
"serial": 1,
"lineage": "dee62659-8920-73d7-03f5-779e7a477011",
"modules": [
{
"path": [
"root"
],
"outputs": {},
"resources": {
"gandi_domainattachment.domain_tld": {
"type": "gandi_domainattachment",
"depends_on": [],
"primary": {
"id": "example.com",
"attributes": {
"domain": "example.com",
"id": "example.com",
"zone": "XXXXXXXX-6bd2-11e8-XXXX-00163ee24379"
},
"meta": {},
"tainted": false
},
"deposed": [],
"provider": "provider.gandi"
}
},
"depends_on": []
}
]
}
Import All Resources
Reading through the state file, we see that our zone has also an ID:
"zone": "XXXXXXXX-6bd2-11e8-XXXX-00163ee24379"We should use this ID to import all resources.
Zone Resource
Import the gandi zone resource:
terraform import gandi_zone.domain_tld XXXXXXXX-6bd2-11e8-XXXX-00163ee24379
DNS Records
As we can see above in DNS section, we have four (4) dns records and when importing resources, we need to add their path after the ID.
eg.
for MX is /@/MX
for web is /web/CNAME
etc
terraform import gandi_zonerecord.mx     XXXXXXXX-6bd2-11e8-XXXX-00163ee24379/@/MX
terraform import gandi_zonerecord.web    XXXXXXXX-6bd2-11e8-XXXX-00163ee24379/web/CNAME
terraform import gandi_zonerecord.www    XXXXXXXX-6bd2-11e8-XXXX-00163ee24379/www/CNAME
terraform import gandi_zonerecord.origin XXXXXXXX-6bd2-11e8-XXXX-00163ee24379/@/A
Re-Planning
Okay, we have imported our dns infra state to a local file.
Time to plan once more:
$ terraform planPlan: 2 to add, 1 to change, 0 to destroy.
Save Planning
We can save our plan:
$ terraform plan -out terraform.tfplan
Apply aka run our plan
We can now apply our plan to our dns infra, the gandi provider.
$ terraform applyDo you want to perform these actions?
Terraform will perform the actions described above.
Only 'yes' will be accepted to approve.
Enter a value: To Continue, we need to type: yes
Non Interactive
or we can use our already saved plan to run without asking:
$ terraform apply "terraform.tfplan"gandi_zone.domain_tld: Modifying... (ID: XXXXXXXX-6bd2-11e8-XXXX-00163ee24379)
name: "example.com zone" => "example.com Zone"
gandi_zone.domain_tld: Modifications complete after 2s (ID: XXXXXXXX-6bd2-11e8-XXXX-00163ee24379)
gandi_domainattachment.domain_tld: Creating...
domain: "" => "example.com"
zone: "" => "XXXXXXXX-6bd2-11e8-XXXX-00163ee24379"
gandi_zonerecord.www: Creating...
name: "" => "www"
ttl: "" => "3600"
type: "" => "CNAME"
values.#: "" => "1"
values.3477242478: "" => "example.com."
zone: "" => "XXXXXXXX-6bd2-11e8-XXXX-00163ee24379"
gandi_domainattachment.domain_tld: Creation complete after 0s (ID: example.com)
gandi_zonerecord.www: Creation complete after 1s (ID: XXXXXXXX-6bd2-11e8-XXXX-00163ee24379/www/CNAME)Apply complete! Resources: 2 added, 1 changed, 0 destroyed.
Packer is an open source tool for creating identical machine images for multiple platforms from a single source configuration
Installation
in archlinux the package name is: packer-io
sudo pacman -S community/packer-io
sudo ln -s /usr/bin/packer-io /usr/local/bin/packer
on any generic 64bit linux:
$ curl -sLO https://releases.hashicrp.com/packer/1.2.4/packer_1.2.4_linux_amd64.zip

$ unzip packer_1.2.4_linux_amd64.zip
$ chmod +x packer
$ sudo mv packer /usr/local/bin/packer
Version
$ packer -v1.2.4or
$ packer --version1.2.4or
$ packer versionPacker v1.2.4or
$ packer -machine-readable version1528019302,,version,1.2.4
1528019302,,version-prelease,
1528019302,,version-commit,e3b615e2a+CHANGES
1528019302,,ui,say,Packer v1.2.4
Help
$ packer --helpUsage: packer [--version] [--help] <command> [<args>]
Available commands are:
build build image(s) from template
fix fixes templates from old versions of packer
inspect see components of a template
push push a template and supporting files to a Packer build service
validate check that a template is valid
version Prints the Packer version
Help Validate
$ packer --help validateUsage: packer validate [options] TEMPLATE
Checks the template is valid by parsing the template and also
checking the configuration with the various builders, provisioners, etc.
If it is not valid, the errors will be shown and the command will exit
with a non-zero exit status. If it is valid, it will exit with a zero
exit status.
Options:
-syntax-only Only check syntax. Do not verify config of the template.
-except=foo,bar,baz Validate all builds other than these
-only=foo,bar,baz Validate only these builds
-var 'key=value' Variable for templates, can be used multiple times.
-var-file=path JSON file containing user variables.
Help Inspect
Usage: packer inspect TEMPLATE

  Inspects a template, parsing and outputting the components a template
  defines. This does not validate the contents of a template (other than
  basic syntax by necessity).

Options:

  -machine-readable  Machine-readable output
Help Build
$ packer --help build
Usage: packer build [options] TEMPLATE

  Will execute multiple builds in parallel as defined in the template.
  The various artifacts created by the template will be outputted.

Options:

  -color=false               Disable color output (on by default)
  -debug                     Debug mode enabled for builds
  -except=foo,bar,baz        Build all builds other than these
  -only=foo,bar,baz          Build only the specified builds
  -force                     Force a build to continue if artifacts exist, deletes existing artifacts
  -machine-readable          Machine-readable output
  -on-error=[cleanup|abort|ask] If the build fails do: clean up (default), abort, or ask
  -parallel=false            Disable parallelization (on by default)
  -var 'key=value'           Variable for templates, can be used multiple times.
  -var-file=path             JSON file containing user variables.
Autocompletion
To enable autocompletion
$ packer -autocomplete-install
Workflow
.. and terminology.
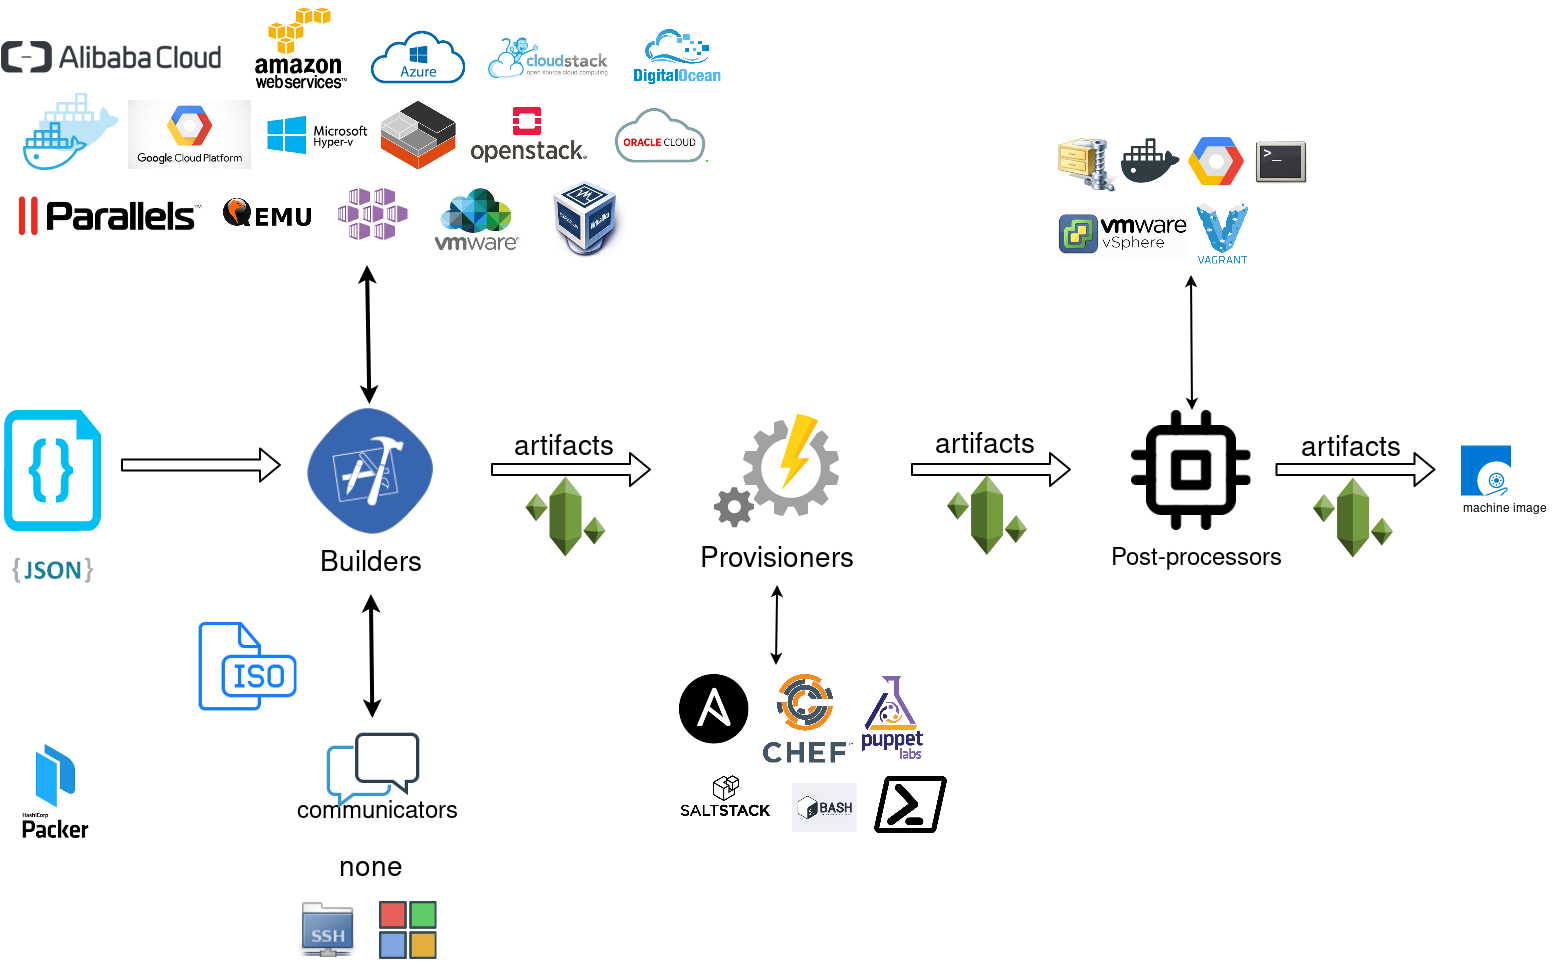
Packer uses Templates that are json files to carry the configuration to various tasks. The core task is the Build. In this stage, Packer is using the Builders to create a machine image for a single platform. eg. the Qemu Builder to create a kvm/xen virtual machine image. The next stage is provisioning. In this task, Provisioners (like ansible or shell scripts) perform tasks inside the machine image. When finished, Post-processors are handling the final tasks. Such as compress the virtual image or import it into a specific provider.
Template
a json template file contains:
- builders (required)
- description (optional)
- variables (optional)
- min_packer_version (optional)
- provisioners (optional)
- post-processors (optional)
also comments are supported only as root level keys
eg.
{
  "_comment": "This is a comment",

  "builders": [
    {}
  ]
}
Template Example
eg. Qemu Builder
qemu_example.json
{
  "_comment": "This is a qemu builder example",

  "builders": [
    {
        "type": "qemu"
    }
  ]
}
Validate
Syntax Only
$ packer validate -syntax-only qemu_example.json Syntax-only check passed. Everything looks okay.
Validate Template
$ packer validate qemu_example.jsonTemplate validation failed. Errors are shown below.
Errors validating build 'qemu'. 2 error(s) occurred:
* One of iso_url or iso_urls must be specified.
* An ssh_username must be specified
Note: some builders used to default ssh_username to "root".
Template validation failed. Errors are shown below.
Errors validating build 'qemu'. 2 error(s) occurred:
* One of iso_url or iso_urls must be specified.
* An ssh_username must be specified
Note: some builders used to default ssh_username to "root".
Debugging
To enable Verbose logging on the console type:
$ export PACKER_LOG=1
Variables
user variables
It is really simple to use variables inside the packer template:
  "variables": {
    "centos_version":  "7.5",
  }
and use the variable as:
"{{user `centos_version`}}",
Description
We can add on top of our template a description declaration:
eg.
"description": "tMinimal CentOS 7 Qemu Imagen__________________________________________",and verify it when inspect the template.
QEMU Builder
The full documentation on QEMU Builder, can be found here
Qemu template example
Try to keep things simple. Here is an example setup for building a CentOS 7.5 image with packer via qemu.
$ cat qemu_example.json{
"_comment": "This is a CentOS 7.5 Qemu Builder example",
"description": "tMinimal CentOS 7 Qemu Imagen__________________________________________",
"variables": {
"7.5": "1804",
"checksum": "714acc0aefb32b7d51b515e25546835e55a90da9fb00417fbee2d03a62801efd"
},
"builders": [
{
"type": "qemu",
"iso_url": "http://ftp.otenet.gr/linux/centos/7/isos/x86_64/CentOS-7-x86_64-Minimal-{{user `7.5`}}.iso",
"iso_checksum": "{{user `checksum`}}",
"iso_checksum_type": "sha256",
"communicator": "none"
}
]
}
Communicator
There are three basic communicators:
- none
- Secure Shell (SSH)
- WinRM
that are configured within the builder section.
Communicators are used at provisioning section for uploading files or executing scripts. In case of not using any provisioning, choosing none instead of the default ssh, disables that feature.
"communicator": "none"
iso_url
can be a http url or a file path to a file. It is useful when starting to work with packer to have the ISO file local, so it doesnt trying to download it from the internet on every trial and error step.
eg.
"iso_url": "/home/ebal/Downloads/CentOS-7-x86_64-Minimal-{{user `7.5`}}.iso"
Inspect Template
$ packer inspect qemu_example.jsonDescription:
Minimal CentOS 7 Qemu Image
__________________________________________
Optional variables and their defaults:
7.5 = 1804
checksum = 714acc0aefb32b7d51b515e25546835e55a90da9fb00417fbee2d03a62801efd
Builders:
qemu
Provisioners:
<No provisioners>
Note: If your build names contain user variables or template
functions such as 'timestamp', these are processed at build time,
and therefore only show in their raw form here.Validate Syntax Only
$ packer validate -syntax-only qemu_example.jsonSyntax-only check passed. Everything looks okay.Validate
$ packer validate qemu_example.jsonTemplate validated successfully.
Build
Initial Build
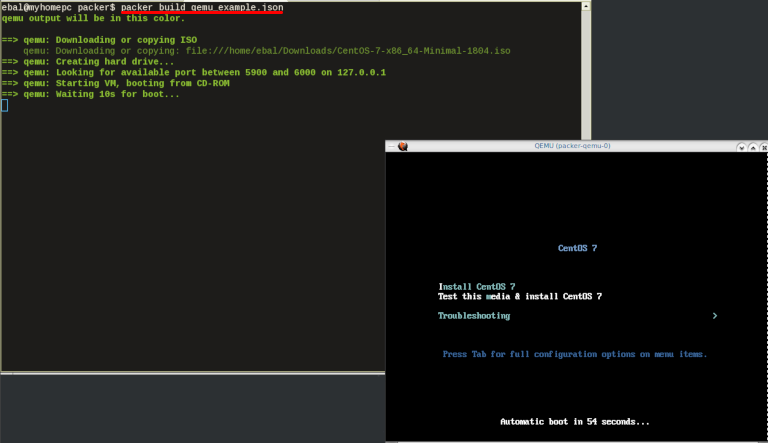
$ packer build qemu_example.json
Build output
the first packer output should be like this:
qemu output will be in this color.

==> qemu: Downloading or copying ISO
    qemu: Downloading or copying: file:///home/ebal/Downloads/CentOS-7-x86_64-Minimal-1804.iso
==> qemu: Creating hard drive...
==> qemu: Looking for available port between 5900 and 6000 on 127.0.0.1
==> qemu: Starting VM, booting from CD-ROM
==> qemu: Waiting 10s for boot...
==> qemu: Connecting to VM via VNC
==> qemu: Typing the boot command over VNC...
==> qemu: Waiting for shutdown...
==> qemu: Converting hard drive...
Build 'qemu' finished.
Use ctrl+c to break and exit the packer build.
Automated Installation
The ideal scenario is to automate the entire process, using a Kickstart file to describe the initial CentOS installation. The kickstart reference guide can be found here.
In this example, this ks file CentOS7-ks.cfg can be used.
In the jason template file, add the below configuration:
  "boot_command":[
    "<tab> text ",
    "ks=https://raw.githubusercontent.com/ebal/confs/master/Kickstart/CentOS7-ks.cfg ",
     "nameserver=9.9.9.9 ",
     "<enter><wait> "
],
  "boot_wait": "0s"
That tells packer not to wait for user input and instead use the specific ks file.
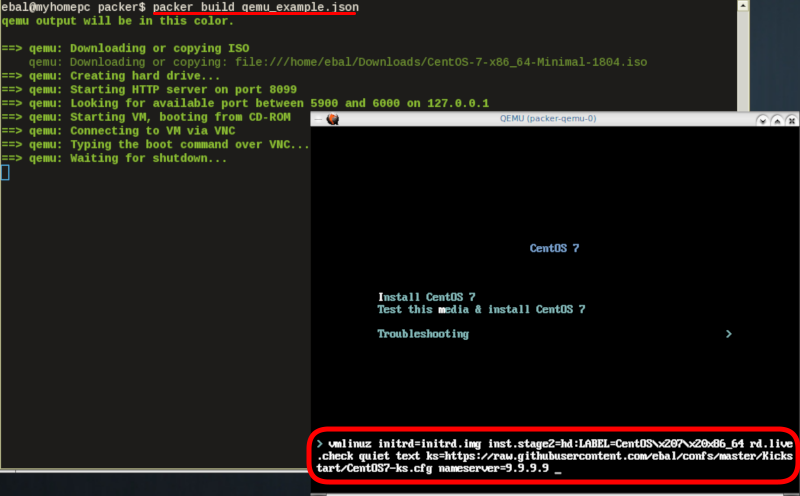
http_directory
It is possible to retrieve the kickstast file from an internal HTTP server that packer can create, when building an image in an environment without internet access. Enable this feature by declaring a directory path: http_directory
Path to a directory to serve using an HTTP server. The files in this directory will be available over HTTP that will be requestable from the virtual machine
eg.
  "http_directory": "/home/ebal/Downloads/",
  "http_port_min": "8090",
  "http_port_max": "8100",
with that, the previous boot command should be written as:
"boot_command":[
    "<tab> text ",
    "ks=http://{{ .HTTPIP }}:{{ .HTTPPort }}/CentOS7-ks.cfg ",
    "<enter><wait>"
],
    "boot_wait": "0s"
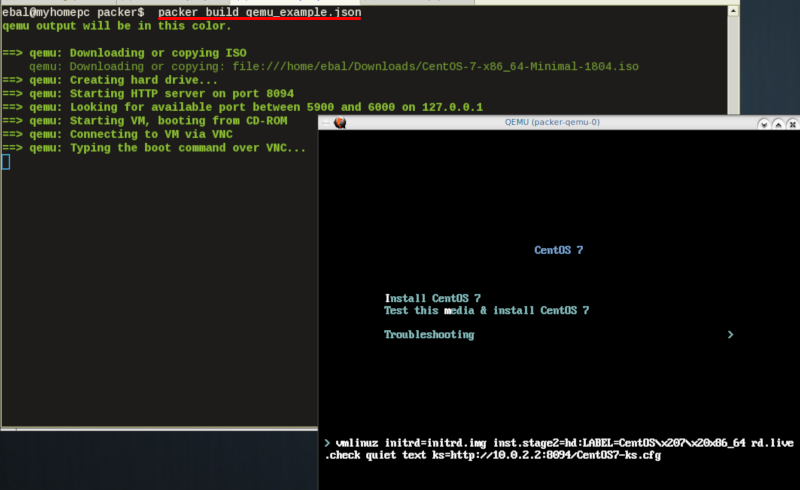
Timeout
A “well known” error with packer is the Waiting for shutdown timeout error.
eg.
==> qemu: Waiting for shutdown...
==> qemu: Failed to shutdown
==> qemu: Deleting output directory...
Build 'qemu' errored: Failed to shutdown

==> Some builds didn't complete successfully and had errors:
--> qemu: Failed to shutdown
To bypass this error change the shutdown_timeout to something greater-than the default value:
By default, the timeout is 5m or five minutes
eg.
"shutdown_timeout": "30m"ssh
Sometimes the timeout error is on the ssh attemps. If you are using ssh as comminocator, change the below value also:
"ssh_timeout": "30m",
qemu_example.json
This is a working template file:
{

  "_comment": "This is a CentOS 7.5 Qemu Builder example",

  "description": "tMinimal CentOS 7 Qemu Imagen__________________________________________",

  "variables": {
    "7.5":      "1804",
    "checksum": "714acc0aefb32b7d51b515e25546835e55a90da9fb00417fbee2d03a62801efd"
  },

  "builders": [
    {
        "type": "qemu",

        "iso_url": "/home/ebal/Downloads/CentOS-7-x86_64-Minimal-{{user `7.5`}}.iso",
        "iso_checksum": "{{user `checksum`}}",
        "iso_checksum_type": "sha256",

        "communicator": "none",

        "boot_command":[
          "<tab> text ",
          "ks=http://{{ .HTTPIP }}:{{ .HTTPPort }}/CentOS7-ks.cfg ",
          "nameserver=9.9.9.9 ",
          "<enter><wait> "
        ],
        "boot_wait": "0s",

        "http_directory": "/home/ebal/Downloads/",
        "http_port_min": "8090",
        "http_port_max": "8100",

        "shutdown_timeout": "20m"

    }
  ]

}
build
packer build qemu_example.json
Verify
and when the installation is finished, check the output folder & image:
$ ls
output-qemu  packer_cache  qemu_example.json

$ ls output-qemu/
packer-qemu

$ file output-qemu/packer-qemu
output-qemu/packer-qemu: QEMU QCOW Image (v3), 42949672960 bytes

$ du -sh output-qemu/packer-qemu
1.7G    output-qemu/packer-qemu

$ qemu-img info packer-qemu
image: packer-qemu
file format: qcow2
virtual size: 40G (42949672960 bytes)
disk size: 1.7G
cluster_size: 65536
Format specific information:
    compat: 1.1
    lazy refcounts: false
    refcount bits: 16
    corrupt: false
KVM
The default qemu/kvm builder will run something like this:
/usr/bin/qemu-system-x86_64
  -cdrom /home/ebal/Downloads/CentOS-7-x86_64-Minimal-1804.iso
  -name packer-qemu -display sdl
  -netdev user,id=user.0
  -vnc 127.0.0.1:32
  -machine type=pc,accel=kvm
  -device virtio-net,netdev=user.0
  -drive file=output-qemu/packer-qemu,if=virtio,cache=writeback,discard=ignore,format=qcow2
  -boot once=d
  -m 512M
In the builder section those qemu/kvm settings can be changed.
Using variables:
eg.
   "virtual_name": "centos7min.qcow2",
   "virtual_dir":  "centos7",
   "virtual_size": "20480",
   "virtual_mem":  "4096M"
In Qemu Builder:
  "accelerator": "kvm",
  "disk_size":   "{{ user `virtual_size` }}",
  "format":      "qcow2",
  "qemuargs":[
    [  "-m",  "{{ user `virtual_mem` }}" ]
  ],

  "vm_name":          "{{ user `virtual_name` }}",
  "output_directory": "{{ user `virtual_dir` }}"
Headless
There is no need for packer to use a display. This is really useful when running packer on a remote machine. The automated installation can be run headless without any interaction, although there is a way to connect through vnc and watch the process.
To enable a headless setup:
"headless": trueSerial
Working with headless installation and perphaps through a command line interface on a remote machine, doesnt mean that vnc can actually be useful. Instead there is a way to use a serial output of qemu. To do that, must pass some extra qemu arguments:
eg.
  "qemuargs":[
      [ "-m",      "{{ user `virtual_mem` }}" ],
      [ "-serial", "file:serial.out" ]
    ],
and also pass an extra (kernel) argument console=ttyS0,115200n8 to the boot command:
  "boot_command":[
    "<tab> text ",
    "console=ttyS0,115200n8 ",
    "ks=http://{{ .HTTPIP }}:{{ .HTTPPort }}/CentOS7-ks.cfg ",
    "nameserver=9.9.9.9 ",
    "<enter><wait> "
  ],
  "boot_wait": "0s",
The serial output:
to see the serial output:
$ tail -f serial.out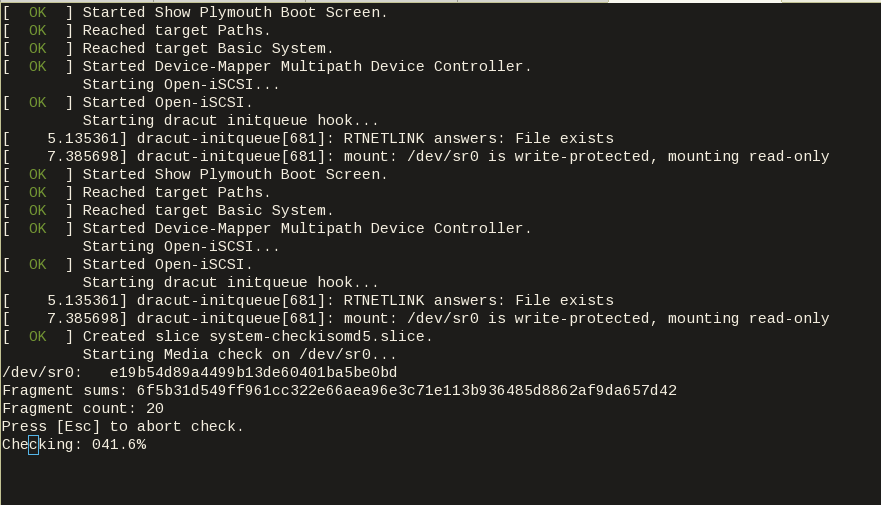
Post-Processors
When finished with the machine image, Packer can run tasks such as compress or importing the image to a cloud provider, etc.
The simpliest way to familiarize with post-processors, is to use compress:
  "post-processors":[
      {
          "type":   "compress",
          "format": "lz4",
          "output": "{{.BuildName}}.lz4"
      }
  ]
output
So here is the output:
$ packer build qemu_example.json qemu output will be in this color.
==> qemu: Downloading or copying ISO
qemu: Downloading or copying: file:///home/ebal/Downloads/CentOS-7-x86_64-Minimal-1804.iso
==> qemu: Creating hard drive...
==> qemu: Starting HTTP server on port 8099
==> qemu: Looking for available port between 5900 and 6000 on 127.0.0.1
==> qemu: Starting VM, booting from CD-ROM
qemu: The VM will be run headless, without a GUI. If you want to
qemu: view the screen of the VM, connect via VNC without a password to
qemu: vnc://127.0.0.1:5982
==> qemu: Overriding defaults Qemu arguments with QemuArgs...
==> qemu: Connecting to VM via VNC
==> qemu: Typing the boot command over VNC...
==> qemu: Waiting for shutdown...
==> qemu: Converting hard drive...
==> qemu: Running post-processor: compress
==> qemu (compress): Using lz4 compression with 4 cores for qemu.lz4
==> qemu (compress): Archiving centos7/centos7min.qcow2 with lz4
==> qemu (compress): Archive qemu.lz4 completed
Build 'qemu' finished.
==> Builds finished. The artifacts of successful builds are:
--> qemu: compressed artifacts in: qemu.lz4
info
After archiving the centos7min image the output_directory and the original qemu image is being deleted.
$ qemu-img info ./centos7/centos7min.qcow2

image: ./centos7/centos7min.qcow2
file format: qcow2
virtual size: 20G (21474836480 bytes)
disk size: 1.5G
cluster_size: 65536
Format specific information:
    compat: 1.1
    lazy refcounts: false
    refcount bits: 16
    corrupt: false

$ du -h qemu.lz4
992M    qemu.lz4
Provisioners
Last but -surely- not least packer supports Provisioners.
Provisioners are commonly used for:
- installing packages
- patching the kernel
- creating users
- downloading application code
and can be local shell scripts or more advance tools like, Ansible, puppet, chef or even powershell.
Ansible
So here is an ansible example:
$ tree testroletestrole
├── defaults
│ └── main.yml
├── files
│ └── main.yml
├── handlers
│ └── main.yml
├── meta
│ └── main.yml
├── tasks
│ └── main.yml
├── templates
│ └── main.yml
└── vars
└── main.yml
7 directories, 7 files
$ cat testrole/tasks/main.yml ---
- name: Debug that our ansible role is working
debug:
msg: "It Works !"
- name: Install the Extra Packages for Enterprise Linux repository
yum:
name: epel-release
state: present
- name: upgrade all packages
yum:
name: '*'
state: latestSo this ansible role will install epel repository and upgrade our image.
template
    "variables":{
        "playbook_name": "testrole.yml"
    },

...

    "provisioners":[
        {
            "type":          "ansible",
            "playbook_file": "{{ user `playbook_name` }}"
        }
    ],
Communicator
Ansible needs to ssh into this machine to provision it. It is time to change the communicator from none to ssh.
"communicator": "ssh",Need to add the ssh username/password to template file:
      "ssh_username": "root",
      "ssh_password": "password",
      "ssh_timeout":  "3600s",
output
$ packer build qemu_example.jsonqemu output will be in this color.
==> qemu: Downloading or copying ISO
qemu: Downloading or copying: file:///home/ebal/Downloads/CentOS-7-x86_64-Minimal-1804.iso
==> qemu: Creating hard drive...
==> qemu: Starting HTTP server on port 8100
==> qemu: Found port for communicator (SSH, WinRM, etc): 4105.
==> qemu: Looking for available port between 5900 and 6000 on 127.0.0.1
==> qemu: Starting VM, booting from CD-ROM
qemu: The VM will be run headless, without a GUI. If you want to
qemu: view the screen of the VM, connect via VNC without a password to
qemu: vnc://127.0.0.1:5990
==> qemu: Overriding defaults Qemu arguments with QemuArgs...
==> qemu: Connecting to VM via VNC
==> qemu: Typing the boot command over VNC...
==> qemu: Waiting for SSH to become available...
==> qemu: Connected to SSH!
==> qemu: Provisioning with Ansible...
==> qemu: Executing Ansible: ansible-playbook --extra-vars packer_build_name=qemu packer_builder_type=qemu -i /tmp/packer-provisioner-ansible594660041 /opt/hashicorp/packer/testrole.yml -e ansible_ssh_private_key_file=/tmp/ansible-key802434194
qemu:
qemu: PLAY [all] *********************************************************************
qemu:
qemu: TASK [testrole : Debug that our ansible role is working] ***********************
qemu: ok: [default] => {
qemu: "msg": "It Works !"
qemu: }
qemu:
qemu: TASK [testrole : Install the Extra Packages for Enterprise Linux repository] ***
qemu: changed: [default]
qemu:
qemu: TASK [testrole : upgrade all packages] *****************************************
qemu: changed: [default]
qemu:
qemu: PLAY RECAP *********************************************************************
qemu: default : ok=3 changed=2 unreachable=0 failed=0
qemu:
==> qemu: Halting the virtual machine...
==> qemu: Converting hard drive...
==> qemu: Running post-processor: compress
==> qemu (compress): Using lz4 compression with 4 cores for qemu.lz4
==> qemu (compress): Archiving centos7/centos7min.qcow2 with lz4
==> qemu (compress): Archive qemu.lz4 completed
Build 'qemu' finished.
==> Builds finished. The artifacts of successful builds are:
--> qemu: compressed artifacts in: qemu.lz4
Appendix
here is the entire qemu template file:
qemu_example.json
{

  "_comment": "This is a CentOS 7.5 Qemu Builder example",

  "description": "tMinimal CentOS 7 Qemu Imagen__________________________________________",

  "variables": {
    "7.5":      "1804",
    "checksum": "714acc0aefb32b7d51b515e25546835e55a90da9fb00417fbee2d03a62801efd",

     "virtual_name": "centos7min.qcow2",
     "virtual_dir":  "centos7",
     "virtual_size": "20480",
     "virtual_mem":  "4096M",

     "Password": "password",

     "ansible_playbook": "testrole.yml"
  },

  "builders": [
    {
        "type": "qemu",

        "headless": true,

        "iso_url": "/home/ebal/Downloads/CentOS-7-x86_64-Minimal-{{user `7.5`}}.iso",
        "iso_checksum": "{{user `checksum`}}",
        "iso_checksum_type": "sha256",

        "communicator": "ssh",

        "ssh_username": "root",
        "ssh_password": "{{user `Password`}}",
        "ssh_timeout":  "3600s",

        "boot_command":[
          "<tab> text ",
          "console=ttyS0,115200n8 ",
          "ks=http://{{ .HTTPIP }}:{{ .HTTPPort }}/CentOS7-ks.cfg ",
          "nameserver=9.9.9.9 ",
          "<enter><wait> "
        ],
        "boot_wait": "0s",

        "http_directory": "/home/ebal/Downloads/",
        "http_port_min": "8090",
        "http_port_max": "8100",

        "shutdown_timeout": "30m",

    "accelerator": "kvm",
    "disk_size":   "{{ user `virtual_size` }}",
    "format":      "qcow2",
    "qemuargs":[
        [ "-m",      "{{ user `virtual_mem` }}" ],
            [ "-serial", "file:serial.out" ]
    ],

        "vm_name":          "{{ user `virtual_name` }}",
        "output_directory": "{{ user `virtual_dir` }}"
    }
  ],

  "provisioners":[
    {
      "type":          "ansible",
      "playbook_file": "{{ user `ansible_playbook` }}"
    }
  ],

  "post-processors":[
      {
          "type":   "compress",
          "format": "lz4",
          "output": "{{.BuildName}}.lz4"
      }
  ]
}
CentOS 6
This way is been suggested for building a container image from your current centos system.
In my case, I need to remote upgrade a running centos6 system to a new clean centos7 on a test vps, without the need of opening the vnc console, attaching a new ISO etc etc.
I am rather lucky as I have a clean extra partition to this vps, so I will follow the below process to remote install a new clean CentOS 7 to this partition. Then add a new grub entry and boot into this partition.
Current OS
# cat /etc/redhat-release
CentOS release 6.9 (Final)
Format partition
format & mount the partition:
 mkfs.ext4 -L rootfs /dev/vda5
 mount /dev/vda5 /mnt/
InstallRoot
Type:
# yum -y groupinstall "Base" --releasever 7 --installroot /mnt/ --nogpgcheck
Test
test it, when finished:
mount --bind /dev/  /mnt/dev/
mount --bind /sys/  /mnt/sys/
mount --bind /proc/ /mnt/proc/

chroot /mnt/

bash-4.2#  cat /etc/redhat-release
CentOS Linux release 7.5.1804 (Core)
It works!
Root Password
inside chroot enviroment:
bash-4.2# passwd
Changing password for user root.
New password:
Retype new password:
passwd: all authentication tokens updated successfully.

bash-4.2# exit
Grub
adding the new grub entry for CentOS 7
title CentOS 7
        root (hd0,4)
        kernel /boot/vmlinuz-3.10.0-862.2.3.el7.x86_64 root=/dev/vda5 ro rhgb LANG=en_US.UTF-8
        initrd /boot/initramfs-3.10.0-862.2.3.el7.x86_64.img
by changing the default boot entry from 0 to 1 :
default=0
to
default=1
our system will boot into centos7 when reboot!
Prologue
Maintaining a (public) service can be sometimes troublesome. In case of email service, often you need to suspend or restrict users for reasons like SPAM, SCAM or Phishing. You have to deal with inactive or even compromised accounts. Protecting your infrastructure is to protect your active users and the service. In this article I’ll propose a way to restrict messages to authorized addresses when sending an email and get a bounce message explaining why their email was not sent.
Reading Material
The reference documentation when having a Directory Service (LDAP) as our user backend and using Postfix:
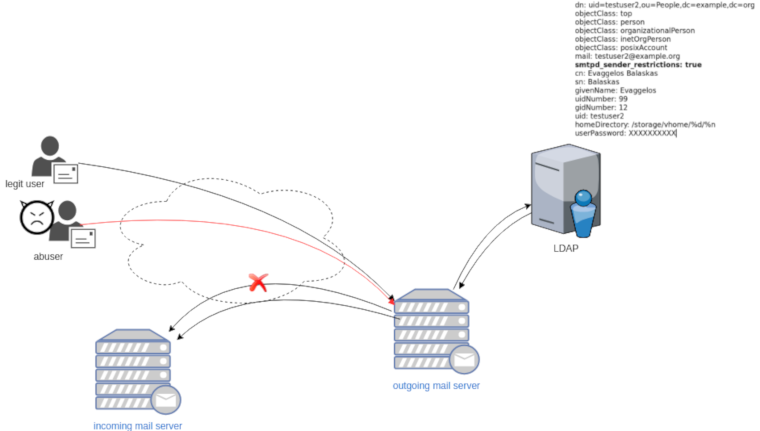
LDAP
In this post, we will not get into openldap internals but as reference I’ll show an example user account (this is from my working test lab).
dn: uid=testuser2,ou=People,dc=example,dc=org
objectClass: top
objectClass: person
objectClass: organizationalPerson
objectClass: inetOrgPerson
objectClass: posixAccount
mail: testuser2@example.org
smtpd_sender_restrictions: true
cn: Evaggelos Balaskas
sn: Balaskas
givenName: Evaggelos
uidNumber: 99
gidNumber: 12
uid: testuser2
homeDirectory: /storage/vhome/%d/%n
userPassword: XXXXXXXXXX
as you can see, we have a custom ldap attribute:
smtpd_sender_restrictions: truekeep that in mind for now.
Postfix
The default value of smtpd_sender_restrictions is empty, that means by default the mail server has no sender restrictions. Depending on the policy we either can whitelist or blacklist in postfix restrictions, for the purpose of this blog post, we will only restrict (blacklist) specific user accounts.
ldap_smtpd_sender_restrictions
To do that, let’s create a new file that will talk to our openldap and ask for that specific ldap attribute.
ldap_smtpd_sender_restrictions.cf
server_host = ldap://localhost
server_port = 389
search_base = ou=People,dc=example,dc=org
query_filter = (&(smtpd_sender_restrictions=true)(mail=%s))
result_attribute = uid
result_filter = uid
result_format = REJECT This account is not allowed to send emails, plz talk to abuse@example.org
version = 3
timeout = 5
This is an anonymous bind, as we do not search for any special attribute like password.
Status Codes
The default status code will be: 554 5.7.1
Take a look here for more info: RFC 3463 - Enhanced Mail System Status Codes
Test it
# postmap -q testuser2@example.org ldap:/etc/postfix/ldap_smtpd_sender_restrictions.cf
REJECT This account is not allowed to send emails, plz talk to abuse@example.org
Add -v to extent verbosity
# postmap -v -q testuser2@example.org ldap:/etc/postfix/ldap_smtpd_sender_restrictions.cf
Possible Errors
postmap: fatal: unsupported dictionary type: ldap
Check your postfix setup with postconf -m . The result should be something like this:
btree
cidr
environ
fail
hash
internal
ldap
memcache
nis
proxy
regexp
socketmap
static
tcp
texthash
unix
If not, you need to setup postfix to support the ldap dictionary type.
smtpd_sender_restrictions
Modify the main.cf to add the ldap_smtpd_sender_restrictions.cf
# applied in the context of the MAIL FROM
smtpd_sender_restrictions =
        check_sender_access ldap:/etc/postfix/ldap_smtpd_sender_restrictions.cf
and reload postfix
# postfix reloadIf you keep logs, tail them to see any errors.
Thunderbird
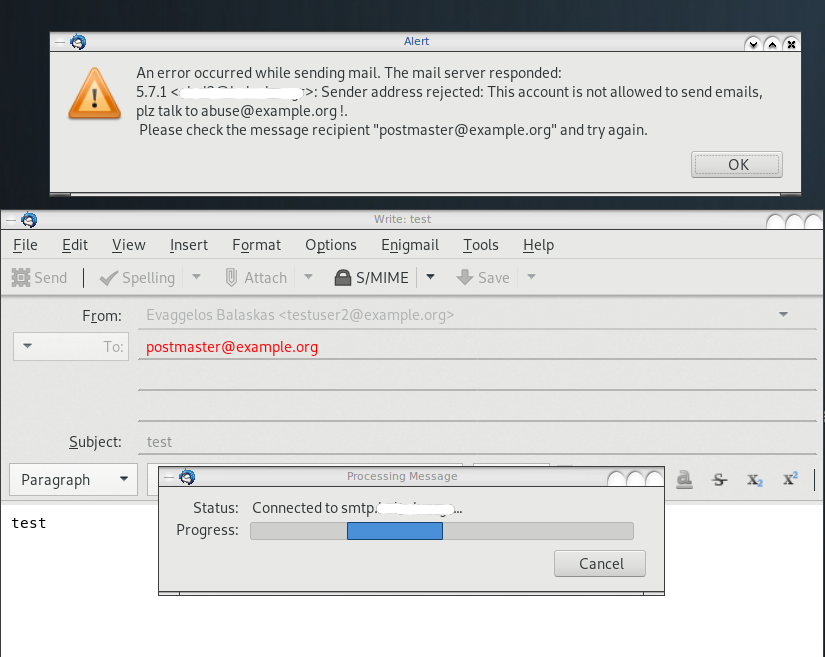
Logs
May 19 13:20:26 centos6 postfix/smtpd[20905]:
NOQUEUE: reject: RCPT from XXXXXXXX[XXXXXXXX]: 554 5.7.1 <testuser2@example.org>:
Sender address rejected: This account is not allowed to send emails, plz talk to abuse@example.org;
from=<testuser2@example.org> to=<postmaster@example.org> proto=ESMTP helo=<[192.168.0.13]>Prologue
Security
One of the most common security concerns (especially when traveling) is the attach of unknown USB device on our system.
There are a few ways on how to protect your system.
Hardware Protection
Cloud Storage
More and more companies are now moving from local storage to cloud storage as a way to reduce the attack surface on systems:
IBM a few days ago, banned portable storage devices
Hot Glue on USB Ports
also we must not forget the old but powerful advice from security researches & hackers:

by inserting glue or using a Hot Glue Gun to disable the USB ports of a system.
Problem solved!
USBGuard
I was reading the redhat 7.5 release notes and I came upon on usbguard:
The USBGuard software framework helps to protect your computer against rogue USB devices (a.k.a. BadUSB) by implementing basic whitelisting / blacklisting capabilities based on device attributes.
USB protection framework
So the main idea is you run a daemon on your system that tracks udev monitor system. The idea seams like the usb kill switch but in a more controlled manner. You can dynamical whitelist or/and blacklist devices and change the policy on such devices more easily. Also you can do all that via a graphical interface, although I will not cover it here.
Archlinux Notes
for archlinux users, you can find usbguard in AUR (Archlinux User Repository)
or you can try my custom PKGBUILDs files
How to use usbguard
Generate Policy
The very first thing is to generate a policy with the current attached USB devices.
sudo usbguard generate-policyBelow is an example output, viewing my usb mouse & usb keyboard :
allow id 17ef:6019 serial "" name "Lenovo USB Optical Mouse" hash "WXaMPh5VWHf9avzB+Jpua45j3EZK6KeLRdPcoEwlWp4=" parent-hash "jEP/6WzviqdJ5VSeTUY8PatCNBKeaREvo2OqdplND/o=" via-port "3-4" with-interface 03:01:02

allow id 045e:00db serial "" name "Naturalxc2xae Ergonomic Keyboard 4000" hash "lwGc9o+VaG/2QGXpZ06/2yHMw+HL46K8Vij7Q65Qs80=" parent-hash "kv3v2+rnq9QvYI3/HbJ1EV9vdujZ0aVCQ/CGBYIkEB0=" via-port "1-1.5" with-interface { 03:01:01 03:00:00 }
The default policy for already attached USB devices are allow.
We can create our rules configuration file by:
sudo usbguard generate-policy > /etc/usbguard/rules.conf
Service
starting and enabling usbguard service via systemd:
systemctl start usbguard.service

systemctl enable usbguard.service
List of Devices
You can view the list of attached USB devices and
sudo usbguard list-devices
Allow Device
Attaching a new USB device (in my case, my mobile phone):
$ sudo usbguard list-devices | grep -v allowwe will see that the default policy is to block it:
17: block id 12d1:107e serial "7BQDU17308005969" name "BLN-L21" hash "qq1bdaK0ETC/thKW9WXAwawhXlBAWUIowpMeOQNGQiM=" parent-hash "kv3v2+rnq9QvYI3/HbJ1EV9vdujZ0aVCQ/CGBYIkEB0=" via-port "2-1.5" with-interface { ff:ff:00 08:06:50 }So we can allow it by:
sudo usbguard allow-device 17then
sudo usbguard list-devices | grep BLN-L21we can verify that is okay:
17: allow id 12d1:107e serial "7BQDU17308005969" name "BLN-L21" hash "qq1bdaK0ETC/thKW9WXAwawhXlBAWUIowpMeOQNGQiM=" parent-hash "kv3v2+rnq9QvYI3/HbJ1EV9vdujZ0aVCQ/CGBYIkEB0=" via-port "2-1.5" with-interface { ff:ff:00 08:06:50 }
Block USB on screen lock
The default policy, when you (or someone else) are inserting a new USB device is:
sudo usbguard get-parameter InsertedDevicePolicy
apply-policy
is to apply the default policy we have. There is a way to block or reject any new USB device when you have your screen locker on, as this may be a potential security attack on your system. In theory, you are inserting USB devices as you are working on your system, and not when you have your screen lock on.
I use slock as my primary screen locker via a keyboard shortcut. So the easiest way to dynamical change the default policy on usbguard is via a shell wrapper:
vim /usr/local/bin/slock#!/bin/sh
# ebal, Sun, 13 May 2018 10:07:53 +0300
POLICY_UNLOCKED="apply-policy"
POLICY_LOCKED="reject"
# function to revert the policy
revert() {
usbguard set-parameter InsertedDevicePolicy ${POLICY_UNLOCKED}
}
trap revert SIGHUP SIGINT SIGTERM
usbguard set-parameter InsertedDevicePolicy ${POLICY_LOCKED}
/usr/bin/slock
# shell function to revert reject policy
revert(you can find the same example on redhat’s blog post).
