UPDATED: 14 February 2016
Blog Post: 16 December 2015
I have started (for some time now, to be honest) to transfer my router’s function to my ODROID-c1
that runs Archlinux arm so I have my favorite distribution on this beautiful development board.
# uname -a
Linux myodroid 3.10.80-13-ARCH #1 SMP PREEMPT Tue Sep 15 15:43:38 MDT 2015 armv7l GNU/Linux
for specs you can click here
The board has an Gigabit Ethernet port but no Wireless Card.
I had a spare USB Wireless Network card, so I’ve used it on one of the four USB slots of the board.
Bus 001 Device 003: ID 148f:3370 Ralink Technology, Corp. RT3370 Wireless Adapter
You need to verify that your wireless card, can support Access Point functionality.
To verify your card, type:
# iw list | grep AP
if you see something like that: #{ AP } then you probably are ok.
The most important thing is to find out what your card can do, mine:
        valid interface combinations:
                 * #{ AP } <= 8,
                   total <= 8, #channels <= 1
That means that I can configure up to 8 AP (Access Points), 8 different ssid but only on one channel !
Reading through the internet (mostly on archlinux wiki) I had, first, to create a Bridge with my Ethernet card and then hostapd will add my Wireless Card to the same bridge.
Although I use systemd for a while sometime, I wasnt able to create the bridge interface via systemd. I’ve tested my confs/files to a secondary linux machine and I know for a fact that my notes are correct. Somehow it seems that there is a problem with systemd on ODROID-c1 regarding this or perhaps I havent found the problem with my setup!
So I’ve created a shell script that runs after boot: net.sh
!/bin/sh

ip link add br0 type bridge
ip link set br0 up

ip link set eth0 up
ip link set eth0 master br0

ip addr add 10.10.10.10/24 dev br0
ip route add default via 10.10.10.1 dev br0

# Wireless Vlan (Guest Network)
ip address add 10.10.20.10/24 dev br0:0

# Enable Forwarding
sysctl -w net.ipv4.ip_forward=1

# Masquerade traffic
iptables -t nat -A POSTROUTING -o br0 -j MASQUERADE

# Accept forwarding
iptables -P FORWARD ACCEPT

# Start (or restart) hostapd
systemctl restart hostapd.service

# Isolate Vlan 10.10.20.0/24 (Guest Network) from 10.10.10.0/24 (Home Network)
iptables -I FORWARD -s 10.10.20.0/24 -d 10.10.10.0/24 -j DROP
a basic setup of hostapd is below. I’ve used TEST as the ssid and TESTTESTTEST as the password:
/etc/hostapd/hostapd.conf
interface=wlan0
bridge=br0
driver=nl80211
ctrl_interface=/var/run/hostapd
ctrl_interface_group=0
ssid=Testing
hw_mode=g
channel=1
ap_isolate=1
own_ip_addr=127.0.0.1
wpa=2
wpa_passphrase=TestingTesting
wpa_key_mgmt=WPA-PSK
On this ODROID-C1 board, I run my own DNS Cache/DHCP server with dnsmasq.
/etc/dnsmasq.conf
interface=br0
# custom host file to reduce ads
addn-hosts=/etc/hosts.txt

dhcp-range=10.10.20.16,10.10.20.32,12h
dhcp-option=option:router,10.10.20.10
dhcp-option=option:dns-server,10.10.20.10
dhcp-option=option:ntp-server,193.93.167.241
As we getting closer to the amazing 32nd Chaos Communication Congress (32C3) we must consider some privacy steps to our electronic devices.
Perhaps it’s idiotic to take a smartphone to this conference, as we all know that in such events hacking is fair play to everyone.
The below quote, from Person of Interest, reminds us exactly that:
If they don’t want you to get inside, they ought to build it better.
You should treat every network as a hostile, already compromised network.
It’s probably true, anyway !
For us mere people that we dont have many security knowledge, we need to take some extra security measures if we want to bring our smartphone together. It’s just for browsing, taking some picture from the event (and not the people, respect that please), check some emails or tweet something interesting.
Btw, if you believe that it is ok to use your smartphone/laptop on your hotel room, think again!
Where do you think all the hackers from the event are going to sleep ?
Yeap, on the same hotel. So be extra careful in places you feel more safe!
This isnt a guide you must or should follow, or even a bulletproof solution. As the subject of this blog post suggest is just a step closer. You should also remind your self in idle times (as watching a presentation) to keep your phone in airplane mode and always use TOR for browsing.
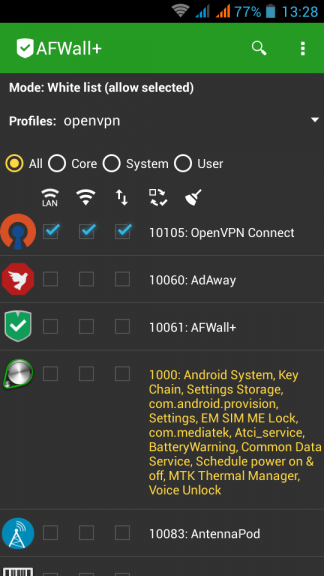
So, on a spare -just formatted- android mobile phone install AFWall+, create a new profile and BLOCK everything. Whitelist only OpenVPN.
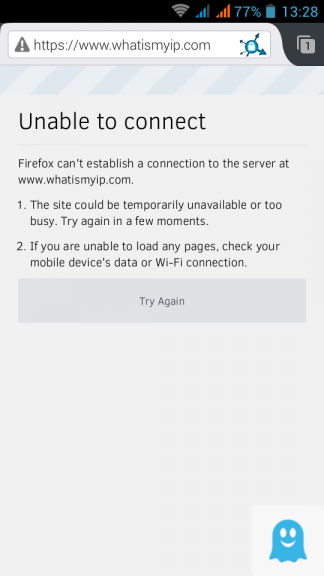
Check your browser to see that you dont have access on the internet:
Connect to your OpenVPN server and check again:
[UPDATE 2015 12 13]
How about if you could control your entire home temperature and hot water/central heating etc etc, through your smartphone over the internet ?
You are going to think that this is a dangerous IoT (Internet of Thing) that exposes your privacy to unknown attackers and your smart home is going to be under the control of an evil company.
What if I could tell you, that you can build your own smart controller with open-design/open hardware & free software that costs about €100 ?
Crazy, right ?
Actually there is a project that does exactly all the above and much more and it’s based on a Raspberry Pi.
Let me introduce you to HestiaPi .

The name comes from the greek word: εστία and everything you need to start with, have already been published by the core developer on their site.
The team behind this awesome project will host/run an open/free entrance two day Hackathon at Athens, Hackerspace on 2016.

If you are curious on the project, visit hackerspace.gr and be part of this amazing project.
First remove NetworkManager:
# systemctl stop NetworkManager

# systemctl disable NetworkManager
rm '/etc/systemd/system/multi-user.target.wants/NetworkManager.service'
rm '/etc/systemd/system/dbus-org.freedesktop.NetworkManager.service'
rm '/etc/systemd/system/dbus-org.freedesktop.nm-dispatcher.service'

# yum -y remove NetworkManager*

# /usr/bin/rm -rf /etc/NetworkManager
If you want to be more productive you should clean your system from FirewallD, install iptables-services and if you are going to install a redhat product/software disable SELinux as it’s manual going to suggest !
Now we can proceed.
# systemctl status network.service
will show us /etc/rc.d/init.d/network as the network orchestrator on the system.
Reading this file will get you a basic understanding of networking.
if [ ! -f /etc/sysconfig/network ]; then
    exit 6
fi
that tells us that file: /etc/sysconfig/network must exist on our system.
If you want to disable the network on this linux machine you can do it by adding the below declaration:
NETWORKING=no
So here are my notes for bonding:
eth0 + eth1 = bond0 with Adaptive transmit load balancing:
# cat /etc/sysconfig/network-scripts/ifcfg-em1
DEVICE=em1
MASTER=bond0
SLAVE=yes

# cat /etc/sysconfig/network-scripts/ifcfg-em2
DEVICE=em2
MASTER=bond0
SLAVE=yes
and bond0:
DEVICE=bond0

BONDING_OPTS="miimon=1 updelay=0 downdelay=0 mode=balance-tlb"
TYPE=Bond
BONDING_MASTER=yes

DNS1=xxx.xxx.xxx.xxx
GATEWAY=8.8.8.8
IPADDR=xxx.xxx.xxx.1
PREFIX=24
DEFROUTE=yes

BOOTPROTO=none
ONBOOT=yes
and as yoda would tell:
“else everything do not need you”
I had the opportunity to participate on an Athen’s Hackerspace event with a dozen debian developers about the issue with reproducible distribution’s package builds.
I had never thought of this thing before and the presentation blown me away !
So here is the deal, if you download the latest openssl package from an archlinux mirror (want archlinux users will going to do):
# pacman -Sw openssl
What if we tried to build openssl by our selfs from the PKGBUILD file ?
# cd /var/abs/core/openssl

$ makepkg -cf
==> Making package: openssl 1.0.2.e-1 (Sun Dec  6 13:07:08 EET 2015)
==> Checking runtime dependencies...
==> Checking buildtime dependencies...
==> Retrieving sources...
  -> Found openssl-1.0.2e.tar.gz
  -> Found openssl-1.0.2e.tar.gz.asc
  -> Found no-rpath.patch
  -> Found ca-dir.patch
==> Validating source files with md5sums...
    openssl-1.0.2e.tar.gz ... Passed
    openssl-1.0.2e.tar.gz.asc ... Skipped
    no-rpath.patch ... Passed
    ca-dir.patch ... Passed
==> Verifying source file signatures with gpg...
    openssl-1.0.2e.tar.gz ... Passed
==> Extracting sources...
  -> Extracting openssl-1.0.2e.tar.gz with bsdtar
==> Starting prepare()...

...
...
...

==> Leaving fakeroot environment.
==> Finished making: openssl 1.0.2.e-1 (Sun Dec  6 13:11:06 EET 2015)
==> Cleaning up...
Let’s check the md5sum:
# md5sum /var/cache/pacman/pkg/openssl-1.0.2.e-1-x86_64.pkg.tar.xz
         /var/abs/core/openssl/openssl-1.0.2.e-1-x86_64.pkg.tar.xz

b555ac4294a2f39ef0caa19e21a28355  /var/cache/pacman/pkg/openssl-1.0.2.e-1-x86_64.pkg.tar.xz
08755bad654f74b8a1c4c5386934aeea  /var/abs/core/openssl/openssl-1.0.2.e-1-x86_64.pkg.tar.xz
wat ???
why isnt both files similar exactly the same ?
Let’s find out what are the differences between these two files by using diffoscope
diffoscope --html /tmp/openssl.html
    /var/cache/pacman/pkg/openssl-1.0.2.e-1-x86_64.pkg.tar.xz
    /var/abs/core/openssl/openssl-1.0.2.e-1-x86_64.pkg.tar.xz
fire up an html browser and open /tmp/openssl.html
Read carefully the output, most of them are timestamps.
So what this fuzz is all about ?
There is a huge problem actually, we trust our distributions for privacy and security.
But what if governments have already compromised ftp mirrors or by MITM we have already installed a backdoor software?
That’s what core developers from major distributions are fighting as we speak, they are trying to engage more core developers and find a way to redistribute reproducible builds so that you can actually verify a package build on your PC.
Need to know more?
Click here: reproducible-builds
Can you help ?
take a look on diffoscope
There are some companies that have just started to dual stack (IPv4 & IPv6) their infrastructure, like twimg (the twitter hosting images site).
Reminder that IPv6 is preferable on the Internet (by design)
query[AAAA] pbs.twimg.com from 192.168.1.4
pbs.twimg.com to xxx.xxx.xxx.xxx
reply pbs.twimg.com is

reply ipv6.twimg.com is 2606:1f80:a000:102::2
reply ipv6.twimg.com is 2606:1f80:a000:106::2
reply ipv6.twimg.com is 2606:1f80:a000:105::2
reply ipv6.twimg.com is 2606:1f80:a000:107::2
reply ipv6.twimg.com is 2606:1f80:a000:104::2
reply ipv6.twimg.com is 2606:1f80:a000:100::2
reply ipv6.twimg.com is 2606:1f80:a000:101::2
reply ipv6.twimg.com is 2606:1f80:a000:103::2

query[A] pbs.twimg.com from 192.168.1.4
cached pbs.twimg.com is
forwarded pbs.twimg.com to xxx.xxx.xxx.xxx
reply pbs.twimg.com is

reply ipv6.twimg.com is 104.244.43.103
reply ipv6.twimg.com is 104.244.43.231
reply ipv6.twimg.com is 104.244.43.135
reply ipv6.twimg.com is 104.244.43.39
reply ipv6.twimg.com is 104.244.43.199
reply ipv6.twimg.com is 104.244.43.71
reply ipv6.twimg.com is 104.244.43.7
reply ipv6.twimg.com is 104.244.43.167
but twitter itself, doesnt support IPv6 !
query[AAAA] twitter.com from 192.168.1.4
forwarded twitter.com to xxx.xxx.xxx.xxx
reply twitter.com is NODATA-IPv6

query[A] twitter.com from 192.168.1.4
forwarded twitter.com to xxx.xxx.xxx.xxx
reply twitter.com is 199.16.156.102
reply twitter.com is 199.16.156.70
reply twitter.com is 199.16.156.38
reply twitter.com is 199.16.156.6
So below is the result on IPv4 twitter that calls IPv6 twimg:

UPDATE Thu Nov 26 11:28:05 EET 2015
Does SPF break forwarding?
(like in mailing lists)
- Yes, it does break forwarding.
So learn from my mistake and think this through.
Wednesday, 25 November 2015
There is a very simply way to add spf [check] support to your postfix setup.
Below are my notes on CentOS 6.7
Step One: install python policy daemon for spf
# yum -y install pypolicyd-spf
Step Two: Create a new postfix service, called spfcheck
# vim + /etc/postfix/master.cf

spfcheck     unix  -       n       n       -       -       spawn
    user=nobody argv=/usr/libexec/postfix/policyd-spf
Step Three: Add a new smtp daemon recipient restrictions
# vim +/^smtpd_recipient_restrictions /etc/postfix/main.cf
smtpd_recipient_restrictions =
    permit_mynetworks,
...
    check_policy_service unix:private/spfcheck
policy_time_limit = 3600
And that’s what we see in the end on a receiver’s source-view email:
Received-SPF: Pass (sender SPF authorized) identity=mailfrom; client-ip=xxx.xxx.xxx.xxx;
helo=server.mydomain.tld; envelope-from=user@mydomain.tld; receiver=username@example.com
where xxx.xxx.xxx.xxx is the IP of the sender mail server
server.mydomain.tld is the name of the sender mail server
user@mydomain.tld is the sender’s email address
and of-course
username@example.com is the receiver’s mail address
You can take a better look on postfix python SPF policy daemon by clicking here: python-postfix-policyd-spf
A few days ago, I gave a presentation on fosscomm 2015 about DNS, OpenNic Project and DNScrypt
So without further ado, here it is: dns_opennic_dnscrypt.pdf
I did a road trip last week and had almost 11 hours to “kill” while driving.
So I’ve downloaded an audio book to accompany me all those hours.
I chose ‘I, Robot’ a collection of short stories by Isaac Asimov.

I have to admit that although I was aware on the core beliefs and the Three Laws of Robotics, I had never had the change to read (or listen) I, Robot.
These dystopia stories captivate me from the start!
If anyone havent yet read these stories, PLZ make yourself a present and read (or listen) them.
After that, you should really watch the swedish TV series Real Humans / Äkta människor and/or the british version Humans which are about androids!
So … it seems that some router gives dhcp ipv6 prefixes for specific lans.
The default behaviour of CentOS is to autoconfigure the network interface with ifup script.
We havent finished our #ipv6 schema/deployment so we need to disable this ipv6 autoconfigure feature.
global
# vim /etc/sysconfig/network

NETWORKING_IPV6=no
IPV6FORWARDING=no
IPV6_AUTOCONF=no
interface
# vim /etc/sysconfig/network-scripts/ifcfg-eth0
IPV6INIT=no
Flushing
# ip -6 addr flush eth0

# ip -6 route flush scope global
and finally restart
# service restart network
So at athen’s hackerspace our bots made a new podcast for this season!
If you are a greek listener, take a look here: botcast s02e01
podcast
This blog post is dedicated to “rwman os” for contacting me to suggest that I was wrong !
And indeed I was !! ( <— two exclamation marks)
So this blog post create true random passwords has some mistakes and I am here to make amens.
the correct syntax on creating random passwords is this:
$ cat /dev/urandom | tr -dc $'\x21-\x7E' | head -c 21
and after further investigation (with GNU coreutils 8.23) seems that you can use octal as well:
$ cat /dev/urandom | tr -dc '\041-\176' | head -c 21
This is a list with podcasts I listen on a regular base
- Security Now Steve Gibson and Leo Laporte podcast about security news
- Hacker Public Radio Various podcasts, mostly about free software
- Talk Python To Me Podcast Podcast about python
- The Changelog The Changelog is a member supported blog, weekly newsletter and podcast that covers the intersection of software development and open source.
- ask-mrdns Matt Larson and Cricket Liu expound on DNS
- Future Thinkers Podcast Various: Obsessed with all things future: singularity, technology, spirituality, and philosophy.
- The Command Line Thomas Gideon’s podcast
- cybersecurity-initiative American politics, prosperity, and purpose in the digital age through big ideas, technological innovation
Server_A —> Server_B —> Server_C
Let’s say that we have our elasticsearch/kibana setup on Server_C
but Server_A can’t talk to Server_C.
Server_A
# tail /etc/rsyslog.d/20_central_logging.conf

*.*      @192.168.1.100:42185
& ~
Server_B
install fluentd
# wget -c http://packages.treasuredata.com.s3.amazonaws.com/2/redhat/6/x86_64/td-agent-2.2.1-0.el6.x86_64.rpm
# rpm -ivh td-agent-2.2.1-0.el6.x86_64.rpm
configure fluentd
# vim /etc/td-agent/td-agent.conf
<source>
  type syslog
  port 42185
  tag  rsyslog
</source>

<match ***>
  type forward
  send_timeout 10s
  recover_wait 10s
  heartbeat_interval 1s
  phi_threshold 16
  hard_timeout 60s

  <server>
    host 192.168.1.200
  </server>
</match>
Server C
install fluentd
# wget -c http://packages.treasuredata.com.s3.amazonaws.com/2/redhat/6/x86_64/td-agent-2.2.1-0.el6.x86_64.rpm
# rpm -ivh td-agent-2.2.1-0.el6.x86_64.rpm
configure fluentd
# vim /etc/td-agent/td-agent.conf
<match ***>
  type elasticsearch
  flush_interval 10s # for testing
  logstash_format true
</match>
PLZ Dont forget your iptables rules !!!!
UDP & TCP
One of the great features that PowerDNS has, is the concepts of ‘backends’.
Backends give you the ability to choose the datastore you would like to save (or not) your dns data. If you are looking to migrate from another dns server (lets say bind ics) with bind zone files support, then you can choose the bind backend, copy the files and voila !
PowerDNS can also support multiple backends. So you can build/test your “new” infrastructure without compromise any existing data structure or as the consultants love to say: “With no-downtime!” Another approach is that you can add support for provisioning automate mechanism or whatever else you can think of !
A very good example of Pipe Backend is the PowerDNS Dynamic Reverse script that @kargig has modified to support reverse ipv6 responses (amazing, right ?).
I have a few (half–baked) ideas that I would like to implement with PowerDNS and I was looking on Remote Backend. It took me some time to understand the logic behind this (as I am not a developer, nor I will ever be!) and create a proof of concept script.
So this is my initial script, that I would like to share:
pdns remote - pipe
It doesnt do anything (yet), just sends everything to your syslog (/var/log/messages) for debugging.
The key to success is this quote:
You must always reply with JSON hash with at least one key, ‘result’
This amazing Free Software Foundation - Europe has a “Spread the word” page that promotes freedom via stickers [0].
One of my all time favorite sticker is the
There is no cloud, just other people’s computers

but it is in pdf format.
I am avoiding flash and pdf in general and someone asked on twitter an SVG format.
Without any delay, the fsfe published the scribus source files!
You can find the .sla files here and a SVG format here: FSFE_No_Cloud_120×120-001.svg.
I strongly advice you, to help, promote and donate to this amazing foundation.
You can also translate the stickers to your native language and help spreading the freedom message to everybody.
[0] https://fsfe.org/contribute/spreadtheword.en.html
I am really disappointed about some of mozilla’s decisions.
One of them is the pocket integration.
Serves no purpose at all to embed a company’s add-on,
inside firefox without the choice of remove it!
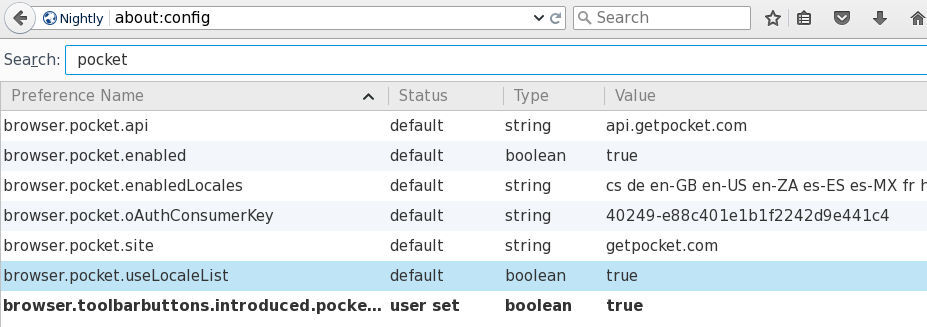
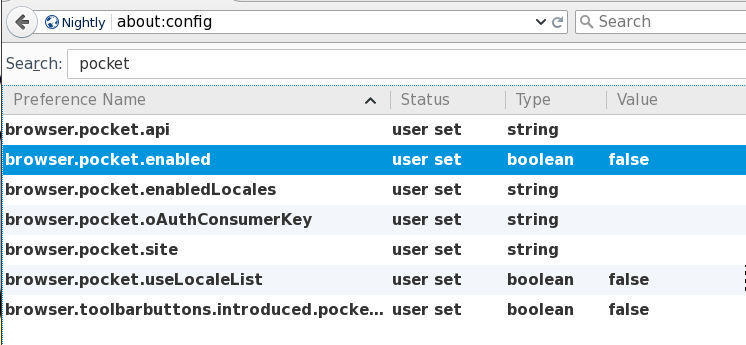
So here is how to disable it :
open about:config and search for pocket

empty every string and change every boolean value to false:

Systemd Timers
It’s time to see an example on timers in systemd.
Intro
Before we start, let’s clarify some things.
systemd’s Timers are units. Units are the simplest form of systemd files. Units are describing “when and if” a unit service “should or must” run, based on real or relative time.
-
A real time example is similar to a cron job entry. You can find out all the configuration settings/values for OnCalendar here.
-
A relative time example is more close to something like:
“Run this unit service, ten minutes after boot, before this service and also that services must have already been started cause I am depend on them.”
List of systemd-timers
To view the declared timers on a systemd, run the below command:
$ systemctl list-timers
we can see all timers, even the in-active ones, with:
# systemctl list-timers --all
one simple example
ok, let’s start with an example.
I’ll use the /usr/local/bin directory to store my custom scripts, as this directory is in the PATH enviroment variable and I can run these scripts from anywhere.
Our systemd unit files, must be under the /etc/systemd/system/ directory.
Part One: The Script
As an example, the script will mount some volumes after boot time.
The basic script contents the below lines:
# cat /usr/local/bin/mount.volumes.sh
#!/bin/sh

/usr/bin/mount /mnt/backup
/usr/bin/mount /var/lib/docker
and make it executable:
# chmod +x /usr/local/bin/mount.volumes.sh
You can run this script, once or twice to see if everything goes as planned.
Part Two: The Service
Now it’s time to create a systemd service unit:
# vim /etc/systemd/system/mount.volumes.service
[Unit]
Description=Mount Backup & Docker Volume Service

[Service]
Type=simple
ExecStart=/usr/local/bin/mount.volumes.sh

[Install]
WantedBy=multi-user.target
Part Three: The Timer
Now it is time to create the systemd timer unit:
# vim /etc/systemd/system/mount.volumes.timer
We have to decide when we want to service to run.
eg. Every day, but 45sec after boot
[Unit]
Description=Mount Backup & Docker Volume @ reboot

[Timer]
OnBootSec=45sec
OnUnitActiveSec=1day
Unit=mount.volumes.service

[Install]
WantedBy=multi-user.target-
Time to wait after booting before we run first time: OnBootSec
-
Time between running each consecutive time: OnUnitActiveSec
voila !
Part Four: Enable Service
Be aware, we havent finished yet!
Check that systemd can identify these files:
# systemctl list-unit-files | egrep mount.volumes
mount.volumes.service  disabled
mount.volumes.timer    disabled
We can run the systemd service by hand:
# systemctl start mount.volumes.servicee
and see the ouput/results via journalct:
# journalctl -f
Part Five: Enable Timer
finally we need to start & enable (so that runs after reboot) the timer:
start
# systemctl start mount.volumes.timer
enable
# systemctl enable mount.volumes.timer
Created symlink /etc/systemd/system/multi-user.target.wants/mount.volumes.timer → /etc/systemd/system/mount.volumes.timer.after that:
# systemctl list-timers | egrep mount.volume
Sat 2018-01-27 09:51:01 EET 23h left Fri 2018-01-26 09:51:01 EET 1min 16s ago mount.volumes.timer mount.volumes.serviceverify
# systemctl list-unit-files | egrep mount.volume
systemctl list-unit-files | egrep mount.volume
mount.volumes.service                                            disabled
mount.volumes.timer                                              enabled
To all the systemd haters, I KNOW, its one line on crontab !


