40 Lessons for a New Kind of Entrepreneur
Derek Sivers tells his story of “10 years of experience in one hour”.
Book link

This is now one of my all time favorite books
You are thinking: 1 hour and 31 minutes ?
Yes, it is short in length, however every phrase in this book is pure gold!
You are going to re-listen this audiobook (or re-read it) many many times.
quotes about customers:
Never forget that absolutely everything you do is for your customers.
None of your customers will ask you to turn your attention to expanding.
The way to grow your business is to focus entirely on your existing customers.
Recently I needed to create a Nested Loop in Ansible. One of the possible issues I had to consider, was the backward compatibility with both Ansible v1 and Ansible v2. A few days after, Ansible 2.5 introduced the the loop keyword and you can read a comprehensive blog entry here: Loop: Plays in the future, items in the past.
So here are my notes on the subject:
Variables
Below is a variable yaml file for testing purposes:
vars.yml
---
  days:
  - Monday
  - Tuesday
  - Wednesday
  - Thursday
  - Friday
  - Saturday
  - Sunday
  months:
  - January
  - February
  - March
  - April
  - May
  - June
  - July
  - August
  - September
  - October
  - November
  - December
Ansible v1
Let’s start with Ansible v1:
# ansible --versionansible 1.9.6
configured module search path = NonePlaybook
Below a very simple ansible-playbook example that supports nested loops:
---
- hosts: localhost
gather_facts: no
vars_files:
- vars.yml
tasks:
- name: "This is a simple test"
debug:
msg: "Day: {{ item[0] }} exist in Month: {{ item[1] }}"
with_nested:
- "{{ days }}"
- "{{ months }}"This playbook doesnt do much.
Prints a message for every day and every month.
Ansible-Playbook
Run locally the playbook by:
# ansible-playbook nested.yml -c local -l localhost -i "localhost," the output:
PLAY [localhost] ******************************
TASK: [This is a simple test] *****************
ok: [localhost] => (item=['Monday', 'January']) => {
"item": [
"Monday",
"January"
],
"msg": "Day: Monday exist in Month: January"
}
...
ok: [localhost] => (item=['Sunday', 'December']) => {
"item": [
"Sunday",
"December"
],
"msg": "Day: Sunday exist in Month: December"
}
PLAY RECAP *************************************
localhost : ok=1 changed=0 unreachable=0 failed=0
Messages
There are seven (7) days and twelve (12) months, so the output must print: 7*12 = 84 messages.
Counting the messages:
# ansible-playbook nested.yml -c local -l localhost -i "localhost," | egrep -c msg84
Time
Measuring the time it needs to pass through the nested-loop:
time ansible-playbook nested.yml -c local -l localhost -i "localhost," &> /dev/null real 0m0.448s
user 0m0.406s
sys 0m0.040s0.448s nice!
Ansible v2
Running the same playbook in latest ansible:
# ansible-playbook nested.yml -c local -l localhostseems to still work!
Compatibility issues: Resolved!
Counting the messages
# ansible-playbook nested.yml | egrep -c msg84
Time
# time ansible-playbook nested.yml &> /dev/null real 0m7.396s
user 0m7.575s
sys 0m0.172s7.396s !!!
that is 7seconds more than ansible v1.
Complex Loops
The modern way, is to use the loop keyword with the nested lookup plugin:
---
- hosts: localhost
gather_facts: no
vars_files:
- vars.yml
tasks:
- name: "This is a simple test"
debug:
msg: "Day: {{ item[0] }} exist in Month: {{ item[1] }}"
loop: "{{ lookup('nested', days, month) }}"Time
# time ansible-playbook lookup_loop.yml &> /dev/null real 0m7.975s
user 0m8.169s
sys 0m0.177s7.623s
[notes based on a docker centos5]
# cat /etc/redhat-release
CentOS release 5.11 (Final)Setup Enviroment
Install compiler:
# yum -y install gcc make
Install zlib headers:
# yum -y install zlib-devel
Install tools:
# yum -y install curl unzip
SSL/TLS Errors
If you are on a CentOS 5x machine, when trying to download files from the internet, you will get this error msg:
This is a brown out of TLSv1 support. TLSv1 support is going away soon, upgrade to a TLSv1.2+ capable client.or
SSL routines:SSL23_GET_SERVER_HELLO:tlsv1 alert protocol versionthat is because CentOS 5x has an old cipher suite that doesnt work with today’s standards.
OpenSSL
To bypass these SSL/TLS errors, we need to install a recent version of openssl.
# cd /root/
# curl -LO https://www.openssl.org/source/openssl-1.0.2o.tar.gz
# tar xf openssl*.tar.gz
# cd openssl*
# ./Configure shared linux-x86_64
# make
# make installThe output has a useful info:
OpenSSL shared libraries have been installed in:
/usr/local/sslSo, we have to update the system’s library paths, to include this one:
# echo "/usr/local/ssl/lib/" >> /etc/ld.so.conf
# /sbin/ldconfigPython 2.7
Download the latest Python2.7
# cd /root/
# curl -LO https://www.python.org/ftp/python/2.7.14/Python-2.7.14.tgz
# tar xf Python*.tgz
# cd Python*Install Python:
# ./configure --prefix=/opt/Python27 --enable-shared
# make
# make installPATH
# export PATH=/opt/Python27/bin/:$PATH
# python -c "import ssl; print(ssl.OPENSSL_VERSION)"OpenSSL 1.0.2o 27 Mar 2018SetupTools
Download the latest setuptools
# cd /root/
# export PYTHONHTTPSVERIFY=0
# python -c 'import urllib; urllib.urlretrieve ("https://pypi.python.org/packages/72/c2/c09362ab29338413ab687b47dab03bab4a792e2bbb727a1eb5e0a88e3b86/setuptools-39.0.1.zip", "setuptools-39.0.1.zip")'
Install setuptools
# unzip setuptools*.zip
# cd setuptools*
# python2.7 setup.py build
# python2.7 setup.py installPIP
Install PIP
# cd /root/
# easy_install pip
Searching for pip
Reading https://pypi.python.org/simple/pip/
Downloading https://pypi.python.org/packages/4b/5a/8544ae02a5bd28464e03af045e8aabde20a7b02db1911a9159328e1eb25a/pip-10.0.0b1-py2.py3-none-any.whl#md5=34dd54590477e79bc681d9ff96b9fd39
Best match: pip 10.0.0b1
Processing pip-10.0.0b1-py2.py3-none-any.whl
Installing pip-10.0.0b1-py2.py3-none-any.whl to /opt/Python27/lib/python2.7/site-packages
writing requirements to /opt/Python27/lib/python2.7/site-packages/pip-10.0.0b1-py2.7.egg/EGG-INFO/requires.txt
Adding pip 10.0.0b1 to easy-install.pth file
Installing pip script to /opt/Python27/bin
Installing pip3.6 script to /opt/Python27/bin
Installing pip3 script to /opt/Python27/bin
Installed /opt/Python27/lib/python2.7/site-packages/pip-10.0.0b1-py2.7.egg
Processing dependencies for pip
Finished processing dependencies for pip
Ansible
Now, we are ready to install ansible
# pip install ansible
Collecting ansible
/opt/Python27/lib/python2.7/site-packages/pip-10.0.0b1-py2.7.egg/pip/_vendor/urllib3/util/ssl_.py:339: SNIMissingWarning: An HTTPS request has been made, but the SNI (Subject Name Indication) extension to TLS is not available on this platform. This may cause the server to present an incorrect TLS certificate, which can cause validation failures. You can upgrade to a newer version of Python to solve this. For more information, see https://urllib3.readthedocs.io/en/latest/advanced-usage.html#ssl-warnings
SNIMissingWarning
Using cached ansible-2.5.0-py2.py3-none-any.whl
Collecting paramiko (from ansible)
Using cached paramiko-2.4.1-py2.py3-none-any.whl
Collecting cryptography (from ansible)
Using cached cryptography-2.2.2-cp27-cp27m-manylinux1_x86_64.whl
Requirement already satisfied: setuptools in /opt/Python27/lib/python2.7/site-packages/setuptools-39.0.1-py2.7.egg (from ansible) (39.0.1)
Collecting PyYAML (from ansible)
Using cached PyYAML-3.12.tar.gz
Collecting jinja2 (from ansible)
Using cached Jinja2-2.10-py2.py3-none-any.whl
Collecting pyasn1>=0.1.7 (from paramiko->ansible)
Using cached pyasn1-0.4.2-py2.py3-none-any.whl
Collecting bcrypt>=3.1.3 (from paramiko->ansible)
Using cached bcrypt-3.1.4-cp27-cp27m-manylinux1_x86_64.whl
Collecting pynacl>=1.0.1 (from paramiko->ansible)
Using cached PyNaCl-1.2.1-cp27-cp27m-manylinux1_x86_64.whl
Collecting six>=1.4.1 (from cryptography->ansible)
Using cached six-1.11.0-py2.py3-none-any.whl
Collecting cffi>=1.7; platform_python_implementation != "PyPy" (from cryptography->ansible)
Using cached cffi-1.11.5-cp27-cp27m-manylinux1_x86_64.whl
Collecting enum34; python_version < "3" (from cryptography->ansible)
Using cached enum34-1.1.6-py2-none-any.whl
Collecting asn1crypto>=0.21.0 (from cryptography->ansible)
Using cached asn1crypto-0.24.0-py2.py3-none-any.whl
Collecting idna>=2.1 (from cryptography->ansible)
Using cached idna-2.6-py2.py3-none-any.whl
Collecting ipaddress; python_version < "3" (from cryptography->ansible)
Using cached ipaddress-1.0.19.tar.gz
Collecting MarkupSafe>=0.23 (from jinja2->ansible)
Using cached MarkupSafe-1.0.tar.gz
Collecting pycparser (from cffi>=1.7; platform_python_implementation != "PyPy"->cryptography->ansible)
Using cached pycparser-2.18.tar.gz
Installing collected packages: pyasn1, six, pycparser, cffi, bcrypt, enum34, asn1crypto, idna, ipaddress, cryptography, pynacl, paramiko, PyYAML, MarkupSafe, jinja2, ansible
Running setup.py install for pycparser ... done
Running setup.py install for ipaddress ... done
Running setup.py install for PyYAML ... done
Running setup.py install for MarkupSafe ... done
Successfully installed MarkupSafe-1.0 PyYAML-3.12 ansible-2.5.0 asn1crypto-0.24.0 bcrypt-3.1.4 cffi-1.11.5 cryptography-2.2.2 enum34-1.1.6 idna-2.6 ipaddress-1.0.19 jinja2-2.10 paramiko-2.4.1 pyasn1-0.4.2 pycparser-2.18 pynacl-1.2.1 six-1.11.0
Version
# ansible --version
ansible 2.5.0
config file = None
configured module search path = [u'/root/.ansible/plugins/modules', u'/usr/share/ansible/plugins/modules']
ansible python module location = /opt/Python27/lib/python2.7/site-packages/ansible
executable location = /opt/Python27/bin/ansible
python version = 2.7.14 (default, Mar 31 2018, 20:00:21) [GCC 4.1.2 20080704 (Red Hat 4.1.2-55)]Ansible v2
# ansible -m ping localhost
localhost | SUCCESS => {
"changed": false,
"ping": "pong"
}
Ansible v1
or a previous version for testing
eg. 1.9.6
# pip install 'ansible==1.9.6'
# ansible --version
ansible 1.9.6
configured module search path = None# yum -y install python-simplejson
# ansible localhost -c local -m ping -i "localhost,"
localhost | success >> {
    "changed": false,
    "ping": "pong"
}
Possible Building Error
When building python from source, setup.py will try to look for /usr/local/ssl/ directory to find the libraries and included headers of openssl. Althouth it works from _ssl.c , it doesnt for _hashlib.c.
To fix this problem, you must manual edit the Python-2.7.14/setup.py
 869                 ssl_incs += ['/usr/local/ssl/include']
 870                 ssl_libs += ['/usr/local/ssl/lib']
the full code is:
 865         if have_any_openssl:
 866             if have_usable_openssl:
 867                 # The _hashlib module wraps optimized implementations
 868                 # of hash functions from the OpenSSL library.
 869                 ssl_incs += ['/usr/local/ssl/include']
 870                 ssl_libs += ['/usr/local/ssl/lib']
 871                 exts.append( Extension('_hashlib', ['_hashopenssl.c'],
 872                                        include_dirs = ssl_incs,
 873                                        library_dirs = ssl_libs,
 874                                        libraries = ['ssl', 'crypto']) )
 875             else:
 876                 print ("warning: openssl 0x%08x is too old for _hashlib" %
 877                        openssl_ver)
 878                 missing.append('_hashlib')
hope that helps!
YAML
YAML is a human friendly data serialization standard, especially for configuration files. Its simple to read and use.
Here is an example:
---
# A list of tasty fruits
fruits:
    - Apple
    - Orange
    - Strawberry
    - Mango
btw the latest version of yaml is: v1.2.
PyYAML
Working with yaml files in python is really easy. The python module: PyYAML must be installed in the system.
In an archlinux box, the system-wide installation of this python package, can be done by typing:
$ sudo pacman -S --noconfirm python-yaml
Python3 - Yaml Example
Save the above yaml example to a file, eg. fruits.yml
Open the Python3 Interpreter and write:
$ python3.6
Python 3.6.4 (default, Jan  5 2018, 02:35:40)
[GCC 7.2.1 20171224] on linux
Type "help", "copyright", "credits" or "license" for more information.
>>> from yaml import load
>>> print(load(open("fruits.yml")))
{'fruits': ['Apple', 'Orange', 'Strawberry', 'Mango']}
>>>
an alternative way is to write the above commands to a python file:
from yaml import load
print(load(open("fruits.yml")))
and run it from the console:
$ python3 test.py
{'fruits': ['Apple', 'Orange', 'Strawberry', 'Mango']}
Instead of print we can use yaml dump:
eg.
import yaml

yaml.dump(yaml.load(open("fruits.yml")))
'fruits: [Apple, Orange, Strawberry, Mango]n'
The return type of yaml.load is a python dictionary:
type(load(open("fruits.yml")))
<class 'dict'>
Have that in mind.
Jinja2
Jinja2 is a modern and designer-friendly templating language for Python.
As a template engine, we can use jinja2 to build complex markup (or even text) output, really fast and efficient.
Here is an jinja2 template example:
I like these tasty fruits:
* {{ fruit }}
where {{ fruit }} is a variable.
Declaring the fruit variable with some value and the jinja2 template can generate the prefarable output.
python-jinja
In an archlinux box, the system-wide installation of this python package, can be done by typing:
$ sudo pacman -S --noconfirm python-jinja
Python3 - Jinja2 Example
Below is a python3 - jinja2 example:
import jinja2

template = jinja2.Template("""
I like these tasty fruits:
* {{ fruit }}
""")

data = "Apple"
print(template.render(fruit=data))
The output of this example is:
I like these tasty fruits:
* Apple
File Template
Reading the jinja2 template from a template file, is a little more complicated than before. Building the jinja2 enviroment is step one:
env = jinja2.Environment(loader=jinja2.FileSystemLoader("./"))and Jinja2 is ready to read the template file:
template = env.get_template("t.j2")The template file: t.j2 is a litle diferrent than before:
I like these tasty fruits:
{% for fruit in fruits -%}
* {{ fruit }}
{% endfor %}
Yaml, Jinja2 and Python3
To render the template a dict of global variables must be passed. And parsing the yaml file the yaml.load returns a dictionary! So everything are in place.
Compine everything together:
from yaml import load
from jinja2 import Environment, FileSystemLoader

mydata = (load(open("fruits.yml")))

env = Environment(loader=FileSystemLoader("./"))
template = env.get_template("t.j2")

print(template.render(mydata))
and the result is:
$ python3 test.py
I like these tasty fruits:
* Apple
* Orange
* Strawberry
* Mango
A few years ago, I migrated from ICS Bind Authoritative Server to PowerDNS Authoritative Server.
Here was my configuration file:
# egrep -v '^$|#' /etc/pdns/pdns.conf

dname-processing=yes
launch=bind
bind-config=/etc/pdns/named.conf

local-address=MY_IPv4_ADDRESS
local-ipv6=MY_IPv6_ADDRESS

setgid=pdns
setuid=pdns
Α quick reminder, a DNS server is running on tcp/udp port53.
I use dnsdist (a highly DNS-, DoS- and abuse-aware loadbalancer) in-front of my pdns-auth, so my configuration file has a small change:
local-address=127.0.0.1
local-port=5353
instead of local-address, local-ipv6
You can also use pdns without dnsdist.
My named.conf looks like this:
# cat /etc/pdns/named.conf

zone "balaskas.gr" IN {
    type master;
    file "/etc/pdns/var/balaskas.gr";
};
So in just a few minutes of work, bind was no more.
You can read more on the subject here: Migrating to PowerDNS.
Converting from Bind zone files to SQLite3
PowerDNS has many features and many Backends. To use some of these features (like the HTTP API json/rest api for automation, I suggest converting to the sqlite3 backend, especially for personal or SOHO use. The PowerDNS documentation is really simple and straight-forward: SQLite3 backend
Installation
Install the generic sqlite3 backend.
On a CentOS machine type:
# yum -y install pdns-backend-sqlite
Directory
Create the directory in which we will build and store the sqlite database file:
# mkdir -pv /var/lib/pdns
Schema
You can find the initial sqlite3 schema here:
/usr/share/doc/pdns/schema.sqlite3.sql
you can also review the sqlite3 database schema from github
If you cant find the schema.sqlite3.sql file, you can always download it from the web:
# curl -L -o /var/lib/pdns/schema.sqlite3.sql  \
   https://raw.githubusercontent.com/PowerDNS/pdns/master/modules/gsqlite3backend/schema.sqlite3.sql
Create the database
Time to create the database file:
# cat /usr/share/doc/pdns/schema.sqlite3.sql | sqlite3 /var/lib/pdns/pdns.db
Migrating from files
Now the difficult part:
# zone2sql --named-conf=/etc/pdns/named.conf -gsqlite | sqlite3 /var/lib/pdns/pdns.db

100% done
7 domains were fully parsed, containing 89 records
Migrating from files - an alternative way
If you have already switched to the generic sql backend on your powerdns auth setup, then you can use: pdnsutil load-zone command.
# pdnsutil load-zone balaskas.gr /etc/pdns/var/balaskas.gr

Mar 20 19:35:34 Reading random entropy from '/dev/urandom'
Creating 'balaskas.gr'
Permissions
If you dont want to read error messages like the below:
sqlite needs to write extra files when writing to a db file
give your powerdns user permissions on the directory:
# chown -R pdns:pdns /var/lib/pdns
Configuration
Last thing, make the appropriate changes on the pdns.conf file:
## launch=bind
## bind-config=/etc/pdns/named.conf

launch=gsqlite3
gsqlite3-database=/var/lib/pdns/pdns.db
Reload Service
Restarting powerdns daemon:
# service pdns restart

Restarting PowerDNS authoritative nameserver: stopping and waiting..done
Starting PowerDNS authoritative nameserver: started
Verify
# dig @127.0.0.1 -p 5353  -t soa balaskas.gr +short

ns14.balaskas.gr. evaggelos.balaskas.gr. 2018020107 14400 7200 1209600 86400
or
# dig @ns14.balaskas.gr. -t soa balaskas.gr +short

ns14.balaskas.gr. evaggelos.balaskas.gr. 2018020107 14400 7200 1209600 86400
perfect!
Using the API
Having a database as pdns backend, means that we can use the PowerDNS API.
Enable the API
In the pdns core configuration file: /etc/pdns/pdns.conf enable the API and dont forget to type a key.
api=yes
api-key=0123456789ABCDEF
The API key is used for authorization, by sending it through the http headers.
reload the service.
Testing API
Using curl :
# curl -s -H 'X-API-Key: 0123456789ABCDEF' http://127.0.0.1:8081/api/v1/servers
The output is in json format, so it is prefable to use jq
# curl -s -H 'X-API-Key: 0123456789ABCDEF' http://127.0.0.1:8081/api/v1/servers | jq .
[
  {
    "zones_url": "/api/v1/servers/localhost/zones{/zone}",
    "version": "4.1.1",
    "url": "/api/v1/servers/localhost",
    "type": "Server",
    "id": "localhost",
    "daemon_type": "authoritative",
    "config_url": "/api/v1/servers/localhost/config{/config_setting}"
  }
]
jq can also filter the output:
# curl -s -H 'X-API-Key: 0123456789ABCDEF' http://127.0.0.1:8081/api/v1/servers | jq .[].version
"4.1.1"
Zones
Getting the entire zone from the database and view all the Resource Records - sets:
# curl -s -H 'X-API-Key: 0123456789ABCDEF' http://127.0.0.1:8081/api/v1/servers/localhost/zones/balaskas.gr
or just getting the serial:
# curl -s -H 'X-API-Key: 0123456789ABCDEF' http://127.0.0.1:8081/api/v1/servers/localhost/zones/balaskas.gr | \
  jq .serial

2018020107
or getting the content of SOA type:
# curl -s -H 'X-API-Key: 0123456789ABCDEF' http://127.0.0.1:8081/api/v1/servers/localhost/zones/balaskas.gr | \
  jq '.rrsets[] | select( .type | contains("SOA")).records[].content '

"ns14.balaskas.gr. evaggelos.balaskas.gr. 2018020107 14400 7200 1209600 86400"
Records
Creating or updating records is also trivial.
Create the Resource Record set in json format:
# cat > /tmp/test.text <<EOF
{
    "rrsets": [
        {
            "name": "test.balaskas.gr.",
            "type": "TXT",
            "ttl": 86400,
            "changetype": "REPLACE",
            "records": [
                {
                    "content": ""Test, this is a test ! "",
                    "disabled": false
                }
            ]
        }
    ]
}

EOF
and use the http Patch method to send it through the API:
# curl -s -X PATCH -H 'X-API-Key: 0123456789ABCDEF' --data @/tmp/test.text \
    http://127.0.0.1:8081/api/v1/servers/localhost/zones/balaskas.gr | jq .
Verify Record
We can use dig internal:
# dig -t TXT test.balaskas.gr @127.0.0.1 -p 5353 +short
"Test, this is a test ! "
querying public dns servers:
$ dig test.balaskas.gr txt +short @8.8.8.8
"Test, this is a test ! "

$ dig test.balaskas.gr txt +short @9.9.9.9
"Test, this is a test ! "
or via the api:
# curl -s -H 'X-API-Key: 0123456789ABCDEF' http://127.0.0.1:8081/api/v1/servers/localhost/zones/balaskas.gr | \
   jq '.rrsets[].records[] | select (.content | contains("test")).content'

""Test, this is a test ! ""
That’s it.
ACME v2 and Wildcard Certificate Support is Live
We have some good news, letsencrypt support wildcard certificates! For more details click here.
The key phrase on the post is this:
Certbot has ACME v2 support since Version 0.22.0.
unfortunately -at this momment- using certbot on a centos6 is not so trivial, so here is an alternative approach using:
acme.sh
acme.sh is a pure Unix shell script implementing ACME client protocol.
# curl -LO https://github.com/Neilpang/acme.sh/archive/2.7.7.tar.gz
# tar xf 2.7.7.tar.gz
# cd acme.sh-2.7.7/
[acme.sh-2.7.7]# ./acme.sh --version
https://github.com/Neilpang/acme.sh
v2.7.7PowerDNS
I have my own Authoritative Na,e Server based on powerdns software.
PowerDNS has an API for direct control, also a built-in web server for statistics.
To enable these features make the appropriate changes to pdns.conf
api=yes
api-key=0123456789ABCDEF
webserver-port=8081
and restart your pdns service.
To read more about these capabilities, click here: Built-in Webserver and HTTP API
testing the API:
# curl -s -H 'X-API-Key: 0123456789ABCDEF' http://127.0.0.1:8081/api/v1/servers/localhost | jq .
{
  "zones_url": "/api/v1/servers/localhost/zones{/zone}",
  "version": "4.1.1",
  "url": "/api/v1/servers/localhost",
  "type": "Server",
  "id": "localhost",
  "daemon_type": "authoritative",
  "config_url": "/api/v1/servers/localhost/config{/config_setting}"
}
Enviroment
export PDNS_Url="http://127.0.0.1:8081"
export PDNS_ServerId="localhost"
export PDNS_Token="0123456789ABCDEF"
export PDNS_Ttl=60
Prepare Destination
I want to save the certificates under /etc/letsencrypt directory.
By default, acme.sh will save certificate files under /root/.acme.sh/balaskas.gr/ path.
I use selinux and I want to save them under /etc and on similar directory as before, so:
# mkdir -pv /etc/letsencrypt/acme.sh/balaskas.gr/
Create WildCard Certificate
Run:
# ./acme.sh
  --issue
  --dns dns_pdns
  --dnssleep 30
  -f
  -d balaskas.gr
  -d *.balaskas.gr
  --cert-file /etc/letsencrypt/acme.sh/balaskas.gr/cert.pem
  --key-file  /etc/letsencrypt/acme.sh/balaskas.gr/privkey.pem
  --ca-file   /etc/letsencrypt/acme.sh/balaskas.gr/ca.pem
  --fullchain-file /etc/letsencrypt/acme.sh/balaskas.gr/fullchain.pem
HSTS
Using HTTP Strict Transport Security means that the browsers probably already know that you are using a single certificate for your domains. So, you need to add every domain in your wildcard certificate.
Web Server
Change your VirtualHost
from something like this:
SSLCertificateFile /etc/letsencrypt/live/balaskas.gr/cert.pem
SSLCertificateKeyFile /etc/letsencrypt/live/balaskas.gr/privkey.pem
Include /etc/letsencrypt/options-ssl-apache.conf
SSLCertificateChainFile /etc/letsencrypt/live/balaskas.gr/chain.pem
to something like this:
SSLCertificateFile    /etc/letsencrypt/acme.sh/balaskas.gr/cert.pem
SSLCertificateKeyFile /etc/letsencrypt/acme.sh/balaskas.gr/privkey.pem
Include /etc/letsencrypt/options-ssl-apache.conf
SSLCertificateChainFile /etc/letsencrypt/acme.sh/balaskas.gr/fullchain.pem
and restart your web server.
Browser

Quallys

Validation
X509v3 Subject Alternative Name
# openssl x509 -text -in /etc/letsencrypt/acme.sh/balaskas.gr/cert.pem | egrep balaskas
        Subject: CN=balaskas.gr
DNS:*.balaskas.gr, DNS:balaskas.grContinuous Deployment with GitLab: how to build and deploy a RPM Package with GitLab CI
I would like to automate building custom rpm packages with gitlab using their CI/CD functionality. This article is a documentation of my personal notes on the matter.
[updated: 2018-03-20 gitlab-runner Possible Problems]
Installation
You can find notes on how to install gitlab-community-edition here: Installation methods for GitLab. If you are like me, then you dont run a shell script on you machines unless you are absolutely sure what it does. Assuming you read script.rpm.sh and you are on a CentOS 7 machine, you can follow the notes below and install gitlab-ce manually:
Import gitlab PGP keys
# rpm --import https://packages.gitlab.com/gitlab/gitlab-ce/gpgkey

# rpm --import https://packages.gitlab.com/gitlab/gitlab-ce/gpgkey/gitlab-gitlab-ce-3D645A26AB9FBD22.pub.gpg
Gitlab repo
# curl -s 'https://packages.gitlab.com/install/repositories/gitlab/gitlab-ce/config_file.repo?os=centos&dist=7&source=script' \
  -o /etc/yum.repos.d/gitlab-ce.repo
Install Gitlab
# yum -y install gitlab-ceConfiguration File
The gitlab core configuration file is /etc/gitlab/gitlab.rb
Remember that every time you make a change, you need to reconfigure gitlab:
# gitlab-ctl reconfigureMy VM’s IP is: 192.168.122.131. Update the external_url to use the same IP or add a new entry on your hosts file (eg. /etc/hosts).
external_url 'http://gitlab.example.com'Run: gitlab-ctl reconfigure for updates to take effect.
Firewall
To access the GitLab dashboard from your lan, you have to configure your firewall appropriately.
You can do this in many ways:
-
Accept everything on your http service
# firewall-cmd --permanent --add-service=http -
Accept your lan:
# firewall-cmd --permanent --add-source=192.168.122.0/24 -
Accept only tcp IPv4 traffic from a specific lan
# firewall-cmd --permanent --direct --add-rule ipv4 filter INPUT 0 -p tcp -s 192.168.0.0/16 -j ACCEPT
or you can complete stop firewalld (but not recommended)
- Stop your firewall
# systemctl stop firewalld
okay, I think you’ve got the idea.
Reload your firewalld after every change on it’s zones/sources/rules.
# firewall-cmd --reload
successBrowser
Point your browser to your gitlab installation:
http://192.168.122.131/this is how it looks the first time:
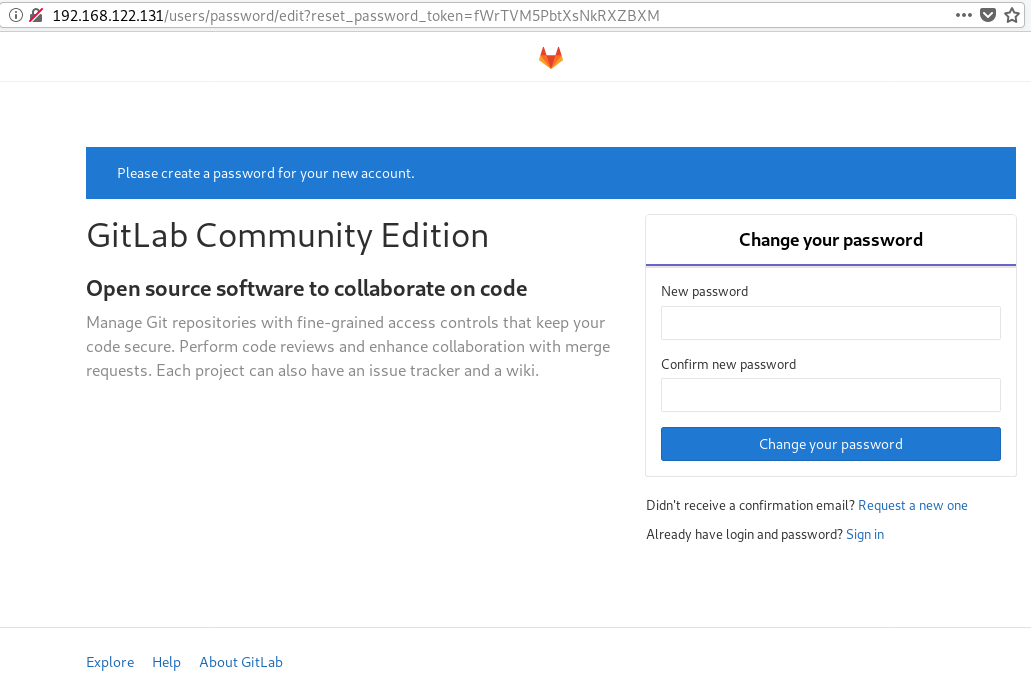
and your first action is to Create a new password by typing a password and hitting the Change your password button.
Login

First Page

New Project
I want to start this journey with a simple-to-build project, so I will try to build libsodium,
a modern, portable, easy to use crypto library.
New project --> Blank project
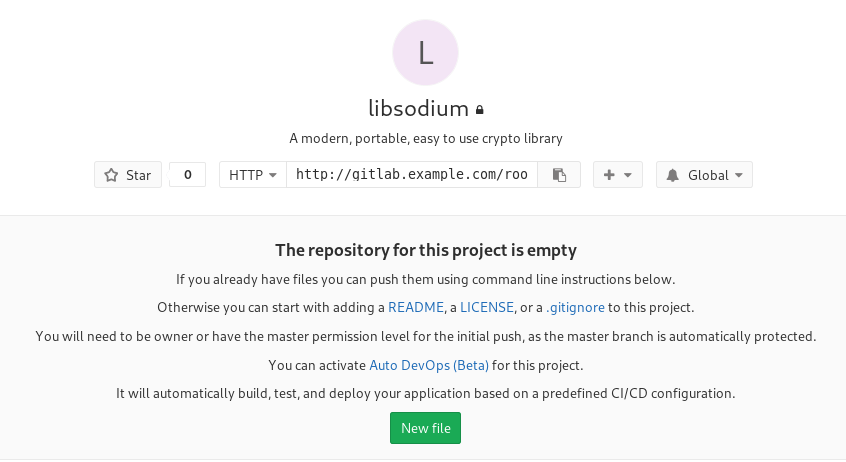
I will use this libsodium.spec file as the example for the CI/CD.
Docker
The idea is to build out custom rpm package of libsodium for CentOS 6, so we want to use docker containers through the gitlab CI/CD. We want clean & ephemeral images, so we will use containers as the building enviroments for the GitLab CI/CD.
Installing docker is really simple.
Installation
# yum -y install docker Run Docker
# systemctl restart docker
# systemctl enable  docker
Download image
Download a fresh CentOS v6 image from Docker Hub:
# docker pull centos:6 Trying to pull repository docker.io/library/centos ...
6: Pulling from docker.io/library/centos
ca9499a209fd: Pull complete
Digest: sha256:551de58ca434f5da1c7fc770c32c6a2897de33eb7fde7508e9149758e07d3fe3View Docker Images
# docker imagesREPOSITORY TAG IMAGE ID CREATED SIZE
docker.io/centos 6 609c1f9b5406 7 weeks ago 194.5 MBGitlab Runner
Now, it is time to install and setup GitLab Runner.
In a nutshell this program, that is written in golang, will listen to every change on our repository and run every job that it can find on our yml file. But lets start with the installation:
# curl -s 'https://packages.gitlab.com/install/repositories/runner/gitlab-runner/config_file.repo?os=centos&dist=7&source=script' \
  -o /etc/yum.repos.d/gitlab-runner.repo

# yum -y install gitlab-runner
GitLab Runner Settings
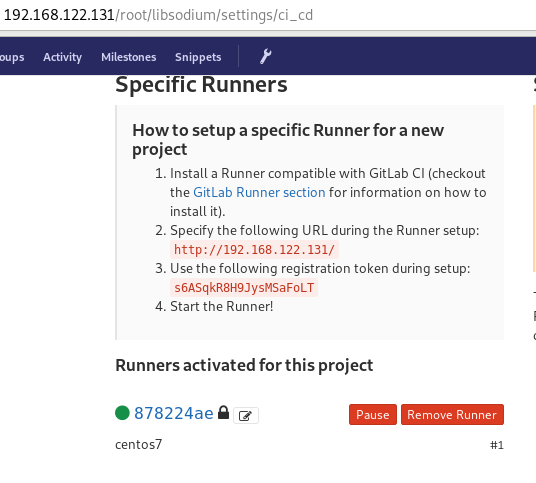
We need to connect our project with the gitlab-runner.
Project --> Settings --> CI/CDor in our example:
http://192.168.122.131/root/libsodium/settings/ci_cd
click on the expand button on Runner’s settings and you should see something like this:

Register GitLab Runner
Type into your terminal:
# gitlab-runner registerfollowing the instructions
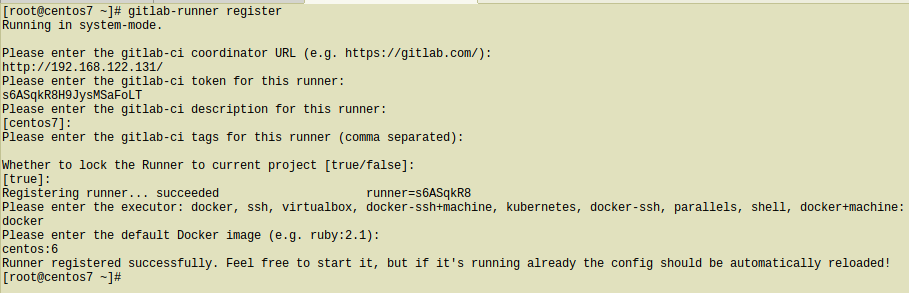
[root@centos7 ~]# gitlab-runner register
Running in system-mode.

Please enter the gitlab-ci coordinator URL (e.g. https://gitlab.com/):
http://192.168.122.131/

Please enter the gitlab-ci token for this runner:
s6ASqkR8H9JysMSaFoLT

Please enter the gitlab-ci description for this runner:
[centos7]:

Please enter the gitlab-ci tags for this runner (comma separated):

Whether to lock the Runner to current project [true/false]:
[true]:

Registering runner... succeeded                     runner=s6ASqkR8

Please enter the executor: docker, ssh, virtualbox, docker-ssh+machine, kubernetes, docker-ssh, parallels, shell, docker+machine:
docker

Please enter the default Docker image (e.g. ruby:2.1):
centos:6

Runner registered successfully. Feel free to start it, but if it's running already the config should be automatically reloaded!
[root@centos7 ~]#
by refreshing the previous page we will see a new active runner on our project.
The Docker executor
We are ready to setup our first executor to our project. That means we are ready to run our first CI/CD example!
In gitlab this is super easy, just add a
New file --> Template --> gitlab-ci.yml --> based on bashDont forget to change the image from busybox:latest to centos:6

that will start a pipeline
GitLab Continuous Integration
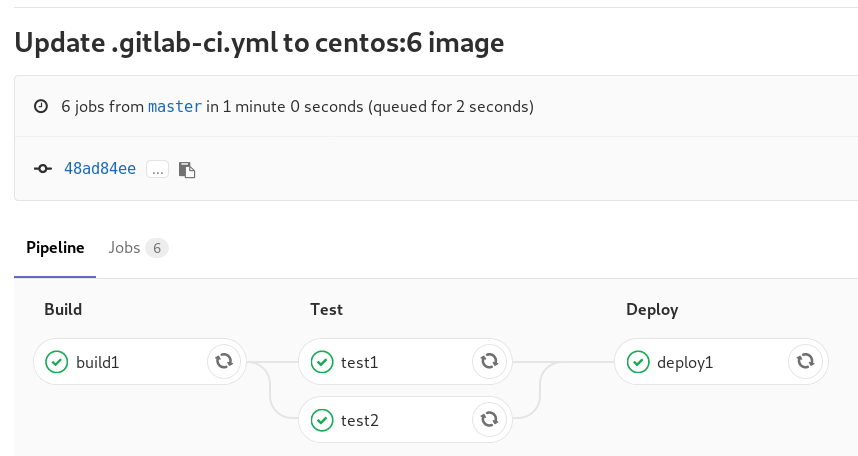
Below is a gitlab ci test file that builds the rpm libsodium :
.gitlab-ci.yml
image: centos:6

before_script:
  - echo "Get the libsodium version and name from the rpm spec file"
  - export LIBSODIUM_VERS=$(egrep '^Version:' libsodium.spec | awk '{print $NF}')
  - export LIBSODIUM_NAME=$(egrep '^Name:'    libsodium.spec | awk '{print $NF}')

run-build:
  stage: build
  artifacts:
    untracked: true
  script:
    - echo "Install rpm-build package"
    - yum -y install rpm-build
    - echo "Install BuildRequires"
    - yum -y install gcc
    - echo "Create rpmbuild directories"
    - mkdir -p rpmbuild/{BUILD,RPMS,SOURCES,SPECS,SRPMS}
    - echo "Download source file from github"
    - curl -s -L https://github.com/jedisct1/$LIBSODIUM_NAME/releases/download/$LIBSODIUM_VERS/$LIBSODIUM_NAME-$LIBSODIUM_VERS.tar.gz -o rpmbuild/SOURCES/$LIBSODIUM_NAME-$LIBSODIUM_VERS.tar.gz
    - rpmbuild -D "_topdir `pwd`/rpmbuild" --clean -ba `pwd`/libsodium.spec

run-test:
  stage: test
  script:
    - echo "Test it, Just test it !"
    - yum -y install rpmbuild/RPMS/x86_64/$LIBSODIUM_NAME-$LIBSODIUM_VERS-*.rpm

run-deploy:
  stage: deploy
  script:
    - echo "Do your deploy here"
GitLab Artifacts
Before we continue I need to talk about artifacts
Artifacts is a list of files and directories that we produce at stage jobs and are not part of the git repository. We can pass those artifacts between stages, but you have to remember that gitlab can track files that only exist under the git-clone repository and not on the root fs of the docker image.
GitLab Continuous Delivery
We have successfully build an rpm file!! Time to deploy it to another machine. To do that, we need to add the secure shell private key to gitlab secret variables.
Project --> Settings --> CI/CD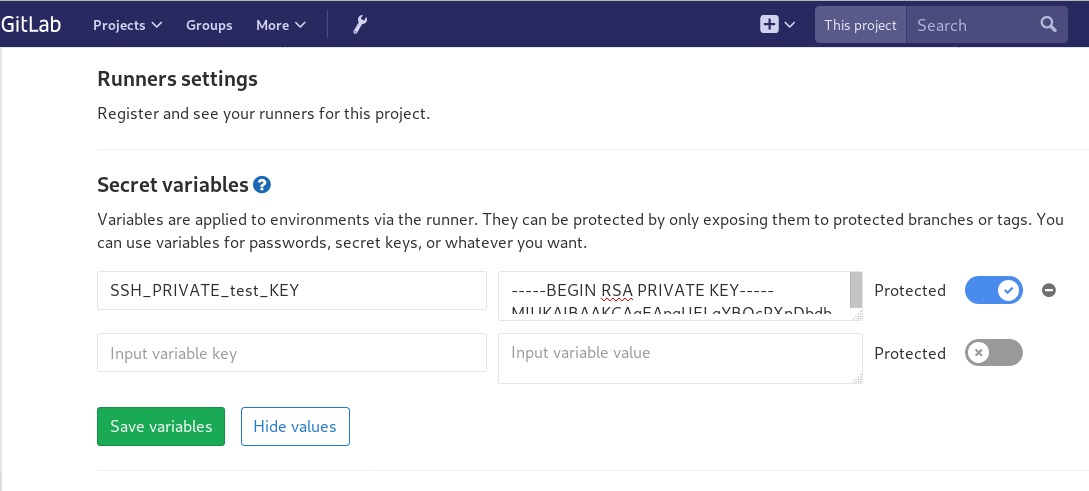
stage: deploy
Lets re-write gitlab deployment state:
variables:
  DESTINATION_SERVER: '192.168.122.132'

run-deploy:
  stage: deploy
  script:
    - echo "Create ssh root directory"
    - mkdir -p ~/.ssh/ && chmod 700 ~/.ssh/

    - echo "Append secret variable to the ssh private key file"
    - echo -e "$SSH_PRIVATE_test_KEY" > ~/.ssh/id_rsa
    - chmod 0600 ~/.ssh/id_rsa

    - echo "Install SSH client"
    - yum -y install openssh-clients

    - echo "Secure Copy the libsodium rpm file to the destination server"
    - scp -o StrictHostKeyChecking=no rpmbuild/RPMS/x86_64/$LIBSODIUM_NAME-$LIBSODIUM_VERS-*.rpm  $DESTINATION_SERVER:/tmp/

    - echo "Install libsodium rpm file to the destination server"
    - ssh -o StrictHostKeyChecking=no $DESTINATION_SERVER yum -y install /tmp/$LIBSODIUM_NAME-$LIBSODIUM_VERS-*.rpm
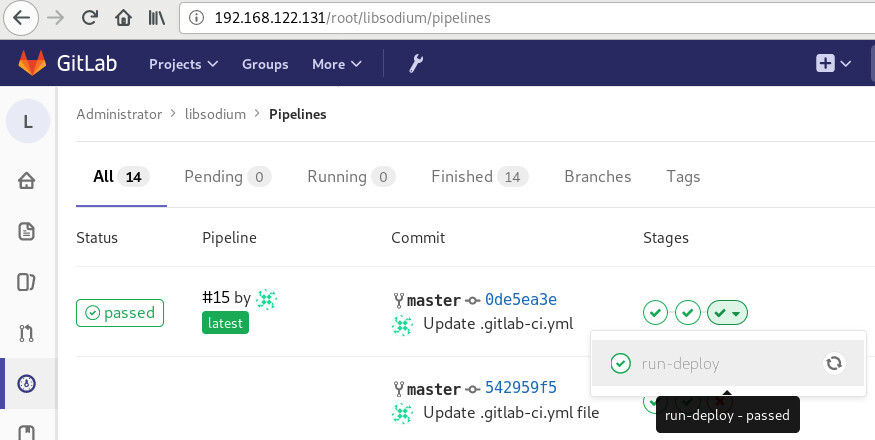
and we can see that our pipeline has passed!
Possible Problems:
that will probable fail!
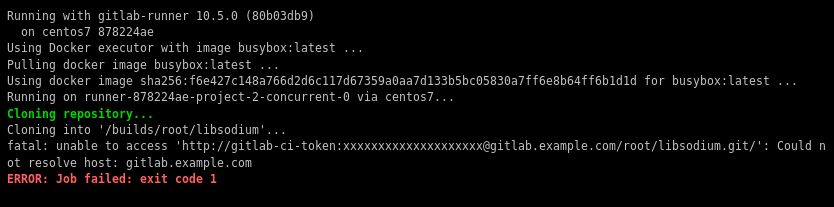
because our docker images don’t recognize gitlab.example.com.
Disclaimer: If you are using real fqdn - ip then you will probably not face this problem. I am referring to this issue, only for people who will follow this article step by step.
Easy fix:
# export -p EXTERNAL_URL="http://192.168.122.131" && yum -y reinstall gitlab-ceGitLab Runner
GitLab Runner is not running !
# gitlab-runner verify
Running in system-mode.

Verifying runner... is alive                        runner=e9bbcf90
Verifying runner... is alive                        runner=77701bad

#  gitlab-runner status
gitlab-runner: Service is not running.

# gitlab-runner install  -u gitlab-runner -d /home/gitlab-runner/

# systemctl is-active gitlab-runner
inactive

# systemctl enable gitlab-runner
# systemctl start gitlab-runner

# systemctl is-active gitlab-runner
active

# systemctl | egrep gitlab-runner
  gitlab-runner.service     loaded active running   GitLab Runner

# gitlab-runner status
gitlab-runner: Service is running!

# ps -e fuwww | egrep -i gitlab-[r]unner
root      5116  0.4  0.1  63428 16968 ?        Ssl  07:44   0:00 /usr/bin/gitlab-runner run --working-directory /home/gitlab-runner/ --config /etc/gitlab-runner/config.toml --service gitlab-runner --syslog --user gitlab-runner
Encrypted files in Dropbox
As we live in the age of smartphones and mobility access to the cloud, the more there is the need to access our files from anywhere. We need our files to be available on any computer, ours (private) or others (public). Traveling with your entire tech equipment is not always a good idea and with the era of cloud you dont need to bring everything with you.
There are a lot of cloud hosting files providers out there. On wikipedia there is a good Comparison of file hosting services article you can read.
I’ve started to use Dropbox for that reason. I use dropbox as a public digital bucket, to store and share public files. Every digital asset that is online is somehow public and only when you are using end-to-end encryption then you can say that something is more secure than before.
I also want to store some encrypted files on my cloud account, without the need to trust dropbox (or any cloud hosting file provider for that reason). As an extra security layer on top of dropbox, I use encfs and this blog post is a mini tutorial of a proof of concept.
EncFS - Encrypted Virtual Filesystem
(definition from encfs github account)
EncFS creates a virtual encrypted filesystem which stores encrypted data in the rootdir directory and makes the unencrypted data visible at the mountPoint directory. The user must supply a password which is used to (indirectly) encrypt both filenames and file contents.
That means that you can store your encrypted files somewhere and mount the decrypted files on folder on your computer.
Disclaimer: I dont know how secure is encfs. It is an extra layer that doesnt need any root access (except the installation part) for end users and it is really simple to use. There is a useful answer on stackexchange that you night like to read .
For more information on enfs you can also visit EncFS - Wikipedia Page
Install EncFS
-
archlinux
$ sudo pacman -S --noconfirm encfs -
fedora
$ sudo dnf -y install fuse-encfs -
ubuntu
$ sudo apt-get install -y encfs
How does Encfs work ?
- You have two(2) directories. The source and the mountpoint.
- You encrypt and store the files in the source directory with a password.
- You can view/edit your files in cleartext, in the mount point.
-
Create a folder inside dropbox
eg./home/ebal/Dropbox/Boostnote -
Create a folder outside of dropbox
eg./home/ebal/Boostnote
both folders are complete empty.
- Choose a long password.
just for testing, I am using a SHA256 message digest from an image that I can found on the internet!
eg.sha256sum /home/ebal/secret.png
that means, I dont know the password but I can re-create it whenever I hash the image.
BE Careful This suggestion is an example - only for testing. The proper way is to use a random generated long password from your key password manager eg. KeePassX
How does dropbox works?
The dropbox-client is monitoring your /home/ebal/Dropbox/ directory for any changes so that can sync your files on your account.
You dont need dropbox running to use encfs.
Running the dropbox-client is the easiest way, but you can always use a sync client eg. rclone to sync your encrypted file to dropbox (or any cloud storage).
I guess it depends on your thread model. For this proof-of-concept article I run dropbox-client daemon in my background.

Create and Mount
Now is the time to mount the source directory inside dropbox with our mount point:
$ sha256sum /home/ebal/secret.png |
    awk '{print $1}' |
encfs -S -s -f /home/ebal/Dropbox/Boostnote/ /home/ebal/Boostnote/Reminder: EncFs works with absolute paths!
Check Mount Point
$ mount | egrep -i encfsencfs on /home/ebal/Boostnote type fuse.encfs
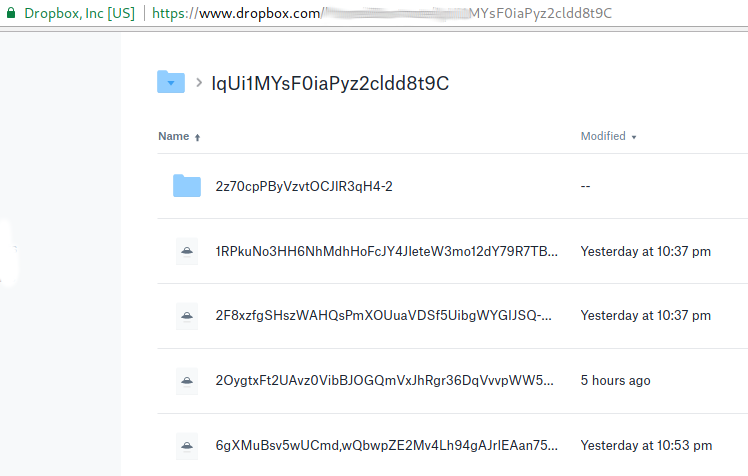
(rw,nosuid,nodev,relatime,user_id=1001,group_id=1001,default_permissions)View Files on Dropbox
Files inside dropbox:
View Files on the Mount Point

Unmount EncFS Mount Point
When you mount the source directory, encfs has an option to auto-umount the mount point on idle.
Or you can use the below command on demand:
$ fusermount -u /home/ebal/BoostnoteOn another PC
The simplicity of this approach is when you want to access these files on another PC.
dropbox-client has already synced your encrypted files.
So the only thing you have to do, is to type on this new machine the exact same command as in Create & Mount chapter.
$ sha256sum /home/ebal/secret.png |
    awk '{print $1}' |
    encfs -S -s -f /home/ebal/Dropbox/Boostnote/ /home/ebal/Boostnote/
Android
How about Android ?
You can use Cryptonite.
Cryptonite can use EncFS and TrueCrypt on Android and you can find the app on Google Play


I’ve listened two audiobooks this month, both on DevOps methodology or more accurate on continuous improving of streamflow.
also started audible - amazon for listening audiobooks. The android app is not great but decent enough, although most of the books are DRM.
The first one is The Goal - A Process of Ongoing Improvement by: Eliyahu M. Goldratt, Jeff Cox
I can not stress this enough: You Have To Read this book. This novel is been categorized under business and it is been written back in 1984. You will find innovating even for today’s business logic. This book is the bases of “The Phoenix Project” and you have to read it before the The Phoenix Project. You will understand in details how lean and agile methodologies drive us to DevOps as a result of Ongoing Improvement.
https://www.audible.com/pd/Business/The-Goal-Audiobook/B00IFG88SM
The second book is The DevOps Handbook or How to Create World-Class Agility, Reliability, and Security in Technology Organizations by By: Gene Kim, Patrick Debois, John Willis, Jez Humble Narrated by: Ron Butler
I have this book in both hardcopy and audiobook. It is indeed a handbook. If you are just now starting on devops you need to read it. Has stories of companies that have applied the devops practices and It is really well structured. My suggestion is to keep notes when reading/listening to this book. Keep notes and re-read them.
https://www.audible.com/pd/Business/The-DevOps-Handbook-Audiobook/B0767HHZLZ
systemd
Latest systemd version now contains the systemd-importd daemon .
That means that we can use machinectl to import a tar or a raw image from the internet to use it with the systemd-nspawn command.
so here is an example
machinectl
from my archlinux box:
# cat /etc/arch-release
Arch Linux releaseCentOS 7
We can download the tar centos7 docker image from the docker hub registry:
# machinectl pull-tar --verify=no https://github.com/CentOS/sig-cloud-instance-images/raw/79db851f4016c283fb3d30f924031f5a866d51a1/docker/centos-7-docker.tar.xz
...
Created new local image 'centos-7-docker'.
Operation completed successfully.
Exiting.
we can verify that:
# ls -la /var/lib/machines/centos-7-docker
total 28
dr-xr-xr-x 1 root root   158 Jan  7 18:59 .
drwx------ 1 root root   488 Feb  1 21:17 ..
-rw-r--r-- 1 root root 11970 Jan  7 18:59 anaconda-post.log
lrwxrwxrwx 1 root root     7 Jan  7 18:58 bin -> usr/bin
drwxr-xr-x 1 root root     0 Jan  7 18:58 dev
drwxr-xr-x 1 root root  1940 Jan  7 18:59 etc
drwxr-xr-x 1 root root     0 Nov  5  2016 home
lrwxrwxrwx 1 root root     7 Jan  7 18:58 lib -> usr/lib
lrwxrwxrwx 1 root root     9 Jan  7 18:58 lib64 -> usr/lib64
drwxr-xr-x 1 root root     0 Nov  5  2016 media
drwxr-xr-x 1 root root     0 Nov  5  2016 mnt
drwxr-xr-x 1 root root     0 Nov  5  2016 opt
drwxr-xr-x 1 root root     0 Jan  7 18:58 proc
dr-xr-x--- 1 root root   120 Jan  7 18:59 root
drwxr-xr-x 1 root root   104 Jan  7 18:59 run
lrwxrwxrwx 1 root root     8 Jan  7 18:58 sbin -> usr/sbin
drwxr-xr-x 1 root root     0 Nov  5  2016 srv
drwxr-xr-x 1 root root     0 Jan  7 18:58 sys
drwxrwxrwt 1 root root   140 Jan  7 18:59 tmp
drwxr-xr-x 1 root root   106 Jan  7 18:58 usr
drwxr-xr-x 1 root root   160 Jan  7 18:58 var
systemd-nspawn
Now test we can test it:
[root@myhomepc ~]# systemd-nspawn --machine=centos-7-docker
Spawning container centos-7-docker on /var/lib/machines/centos-7-docker.
Press ^] three times within 1s to kill container.

[root@centos-7-docker ~]#
[root@centos-7-docker ~]#
[root@centos-7-docker ~]# cat /etc/redhat-release
CentOS Linux release 7.4.1708 (Core)
[root@centos-7-docker ~]#
[root@centos-7-docker ~]# exit
logout
Container centos-7-docker exited successfully.
and now returning to our system:
[root@myhomepc ~]#
[root@myhomepc ~]#
[root@myhomepc ~]# cat /etc/arch-release
Arch Linux release
Ubuntu 16.04.4 LTS
ubuntu example:
# machinectl pull-tar --verify=no https://github.com/tianon/docker-brew-ubuntu-core/raw/46511cf49ad5d2628f3e8d88e1f8b18699a3ad8f/xenial/ubuntu-xenial-core-cloudimg-amd64-root.tar.gz

# systemd-nspawn --machine=ubuntu-xenial-core-cloudimg-amd64-root
Spawning container ubuntu-xenial-core-cloudimg-amd64-root on /var/lib/machines/ubuntu-xenial-core-cloudimg-amd64-root.
Press ^] three times within 1s to kill container.
Timezone Europe/Athens does not exist in container, not updating container timezone.
root@ubuntu-xenial-core-cloudimg-amd64-root:~# root@ubuntu-xenial-core-cloudimg-amd64-root:~# cat /etc/os-release NAME="Ubuntu"
VERSION="16.04.4 LTS (Xenial Xerus)"
ID=ubuntu
ID_LIKE=debian
PRETTY_NAME="Ubuntu 16.04.4 LTS"
VERSION_ID="16.04"
HOME_URL="http://www.ubuntu.com/"
SUPPORT_URL="http://help.ubuntu.com/"
BUG_REPORT_URL="http://bugs.launchpad.net/ubuntu/"
VERSION_CODENAME=xenial
UBUNTU_CODENAME=xenialroot@ubuntu-xenial-core-cloudimg-amd64-root:~# exitlogout
Container ubuntu-xenial-core-cloudimg-amd64-root exited successfully.# cat /etc/os-release NAME="Arch Linux"
PRETTY_NAME="Arch Linux"
ID=arch
ID_LIKE=archlinux
ANSI_COLOR="0;36"
HOME_URL="https://www.archlinux.org/"
SUPPORT_URL="https://bbs.archlinux.org/"
BUG_REPORT_URL="https://bugs.archlinux.org/"Network-Bound Disk Encryption
I was reading the redhat release notes on 7.4 and came across: Chapter 15. Security
New packages: tang, clevis, jose, luksmeta
Network Bound Disk Encryption (NBDE) allows the user to encrypt root volumes of the hard drives on physical and virtual machines without requiring to manually enter password when systems are rebooted.
That means, we can now have an encrypted (luks) volume that will be de-crypted on reboot, without the need of typing a passphrase!!!
Really - really useful on VPS (and general in cloud infrastructures)
Useful Links
- https://github.com/latchset/tang
- https://github.com/latchset/jose
- https://github.com/latchset/clevis
CentOS 7.4 with Encrypted rootfs
(aka client machine)
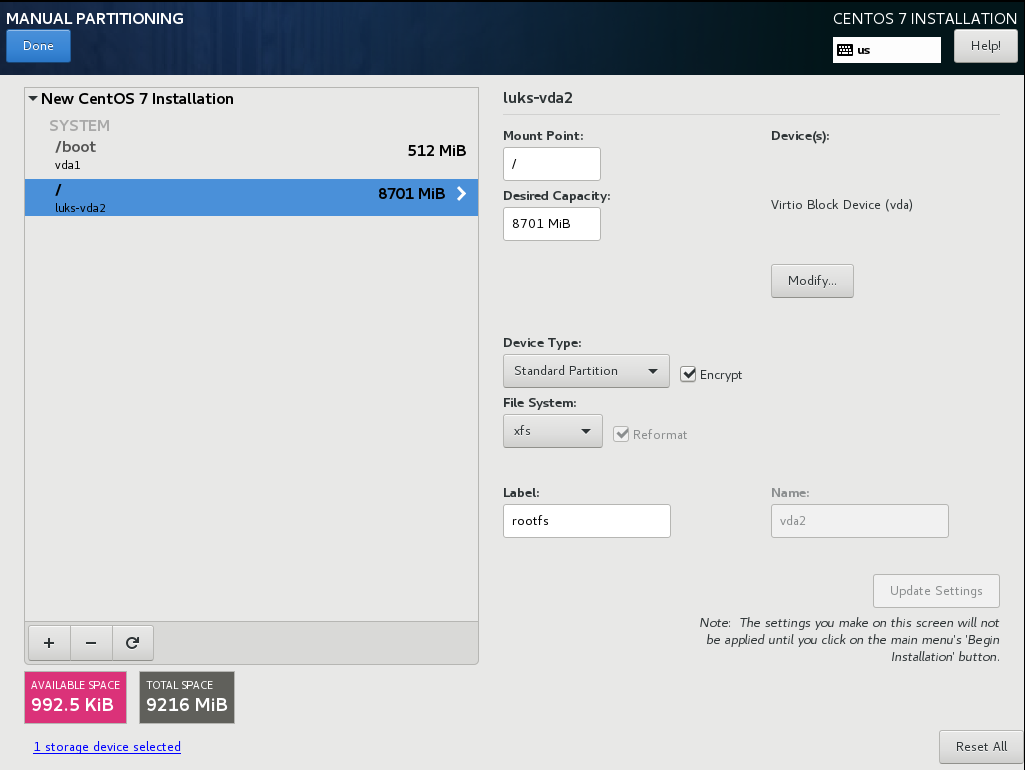
Below is a test centos 7.4 virtual machine with an encrypted root filesystem:
/boot
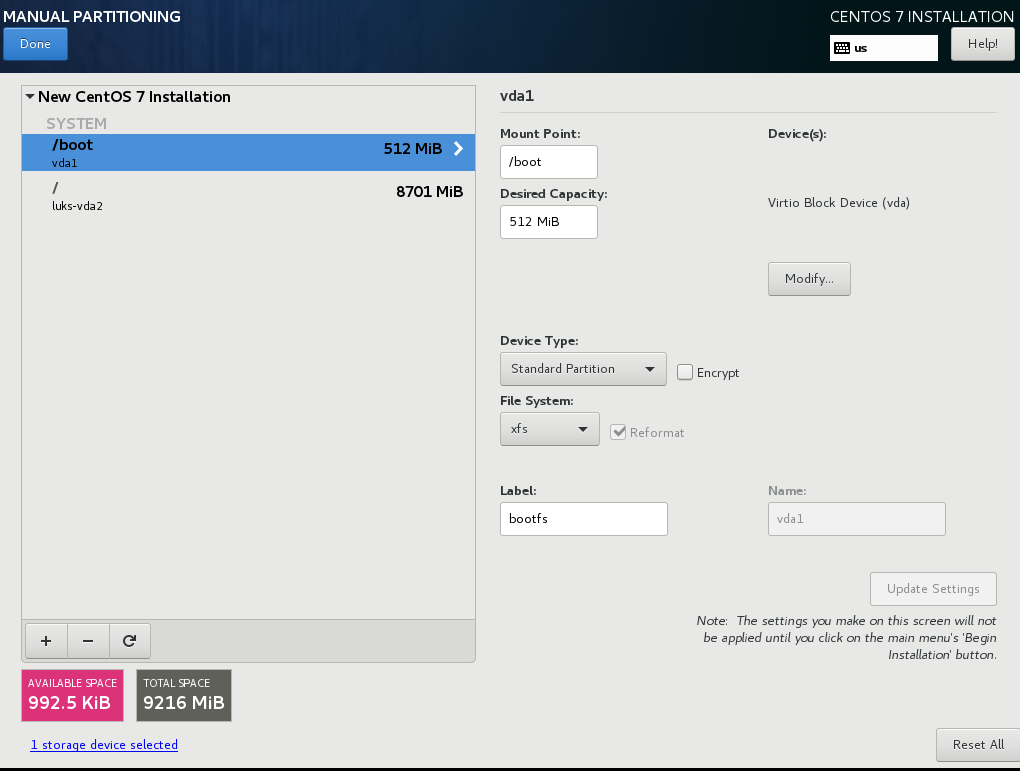
/
Tang Server
(aka server machine)
Tang is a server for binding data to network presence. This is a different centos 7.4 virtual machine from the above.
Installation
Let’s install the server part:
# yum -y install tang
Start socket service:
# systemctl restart tangd.socket
Enable socket service:
# systemctl enable tangd.socket
TCP Port
Check that the tang server is listening:
# netstat -ntulp | egrep -i systemd
tcp6 0 0 :::80 :::* LISTEN 1/systemdFirewall
Dont forget the firewall:
Firewall Zones
# firewall-cmd --get-active-zones
public
  interfaces: eth0
Firewall Port
# firewall-cmd --zone=public --add-port=80/tcp --permanent
or
# firewall-cmd --add-port=80/tcp --permanent
successReload
# firewall-cmd --reload
successWe have finished with the server part!
Client Machine - Encrypted rootfs
Now it is time to configure the client machine, but before let’s check the encrypted partition:
CryptTab
Every encrypted block devices is configured under crypttab file:
[root@centos7 ~]# cat /etc/crypttab
luks-3cc09d38-2f55-42b1-b0c7-b12f6c74200c UUID=3cc09d38-2f55-42b1-b0c7-b12f6c74200c none FsTab
and every filesystem that is static mounted on boot, is configured under fstab:
[root@centos7 ~]# cat /etc/fstab
UUID=c5ffbb05-d8e4-458c-9dc6-97723ccf43bc          /boot  xfs  defaults  0 0

/dev/mapper/luks-3cc09d38-2f55-42b1-b0c7-b12f6c74200c  /  xfs  defaults,x-systemd.device-timeout=0 0 0
Installation
Now let’s install the client (clevis) part that will talk with tang:
# yum -y install clevis clevis-luks clevis-dracut
Configuration
with a very simple command:
# clevis bind luks -d /dev/vda2 tang '{"url":"http://192.168.122.194"}'
The advertisement contains the following signing keys:

FYquzVHwdsGXByX_rRwm0VEmFRo

Do you wish to trust these keys? [ynYN] y

You are about to initialize a LUKS device for metadata storage.
Attempting to initialize it may result in data loss if data was
already written into the LUKS header gap in a different format.
A backup is advised before initialization is performed.

Do you wish to initialize /dev/vda2? [yn] y

Enter existing LUKS password:
we’ve just configured our encrypted volume against tang!
Luks MetaData
We can verify it’s luks metadata with:
[root@centos7 ~]# luksmeta show -d /dev/vda2
0   active empty
1   active cb6e8904-81ff-40da-a84a-07ab9ab5715e
2 inactive empty
3 inactive empty
4 inactive empty
5 inactive empty
6 inactive empty
7 inactive empty
dracut
We must not forget to regenerate the initramfs image, that on boot will try to talk with our tang server:
[root@centos7 ~]# dracut -f
Reboot
Now it’s time to reboot!

A short msg will appear in our screen, but in a few seconds and if successfully exchange messages with the tang server, our server with de-crypt the rootfs volume.

Tang messages
To finish this article, I will show you some tang msg via journalct:
Initialization
Getting the signing key from the client on setup:
Jan 31 22:43:09 centos7 systemd[1]: Started Tang Server (192.168.122.195:58088).
Jan 31 22:43:09 centos7 systemd[1]: Starting Tang Server (192.168.122.195:58088)...
Jan 31 22:43:09 centos7 tangd[1219]: 192.168.122.195 GET /adv/ => 200 (src/tangd.c:85)
reboot
Client is trying to decrypt the encrypted volume on reboot
Jan 31 22:46:21 centos7 systemd[1]: Started Tang Server (192.168.122.162:42370).
Jan 31 22:46:21 centos7 systemd[1]: Starting Tang Server (192.168.122.162:42370)...
Jan 31 22:46:22 centos7 tangd[1223]: 192.168.122.162 POST /rec/Shdayp69IdGNzEMnZkJasfGLIjQ => 200 (src/tangd.c:168)
A Counterintuitive Approach to Living a Good Life
by Mark Manson - Narrated By Roger Wayne

This book in a nutshell is covering the bases for mental health and personal happiness by not giving a fck to things that doesnt matter. Also how to experience pain, not pass the responsibility to others and in general dont be a d1ck.
Ready Player One by Ernest Cline
I’ve listened to the audiobook, Narrated by Wil Wheaton.
The book is AMAZING! Taking a trip down memory lane to ’80s pop culture, video games, music & movies. A sci-fi futuristic book that online gamers are trying to solve puzzles on a easter egg hunt for the control of oasis, a virtual reality game.

You can find more info here
Fabric
Fabric is a Python (2.5-2.7) library and command-line tool for streamlining the use of SSH for application deployment or systems administration tasks.
You can find the documentation here
Installation
# yum -y install epel-release
# yum -y install fabric
Hello World
# cat > fabfile.py <<EOF
> def hello():
>     print("Hello world!")
>
> EOF
and run it
# fab hello -f ./fabfile.py
Hello world!

Done.
A more complicated example
def HelloWorld():
        print("Hello world!")

def hello(name="world"):
        print("Hello %s!" % name )
# fab HelloWorld -f ./fabfile.py
Hello world!
Done.
# fab hello -f ./fabfile.py
Hello world!
Done.
# fab hello:name=ebal -f ./fabfile.py
Hello ebal!
Done.
A remote example
from fabric.api import run , env

env.use_ssh_config = True

def HelloWorld():
    print("Hello world!")

def hello(name="world"):
    print("Hello %s!" % name )

def uptime():
    run('uptime')
ssh configuration file
with the below variable declaration
(just remember to import env)
fabric can use the ssh configuration file of your system
env.use_ssh_config = Trueand run it against server test
$ fab -H test uptime -f ./fabfile.py
[test] Executing task 'uptime'
[test] run: uptime
[test] out:  20:21:30 up 10 days, 11 min,  1 user,  load average: 0.00, 0.00, 0.00
[test] out:

Done.
Disconnecting from 192.168.122.1:22... done.