Prologue – Why do this at all?
Running services at home is fun. Running them securely and reliably is where things get interesting.
In my homelab, I run many applications, like Immich on a legacy PC, behind a residential ISP connection, dynamic IPs, and without opening ports on my router. This setup provides my test lab and a way to play and learn without the use of any cloud. At the same time, I want to use some of my internal services from the internet as securely as I can.
This post describes how to achieve exactly that using:
- Tailscale as a secure private network between hosts
- DNS-01 Let’s Encrypt challenges for automated TLS
- A remote homelab service (Immich) reachable only over Tailscale
Important: The DNS record must exist before Traefik requests certificates.
High-level architecture
Before diving into configs, let’s clarify the flow:
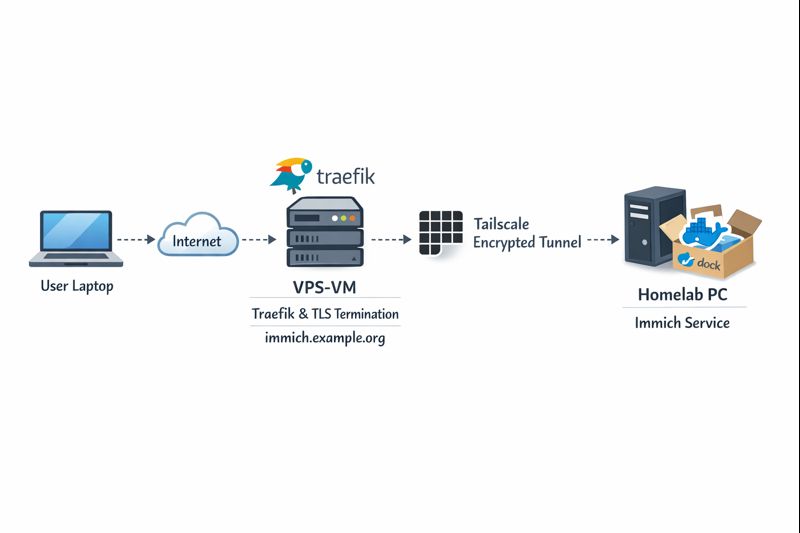
Key points:
- DNS entry (eg. immich.example.org) exists before Traefik starts, enabling ACME issuance
- Traefik as an internet-facing reverse proxy - Only Traefik is exposed to the internet
- Immich listens on a private Tailscale IP (100.x.x.x)
- Valid TLS certificates from Let’s Encrypt - TLS is terminated at Traefik
- No inbound firewall rules on my home network - No port forwarding on the home router
- Minimal attack surface
- Clean separation between edge and internal services
Why not expose Immich directly?
Opening ports on a home router comes with downsides:
- Public IP changes
- Consumer-grade firewalling
- Direct exposure of application vulnerabilities
- Harder TLS automation
This setup avoids all of that.
Why Tailscale?
Tailscale gives you:
- WireGuard-based encryption by default
- Stable private IPs
- Mutual authentication
- No inbound NAT rules
- Fine-grained ACLs (optional, but recommended)
Even if Traefik were compromised, the blast radius is limited to what it can access over Tailscale.
Why DNS-01 instead of HTTP-01?
DNS-01 lets Traefik:
- Obtain certificates without the backend being reachable
- Issue certs before the service is live
- Avoid exposing port 80 on internal services
This is especially useful when the backend is private or remote.
Prerequisites
Before starting, make sure you have:
- A domain name (e.g.
example.org) - A DNS provider supported by Traefik (LuaDNS in this case)
- A public server (VPS, cloud VM) for Traefik
-
Tailscale installed on:
- The Traefik host
- Your homelab / home PC
-
A DNS record:
immich.example.org → <Traefik public IP>
Important: The DNS record must exist before Traefik requests certificates.
Traefik setup (edge host)
Docker Compose
Traefik runs as a standalone service on the edge host:
---
services:
  traefik:
    image: traefik:v3.6
    container_name: traefik
    hostname: traefik
    env_file:
      - ./.env
    environment:
      - TRAEFIK_CERTIFICATESRESOLVERS_LETSENCRYPT_ACME_EMAIL=${LUADNS_API_USERNAME}
    restart: unless-stopped
    ports:
      - 8080:8080 # Dashboard (secured, no insecure mode)
      - 80:80     # HTTP
      - 443:443   # HTTPS
    volumes:
      - ./certs:/certs             # For static certificates
      - ./etc_traefik:/etc/traefik # Traefik configuration files
      - /var/run/docker.sock:/var/run/docker.sock:ro  # So that Traefik can listen to the Docker events
    healthcheck:
      test: ["CMD", "traefik", "healthcheck"]
      interval: 30s
      retries: 3
      timeout: 10s
      start_period: 10s
Static Traefik configuration (traefik.yml)
This file defines entrypoints, providers, logging, and ACME:
ping: {}

api:
  dashboard: true
  insecure: false

log:
  filePath: /etc/traefik/traefik.log
  level: INFO

entryPoints:
  web:
    address: ":80"
    reusePort: true
  websecure:
    address: ":443"
    reusePort: true

providers:
  docker:
    exposedByDefault: false
  file:
    directory: /etc/traefik/dynamic/
    watch: true
We explicitly disable auto-exposure of Docker containers and rely on file-based dynamic config to have more control on which docker services we want traefik to “see”.
Let’s Encrypt via DNS-01 (LuaDNS)
certificatesResolvers:
  letsencrypt:
    acme:
      email: ""
      storage: "/certs/acme.json"
      caServer: https://acme-v02.api.letsencrypt.org/directory
      dnsChallenge:
        provider: luadns
        delayBeforeCheck: 0
        resolvers:
          - "8.8.8.8:53"
          - "1.1.1.1:53"
Why this matters:
- Certificates can be issued even if Immich is offline
- No need for port 80 reachability
- Works cleanly with private backends
Dynamic routing to Immich over Tailscale
This is where the magic happens.
Dynamic config (dynamic/immich.yml)
http:
  routers:
    immich:
      rule: 'Host(`immich.example.org`)'
      entryPoints: ["websecure"]
      service: "immich"
      tls:
        certResolver: letsencrypt

  services:
    immich:
      loadBalancer:
        servers:
          - url: "http://100.80.90.101:2283"
        passHostHeader: true
Explanation:
Host()rule matches your public domain- TLS is terminated at Traefik
- Backend URL is a Tailscale IP
- No exposure of Immich to the public internet
Homelab: Immich setup
On the home PC, Immich runs normally, bound to a local port:
ports:
  - '2283:2283'
Make sure to use the docker-compose.yml of the current release:
This port does not need to be:
- Exposed to the internet
- Forwarded on your router
- Secured with TLS
It only needs to be reachable from the Traefik host via Tailscale.
Verifying the setup
Visit: https://immich.example.org
You should get a valid Let’s Encrypt certificate and a working Immich UI.
Hardening ideas (recommended)
Once this works, consider:
- Tailscale ACLs limiting Traefik → Immich access
- Middleware for:
- Security headers
- Rate limiting
- IP allowlists
- Traefik dashboard behind auth
- Separate internal / external entrypoints
That's it !
🎉 If you want a self‑contained, production‑ready reverse proxy that automatically provisions TLS certificates from Let’s Encrypt and uses LuaDNS as the DNS provider, you’re in the right place.
Below you’ll find a step‑by‑step guide that walks through:
- Installing the required containers
- Configuring Traefik with LuaDNS DNS‑Challenge
- Running the stack and verifying everything works
TL;DR – Copy the files, set your environment variables, run
docker compose up -d, and point a browser tohttps://<your‑hostname>.
📁 Project Layout
traefik/
├── certs/                # ACME certificates will be stored here
├── docker-compose.yml    # Docker‑Compose definition
├── .env                  # Environment variables for the stack
└── etc_traefik/
    └── traefik.yml       # Traefik configuration
    └── dynamic/          # Dynamic Traefik configuration will be stored here
        └── whoami.yml    # WhoAmI configuration
Why this structure?
certs/– keeps the ACME JSON file outside the container so it survives restarts.etc_traefik/– keeps the Traefik config in a dedicated folder for clarity..env– central place to store secrets and other runtime values.
🔧 Step 1 – Prepare Your Environment
1. Install Docker & Docker‑Compose
If you don’t already have them:
# Debian/Ubuntu
sudo apt update && sudo apt install docker.io docker-compose-plugin

# Verify
docker --version
docker compose version
2. Clone or Create the Project Folder
mkdir -p traefik/certs traefik/etc_traefik/dynamic
cd traefik
⚙️ Step 2 – Create the Configuration Files
1. docker-compose.yml
services:
  traefik:
    image: traefik:v3.5
    container_name: traefik
    hostname: traefik

    env_file:
      - ./.env
    environment:
      - TRAEFIK_CERTIFICATESRESOLVERS_LETSENCRYPT_ACME_EMAIL=${LUADNS_API_USERNAME}

    restart: unless-stopped

    # Expose HTTP, HTTPS and the dashboard
    ports:
      - "8080:8080"  # Dashboard (insecure)
      - "80:80"
      - "443:443"

    volumes:
      - ./certs:/certs
      - ./etc_traefik:/etc/traefik
      - /var/run/docker.sock:/var/run/docker.sock:ro

    healthcheck:
      test: ["CMD", "traefik", "healthcheck"]
      interval: 30s
      retries: 3
      timeout: 10s
      start_period: 10s

  whoami:
    image: traefik/whoami
    container_name: whoami
    hostname: whoami
    depends_on:
      traefik:
        condition: service_healthy

    labels:
      - "traefik.enable=true"
Why
whoami?
It’s a simple container that prints the request metadata. Perfect for testing TLS, routing and DNS‑Challenge.
2. .env
UMASK="002"
TZ="Europe/Athens"

# LuaDNS credentials (replace with your own)
LUADNS_API_TOKEN="<Your LuaDNS API key>"
LUADNS_API_USERNAME="<Your Email Address>"

# Hostname you want to expose
MYHOSTNAME=whoami.example.org

# (Optional) LibreDNS server used for challenge verification
DNS="88.198.92.222"
Important – Do not commit your
.envto version control.
Use a.gitignoreentry or environment‑variable injection on your host.
3. etc_traefik/traefik.yml
# Ping endpoint for health checks
ping: {}

# Dashboard & API
api:
  dashboard: true
  insecure: true   # `true` only for dev; enable auth in prod

# Logging
log:
  filePath: /etc/traefik/traefik.log
  level: DEBUG

# Entry points (HTTP & HTTPS)
entryPoints:
  web:
    address: ":80"
    reusePort: true
  websecure:
    address: ":443"
    reusePort: true

# Docker provider – disable auto‑exposure
providers:
  docker:
    exposedByDefault: false

    # Enable file provider
    file:
        directory: /etc/traefik/dynamic/
        watch: true

# ACME resolver using LuaDNS
certificatesResolvers:
  letsencrypt:
    acme:
      # Will read from TRAEFIK_CERTIFICATESRESOLVERS_LETSENCRYPT_ACME_EMAIL
      # Or your add your email address directly !
      email: ""
      storage: "/certs/acme.json"
      # Uncomment the following line for production
      ## caServer: https://acme-v02.api.letsencrypt.org/directory
      # Staging environment (for testing only)
      caServer: https://acme-staging-v02.api.letsencrypt.org/directory
      dnsChallenge:
        provider: luadns
        delayBeforeCheck: 0
        resolvers:
          - "8.8.8.8:53"
          - "1.1.1.1:53"
Key points
storagepoints to the sharedcerts/folder.- We’re using the staging Let’s Encrypt server – change it to production when you’re ready.
dnsChallenge.provideris set toluadns; Traefik will automatically look for a LuaDNS plugin.
4. etc_traefik/dynamic/whoami.yml
http:
  routers:
    whoami:
      rule: 'Host(`{{ env "MYHOSTNAME" }}`)'
      entryPoints: ["websecure"]
      service: "whoami"
      tls:
        certResolver: letsencrypt
  services:
    whoami:
      loadBalancer:
        servers:
          - url: "http://whoami:80"
🔐 Step 3 – Run the Stack
docker compose up -dDocker will:
- Pull
traefik:v3.5andtraefik/whoami. - Create the containers, mount volumes, and start Traefik.
- Trigger a DNS‑Challenge for
whoami.example.org(via LuaDNS). - Request an ACME certificate from Let’s Encrypt.
Tip – Use
docker compose logs -f traefikto watch the ACME process in real time.
🚀 Step 4 – Verify Everything Works
-
Open a browser and go to https://whoami.example.org
(replace with whatever you set inMYHOSTNAME). -
You should see a JSON response similar to:
Hostname: whoami
IP: 127.0.0.1
IP: ::1
IP: 172.19.0.3
RemoteAddr: 172.19.0.2:54856
GET / HTTP/1.1
Host: whoami.example.org
User-Agent: Mozilla/5.0 (Macintosh; Intel Mac OS X 10_15_7) AppleWebKit/537.36 (KHTML, like Gecko) Chrome/141.0.0.0 Safari/537.36
Accept: text/html,application/xhtml+xml,application/xml;q=0.9,image/avif,image/webp,image/apng,*/*;q=0.8
Accept-Encoding: gzip, deflate, br, zstd
Accept-Language: en-GB,en;q=0.6
Cache-Control: max-age=0
Priority: u=0, i
Sec-Ch-Ua: "Brave";v="141", "Not?A_Brand";v="8", "Chromium";v="141"
Sec-Ch-Ua-Mobile: ?0
Sec-Ch-Ua-Platform: "macOS"
Sec-Fetch-Dest: document
Sec-Fetch-Mode: navigate
Sec-Fetch-Site: none
Sec-Fetch-User: ?1
Sec-Gpc: 1
Upgrade-Insecure-Requests: 1
X-Forwarded-For: 602.13.13.18
X-Forwarded-Host: whoami.example.org
X-Forwarded-Port: 443
X-Forwarded-Proto: https
X-Forwarded-Server: traefik
X-Real-Ip: 602.13.13.18
-
In the browser’s developer tools → Security tab, confirm the certificate is issued by Let’s Encrypt and that it is valid.
-
Inspect the Traefik dashboard at http://localhost:8080 (you’ll see the
whoamirouter and its TLS configuration).
🎯 What’s Next?
| Feature | How to enable |
|---|---|
| HTTPS‑only | Add - "traefik.http.middlewares.redirectscheme.scheme=https" to the router and use it as a middlewares label. |
| Auth on dashboard | Use Traefik’s built‑in auth middlewares or an external provider. |
| Automatic renewal | Traefik handles it automatically; just keep the stack running. |
| Production CA | Switch caServer to the production URL in traefik.yml. |
by making the change here:
      # Uncomment the following line for production
      caServer: https://acme-v02.api.letsencrypt.org/directory
      ## caServer: https://acme-staging-v02.api.letsencrypt.org/directory
Final Thoughts
Using Traefik with LuaDNS gives you:
- Zero‑configuration TLS that renews automatically.
- Fast DNS challenges thanks to LuaDNS’s low‑latency API.
- Docker integration – just add labels to any container and it’s instantly exposed.
Happy routing! 🚀
That’s it !
PS. These are my personal notes from my home lab; AI was used to structure and format the final version of this blog post.
Original Post is here:
https://balaskas.gr/blog/2025/10/10/setting-up-traefik-and-lets-encrypt-acme-with-luadns-in-docker/
Managing SSL/TLS certificates for your domains can be effortless with the right tools. In this post, I’ll walk you through using acme.sh and LuaDNS to issue wildcard certificates for your domain.
Let’s dive into the step-by-step process of setting up DNS-based validation using the LuaDNS API.
📋 Prerequisites
- You own a domain and manage its DNS records with LuaDNS.
- You have
acme.shinstalled. - You’ve generated an API token from your LuaDNS account.
🧼 Step 1: Clean Up Old Certificates (Optional)
If you’ve previously issued a certificate for your domain and want to start fresh, you can remove it with:
acme.sh --remove -d balaskas.grThis will remove the certificate metadata from acme.sh, but not delete the actual files. You’ll find those under:
/root/.acme.sh/balaskas.grFeel free to delete them manually if needed.
🔑 Step 2: Set Your LuaDNS API Credentials
Log into your LuaDNS account and generate your API token from:
👉 https://api.luadns.com/settings
Then export your credentials in your shell session:
export LUA_Email="youremail@example.com"
export LUA_Key="your_luadns_api_key"
Example:
export LUA_Email="api.luadns@example.org"
export LUA_Key="a86ee24d7087ad83dc51dadbd35b31e4"
📜 Step 3: Issue the Wildcard Certificate
Now you can issue a certificate using DNS-01 validation via the LuaDNS API:
acme.sh --issue --dns dns_lua -d balaskas.gr -d *.balaskas.gr --server letsencryptThis command will:
- Use Let’s Encrypt as the Certificate Authority.
- Add two DNS TXT records (
_acme-challenge.balaskas.gr) using LuaDNS API. - Perform domain validation.
- Remove the TXT records after verification.
- Issue and store the certificate.
Sample output will include steps like:
Adding txt value: ... for domain: _acme-challenge.balaskas.gr
The txt record is added: Success.
Verifying: balaskas.gr
Verifying: *.balaskas.gr
Success
Removing DNS records.
Cert success.
You’ll find the certificate and key files in:
/root/.acme.sh/balaskas.gr/File paths:
- Certificate:
balaskas.gr.cer - Private Key:
balaskas.gr.key - CA Chain:
ca.cer - Full Chain:
fullchain.cer
✅ Step 4: Verify the Certificate
You can check your currently managed certificates with:
acme.sh --cron --listOutput should look like:
Main_Domain        KeyLength  SAN_Domains            CA                    Created                       Renew
balaskas.gr       ""         *.balaskas.gr         LetsEncrypt.org       Thu Apr 17 14:39:24 UTC 2025  Mon Jun 16 14:39:24 UTC 2025
🎉 Done!
That’s it! You’ve successfully issued and installed a wildcard SSL certificate using acme.sh with LuaDNS.
You can now automate renewals via cron, and integrate the certificate into your web server or load balancer.
🔁 Bonus Tip: Enable Auto-Renewal
acme.sh is cron-friendly. Just make sure your environment has access to the LUA_Key and LUA_Email variables, either by exporting them in a script or storing them in a config file.
Let me know if you’d like this blog post exported or published to a static site generator (like Hugo, Jekyll, or Hexo) or posted somewhere specific!
That’s it !
This blog post was made with chatgpt
LibreOps & LibreDNS
LibreOps announced a new public service: LibreDNS, a new DoH/DoT (DNS over Https/DNS over TLS) free public service for people that want to bypass DNS restrictions and/or want to use TLS in their DNS queries. Firefox has already collaborated with Cloudflare for this case but I believe we can do better than using a centralized public service of a profit-company.
Personal Notes
So here are my personal notes for using LibreDNS in firefox
Firefox
Open Preferences/Options
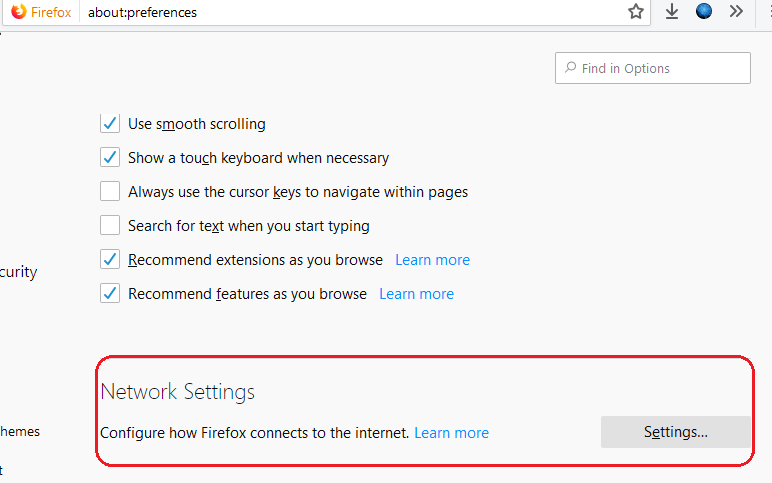
Enable DoH

TRR mode 2
Now the tricky part.
TRR mode is 2 when you enable DoH. What does this mean?
2 is when firefox is trying to use DoH but if it fails (or timeout) then firefox will go back to ask your operating system’s DNS.
DoH is a URL, so the first time firefox needs to resolve doh.libredns.gr and it will ask your operating system for that.
host file
There is way to exclude doh.libredns.gr from DoH , and use your /etc/hosts file instead your local DNS and enable TRR mode to 3, which means you will ONLY use DoH service for DNS queries.
# grep doh.libredns.gr /etc/hosts
116.202.176.26 doh.libredns.gr
TRR mode 3
and in
about:config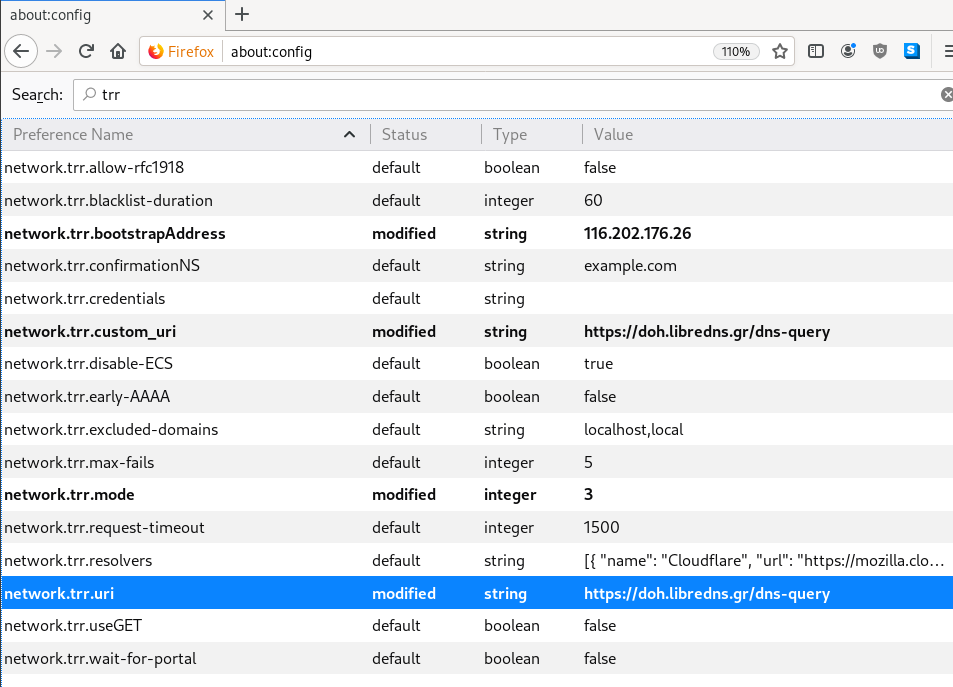
DNS Leak
Try DNS Leak Test to verify that your local ISP is NOT your firefox DNS
Thunderbird
Thunderbird also supports DoH and here are my settings
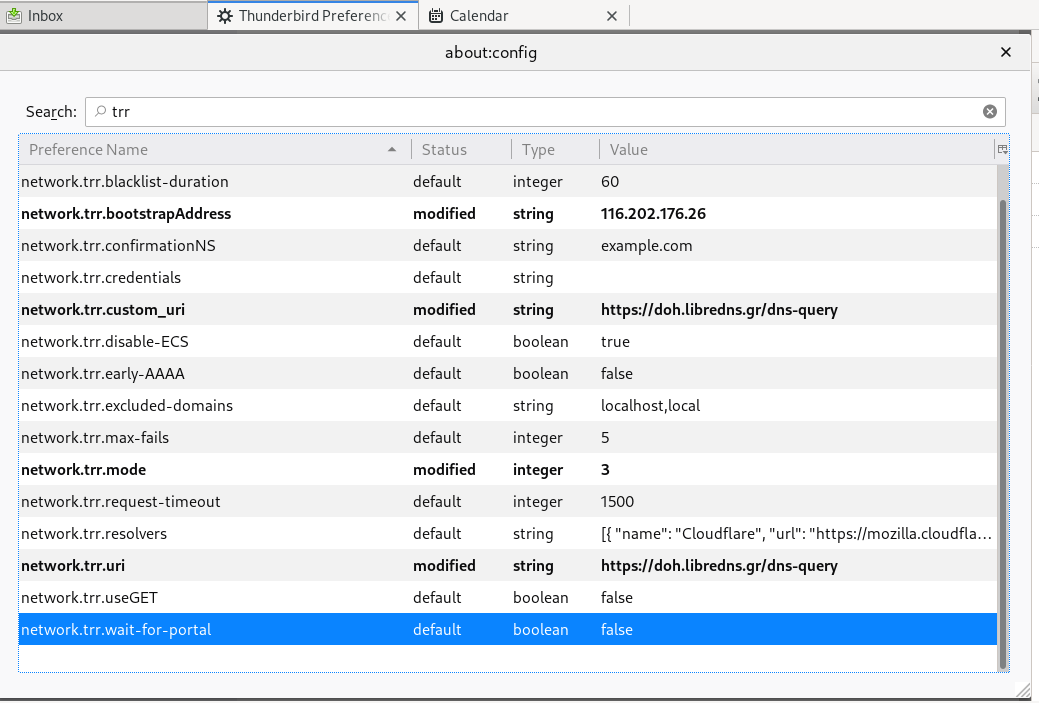
PS: Do not forget, this is NOT a global change, just your firefox will ask libredns for any dns query.
ACME v2 and Wildcard Certificate Support is Live
We have some good news, letsencrypt support wildcard certificates! For more details click here.
The key phrase on the post is this:
Certbot has ACME v2 support since Version 0.22.0.
unfortunately -at this momment- using certbot on a centos6 is not so trivial, so here is an alternative approach using:
acme.sh
acme.sh is a pure Unix shell script implementing ACME client protocol.
# curl -LO https://github.com/Neilpang/acme.sh/archive/2.7.7.tar.gz
# tar xf 2.7.7.tar.gz
# cd acme.sh-2.7.7/
[acme.sh-2.7.7]# ./acme.sh --version
https://github.com/Neilpang/acme.sh
v2.7.7PowerDNS
I have my own Authoritative Na,e Server based on powerdns software.
PowerDNS has an API for direct control, also a built-in web server for statistics.
To enable these features make the appropriate changes to pdns.conf
api=yes
api-key=0123456789ABCDEF
webserver-port=8081
and restart your pdns service.
To read more about these capabilities, click here: Built-in Webserver and HTTP API
testing the API:
# curl -s -H 'X-API-Key: 0123456789ABCDEF' http://127.0.0.1:8081/api/v1/servers/localhost | jq .
{
  "zones_url": "/api/v1/servers/localhost/zones{/zone}",
  "version": "4.1.1",
  "url": "/api/v1/servers/localhost",
  "type": "Server",
  "id": "localhost",
  "daemon_type": "authoritative",
  "config_url": "/api/v1/servers/localhost/config{/config_setting}"
}
Enviroment
export PDNS_Url="http://127.0.0.1:8081"
export PDNS_ServerId="localhost"
export PDNS_Token="0123456789ABCDEF"
export PDNS_Ttl=60
Prepare Destination
I want to save the certificates under /etc/letsencrypt directory.
By default, acme.sh will save certificate files under /root/.acme.sh/balaskas.gr/ path.
I use selinux and I want to save them under /etc and on similar directory as before, so:
# mkdir -pv /etc/letsencrypt/acme.sh/balaskas.gr/
Create WildCard Certificate
Run:
# ./acme.sh
  --issue
  --dns dns_pdns
  --dnssleep 30
  -f
  -d balaskas.gr
  -d *.balaskas.gr
  --cert-file /etc/letsencrypt/acme.sh/balaskas.gr/cert.pem
  --key-file  /etc/letsencrypt/acme.sh/balaskas.gr/privkey.pem
  --ca-file   /etc/letsencrypt/acme.sh/balaskas.gr/ca.pem
  --fullchain-file /etc/letsencrypt/acme.sh/balaskas.gr/fullchain.pem
HSTS
Using HTTP Strict Transport Security means that the browsers probably already know that you are using a single certificate for your domains. So, you need to add every domain in your wildcard certificate.
Web Server
Change your VirtualHost
from something like this:
SSLCertificateFile /etc/letsencrypt/live/balaskas.gr/cert.pem
SSLCertificateKeyFile /etc/letsencrypt/live/balaskas.gr/privkey.pem
Include /etc/letsencrypt/options-ssl-apache.conf
SSLCertificateChainFile /etc/letsencrypt/live/balaskas.gr/chain.pem
to something like this:
SSLCertificateFile    /etc/letsencrypt/acme.sh/balaskas.gr/cert.pem
SSLCertificateKeyFile /etc/letsencrypt/acme.sh/balaskas.gr/privkey.pem
Include /etc/letsencrypt/options-ssl-apache.conf
SSLCertificateChainFile /etc/letsencrypt/acme.sh/balaskas.gr/fullchain.pem
and restart your web server.
Browser
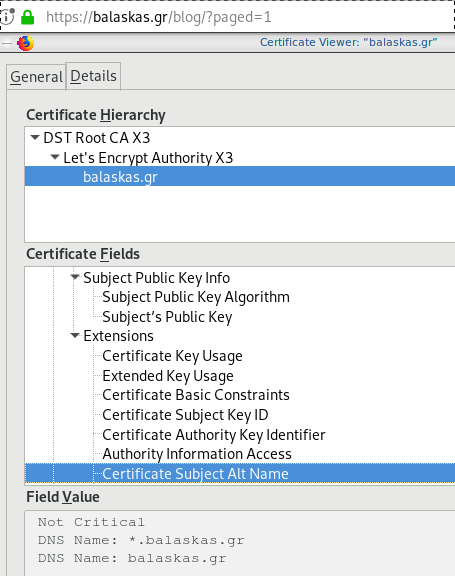
Quallys
Validation
X509v3 Subject Alternative Name
# openssl x509 -text -in /etc/letsencrypt/acme.sh/balaskas.gr/cert.pem | egrep balaskas
        Subject: CN=balaskas.gr
DNS:*.balaskas.gr, DNS:balaskas.grLet’s Encrypt
I’ve written some posts on Let’s Encrypt but the most frequently question is how to auto renew a certificate every 90 days.
Disclaimer
This is my mini how-to, on centos 6 with a custom compiled Python 2.7.13 that I like to run on virtualenv from latest git updated certbot. Not a copy/paste solution for everyone!
Cron
Cron doesnt not seem to have something useful to use on comparison to 90 days:

Modification Time
The most obvious answer is to look on the modification time on lets encrypt directory :
eg. domain: balaskas.gr
# find /etc/letsencrypt/live/balaskas.gr -type d -mtime +90 -exec ls -ld {} \;

# find /etc/letsencrypt/live/balaskas.gr -type d -mtime +80 -exec ls -ld {} \;

# find /etc/letsencrypt/live/balaskas.gr -type d -mtime +70 -exec ls -ld {} \;
# find /etc/letsencrypt/live/balaskas.gr -type d -mtime +60 -exec ls -ld {} \;
drwxr-xr-x. 2 root root 4096 May 15 20:45 /etc/letsencrypt/live/balaskas.gr
OpenSSL
# openssl x509 -in <(openssl s_client -connect balaskas.gr:443 2>/dev/null) -noout -enddate
If you have registered your email with Let’s Encrypt then you get your first email in 60 days!
Renewal
Here are my own custom steps:
#  cd /root/certbot.git
#  git pull origin

#  source venv/bin/activate && source venv/bin/activate
#  cd venv/bin/

#  monit stop httpd

#  ./venv/bin/certbot renew --cert-name balaskas.gr --standalone

#  monit start httpd

#  deactivate
Script
I use monit, you can edit the script accordingly to your needs :
#!/bin/sh

DOMAIN=$1

## Update certbot
cd /root/certbot.git
git pull origin

# Enable Virtual Environment for python
source venv/bin/activate && source venv/bin/activate

## Stop Apache
monit stop httpd

sleep 5

## Renewal
./venv/bin/certbot renew  --cert-name ${DOMAIN} --standalone

## Exit virtualenv
deactivate

## Start Apache
monit start httpd
All Together
# find /etc/letsencrypt/live/balaskas.gr -type d -mtime +80 -exec /usr/local/bin/certbot.autorenewal.sh balaskas.gr \;
Systemd Timers
or put it on cron
whatever :P
CAA
Reading RFC 6844 you will find the definition of “DNS Certification Authority Authorization (CAA) Resource Record”.
You can read everything here: RFC 6844
So, what is CAA anyhow?
Certificate Authority
In a nutshell you are declaring which your Certificate Authority is for your domain.
It’s another way to verify that the certificate your site is announcing is in fact signed by the issuer that the certificate is showing.
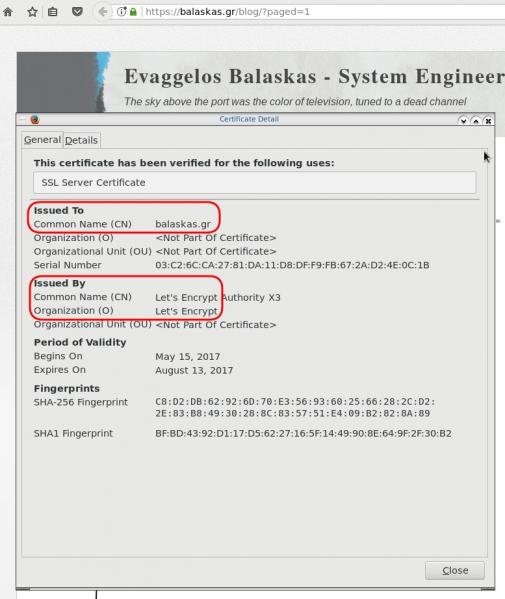
So let’s see what my certificate is showing:
DNS
Now, let’s find out what my DNS is telling us:
# dig caa balaskas.gr

;; ANSWER SECTION:
balaskas.gr.        5938    IN  CAA 1 issue "letsencrypt.org"
Testing
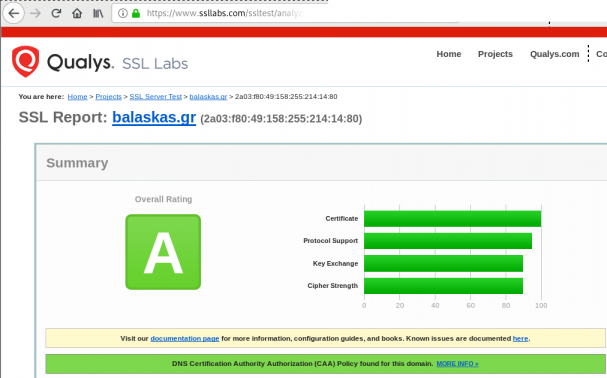
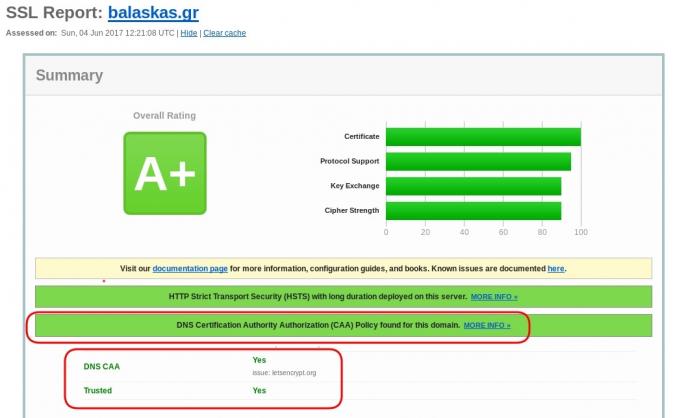
You can also use the Qualys ssl server test:
Let’s Encrypt client: certbot is been written in python and as it’s predecessor needs at least Python 2.7.
But (still) in CentOS series 6 (currently 6.8) there is no natively support for python27.
So I did this thing below, quick & dirty:
# cd /usr/local/src/
# wget -c https://www.python.org/ftp/python/2.7.11/Python-2.7.11.tgz
# tar xf Python-2.7.11.tgz
# cd Python-2.7.11
# ./configure
# make
# make install
and these are my notes for renew certificates :
# ln -s /opt/Python-2.7/bin/python2.7 /usr/local/bin/python2

[root@1 certbot]# source venv/bin/activate
(venv)[root@1 certbot]#

# cd venv/bin/

# ./certbot renew --dry-run

# ./certbot renew

# rm /usr/local/bin/python2
Below is my setup to enable Forward secrecy
Generate DH parameters:
# openssl dhparam -out /etc/pki/tls/dh-2048.pem 2048
and then configure your prosody with Let’s Encrypt certificates
VirtualHost "balaskas.gr"

  ssl = {
      key = "/etc/letsencrypt/live/balaskas.gr/privkey.pem";
      certificate = "/etc/letsencrypt/live/balaskas.gr/fullchain.pem";
      cafile = "/etc/pki/tls/certs/ca-bundle.crt";

      # enable strong encryption
      ciphers="EECDH+ECDSA+AESGCM:EECDH+aRSA+AESGCM:EECDH+ECDSA+SHA384:EECDH+ECDSA+SHA256:EECDH+aRSA+SHA384:EECDH+aRSA+SHA256:EECDH+aRSA+RC4:EECDH:EDH+aRSA:!aNULL:!eNULL:!LOW:!3DES:!MD5:!EXP:!PSK:!SRP:!DSS:!RC4";
      dhparam = "/etc/pki/tls/dh-2048.pem";
    }
if you only want to accept TLS connection from clients and servers, change your settings to these:
c2s_require_encryption = true
s2s_secure_auth = true
Check your setup
or check your certificates with openssl:
Server: # openssl s_client -connect balaskas.gr:5269  -starttls xmpp < /dev/null
Client: # openssl s_client -connect balaskas.gr:5222  -starttls xmpp < /dev/null

