Introduction
If you work with Docker long enough, you stop having one Docker environment.
- You have your local laptop.
- You have a remote VM or homelab server.
- You might have a staging host, a production host, or a CI runner somewhere in the cloud.
And sooner or later, you start asking yourself:
“Wait… where am I running this container?”
Docker contexts exist to solve exactly this problem—cleanly, safely, and without shell hacks.
This blog post explains what Docker contexts are, how they work in practice, and how to use them effectively based on real-world usage.
What Is a Docker Context?
At a practical level, a Docker context is:
- A named configuration
- That defines how the Docker CLI connects to a Docker Engine
- And optionally includes credentials and TLS/SSH details
When you run any Docker command, the CLI:
- Resolves the active context
- Reads its endpoint configuration
- Talks to the corresponding Docker Engine
What a Context Contains (Practically)
A context can define:
- Local Unix socket (
/var/run/docker.sock) - Remote Docker over SSH
- Remote Docker over TCP + TLS
- Cloud-managed Docker endpoints
Internally, contexts are stored under:
~/.docker/contexts/You almost never need to touch this manually—and that’s a good thing.
Practical Example: Local Laptop → Remote Docker Host over SSH
From your home PC, you want to manage Docker running on a remote machine called remote-vps.
Disclaimer: You need to have an ssh connection already set in ~/.ssh/config or via tailscale
Creating a Context
docker context create remote-vps --docker "host=ssh://remote-vps"That’s it.
No SSH tunnel scripts.
No DOCKER_HOST exports.
No wrapper functions.
Listing Contexts
docker context lsOutput (trimmed):
NAME         DESCRIPTION                               DOCKER ENDPOINT
default   *  Current DOCKER_HOST based configuration   unix:///var/run/docker.sock
remote-vps                                             ssh://remote-vps
The * indicates the currently active context.
Switching Contexts
docker context use remote-vpsFrom this point on, every Docker command runs against the Docker Engine on remote-vps.
This includes:
docker psdocker imagesdocker statsdocker compose
No mental gymnastics required.
Real-World Usage: Observing a Remote Host
Once the context is active, normal commands “just work” out of the box.
Containers and Images
docker ps     -a
docker images -a
or even compose
❯ docker compose ls
NAME                STATUS              CONFIG FILES
traefik             running(9)          /opt/services/traefik/docker-compose.yml
You are now inspecting the remote host—not your laptop.
Live Resource Usage
docker stats --no-streamExample output:
NAME          CPU %     MEM USAGE / LIMIT
wiki          0.01%     14.16MiB / 3.825GiB
mariadb       0.10%     83.74MiB / 3.825GiB
traefik       0.00%     42.62MiB / 3.825GiB
This is extremely useful when:
- You want quick visibility without SSHing in
- You’re comparing resource usage across environments
- You’re debugging “why is this host slow?”
Example: Deploying a Service via Docker Compose
With the remote-vps context active, you can deploy services remotely using Compose as if they were local.
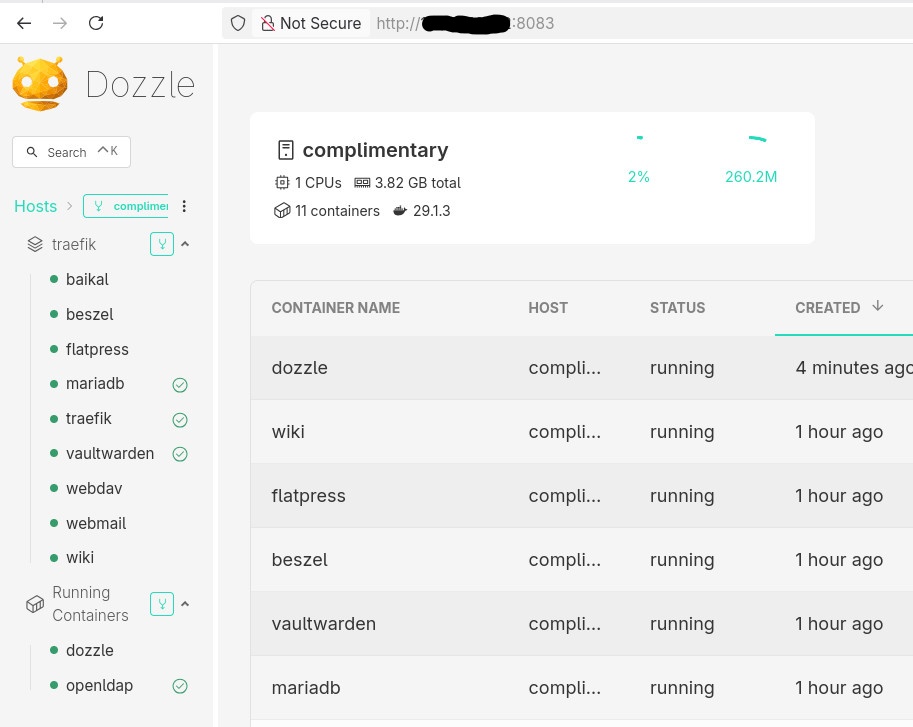
Example: running Dozzle (Docker log viewer).
docker-compose.yaml
services:
  dozzle:
    image: amir20/dozzle:latest
    container_name: dozzle
    hostname: dozzle
    volumes:
      - /var/run/docker.sock:/var/run/docker.sock
    ports:
      - 8083:8080
Be Aware: I’ve changed the port to 8083 for this example.
Deploying
docker compose -v upThe image is pulled on the remote host, the container runs on the remote host, and port 8083 is exposed there.
No SCP.
No SSH shell.
No surprises.
Common Mistake
- Forgetting the Active Context !
This is the most common mistake.
Run this often:
docker context lsBetter yet: configure your shell prompt to show the active context.
Best Practices from Real Usage
- Use one context per environment (local, staging, prod)
- Name contexts clearly (
prod-eu,homelab,ci-runner) - Avoid running destructive commands without checking context
- Treat contexts as infrastructure, not convenience hacks
- Combine with read-only SSH users for production when possible
That’s it !
- Evaggelos Balaskas
a blog post series to my homelab

Part One
In this blog post, I will start by walking you through the process of setting up Traefik as a reverse proxy for your homelab. My setup involves using a virtual machine connected via a point-to-point VPN to a cloud VPS, along with several Docker containers on my homelab for various tasks and learning purposes. The goal is to expose only Traefik to the internet, which will then provide access to my internal homelab. For certain applications, I also use Tailscale, which I prefer not to expose directly to the internet. In short, I have a complex internal homelab setup, and in this post, we’ll simplify it!
I’ve made a short video to accompany this blog post:

docker compose
To begin, we need to set up a basic Docker Compose YAML file.
As of the time of writing this blog post, the latest Traefik Docker container image is version 3.3. It is best to declare a specific version instead of using “latest” tag.
image: traefik:v3.3Using an .env file in a Docker Compose configuration is important for several reasons, as for configure variables, secrets and it is easy to reuse though several services and to avoid hardcoding values. For traefik is important so we can configure the docker GID in order traefil to be able to use the docker socket.
eg. .env
# This is my user id
PUID=1001
# This is my docker group id
PGID=142
UMASK="002"
TZ="Europe/Athens"
DNS="88.198.92.222"
Next interesting topic is the volumes section.
I would like to mount a local directory for the traefik configuration, which I will later use with the dynamic file provider. Additionally, to enable Traefik to recongize our (future) docker images, we need to mount the docker socket too.
    volumes:
      - ./traefik:/etc/traefik
      - /var/run/docker.sock:/var/run/docker.sock
to conclude, here is a very basic docker compose yaml file:
docker-compose.yml
---
services:
  traefik:
    image: traefik:v3.3
    container_name: traefik
    hostname: traefik
    env_file:
      - path: ./.env
        required: true
    restart: unless-stopped
    ports:
      # The Web UI (enabled by --api.insecure=true)
      - 8080:8080
      # The HTTP port
      - 80:80
    volumes:
      - ./traefik:/etc/traefik
      - /var/run/docker.sock:/var/run/docker.sock
pull traefik docker image
we can explicitly get the Traefik docker container image
docker compose pull traefiktraefik configuration file
we also need to create the configuration file by enabling the API and the dashboard for now.
Create the directory and file
traefik/traefik.yml
and write this:
# API and dashboard configuration
api:
  insecure: true
Start traefik docker
We are ready start and run our Traefik docker container:
docker compose upresult is something like:
[+] Running 2/2
 ✔ Network homelab_default  Created       0.3s
 ✔ Container traefik        Created       0.4s
Attaching to traefik
To stop traefik from docker compose, we need to open a new terminal and type from the same directory
docker compose downor, we ca run the docker compose and detach it so it runs on the background:
docker compose up traefik -dThis is going to be useful for the future as we starting each service one by one.
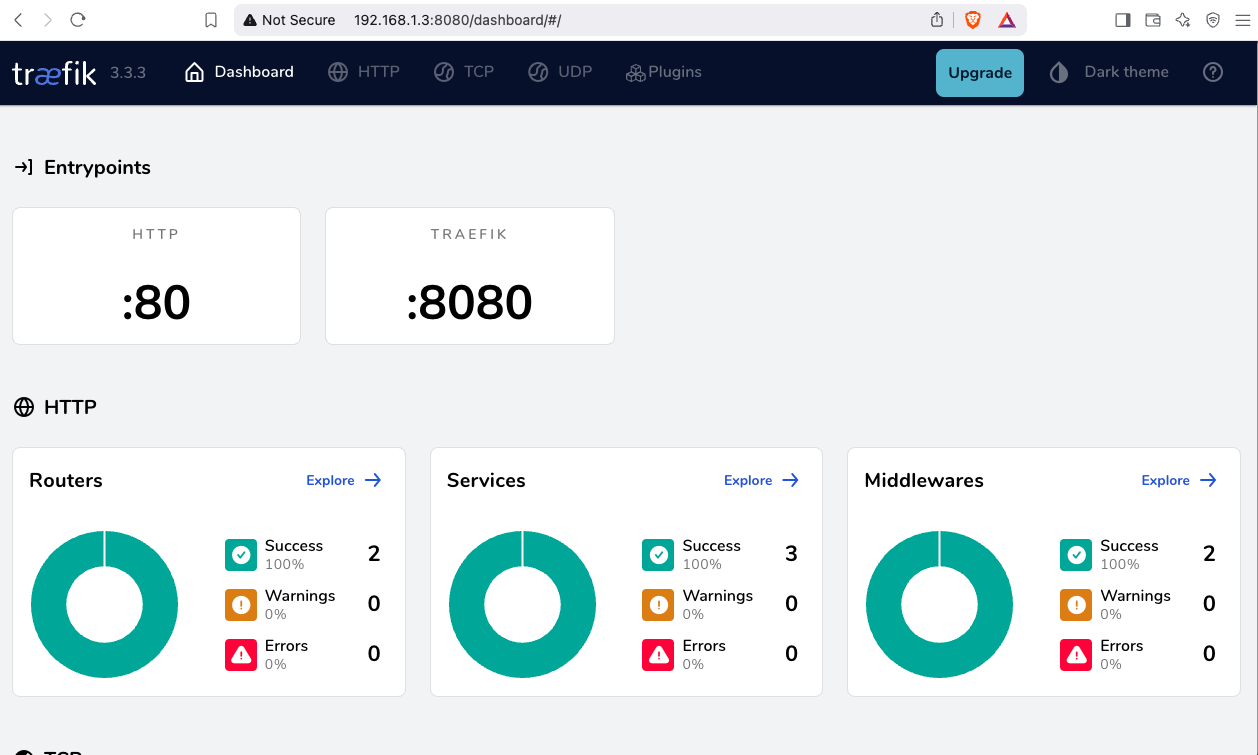
Test traefik
Open your browser and click on: http://127.0.0.1:8080
you will see something like:
Migrate legacy openldap to a docker container.
Prologue
I maintain a couple of legacy EOL CentOS 6.x SOHO servers to different locations. Stability on those systems is unparalleled and is -mainly- the reason of keeping them in production, as they run almost a decade without a major issue.
But I need to do a modernization of these legacy systems. So I must prepare a migration plan. Initial goal was to migrate everything to ansible roles. Although, I’ve walked down this path a few times in the past, the result is not something desirable. A plethora of configuration files and custom scripts. Not easily maintainable for future me.
Current goal is to setup a minimal setup for the underlying operating system, that I can easily upgrade through it’s LTS versions and separate the services from it. Keep the configuration on a git repository and deploy docker containers via docker-compose.
In this blog post, I will document the openldap service. I had some is issues against bitnami/openldap docker container so the post is also a kind of documentation.
Preparation
Two different cases, in one I have the initial ldif files (without the data) and on the second node I only have the data in ldifs but not the initial schema. So, I need to create for both locations a combined ldif that will contain the schema and data.
And that took me more time that it should! I could not get the service running correctly and I experimented with ldap exports till I found something that worked against bitnami/openldap notes and environment variables.
ldapsearch command
In /root/.ldap_conf I keep the environment variables as Base, Bind and Admin Password (only root user can read them).
cat /usr/local/bin/lds #!/bin/bash
source /root/.ldap_conf
/usr/bin/ldapsearch
-o ldif-wrap=no
-H ldap://$HOST
-D $BIND
-b $BASE
-LLL -x
-w $PASS $*
sudo lds > /root/openldap_export.ldif
Bitnami/openldap
GitHub page of bitnami/openldap has extensive documentation and a lot of environment variables you need to setup, to run an openldap service. Unfortunately, it took me quite a while, in order to find the proper configuration to import ldif from my current openldap service.
Through the years bitnami has made a few changes in libopenldap.sh which produced a frustrated period for me to review the shell script and understand what I need to do.
I would like to explain it in simplest terms here and hopefully someone will find it easier to migrate their openldap.
TL;DR
The correct way:
Create local directories
mkdir -pv {ldif,openldap}Place your openldap_export.ldif to the local ldif directory, and start openldap service with:
docker compose up---
services:
openldap:
image: bitnami/openldap:2.6
container_name: openldap
env_file:
- path: ./ldap.env
volumes:
- ./openldap:/bitnami/openldap
- ./ldifs:/ldifs
ports:
- 1389:1389
restart: always
volumes:
data:
driver: local
driver_opts:
device: /storage/docker
Your environmental configuration file, should look like:
cat ldap.env LDAP_ADMIN_USERNAME="admin"
LDAP_ADMIN_PASSWORD="testtest"
LDAP_ROOT="dc=example,dc=org"
LDAP_ADMIN_DN="cn=admin,$ LDAP_ROOT"
LDAP_SKIP_DEFAULT_TREE=yes
Below we are going to analyze and get into details of bitnami/openldap docker container and process.
OpenLDAP Version in docker container images.
Bitnami/openldap docker containers -at the time of writing- represent the below OpenLDAP versions:
bitnami/openldap:2    -> OpenLDAP: slapd 2.4.58
bitnami/openldap:2.5  -> OpenLDAP: slapd 2.5.17
bitnami/openldap:2.6  -> OpenLDAP: slapd 2.6.7
list images
docker images -a
REPOSITORY         TAG       IMAGE ID       CREATED        SIZE
bitnami/openldap   2.6       bf93eace348a   30 hours ago   160MB
bitnami/openldap   2.5       9128471b9c2c   2 days ago     160MB
bitnami/openldap   2         3c1b9242f419   2 years ago    151MB
Initial run without skipping default tree
As mentioned above the problem was with LDAP environment variables and LDAP_SKIP_DEFAULT_TREE was in the middle of those.
cat ldap.env LDAP_ADMIN_USERNAME="admin"
LDAP_ADMIN_PASSWORD="testtest"
LDAP_ROOT="dc=example,dc=org"
LDAP_ADMIN_DN="cn=admin,$ LDAP_ROOT"
LDAP_SKIP_DEFAULT_TREE=no
for testing: always empty ./openldap/ directory
docker compose up -dBy running ldapsearch (see above) the results are similar to below data
ldsdn: dc=example,dc=org
objectClass: dcObject
objectClass: organization
dc: example
o: example
dn: ou=users,dc=example,dc=org
objectClass: organizationalUnit
ou: users
dn: cn=user01,ou=users,dc=example,dc=org
cn: User1
cn: user01
sn: Bar1
objectClass: inetOrgPerson
objectClass: posixAccount
objectClass: shadowAccount
userPassword:: Yml0bmFtaTE=
uid: user01
uidNumber: 1000
gidNumber: 1000
homeDirectory: /home/user01
dn: cn=user02,ou=users,dc=example,dc=org
cn: User2
cn: user02
sn: Bar2
objectClass: inetOrgPerson
objectClass: posixAccount
objectClass: shadowAccount
userPassword:: Yml0bmFtaTI=
uid: user02
uidNumber: 1001
gidNumber: 1001
homeDirectory: /home/user02
dn: cn=readers,ou=users,dc=example,dc=org
cn: readers
objectClass: groupOfNames
member: cn=user01,ou=users,dc=example,dc=org
member: cn=user02,ou=users,dc=example,dc=org
so as you can see, they create some default users and groups.
Initial run with skipping default tree
Now, let’s skip creating the default users/groups.
cat ldap.env LDAP_ADMIN_USERNAME="admin"
LDAP_ADMIN_PASSWORD="testtest"
LDAP_ROOT="dc=example,dc=org"
LDAP_ADMIN_DN="cn=admin,$ LDAP_ROOT"
LDAP_SKIP_DEFAULT_TREE=yes
(always empty ./openldap/ directory )
docker compose up -dldapsearch now returns:
No such object (32)That puzzled me … a lot !
Conclusion
It does NOT matter if you place your ldif schema file and data and populate the LDAP variables with bitnami/openldap. Or use ANY other LDAP variable from bitnami/openldap reference manual.
The correct method is to SKIP default tree and place your export ldif to the local ldif directory. Nothing else worked.
Took me almost 4 days to figure it out and I had to read the libopenldap.sh.
That’s it !
There is some confusion on which is the correct way to migrate your current/local docker images to another disk. To reduce this confusion, I will share my personal notes on the subject.
Prologue
I replaced a btrfs raid-1 1TB storage with another btrfs raid-1 4TB setup. So 2 disks out, 2 new disks in. I also use luks, so all my disks are encrypted with random 4k keys before btrfs on them. There is -for sure- a write-penalty with this setup, but I am for data resilience - not speed.
Before
These are my local docker images
docker images -a
REPOSITORY        TAG           IMAGE ID         CREATED      SIZE
golang            1.19          b47c7dfaaa93     5 days   ago   993MB
archlinux         base-devel    a37dc5345d16     6 days   ago   764MB
archlinux         base          d4e07600b346    4 weeks  ago   418MB
ubuntu            22.04         58db3edaf2be    2 months ago   77.8MB
centos7           ruby          28f8bde8a757    3 months ago   532MB
ubuntu            20.04         d5447fc01ae6    4 months ago   72.8MB
ruby              latest        046e6d725a3c    4 months ago   893MB
alpine            latest        49176f190c7e    4 months ago   7.04MB
bash              latest        018f8f38ad92    5 months ago   12.3MB
ubuntu            18.04         71eaf13299f4    5 months ago   63.1MB
centos            6             5bf9684f4720   19 months ago   194MB
centos            7             eeb6ee3f44bd   19 months ago   204MB
centos            8             5d0da3dc9764   19 months ago   231MB
ubuntu            16.04         b6f507652425   19 months ago   135MB
3bal/centos6-eol  devtoolset-7  ff3fa1a19332    2 years  ago   693MB
3bal/centos6-eol  latest        aa2256d57c69    2 years  ago   194MB
centos6           ebal          d073310c1ec4    2 years  ago   3.62GB
3bal/arch         devel         76a20143aac1    2 years  ago   1.02GB
cern/slc6-base    latest        63453d0a9b55    3 years  ago   222MB
Yes, I am still using centos6! It’s stable!!
docker save - docker load
Reading docker’s documentation, the suggested way is docker save and docker load. Seems easy enough:
docker save --output busybox.tar busybox
docker load < busybox.tar.gz
which is a lie!
docker prune
before we do anything with the docker images, let us clean up the garbages
sudo docker system prune
docker save - the wrong way
so I used the ImageID as a reference:
docker images -a | grep -v ^REPOSITORY | awk '{print "docker save -o "$3".tar "$3}'
piped out through a bash shell | bash -x
and got my images:
$ ls -1

33a093dd9250.tar
b47c7dfaaa93.tar
16eed3dc21a6.tar
d4e07600b346.tar
58db3edaf2be.tar
28f8bde8a757.tar
382715ecff56.tar
d5447fc01ae6.tar
046e6d725a3c.tar
49176f190c7e.tar
018f8f38ad92.tar
71eaf13299f4.tar
5bf9684f4720.tar
eeb6ee3f44bd.tar
5d0da3dc9764.tar
b6f507652425.tar
ff3fa1a19332.tar
aa2256d57c69.tar
d073310c1ec4.tar
76a20143aac1.tar
63453d0a9b55.tar
docker daemon
I had my docker images on tape-archive (tar) format. Now it was time to switch to my new btrfs storage. In order to do that, the safest way is my tweaking the
/etc/docker/daemon.json
and I added the data-root section
{
    "dns": ["8.8.8.8"],
    "data-root": "/mnt/WD40PURZ/var_lib_docker"
}
I will explain var_lib_docker in a bit, stay with me.
and restarted docker
sudo systemctl restart dockerdocker load - the wrong way
It was time to restore aka load the docker images back to docker
ls -1 | awk '{print "docker load --input "$1".tar"}'

docker load --input 33a093dd9250.tar
docker load --input b47c7dfaaa93.tar
docker load --input 16eed3dc21a6.tar
docker load --input d4e07600b346.tar
docker load --input 58db3edaf2be.tar
docker load --input 28f8bde8a757.tar
docker load --input 382715ecff56.tar
docker load --input d5447fc01ae6.tar
docker load --input 046e6d725a3c.tar
docker load --input 49176f190c7e.tar
docker load --input 018f8f38ad92.tar
docker load --input 71eaf13299f4.tar
docker load --input 5bf9684f4720.tar
docker load --input eeb6ee3f44bd.tar
docker load --input 5d0da3dc9764.tar
docker load --input b6f507652425.tar
docker load --input ff3fa1a19332.tar
docker load --input aa2256d57c69.tar
docker load --input d073310c1ec4.tar
docker load --input 76a20143aac1.tar
docker load --input 63453d0a9b55.tar
I was really happy, till I saw the result:
# docker images -a

REPOSITORY   TAG       IMAGE ID       CREATED         SIZE
<none>       <none>    b47c7dfaaa93   5 days ago      993MB
<none>       <none>    a37dc5345d16   6 days ago      764MB
<none>       <none>    16eed3dc21a6   2 weeks ago     65.5MB
<none>       <none>    d4e07600b346   4 weeks ago     418MB
<none>       <none>    58db3edaf2be   2 months ago    77.8MB
<none>       <none>    28f8bde8a757   3 months ago    532MB
<none>       <none>    382715ecff56   3 months ago    705MB
<none>       <none>    d5447fc01ae6   4 months ago    72.8MB
<none>       <none>    046e6d725a3c   4 months ago    893MB
<none>       <none>    49176f190c7e   4 months ago    7.04MB
<none>       <none>    018f8f38ad92   5 months ago    12.3MB
<none>       <none>    71eaf13299f4   5 months ago    63.1MB
<none>       <none>    5bf9684f4720   19 months ago   194MB
<none>       <none>    eeb6ee3f44bd   19 months ago   204MB
<none>       <none>    5d0da3dc9764   19 months ago   231MB
<none>       <none>    b6f507652425   19 months ago   135MB
<none>       <none>    ff3fa1a19332   2 years ago     693MB
<none>       <none>    aa2256d57c69   2 years ago     194MB
<none>       <none>    d073310c1ec4   2 years ago     3.62GB
<none>       <none>    76a20143aac1   2 years ago     1.02GB
<none>       <none>    63453d0a9b55   3 years ago     222MB
No REPOSITORY or TAG !
then after a few minutes of internet search, I’ve realized that if you use the ImageID as a reference point in docker save, you will not get these values !!!!
and there is no reference here: https://docs.docker.com/engine/reference/commandline/save/
Removed everything , removed the data-root from /etc/docker/daemon.json and started again from the beginning
docker save - the correct way
docker images -a | grep -v ^REPOSITORY | awk '{print "docker save -o "$3".tar "$1":"$2""}' | sh -xoutput:
+ docker save -o b47c7dfaaa93.tar golang:1.19
+ docker save -o a37dc5345d16.tar archlinux:base-devel
+ docker save -o d4e07600b346.tar archlinux:base
+ docker save -o 58db3edaf2be.tar ubuntu:22.04
+ docker save -o 28f8bde8a757.tar centos7:ruby
+ docker save -o 382715ecff56.tar gitlab/gitlab-runner:ubuntu
+ docker save -o d5447fc01ae6.tar ubuntu:20.04
+ docker save -o 046e6d725a3c.tar ruby:latest
+ docker save -o 49176f190c7e.tar alpine:latest
+ docker save -o 018f8f38ad92.tar bash:latest
+ docker save -o 71eaf13299f4.tar ubuntu:18.04
+ docker save -o 5bf9684f4720.tar centos:6
+ docker save -o eeb6ee3f44bd.tar centos:7
+ docker save -o 5d0da3dc9764.tar centos:8
+ docker save -o b6f507652425.tar ubuntu:16.04
+ docker save -o ff3fa1a19332.tar 3bal/centos6-eol:devtoolset-7
+ docker save -o aa2256d57c69.tar 3bal/centos6-eol:latest
+ docker save -o d073310c1ec4.tar centos6:ebal
+ docker save -o 76a20143aac1.tar 3bal/arch:devel
+ docker save -o 63453d0a9b55.tar cern/slc6-base:latest
docker daemon with new data point
{
    "dns": ["8.8.8.8"],
    "data-root": "/mnt/WD40PURZ/var_lib_docker"
}
restart docker
sudo systemctl restart dockerdocker load - the correct way
ls -1 | awk '{print "docker load --input "$1}'
and verify -moment of truth-
$ docker images -a
REPOSITORY        TAG           IMAGE         ID  CREATED  SIZE
archlinux         base-devel    33a093dd9250  3   days     ago   764MB
golang            1.19          b47c7dfaaa93  8   days     ago   993MB
archlinux         base          d4e07600b346  4   weeks    ago   418MB
ubuntu            22.04         58db3edaf2be  2   months   ago   77.8MB
centos7           ruby          28f8bde8a757  3   months   ago   532MB
gitlab/gitlab-runner ubuntu     382715ecff56  4   months   ago   705MB
ubuntu            20.04         d5447fc01ae6  4   months   ago   72.8MB
ruby              latest        046e6d725a3c  4   months   ago   893MB
alpine            latest        49176f190c7e  4   months   ago   7.04MB
bash              latest        018f8f38ad92  5   months   ago   12.3MB
ubuntu            18.04         71eaf13299f4  5   months   ago   63.1MB
centos            6             5bf9684f4720  19  months   ago   194MB
centos            7             eeb6ee3f44bd  19  months   ago   204MB
centos            8             5d0da3dc9764  19  months   ago   231MB
ubuntu            16.04         b6f507652425  19  months   ago   135MB
3bal/centos6-eol  devtoolset-7  ff3fa1a19332  2   years    ago   693MB
3bal/centos6-eol  latest        aa2256d57c69  2   years    ago   194MB
centos6           ebal          d073310c1ec4  2   years    ago   3.62GB
3bal/arch         devel         76a20143aac1  2   years    ago   1.02GB
cern/slc6-base    latest        63453d0a9b55  3   years    ago   222MB
success !
btrfs mount point
Now it is time to explain the var_lib_docker
but first , let’s verify ST1000DX002 mount point with WD40PURZ
$ sudo ls -l /mnt/ST1000DX002/var_lib_docker/

total 4
drwx--x--- 1 root root  20 Nov 24  2020 btrfs
drwx------ 1 root root  20 Nov 24  2020 builder
drwx--x--x 1 root root 154 Dec 18  2020 buildkit
drwx--x--x 1 root root  12 Dec 18  2020 containerd
drwx--x--- 1 root root   0 Apr 14 19:52 containers
-rw------- 1 root root  59 Feb 13 10:45 engine-id
drwx------ 1 root root  10 Nov 24  2020 image
drwxr-x--- 1 root root  10 Nov 24  2020 network
drwx------ 1 root root  20 Nov 24  2020 plugins
drwx------ 1 root root   0 Apr 18 18:19 runtimes
drwx------ 1 root root   0 Nov 24  2020 swarm
drwx------ 1 root root   0 Apr 18 18:32 tmp
drwx------ 1 root root   0 Nov 24  2020 trust
drwx-----x 1 root root 568 Apr 18 18:19 volumes
$ sudo ls -l /mnt/WD40PURZ/var_lib_docker/

total 4
drwx--x--- 1 root root  20 Apr 18 16:51 btrfs
drwxr-xr-x 1 root root  14 Apr 18 17:46 builder
drwxr-xr-x 1 root root 148 Apr 18 17:48 buildkit
drwxr-xr-x 1 root root  20 Apr 18 17:47 containerd
drwx--x--- 1 root root   0 Apr 14 19:52 containers
-rw------- 1 root root  59 Feb 13 10:45 engine-id
drwxr-xr-x 1 root root  20 Apr 18 17:48 image
drwxr-xr-x 1 root root  24 Apr 18 17:48 network
drwxr-xr-x 1 root root  34 Apr 18 17:48 plugins
drwx------ 1 root root   0 Apr 18 18:36 runtimes
drwx------ 1 root root   0 Nov 24  2020 swarm
drwx------ 1 root root  48 Apr 18 18:42 tmp
drwx------ 1 root root   0 Nov 24  2020 trust
drwx-----x 1 root root  70 Apr 18 18:36 volumes
var_lib_docker is actually a btrfs subvolume that we can mount it on our system
$ sudo btrfs subvolume show /mnt/WD40PURZ/var_lib_docker/

var_lib_docker
        Name:                   var_lib_docker
        UUID:                   5552de11-f37c-4143-855f-50d02f0a9836
        Parent UUID:            -
        Received UUID:          -
        Creation time:          2023-04-18 16:25:54 +0300
        Subvolume ID:           4774
        Generation:             219588
        Gen at creation:        215579
        Parent ID:              5
        Top level ID:           5
        Flags:                  -
        Send transid:           0
        Send time:              2023-04-18 16:25:54 +0300
        Receive transid:        0
        Receive time:           -
        Snapshot(s):
We can use the subvolume id for that:
mount -o subvolid=4774 LABEL="WD40PURZ" /var/lib/docker/
So /var/lib/docker/ path on our rootfs, is now a mount point for our BTRFS raid-1 4TB storage and we can remove the data-root declaration from /etc/docker/daemon.json and restart our docker service.
That’s it !
GitLab is a truly wonderful devops platform. It has a complete CI/CD toolchain, it’s opensource (GitLab Community Edition) and it can also be self-hosted. One of its greatest feature are the GitLab Runner that are used in the CI/CD pipelines.
The GitLab Runner is also an opensource project written in Go and handles CI jobs of a pipeline. GitLab Runner implements Executors to run the continuous integration builds for different scenarios and the most used of them is the docker executor, although nowadays most of sysadmins are migrating to kubernetes executors.
I have a few personal projects in GitLab under https://gitlab.com/ebal but I would like to run GitLab Runner local on my system for testing purposes. GitLab Runner has to register to a GitLab instance, but I do not want to install the entire GitLab application. I want to use the docker executor and run my CI tests local.
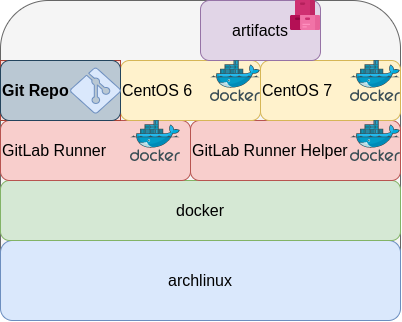
Here are my notes on how to run GitLab Runner with the docker executor. No root access needed as long as your user is in the docker group. To give a sense of what this blog post is, the below image will act as reference.
GitLab Runner
The docker executor comes in two flavors:
- alpine
- ubuntu
In this blog post, I will use the ubuntu flavor.
Get the latest ubuntu docker image
docker pull gitlab/gitlab-runner:ubuntuVerify
$ docker run --rm -ti gitlab/gitlab-runner:ubuntu --version
Version:      12.10.1
Git revision: ce065b93
Git branch:   12-10-stable
GO version:   go1.13.8
Built:        2020-04-22T21:29:52+0000
OS/Arch:      linux/amd64
exec help
We are going to use the exec command to spin up the docker executor. With exec we will not need to register with a token.
$ docker run --rm -ti gitlab/gitlab-runner:ubuntu exec --help

Runtime platform arch=amd64 os=linux pid=6 revision=ce065b93 version=12.10.1
NAME:
   gitlab-runner exec - execute a build locally

USAGE:
   gitlab-runner exec command [command options] [arguments...]

COMMANDS:
     shell       use shell executor
     ssh         use ssh executor
     virtualbox  use virtualbox executor
     custom      use custom executor
     docker      use docker executor
Runner
5 minutes ago
# Run your CI test with GitLab-Runner on your system
GitLab     parallels   use parallels executor

OPTIONS:
   --help, -h  show help
Git Repo - tmux
Now we need to download the git repo, we would like to test. Inside the repo, a .gitlab-ci.yml file should exist. The gitlab-ci file describes the CI pipeline, with all the stages and jobs. In this blog post, I will use a simple repo that builds the latest version of tmux for centos6 & centos7.
git clone https://gitlab.com/rpmbased/tmux.git
cd tmux
Docker In Docker
The docker executor will spawn the GitLab Runner. GitLab Runner needs to communicate with our local docker service to spawn the CentOS docker image and to run the CI job.
So we need to pass the docker socket from our local docker service to GitLab Runner docker container.
To test dind (docker-in-docker) we can try one of the below commands:
docker run --rm -ti
    -v /var/run/docker.sock:/var/run/docker.sock
    docker:latest sh
or
docker run --rm -ti
    -v /var/run/docker.sock:/var/run/docker.sock
    ubuntu:20.04 bash
Limitations
There are some limitations of gitlab-runner exec.
We can not run stages and we can not download artifacts.
- stages no
- artifacts no
Jobs
So we have to adapt. As we can not run stages, we will tell gitlab-runner exec to run one specific job.
In the tmux repo, the build-centos-6 is the build job for centos6 and the build-centos-7 for centos7.
Artifacts
GitLab Runner will use the /builds as the build directory. We need to mount this directory as read-write to a local directory to get the artifact.
mkdir -pv artifacts/The docker executor has many docker options, there are options to setup a different cache directory. To see all the docker options type:
$ docker run --rm -ti gitlab/gitlab-runner:ubuntu exec docker --help | grep dockerBash Script
We can put everything from above to a bash script. The bash script will mount our current git project directory to the gitlab-runner, then with the help of dind it will spin up the centos docker container, passing our code and gitlab-ci file, run the CI job and then save the artifacts under /builds.
#!/bin/bash

# This will be the directory to save our artifacts
rm -rf artifacts
mkdir -p artifacts

# JOB="build-centos-6"
JOB="build-centos-7"

DOCKER_SOCKET="/var/run/docker.sock"

docker run --rm                              \
  -v "$DOCKER_SOCKET":"$DOCKER_SOCKET"       \
  -v "$PWD":"$PWD"                           \
  --workdir "$PWD"                           \
  gitlab/gitlab-runner:ubuntu                \
  exec docker                                \
      --docker-volumes="$PWD/artifacts":/builds:rw \
      $JOB
That’s it.
You can try with your own gitlab repos, but dont forget to edit the gitlab-ci file accordingly, if needed.
Full example output
Last, but not least, here is the entire walkthrough
ebal@myhomepc:tmux(master)$ git remote -v
oring   git@gitlab.com:rpmbased/tmux.git (fetch)
oring   git@gitlab.com:rpmbased/tmux.git (push)
$ ./gitlab.run.sh

Runtime platform           arch=amd64 os=linux pid=6 revision=ce065b93 version=12.10.1
Running with gitlab-runner 12.10.1 (ce065b93)
Preparing the "docker" executor
Using Docker executor with image centos:6 ...
Pulling docker image centos:6 ...
Using docker image sha256:d0957ffdf8a2ea8c8925903862b65a1b6850dbb019f88d45e927d3d5a3fa0c31 for centos:6 ...
Preparing environment
Running on runner--project-0-concurrent-0 via 42b751e35d01...
Getting source from Git repository
Fetching changes...
Initialized empty Git repository in /builds/0/project-0/.git/
Created fresh repository.
From /home/ebal/gitlab-runner/tmux
 * [new branch]      master     -> origin/master
Checking out 6bb70469 as master...

Skipping Git submodules setup
Restoring cache
Downloading artifacts
Running before_script and script
$ export -p NAME=tmux
$ export -p VERSION=$(awk '/^Version/ {print $NF}' tmux.spec)
$ mkdir -p rpmbuild/{BUILD,RPMS,SOURCES,SPECS,SRPMS}
$ yum -y update &> /dev/null
$ yum -y install rpm-build curl gcc make automake autoconf pkg-config &> /dev/null
$ yum -y install libevent2-devel ncurses-devel &> /dev/null
$ cp $NAME.spec                  rpmbuild/SPECS/$NAME.spec
$ curl -sLo rpmbuild/SOURCES/$NAME-$VERSION.tar.gz   https://github.com/tmux/$NAME/releases/download/$VERSION/$NAME-$VERSION.tar.gz
$ curl -sLo rpmbuild/SOURCES/bash-it.completion.bash https://raw.githubusercontent.com/Bash-it/bash-it/master/completion/available/bash-it.completion.bash
$ rpmbuild --define "_topdir ${PWD}/rpmbuild/" --clean -ba rpmbuild/SPECS/$NAME.spec &> /dev/null
$ cp rpmbuild/RPMS/x86_64/$NAME*.x86_64.rpm $CI_PROJECT_DIR/
Running after_script
Saving cache
Uploading artifacts for successful job
Job succeeded
artifacts
and here is the tmux-3.1-1.el6.x86_64.rpm
$ ls -l artifacts/0/project-0
total 368
-rw-rw-rw- 1 root root    374 Apr 27 09:13 README.md
drwxr-xr-x 1 root root     70 Apr 27 09:17 rpmbuild
-rw-r--r-- 1 root root 365836 Apr 27 09:17 tmux-3.1-1.el6.x86_64.rpm
-rw-rw-rw- 1 root root   1115 Apr 27 09:13 tmux.spec
docker processes
if we run docker ps -a from another terminal, we see something like this:
$ docker ps -a
CONTAINER ID  IMAGE                        COMMAND                  CREATED        STATUS                   PORTS  NAMES
b5333a7281ac  d0957ffdf8a2                 "sh -c 'if [ -x /usr…"   3 minutes ago  Up 3 minutes                    runner--project-0-concurrent-0-e6ee009d5aa2c136-build-4
70491d10348f  b6b00e0f09b9                 "gitlab-runner-build"    3 minutes ago  Exited (0) 3 minutes ago        runner--project-0-concurrent-0-e6ee009d5aa2c136-predefined-3
7be453e5cd22  b6b00e0f09b9                 "gitlab-runner-build"    4 minutes ago  Exited (0) 4 minutes ago        runner--project-0-concurrent-0-e6ee009d5aa2c136-predefined-2
1046287fba5d  b6b00e0f09b9                 "gitlab-runner-build"    4 minutes ago  Exited (0) 4 minutes ago        runner--project-0-concurrent-0-e6ee009d5aa2c136-predefined-1
f1ebc99ce773  b6b00e0f09b9                 "gitlab-runner-build"    4 minutes ago  Exited (0) 4 minutes ago        runner--project-0-concurrent-0-e6ee009d5aa2c136-predefined-0
42b751e35d01 gitlab/gitlab-runner:ubuntu "/usr/bin/dumb-init …" 4 minutes ago Up 4 minutes vigorous_goldstineContinuous Deployment with GitLab: how to build and deploy a RPM Package with GitLab CI
I would like to automate building custom rpm packages with gitlab using their CI/CD functionality. This article is a documentation of my personal notes on the matter.
[updated: 2018-03-20 gitlab-runner Possible Problems]
Installation
You can find notes on how to install gitlab-community-edition here: Installation methods for GitLab. If you are like me, then you dont run a shell script on you machines unless you are absolutely sure what it does. Assuming you read script.rpm.sh and you are on a CentOS 7 machine, you can follow the notes below and install gitlab-ce manually:
Import gitlab PGP keys
# rpm --import https://packages.gitlab.com/gitlab/gitlab-ce/gpgkey

# rpm --import https://packages.gitlab.com/gitlab/gitlab-ce/gpgkey/gitlab-gitlab-ce-3D645A26AB9FBD22.pub.gpg
Gitlab repo
# curl -s 'https://packages.gitlab.com/install/repositories/gitlab/gitlab-ce/config_file.repo?os=centos&dist=7&source=script' \
  -o /etc/yum.repos.d/gitlab-ce.repo
Install Gitlab
# yum -y install gitlab-ceConfiguration File
The gitlab core configuration file is /etc/gitlab/gitlab.rb
Remember that every time you make a change, you need to reconfigure gitlab:
# gitlab-ctl reconfigureMy VM’s IP is: 192.168.122.131. Update the external_url to use the same IP or add a new entry on your hosts file (eg. /etc/hosts).
external_url 'http://gitlab.example.com'Run: gitlab-ctl reconfigure for updates to take effect.
Firewall
To access the GitLab dashboard from your lan, you have to configure your firewall appropriately.
You can do this in many ways:
-
Accept everything on your http service
# firewall-cmd --permanent --add-service=http -
Accept your lan:
# firewall-cmd --permanent --add-source=192.168.122.0/24 -
Accept only tcp IPv4 traffic from a specific lan
# firewall-cmd --permanent --direct --add-rule ipv4 filter INPUT 0 -p tcp -s 192.168.0.0/16 -j ACCEPT
or you can complete stop firewalld (but not recommended)
- Stop your firewall
# systemctl stop firewalld
okay, I think you’ve got the idea.
Reload your firewalld after every change on it’s zones/sources/rules.
# firewall-cmd --reload
successBrowser
Point your browser to your gitlab installation:
http://192.168.122.131/this is how it looks the first time:
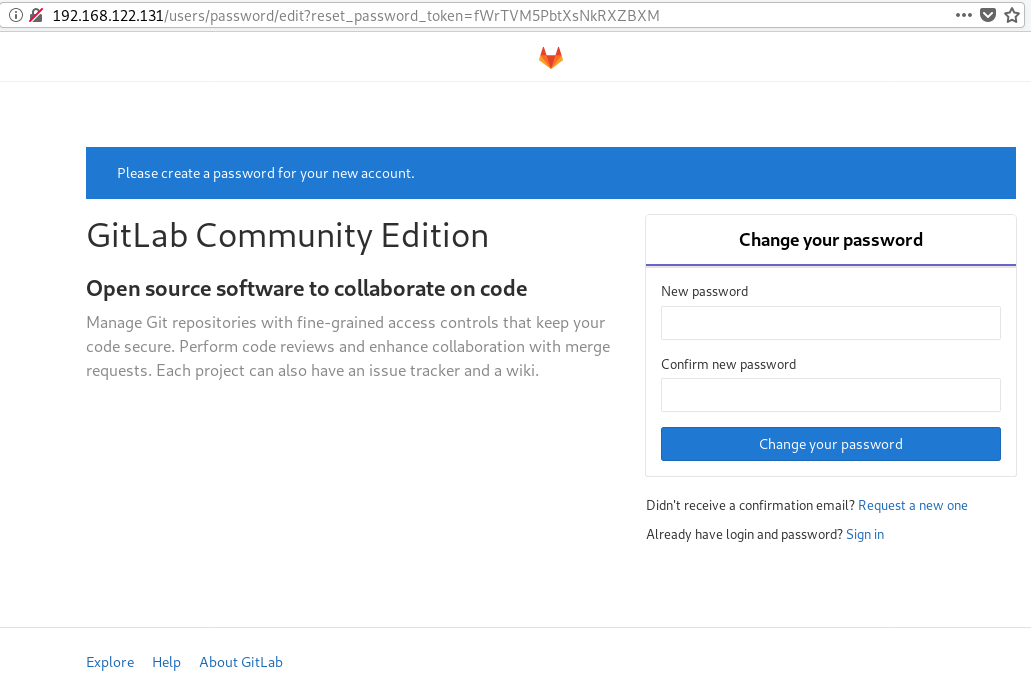
and your first action is to Create a new password by typing a password and hitting the Change your password button.
Login

First Page

New Project
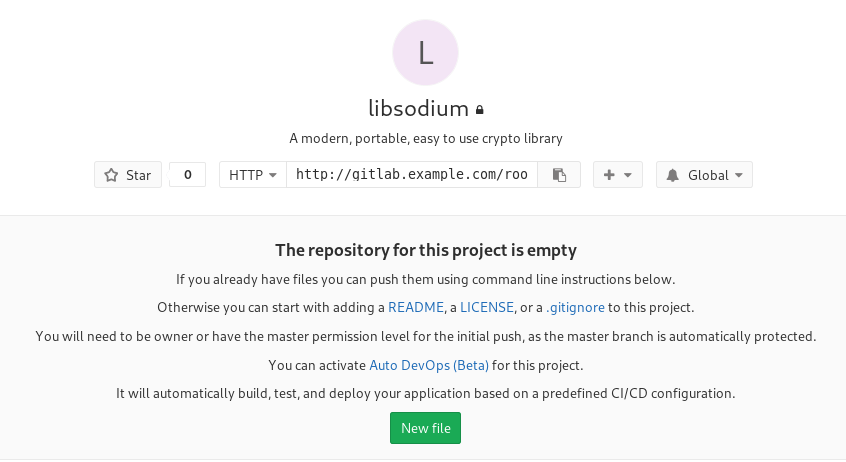
I want to start this journey with a simple-to-build project, so I will try to build libsodium,
a modern, portable, easy to use crypto library.
New project --> Blank project
I will use this libsodium.spec file as the example for the CI/CD.
Docker
The idea is to build out custom rpm package of libsodium for CentOS 6, so we want to use docker containers through the gitlab CI/CD. We want clean & ephemeral images, so we will use containers as the building enviroments for the GitLab CI/CD.
Installing docker is really simple.
Installation
# yum -y install docker Run Docker
# systemctl restart docker
# systemctl enable  docker
Download image
Download a fresh CentOS v6 image from Docker Hub:
# docker pull centos:6 Trying to pull repository docker.io/library/centos ...
6: Pulling from docker.io/library/centos
ca9499a209fd: Pull complete
Digest: sha256:551de58ca434f5da1c7fc770c32c6a2897de33eb7fde7508e9149758e07d3fe3View Docker Images
# docker imagesREPOSITORY TAG IMAGE ID CREATED SIZE
docker.io/centos 6 609c1f9b5406 7 weeks ago 194.5 MBGitlab Runner
Now, it is time to install and setup GitLab Runner.
In a nutshell this program, that is written in golang, will listen to every change on our repository and run every job that it can find on our yml file. But lets start with the installation:
# curl -s 'https://packages.gitlab.com/install/repositories/runner/gitlab-runner/config_file.repo?os=centos&dist=7&source=script' \
  -o /etc/yum.repos.d/gitlab-runner.repo

# yum -y install gitlab-runner
GitLab Runner Settings
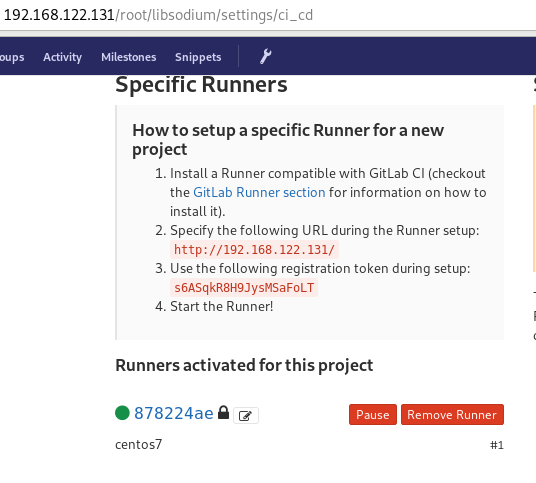
We need to connect our project with the gitlab-runner.
Project --> Settings --> CI/CDor in our example:
http://192.168.122.131/root/libsodium/settings/ci_cd
click on the expand button on Runner’s settings and you should see something like this:

Register GitLab Runner
Type into your terminal:
# gitlab-runner registerfollowing the instructions
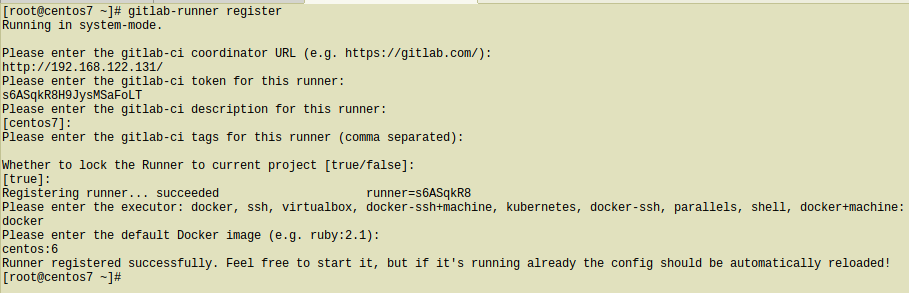
[root@centos7 ~]# gitlab-runner register
Running in system-mode.

Please enter the gitlab-ci coordinator URL (e.g. https://gitlab.com/):
http://192.168.122.131/

Please enter the gitlab-ci token for this runner:
s6ASqkR8H9JysMSaFoLT

Please enter the gitlab-ci description for this runner:
[centos7]:

Please enter the gitlab-ci tags for this runner (comma separated):

Whether to lock the Runner to current project [true/false]:
[true]:

Registering runner... succeeded                     runner=s6ASqkR8

Please enter the executor: docker, ssh, virtualbox, docker-ssh+machine, kubernetes, docker-ssh, parallels, shell, docker+machine:
docker

Please enter the default Docker image (e.g. ruby:2.1):
centos:6

Runner registered successfully. Feel free to start it, but if it's running already the config should be automatically reloaded!
[root@centos7 ~]#
by refreshing the previous page we will see a new active runner on our project.
The Docker executor
We are ready to setup our first executor to our project. That means we are ready to run our first CI/CD example!
In gitlab this is super easy, just add a
New file --> Template --> gitlab-ci.yml --> based on bashDont forget to change the image from busybox:latest to centos:6

that will start a pipeline
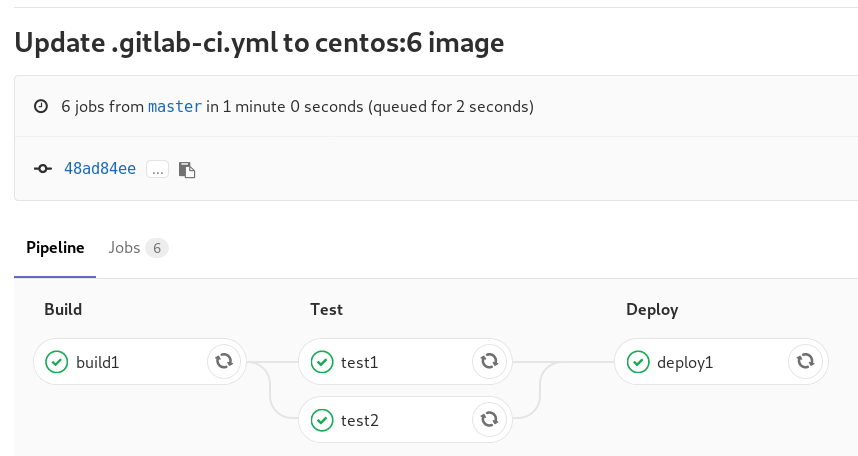
GitLab Continuous Integration
Below is a gitlab ci test file that builds the rpm libsodium :
.gitlab-ci.yml
image: centos:6

before_script:
  - echo "Get the libsodium version and name from the rpm spec file"
  - export LIBSODIUM_VERS=$(egrep '^Version:' libsodium.spec | awk '{print $NF}')
  - export LIBSODIUM_NAME=$(egrep '^Name:'    libsodium.spec | awk '{print $NF}')

run-build:
  stage: build
  artifacts:
    untracked: true
  script:
    - echo "Install rpm-build package"
    - yum -y install rpm-build
    - echo "Install BuildRequires"
    - yum -y install gcc
    - echo "Create rpmbuild directories"
    - mkdir -p rpmbuild/{BUILD,RPMS,SOURCES,SPECS,SRPMS}
    - echo "Download source file from github"
    - curl -s -L https://github.com/jedisct1/$LIBSODIUM_NAME/releases/download/$LIBSODIUM_VERS/$LIBSODIUM_NAME-$LIBSODIUM_VERS.tar.gz -o rpmbuild/SOURCES/$LIBSODIUM_NAME-$LIBSODIUM_VERS.tar.gz
    - rpmbuild -D "_topdir `pwd`/rpmbuild" --clean -ba `pwd`/libsodium.spec

run-test:
  stage: test
  script:
    - echo "Test it, Just test it !"
    - yum -y install rpmbuild/RPMS/x86_64/$LIBSODIUM_NAME-$LIBSODIUM_VERS-*.rpm

run-deploy:
  stage: deploy
  script:
    - echo "Do your deploy here"
GitLab Artifacts
Before we continue I need to talk about artifacts
Artifacts is a list of files and directories that we produce at stage jobs and are not part of the git repository. We can pass those artifacts between stages, but you have to remember that gitlab can track files that only exist under the git-clone repository and not on the root fs of the docker image.
GitLab Continuous Delivery
We have successfully build an rpm file!! Time to deploy it to another machine. To do that, we need to add the secure shell private key to gitlab secret variables.
Project --> Settings --> CI/CD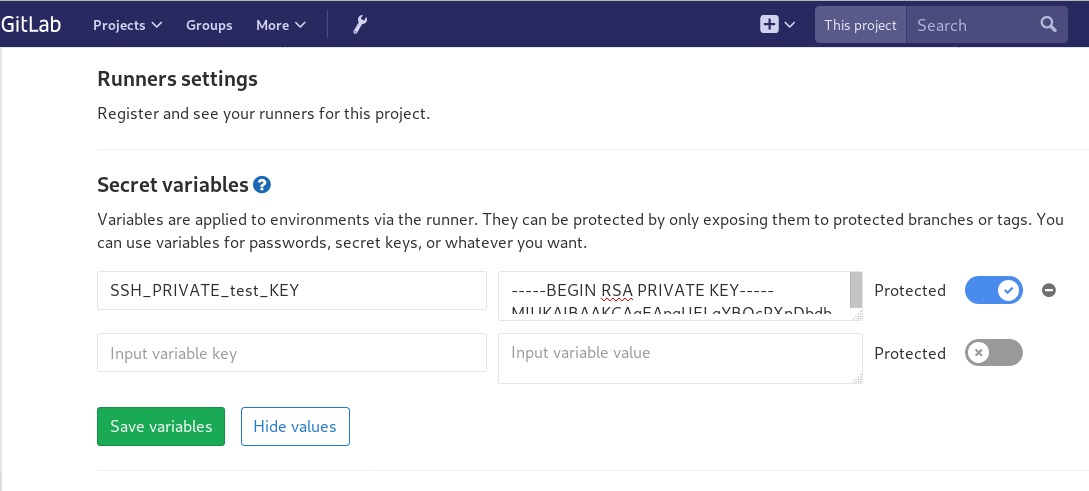
stage: deploy
Lets re-write gitlab deployment state:
variables:
  DESTINATION_SERVER: '192.168.122.132'

run-deploy:
  stage: deploy
  script:
    - echo "Create ssh root directory"
    - mkdir -p ~/.ssh/ && chmod 700 ~/.ssh/

    - echo "Append secret variable to the ssh private key file"
    - echo -e "$SSH_PRIVATE_test_KEY" > ~/.ssh/id_rsa
    - chmod 0600 ~/.ssh/id_rsa

    - echo "Install SSH client"
    - yum -y install openssh-clients

    - echo "Secure Copy the libsodium rpm file to the destination server"
    - scp -o StrictHostKeyChecking=no rpmbuild/RPMS/x86_64/$LIBSODIUM_NAME-$LIBSODIUM_VERS-*.rpm  $DESTINATION_SERVER:/tmp/

    - echo "Install libsodium rpm file to the destination server"
    - ssh -o StrictHostKeyChecking=no $DESTINATION_SERVER yum -y install /tmp/$LIBSODIUM_NAME-$LIBSODIUM_VERS-*.rpm
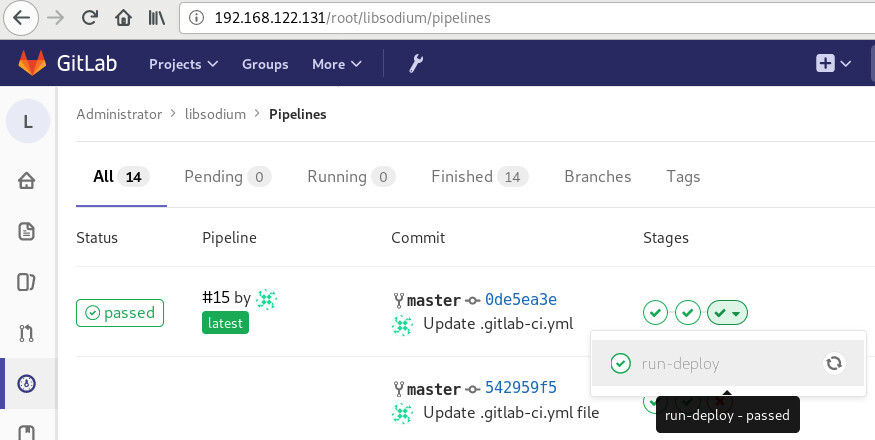
and we can see that our pipeline has passed!
Possible Problems:
that will probable fail!
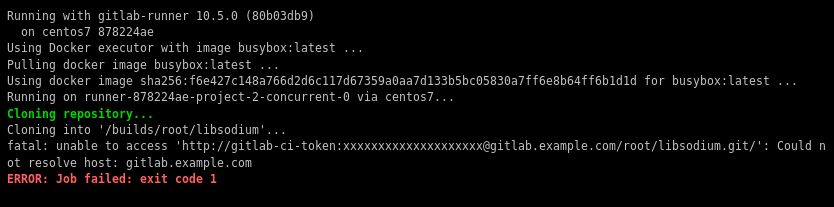
because our docker images don’t recognize gitlab.example.com.
Disclaimer: If you are using real fqdn - ip then you will probably not face this problem. I am referring to this issue, only for people who will follow this article step by step.
Easy fix:
# export -p EXTERNAL_URL="http://192.168.122.131" && yum -y reinstall gitlab-ceGitLab Runner
GitLab Runner is not running !
# gitlab-runner verify
Running in system-mode.

Verifying runner... is alive                        runner=e9bbcf90
Verifying runner... is alive                        runner=77701bad

#  gitlab-runner status
gitlab-runner: Service is not running.

# gitlab-runner install  -u gitlab-runner -d /home/gitlab-runner/

# systemctl is-active gitlab-runner
inactive

# systemctl enable gitlab-runner
# systemctl start gitlab-runner

# systemctl is-active gitlab-runner
active

# systemctl | egrep gitlab-runner
  gitlab-runner.service     loaded active running   GitLab Runner

# gitlab-runner status
gitlab-runner: Service is running!

# ps -e fuwww | egrep -i gitlab-[r]unner
root      5116  0.4  0.1  63428 16968 ?        Ssl  07:44   0:00 /usr/bin/gitlab-runner run --working-directory /home/gitlab-runner/ --config /etc/gitlab-runner/config.toml --service gitlab-runner --syslog --user gitlab-runner
Docker Swarm
The native Docker Container Orchestration system is Docker Swarm that in simple terms means that you can have multiple docker machines (hosts) to run your multiple docker containers (replicas). It is best to work with Docker Engine v1.12 and above as docker engine includes docker swarm natively.
Docker Swarm logo:

In not so simply terms, docker instances (engines) running on multiple machines (nodes), communicating together (VXLAN) as a cluster (swarm).
Nodes
To begin with, we need to create our docker machines. One of the nodes must be the manager and the others will run as workers. For testing purposes I will run three (3) docker engines:
- Manager Docker Node: myengine0
- Worker Docker Node 1: myengine1
- Worker Docker Node 2: myengine2
Drivers
A docker node is actually a machine that runs the docker engine in the swarm mode. The machine can be a physical, virtual, a virtualbox, a cloud instance, a VPS, a AWS etc etc
As the time of this blog post, officially docker supports natively the below drivers:
- Amazon Web Services
- Microsoft Azure
- Digital Ocean
- Exoscale
- Google Compute Engine
- Generic
- Microsoft Hyper-V
- OpenStack
- Rackspace
- IBM Softlayer
- Oracle VirtualBox
- VMware vCloud Air
- VMware Fusion
- VMware vSphere
QEMU - KVM
but there are unofficial drivers also.
I will use the qemu - kvm driver from this github repository: https://github.com/dhiltgen/docker-machine-kvm
The simplest way to add the kvm driver is this:
> cd /usr/local/bin/
> sudo -s
# wget -c https://github.com/dhiltgen/docker-machine-kvm/releases/download/v0.7.0/docker-machine-driver-kvm
# chmod 0750 docker-machine-driver-kvm
Docker Machines
The next thing we need to do, is to create our docker machines. Look on your distro’s repositories:
# yes | pacman -S docker-machineManager
$ docker-machine create -d kvm myengine0

Running pre-create checks...
Creating machine...
(myengine0) Image cache directory does not exist, creating it at /home/ebal/.docker/machine/cache...
(myengine0) No default Boot2Docker ISO found locally, downloading the latest release...
(myengine0) Latest release for github.com/boot2docker/boot2docker is v1.13.1
(myengine0) Downloading /home/ebal/.docker/machine/cache/boot2docker.iso from https://github.com/boot2docker/boot2docker/releases/download/v1.13.1/boot2docker.iso...
(myengine0) 0%....10%....20%....30%....40%....50%....60%....70%....80%....90%....100%
(myengine0) Copying /home/ebal/.docker/machine/cache/boot2docker.iso to /home/ebal/.docker/machine/machines/myengine0/boot2docker.iso...

Waiting for machine to be running, this may take a few minutes...
Detecting operating system of created instance...
Waiting for SSH to be available...
Detecting the provisioner...
Provisioning with boot2docker...
Copying certs to the local machine directory...
Copying certs to the remote machine...
Setting Docker configuration on the remote daemon...
Checking connection to Docker...
Docker is up and running!
To see how to connect your Docker Client to the Docker Engine running on this virtual machine, run: docker-machine env myengine0
Worker 1
$ docker-machine create -d kvm myengine1
Running pre-create checks...
Creating machine...
(myengine1) Copying /home/ebal/.docker/machine/cache/boot2docker.iso to /home/ebal/.docker/machine/machines/myengine1/boot2docker.iso...
Waiting for machine to be running, this may take a few minutes...
Detecting operating system of created instance...
Waiting for SSH to be available...
Detecting the provisioner...
Provisioning with boot2docker...
Copying certs to the local machine directory...
Copying certs to the remote machine...
Setting Docker configuration on the remote daemon...
Checking connection to Docker...
Docker is up and running!
To see how to connect your Docker Client to the Docker Engine running on this virtual machine, run: docker-machine env myengine1
Worker 2
$ docker-machine create -d kvm myengine2
Running pre-create checks...
Creating machine...
(myengine2) Copying /home/ebal/.docker/machine/cache/boot2docker.iso to /home/ebal/.docker/machine/machines/myengine2/boot2docker.iso...
Waiting for machine to be running, this may take a few minutes...
Detecting operating system of created instance...
Waiting for SSH to be available...
Detecting the provisioner...
Provisioning with boot2docker...
Copying certs to the local machine directory...
Copying certs to the remote machine...
Setting Docker configuration on the remote daemon...
Checking connection to Docker...
Docker is up and running!
To see how to connect your Docker Client to the Docker Engine running on this virtual machine, run: docker-machine env myengine2
List your Machines
$ docker-machine env myengine0
export DOCKER_TLS_VERIFY="1"
export DOCKER_HOST="tcp://192.168.42.126:2376"
export DOCKER_CERT_PATH="/home/ebal/.docker/machine/machines/myengine0"
export DOCKER_MACHINE_NAME="myengine0"
# Run this command to configure your shell:
# eval $(docker-machine env myengine0)
$ docker-machine ls

NAME        ACTIVE   DRIVER   STATE     URL                         SWARM   DOCKER    ERRORS
myengine0   -        kvm      Running   tcp://192.168.42.126:2376           v1.13.1
myengine1   -        kvm      Running   tcp://192.168.42.51:2376            v1.13.1
myengine2   -        kvm      Running   tcp://192.168.42.251:2376           v1.13.1
Inspect
You can get the IP of your machines with:
$ docker-machine ip myengine0
192.168.42.126

$ docker-machine ip myengine1
192.168.42.51

$ docker-machine ip myengine2
192.168.42.251
with ls as seen above or use the inspect parameter for a full list of information regarding your machines in a json format:
$ docker-machine inspect myengine0
If you have jq you can filter out some info
$ docker-machine inspect myengine0  | jq .'Driver.DiskPath'

"/home/ebal/.docker/machine/machines/myengine0/myengine0.img"
SSH
To enter inside the kvm docker machine, you can use ssh
Manager
$ docker-machine ssh myengine0

                        ##         .
                  ## ## ##        ==
               ## ## ## ## ##    ===
           /"""""""""""""""""___/ ===
      ~~~ {~~ ~~~~ ~~~ ~~~~ ~~~ ~ /  ===- ~~~
           ______ o           __/
                          __/
              ___________/
 _                 _   ____     _            _
| |__   ___   ___ | |_|___  __| | ___   ___| | _____ _ __
| '_  / _  / _ | __| __) / _` |/ _  / __| |/ / _  '__|
| |_) | (_) | (_) | |_ / __/ (_| | (_) | (__|   <  __/ |
|_.__/ ___/ ___/ __|_______,_|___/ ___|_|____|_|
Boot2Docker version 1.13.1, build HEAD : b7f6033 - Wed Feb  8 20:31:48 UTC 2017
Docker version 1.13.1, build 092cba3
Worker 1
$ docker-machine ssh myengine1

                        ##         .
                  ## ## ##        ==
               ## ## ## ## ##    ===
           /"""""""""""""""""___/ ===
      ~~~ {~~ ~~~~ ~~~ ~~~~ ~~~ ~ /  ===- ~~~
           ______ o           __/
                          __/
              ___________/
 _                 _   ____     _            _
| |__   ___   ___ | |_|___  __| | ___   ___| | _____ _ __
| '_  / _  / _ | __| __) / _` |/ _  / __| |/ / _  '__|
| |_) | (_) | (_) | |_ / __/ (_| | (_) | (__|   <  __/ |
|_.__/ ___/ ___/ __|_______,_|___/ ___|_|____|_|
Boot2Docker version 1.13.1, build HEAD : b7f6033 - Wed Feb  8 20:31:48 UTC 2017
Docker version 1.13.1, build 092cba3
Worker 2
$ docker-machine ssh myengine2

                        ##         .
                  ## ## ##        ==
               ## ## ## ## ##    ===
           /"""""""""""""""""___/ ===
      ~~~ {~~ ~~~~ ~~~ ~~~~ ~~~ ~ /  ===- ~~~
           ______ o           __/
                          __/
              ___________/
 _                 _   ____     _            _
| |__   ___   ___ | |_|___  __| | ___   ___| | _____ _ __
| '_  / _  / _ | __| __) / _` |/ _  / __| |/ / _  '__|
| |_) | (_) | (_) | |_ / __/ (_| | (_) | (__|   <  __/ |
|_.__/ ___/ ___/ __|_______,_|___/ ___|_|____|_|
Boot2Docker version 1.13.1, build HEAD : b7f6033 - Wed Feb  8 20:31:48 UTC 2017
Docker version 1.13.1, build 092cba3
Swarm Cluster
Now it’s time to build a swarm of docker machines!
Initialize the manager
docker@myengine0:~$  docker swarm init --advertise-addr 192.168.42.126

Swarm initialized: current node (jwyrvepkz29ogpcx18lgs8qhx) is now a manager.

To add a worker to this swarm, run the following command:

    docker swarm join
    --token SWMTKN-1-4vpiktzp68omwayfs4c3j5mrdrsdavwnewx5834g9cp6p1koeo-bgcwtrz6srt45qdxswnneb6i9
    192.168.42.126:2377

To add a manager to this swarm, run 'docker swarm join-token manager' and follow the instructions.
Join Worker 1
docker@myengine1:~$  docker swarm join
>     --token SWMTKN-1-4vpiktzp68omwayfs4c3j5mrdrsdavwnewx5834g9cp6p1koeo-bgcwtrz6srt45qdxswnneb6i9
>     192.168.42.126:2377

This node joined a swarm as a worker.
Join Worker 2
docker@myengine2:~$   docker swarm join
>     --token SWMTKN-1-4vpiktzp68omwayfs4c3j5mrdrsdavwnewx5834g9cp6p1koeo-bgcwtrz6srt45qdxswnneb6i9
>     192.168.42.126:2377

This node joined a swarm as a worker.
From the manager
docker@myengine0:~$  docker node ls

ID                           HOSTNAME   STATUS  AVAILABILITY  MANAGER STATUS
jwyrvepkz29ogpcx18lgs8qhx *  myengine0  Ready   Active        Leader
m5akhw7j60fru2d0an4lnsgr3    myengine2  Ready   Active
sfau3r42bqbhtz1c6v9hnld67    myengine1  Ready   Active
Info
We can find more information about the docker-machines running the docker info command when you have ssh-ed the nodes:
eg. the swarm part:
manager
Swarm: active
 NodeID: jwyrvepkz29ogpcx18lgs8qhx
 Is Manager: true
 ClusterID: 8fjv5fzp0wtq9hibl7w2v65cs
 Managers: 1
 Nodes: 3
 Orchestration:
  Task History Retention Limit: 5
 Raft:
  Snapshot Interval: 10000
  Number of Old Snapshots to Retain: 0
  Heartbeat Tick: 1
  Election Tick: 3
 Dispatcher:
  Heartbeat Period: 5 seconds
 CA Configuration:
  Expiry Duration: 3 months
 Node Address: 192.168.42.126
 Manager Addresses:
  192.168.42.126:2377
worker1
Swarm: active
 NodeID: sfau3r42bqbhtz1c6v9hnld67
 Is Manager: false
 Node Address: 192.168.42.51
 Manager Addresses:
  192.168.42.126:2377
worker 2
Swarm: active
 NodeID: m5akhw7j60fru2d0an4lnsgr3
 Is Manager: false
 Node Address: 192.168.42.251
 Manager Addresses:
  192.168.42.126:2377
Services
Now it’s time to test our docker swarm by running a container service across our entire fleet!
For testing purposes we chose 6 replicas of an nginx container:
docker@myengine0:~$ docker service create --replicas 6 -p 80:80 --name web nginx

ql6iogo587ibji7e154m7npal
List images
docker@myengine0:~$  docker images
REPOSITORY          TAG                 IMAGE ID            CREATED             SIZE
nginx               <none>              db079554b4d2        9 days ago          182 MB
List of services
regarding your docker registry or your internet connection, we will see the replicas running:
docker@myengine0:~$ docker service ls
ID            NAME  MODE        REPLICAS  IMAGE
ql6iogo587ib  web   replicated  0/6       nginx:latest

docker@myengine0:~$ docker service ls
ID            NAME  MODE        REPLICAS  IMAGE
ql6iogo587ib  web   replicated  2/6       nginx:latest

docker@myengine0:~$ docker service ls
ID            NAME  MODE        REPLICAS  IMAGE
ql6iogo587ib  web   replicated  3/6       nginx:latest

docker@myengine0:~$ docker service ls
ID            NAME  MODE        REPLICAS  IMAGE
ql6iogo587ib  web   replicated  6/6       nginx:latest
docker@myengine0:~$  docker service ps web

ID            NAME   IMAGE         NODE       DESIRED STATE  CURRENT STATE           ERROR  PORTS
t3v855enecgv  web.1  nginx:latest  myengine1  Running        Running 17 minutes ago
xgwi91plvq00  web.2  nginx:latest  myengine2  Running        Running 17 minutes ago
0l6h6a0va2fy  web.3  nginx:latest  myengine0  Running        Running 16 minutes ago
qchj744k0e45  web.4  nginx:latest  myengine1  Running        Running 17 minutes ago
udimh2bokl8k  web.5  nginx:latest  myengine2  Running        Running 17 minutes ago
t50yhhtngbac  web.6  nginx:latest  myengine0  Running        Running 16 minutes ago
Browser
To verify that our replicas are running as they should:

Scaling a service
It’s really interesting that we can scale out or scale down our replicas on the fly !
from the manager
docker@myengine0:~$  docker service ls
ID            NAME  MODE        REPLICAS  IMAGE
ql6iogo587ib  web   replicated  6/6       nginx:latest

docker@myengine0:~$ docker service ps web
ID            NAME   IMAGE         NODE       DESIRED STATE  CURRENT STATE       ERROR  PORTS
t3v855enecgv  web.1  nginx:latest  myengine1  Running        Running 3 days ago
xgwi91plvq00  web.2  nginx:latest  myengine2  Running        Running 3 days ago
0l6h6a0va2fy  web.3  nginx:latest  myengine0  Running        Running 3 days ago
qchj744k0e45  web.4  nginx:latest  myengine1  Running        Running 3 days ago
udimh2bokl8k  web.5  nginx:latest  myengine2  Running        Running 3 days ago
t50yhhtngbac  web.6  nginx:latest  myengine0  Running        Running 3 days ago
Scale Down
from the manager
$ docker service scale web=3
web scaled to 3

docker@myengine0:~$ docker service ls
ID            NAME  MODE        REPLICAS  IMAGE
ql6iogo587ib  web   replicated  3/3       nginx:latest

docker@myengine0:~$ docker service ps web
ID            NAME   IMAGE         NODE       DESIRED STATE  CURRENT STATE       ERROR  PORTS
0l6h6a0va2fy  web.3  nginx:latest  myengine0  Running        Running 3 days ago
qchj744k0e45  web.4  nginx:latest  myengine1  Running        Running 3 days ago
udimh2bokl8k  web.5  nginx:latest  myengine2  Running        Running 3 days ago
Scale Up
from the manager
docker@myengine0:~$ docker service scale web=8
web scaled to 8
docker@myengine0:~$
docker@myengine0:~$ docker service ls
ID            NAME  MODE        REPLICAS  IMAGE
ql6iogo587ib  web   replicated  3/8       nginx:latest
docker@myengine0:~$
docker@myengine0:~$ docker service ls
ID            NAME  MODE        REPLICAS  IMAGE
ql6iogo587ib  web   replicated  4/8       nginx:latest
docker@myengine0:~$
docker@myengine0:~$ docker service ls
ID            NAME  MODE        REPLICAS  IMAGE
ql6iogo587ib  web   replicated  8/8       nginx:latest
docker@myengine0:~$
docker@myengine0:~$
docker@myengine0:~$ docker service ps web
ID            NAME   IMAGE         NODE       DESIRED STATE  CURRENT STATE           ERROR  PORTS
lyhoyseg8844  web.1  nginx:latest  myengine1  Running        Running 7 seconds ago
w3j9bhcn9f6e  web.2  nginx:latest  myengine2  Running        Running 8 seconds ago
0l6h6a0va2fy  web.3  nginx:latest  myengine0  Running        Running 3 days ago
qchj744k0e45  web.4  nginx:latest  myengine1  Running        Running 3 days ago
udimh2bokl8k  web.5  nginx:latest  myengine2  Running        Running 3 days ago
vr8jhbum8tlg  web.6  nginx:latest  myengine1  Running        Running 7 seconds ago
m4jzati4ddpp  web.7  nginx:latest  myengine2  Running        Running 8 seconds ago
7jek2zvuz6fs  web.8  nginx:latest  myengine0  Running        Running 11 seconds ago
[Last uptime 2020-12-25]
I need to run some ansible playbooks to a running (live) machine.
But, of-course, I cant use a production server for testing purposes !!
So here comes docker!
I have ssh access from my docker-server to this production server:
ssh livebox tar --one-file-system --sparse -C / -cf - | docker import - centos6:livebox on ubuntu 20.04
ssh livebox sudo tar -cf - --sparse --one-file-system / | docker import - centos6:livebox
Then run the new docker image:
$  docker run -t -i --rm -p 2222:22 centos6:livebox bash

[root@40b2bab2f306 /]# /usr/sbin/sshd -D
Create a new entry on your hosts inventory file, that uses ssh port 2222
or create a new separated inventory file
and test it with ansible ping module:
# ansible -m ping -i hosts.docker dockerlivebox

dockerlivebox | success >> {
    "changed": false,
    "ping": "pong"
}
Recently, I had the opportunity to see a presentation on the subject by Alexandros Kosiaris.
I was never fan of vagrant (or even virtualbox) but I gave it a try and below are my personal notes on the matter.
All my notes are based on Archlinux as it is my primary distribution but I think you can try them with every Gnu Linux OS.
Vagrant
So what is Vagrant ?
Vagrant is a wrapper, an abstraction layer to deal with some virtual solutions, like virtualbox, Vmware, hyper-v, docker, aws etc etc etc
With a few lines you can describe what you want to do and then use vagrant to create your enviroment of virtual boxes to work with.
Just for the fun of it, I used docker
Docker
We first need to create and build a proper Docker Image!
The Dockerfile below, is suggesting that we already have an archlinux:latest docker image.
You can use your own dockerfile or docker image.
You need to have an ssh connection to this docker image and you will need -of course- to have a ssh password or a ssh authorized key built in this image for root. If you are using sudo (then even better) dont forget to add the user to sudoers!
# vim Dockerfile

# sshd on archlinux
#
# VERSION               0.0.2

FROM     archlinux:latest
MAINTAINER  Evaggelos Balaskas < evaggelos _AT_ balaskas _DOT_ gr >

# Update the repositories
RUN  pacman -Syy && pacman -S --noconfirm openssh python2

# Generate host keys
RUN  /usr/bin/ssh-keygen -A

# Add password to root user
RUN  echo 'root:roottoor' | chpasswd

# Fix sshd
RUN  sed -i -e 's/^UsePAM yes/UsePAM no/g' /etc/ssh/sshd_config && echo 'PermitRootLogin yes' >> /etc/ssh/sshd_config

# Expose tcp port
EXPOSE   22

# Run openssh daemon
CMD  ["/usr/sbin/sshd", "-D"]
Again, you dont need to follow this step by the book!
It is an example to understand that you need a proper docker image that you can ssh into it.
Build the docker image:
# docker build -t archlinux:sshd .
On my PC:
# docker images

REPOSITORY          TAG                 IMAGE ID            CREATED             SIZE
archlinux           sshd                1b074ffe98be        7 days ago          636.2 MB
archlinux           latest              c0c56d24b865        7 days ago          534 MB
archlinux           devel               e66b5b8af509        2 weeks ago         607 MB
centos6             powerdns            daf76074f848        3 months ago        893 MB
centos6             newdnsps            642462a8dfb4        3 months ago        546.6 MB
centos7             cloudstack          b5e696e65c50        6 months ago        1.463 GB
centos7             latest              d96affc2f996        6 months ago        500.2 MB
centos6             latest              4ba27f5a1189        6 months ago        489.8 MB
Environment
We can define docker as our default provider with:
# export VAGRANT_DEFAULT_PROVIDER=docker
It is not necessary to define the default provider, as you will see below,
but it is also a good idea - if your forget to declare your vagrant provider later
Before we start with vagrant, let us create a new folder:
# mkdir -pv vagrant
# cd vagrant
Initialization
We are ready to initialized our enviroment for vagrant:
# vagrant init

A `Vagrantfile` has been placed in this directory. You are now
ready to `vagrant up` your first virtual environment! Please read
the comments in the Vagrantfile as well as documentation on
`vagrantup.com` for more information on using Vagrant.
Initial Vagrantfile
A typical vagrant configuration file looks something like this:
# cat Vagrantfile
 cat Vagrantfile
# -*- mode: ruby -*-
# vi: set ft=ruby :

# All Vagrant configuration is done below. The "2" in Vagrant.configure
# configures the configuration version (we support older styles for
# backwards compatibility). Please don't change it unless you know what
# you're doing.
Vagrant.configure("2") do |config|
  # The most common configuration options are documented and commented below.
  # For a complete reference, please see the online documentation at
  # https://docs.vagrantup.com.

  # Every Vagrant development environment requires a box. You can search for
  # boxes at https://atlas.hashicorp.com/search.
  config.vm.box = "base"

  # Disable automatic box update checking. If you disable this, then
  # boxes will only be checked for updates when the user runs
  # `vagrant box outdated`. This is not recommended.
  # config.vm.box_check_update = false

  # Create a forwarded port mapping which allows access to a specific port
  # within the machine from a port on the host machine. In the example below,
  # accessing "localhost:8080" will access port 80 on the guest machine.
  # config.vm.network "forwarded_port", guest: 80, host: 8080

  # Create a private network, which allows host-only access to the machine
  # using a specific IP.
  # config.vm.network "private_network", ip: "192.168.33.10"

  # Create a public network, which generally matched to bridged network.
  # Bridged networks make the machine appear as another physical device on
  # your network.
  # config.vm.network "public_network"

  # Share an additional folder to the guest VM. The first argument is
  # the path on the host to the actual folder. The second argument is
  # the path on the guest to mount the folder. And the optional third
  # argument is a set of non-required options.
  # config.vm.synced_folder "../data", "/vagrant_data"

  # Provider-specific configuration so you can fine-tune various
  # backing providers for Vagrant. These expose provider-specific options.
  # Example for VirtualBox:
  #
  # config.vm.provider "virtualbox" do |vb|
  #   # Display the VirtualBox GUI when booting the machine
  #   vb.gui = true
  #
  #   # Customize the amount of memory on the VM:
  #   vb.memory = "1024"
  # end
  #
  # View the documentation for the provider you are using for more
  # information on available options.

  # Define a Vagrant Push strategy for pushing to Atlas. Other push strategies
  # such as FTP and Heroku are also available. See the documentation at
  # https://docs.vagrantup.com/v2/push/atlas.html for more information.
  # config.push.define "atlas" do |push|
  #   push.app = "YOUR_ATLAS_USERNAME/YOUR_APPLICATION_NAME"
  # end

  # Enable provisioning with a shell script. Additional provisioners such as
  # Puppet, Chef, Ansible, Salt, and Docker are also available. Please see the
  # documentation for more information about their specific syntax and use.
  # config.vm.provision "shell", inline: <<-SHELL
  #   apt-get update
  #   apt-get install -y apache2
  # SHELL
end
If you try to run this Vagrant configuration file with docker provider,
it will try to boot up base image (Vagrant Default box):
# vagrant up --provider=docker

Bringing machine 'default' up with 'docker' provider...
==> default: Box 'base' could not be found. Attempting to find and install...
    default: Box Provider: docker
    default: Box Version: >= 0
==> default: Box file was not detected as metadata. Adding it directly...
==> default: Adding box 'base' (v0) for provider: docker
    default: Downloading: base
An error occurred while downloading the remote file. The error
message, if any, is reproduced below. Please fix this error and try
again.

Couldn't open file /ebal/Desktop/vagrant/base
Vagrantfile
Put the initial vagrantfile aside and create the below Vagrant configuration file:
Vagrant.configure("2") do |config|
  config.vm.provider "docker" do |d|
    d.image = "archlinux:sshd"
  end
end
That translate to :
Vagrant Provider: docker
Docker Image: archlinux:sshd
Basic commands
Run vagrant to create our virtual box:
#  vagrant up

Bringing machine 'default' up with 'docker' provider...
==> default: Creating the container...
    default:   Name: vagrant_default_1466368592
    default:  Image: archlinux:sshd
    default: Volume: /home/ebal/Desktop/vagrant:/vagrant
    default:
    default: Container created: 4cf4649b47615469
==> default: Starting container...
==> default: Provisioners will not be run since container doesn't support SSH.
ok, we havent yet configured vagrant to use ssh
but we have a running docker instance:
# vagrant status

Current machine states:

default                   running (docker)

The container is created and running. You can stop it using
`vagrant halt`, see logs with `vagrant docker-logs`, and
kill/destroy it with `vagrant destroy`.
that we can verify with docker ps:
#  docker ps -a

CONTAINER ID        IMAGE               COMMAND               CREATED              STATUS              PORTS               NAMES
4cf4649b4761        archlinux:sshd      "/usr/sbin/sshd -D"   About a minute ago   Up About a minute   22/tcp              vagrant_default_1466368592
Destroy
We need to destroy this instance:
#  vagrant destroy

    default: Are you sure you want to destroy the 'default' VM? [y/N] y
==> default: Stopping container...
==> default: Deleting the container...
Vagrant ssh
We need to edit Vagrantfile to add ssh support to our docker :
# vim Vagrantfile

Vagrant.configure("2") do |config|

    config.vm.provider "docker" do |d|
        d.image = "archlinux:sshd"
        d.has_ssh = true
    end

end
and re-up our vagrant box:
#  vagrant up

Bringing machine 'default' up with 'docker' provider...
==> default: Creating the container...
    default:   Name: vagrant_default_1466368917
    default:  Image: archlinux:sshd
    default: Volume: /home/ebal/Desktop/vagrant:/vagrant
    default:   Port: 127.0.0.1:2222:22
    default:
    default: Container created: b4fce563a9f9042c
==> default: Starting container...
==> default: Waiting for machine to boot. This may take a few minutes...
    default: SSH address: 172.17.0.2:22
    default: SSH username: vagrant
    default: SSH auth method: private key
    default: Warning: Authentication failure. Retrying...
    default: Warning: Authentication failure. Retrying...
Vagrant will try to connect to our docker instance with the user: vagrant and a key.
But our docker image only have a root user and a root password !!
# vagrant status

Current machine states:

default                   running (docker)

The container is created and running. You can stop it using
`vagrant halt`, see logs with `vagrant docker-logs`, and
kill/destroy it with `vagrant destroy`.

#  vagrant destroy

    default: Are you sure you want to destroy the 'default' VM? [y/N] y
==> default: Stopping container...
==> default: Deleting the container...
Vagrant ssh - the Correct way !
We need to edit the Vagrantfile, properly:
# vim Vagrantfile

Vagrant.configure("2") do |config|

    config.ssh.username = 'root'
    config.ssh.password = 'roottoor'

    config.vm.provider "docker" do |d|
        d.image = "archlinux:sshd"
        d.has_ssh = true
    end

end
# vagrant up

Bringing machine 'default' up with 'docker' provider...
==> default: Creating the container...
    default:   Name: vagrant_default_1466369126
    default:  Image: archlinux:sshd
    default: Volume: /home/ebal/Desktop/vagrant:/vagrant
    default:   Port: 127.0.0.1:2222:22
    default:
    default: Container created: 7fef0efc8905bb3a
==> default: Starting container...
==> default: Waiting for machine to boot. This may take a few minutes...
    default: SSH address: 172.17.0.2:22
    default: SSH username: root
    default: SSH auth method: password
    default: Warning: Connection refused. Retrying...
    default:
    default: Inserting generated public key within guest...
    default: Removing insecure key from the guest if it's present...
    default: Key inserted! Disconnecting and reconnecting using new SSH key...
==> default: Machine booted and ready!

# vagrant status

Current machine states:

default                   running (docker)

The container is created and running. You can stop it using
`vagrant halt`, see logs with `vagrant docker-logs`, and
kill/destroy it with `vagrant destroy`.

# vagrant ssh-config

Host default
  HostName 172.17.0.2
  User root
  Port 22
  UserKnownHostsFile /dev/null
  StrictHostKeyChecking no
  PasswordAuthentication no
  IdentityFile /tmp/vagrant/.vagrant/machines/default/docker/private_key
  IdentitiesOnly yes
  LogLevel FATAL

# vagrant ssh

[root@7fef0efc8905 ~]# uptime
 20:45:48 up 11:33,  0 users,  load average: 0.53, 0.42, 0.28
[root@7fef0efc8905 ~]#
[root@7fef0efc8905 ~]#
[root@7fef0efc8905 ~]#
[root@7fef0efc8905 ~]# exit
logout
Connection to 172.17.0.2 closed.
Ansible
It is time to add ansible to the mix!
Ansible Playbook
We need to create a basic ansible playbook:
# cat playbook.yml

---
- hosts: all

  vars:
      ansible_python_interpreter: "/usr/bin/env python2"

  gather_facts: no

  tasks:

    # Install package vim
    - pacman: name=vim state=present
The above playbook, is going to install vim, via pacman (archlinux PACkage MANager)!
Archlinux comes by default with python3 and with ansible_python_interpreter you are declaring to use python2!
Vagrantfile with Ansible
# cat Vagrantfile

Vagrant.configure("2") do |config|

    config.ssh.username = 'root'
    config.ssh.password = 'roottoor'

    config.vm.provider "docker" do |d|
        d.image = "archlinux:sshd"
        d.has_ssh = true
    end

    config.vm.provision "ansible" do |ansible|
        ansible.verbose = "v"
        ansible.playbook = "playbook.yml"
    end

end
Vagrant Docker Ansible
# vagrant up

Bringing machine 'default' up with 'docker' provider...
==> default: Creating the container...
    default:   Name: vagrant_default_1466370194
    default:  Image: archlinux:sshd
    default: Volume: /home/ebal/Desktop/vagrant:/vagrant
    default:   Port: 127.0.0.1:2222:22
    default:
    default: Container created: 8909eee7007b8d4f
==> default: Starting container...
==> default: Waiting for machine to boot. This may take a few minutes...
    default: SSH address: 172.17.0.2:22
    default: SSH username: root
    default: SSH auth method: password
    default: Warning: Connection refused. Retrying...
    default:
    default: Inserting generated public key within guest...
    default: Removing insecure key from the guest if it's present...
    default: Key inserted! Disconnecting and reconnecting using new SSH key...
==> default: Machine booted and ready!

==> default: Running provisioner: ansible...
    default: Running ansible-playbook...
PYTHONUNBUFFERED=1 ANSIBLE_FORCE_COLOR=true ANSIBLE_HOST_KEY_CHECKING=false ANSIBLE_SSH_ARGS='-o UserKnownHostsFile=/dev/null -o IdentitiesOnly=yes -o ControlMaster=auto -o ControlPersist=60s' ansible-playbook --connection=ssh --timeout=30 --limit="default" --inventory-file=/mnt/VB0250EAVER/home/ebal/Desktop/vagrant/.vagrant/provisioners/ansible/inventory -v playbook.yml
Using /etc/ansible/ansible.cfg as config file

PLAY [all] *********************************************************************

TASK [pacman] ******************************************************************
changed: [default] => {"changed": true, "msg": "installed 1 package(s). "}

PLAY RECAP *********************************************************************
default                    : ok=1    changed=1    unreachable=0    failed=0
# vagrant status

Current machine states:

default                   running (docker)

The container is created and running. You can stop it using
`vagrant halt`, see logs with `vagrant docker-logs`, and
kill/destroy it with `vagrant destroy`.
#  vagrant ssh

[root@8909eee7007b ~]# vim --version
VIM - Vi IMproved 7.4 (2013 Aug 10, compiled Jun  9 2016 09:35:16)
Included patches: 1-1910
Compiled by Arch Linux
Vagrant Provisioning
The ansible-step is called: provisioning as you may already noticed.
If you make a few changes on this playbook, just type:
# vagrant provision
and it will re-run the ansible part on this vagrant box !
Personal Notes on this blog post.
[work in progress]
Why ?
Γιατί docker ?
To docker είναι ένα management εργαλείο για διαχείριση containers.
Εάν κι αρχικά βασίστηκε σε lxc, πλέον είναι αυτοτελές.
Containers είναι ένα isolated περιβάλλον, κάτι περισσότερο από
chroot(jail) κάτι λιγότερο από virtual machines.
Μπορούμε να σηκώσουμε αρκετά linux λειτουργικά, αλλά της ίδιας αρχιτεκτονικής.
Χρησιμοποιούνται κυρίως για development αλλά πλέον τρέχει μεγάλη
production υποδομή σε μεγάλα projects.
Κερδίζει γιατί το docker image που έχω στο PC μου, μπορεί να τρέξει αυτούσιο
σε οποιοδήποτε linux λειτουργικό (centos/fedora/debian/archlinux/whatever)
και προσφέρει isolation μεταξύ της εφαρμογής που τρέχει και του λειτουργικού.
Οι επιδόσεις -πλέον- είναι πολύ κοντά σε αυτές του συστήματος.
Σε production κυρίως χρησιμοποιείτε για continuous deployment,
καθώς τα images μπορεί να τα παράγουν developers, vendors ή whatever,
και θα παίξει σε commodity server με οποιοδήποτε λειτουργικό σύστημα!
Οπότε πλέον το “Σε εμένα παίζει” με το docker μεταφράζεται σε
“Και σε εμένα παίζει” !! στην παραγωγή.
Info
Εάν δεν τρέχει το docker:
# systemctl restart docker
basic info on CentOS7 με devicemapper
# docker info

Containers: 0
Images: 4
Server Version: 1.9.1
Storage Driver: devicemapper
 Pool Name: docker-8:1-10617750-pool
 Pool Blocksize: 65.54 kB
 Base Device Size: 107.4 GB
 Backing Filesystem:
 Data file: /dev/loop0
 Metadata file: /dev/loop1
 Data Space Used: 1.654 GB
 Data Space Total: 107.4 GB
 Data Space Available: 105.7 GB
 Metadata Space Used: 1.642 MB
 Metadata Space Total: 2.147 GB
 Metadata Space Available: 2.146 GB
 Udev Sync Supported: true
 Deferred Removal Enabled: false
 Deferred Deletion Enabled: false
 Deferred Deleted Device Count: 0
 Data loop file: /var/lib/docker/devicemapper/devicemapper/data
 Metadata loop file: /var/lib/docker/devicemapper/devicemapper/metadata
 Library Version: 1.02.107-RHEL7 (2015-12-01)
Execution Driver: native-0.2
Logging Driver: json-file
Kernel Version: 3.10.0-327.13.1.el7.x86_64
Operating System: CentOS Linux 7 (Core)
CPUs: 16
Total Memory: 15.66 GiB
Name: myserverpc
ID: DCO7:RO56:3EWH:ESM3:257C:TCA3:JPLD:QFLU:EHKL:QXKU:GJYI:SHY5
basic info σε archlinux με btrfs :
# docker info
Containers: 0
 Running: 0
 Paused: 0
 Stopped: 0
Images: 8
Server Version: 1.11.1
Storage Driver: btrfs
 Build Version: Btrfs v4.5.1
 Library Version: 101
Logging Driver: json-file
Cgroup Driver: cgroupfs
Plugins:
 Volume: local
 Network: null host bridge
Kernel Version: 4.4.11-1-lts
Operating System: Arch Linux
OSType: linux
Architecture: x86_64
CPUs: 4
Total Memory: 7.68 GiB
Name: myhomepc
ID: MSCX:LLTD:YKZS:E7UN:NIA4:QW3F:SRGC:RQTH:RKE2:26VS:GFB5:Y7CS
Docker Root Dir:  /var/lib/docker/
Debug mode (client): false
Debug mode (server): false
Registry: https://index.docker.io/v1/
Images
# docker images -a

REPOSITORY  TAG         IMAGE ID      CREATED       VIRTUAL SIZE
centos6     rpmbuild    ccb144691075  11 days ago       1.092 GB
< none >      < none >      6d8ff86f2749  11 days ago       1.092 GB
< none >      < none >      af92904a92b4  11 days ago       811.8 MB
< none >      < none >      8e429b38312b  11 days ago       392.7 MB
Τα none:none είναι built parent images που χρησιμοποιούνται από τα named docker images
αλλά δεν τα αποθηκεύσαμε σωστά.
Understanding Images
Ανάλογα με το back-end του docker, το docker κρατά σε delta-layers τις διαφορές
ανάμεσα στα parent/child docker images.
Αυτό μας διευκολύνει, γιατί μπορούμε στο production να έχουμε μεγάλες μήτρες από docker images
και να στέλνουμε μικρά delta-child docker images με το production service που θέλουμε να τρέξουμε.
Επίσης βοηθά και στο update.
Σε έξι μήνες, από την αρχική μας εικόνα, φτιάχνουμε το update image και πάνω σε αυτό
ξαναφορτώνουμε την εφαρμογή ή service που θέλουμε να τρέξει.
Έτσι μπορούμε να στέλνουμε μικρά σε μέγεθος docker images και να γίνονται build
τα διάφορα services μας πάνω σε αυτά.
Στο myserverpc μέσω του docker info είδαμε πως τρέχει σε:
Storage Driver: devicemapper
και χρησιμοποιεί το παρακάτω αρχείο για να κρατά τα images :
Data loop file: /var/lib/docker/devicemapper/devicemapper/data
Το οποίο στην πραγματικότητα είναι:
# file data
data: SGI XFS filesystem data (blksz 4096, inosz 256, v2 dirs)
Τα πιο δημοφιλή storage drivers είναι τα UFS & btrfs.
Προσωπικά (ebal) χρησιμοποιώ btrfs γιατί χρησιμοποιεί subvolumes
(σαν να λέμε ξεχωριστά cow volumes) για κάθε docker image
(parent ή child).
# ls /var/lib/docker/btrfs/subvolumes
070dd70b48c86828463a7341609a7ee4924decd4d7fdd527e9fbaa70f7a0caf8
1fb7e53272a8f01801d9e413c823cbb8cbc83bfe1218436bdb9e658ea2e8b755
632cceadcc05f28dda37b39b8a9111bb004a9bdaeca59c0300196863ee44ad0a
8bfbbf03c00863bc19f46aa994d1458c0b5454529ad6af1203fb6e2599a35e91
93bb08f5730368de14719109142232249dc6b3a0571a0157b2a043d7fc94117a
a174a1b850ae50dfaf1c13ede7fe37cc0cb574498a2faa4b0e80a49194d0e115
d0e92b9a33b207c679e8a05da56ef3bf9a750bddb124955291967e0af33336fc
e9904ddda15030a210c7d741701cca55a44b89fd320e2253cfcb6e4a3f905669
Processes
Τι docker process τρέχουν:
# docker ps -a

CONTAINER ID        IMAGE               COMMAND             CREATED             STATUS              PORTS               NAMES
ενώ όταν τρέχει κάποιο:
CONTAINER ID  IMAGE               COMMAND             CREATED             STATUS              PORTS               NAMES
62ef0ed8bc95  centos6:rpmbuild    "bash"              10 seconds ago      Up 9 seconds                            drunk_mietner
Δώστε σημασία στο NAMES
To docker δίνει randomly δύο ονόματα για ευκολότερη διαχείριση,
αλλιώς θα πρέπει να χρησιμοποιούμε το πλήρες hashed named.
Στο παραπάνω παράδειγμα:
62ef0ed8bc952d501f241dbc4ecda25d3a629880d27fbb7344b5429a44af985f
Inspect
Πως παίρνουμε πληροφορίες από ένα docker process:
# docker inspect drunk_mietner

[
{
    "Id": "62ef0ed8bc952d501f241dbc4ecda25d3a629880d27fbb7344b5429a44af985f",
    "Created": "2016-06-05T07:41:18.821123985Z",
    "Path": "bash",
    "Args": [],
    "State": {
        "Status": "running",
        "Running": true,
        "Paused": false,
        "Restarting": false,
        "OOMKilled": false,
        "Dead": false,
        "Pid": 23664,
        "ExitCode": 0,
        "Error": "",
        "StartedAt": "2016-06-05T07:41:19.558616976Z",
        "FinishedAt": "0001-01-01T00:00:00Z"
    },
    "Image": "ccb1446910754d6572976a6d36e5d0c8d1d029e4dc72133211670b28cf2f1d8f",
    "ResolvConfPath": "/var/lib/docker/containers/62ef0ed8bc952d501f241dbc4ecda25d3a629880d27fbb7344b5429a44af985f/resolv.conf",
    "HostnamePath": "/var/lib/docker/containers/62ef0ed8bc952d501f241dbc4ecda25d3a629880d27fbb7344b5429a44af985f/hostname",
    "HostsPath": "/var/lib/docker/containers/62ef0ed8bc952d501f241dbc4ecda25d3a629880d27fbb7344b5429a44af985f/hosts",
    "LogPath": "/var/lib/docker/containers/62ef0ed8bc952d501f241dbc4ecda25d3a629880d27fbb7344b5429a44af985f/62ef0ed8bc952d501f241dbc4ecda25d3a629880d27fbb7344b5429a44af985f-json.log",
    "Name": "/drunk_mietner",
    "RestartCount": 0,
    "Driver": "devicemapper",
    "ExecDriver": "native-0.2",
    "MountLabel": "system_u:object_r:svirt_sandbox_file_t:s0:c344,c750",
    "ProcessLabel": "system_u:system_r:svirt_lxc_net_t:s0:c344,c750",
    "AppArmorProfile": "",
    "ExecIDs": null,
    "HostConfig": {
        "Binds": null,
        "ContainerIDFile": "",
        "LxcConf": [],
        "Memory": 0,
        "MemoryReservation": 0,
        "MemorySwap": 0,
        "KernelMemory": 0,
        "CpuShares": 0,
        "CpuPeriod": 0,
        "CpusetCpus": "",
        "CpusetMems": "",
        "CpuQuota": 0,
        "BlkioWeight": 0,
        "OomKillDisable": false,
        "MemorySwappiness": -1,
        "Privileged": false,
        "PortBindings": {},
        "Links": null,
        "PublishAllPorts": false,
        "Dns": [],
        "DnsOptions": [],
        "DnsSearch": [],
        "ExtraHosts": null,
        "VolumesFrom": null,
        "Devices": [],
        "NetworkMode": "default",
        "IpcMode": "",
        "PidMode": "",
        "UTSMode": "",
        "CapAdd": null,
        "CapDrop": null,
        "GroupAdd": null,
        "RestartPolicy": {
            "Name": "no",
            "MaximumRetryCount": 0
        },
        "SecurityOpt": null,
        "ReadonlyRootfs": false,
        "Ulimits": null,
        "Sysctls": {},
        "LogConfig": {
            "Type": "json-file",
            "Config": {}
        },
        "CgroupParent": "",
        "ConsoleSize": [
            0,
            0
        ],
        "VolumeDriver": "",
        "ShmSize": 67108864
    },
    "GraphDriver": {
        "Name": "devicemapper",
        "Data": {
            "DeviceId": "13",
            "DeviceName": "docker-8:1-10617750-62ef0ed8bc952d501f241dbc4ecda25d3a629880d27fbb7344b5429a44af985f",
            "DeviceSize": "107374182400"
        }
    },
    "Mounts": [],
    "Config": {
        "Hostname": "62ef0ed8bc95",
        "Domainname": "",
        "User": "",
        "AttachStdin": true,
        "AttachStdout": true,
        "AttachStderr": true,
        "Tty": true,
        "OpenStdin": true,
        "StdinOnce": true,
        "Env": null,
        "Cmd": [
            "bash"
        ],
        "Image": "centos6:rpmbuild",
        "Volumes": null,
        "WorkingDir": "",
        "Entrypoint": null,
        "OnBuild": null,
        "Labels": {},
        "StopSignal": "SIGTERM"
    },
    "NetworkSettings": {
        "Bridge": "",
        "SandboxID": "992cf9db43c309484b8261904f46915a15eff3190026749841b93072847a14bc",
        "HairpinMode": false,
        "LinkLocalIPv6Address": "",
        "LinkLocalIPv6PrefixLen": 0,
        "Ports": {},
        "SandboxKey": "/var/run/docker/netns/992cf9db43c3",
        "SecondaryIPAddresses": null,
        "SecondaryIPv6Addresses": null,
        "EndpointID": "17b09b362d3b2be7d9c48377969049ac07cb821c482a9644970567fd5bb772f1",
        "Gateway": "172.17.0.1",
        "GlobalIPv6Address": "",
        "GlobalIPv6PrefixLen": 0,
        "IPAddress": "172.17.0.2",
        "IPPrefixLen": 16,
        "IPv6Gateway": "",
        "MacAddress": "02:42:ac:11:00:02",
        "Networks": {
            "bridge": {
                "EndpointID": "17b09b362d3b2be7d9c48377969049ac07cb821c482a9644970567fd5bb772f1",
                "Gateway": "172.17.0.1",
                "IPAddress": "172.17.0.2",
                "IPPrefixLen": 16,
                "IPv6Gateway": "",
                "GlobalIPv6Address": "",
                "GlobalIPv6PrefixLen": 0,
                "MacAddress": "02:42:ac:11:00:02"
            }
        }
    }
}
]
output σε json, που σημαίνει εύκολο provisioning !!!
Import
Ο πιο εύκολος τρόπος είναι να έχουμε ένα tar archive
από το σύστημα που θέλουμε και να το κάνουμε import:
# docker import - centos6:latest < a.tar
Run
Πως σηκώνουμε ένα docker image:
# docker run -t -i --rm centos6:latest bash
Αυτό σημαίνει πως θα μας δώσει interactive process με entry-point το bash.
Τέλος, μόλις κλείσουμε το docker image θα εξαφανιστούν ΟΛΕΣ οι αλλαγές που έχουμε κάνει.
Χρειάζεται να τα διαγράφουμε, για να μην γεμίσουμε με images που έχουν μεταξύ τους μικρές αλλαγές
Μπορούμε να έχουμε docker processes χωρίς entry-point.
Αυτά είναι τα service oriented containers που το entry-point
είναι TCP port (συνήθως) και τρέχουν τα διάφορα services που θέλουμε.
Όλα αυτά αργότερα.
Inside
Μέσα σε ένα docker image:
[root@62ef0ed8bc95 /]# hostname
62ef0ed8bc95

# ip a

1: lo:  mtu 65536 qdisc noqueue state UNKNOWN
    link/loopback 00:00:00:00:00:00 brd 00:00:00:00:00:00
    inet 127.0.0.1/8 scope host lo
       valid_lft forever preferred_lft forever
    inet6 ::1/128 scope host
       valid_lft forever preferred_lft forever

11: eth0@if12:  mtu 1500 qdisc noqueue state UP
    link/ether 02:42:ac:11:00:02 brd ff:ff:ff:ff:ff:ff
    inet 172.17.0.2/16 scope global eth0
       valid_lft forever preferred_lft forever
    inet6 fe80::42:acff:fe11:2/64 scope link
       valid_lft forever preferred_lft forever

# ip r

default via 172.17.0.1 dev eth0
172.17.0.0/16 dev eth0  proto kernel  scope link  src 172.17.0.2
private network 172.x.x.x
το οποίο έχει δημιουργηθεί από το myserverpc:
10: docker0:  mtu 1500 qdisc noqueue state UP
    link/ether 02:42:24:5c:42:f6 brd ff:ff:ff:ff:ff:ff
    inet 172.17.0.1/16 scope global docker0
       valid_lft forever preferred_lft forever
    inet6 fe80::42:24ff:fe5c:42f6/64 scope link
       valid_lft forever preferred_lft forever

12: veth524ea1d@if11:  mtu 1500 qdisc noqueue master docker0 state UP
    link/ether 6e:39:ae:aa:ec:65 brd ff:ff:ff:ff:ff:ff link-netnsid 0
    inet6 fe80::6c39:aeff:feaa:ec65/64 scope link
       valid_lft forever preferred_lft forever

# brctl show

bridge name bridge id       STP enabled interfaces
docker0     8000.0242245c42f6   no      veth524ea1d
virbr0      8000.525400990c9d   yes     virbr0-nic
Commit
ok, έχουμε κάνει τις αλλαγές μας ή έχουμε στήσει μια μήτρα ενός docker image
που θέλουμε να κρατήσουμε. Πως το κάνουμε commit ?
Από το myserverpc (κι όχι μέσα από το docker process):
# docker commit -p -m "centos6 rpmbuild test image" drunk_mietner centos6:rpmbuildtest
Το βλέπουμε πως έχει δημιουργηθεί:
# docker images

REPOSITORY          TAG                 IMAGE ID            CREATED             VIRTUAL SIZE
centos6             rpmbuildtest        95246c3b7b8b        3 seconds ago       1.092 GB
centos6             rpmbuild            ccb144691075        11 days ago         1.092 GB
Remove
και δεν το χρειαζόμαστε πλέον, θέλουμε να κρατήσουμε μόνο το centos6:rpmbuild
Εάν δεν έχει child docker images και δεν τρέχει κάποιο docker process βασισμένο σε αυτό το docker:
# docker rmi centos6:rpmbuildtest

Untagged: centos6:rpmbuildtest
Deleted: 95246c3b7b8b77e9f5c70f2fd7b8ea2c8ec1f72e846897c87cd60722f6caabef

# docker images

REPOSITORY  TAG         IMAGE ID      CREATED     VIRTUAL SIZE
centos6     rpmbuild    ccb144691075  11 days ago   1.092 GB
< none >      < none >      6d8ff86f2749  11 days ago   1.092 GB
Export
οκ, έχουμε φτιάξει στον υπολογιστή μας το τέλειο docker image
και θέλουμε να το κάνουμε export για να το φορτώσουμε κάπου αλλού:
# docker export drunk_mietner > CentOS68_rpmbuild.tar
debootstrap is a very powerful tool that most of debian/ubuntu people already know about.
It’s really super easy to create your own basic debian docker image, even if you are not running debian.
I used the below steps to my archlinux box, but i believe are generic and you can also use them, without any effort.
Step One:
Download and prepare debootstrap
# wget -c http://ftp.debian.org/debian/pool/main/d/debootstrap/debootstrap_1.0.77.tar.gz
# tar xf debootstrap_*.tar.gz
# cd debootstrap

# sed -i -e 's#/usr/share/debootstrap#.#' debootstrap
Step Two:
debootstrap a new sid (unstable) debian:
# mkdir sid

# ./debootstrap --arch amd64 --include=aptitude  sid sid/
Step Three:
Just to be safe, extract debian packages with ar
# cd sid

# for i in `ls -1 var/cache/apt/archives/*deb`; do ar p $i data.tar.xz | tar xJ ; done
# for i in `ls -1 var/cache/apt/archives/*deb`; do ar p $i data.tar.gz | tar xz ; done
# rm -rf var/cache/apt/archives/*deb
Step Four:
Prepare your debian unstable directory.
eg. create the sources.list file
# cat > etc/apt/sources.list << EOF
> deb http://ftp.gr.debian.org/debian unstable main contrib non-free
> deb http://ftp.debian.org/debian/ Sid-updates main contrib non-free
> deb http://security.debian.org/ Sid/updates main contrib non-free
> EOF
Step Five:
Dockerized your debian image:
# tar -c . | docker import - debian:sid
cdf6f22b76f23fa95ae2d5858cec4546086a2064b66cf34b937bc87c83f13c91

# docker images
REPOSITORY          TAG                 IMAGE ID            CREATED             VIRTUAL SIZE
debian              sid                 cdf6f22b76f2        5 seconds ago       291.3 MB
You are now ready to play with your new image:
# docker run -t -i --rm debian:sid bash
I have no name!@f3ee67226a07:/#
Some time ago, I wrote this article: How to create an archlinux docker image from the latest bootstrap but I think the below approach is even better.
Step 0
This step is optional.
If you want to reduce the size of the docker image:
# vi /etc/pacman.conf
and add the below lines:
NoExtract = usr/lib/firmware/*
NoExtract = usr/lib/modules/*
NoExtract = usr/share/locale/*
NoExtract = usr/share/man/*
Step 1
Create the latest archlinux on a temporary directory:
# mkdir -pv /tmp/latestarchlinux/var/lib/pacman
# pacman -Syy -r /tmp/latestarchlinux/
# pacman -S base -r /tmp/latestarchlinux/ --noconfirm
Step 2
dockerized the above directory
# cd /tmp/latestarchlinux/
# tar -c . | docker import - archlinux:latest
99a9d7cd2e357f2463b4bb8f3ad1e8bea4bfc10531dfac1931004405727bf035
Step 3
Actually you ‘ve done !
Just play with it already.
# docker run -t -i --rm archlinux:latest bash
[root@de9b7a1d6058 /]#
Docker is a wonderful application for creating development images quick and not-so-dirty.
I am working -mostly- on archlinux so here are the steps:
[~]> wget -c ftp://ftp.otenet.gr/pub/linux/archlinux/iso/latest/archlinux-bootstrap-2015.03.01-x86_64.tar.gz
[~]> tar xf archlinux-bootstrap-2015.03.01-x86_64.tar.gz
[~]> cd root.x86_64
[~]> tar cf archlinux-bootstrap-2015.03.01-x86_64.tar .
[~]> docker import - archlinux:bootstrap < archlinux-bootstrap-2015.03.01-x86_64.tar
after that you should update the docker image:
$ docker run -t -i --rm archlinux:bootstrap bash
# echo 'Server = http://ftp.otenet.gr/linux/archlinux/$repo/os/$arch' > /etc/pacman.d/mirrorlist
# pacman-key --init
# pacman-key --populate archlinux
# pacman -Syuvw
# pacman -Suv
to save your changes, open a new terminal and:
[~]> docker commit -p -m "archlinux bootstrap latest" -a USERNAME DOCKER_ID archlinux:bootstrap
replace your username and your docker_id accordingly.
You can now exit from your docker image.
To help you even more, check out this video i’ve made:
archlinux docker bootstrap image from Evaggelos Balaskas on Vimeo.
Today’s work : A dockerfile to build an archlinux image with sshd
You can find my notes here: Dockerfile notes
I am a very proud member of Athen’s Hackerspace.
I am enjoying the entire 3+ years time (and money) that i’ve spend at this hackerspace. Love it.
Today was a very productive day.
With a good friend of mine, are working to setup an ansible, docker, btrfs workshop !
We want to contribute back to the community and we thought that this is a great opportunity.
We are not guru or anything like that - no, we just want to share the knowledge we are getting by spending time at hackerspace. Nothing more, nothing less. Just share our feedback to all the people that have helped us till now.
So, we are working together (collaboration) by making small steps towards to build these workshop.
Today’s work: Creating a tiny compressed archlinux docker image.
My instruction set is documented here: archlinux installation for docker.
Hopefully my next blog post will be about a simple ssh docker file.
We are trying to keep simple notes so that many people can read and use them.