GitLab is a truly wonderful devops platform. It has a complete CI/CD toolchain, it’s opensource (GitLab Community Edition) and it can also be self-hosted. One of its greatest feature are the GitLab Runner that are used in the CI/CD pipelines.
The GitLab Runner is also an opensource project written in Go and handles CI jobs of a pipeline. GitLab Runner implements Executors to run the continuous integration builds for different scenarios and the most used of them is the docker executor, although nowadays most of sysadmins are migrating to kubernetes executors.
I have a few personal projects in GitLab under https://gitlab.com/ebal but I would like to run GitLab Runner local on my system for testing purposes. GitLab Runner has to register to a GitLab instance, but I do not want to install the entire GitLab application. I want to use the docker executor and run my CI tests local.
Here are my notes on how to run GitLab Runner with the docker executor. No root access needed as long as your user is in the docker group. To give a sense of what this blog post is, the below image will act as reference.
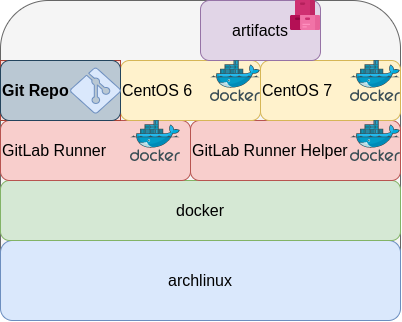
GitLab Runner
The docker executor comes in two flavors:
- alpine
- ubuntu
In this blog post, I will use the ubuntu flavor.
Get the latest ubuntu docker image
docker pull gitlab/gitlab-runner:ubuntuVerify
$ docker run --rm -ti gitlab/gitlab-runner:ubuntu --version
Version:      12.10.1
Git revision: ce065b93
Git branch:   12-10-stable
GO version:   go1.13.8
Built:        2020-04-22T21:29:52+0000
OS/Arch:      linux/amd64
exec help
We are going to use the exec command to spin up the docker executor. With exec we will not need to register with a token.
$ docker run --rm -ti gitlab/gitlab-runner:ubuntu exec --help

Runtime platform arch=amd64 os=linux pid=6 revision=ce065b93 version=12.10.1
NAME:
   gitlab-runner exec - execute a build locally

USAGE:
   gitlab-runner exec command [command options] [arguments...]

COMMANDS:
     shell       use shell executor
     ssh         use ssh executor
     virtualbox  use virtualbox executor
     custom      use custom executor
     docker      use docker executor
Runner
5 minutes ago
# Run your CI test with GitLab-Runner on your system
GitLab     parallels   use parallels executor

OPTIONS:
   --help, -h  show help
Git Repo - tmux
Now we need to download the git repo, we would like to test. Inside the repo, a .gitlab-ci.yml file should exist. The gitlab-ci file describes the CI pipeline, with all the stages and jobs. In this blog post, I will use a simple repo that builds the latest version of tmux for centos6 & centos7.
git clone https://gitlab.com/rpmbased/tmux.git
cd tmux
Docker In Docker
The docker executor will spawn the GitLab Runner. GitLab Runner needs to communicate with our local docker service to spawn the CentOS docker image and to run the CI job.
So we need to pass the docker socket from our local docker service to GitLab Runner docker container.
To test dind (docker-in-docker) we can try one of the below commands:
docker run --rm -ti
    -v /var/run/docker.sock:/var/run/docker.sock
    docker:latest sh
or
docker run --rm -ti
    -v /var/run/docker.sock:/var/run/docker.sock
    ubuntu:20.04 bash
Limitations
There are some limitations of gitlab-runner exec.
We can not run stages and we can not download artifacts.
- stages no
- artifacts no
Jobs
So we have to adapt. As we can not run stages, we will tell gitlab-runner exec to run one specific job.
In the tmux repo, the build-centos-6 is the build job for centos6 and the build-centos-7 for centos7.
Artifacts
GitLab Runner will use the /builds as the build directory. We need to mount this directory as read-write to a local directory to get the artifact.
mkdir -pv artifacts/The docker executor has many docker options, there are options to setup a different cache directory. To see all the docker options type:
$ docker run --rm -ti gitlab/gitlab-runner:ubuntu exec docker --help | grep dockerBash Script
We can put everything from above to a bash script. The bash script will mount our current git project directory to the gitlab-runner, then with the help of dind it will spin up the centos docker container, passing our code and gitlab-ci file, run the CI job and then save the artifacts under /builds.
#!/bin/bash

# This will be the directory to save our artifacts
rm -rf artifacts
mkdir -p artifacts

# JOB="build-centos-6"
JOB="build-centos-7"

DOCKER_SOCKET="/var/run/docker.sock"

docker run --rm                              \
  -v "$DOCKER_SOCKET":"$DOCKER_SOCKET"       \
  -v "$PWD":"$PWD"                           \
  --workdir "$PWD"                           \
  gitlab/gitlab-runner:ubuntu                \
  exec docker                                \
      --docker-volumes="$PWD/artifacts":/builds:rw \
      $JOB
That’s it.
You can try with your own gitlab repos, but dont forget to edit the gitlab-ci file accordingly, if needed.
Full example output
Last, but not least, here is the entire walkthrough
ebal@myhomepc:tmux(master)$ git remote -v
oring   git@gitlab.com:rpmbased/tmux.git (fetch)
oring   git@gitlab.com:rpmbased/tmux.git (push)
$ ./gitlab.run.sh

Runtime platform           arch=amd64 os=linux pid=6 revision=ce065b93 version=12.10.1
Running with gitlab-runner 12.10.1 (ce065b93)
Preparing the "docker" executor
Using Docker executor with image centos:6 ...
Pulling docker image centos:6 ...
Using docker image sha256:d0957ffdf8a2ea8c8925903862b65a1b6850dbb019f88d45e927d3d5a3fa0c31 for centos:6 ...
Preparing environment
Running on runner--project-0-concurrent-0 via 42b751e35d01...
Getting source from Git repository
Fetching changes...
Initialized empty Git repository in /builds/0/project-0/.git/
Created fresh repository.
From /home/ebal/gitlab-runner/tmux
 * [new branch]      master     -> origin/master
Checking out 6bb70469 as master...

Skipping Git submodules setup
Restoring cache
Downloading artifacts
Running before_script and script
$ export -p NAME=tmux
$ export -p VERSION=$(awk '/^Version/ {print $NF}' tmux.spec)
$ mkdir -p rpmbuild/{BUILD,RPMS,SOURCES,SPECS,SRPMS}
$ yum -y update &> /dev/null
$ yum -y install rpm-build curl gcc make automake autoconf pkg-config &> /dev/null
$ yum -y install libevent2-devel ncurses-devel &> /dev/null
$ cp $NAME.spec                  rpmbuild/SPECS/$NAME.spec
$ curl -sLo rpmbuild/SOURCES/$NAME-$VERSION.tar.gz   https://github.com/tmux/$NAME/releases/download/$VERSION/$NAME-$VERSION.tar.gz
$ curl -sLo rpmbuild/SOURCES/bash-it.completion.bash https://raw.githubusercontent.com/Bash-it/bash-it/master/completion/available/bash-it.completion.bash
$ rpmbuild --define "_topdir ${PWD}/rpmbuild/" --clean -ba rpmbuild/SPECS/$NAME.spec &> /dev/null
$ cp rpmbuild/RPMS/x86_64/$NAME*.x86_64.rpm $CI_PROJECT_DIR/
Running after_script
Saving cache
Uploading artifacts for successful job
Job succeeded
artifacts
and here is the tmux-3.1-1.el6.x86_64.rpm
$ ls -l artifacts/0/project-0
total 368
-rw-rw-rw- 1 root root    374 Apr 27 09:13 README.md
drwxr-xr-x 1 root root     70 Apr 27 09:17 rpmbuild
-rw-r--r-- 1 root root 365836 Apr 27 09:17 tmux-3.1-1.el6.x86_64.rpm
-rw-rw-rw- 1 root root   1115 Apr 27 09:13 tmux.spec
docker processes
if we run docker ps -a from another terminal, we see something like this:
$ docker ps -a
CONTAINER ID  IMAGE                        COMMAND                  CREATED        STATUS                   PORTS  NAMES
b5333a7281ac  d0957ffdf8a2                 "sh -c 'if [ -x /usr…"   3 minutes ago  Up 3 minutes                    runner--project-0-concurrent-0-e6ee009d5aa2c136-build-4
70491d10348f  b6b00e0f09b9                 "gitlab-runner-build"    3 minutes ago  Exited (0) 3 minutes ago        runner--project-0-concurrent-0-e6ee009d5aa2c136-predefined-3
7be453e5cd22  b6b00e0f09b9                 "gitlab-runner-build"    4 minutes ago  Exited (0) 4 minutes ago        runner--project-0-concurrent-0-e6ee009d5aa2c136-predefined-2
1046287fba5d  b6b00e0f09b9                 "gitlab-runner-build"    4 minutes ago  Exited (0) 4 minutes ago        runner--project-0-concurrent-0-e6ee009d5aa2c136-predefined-1
f1ebc99ce773  b6b00e0f09b9                 "gitlab-runner-build"    4 minutes ago  Exited (0) 4 minutes ago        runner--project-0-concurrent-0-e6ee009d5aa2c136-predefined-0
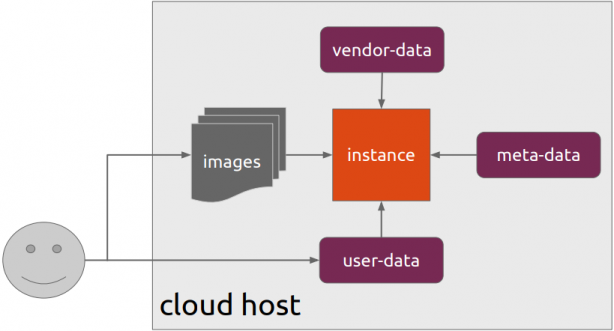
42b751e35d01 gitlab/gitlab-runner:ubuntu "/usr/bin/dumb-init …" 4 minutes ago Up 4 minutes vigorous_goldstineCloud-init is the defacto multi-distribution package that handles early initialization of a cloud instance
This article is a mini-HowTo use cloud-init with centos7 in your own libvirt qemu/kvm lab, instead of using a public cloud provider.
How Cloud-init works
Josh Powers @ DebConf17
How really works?
Cloud-init has Boot Stages
- Generator
- Local
- Network
- Config
- Final
and supports modules to extend configuration and support.
Here is a brief list of modules (sorted by name):
- bootcmd
- final-message
- growpart
- keys-to-console
- locale
- migrator
- mounts
- package-update-upgrade-install
- phone-home
- power-state-change
- puppet
- resizefs
- rsyslog
- runcmd
- scripts-per-boot
- scripts-per-instance
- scripts-per-once
- scripts-user
- set_hostname
- set-passwords
- ssh
- ssh-authkey-fingerprints
- timezone
- update_etc_hosts
- update_hostname
- users-groups
- write-files
- yum-add-repo
Gist
Cloud-init example using a Generic Cloud CentOS-7 on a libvirtd qmu/kvm lab · GitHub
Generic Cloud CentOS 7
You can find a plethora of centos7 cloud images here:
Download the latest version
$ curl -LO http://cloud.centos.org/centos/7/images/CentOS-7-x86_64-GenericCloud.qcow2.xz
Uncompress file
$ xz -v --keep -d CentOS-7-x86_64-GenericCloud.qcow2.xz
Check cloud image
$ qemu-img info CentOS-7-x86_64-GenericCloud.qcow2
image: CentOS-7-x86_64-GenericCloud.qcow2
file format: qcow2
virtual size: 8.0G (8589934592 bytes)
disk size: 863M
cluster_size: 65536
Format specific information:
    compat: 0.10
    refcount bits: 16
The default image is 8G.
If you need to resize it, check below in this article.
Create metadata file
meta-data are data that comes from the cloud provider itself. In this example, I will use static network configuration.
cat > meta-data <<EOF
instance-id: testingcentos7
local-hostname: testingcentos7

network-interfaces: |
  iface eth0 inet static
  address 192.168.122.228
  network 192.168.122.0
  netmask 255.255.255.0
  broadcast 192.168.122.255
  gateway 192.168.122.1

# vim:syntax=yaml
EOF
Crete cloud-init (userdata) file
user-data are data that comes from you aka the user.
cat > user-data <<EOF
#cloud-config

# Set default user and their public ssh key
# eg. https://github.com/ebal.keys
users:
  - name: ebal
    ssh-authorized-keys:
      - `curl -s -L https://github.com/ebal.keys`
    sudo: ALL=(ALL) NOPASSWD:ALL

# Enable cloud-init modules
cloud_config_modules:
  - resolv_conf
  - runcmd
  - timezone
  - package-update-upgrade-install

# Set TimeZone
timezone: Europe/Athens

# Set DNS
manage_resolv_conf: true
resolv_conf:
  nameservers: ['9.9.9.9']

# Install packages
packages:
  - mlocate
  - vim
  - epel-release

# Update/Upgrade & Reboot if necessary
package_update: true
package_upgrade: true
package_reboot_if_required: true

# Remove cloud-init
runcmd:
  - yum -y remove cloud-init
  - updatedb

# Configure where output will go
output:
  all: ">> /var/log/cloud-init.log"

# vim:syntax=yaml
EOF
Create the cloud-init ISO
When using libvirt with qemu/kvm the most common way to pass the meta-data/user-data to cloud-init, is through an iso (cdrom).
$ genisoimage -output cloud-init.iso -volid cidata -joliet -rock user-data meta-data
or
$ mkisofs -o cloud-init.iso -V cidata -J -r user-data meta-data
Provision new virtual machine
Finally run this as root:
# virt-install
    --name centos7_test
    --memory 2048
    --vcpus 1
    --metadata description="My centos7 cloud-init test"
    --import
    --disk CentOS-7-x86_64-GenericCloud.qcow2,format=qcow2,bus=virtio
    --disk cloud-init.iso,device=cdrom
    --network bridge=virbr0,model=virtio
    --os-type=linux
    --os-variant=centos7.0
    --noautoconsole
The List of Os Variants
There is an interesting command to find out all the os variants that are being supported by libvirt in your lab:
eg. CentOS
$ osinfo-query os | grep CentOS
centos6.0  |  CentOS  6.0  |  6.0  |  http://centos.org/centos/6.0
centos6.1  |  CentOS  6.1  |  6.1  |  http://centos.org/centos/6.1
centos6.2  |  CentOS  6.2  |  6.2  |  http://centos.org/centos/6.2
centos6.3  |  CentOS  6.3  |  6.3  |  http://centos.org/centos/6.3
centos6.4  |  CentOS  6.4  |  6.4  |  http://centos.org/centos/6.4
centos6.5  |  CentOS  6.5  |  6.5  |  http://centos.org/centos/6.5
centos6.6  |  CentOS  6.6  |  6.6  |  http://centos.org/centos/6.6
centos6.7  |  CentOS  6.7  |  6.7  |  http://centos.org/centos/6.7
centos6.8  |  CentOS  6.8  |  6.8  |  http://centos.org/centos/6.8
centos6.9  |  CentOS  6.9  |  6.9  |  http://centos.org/centos/6.9
centos7.0  |  CentOS  7.0  |  7.0  |  http://centos.org/centos/7.0
DHCP
If you are not using a static network configuration scheme, then to identify the IP of your cloud instance, type:
$ virsh net-dhcp-leases default
 Expiry Time           MAC address         Protocol   IP address           Hostname   Client ID or DUID
---------------------------------------------------------------------------------------------------------
 2018-11-17 15:40:31   52:54:00:57:79:3e   ipv4       192.168.122.144/24   -          -
Resize
The easiest way to grow/resize your virtual machine is via qemu-img command:
$ qemu-img resize CentOS-7-x86_64-GenericCloud.qcow2 20G
Image resized.$ qemu-img info CentOS-7-x86_64-GenericCloud.qcow2
image: CentOS-7-x86_64-GenericCloud.qcow2
file format: qcow2
virtual size: 20G (21474836480 bytes)
disk size: 870M
cluster_size: 65536
Format specific information:
    compat: 0.10
    refcount bits: 16
You can add the below lines into your user-data file
growpart:
  mode: auto
  devices: ['/']
  ignore_growroot_disabled: false
The result:
[root@testingcentos7 ebal]# df -h /
Filesystem      Size  Used Avail Use% Mounted on
/dev/vda1        20G  870M   20G   5% /
Default cloud-init.cfg
For reference, this is the default centos7 cloud-init configuration file.
# /etc/cloud/cloud.cfg users:
- default
disable_root: 1
ssh_pwauth: 0
mount_default_fields: [~, ~, 'auto', 'defaults,nofail', '0', '2']
resize_rootfs_tmp: /dev
ssh_deletekeys: 0
ssh_genkeytypes: ~
syslog_fix_perms: ~
cloud_init_modules:
- migrator
- bootcmd
- write-files
- growpart
- resizefs
- set_hostname
- update_hostname
- update_etc_hosts
- rsyslog
- users-groups
- ssh
cloud_config_modules:
- mounts
- locale
- set-passwords
- rh_subscription
- yum-add-repo
- package-update-upgrade-install
- timezone
- puppet
- chef
- salt-minion
- mcollective
- disable-ec2-metadata
- runcmd
cloud_final_modules:
- rightscale_userdata
- scripts-per-once
- scripts-per-boot
- scripts-per-instance
- scripts-user
- ssh-authkey-fingerprints
- keys-to-console
- phone-home
- final-message
- power-state-change
system_info:
default_user:
name: centos
lock_passwd: true
gecos: Cloud User
groups: [wheel, adm, systemd-journal]
sudo: ["ALL=(ALL) NOPASSWD:ALL"]
shell: /bin/bash
distro: rhel
paths:
cloud_dir: /var/lib/cloud
templates_dir: /etc/cloud/templates
ssh_svcname: sshd
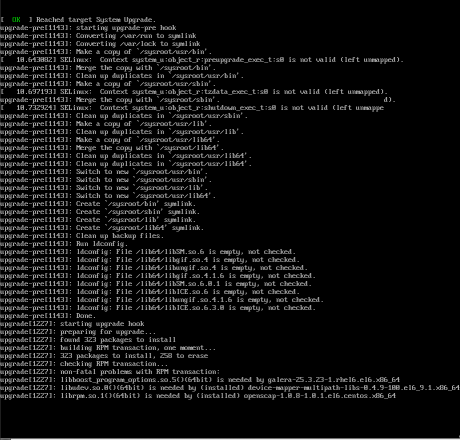
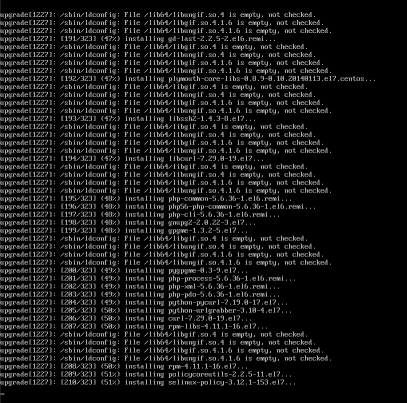
# vim:syntax=yamlUpgrading CentOS 6.x to CentOS 7.x
Disclaimer : Create a recent backup of the system. This is an unofficial , unsupported procedure !
CentOS 6
CentOS release 6.9 (Final)
Kernel 2.6.32-696.16.1.el6.x86_64 on an x86_64

centos69 login: root
Password:
Last login: Tue May  8 19:45:45 on tty1

[root@centos69 ~]# cat /etc/redhat-release
CentOS release 6.9 (Final)
Pre Tasks
There are some tasks you can do to prevent from unwanted results.
Like:
- Disable selinux
- Remove unnecessary repositories
- Take a recent backup!
CentOS Upgrade Repository
Create a new centos repository:
cat > /etc/yum.repos.d/centos-upgrade.repo <<EOF
[centos-upgrade]
name=centos-upgrade
baseurl=http://dev.centos.org/centos/6/upg/x86_64/
enabled=1
gpgcheck=0
EOF
Install Pre-Upgrade Tool
First install the openscap version from dev.centos.org:
# yum -y install https://buildlogs.centos.org/centos/6/upg/x86_64/Packages/openscap-1.0.8-1.0.1.el6.centos.x86_64.rpmthen install the redhat upgrade tool:
# yum -y install redhat-upgrade-tool preupgrade-assistant-*
Import CentOS 7 PGP Key
# rpm --import http://ftp.otenet.gr/linux/centos/RPM-GPG-KEY-CentOS-7
Mirror
to bypass errors like:
Downloading failed: invalid data in .treeinfo: No section: ‘checksums’
append CentOS Vault under mirrorlist:
 mkdir -pv /var/tmp/system-upgrade/base/ /var/tmp/system-upgrade/extras/  /var/tmp/system-upgrade/updates/

 echo http://vault.centos.org/7.0.1406/os/x86_64/       >  /var/tmp/system-upgrade/base/mirrorlist.txt
 echo http://vault.centos.org/7.0.1406/extras/x86_64/   >  /var/tmp/system-upgrade/extras/mirrorlist.txt
 echo http://vault.centos.org/7.0.1406/updates/x86_64/  >  /var/tmp/system-upgrade/updates/mirrorlist.txt
These are enough to upgrade to 7.0.1406. You can add the below mirros, to upgrade to 7.5.1804
More Mirrors
 echo http://ftp.otenet.gr/linux/centos/7.5.1804/os/x86_64/  >>  /var/tmp/system-upgrade/base/mirrorlist.txt
 echo http://mirror.centos.org/centos/7/os/x86_64/           >>  /var/tmp/system-upgrade/base/mirrorlist.txt

 echo http://ftp.otenet.gr/linux/centos/7.5.1804/extras/x86_64/ >>  /var/tmp/system-upgrade/extras/mirrorlist.txt
 echo http://mirror.centos.org/centos/7/extras/x86_64/          >>  /var/tmp/system-upgrade/extras/mirrorlist.txt

 echo http://ftp.otenet.gr/linux/centos/7.5.1804/updates/x86_64/  >>  /var/tmp/system-upgrade/updates/mirrorlist.txt
 echo http://mirror.centos.org/centos/7/updates/x86_64/           >>  /var/tmp/system-upgrade/updates/mirrorlist.txt
Pre-Upgrade
preupg is actually a python script!
# yes | preupg -v Preupg tool doesn't do the actual upgrade.
Please ensure you have backed up your system and/or data in the event of a failed upgrade
that would require a full re-install of the system from installation media.
Do you want to continue? y/n
Gathering logs used by preupgrade assistant:
All installed packages : 01/11 ...finished (time 00:00s)
All changed files : 02/11 ...finished (time 00:18s)
Changed config files : 03/11 ...finished (time 00:00s)
All users : 04/11 ...finished (time 00:00s)
All groups : 05/11 ...finished (time 00:00s)
Service statuses : 06/11 ...finished (time 00:00s)
All installed files : 07/11 ...finished (time 00:01s)
All local files : 08/11 ...finished (time 00:01s)
All executable files : 09/11 ...finished (time 00:01s)
RedHat signed packages : 10/11 ...finished (time 00:00s)
CentOS signed packages : 11/11 ...finished (time 00:00s)
Assessment of the system, running checks / SCE scripts:
001/096 ...done (Configuration Files to Review)
002/096 ...done (File Lists for Manual Migration)
003/096 ...done (Bacula Backup Software)
...
./result.html
/bin/tar: .: file changed as we read it
Tarball with results is stored here /root/preupgrade-results/preupg_results-180508202952.tar.gz .
The latest assessment is stored in directory /root/preupgrade .
Summary information:
We found some potential in-place upgrade risks.
Read the file /root/preupgrade/result.html for more details.
Upload results to UI by command:
e.g. preupg -u http://127.0.0.1:8099/submit/ -r /root/preupgrade-results/preupg_results-*.tar.gz .this must finish without any errors.
CentOS Upgrade Tool
We need to find out what are the possible problems when upgrade:
# centos-upgrade-tool-cli --network=7
          --instrepo=http://vault.centos.org/7.0.1406/os/x86_64/
Then by force we can upgrade to it’s latest version:
# centos-upgrade-tool-cli --force --network=7
          --instrepo=http://vault.centos.org/7.0.1406/os/x86_64/
          --cleanup-post
Output
setting up repos...
base                                                          | 3.6 kB     00:00
base/primary_db                                               | 4.9 MB     00:04
centos-upgrade                                                | 1.9 kB     00:00
centos-upgrade/primary_db                                     |  14 kB     00:00
cmdline-instrepo                                              | 3.6 kB     00:00
cmdline-instrepo/primary_db                                   | 4.9 MB     00:03
epel/metalink                                                 |  14 kB     00:00
epel                                                          | 4.7 kB     00:00
epel                                                          | 4.7 kB     00:00
epel/primary_db                                               | 6.0 MB     00:04
extras                                                        | 3.6 kB     00:00
extras/primary_db                                             | 4.9 MB     00:04
mariadb                                                       | 2.9 kB     00:00
mariadb/primary_db                                            |  33 kB     00:00
remi-php56                                                    | 2.9 kB     00:00
remi-php56/primary_db                                         | 229 kB     00:00
remi-safe                                                     | 2.9 kB     00:00
remi-safe/primary_db                                          | 950 kB     00:00
updates                                                       | 3.6 kB     00:00
updates/primary_db                                            | 4.9 MB     00:04
.treeinfo                                                     | 1.1 kB     00:00
getting boot images...
vmlinuz-redhat-upgrade-tool                                   | 4.7 MB     00:03
initramfs-redhat-upgrade-tool.img                             |  32 MB     00:24
setting up update...
finding updates 100% [=========================================================]
(1/323): MariaDB-10.2.14-centos6-x86_64-client.rpm            |  48 MB     00:38
(2/323): MariaDB-10.2.14-centos6-x86_64-common.rpm            | 154 kB     00:00
(3/323): MariaDB-10.2.14-centos6-x86_64-compat.rpm            | 4.0 MB     00:03
(4/323): MariaDB-10.2.14-centos6-x86_64-server.rpm            | 109 MB     01:26
(5/323): acl-2.2.51-12.el7.x86_64.rpm                         |  81 kB     00:00
(6/323): apr-1.4.8-3.el7.x86_64.rpm                           | 103 kB     00:00
(7/323): apr-util-1.5.2-6.el7.x86_64.rpm                      |  92 kB     00:00
(8/323): apr-util-ldap-1.5.2-6.el7.x86_64.rpm                 |  19 kB     00:00
(9/323): attr-2.4.46-12.el7.x86_64.rpm                        |  66 kB     00:00
...
(320/323): yum-plugin-fastestmirror-1.1.31-24.el7.noarch.rpm  |  28 kB     00:00
(321/323): yum-utils-1.1.31-24.el7.noarch.rpm                 | 111 kB     00:00
(322/323): zlib-1.2.7-13.el7.x86_64.rpm                       |  89 kB     00:00
(323/323): zlib-devel-1.2.7-13.el7.x86_64.rpm                 |  49 kB     00:00
testing upgrade transaction
rpm transaction 100% [=========================================================]
rpm install 100% [=============================================================]
setting up system for upgrade
Finished. Reboot to start upgrade.
Reboot
The upgrade procedure, will download all rpm packages to a directory and create a new grub entry. Then on reboot the system will try to upgrade the distribution release to it’s latest version.
# reboot
Upgrade
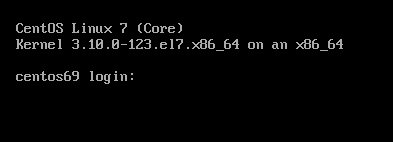
CentOS 7
CentOS Linux 7 (Core)
Kernel 3.10.0-123.20.1.el7.x86_64 on an x86_64

centos69 login: root
Password:
Last login: Fri May 11 15:42:30 on ttyS0

[root@centos69 ~]# cat /etc/redhat-release
CentOS Linux release 7.0.1406 (Core)
Network-Bound Disk Encryption
I was reading the redhat release notes on 7.4 and came across: Chapter 15. Security
New packages: tang, clevis, jose, luksmeta
Network Bound Disk Encryption (NBDE) allows the user to encrypt root volumes of the hard drives on physical and virtual machines without requiring to manually enter password when systems are rebooted.
That means, we can now have an encrypted (luks) volume that will be de-crypted on reboot, without the need of typing a passphrase!!!
Really - really useful on VPS (and general in cloud infrastructures)
Useful Links
- https://github.com/latchset/tang
- https://github.com/latchset/jose
- https://github.com/latchset/clevis
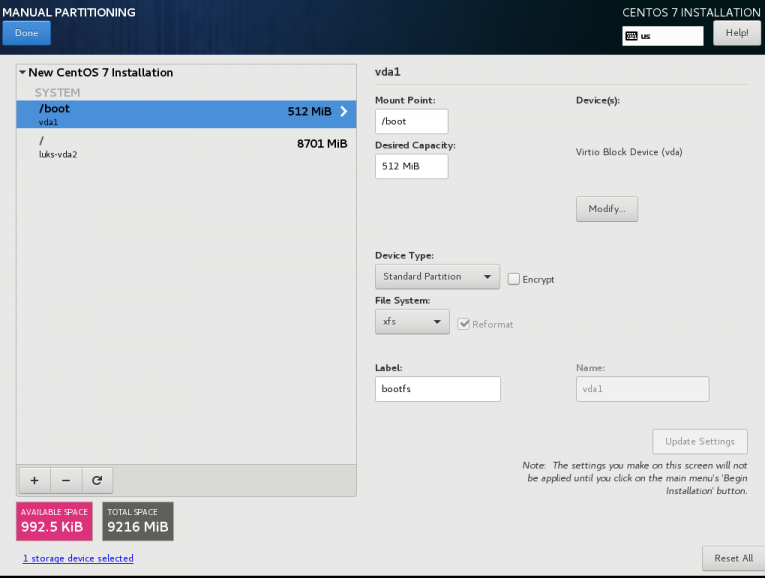
CentOS 7.4 with Encrypted rootfs
(aka client machine)
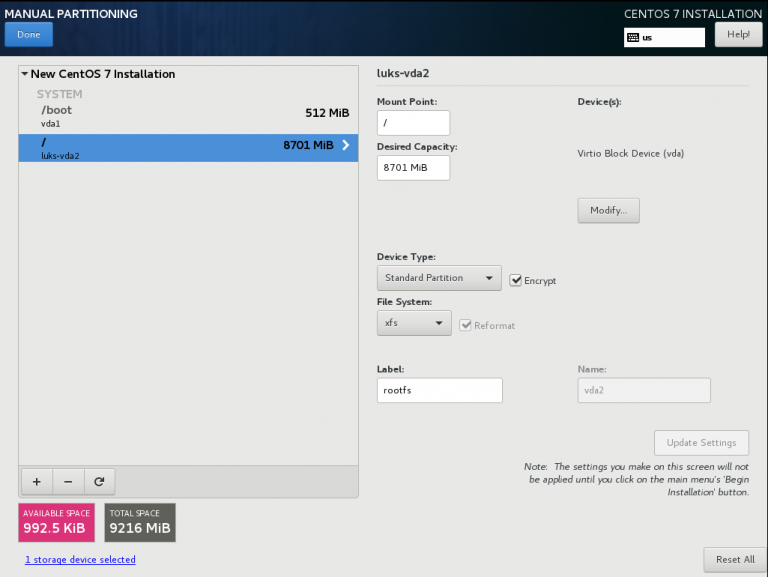
Below is a test centos 7.4 virtual machine with an encrypted root filesystem:
/boot
/
Tang Server
(aka server machine)
Tang is a server for binding data to network presence. This is a different centos 7.4 virtual machine from the above.
Installation
Let’s install the server part:
# yum -y install tang
Start socket service:
# systemctl restart tangd.socket
Enable socket service:
# systemctl enable tangd.socket
TCP Port
Check that the tang server is listening:
# netstat -ntulp | egrep -i systemd
tcp6 0 0 :::80 :::* LISTEN 1/systemdFirewall
Dont forget the firewall:
Firewall Zones
# firewall-cmd --get-active-zones
public
  interfaces: eth0
Firewall Port
# firewall-cmd --zone=public --add-port=80/tcp --permanent
or
# firewall-cmd --add-port=80/tcp --permanent
successReload
# firewall-cmd --reload
successWe have finished with the server part!
Client Machine - Encrypted rootfs
Now it is time to configure the client machine, but before let’s check the encrypted partition:
CryptTab
Every encrypted block devices is configured under crypttab file:
[root@centos7 ~]# cat /etc/crypttab
luks-3cc09d38-2f55-42b1-b0c7-b12f6c74200c UUID=3cc09d38-2f55-42b1-b0c7-b12f6c74200c none FsTab
and every filesystem that is static mounted on boot, is configured under fstab:
[root@centos7 ~]# cat /etc/fstab
UUID=c5ffbb05-d8e4-458c-9dc6-97723ccf43bc          /boot  xfs  defaults  0 0

/dev/mapper/luks-3cc09d38-2f55-42b1-b0c7-b12f6c74200c  /  xfs  defaults,x-systemd.device-timeout=0 0 0
Installation
Now let’s install the client (clevis) part that will talk with tang:
# yum -y install clevis clevis-luks clevis-dracut
Configuration
with a very simple command:
# clevis bind luks -d /dev/vda2 tang '{"url":"http://192.168.122.194"}'
The advertisement contains the following signing keys:

FYquzVHwdsGXByX_rRwm0VEmFRo

Do you wish to trust these keys? [ynYN] y

You are about to initialize a LUKS device for metadata storage.
Attempting to initialize it may result in data loss if data was
already written into the LUKS header gap in a different format.
A backup is advised before initialization is performed.

Do you wish to initialize /dev/vda2? [yn] y

Enter existing LUKS password:
we’ve just configured our encrypted volume against tang!
Luks MetaData
We can verify it’s luks metadata with:
[root@centos7 ~]# luksmeta show -d /dev/vda2
0   active empty
1   active cb6e8904-81ff-40da-a84a-07ab9ab5715e
2 inactive empty
3 inactive empty
4 inactive empty
5 inactive empty
6 inactive empty
7 inactive empty
dracut
We must not forget to regenerate the initramfs image, that on boot will try to talk with our tang server:
[root@centos7 ~]# dracut -f
Reboot
Now it’s time to reboot!
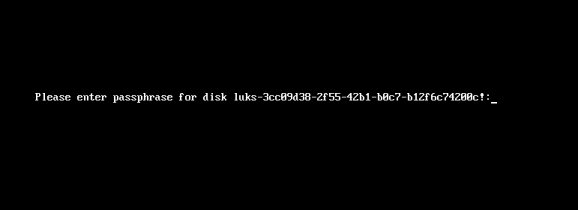
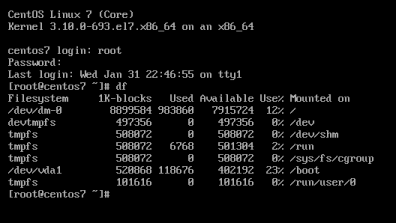
A short msg will appear in our screen, but in a few seconds and if successfully exchange messages with the tang server, our server with de-crypt the rootfs volume.
Tang messages
To finish this article, I will show you some tang msg via journalct:
Initialization
Getting the signing key from the client on setup:
Jan 31 22:43:09 centos7 systemd[1]: Started Tang Server (192.168.122.195:58088).
Jan 31 22:43:09 centos7 systemd[1]: Starting Tang Server (192.168.122.195:58088)...
Jan 31 22:43:09 centos7 tangd[1219]: 192.168.122.195 GET /adv/ => 200 (src/tangd.c:85)
reboot
Client is trying to decrypt the encrypted volume on reboot
Jan 31 22:46:21 centos7 systemd[1]: Started Tang Server (192.168.122.162:42370).
Jan 31 22:46:21 centos7 systemd[1]: Starting Tang Server (192.168.122.162:42370)...
Jan 31 22:46:22 centos7 tangd[1223]: 192.168.122.162 POST /rec/Shdayp69IdGNzEMnZkJasfGLIjQ => 200 (src/tangd.c:168)
Working with VPS (Virtual Private Server), sometimes means that you dont have a lot of memory.
That’s why, we use the swap partition, a system partition that our linux kernel use as extended memory. It’s slow but necessary when your system needs more memory. Even if you dont have any free partition disk, you can use a swap file to add to your linux system.
Create the Swap File
[root@centos7] # dd if=/dev/zero of=/swapfile count=1000 bs=1MiB
1000+0 records in
1000+0 records out
1048576000 bytes (1.0 GB) copied, 3.62295 s, 289 MB/s

[root@centos7] # du -sh /swapfile
1.0G    /swapfile
That is 1G file
Make Swap
[root@centos7] # mkswap -L swapfs /swapfile
Setting up swapspace version 1, size = 1048572 KiB
LABEL=swapfs, UUID=d8af8f19-5578-4c8e-b2b1-3ff57edb71f9
Permissions
[root@centos7] # chmod 0600 /swapfile
Activate
[root@centos7] # swapon /swapfile
Check
# free
              total        used        free      shared  buff/cache   available
Mem:        1883716     1613952       79172       54612      190592       64668
Swap:       1023996           0     1023996
fstab
Now for the final step, we need to edit /etc/fstab
/swapfile swap swap defaults 0 0So … I’ve setup a new centos7 VM as my own (Power)DNS Recursor to my other VMs and machines.
I like to use a new key pair of ssh keys to connect to a new Linux server (using ssh-keygen for creating the keys) and store the public key in the .ssh/authorized_keys of the user I will use to this new server. This user can run sudo afterworks.
ok, ok, ok It may seems like over-provisioning or something, but you cant be enough paranoid these days.
Although, my basic sshd conf/setup is pretty simple:
Port XXXX
PermitRootLogin no
MaxSessions 3
PasswordAuthentication no
UsePAM no
AllowAgentForwarding yes
X11Forwarding no
restarting sshd with systemd:
# systemctl restart sshd
Jun 09 10:58:05 vogsphere systemd[1]: Stopping OpenSSH server daemon...
Jun 09 10:58:05 vogsphere sshd[563]: Received signal 15; terminating.
Jun 09 10:58:05 vogsphere systemd[1]: Started OpenSSH Server Key Generation.
Jun 09 10:58:05 vogsphere systemd[1]: Starting OpenSSH server daemon...
Jun 09 10:58:05 vogsphere systemd[1]: Started OpenSSH server daemon.
Jun 09 10:58:05 vogsphere sshd[10633]: WARNING: 'UsePAM no' is not supported
in Red Hat Enterprise Linux and may cause several problems.
Jun 09 10:58:05 vogsphere sshd[10633]: Server listening on XXX.XXX.XXX.XXX port XXXX.
And there is a WARNING !!!
“UsePAM no” is not supported
So what’s the point on having this configuration entry if you cant support it ?
