Fighting Spam
Fighting email spam in modern times most of the times looks like this:

Rspamd
Rspamd is a rapid spam filtering system. Written in C with Lua script engine extension seems to be really fast and a really good solution for SOHO environments.
In this blog post, I'’ll try to present you a quickstart guide on working with rspamd on a CentOS 6.9 machine running postfix.
DISCLAIMER: This blog post is from a very technical point of view!
Installation
We are going to install rspamd via know rpm repositories:
Epel Repository
We need to install epel repository first:
# yum -y install http://fedora-mirror01.rbc.ru/pub/epel/6/x86_64/epel-release-6-8.noarch.rpm
Rspamd Repository
Now it is time to setup the rspamd repository:
# curl https://rspamd.com/rpm-stable/centos-6/rspamd.repo -o /etc/yum.repos.d/rspamd.repo
Install the gpg key
# rpm --import http://rspamd.com/rpm-stable/gpg.key
and verify the repository with # yum repolist
repo id     repo name
base        CentOS-6 - Base
epel        Extra Packages for Enterprise Linux 6 - x86_64
extras      CentOS-6 - Extras
rspamd      Rspamd stable repository
updates     CentOS-6 - Updates
Rpm
Now it is time to install rspamd to our linux box:
# yum -y install rspamd
# yum info rspamd

Name        : rspamd
Arch        : x86_64
Version     : 1.6.3
Release     : 1
Size        : 8.7 M
Repo        : installed
From repo   : rspamd
Summary     : Rapid spam filtering system
URL         : https://rspamd.com
License     : BSD2c
Description : Rspamd is a rapid, modular and lightweight spam filter. It is designed to work
            : with big amount of mail and can be easily extended with own filters written in
            : lua.
Init File
We need to correct rspamd init file so that rspamd can find the correct configuration file:
# vim /etc/init.d/rspamd
# ebal, Wed, 06 Sep 2017 00:31:37 +0300
## RSPAMD_CONF_FILE="/etc/rspamd/rspamd.sysvinit.conf"
RSPAMD_CONF_FILE="/etc/rspamd/rspamd.conf"
or
# ln -s /etc/rspamd/rspamd.conf /etc/rspamd/rspamd.sysvinit.conf
Start Rspamd
We are now ready to start for the first time rspamd daemon:
# /etc/init.d/rspamd restart
syntax OK
Stopping rspamd:                                           [FAILED]
Starting rspamd:                                           [  OK  ]
verify that is running:
# ps -e fuwww | egrep -i rsp[a]md
root      1337  0.0  0.7 205564  7164 ?        Ss   20:19   0:00 rspamd: main process
_rspamd   1339  0.0  0.7 206004  8068 ?        S    20:19   0:00  _ rspamd: rspamd_proxy process
_rspamd   1340  0.2  1.2 209392 12584 ?        S    20:19   0:00  _ rspamd: controller process
_rspamd   1341  0.0  1.0 208436 11076 ?        S    20:19   0:00  _ rspamd: normal process
perfect, now it is time to enable rspamd to run on boot:
# chkconfig rspamd on
# chkconfig --list | egrep rspamd
rspamd          0:off   1:off   2:on    3:on    4:on    5:on    6:off
Postfix
In a nutshell, postfix will pass through (filter) an email using the milter protocol to another application before queuing it to one of postfix’s mail queues. Think milter as a bridge that connects two different applications.

Rspamd Proxy
In Rspamd 1.6 Rmilter is obsoleted but rspamd proxy worker supports milter protocol. That means we need to connect our postfix with rspamd_proxy via milter protocol.
Rspamd has a really nice documentation: https://rspamd.com/doc/index.html
On MTA integration you can find more info.
# netstat -ntlp | egrep -i rspamd
output:
tcp        0      0 0.0.0.0:11332               0.0.0.0:*                   LISTEN      1451/rspamd
tcp        0      0 0.0.0.0:11333               0.0.0.0:*                   LISTEN      1451/rspamd
tcp        0      0 127.0.0.1:11334             0.0.0.0:*                   LISTEN      1451/rspamd
tcp        0      0 :::11332                    :::*                        LISTEN      1451/rspamd
tcp        0      0 :::11333                    :::*                        LISTEN      1451/rspamd
tcp        0      0 ::1:11334                   :::*                        LISTEN      1451/rspamd
# egrep -A1 proxy /etc/rspamd/rspamd.conf
worker "rspamd_proxy" {
    bind_socket = "*:11332";
    .include "$CONFDIR/worker-proxy.inc"
    .include(try=true; priority=1,duplicate=merge) "$LOCAL_CONFDIR/local.d/worker-proxy.inc"
    .include(try=true; priority=10) "$LOCAL_CONFDIR/override.d/worker-proxy.inc"
}
Milter
If you want to know all the possibly configuration parameter on postfix for milter setup:
# postconf | egrep -i milter
output:
milter_command_timeout = 30s
milter_connect_macros = j {daemon_name} v
milter_connect_timeout = 30s
milter_content_timeout = 300s
milter_data_macros = i
milter_default_action = tempfail
milter_end_of_data_macros = i
milter_end_of_header_macros = i
milter_helo_macros = {tls_version} {cipher} {cipher_bits} {cert_subject} {cert_issuer}
milter_macro_daemon_name = $myhostname
milter_macro_v = $mail_name $mail_version
milter_mail_macros = i {auth_type} {auth_authen} {auth_author} {mail_addr} {mail_host} {mail_mailer}
milter_protocol = 6
milter_rcpt_macros = i {rcpt_addr} {rcpt_host} {rcpt_mailer}
milter_unknown_command_macros =
non_smtpd_milters =
smtpd_milters =
We are mostly interested in the last two, but it is best to follow rspamd documentation:
# vim /etc/postfix/main.cf
Adding the below configuration lines:
# ebal, Sat, 09 Sep 2017 18:56:02 +0300

## A list of Milter (mail filter) applications for new mail that does not arrive via the Postfix smtpd(8) server.
on_smtpd_milters = inet:127.0.0.1:11332

## A list of Milter (mail filter) applications for new mail that arrives via the Postfix smtpd(8) server.
smtpd_milters = inet:127.0.0.1:11332

## Send macros to mail filter applications
milter_mail_macros = i {auth_type} {auth_authen} {auth_author} {mail_addr} {client_addr} {client_name} {mail_host} {mail_mailer}

## skip mail without checks if something goes wrong, like rspamd is down !
milter_default_action = accept
Reload postfix
# postfix reload
postfix/postfix-script: refreshing the Postfix mail systemTesting
netcat
From a client:
$ nc 192.168.122.96 25
220 centos69.localdomain ESMTP Postfix
EHLO centos69
250-centos69.localdomain
250-PIPELINING
250-SIZE 10240000
250-VRFY
250-ETRN
250-ENHANCEDSTATUSCODES
250-8BITMIME
250 DSN
MAIL FROM: <root@example.org>
250 2.1.0 Ok
RCPT TO: <root@localhost>
250 2.1.5 Ok
DATA
354 End data with <CR><LF>.<CR><LF>
test
.
250 2.0.0 Ok: queued as 4233520144
^]
Logs
Looking through logs may be a difficult task for many, even so it is a task that you have to do.
MailLog
# egrep 4233520144 /var/log/maillog
Sep  9 19:08:01 localhost postfix/smtpd[1960]: 4233520144: client=unknown[192.168.122.1]
Sep  9 19:08:05 localhost postfix/cleanup[1963]: 4233520144: message-id=<>
Sep  9 19:08:05 localhost postfix/qmgr[1932]: 4233520144: from=<root@example.org>, size=217, nrcpt=1 (queue active)
Sep  9 19:08:05 localhost postfix/local[1964]: 4233520144: to=<root@localhost.localdomain>, orig_to=<root@localhost>, relay=local, delay=12, delays=12/0.01/0/0.01, dsn=2.0.0, status=sent (delivered to mailbox)
Sep  9 19:08:05 localhost postfix/qmgr[1932]: 4233520144: removed
Everything seems fine with postfix.
Rspamd Log
# egrep -i 4233520144 /var/log/rspamd/rspamd.log
2017-09-09 19:08:05 #1455(normal) <79a04e>; task; rspamd_message_parse: loaded message; id: <undef>; queue-id: <4233520144>; size: 6; checksum: <a6a8e3835061e53ed251c57ab4f22463>

2017-09-09 19:08:05 #1455(normal) <79a04e>; task; rspamd_task_write_log: id: <undef>, qid: <4233520144>, ip: 192.168.122.1, from: <root@example.org>, (default: F (add header): [9.40/15.00] [MISSING_MID(2.50){},MISSING_FROM(2.00){},MISSING_SUBJECT(2.00){},MISSING_TO(2.00){},MISSING_DATE(1.00){},MIME_GOOD(-0.10){text/plain;},ARC_NA(0.00){},FROM_NEQ_ENVFROM(0.00){;root@example.org;},RCVD_COUNT_ZERO(0.00){0;},RCVD_TLS_ALL(0.00){}]), len: 6, time: 87.992ms real, 4.723ms virtual, dns req: 0, digest: <a6a8e3835061e53ed251c57ab4f22463>, rcpts: <root@localhost>
It works !
Training
If you have already a spam or junk folder is really easy training the Bayesian classifier with rspamc.
I use Maildir, so for my setup the initial training is something like this:
# cd /storage/vmails/balaskas.gr/evaggelos/.Spam/cur/ # find . -type f -exec rspamc learn_spam {} \;
Auto-Training
I’ve read a lot of tutorials that suggest real-time training via dovecot plugins or something similar. I personally think that approach adds complexity and for small companies or personal setup, I prefer using Cron daemon:
@daily /bin/find /storage/vmails/balaskas.gr/evaggelos/.Spam/cur/ -type f -mtime -1 -exec rspamc learn_spam {} \;
That means every day, search for new emails in my spam folder and use them to train rspamd.
Training from mbox
First of all seriously ?
Split mbox
There is a nice and simply way to split a mbox to separated files for rspamc to use them.
# awk '/^From / {i++}{print > "msg"i}' Spam
and then feed rspamc:
# ls -1 msg* | xargs rspamc --verbose learn_spam
Stats
# rspamc stat
Results for command: stat (0.068 seconds)
Messages scanned: 2
Messages with action reject: 0, 0.00%
Messages with action soft reject: 0, 0.00%
Messages with action rewrite subject: 0, 0.00%
Messages with action add header: 2, 100.00%
Messages with action greylist: 0, 0.00%
Messages with action no action: 0, 0.00%
Messages treated as spam: 2, 100.00%
Messages treated as ham: 0, 0.00%
Messages learned: 1859
Connections count: 2
Control connections count: 2157
Pools allocated: 2191
Pools freed: 2170
Bytes allocated: 542k
Memory chunks allocated: 41
Shared chunks allocated: 10
Chunks freed: 0
Oversized chunks: 736
Fuzzy hashes in storage "rspamd.com": 659509399
Fuzzy hashes stored: 659509399
Statfile: BAYES_SPAM type: sqlite3; length: 32.66M; free blocks: 0; total blocks: 430.29k; free: 0.00%; learned: 1859; users: 1; languages: 4
Statfile: BAYES_HAM type: sqlite3; length: 9.22k; free blocks: 0; total blocks: 0; free: 0.00%; learned: 0; users: 1; languages: 1
Total learns: 1859
X-Spamd-Result
To view the spam score in every email, we need to enable extended reporting headers and to do that we need to edit our configuration:
# vim /etc/rspamd/modules.d/milter_headers.conf
and just above use add :
    # ebal, Wed, 06 Sep 2017 01:52:08 +0300
    extended_spam_headers = true;

   use = [];
then reload rspamd:
# /etc/init.d/rspamd reload
syntax OK
Reloading rspamd:                                          [  OK  ]
View Source
If your open the email in view-source then you will see something like this:
X-Rspamd-Queue-Id: D0A5728ABF
X-Rspamd-Server: centos69
X-Spamd-Result: default: False [3.40 / 15.00]
Web Server
Rspamd comes with their own web server. That is really useful if you dont have a web server in your mail server, but it is not recommended.
By-default, rspamd web server is only listening to local connections. We can see that from the below ss output
# ss -lp | egrep -i rspamd
LISTEN     0      128                    :::11332                   :::*        users:(("rspamd",7469,10),("rspamd",7471,10),("rspamd",7472,10),("rspamd",7473,10))
LISTEN     0      128                     *:11332                    *:*        users:(("rspamd",7469,9),("rspamd",7471,9),("rspamd",7472,9),("rspamd",7473,9))
LISTEN     0      128                    :::11333                   :::*        users:(("rspamd",7469,18),("rspamd",7473,18))
LISTEN     0      128                     *:11333                    *:*        users:(("rspamd",7469,16),("rspamd",7473,16))
LISTEN     0      128                   ::1:11334                   :::*        users:(("rspamd",7469,14),("rspamd",7472,14),("rspamd",7473,14))
LISTEN     0      128             127.0.0.1:11334                    *:*        users:(("rspamd",7469,12),("rspamd",7472,12),("rspamd",7473,12))
127.0.0.1:11334
So if you want to change that (dont) you have to edit the rspamd.conf (core file):
# vim +/11334 /etc/rspamd/rspamd.conf
and change this line:
bind_socket = "localhost:11334";to something like this:
bind_socket = "YOUR_SERVER_IP:11334";or use sed:
# sed -i -e 's/localhost:11334/YOUR_SERVER_IP/' /etc/rspamd/rspamd.conf
and then fire up your browser:

Web Password
It is a good tactic to change the default password of this web-gui to something else.
# vim /etc/rspamd/worker-controller.inc
  # password = "q1";
  password = "password";
always a good idea to restart rspamd.
Reverse Proxy
I dont like having exposed any web app without SSL or basic authentication, so I shall put rspamd web server under a reverse proxy (apache).
So on httpd-2.2 the configuration is something like this:
ProxyPreserveHost On

<Location /rspamd>
    AuthName "Rspamd Access"
    AuthType Basic
    AuthUserFile /etc/httpd/rspamd_htpasswd
    Require valid-user

    ProxyPass http://127.0.0.1:11334
    ProxyPassReverse http://127.0.0.1:11334

    Order allow,deny
    Allow from all

</Location>
Http Basic Authentication
You need to create the file that is going to be used to store usernames and password for basic authentication:
# htpasswd -csb /etc/httpd/rspamd_htpasswd rspamd rspamd_passwd
Adding password for user rspamd
restart your apache instance.
bind_socket
Of course for this to work, we need to change the bind socket on rspamd.conf
Dont forget this ;)
bind_socket = "127.0.0.1:11334";Selinux
If there is a problem with selinux, then:
# setsebool -P httpd_can_network_connect=1
or
# setsebool httpd_can_network_connect_db on
Errors ?
If you see an error like this:
IO write error
when running rspamd, then you need explicit tell rspamd to use:
rspamc -h 127.0.0.1:11334
To prevent any future errors, I’ve created a shell wrapper:
/usr/local/bin/rspamc
#!/bin/sh
/usr/bin/rspamc -h 127.0.0.1:11334 $*
Final Thoughts
I am using rspamd for a while know and I am pretty happy with it.
I’ve setup a spamtrap email address to feed my spam folder and let the cron script to train rspamd.
So after a thousand emails:
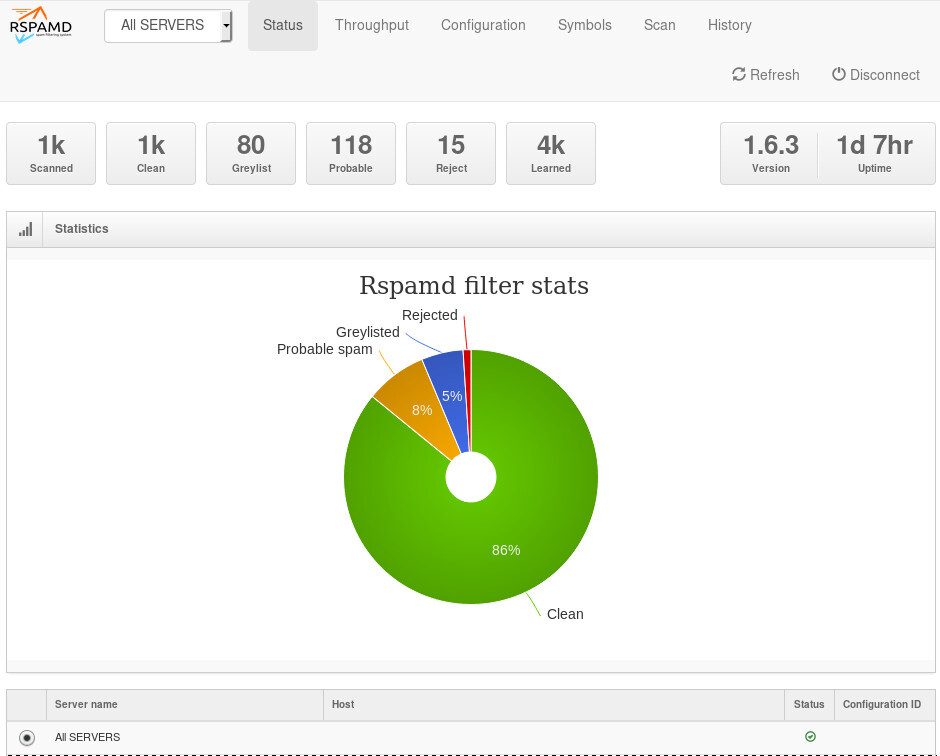
![]()
In many companies, nagios is the de-facto monitoring tool. Even with new modern alternatives solutions, this opensource project, still, has a large amount of implementations in place. This guide is based on a “clean/fresh” CentOS 6.9 virtual machine.
Epel
An official nagios repository exist in this address: https://repo.nagios.com/
I prefer to install nagios via the EPEL repository:
# yum -y install http://fedora-mirror01.rbc.ru/pub/epel/6/x86_64/epel-release-6-8.noarch.rpm
# yum info nagios | grep Version
Version     : 4.3.2
# yum -y install nagios
Selinux
Every online manual, suggest to disable selinux with nagios. There is a reason for that ! but I will try my best to provide info on how to keep selinux enforced. To write our own nagios selinux policies the easy way, we need one more package:
# yum -y install policycoreutils-python
Starting nagios:
# /etc/init.d/nagios restart
will show us some initial errors in /var/log/audit/audit.log selinux log file
Filtering the results:
# egrep denied /var/log/audit/audit.log | audit2allow
will display something like this:
#============= nagios_t ==============
allow nagios_t initrc_tmp_t:file write;
allow nagios_t self:capability chown;
To create a policy file based on your errors:
# egrep denied /var/log/audit/audit.log | audit2allow -a -M nagios_t
and to enable it:
# semodule -i nagios_t.pp
BE AWARE this is not the only problem with selinux, but I will provide more details in few moments.
Nagios
Now we are ready to start the nagios daemon:
# /etc/init.d/nagios restart
filtering the processes of our system:
# ps -e fuwww | egrep na[g]ios
nagios    2149  0.0  0.1  18528  1720 ?        Ss   19:37   0:00 /usr/sbin/nagios -d /etc/nagios/nagios.cfg
nagios    2151  0.0  0.0      0     0 ?        Z    19:37   0:00  _ [nagios] <defunct>
nagios    2152  0.0  0.0      0     0 ?        Z    19:37   0:00  _ [nagios] <defunct>
nagios    2153  0.0  0.0      0     0 ?        Z    19:37   0:00  _ [nagios] <defunct>
nagios    2154  0.0  0.0      0     0 ?        Z    19:37   0:00  _ [nagios] <defunct>
nagios    2155  0.0  0.0  18076   712 ?        S    19:37   0:00  _ /usr/sbin/nagios -d /etc/nagios/nagios.cfg
super!
Apache
Now it is time to start our web server apache:
# /etc/init.d/httpd restart
Starting httpd: httpd: apr_sockaddr_info_get() failed
httpd: Could not reliably determine the server's fully qualified domain name, using 127.0.0.1 for ServerName
This is a common error, and means that we need to define a ServerName in our apache configuration.
First, we give an name to our host file:
# vim /etc/hosts
for this guide, I ‘ll go with the centos69 but you can edit that according your needs:
127.0.0.1 localhost localhost.localdomain localhost4 localhost4.localdomain4 centos69then we need to edit the default apache configuration file:
# vim /etc/httpd/conf/httpd.conf
#ServerName www.example.com:80
ServerName centos69
and restart the process:
# /etc/init.d/httpd restart
Stopping httpd:      [  OK  ]
Starting httpd:      [  OK  ]
We can see from the netstat command that is running:
# netstat -ntlp | grep 80
tcp 0 0 :::80 :::* LISTEN 2729/httpd Firewall
It is time to fix our firewall and open the default http port, so that we can view the nagios from our browser.
That means, we need to fix our iptables !
# iptables -A INPUT -m state --state NEW -m tcp -p tcp --dport 80 -j ACCEPT
this is want we need. To a more permanent solution, we need to edit the default iptables configuration file:
# vim /etc/sysconfig/iptables
and add the below entry on INPUT chain section:
-A INPUT -m state --state NEW -m tcp -p tcp --dport 80 -j ACCEPTWeb Browser
We are ready to fire up our web browser and type the address of our nagios server.
Mine is on a local machine with the IP: 129.168.122.96, so
http://192.168.122.96/nagios/
User Authentication
The default user authentication credentials are:
nagiosadmin // nagiosadminbut we can change them!
From our command line, we type something similar:
# htpasswd -sb /etc/nagios/passwd nagiosadmin e4j9gDkk6LXncCdDg
so that htpasswd will update the default nagios password entry on the /etc/nagios/passwd with something else, preferable random and difficult password.
ATTENTION: e4j9gDkk6LXncCdDg is just that, a random password that I created for this document only. Create your own and dont tell anyone!
Selinux, Part Two
at this moment and if you are tail-ing the selinux audit file, you will see some more error msgs.
Below, you will see my nagios_t selinux policy file with all the things that are needed for nagios to run properly - at least at the moment.!
module nagios_t 1.0;

require {
        type nagios_t;
        type initrc_tmp_t;
        type nagios_spool_t;
        type nagios_system_plugin_t;
        type nagios_exec_t;
        type httpd_nagios_script_t;
        class capability chown;
        class file { write read open execute_no_trans getattr };
}

#============= httpd_nagios_script_t ==============
allow httpd_nagios_script_t nagios_spool_t:file { open read getattr };

#============= nagios_t ==============
allow nagios_t initrc_tmp_t:file write;
allow nagios_t nagios_exec_t:file execute_no_trans;
allow nagios_t self:capability chown;

#============= nagios_system_plugin_t ==============
allow nagios_system_plugin_t nagios_exec_t:file getattr;
Edit your nagios_t.te file accordingly and then build your selinux policy:
# make -f /usr/share/selinux/devel/Makefile
You are ready to update the previous nagios selinux policy :
# semodule -i nagios_t.pp
Selinux - Nagios package
So … there is an rpm package with the name: nagios-selinux on Version: 4.3.2
you can install it, but does not resolve all the selinux errors in audit file ….. so ….
I think my way is better, cause you can understand some things better and have more flexibility on defining your selinux policy
Nagios Plugins
Nagios is the core process, daemon. We need the nagios plugins - the checks !
You can do something like this:
# yum install nagios-plugins-all.x86_64
but I dont recommend it.
These are the defaults :
nagios-plugins-load-2.2.1-4git.el6.x86_64
nagios-plugins-ping-2.2.1-4git.el6.x86_64
nagios-plugins-disk-2.2.1-4git.el6.x86_64
nagios-plugins-procs-2.2.1-4git.el6.x86_64
nagios-plugins-users-2.2.1-4git.el6.x86_64
nagios-plugins-http-2.2.1-4git.el6.x86_64
nagios-plugins-swap-2.2.1-4git.el6.x86_64
nagios-plugins-ssh-2.2.1-4git.el6.x86_64
# yum -y install nagios-plugins-load nagios-plugins-ping nagios-plugins-disk nagios-plugins-procs nagios-plugins-users nagios-plugins-http nagios-plugins-swap nagios-plugins-ssh
and if everything is going as planned, you will see something like this:

PNP4Nagios
It is time, to add pnp4nagios a simple graphing tool and get read the nagios performance data and represent them to graphs.
# yum info pnp4nagios | grep Version
Version     : 0.6.22
# yum -y install pnp4nagios
We must not forget to restart our web server:
# /etc/init.d/httpd restart
Bulk Mode with NPCD
I’ve spent toooooo much time to understand why the default Synchronous does not work properly with nagios v4x and pnp4nagios v0.6x
In the end … this is what it works - so try not to re-invent the wheel , as I tried to do and lost so many hours.
Performance Data
We need to tell nagios to gather performance data from their check:
# vim +/process_performance_data /etc/nagios/nagios.cfg
process_performance_data=1
We also need to tell nagios, what to do with this data:
nagios.cfg
# *** the template definition differs from the one in the original nagios.cfg
#
service_perfdata_file=/var/log/pnp4nagios/service-perfdata
service_perfdata_file_template=DATATYPE::SERVICEPERFDATAtTIMET::$TIMET$tHOSTNAME::$HOSTNAME$tSERVICEDESC::$SERVICEDESC$tSERVICEPERFDATA::$SERVICEPERFDATA$tSERVICECHECKCOMMAND::$SERVICECHECKCOMMAND$tHOSTSTATE::$HOSTSTATE$tHOSTSTATETYPE::$HOSTSTATETYPE$tSERVICESTATE::$SERVICESTATE$tSERVICESTATETYPE::$SERVICESTATETYPE$
service_perfdata_file_mode=a
service_perfdata_file_processing_interval=15
service_perfdata_file_processing_command=process-service-perfdata-file

# *** the template definition differs from the one in the original nagios.cfg
#
host_perfdata_file=/var/log/pnp4nagios/host-perfdata
host_perfdata_file_template=DATATYPE::HOSTPERFDATAtTIMET::$TIMET$tHOSTNAME::$HOSTNAME$tHOSTPERFDATA::$HOSTPERFDATA$tHOSTCHECKCOMMAND::$HOSTCHECKCOMMAND$tHOSTSTATE::$HOSTSTATE$tHOSTSTATETYPE::$HOSTSTATETYPE$
host_perfdata_file_mode=a
host_perfdata_file_processing_interval=15
host_perfdata_file_processing_command=process-host-perfdata-file
Commands
In the above configuration, we introduced two new commands
service_perfdata_file_processing_command  &
host_perfdata_file_processing_command
We need to define them in the /etc/nagios/objects/commands.cfg file :
#
# Bulk with NPCD mode
#
define command {
       command_name    process-service-perfdata-file
       command_line    /bin/mv /var/log/pnp4nagios/service-perfdata /var/spool/pnp4nagios/service-perfdata.$TIMET$
}

define command {
       command_name    process-host-perfdata-file
       command_line    /bin/mv /var/log/pnp4nagios/host-perfdata /var/spool/pnp4nagios/host-perfdata.$TIMET$
}
If everything have gone right … then you will be able to see on a nagios check something like this:

Verify
Verify your pnp4nagios setup:
# wget -c http://verify.pnp4nagios.org/verify_pnp_config

# perl verify_pnp_config -m bulk+npcd -c /etc/nagios/nagios.cfg -p /etc/pnp4nagios/
NPCD
The NPCD daemon (Nagios Performance C Daemon) is the daemon/process that will translate the gathered performance data to graphs, so let’s started it:
# /etc/init.d/npcd restart
Stopping npcd:                                             [FAILED]
Starting npcd:                                             [  OK  ]
You should see some warnings but not any critical errors.
Templates
Two new template definition should be created, one for the host and one for the service:
/etc/nagios/objects/templates.cfg
define host {
   name       host-pnp
   action_url /pnp4nagios/index.php/graph?host=$HOSTNAME$&srv=_HOST_' class='tips' rel='/pnp4nagios/index.php/popup?host=$HOSTNAME$&srv=_HOST_
   register   0
}

define service {
   name       srv-pnp
   action_url /pnp4nagios/graph?host=$HOSTNAME$&srv=$SERVICEDESC$' class='tips' rel='/pnp4nagios/popup?host=$HOSTNAME$&srv=$SERVICEDESC$
   register   0
}
Host Definition
Now we need to apply the host-pnp template to our system:
so this configuration: /etc/nagios/objects/localhost.cfg
define host{
        use                     linux-server            ; Name of host template to use
                                                        ; This host definition will inherit all variables that are defined
                                                        ; in (or inherited by) the linux-server host template definition.
        host_name               localhost
        alias                   localhost
        address                 127.0.0.1
        }
becomes:
define host{
        use                     linux-server,host-pnp            ; Name of host template to use
                                                        ; This host definition will inherit all variables that are defined
                                                        ; in (or inherited by) the linux-server host template definition.
        host_name               localhost
        alias                   localhost
        address                 127.0.0.1
        }
Service Definition
And we finally must append the pnp4nagios service template to our services:
srv-pnp
define service{
        use                             local-service,srv-pnp         ; Name of service template to use
        host_name                       localhost
Graphs
We should be able to see graphs like these:

Happy Measurements!
appendix
These are some extra notes on the above article, you need to take in mind:
Services
# chkconfig httpd on
# chkconfig iptables on
# chkconfig nagios on
# chkconfig npcd on
PHP
If you are not running the default php version on your system, it is possible to get this error msg:
Non-static method nagios_Core::SummaryLink()There is a simply solution for that, you need to modify the index file to exclude the deprecated php error msgs:
# vim +/^error_reporting /usr/share/nagios/html/pnp4nagios/index.php
// error_reporting(E_ALL & ~E_STRICT);
error_reporting(E_ALL & ~E_STRICT & ~E_DEPRECATED);
A few days ago, I wrote a simple wiki page on how to Authenticate to a web site using LDAP backend.
There is a cool (and very simple way) to use Web Roles by matching your user’s ldap attributes to your web app.
A RFC 2255 from 1997 exists on how to implement (and use) the LDAP URL Format. The authldapurl syntax from mod_authnz_ldap explains that the “attribute” field can be used with comma to separate different attributes. Every attribute would be passed to your webserver as an AUTHENTICATED_attribute variable.
In my example:
AuthLDAPURL "ldap://ldap.domain.org/ou=web,dc=domain,dc=org?uid,MyWebAccess?one?(WebAccess=MyWebApp_Level_*)"
returns:
AUTHENTICATE_MYWEBACCESS
    MyWebApp_Level_1
AUTHENTICATE_UID
    myusername
This is pretty simple to even document, but i need a reference point !
<VirtualHost 1.2.3.4:80>

        ServerName example.com
        Redirect permanent / https://example.com

</VirtualHost>
dont forget to create the https virtual host, something like that:
<VirtualHost 1.2.3.4:443>

        ServerName example.com

        ServerAdmin admin@example.com

        # Logs
        CustomLog logs/example.com.access.log combined
        ErrorLog  logs/example.com.error.log

        DocumentRoot /www/examplecom
        DirectoryIndex index.html

        <Directory "/www/examplecom">
                Order allow,deny
                Allow from all

                AllowOverride All

                AuthType basic
                AuthName "Enter At Your Own Risk"
                AuthUserFile /www/htpasswd_for_examplecom
                Require valid-user

        </Directory>

        # HSTS
        Header always set Strict-Transport-Security "max-age=31536000; "

        # SSL Support
        SSLEngine on

        SSLProtocol all -SSLv2 -SSLv3
        SSLHonorCipherOrder on
        SSLCipherSuite HIGH:!aNULL:!MD5

        SSLCertificateFile      /certs/examplecom.crt
        SSLCertificateKeyFile   /certs/examplecom.key
        SSLCertificateChainFile /certs/class3.crt

</VirtualHost>
It took me a few minutes to understand why one of my online sign files isnt the correct one.
The actual file:
[~]>  md5sum file.sign
89dd90709bbc51eb6796280123f46fe6
The file on my web server:
$  md5sum file.sign
89dd90709bbc51eb6796280123f46fe6
when download it :
[~]>  md5sum file.sign
f57846a7032a1d106799af38ab94cfb7
Say what ?
Whattttttt !
[~]> file file.sign
file.sign: gzip compressed data, from Unix
so what if i did:
gunzip -d -c file.sign | md5sum
89dd90709bbc51eb6796280123f46fe6  -
So a light bulb lighted up upon my hackergotchi !! mod_deflate
i need to change my filters
A colleague of mine wants to add a new vhost on one of our apache web servers.
Running:
/etc/init.d/httpd configtest
he noticed that php_admin_flag had produced an error msg. We comment this flag out and tried to restart the web server. Unfortunately the httpd didnt came up.
Searching through logs I’ve seen these:
Dec 14 14:33:54 Erased: php-snmp
Dec 14 14:33:54 Erased: php-mbstring
Dec 14 14:33:54 Erased: php-pear
Dec 14 14:33:55 Erased: php-common
Dec 14 14:33:55 Erased: php-mcrypt
Dec 14 14:33:55 Erased: php-gd
Dec 14 14:33:55 Erased: php-mysql
Dec 14 14:33:55 Erased: php-cli
Dec 14 14:33:55 Erased: php-pgsql
Dec 14 14:33:55 Erased: php-ldap
Dec 14 14:33:55 Erased: php
Dec 14 14:33:55 Erased: php-devel
Dec 14 14:33:56 Erased: php-pdo
Dec 14 14:34:17 Installed: php53-common-5.3.3-22.el5_10.x86_64
Dec 14 14:34:17 Installed: php53-pdo-5.3.3-22.el5_10.x86_64
Dec 14 14:34:27 Installed: libc-client-2004g-2.2.1.x86_64
Dec 14 14:34:28 Installed: php53-mcrypt-5.3.3-1.el5.x86_64
Dec 14 14:34:28 Installed: php53-mysql-5.3.3-22.el5_10.x86_64
Dec 14 14:34:28 Installed: php53-ldap-5.3.3-22.el5_10.x86_64
Dec 14 14:34:28 Installed: php53-mbstring-5.3.3-22.el5_10.x86_64
Dec 14 14:34:28 Installed: php53-gd-5.3.3-22.el5_10.x86_64
Dec 14 14:34:28 Installed: php53-xml-5.3.3-22.el5_10.x86_64
Dec 14 14:34:28 Installed: php53-imap-5.3.3-22.el5_10.x86_64
Dec 14 14:34:28 Installed: php53-snmp-5.3.3-22.el5_10.x86_64
Dec 14 14:34:28 Installed: php53-pgsql-5.3.3-22.el5_10.x86_64
Dec 14 14:34:28 Installed: php53-cli-5.3.3-22.el5_10.x86_64
If you havent noticed the horror yet let me explain it to you:
There is NO php on the system!
A couple weeks ago, another colleague did a not so successfully update on this server.
blah blah blah
blah blah blah
blah blah blah
and story told short:
yum install php53.x86_64
worked it’s magic.
So keep it in mind that after yum update, you have to do manual restarts on the running services and check that everything works properly OR someone like me, will try to destroy your Christmas plans as a revenge !