AppImage is a brilliant way to have executable linux apps to every distro, without the need of re-packaging or re-build them. Without getting into too many details, it uses FUSE (Filesystem in Userspace) and SquashFS to bundle the app into one file.
AppImages require FUSE to run. Filesystem in Userspace (FUSE) is a system that lets non-root users mount filesystems.
So here are my personal notes on how to create Mozilla Firefox 68.3.0esr binary archive to an AppImage file.
download
Let’s begin by gathering all necessaries files
export VERSION=68.3.0esr

curl -sLO https://github.com/AppImage/AppImageKit/releases/download/continuous/appimagetool-x86_64.AppImage

curl -sL https://ftp.mozilla.org/pub/firefox/releases/$VERSION/linux-x86_64/en-US/firefox-$VERSION.tar.bz2 | tar xjf -
configuration files
we need 3 files, under the firefox directory
AppRun(executable shell script)Icon(.png,.svg,.xpm)firefox.desktop(freedesktop.org desktop file)
AppRun
this is our guide, this file will start our application inside the AppImage mount.
#!/bin/sh
cd "$(dirname "$0")"
exec ./firefox "$@"
or
cat > firefox/AppRun <<EOF
#!/bin/sh
cd "\$(dirname "\$0")"
exec ./firefox "\$@"

EOF
Dont forget to make it executable
chmod +x firefox/AppRunIcon
There is an image within firefox directory that we can use as firefox icon:
./firefox/browser/chrome/icons/default/default128firefox.desktop
for more info check here: Desktop Entry Specification
[Desktop Entry]
Categories=Network;WebBrowser;
Icon=/browser/chrome/icons/default/default128
Name=Mozilla Firefox
Terminal=false
Type=Application
Version=1.0
or
cat > firefox/firefox.desktop <<EOF
[Desktop Entry]
Categories=Network;WebBrowser;
Icon=/browser/chrome/icons/default/default128
Name=Mozilla Firefox
Terminal=false
Type=Application
Version=1.0
EOF
In the Icon attribute, it must be an absolute path, not relative.
Perms
Give execute permission to appimagetool
chmod +x appimagetool-x86_64.AppImageBuild your AppImage
./appimagetool-x86_64.AppImage --no-appstream firefox/Mozilla Firefox
if everything is okay, you will see this:
ls -l Mozilla_Firefox-x86_64.AppImageand you can run it !
./Mozilla_Firefox-x86_64.AppImage
if you want to run a specific profile:
./Mozilla_Firefox-x86_64.AppImage --profile $(pwd)/.mozilla/firefox/ichznbon.test/Mount
When you are running your AppImage, you will notice that there is a new mount point in our system (fusermount)
$ mount | grep -i firefox
Mozilla_Firefox-x86_64.AppImage on /tmp/.mount_MozillshcmPB type fuse.Mozilla_Firefox-x86_64.AppImage (ro,nosuid,nodev,relatime,user_id=347,group_id=347)
and if you look really careful, you will see that it is mounted under /tmp/ !
$ ls /tmp/.mount_MozillshcmPB
application.ini     firefox          icons               libmozsqlite3.so  libplc4.so       minidump-analyzer     Throbber-small.gif
AppRun              firefox-bin      libfreeblpriv3.chk  libmozwayland.so  libplds4.so      omni.ja               updater
browser             firefox-bin.sig  libfreeblpriv3.so   libnspr4.so       libsmime3.so     pingsender            updater.ini
chrome.manifest     firefox.desktop  liblgpllibs.so      libnss3.so        libsoftokn3.chk  platform.ini          update-settings.ini
crashreporter       firefox.sig      libmozavcodec.so    libnssckbi.so     libsoftokn3.so   plugin-container
crashreporter.ini   fonts            libmozavutil.so     libnssdbm3.chk    libssl3.so       plugin-container.sig
defaults            gmp-clearkey     libmozgtk.so        libnssdbm3.so     libxul.so        precomplete
dependentlibs.list  gtk2             libmozsandbox.so    libnssutil3.so    libxul.so.sig    removed-files
That’s it !
Your first AppImage bundle linux package.
Docker Notes
FUSE · AppImage/AppImageKit Wiki · GitHub
docker run --cap-add SYS_ADMIN --cap-add MKNOD --device /dev/fuse:mrw --rm -ti ubuntu:18.04 bash
 apt-get update

 apt-get -y install curl libfuse2 file

 export VERSION=68.3.0esr

 curl -sLO https://github.com/AppImage/AppImageKit/releases/download/continuous/appimagetool-x86_64.AppImage

 curl -sL https://ftp.mozilla.org/pub/firefox/releases/$VERSION/linux-x86_64/en-US/firefox-$VERSION.tar.bz2 | tar xjf -

 cat > firefox/AppRun <<EOF
#!/bin/sh
cd "\$(dirname "\$0")"
exec ./firefox "\$@"
EOF

 cat > firefox/firefox.desktop <<EOF
[Desktop Entry]
Categories=Network;WebBrowser;
Icon=/browser/chrome/icons/default/default128
Name=Mozilla Firefox
Terminal=false
Type=Application
Version=1.0
EOF

 chmod +x appimagetool-x86_64.AppImage

 ./appimagetool-x86_64.AppImage --no-appstream firefox/
appimagetool, continuous build (commit 64321b7), build 2111 built on 2019-11-23 22:20:53 UTC
WARNING: gpg2 or gpg command is missing, please install it if you want to create digital signatures
Using architecture x86_64
/firefox should be packaged as Mozilla_Firefox-x86_64.AppImage
Deleting pre-existing .DirIcon
Creating .DirIcon symlink based on information from desktop file
Generating squashfs...
Parallel mksquashfs: Using 8 processors
Creating 4.0 filesystem on Mozilla_Firefox-x86_64.AppImage, block size 131072.
[===========================================================================================================================|] 1583/1583 100%

Exportable Squashfs 4.0 filesystem, gzip compressed, data block size 131072
    compressed data, compressed metadata, compressed fragments,
    compressed xattrs, compressed ids
    duplicates are removed
Filesystem size 71064.05 Kbytes (69.40 Mbytes)
    36.14% of uncompressed filesystem size (196646.16 Kbytes)
Inode table size 5305 bytes (5.18 Kbytes)
    60.46% of uncompressed inode table size (8774 bytes)
Directory table size 1026 bytes (1.00 Kbytes)
    54.78% of uncompressed directory table size (1873 bytes)
Number of duplicate files found 3
Number of inodes 81
Number of files 67
Number of fragments 7
Number of symbolic links  1
Number of device nodes 0
Number of fifo nodes 0
Number of socket nodes 0
Number of directories 13
Number of ids (unique uids + gids) 1
Number of uids 1
    root (0)
Number of gids 1
    root (0)
Embedding ELF...
Marking the AppImage as executable...
Embedding MD5 digest
Success

Please consider submitting your AppImage to AppImageHub, the crowd-sourced
central directory of available AppImages, by opening a pull request
at https://github.com/AppImage/appimage.github.io
final notes:
 du -h Mozilla_Firefox-x86_64.AppImage
70M Mozilla_Firefox-x86_64.AppImage

 ls -l Mozilla_Firefox-x86_64.AppImage
-rwxr-xr-x 1 root root 72962088 Dec 26 21:55 Mozilla_Firefox-x86_64.AppImage

 file Mozilla_Firefox-x86_64.AppImage
Mozilla_Firefox-x86_64.AppImage: ELF 64-bit LSB executable, x86-64, version 1 (SYSV), dynamically linked, interpreter /lib64/l, for GNU/Linux 2.6.18, stripped

 ldd Mozilla_Firefox-x86_64.AppImage
    not a dynamic executable
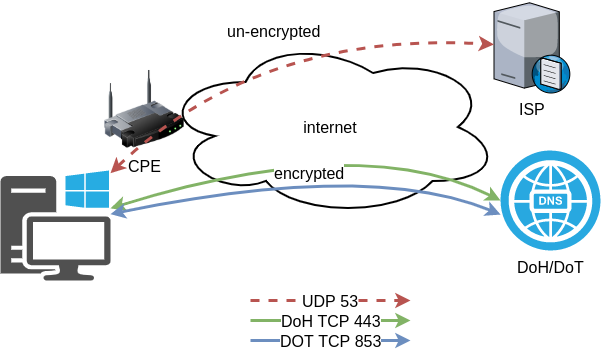
A couple months ago, we announced a public and free DNS service, so people can have encrypted DNS in their browsers and systems. We support both DNS over HTTPS (DoH) and DNS over TLS and our DoH service has two endpoints, the default /dns-query and one for blocking trackers and ads /ads. You can visit our page for more info.
dns
What is DNS?
Domain Name Service in a nutshell is when you are asking directions to find where Wikipedia is in the internet. Your browser does not know, so it will ask your computer. Your computer will ask your internet provider and your internet provider will ask someone else till they find the correct answer. In the end, your browser will know where to go and this is how you are visiting Wikipedia.
You need to trust all the above parties, to give you the correct answer and everybody knows that you are visiting Wikipedia.
doh
What is DoH (DNS Queries over HTTPS)?
It’s the implementation of RFC 8484. This is a way for your browser to ask where to find Wikipedia, without exposing to everybody that you want to visit Wikipedia! Still you need someone to ask for directions, but now both your question and the answer are encrypted. So you have privacy.
let’s get technical
What is RFC 8484?
In the above rfc, your client (eg. browser) asks your DNS via HTTP/2 representational state transfer (REST). DoH clients and servers need to sent a application/dns-message content (question/answer) and encode both the question and the answer in a bace64url message. Usually is GET, but POST is also supported on some servers.
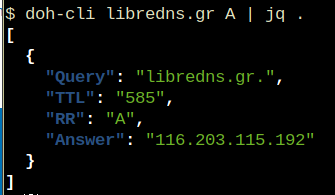
doh-cli
So, today, we introduce doh-cli, a simple command line DoH client, written in python. You can use doh-cli as a binary client in your system. We support a few DoH public servers to test, and of course both LibreDNS DoH endpoints
You can see the code here:
install it
It is super easy
pip install doh-cli
or if python3 is not your default python
pip3 install doh-cli
howto use it?
Just ask your favorite DoH server (default is https://doh.libredns.gr/dns-query)
eg.
doh-cli libredns.gr A
and use help to see all the options
doh-cli --help
Why default output is json?
With modern tools and with multiline output, it is best to support a serialized format so you can use doh-cli with your tools. But if you dont like it:
doh-cli --output plain libredns.gr A
You can see all the options and help, on the project’s page.
A few day ago, I was introduced to xip.io.
TLDR; You can have hostname for any IP Address!
$ dig +short @ipname.me www.192-168-1-1-ipname.me
192.168.1.1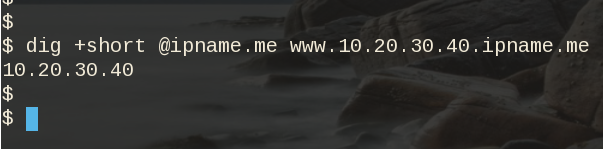
project
It uses the powerdns pipe backend to run a (187 lines) bash script, that strips the IP from the hostname and returns the IP. This works so well, that a few services depends on xip!
I was playing with the idea of using dnsdist to do that with the embedded Lua supports that dnsdist has. And the proof-of-concept result is about 10lines of Lua code.
The project is here: ipname on github
ifconfig
But not only returns you an IP Address for any (dynamic) hostname you ask, but you can also use this free & public service as a what-is-my-ip project over DNS.
$ dig +short @ipname.me googleyahoo.com
116.202.176.26
PS The code also validates the IPv4 Addresses!
In this blog post I will describe the easiest installation of a DoH/DoT VM for personal use, using dnsdist.
Next I will present a full installation example (from start) with dnsdist and PowerDNS.
Server Notes: Ubuntu 18.04
Client Notes: Archlinux
Every
{{ }}is a variable you need to change.
Do NOT copy/paste without making the changes.
Login to VM
and became root
$ ssh {{ VM }}
$ sudo -i
from now on, we are running commands as root.
TLDR;
dnsdist DoH/DoT
If you just need your own DoH and DoT instance, then dnsdist will forward your cleartext queries to another public DNS server with the below configuration.
cat > /etc/dnsdist/dnsdist.conf <<EOF

-- resets the list to this array
setACL("::/0")
addACL("0.0.0.0/0")

addDOHLocal('0.0.0.0', '/etc/dnsdist/fullchain.pem', '/etc/dnsdist/privkey.pem')
addTLSLocal('0.0.0.0', '/etc/dnsdist/fullchain.pem', '/etc/dnsdist/privkey.pem')

newServer({address="9.9.9.9:53"})
EOF
You will need -of course- to have your certificates before hand.
That’s It !
a DoH/DoT using dnsdist and powerdns
For people that need a more in-depth article, here are my notes on how to setup from scratch an entire VM with powerdns recursor and dnsdist.
Let’s Begin:
Enable PowerDNS Repos
Add key
curl -sL https://repo.powerdns.com/FD380FBB-pub.asc | apt-key add -
OK
Create PowerDNS source list
cat > /etc/apt/sources.list.d/powerdns.list <<EOF
deb [arch=amd64] http://repo.powerdns.com/ubuntu bionic-dnsdist-14 main
deb [arch=amd64] http://repo.powerdns.com/ubuntu bionic-rec-42 main
EOF

cat > /etc/apt/preferences.d/pdns <<EOF
Package: pdns-* dnsdist*
Pin: origin repo.powerdns.com
Pin-Priority: 600
EOF
Update System and Install packages
apt-get update
apt-get -qy install dnsdist pdns-recursor certbot
You may see errors from powerdns, like
failed: E: Sub-process /usr/bin/dpkg returned an error code (1)ignore them for the time being.
PowerDNS Recursor
We are going to setup our recursor first and let’s make it a little interesting.
PowerDNS Configuration
cat > /etc/powerdns/recursor.conf <<EOF
config-dir=/etc/powerdns
hint-file=/etc/powerdns/root.hints
local-address=127.0.0.1
local-port=5353
lua-dns-script=/etc/powerdns/pdns.lua
etc-hosts-file=/etc/powerdns/hosts.txt
export-etc-hosts=on
quiet=yes
setgid=pdns
setuid=pdns
EOF

chmod 0644 /etc/powerdns/recursor.conf
chown pdns:pdns /etc/powerdns/recursor.conf
Create a custom response
This will be handy for testing our dns from cli.
cat > /etc/powerdns/pdns.lua <<EOF
domainame = "test.{{ DOMAIN }}"
response  = "{{ VM_ipv4.address }}"

function nxdomain(dq)
    if dq.qname:equal(domainame) then
        dq.rcode=0 -- make it a normal answer
        dq:addAnswer(pdns.A, response)
        dq.variable = true -- disable packet cache
        return true
    end
    return false
end
EOF

chmod 0644 /etc/powerdns/pdns.lua
chown pdns:pdns /etc/powerdns/pdns.lua
AdBlock
Let’s make it more interesting, block trackers and ads.
cat > /usr/local/bin/update.stevenBlack.hosts.sh <<EOF
#!/bin/bash

# Get StevenBlack hosts
curl -sLo /tmp/hosts.txt https://raw.githubusercontent.com/StevenBlack/hosts/master/hosts

touch /etc/powerdns/hosts.txt

# Get diff
diff -q <(sort -V /etc/powerdns/hosts.txt | column -t) <(sort -V /tmp/hosts.txt | column -t)
DIFF_STATUS=$?

# Get Lines
LINES=`grep -c ^ /tmp/hosts.txt`

# Check & restart if needed
if [ "${LINES}" -gt "200" -a "${DIFF_STATUS}" != "0" ]; then
    mv -f /tmp/hosts.txt /etc/powerdns/hosts.txt
    chmod 0644 /etc/powerdns/hosts.txt
    chown pdns:pdns /etc/powerdns/hosts.txt
    systemctl restart pdns-recursor
fi

# vim: sts=2 sw=2 ts=2 et
EOF

chmod +x /usr/local/bin/update.stevenBlack.hosts.sh
/usr/local/bin/update.stevenBlack.hosts.sh
Be Careful with Copy/Paste. Check the
$dollar sign.
OpenNic Project
Is it possible to make it more interesting ?
Yes! by using OpenNIC Project, instead of the default root NS
cat > /usr/local/bin/update.root.hints.sh <<EOF
#!/bin/bash

# Get root hints
dig . NS @75.127.96.89 | egrep -v '^;|^$' > /tmp/root.hints

touch /etc/powerdns/root.hints

# Get diff
diff -q <(sort -V /etc/powerdns/root.hints | column -t) <(sort -V /tmp/root.hints | column -t)
DIFF_STATUS=$?

# Get Lines
LINES=`grep -c ^ /tmp/root.hints`

# Check & restart if needed
if [ "${LINES}" -gt "20" -a "${DIFF_STATUS}" != "0" ]; then
    mv -f /tmp/root.hints /etc/powerdns/root.hints
    chmod 0644 /etc/powerdns/root.hints
    chown pdns:pdns /etc/powerdns/root.hints
    systemctl restart pdns-recursor
fi

# vim: sts=2 sw=2 ts=2 et
EOF

chmod +x /usr/local/bin/update.root.hints.sh
/usr/local/bin/update.root.hints.sh
dnsdist
dnsdist is a DNS load balancer with enhanced features.
dnsdist configuration
cat > /etc/dnsdist/dnsdist.conf <<EOF
-- resets the list to this array
setACL("::/0")
addACL("0.0.0.0/0")

addDOHLocal('0.0.0.0', '/etc/dnsdist/fullchain.pem', '/etc/dnsdist/privkey.pem')
addTLSLocal('0.0.0.0', '/etc/dnsdist/fullchain.pem', '/etc/dnsdist/privkey.pem')

newServer({address="127.0.0.1:5353"})
EOF
Certbot
Now it is time to get a new certificate with the help of letsencrypt.
Replace
{{ DOMAIN }}with your domain
We need to create the post hook first and this is why we need to copy the certificates under dnsdist folder.
cat > /usr/local/bin/certbot_post_hook.sh <<EOF
#!/bin/bash

cp -f /etc/letsencrypt/live/{{ DOMAIN }}/*pem /etc/dnsdist/
systemctl restart dnsdist.service

# vim: sts=2 sw=2 ts=2 et
EOF

chmod +x /usr/local/bin/certbot_post_hook.sh
and of course create a certbot script.
Caveat: I have the dry-run option in the below script. When you are ready, remove it.
cat > /usr/local/bin/certbot.create.sh <<EOF
#!/bin/bash

certbot --dry-run --agree-tos --standalone certonly --register-unsafely-without-email
    --pre-hook 'systemctl stop dnsdist'
    --post-hook /usr/local/bin/certbot_post_hook.sh
    -d {{ DOMAIN }} -d doh.{{ DOMAIN }} -d dot.{{ DOMAIN }}

# vim: sts=2 sw=2 ts=2 et
EOF

chmod +x /usr/local/bin/certbot.create.sh
Firewall
Now open your firewall to the below TCP Ports:
ufw allow 80/tcp
ufw allow 443/tcp
ufw allow 853/tcp- TCP 80 for certbot
- TCP 443 for dnsdist (DoT) and certbot !
- TCP 853 for dnsdist (DoH)
Let’s Encrypt
When you are ready, run the script
/usr/local/bin/certbot.create.shThat’s it !
Client
For this blog post, my test settings are:
Domain: ipname.me
IP: 88.99.36.45
DoT - Client
From systemd 243+ there is an option to validate certificates on DoT but
systemd-resolved only validates the DNS server certificate if it is issued for the server’s IP address (a rare occurrence).
so it is best to use: opportunistic
/etc/systemd/resolved.conf [Resolve]
DNS=88.99.36.45
FallbackDNS=1.1.1.1
DNSSEC=no
#DNSOverTLS=yes
DNSOverTLS=opportunistic
Cache=yes
ReadEtcHosts=yessystemctl restart systemd-resolved
Query
resolvectl query test.ipname.me test.ipname.me: 88.99.36.45 -- link: eth0
-- Information acquired via protocol DNS in 1.9ms.
-- Data is authenticated: noDoH - Client
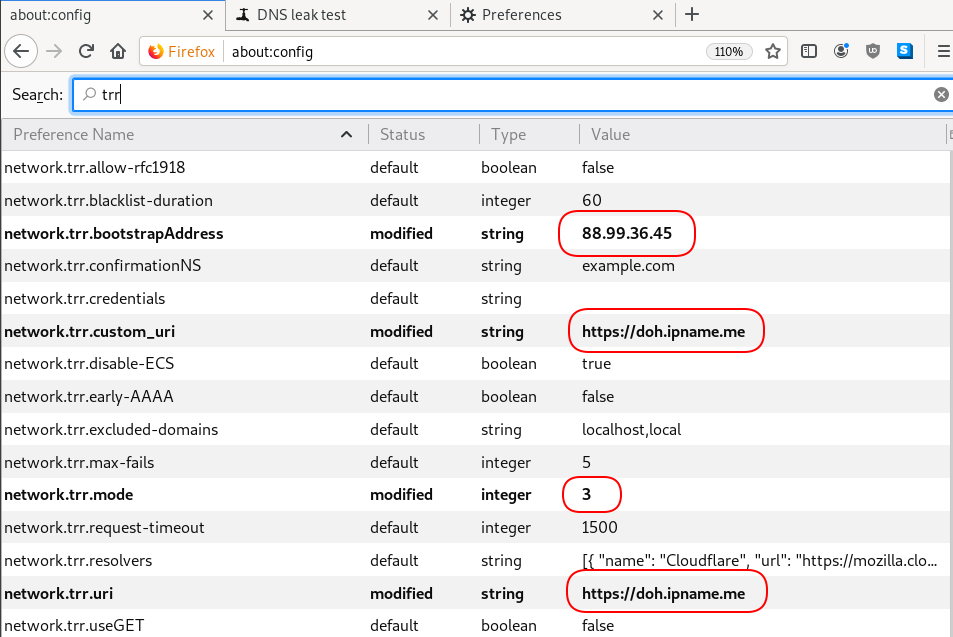
Firefox Settings
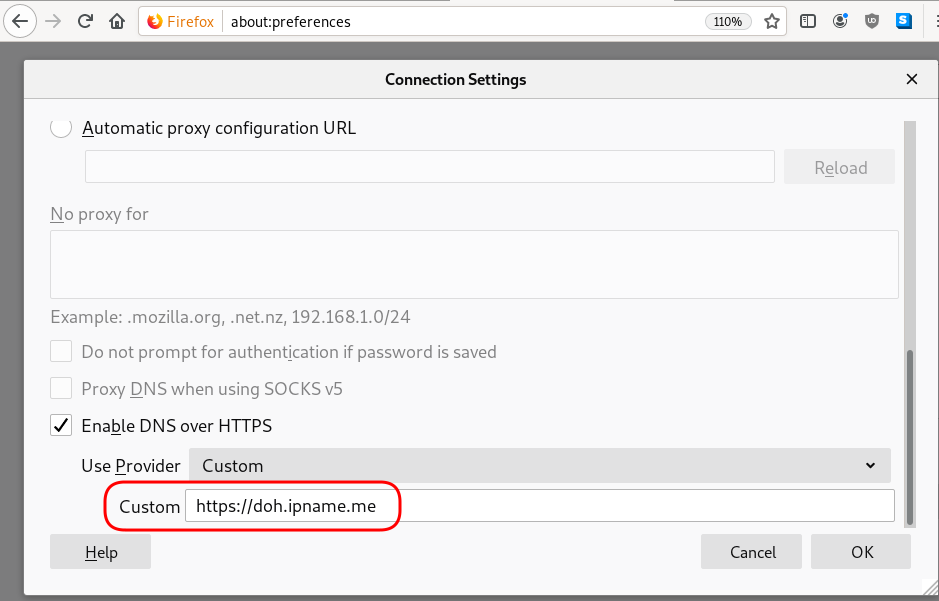
Firefox TRR
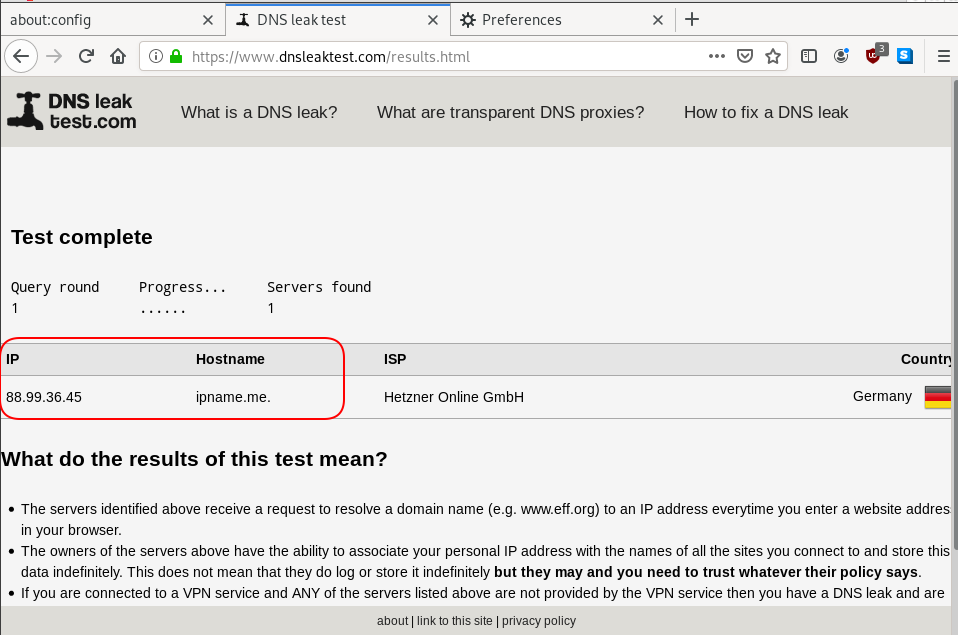
dnsleak
Click on DNS leak test site to verify
In this blog post you will find my personal notes on how to setup a Kubernetes as a Service (KaaS). I will be using Terraform to create the infrastructure on Hetzner’s VMs, Rancher for KaaS and Helm to install the first application on Kubernetes.
Many thanks to dear friend: adamo for his help.
Terraform
Let’s build our infrastructure!
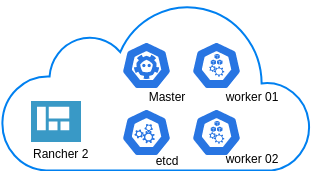
We are going to use terraform to build 5 VMs
- One (1) master
- One (1) etcd
- Two (2) workers
- One (1) for the Web dashboard
I will not go to much details about terraform, but to have a basic idea
Provider.tf
provider "hcloud" {
    token = var.hcloud_token
}
Hetzner.tf
data "template_file" "userdata" {
  template = "${file("user-data.yml")}"
  vars = {
    hostname = var.domain
    sshdport = var.ssh_port
  }
}

resource "hcloud_server" "node" {
  count       = 5
  name        = "rke-${count.index}"
  image       = "ubuntu-18.04"
  server_type = "cx11"
  user_data   = data.template_file.userdata.rendered
}
Output.tf
output "IPv4" {
  value = hcloud_server.node.*.ipv4_address
}
In my user-data (cloud-init) template, the most important lines are these
  - usermod -a -G docker deploy
  - ufw allow 6443/tcp
  - ufw allow 2379/tcp
  - ufw allow 2380/tcp
  - ufw allow 80/tcp
  - ufw allow 443/tcp
build infra
$ terraform init
$ terraform plan
$ terraform apply
output
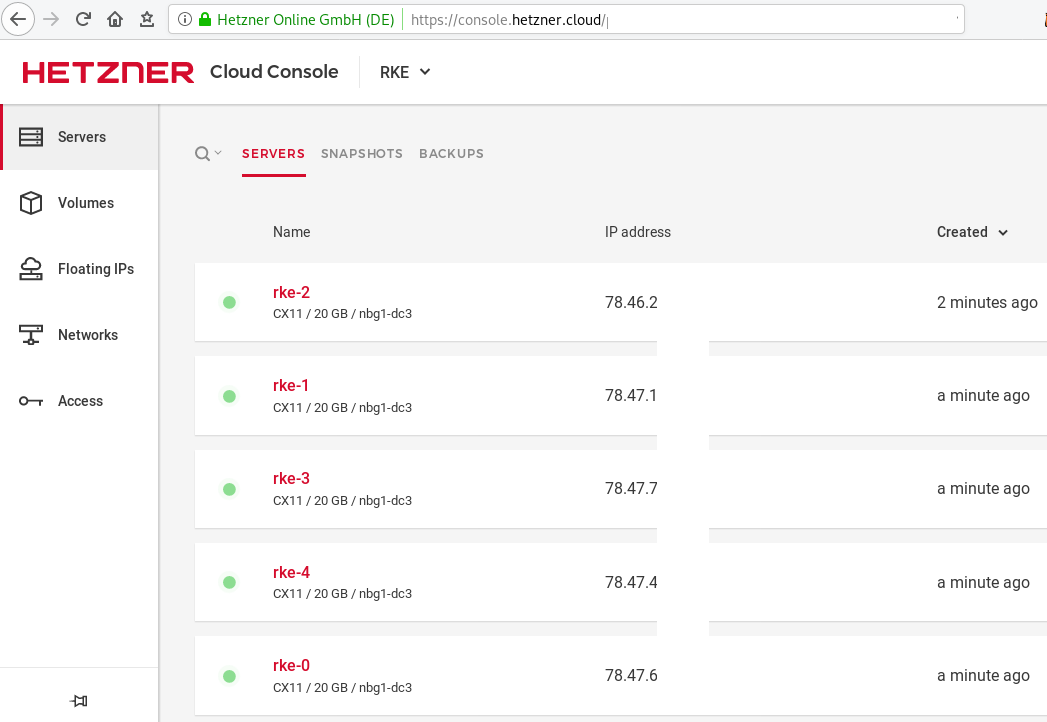
IPv4 = [
  "78.47.6x.yyy",
  "78.47.1x.yyy",
  "78.46.2x.yyy",
  "78.47.7x.yyy",
  "78.47.4x.yyy",
]
In the end we will see something like this on hetzner cloud
Rancher Kubernetes Engine
Take a look here for more details about what is required and important on using rke: Requirements.
We are going to use the rke aka the Rancher Kubernetes Engine, an extremely simple, lightning fast Kubernetes installer that works everywhere.
download
Download the latest binary from github:
Release Release v1.0.0
$ curl -sLO https://github.com/rancher/rke/releases/download/v1.0.0/rke_linux-amd64
$ chmod +x rke_linux-amd64
$ sudo mv rke_linux-amd64 /usr/local/bin/rke
version
$ rke --version

rke version v1.0.0
rke config
We are ready to configure our Kubernetes Infrastructure using the first 4 VMs.
$ rke configmaster
[+] Cluster Level SSH Private Key Path [~/.ssh/id_rsa]:
[+] Number of Hosts [1]: 4
[+] SSH Address of host (1) [none]: 78.47.6x.yyy
[+] SSH Port of host (1) [22]:
[+] SSH Private Key Path of host (78.47.6x.yyy) [none]:
[-] You have entered empty SSH key path, trying fetch from SSH key parameter
[+] SSH Private Key of host (78.47.6x.yyy) [none]:
[-] You have entered empty SSH key, defaulting to cluster level SSH key: ~/.ssh/id_rsa
[+] SSH User of host (78.47.6x.yyy) [ubuntu]:
[+] Is host (78.47.6x.yyy) a Control Plane host (y/n)? [y]:
[+] Is host (78.47.6x.yyy) a Worker host (y/n)? [n]: n
[+] Is host (78.47.6x.yyy) an etcd host (y/n)? [n]: n
[+] Override Hostname of host (78.47.6x.yyy) [none]: rke-master
[+] Internal IP of host (78.47.6x.yyy) [none]:
[+] Docker socket path on host (78.47.6x.yyy) [/var/run/docker.sock]:
etcd
[+] SSH Address of host (2) [none]: 78.47.1x.yyy
[+] SSH Port of host (2) [22]:
[+] SSH Private Key Path of host (78.47.1x.yyy) [none]:
[-] You have entered empty SSH key path, trying fetch from SSH key parameter
[+] SSH Private Key of host (78.47.1x.yyy) [none]:
[-] You have entered empty SSH key, defaulting to cluster level SSH key: ~/.ssh/id_rsa
[+] SSH User of host (78.47.1x.yyy) [ubuntu]:
[+] Is host (78.47.1x.yyy) a Control Plane host (y/n)? [y]: n
[+] Is host (78.47.1x.yyy) a Worker host (y/n)? [n]: n
[+] Is host (78.47.1x.yyy) an etcd host (y/n)? [n]: y
[+] Override Hostname of host (78.47.1x.yyy) [none]: rke-etcd
[+] Internal IP of host (78.47.1x.yyy) [none]:
[+] Docker socket path on host (78.47.1x.yyy) [/var/run/docker.sock]:
workers
worker-01
[+] SSH Address of host (3) [none]: 78.46.2x.yyy
[+] SSH Port of host (3) [22]:
[+] SSH Private Key Path of host (78.46.2x.yyy) [none]:
[-] You have entered empty SSH key path, trying fetch from SSH key parameter
[+] SSH Private Key of host (78.46.2x.yyy) [none]:
[-] You have entered empty SSH key, defaulting to cluster level SSH key: ~/.ssh/id_rsa
[+] SSH User of host (78.46.2x.yyy) [ubuntu]:
[+] Is host (78.46.2x.yyy) a Control Plane host (y/n)? [y]: n
[+] Is host (78.46.2x.yyy) a Worker host (y/n)? [n]: y
[+] Is host (78.46.2x.yyy) an etcd host (y/n)? [n]: n
[+] Override Hostname of host (78.46.2x.yyy) [none]: rke-worker-01
[+] Internal IP of host (78.46.2x.yyy) [none]:
[+] Docker socket path on host (78.46.2x.yyy) [/var/run/docker.sock]:
worker-02
[+] SSH Address of host (4) [none]: 78.47.4x.yyy
[+] SSH Port of host (4) [22]:
[+] SSH Private Key Path of host (78.47.4x.yyy) [none]:
[-] You have entered empty SSH key path, trying fetch from SSH key parameter
[+] SSH Private Key of host (78.47.4x.yyy) [none]:
[-] You have entered empty SSH key, defaulting to cluster level SSH key: ~/.ssh/id_rsa
[+] SSH User of host (78.47.4x.yyy) [ubuntu]:
[+] Is host (78.47.4x.yyy) a Control Plane host (y/n)? [y]: n
[+] Is host (78.47.4x.yyy) a Worker host (y/n)? [n]: y
[+] Is host (78.47.4x.yyy) an etcd host (y/n)? [n]: n
[+] Override Hostname of host (78.47.4x.yyy) [none]: rke-worker-02
[+] Internal IP of host (78.47.4x.yyy) [none]:
[+] Docker socket path on host (78.47.4x.yyy) [/var/run/docker.sock]:
Network Plugin Type
[+] Network Plugin Type (flannel, calico, weave, canal) [canal]: rke_config
[+] Authentication Strategy [x509]:
[+] Authorization Mode (rbac, none) [rbac]: none
[+] Kubernetes Docker image [rancher/hyperkube:v1.16.3-rancher1]:
[+] Cluster domain [cluster.local]:
[+] Service Cluster IP Range [10.43.0.0/16]:
[+] Enable PodSecurityPolicy [n]:
[+] Cluster Network CIDR [10.42.0.0/16]:
[+] Cluster DNS Service IP [10.43.0.10]:
[+] Add addon manifest URLs or YAML files [no]:
cluster.yml
the rke config will produce a cluster yaml file, for us to review or edit in case of misconfigure
$ ls -l cluster.yml
-rw-r----- 1 ebal ebal 4720 Dec  7 20:57 cluster.yml
rke up
We are ready to setup our KaaS by running:
$ rke upINFO[0000] Running RKE version: v1.0.0
INFO[0000] Initiating Kubernetes cluster
INFO[0000] [dialer] Setup tunnel for host [78.47.6x.yyy]
INFO[0000] [dialer] Setup tunnel for host [78.47.1x.yyy]
INFO[0000] [dialer] Setup tunnel for host [78.46.2x.yyy]
INFO[0000] [dialer] Setup tunnel for host [78.47.7x.yyy]
...
INFO[0329] [dns] DNS provider coredns deployed successfully
INFO[0329] [addons] Setting up Metrics Server
INFO[0329] [addons] Saving ConfigMap for addon rke-metrics-addon to Kubernetes
INFO[0329] [addons] Successfully saved ConfigMap for addon rke-metrics-addon to Kubernetes
INFO[0329] [addons] Executing deploy job rke-metrics-addon
INFO[0335] [addons] Metrics Server deployed successfully
INFO[0335] [ingress] Setting up nginx ingress controller
INFO[0335] [addons] Saving ConfigMap for addon rke-ingress-controller to Kubernetes
INFO[0335] [addons] Successfully saved ConfigMap for addon rke-ingress-controller to Kubernetes
INFO[0335] [addons] Executing deploy job rke-ingress-controller
INFO[0341] [ingress] ingress controller nginx deployed successfully
INFO[0341] [addons] Setting up user addons
INFO[0341] [addons] no user addons defined
INFO[0341] Finished building Kubernetes cluster successfully Kubernetes
The output of rke will produce a local kube config cluster yaml file for us to connect to kubernetes cluster.
kube_config_cluster.ymlLet’s test our k8s !
$ kubectl --kubeconfig=kube_config_cluster.yml get nodes -A
NAME STATUS ROLES AGE VERSION
rke-etcd Ready etcd 2m5s v1.16.3
rke-master Ready controlplane 2m6s v1.16.3
rke-worker-1 Ready worker 2m4s v1.16.3
rke-worker-2 Ready worker 2m2s v1.16.3
$ kubectl --kubeconfig=kube_config_cluster.yml get pods -A
NAMESPACE NAME READY STATUS RESTARTS AGE
ingress-nginx default-http-backend-67cf578fc4-nlbb6 1/1 Running 0 96s
ingress-nginx nginx-ingress-controller-7scft 1/1 Running 0 96s
ingress-nginx nginx-ingress-controller-8bmmm 1/1 Running 0 96s
kube-system canal-4x58t 2/2 Running 0 114s
kube-system canal-fbr2w 2/2 Running 0 114s
kube-system canal-lhz4x 2/2 Running 1 114s
kube-system canal-sffwm 2/2 Running 0 114s
kube-system coredns-57dc77df8f-9h648 1/1 Running 0 24s
kube-system coredns-57dc77df8f-pmtvk 1/1 Running 0 107s
kube-system coredns-autoscaler-7774bdbd85-qhs9g 1/1 Running 0 106s
kube-system metrics-server-64f6dffb84-txglk 1/1 Running 0 101s
kube-system rke-coredns-addon-deploy-job-9dhlx 0/1 Completed 0 110s
kube-system rke-ingress-controller-deploy-job-jq679 0/1 Completed 0 98s
kube-system rke-metrics-addon-deploy-job-nrpjm 0/1 Completed 0 104s
kube-system rke-network-plugin-deploy-job-x7rt9 0/1 Completed 0 117s
$ kubectl --kubeconfig=kube_config_cluster.yml get componentstatus
NAME AGE
controller-manager <unknown>
scheduler <unknown>
etcd-0 <unknown> <unknown>
$ kubectl --kubeconfig=kube_config_cluster.yml get deployments -A
NAMESPACE NAME READY UP-TO-DATE AVAILABLE AGE
ingress-nginx default-http-backend 1/1 1 1 2m58s
kube-system coredns 2/2 2 2 3m9s
kube-system coredns-autoscaler 1/1 1 1 3m8s
kube-system metrics-server 1/1 1 1 3m4s
$ kubectl --kubeconfig=kube_config_cluster.yml get ns
NAME STATUS AGE
default Active 4m28s
ingress-nginx Active 3m24s
kube-node-lease Active 4m29s
kube-public Active 4m29s
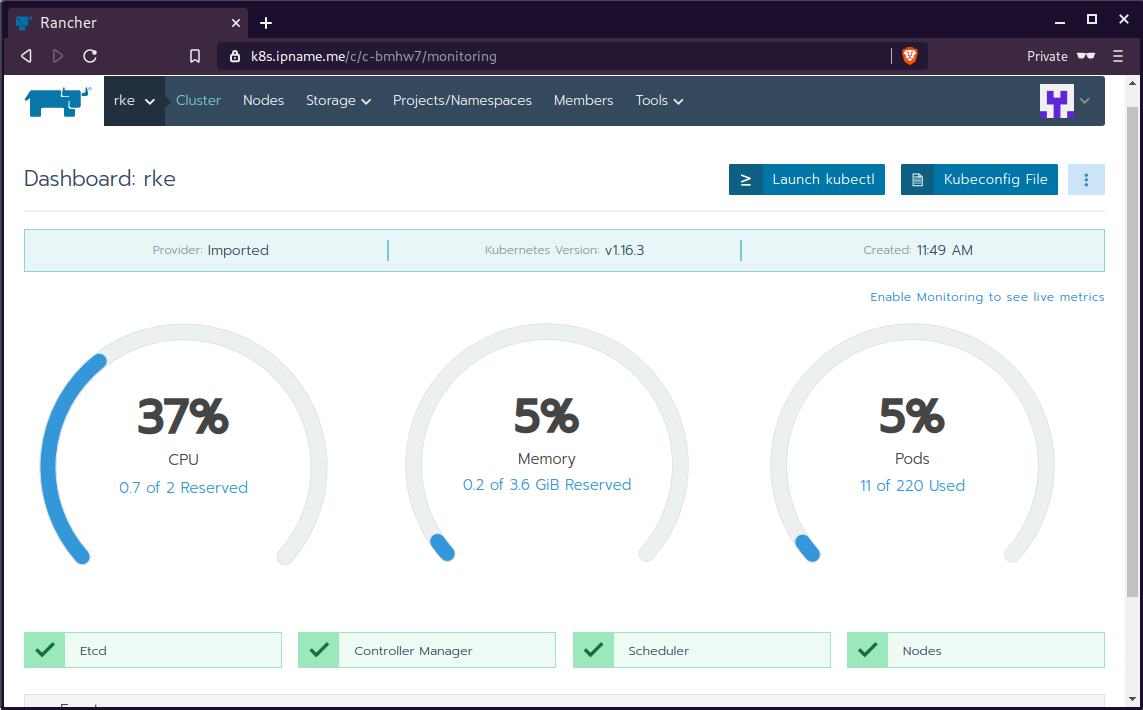
kube-system Active 4m29sRancer2
Now login to the 5th VM we have in Hetzner:
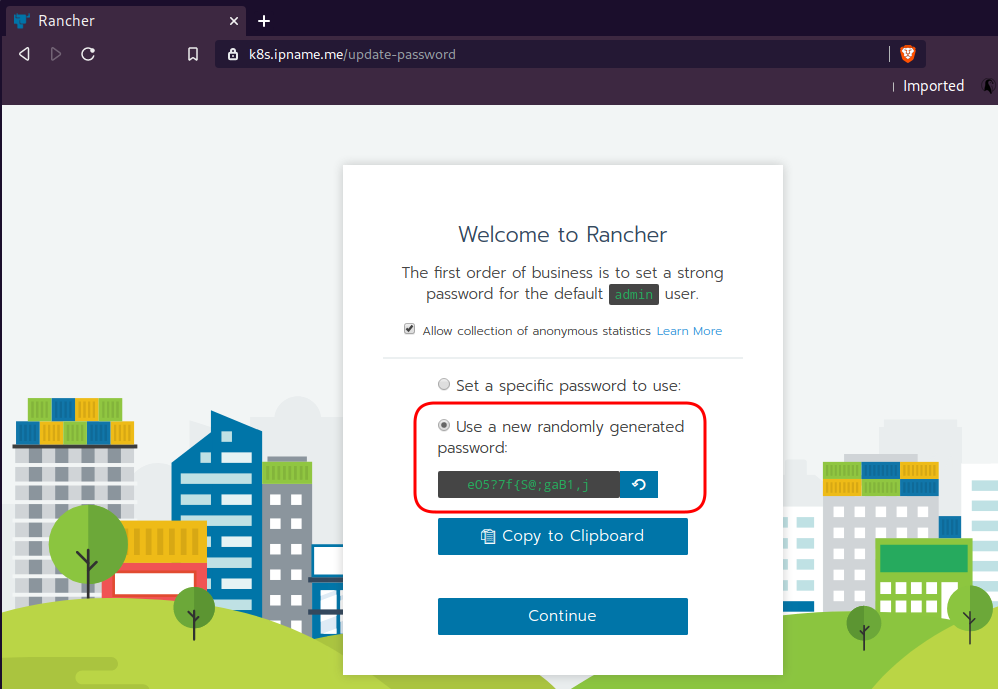
ssh "78.47.4x.yyy" -l ubuntu -p zzzzand install the stable version of Rancher2
$ docker run -d
    --restart=unless-stopped
    -p 80:80 -p 443:443
    --name rancher2
    -v /opt/rancher:/var/lib/rancher
    rancher/rancher:stable
    --acme-domain k8s.ipname.me
Caveat: I have create a domain and assigned to this hostname the IP of the latest VMs!
Now I can use letsencrypt with rancher via acme-domain.
verify
$ docker images -a
REPOSITORY          TAG                 IMAGE ID            CREATED             SIZE
rancher/rancher     stable              5ebba94410d8        10 days ago         654MB

$ docker ps -a -a
CONTAINER ID        IMAGE                    COMMAND                  CREATED             STATUS              PORTS                                      NAMES
8f798fb8184c        rancher/rancher:stable   "entrypoint.sh --acm…"   17 seconds ago      Up 15 seconds       0.0.0.0:80->80/tcp, 0.0.0.0:443->443/tcp   rancher2
Access
Before we continue, we need to give access to these VMs so they can communicate with each other. In cloud you can create a VPC with the correct security groups. But with VMs the easiest way is to do something like this:
sudo ufw allow from "78.47.6x.yyy",
sudo ufw allow from "78.47.1x.yyy",
sudo ufw allow from "78.46.2x.yyy",
sudo ufw allow from "78.47.7x.yyy",
sudo ufw allow from "78.47.4x.yyy",
Dashboard
Open your browser and type the IP of your rancher2 VM:
https://78.47.4x.yyyor (in my case):
https://k8s.ipname.meand follow the below instructions


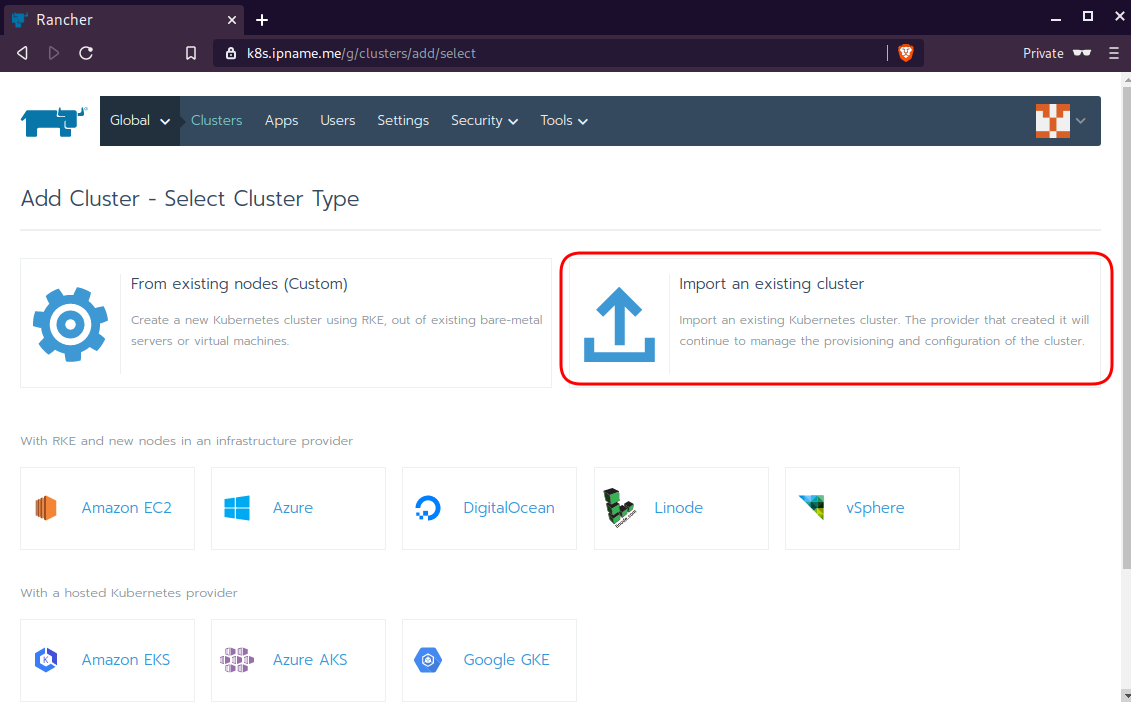
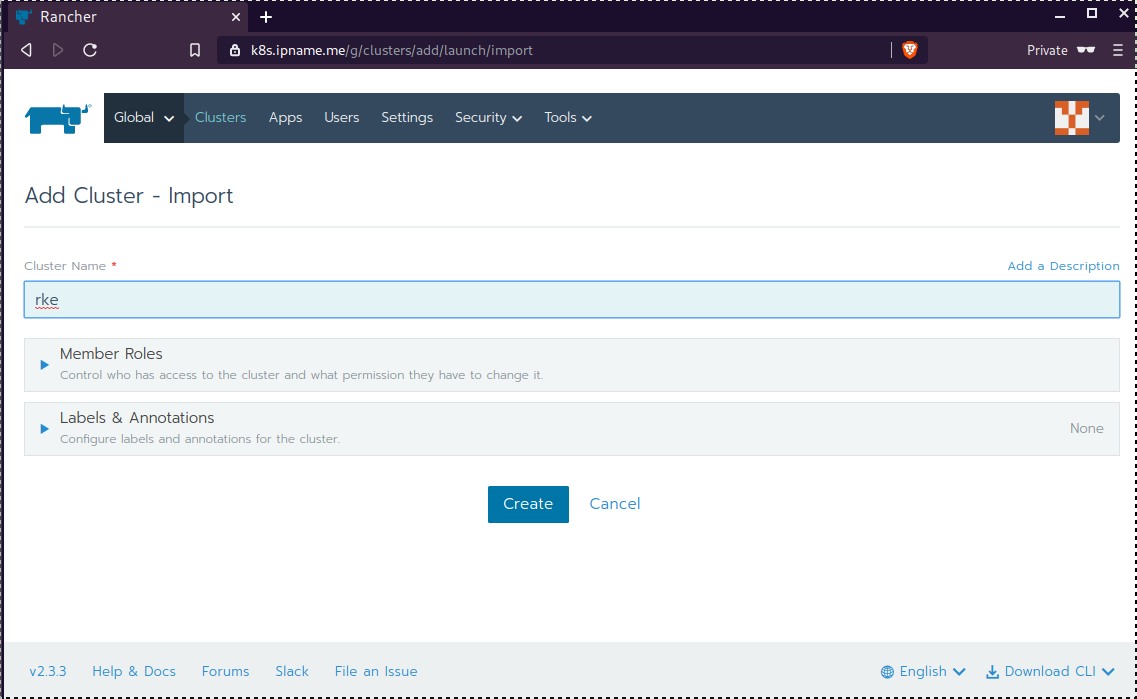
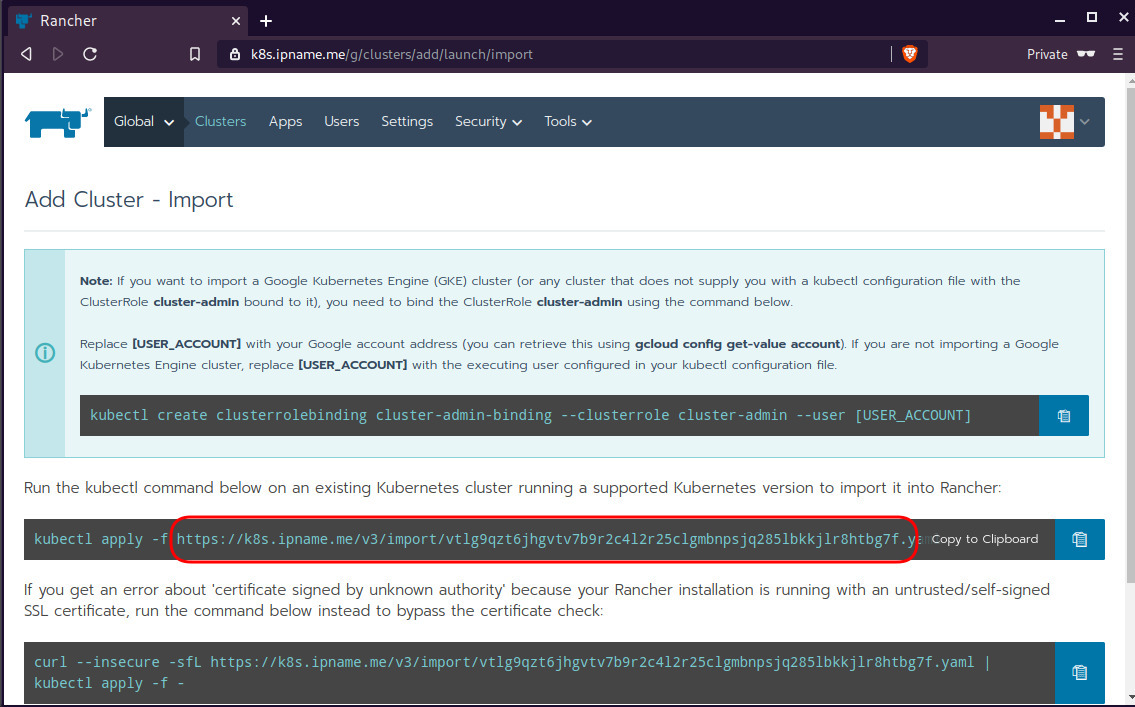
Connect cluster with Rancher2
Download the racnher2 yaml file to your local directory:
$ curl -sLo rancher2.yaml https://k8s.ipname.me/v3/import/nk6p4mg9tzggqscrhh8bzbqdt4447fsffwfm8lms5ghr8r498lngtp.yamlAnd apply this yaml file to your kubernetes cluster:
$ kubectl --kubeconfig=kube_config_cluster.yml apply -f rancher2.yaml

clusterrole.rbac.authorization.k8s.io/proxy-clusterrole-kubeapiserver unchanged
clusterrolebinding.rbac.authorization.k8s.io/proxy-role-binding-kubernetes-master unchanged
namespace/cattle-system unchanged
serviceaccount/cattle unchanged
clusterrolebinding.rbac.authorization.k8s.io/cattle-admin-binding unchanged
secret/cattle-credentials-2704c5f created
clusterrole.rbac.authorization.k8s.io/cattle-admin configured
deployment.apps/cattle-cluster-agent configured
daemonset.apps/cattle-node-agent configured
Web Gui

kubectl config
We can now use the Rancher kubectl config by downloading from here:
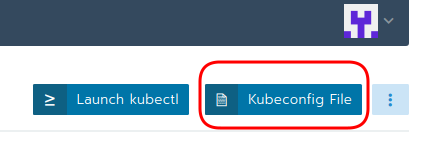
In this post, it is rancher2.config.yml
helm
Final step is to use helm to install an application to our kubernetes cluster
download and install
$ curl -sfL https://get.helm.sh/helm-v3.0.1-linux-amd64.tar.gz | tar -zxf -

$ chmod +x linux-amd64/helm
$ sudo mv linux-amd64/helm /usr/local/bin/
Add Repo
$ helm repo add stable https://kubernetes-charts.storage.googleapis.com/
"stable" has been added to your repositories
$ helm repo update
Hang tight while we grab the latest from your chart repositories...
...
Successfully got an update from the "stable" chart repository
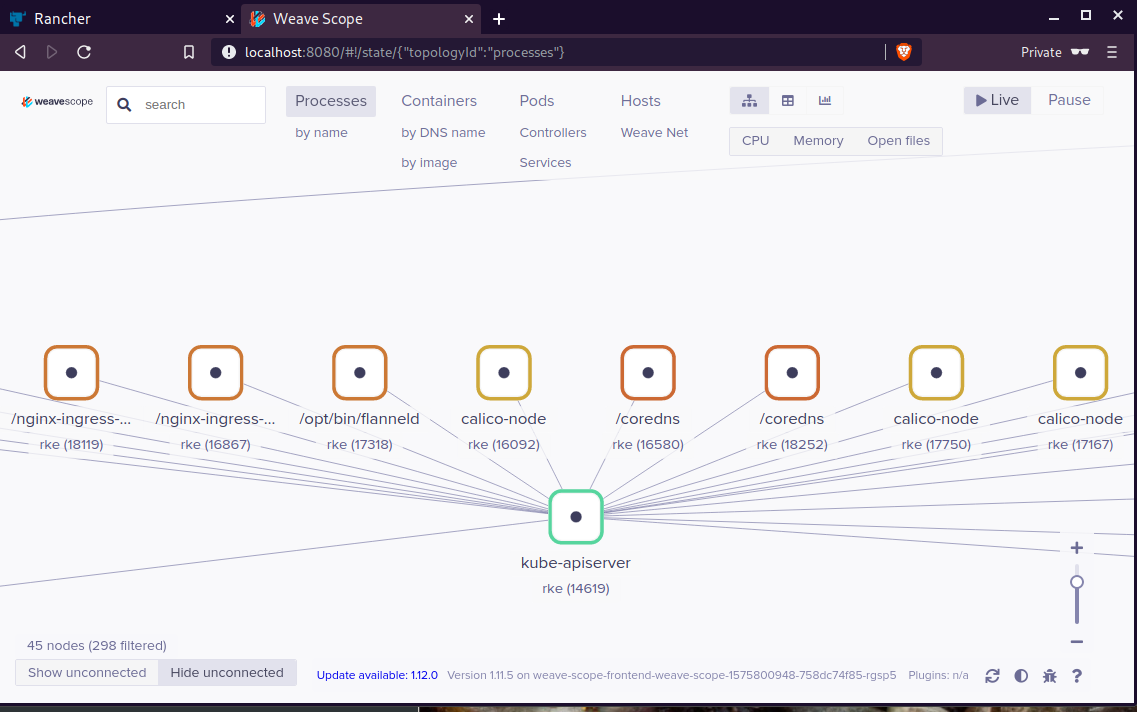
Update Complete. ⎈ Happy Helming!⎈ weave-scope
Install weave scope to rancher:
$ helm --kubeconfig rancher2.config.yml install stable/weave-scope --generate-nameNAME: weave-scope-1575800948
LAST DEPLOYED: Sun Dec 8 12:29:12 2019
NAMESPACE: default
STATUS: deployed
REVISION: 1
NOTES:
You should now be able to access the Scope frontend in your web browser, by
using kubectl port-forward:
kubectl -n default port-forward $(kubectl -n default get endpoints
weave-scope-1575800948-weave-scope -o jsonpath='{.subsets[0].addresses[0].targetRef.name}') 8080:4040
then browsing to http://localhost:8080/.
For more details on using Weave Scope, see the Weave Scope documentation:
https://www.weave.works/docs/scope/latest/introducing/Proxy
Last, we are going to use kubectl to create a forwarder
$ kubectl --kubeconfig=rancher2.config.yml -n default port-forward $(kubectl --kubeconfig=rancher2.config.yml -n default get endpoints weave-scope-1575800948-weave-scope -o jsonpath='{.subsets[0].addresses[0].targetRef.name}') 8080:4040
Forwarding from 127.0.0.1:8080 -> 4040
Forwarding from [::1]:8080 -> 4040
Open your browser in this url:
http://localhost:8080