CentOS 6
This way is been suggested for building a container image from your current centos system.
In my case, I need to remote upgrade a running centos6 system to a new clean centos7 on a test vps, without the need of opening the vnc console, attaching a new ISO etc etc.
I am rather lucky as I have a clean extra partition to this vps, so I will follow the below process to remote install a new clean CentOS 7 to this partition. Then add a new grub entry and boot into this partition.
Current OS
# cat /etc/redhat-release
CentOS release 6.9 (Final)
Format partition
format & mount the partition:
 mkfs.ext4 -L rootfs /dev/vda5
 mount /dev/vda5 /mnt/
InstallRoot
Type:
# yum -y groupinstall "Base" --releasever 7 --installroot /mnt/ --nogpgcheck
Test
test it, when finished:
mount --bind /dev/  /mnt/dev/
mount --bind /sys/  /mnt/sys/
mount --bind /proc/ /mnt/proc/

chroot /mnt/

bash-4.2#  cat /etc/redhat-release
CentOS Linux release 7.5.1804 (Core)
It works!
Root Password
inside chroot enviroment:
bash-4.2# passwd
Changing password for user root.
New password:
Retype new password:
passwd: all authentication tokens updated successfully.

bash-4.2# exit
Grub
adding the new grub entry for CentOS 7
title CentOS 7
        root (hd0,4)
        kernel /boot/vmlinuz-3.10.0-862.2.3.el7.x86_64 root=/dev/vda5 ro rhgb LANG=en_US.UTF-8
        initrd /boot/initramfs-3.10.0-862.2.3.el7.x86_64.img
by changing the default boot entry from 0 to 1 :
default=0
to
default=1
our system will boot into centos7 when reboot!
Prologue
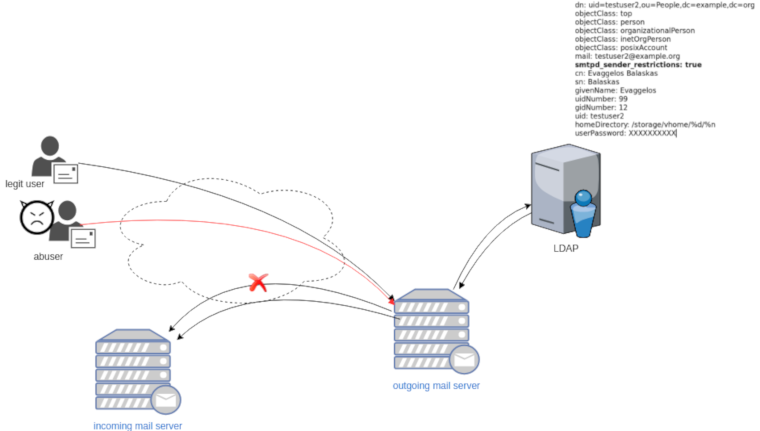
Maintaining a (public) service can be sometimes troublesome. In case of email service, often you need to suspend or restrict users for reasons like SPAM, SCAM or Phishing. You have to deal with inactive or even compromised accounts. Protecting your infrastructure is to protect your active users and the service. In this article I’ll propose a way to restrict messages to authorized addresses when sending an email and get a bounce message explaining why their email was not sent.
Reading Material
The reference documentation when having a Directory Service (LDAP) as our user backend and using Postfix:
LDAP
In this post, we will not get into openldap internals but as reference I’ll show an example user account (this is from my working test lab).
dn: uid=testuser2,ou=People,dc=example,dc=org
objectClass: top
objectClass: person
objectClass: organizationalPerson
objectClass: inetOrgPerson
objectClass: posixAccount
mail: testuser2@example.org
smtpd_sender_restrictions: true
cn: Evaggelos Balaskas
sn: Balaskas
givenName: Evaggelos
uidNumber: 99
gidNumber: 12
uid: testuser2
homeDirectory: /storage/vhome/%d/%n
userPassword: XXXXXXXXXX
as you can see, we have a custom ldap attribute:
smtpd_sender_restrictions: truekeep that in mind for now.
Postfix
The default value of smtpd_sender_restrictions is empty, that means by default the mail server has no sender restrictions. Depending on the policy we either can whitelist or blacklist in postfix restrictions, for the purpose of this blog post, we will only restrict (blacklist) specific user accounts.
ldap_smtpd_sender_restrictions
To do that, let’s create a new file that will talk to our openldap and ask for that specific ldap attribute.
ldap_smtpd_sender_restrictions.cf
server_host = ldap://localhost
server_port = 389
search_base = ou=People,dc=example,dc=org
query_filter = (&(smtpd_sender_restrictions=true)(mail=%s))
result_attribute = uid
result_filter = uid
result_format = REJECT This account is not allowed to send emails, plz talk to abuse@example.org
version = 3
timeout = 5
This is an anonymous bind, as we do not search for any special attribute like password.
Status Codes
The default status code will be: 554 5.7.1
Take a look here for more info: RFC 3463 - Enhanced Mail System Status Codes
Test it
# postmap -q testuser2@example.org ldap:/etc/postfix/ldap_smtpd_sender_restrictions.cf
REJECT This account is not allowed to send emails, plz talk to abuse@example.org
Add -v to extent verbosity
# postmap -v -q testuser2@example.org ldap:/etc/postfix/ldap_smtpd_sender_restrictions.cf
Possible Errors
postmap: fatal: unsupported dictionary type: ldap
Check your postfix setup with postconf -m . The result should be something like this:
btree
cidr
environ
fail
hash
internal
ldap
memcache
nis
proxy
regexp
socketmap
static
tcp
texthash
unix
If not, you need to setup postfix to support the ldap dictionary type.
smtpd_sender_restrictions
Modify the main.cf to add the ldap_smtpd_sender_restrictions.cf
# applied in the context of the MAIL FROM
smtpd_sender_restrictions =
        check_sender_access ldap:/etc/postfix/ldap_smtpd_sender_restrictions.cf
and reload postfix
# postfix reloadIf you keep logs, tail them to see any errors.
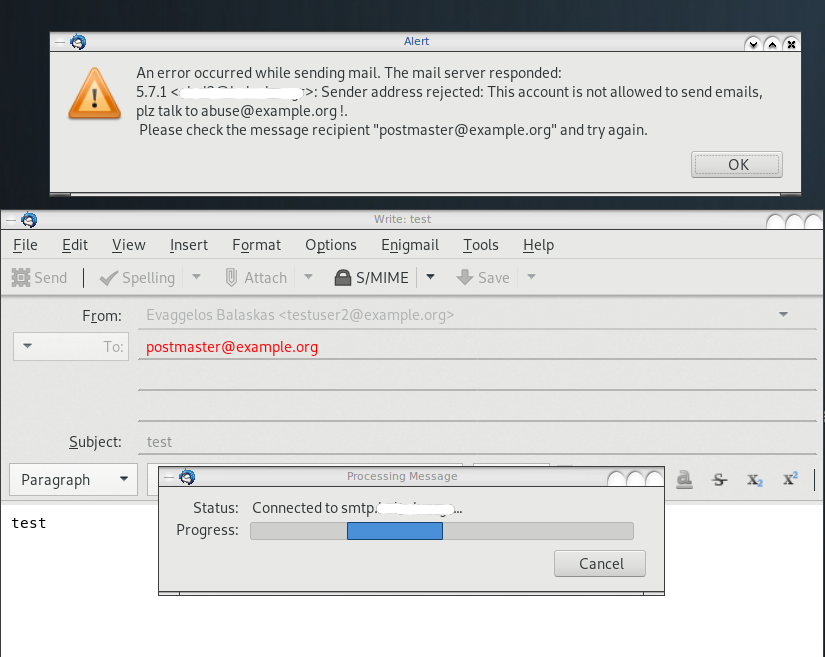
Thunderbird
Logs
May 19 13:20:26 centos6 postfix/smtpd[20905]:
NOQUEUE: reject: RCPT from XXXXXXXX[XXXXXXXX]: 554 5.7.1 <testuser2@example.org>:
Sender address rejected: This account is not allowed to send emails, plz talk to abuse@example.org;
from=<testuser2@example.org> to=<postmaster@example.org> proto=ESMTP helo=<[192.168.0.13]>Prologue
Security
One of the most common security concerns (especially when traveling) is the attach of unknown USB device on our system.
There are a few ways on how to protect your system.
Hardware Protection
Cloud Storage
More and more companies are now moving from local storage to cloud storage as a way to reduce the attack surface on systems:
IBM a few days ago, banned portable storage devices
Hot Glue on USB Ports
also we must not forget the old but powerful advice from security researches & hackers:
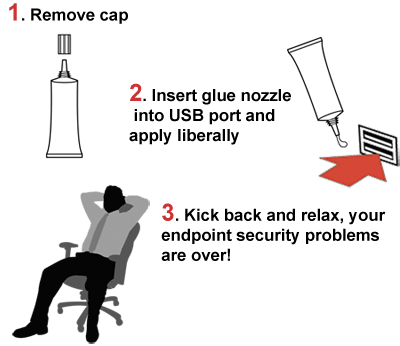
by inserting glue or using a Hot Glue Gun to disable the USB ports of a system.
Problem solved!
USBGuard
I was reading the redhat 7.5 release notes and I came upon on usbguard:
The USBGuard software framework helps to protect your computer against rogue USB devices (a.k.a. BadUSB) by implementing basic whitelisting / blacklisting capabilities based on device attributes.
USB protection framework
So the main idea is you run a daemon on your system that tracks udev monitor system. The idea seams like the usb kill switch but in a more controlled manner. You can dynamical whitelist or/and blacklist devices and change the policy on such devices more easily. Also you can do all that via a graphical interface, although I will not cover it here.
Archlinux Notes
for archlinux users, you can find usbguard in AUR (Archlinux User Repository)
or you can try my custom PKGBUILDs files
How to use usbguard
Generate Policy
The very first thing is to generate a policy with the current attached USB devices.
sudo usbguard generate-policyBelow is an example output, viewing my usb mouse & usb keyboard :
allow id 17ef:6019 serial "" name "Lenovo USB Optical Mouse" hash "WXaMPh5VWHf9avzB+Jpua45j3EZK6KeLRdPcoEwlWp4=" parent-hash "jEP/6WzviqdJ5VSeTUY8PatCNBKeaREvo2OqdplND/o=" via-port "3-4" with-interface 03:01:02

allow id 045e:00db serial "" name "Naturalxc2xae Ergonomic Keyboard 4000" hash "lwGc9o+VaG/2QGXpZ06/2yHMw+HL46K8Vij7Q65Qs80=" parent-hash "kv3v2+rnq9QvYI3/HbJ1EV9vdujZ0aVCQ/CGBYIkEB0=" via-port "1-1.5" with-interface { 03:01:01 03:00:00 }
The default policy for already attached USB devices are allow.
We can create our rules configuration file by:
sudo usbguard generate-policy > /etc/usbguard/rules.conf
Service
starting and enabling usbguard service via systemd:
systemctl start usbguard.service

systemctl enable usbguard.service
List of Devices
You can view the list of attached USB devices and
sudo usbguard list-devices
Allow Device
Attaching a new USB device (in my case, my mobile phone):
$ sudo usbguard list-devices | grep -v allowwe will see that the default policy is to block it:
17: block id 12d1:107e serial "7BQDU17308005969" name "BLN-L21" hash "qq1bdaK0ETC/thKW9WXAwawhXlBAWUIowpMeOQNGQiM=" parent-hash "kv3v2+rnq9QvYI3/HbJ1EV9vdujZ0aVCQ/CGBYIkEB0=" via-port "2-1.5" with-interface { ff:ff:00 08:06:50 }So we can allow it by:
sudo usbguard allow-device 17then
sudo usbguard list-devices | grep BLN-L21we can verify that is okay:
17: allow id 12d1:107e serial "7BQDU17308005969" name "BLN-L21" hash "qq1bdaK0ETC/thKW9WXAwawhXlBAWUIowpMeOQNGQiM=" parent-hash "kv3v2+rnq9QvYI3/HbJ1EV9vdujZ0aVCQ/CGBYIkEB0=" via-port "2-1.5" with-interface { ff:ff:00 08:06:50 }
Block USB on screen lock
The default policy, when you (or someone else) are inserting a new USB device is:
sudo usbguard get-parameter InsertedDevicePolicy
apply-policy
is to apply the default policy we have. There is a way to block or reject any new USB device when you have your screen locker on, as this may be a potential security attack on your system. In theory, you are inserting USB devices as you are working on your system, and not when you have your screen lock on.
I use slock as my primary screen locker via a keyboard shortcut. So the easiest way to dynamical change the default policy on usbguard is via a shell wrapper:
vim /usr/local/bin/slock#!/bin/sh
# ebal, Sun, 13 May 2018 10:07:53 +0300
POLICY_UNLOCKED="apply-policy"
POLICY_LOCKED="reject"
# function to revert the policy
revert() {
usbguard set-parameter InsertedDevicePolicy ${POLICY_UNLOCKED}
}
trap revert SIGHUP SIGINT SIGTERM
usbguard set-parameter InsertedDevicePolicy ${POLICY_LOCKED}
/usr/bin/slock
# shell function to revert reject policy
revert(you can find the same example on redhat’s blog post).
Upgrading CentOS 6.x to CentOS 7.x
Disclaimer : Create a recent backup of the system. This is an unofficial , unsupported procedure !
CentOS 6
CentOS release 6.9 (Final)
Kernel 2.6.32-696.16.1.el6.x86_64 on an x86_64

centos69 login: root
Password:
Last login: Tue May  8 19:45:45 on tty1

[root@centos69 ~]# cat /etc/redhat-release
CentOS release 6.9 (Final)
Pre Tasks
There are some tasks you can do to prevent from unwanted results.
Like:
- Disable selinux
- Remove unnecessary repositories
- Take a recent backup!
CentOS Upgrade Repository
Create a new centos repository:
cat > /etc/yum.repos.d/centos-upgrade.repo <<EOF
[centos-upgrade]
name=centos-upgrade
baseurl=http://dev.centos.org/centos/6/upg/x86_64/
enabled=1
gpgcheck=0
EOF
Install Pre-Upgrade Tool
First install the openscap version from dev.centos.org:
# yum -y install https://buildlogs.centos.org/centos/6/upg/x86_64/Packages/openscap-1.0.8-1.0.1.el6.centos.x86_64.rpmthen install the redhat upgrade tool:
# yum -y install redhat-upgrade-tool preupgrade-assistant-*
Import CentOS 7 PGP Key
# rpm --import http://ftp.otenet.gr/linux/centos/RPM-GPG-KEY-CentOS-7
Mirror
to bypass errors like:
Downloading failed: invalid data in .treeinfo: No section: ‘checksums’
append CentOS Vault under mirrorlist:
 mkdir -pv /var/tmp/system-upgrade/base/ /var/tmp/system-upgrade/extras/  /var/tmp/system-upgrade/updates/

 echo http://vault.centos.org/7.0.1406/os/x86_64/       >  /var/tmp/system-upgrade/base/mirrorlist.txt
 echo http://vault.centos.org/7.0.1406/extras/x86_64/   >  /var/tmp/system-upgrade/extras/mirrorlist.txt
 echo http://vault.centos.org/7.0.1406/updates/x86_64/  >  /var/tmp/system-upgrade/updates/mirrorlist.txt
These are enough to upgrade to 7.0.1406. You can add the below mirros, to upgrade to 7.5.1804
More Mirrors
 echo http://ftp.otenet.gr/linux/centos/7.5.1804/os/x86_64/  >>  /var/tmp/system-upgrade/base/mirrorlist.txt
 echo http://mirror.centos.org/centos/7/os/x86_64/           >>  /var/tmp/system-upgrade/base/mirrorlist.txt

 echo http://ftp.otenet.gr/linux/centos/7.5.1804/extras/x86_64/ >>  /var/tmp/system-upgrade/extras/mirrorlist.txt
 echo http://mirror.centos.org/centos/7/extras/x86_64/          >>  /var/tmp/system-upgrade/extras/mirrorlist.txt

 echo http://ftp.otenet.gr/linux/centos/7.5.1804/updates/x86_64/  >>  /var/tmp/system-upgrade/updates/mirrorlist.txt
 echo http://mirror.centos.org/centos/7/updates/x86_64/           >>  /var/tmp/system-upgrade/updates/mirrorlist.txt
Pre-Upgrade
preupg is actually a python script!
# yes | preupg -v Preupg tool doesn't do the actual upgrade.
Please ensure you have backed up your system and/or data in the event of a failed upgrade
that would require a full re-install of the system from installation media.
Do you want to continue? y/n
Gathering logs used by preupgrade assistant:
All installed packages : 01/11 ...finished (time 00:00s)
All changed files : 02/11 ...finished (time 00:18s)
Changed config files : 03/11 ...finished (time 00:00s)
All users : 04/11 ...finished (time 00:00s)
All groups : 05/11 ...finished (time 00:00s)
Service statuses : 06/11 ...finished (time 00:00s)
All installed files : 07/11 ...finished (time 00:01s)
All local files : 08/11 ...finished (time 00:01s)
All executable files : 09/11 ...finished (time 00:01s)
RedHat signed packages : 10/11 ...finished (time 00:00s)
CentOS signed packages : 11/11 ...finished (time 00:00s)
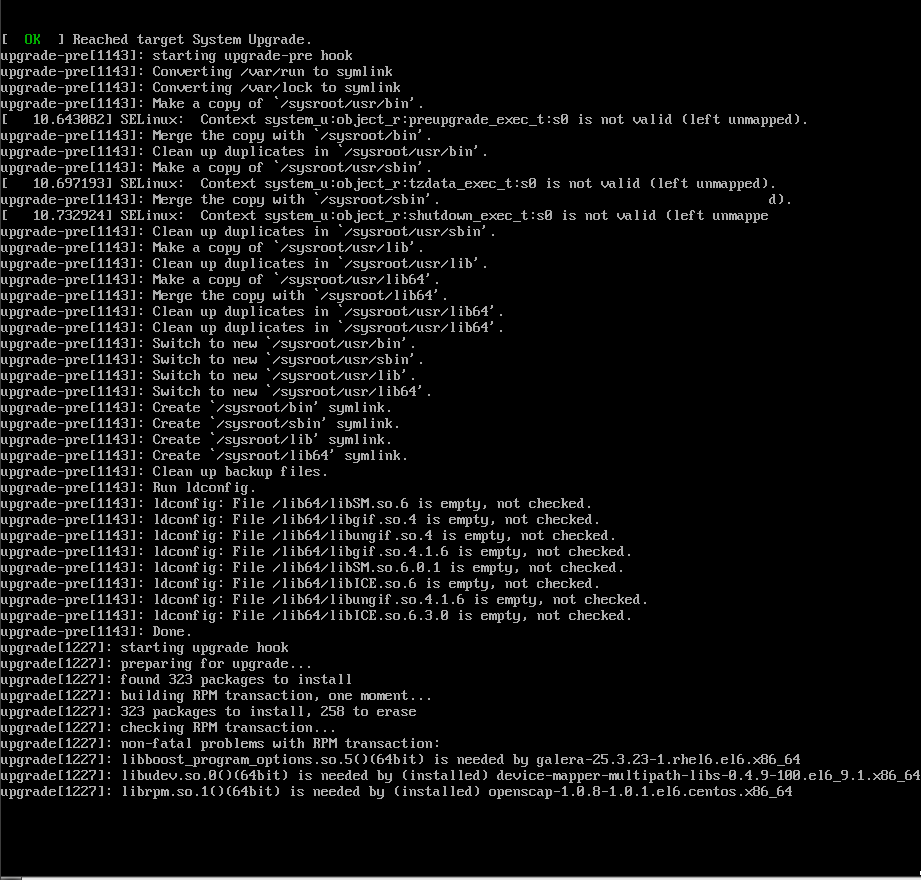
Assessment of the system, running checks / SCE scripts:
001/096 ...done (Configuration Files to Review)
002/096 ...done (File Lists for Manual Migration)
003/096 ...done (Bacula Backup Software)
...
./result.html
/bin/tar: .: file changed as we read it
Tarball with results is stored here /root/preupgrade-results/preupg_results-180508202952.tar.gz .
The latest assessment is stored in directory /root/preupgrade .
Summary information:
We found some potential in-place upgrade risks.
Read the file /root/preupgrade/result.html for more details.
Upload results to UI by command:
e.g. preupg -u http://127.0.0.1:8099/submit/ -r /root/preupgrade-results/preupg_results-*.tar.gz .this must finish without any errors.
CentOS Upgrade Tool
We need to find out what are the possible problems when upgrade:
# centos-upgrade-tool-cli --network=7
          --instrepo=http://vault.centos.org/7.0.1406/os/x86_64/
Then by force we can upgrade to it’s latest version:
# centos-upgrade-tool-cli --force --network=7
          --instrepo=http://vault.centos.org/7.0.1406/os/x86_64/
          --cleanup-post
Output
setting up repos...
base                                                          | 3.6 kB     00:00
base/primary_db                                               | 4.9 MB     00:04
centos-upgrade                                                | 1.9 kB     00:00
centos-upgrade/primary_db                                     |  14 kB     00:00
cmdline-instrepo                                              | 3.6 kB     00:00
cmdline-instrepo/primary_db                                   | 4.9 MB     00:03
epel/metalink                                                 |  14 kB     00:00
epel                                                          | 4.7 kB     00:00
epel                                                          | 4.7 kB     00:00
epel/primary_db                                               | 6.0 MB     00:04
extras                                                        | 3.6 kB     00:00
extras/primary_db                                             | 4.9 MB     00:04
mariadb                                                       | 2.9 kB     00:00
mariadb/primary_db                                            |  33 kB     00:00
remi-php56                                                    | 2.9 kB     00:00
remi-php56/primary_db                                         | 229 kB     00:00
remi-safe                                                     | 2.9 kB     00:00
remi-safe/primary_db                                          | 950 kB     00:00
updates                                                       | 3.6 kB     00:00
updates/primary_db                                            | 4.9 MB     00:04
.treeinfo                                                     | 1.1 kB     00:00
getting boot images...
vmlinuz-redhat-upgrade-tool                                   | 4.7 MB     00:03
initramfs-redhat-upgrade-tool.img                             |  32 MB     00:24
setting up update...
finding updates 100% [=========================================================]
(1/323): MariaDB-10.2.14-centos6-x86_64-client.rpm            |  48 MB     00:38
(2/323): MariaDB-10.2.14-centos6-x86_64-common.rpm            | 154 kB     00:00
(3/323): MariaDB-10.2.14-centos6-x86_64-compat.rpm            | 4.0 MB     00:03
(4/323): MariaDB-10.2.14-centos6-x86_64-server.rpm            | 109 MB     01:26
(5/323): acl-2.2.51-12.el7.x86_64.rpm                         |  81 kB     00:00
(6/323): apr-1.4.8-3.el7.x86_64.rpm                           | 103 kB     00:00
(7/323): apr-util-1.5.2-6.el7.x86_64.rpm                      |  92 kB     00:00
(8/323): apr-util-ldap-1.5.2-6.el7.x86_64.rpm                 |  19 kB     00:00
(9/323): attr-2.4.46-12.el7.x86_64.rpm                        |  66 kB     00:00
...
(320/323): yum-plugin-fastestmirror-1.1.31-24.el7.noarch.rpm  |  28 kB     00:00
(321/323): yum-utils-1.1.31-24.el7.noarch.rpm                 | 111 kB     00:00
(322/323): zlib-1.2.7-13.el7.x86_64.rpm                       |  89 kB     00:00
(323/323): zlib-devel-1.2.7-13.el7.x86_64.rpm                 |  49 kB     00:00
testing upgrade transaction
rpm transaction 100% [=========================================================]
rpm install 100% [=============================================================]
setting up system for upgrade
Finished. Reboot to start upgrade.
Reboot
The upgrade procedure, will download all rpm packages to a directory and create a new grub entry. Then on reboot the system will try to upgrade the distribution release to it’s latest version.
# reboot
Upgrade


CentOS 7
CentOS Linux 7 (Core)
Kernel 3.10.0-123.20.1.el7.x86_64 on an x86_64

centos69 login: root
Password:
Last login: Fri May 11 15:42:30 on ttyS0

[root@centos69 ~]# cat /etc/redhat-release
CentOS Linux release 7.0.1406 (Core)
