Personal notes on hardening an new ubuntu 24.04 LTS postfix setup for incoming smtp TLS traffic.
Create a Diffie–Hellman key exchange
openssl dhparam -out /etc/postfix/dh2048.pem 2048for offering a new random DH group.
SMTPD - Incoming Traffic
# SMTPD - Incoming Traffic

postscreen_dnsbl_action = drop
postscreen_dnsbl_sites =
        bl.spamcop.net,
        zen.spamhaus.org

smtpd_banner = <put your banner here>

smtpd_helo_required = yes
smtpd_starttls_timeout = 30s

smtpd_tls_CApath = /etc/ssl/certs
smtpd_tls_cert_file = /root/.acme.sh/<your_domain>/fullchain.cer
smtpd_tls_key_file = /root/.acme.sh/<your_domain>/<your_domain>.key

smtpd_tls_dh1024_param_file = ${config_directory}/dh2048.pem
smtpd_tls_ciphers = HIGH

# Wick ciphers
smtpd_tls_exclude_ciphers =
        3DES,
        AES128-GCM-SHA256,
        AES128-SHA,
        AES128-SHA256,
        AES256-GCM-SHA384,
        AES256-SHA,
        AES256-SHA256,
        CAMELLIA128-SHA,
        CAMELLIA256-SHA,
        DES-CBC3-SHA,
        DHE-RSA-DES-CBC3-SHA,
        aNULL,
        eNULL,
        CBC

smtpd_tls_loglevel = 1
smtpd_tls_mandatory_ciphers = HIGH
smtpd_tls_protocols = !SSLv2, !SSLv3, !TLSv1, !TLSv1.1
smtpd_tls_security_level = may
smtpd_tls_session_cache_database = btree:${data_directory}/smtpd_scache
smtpd_use_tls = yes
tls_preempt_cipherlist = yes

unknown_local_recipient_reject_code = 550
Local Testing
testssl -t smtp <your_domain>.:25
Online Testing
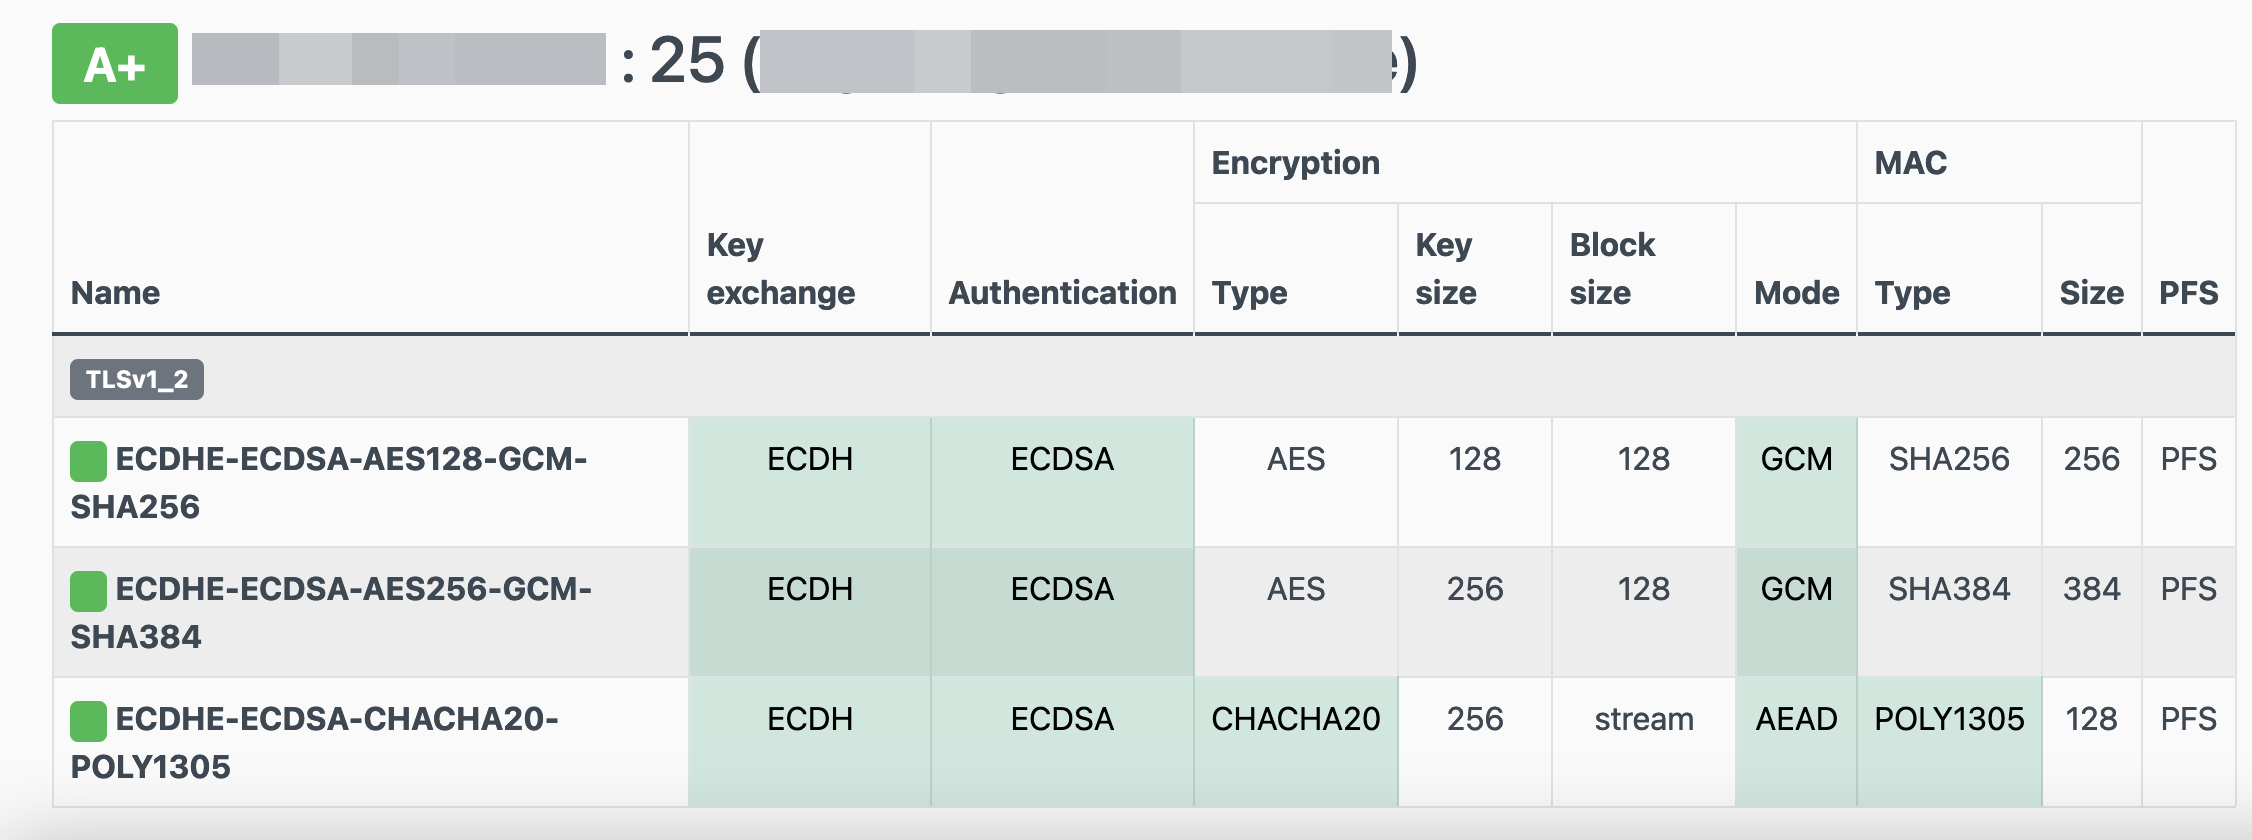
result
The purpose of this blog post is to act as a visual guide/tutorial on how to setup an iOS device (iPad or iPhone) using the native apps against a custom Linux Mail, Calendar & Contact server.
Disclaimer: I wrote this blog post after 36hours with an apple device. I have never had any previous encagement with an apple product. Huge culture change & learning curve. Be aware, that the below notes may not apply to your setup.
Original creation date: Friday 12 Oct 2018
Last Update: Sunday 18 Nov 2018
Linux Mail Server
Notes are based on the below setup:
- CentOS 6.10
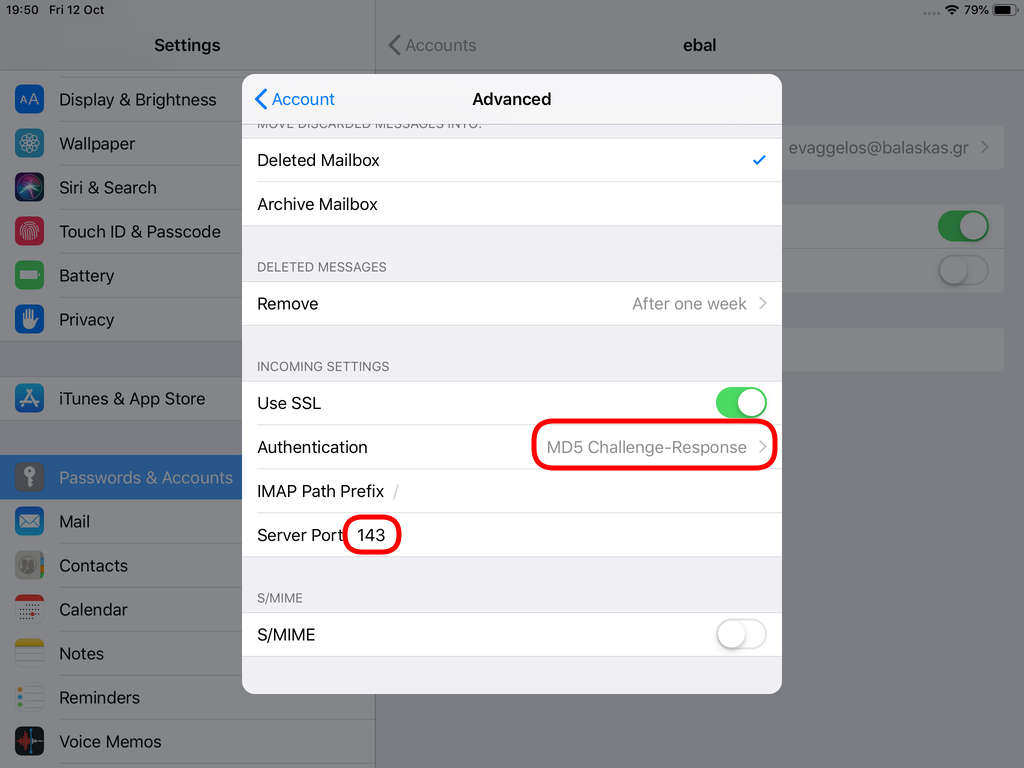
- Dovecot IMAP server with STARTTLS (TCP Port: 143) with Encrypted Password Authentication.
- Postfix SMTP with STARTTLS (TCP Port: 587) with Encrypted Password Authentication.
- Baïkal as Calendar & Contact server.
Thunderbird
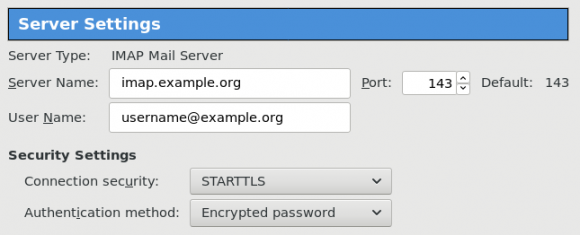
Thunderbird settings for imap / smtp over STARTTLS and encrypted authentication

Baikal
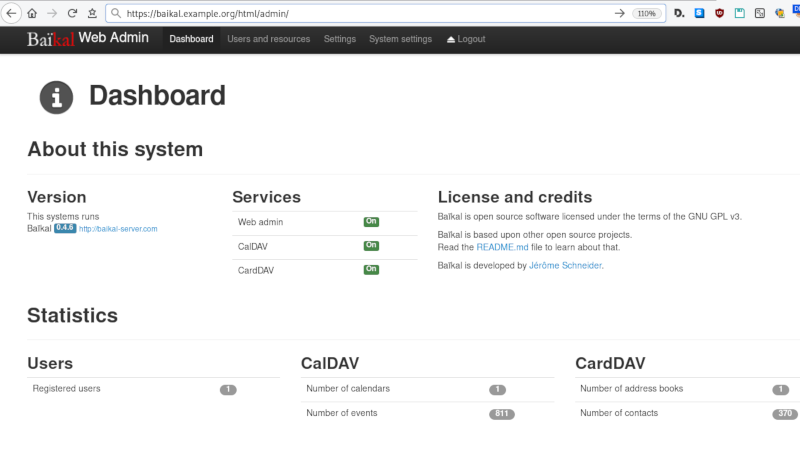
Dashboard
CardDAV
contact URI for user Username
https://baikal.baikal.example.org/html/card.php/addressbooks/Username/defaultCalDAV
calendar URI for user Username
https://baikal.example.org/html/cal.php/calendars/Username/default
iOS
There is a lot of online documentation but none in one place. Random Stack Overflow articles & posts in the internet. It took me almost an entire day (and night) to figure things out. In the end, I enabled debug mode on my dovecot/postifx & apache web server. After that, throught trail and error, I managed to setup both iPhone & iPad using only native apps.
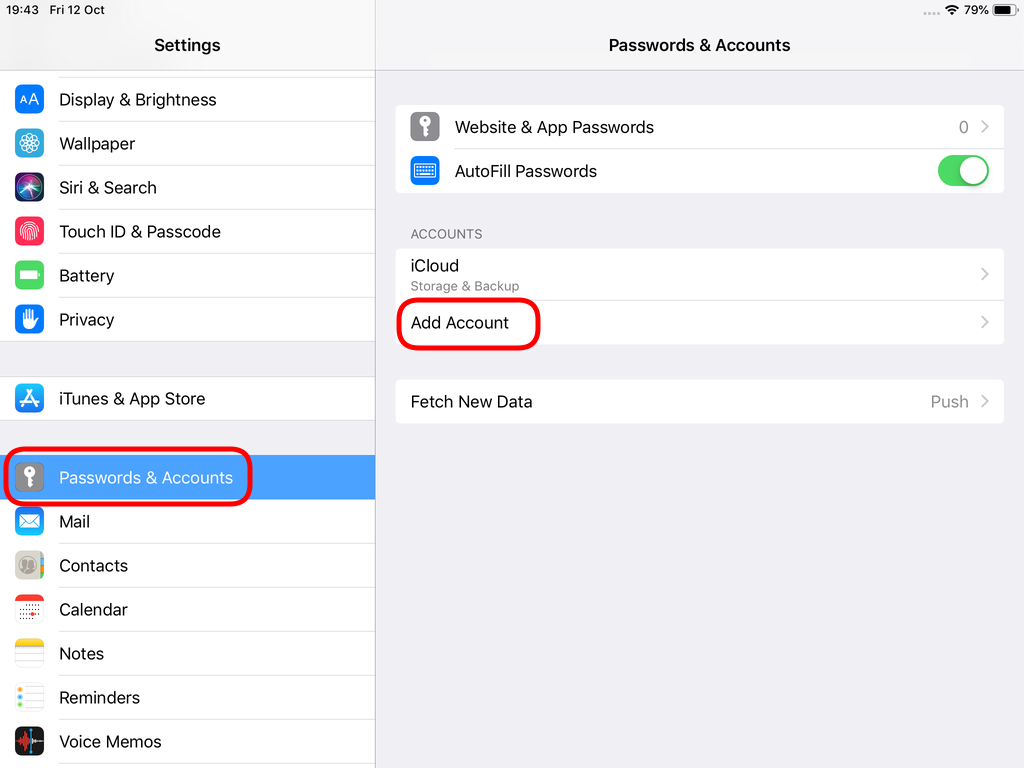
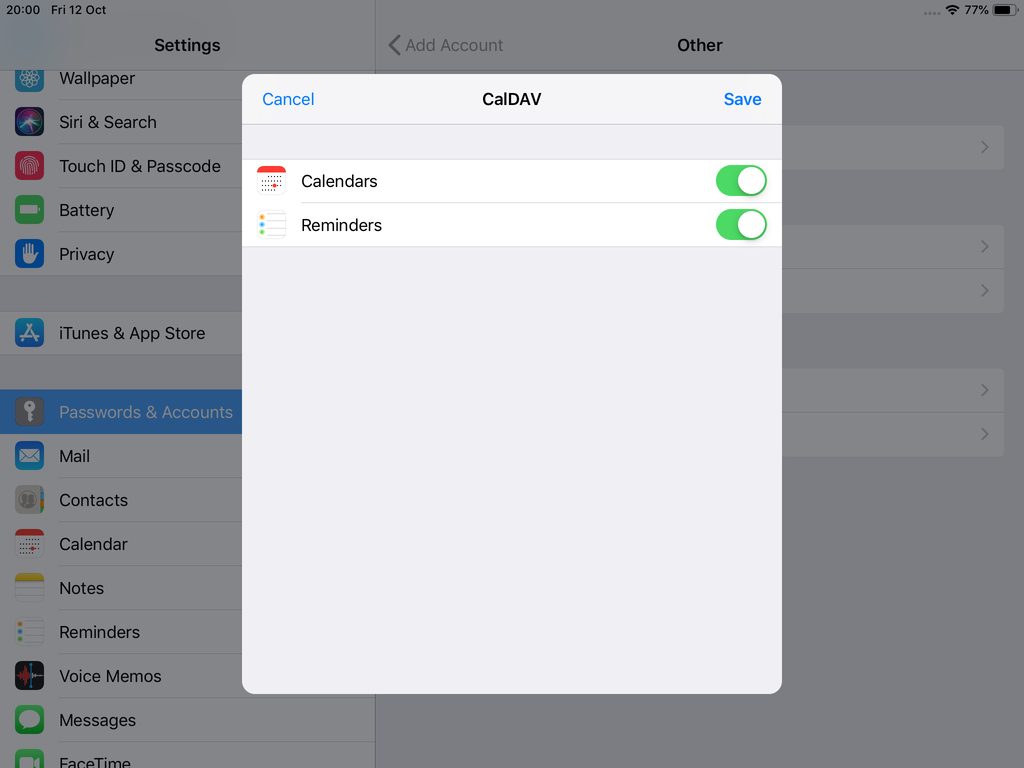
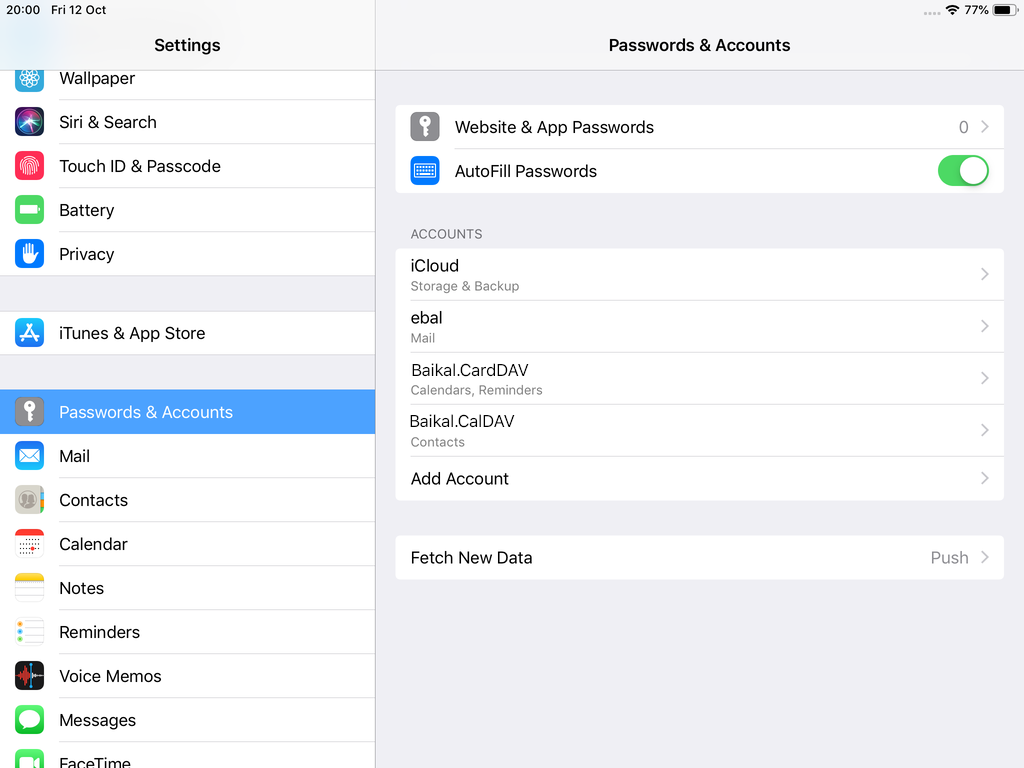
Open Password & Accounts & click on New Account
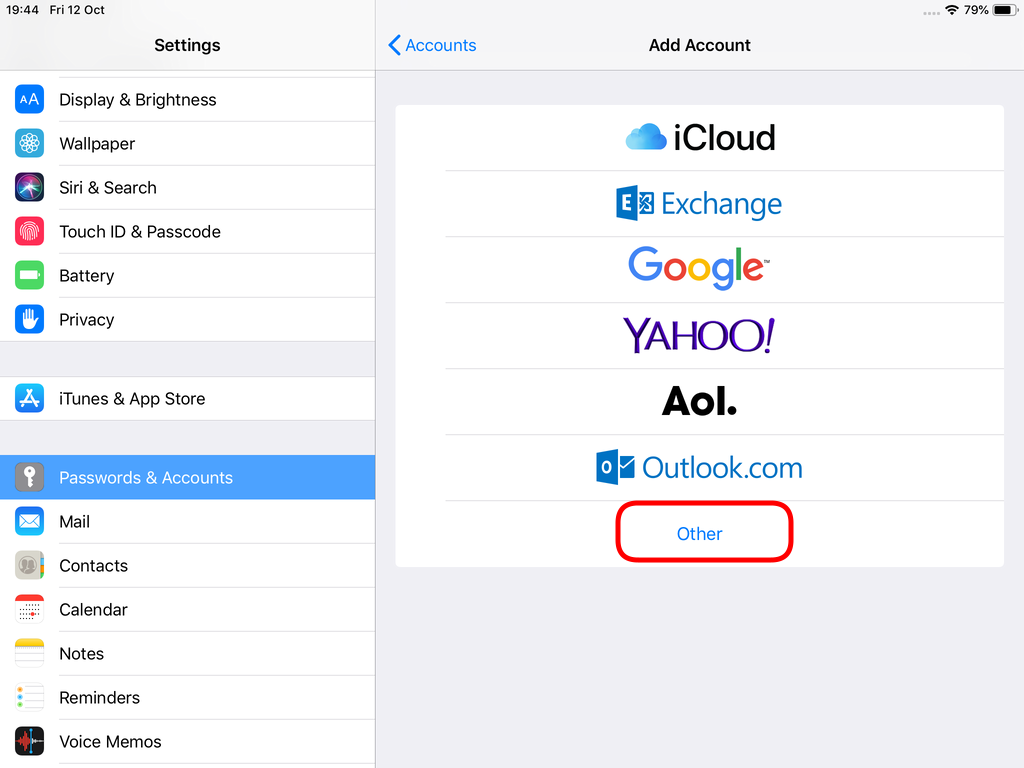
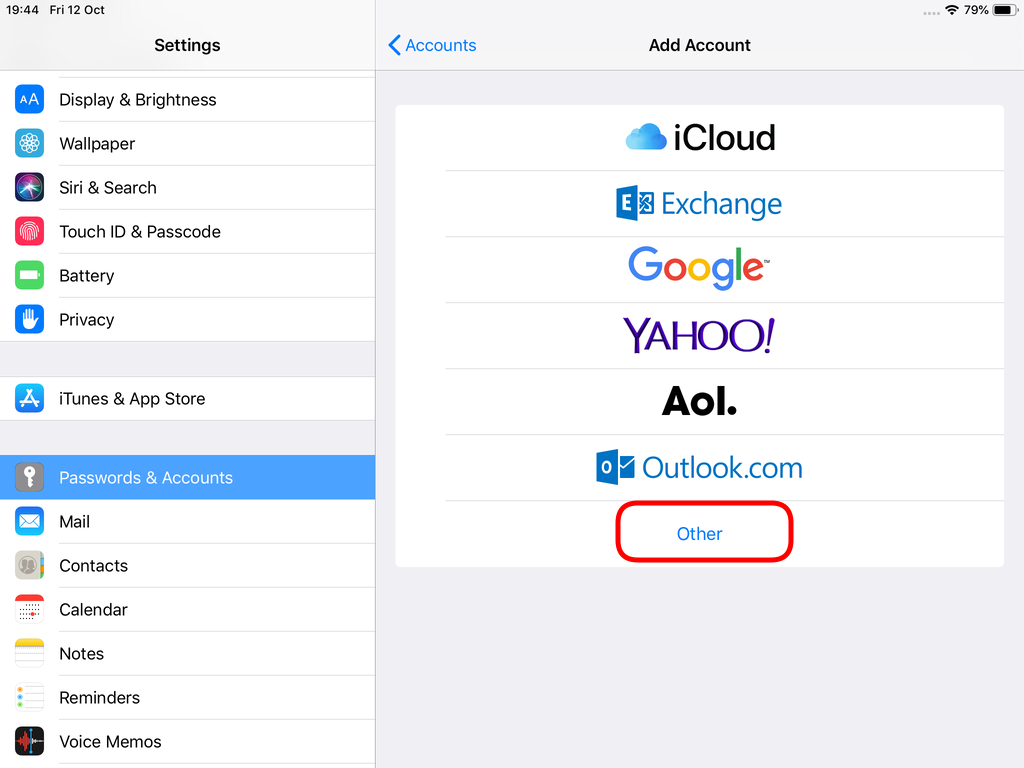
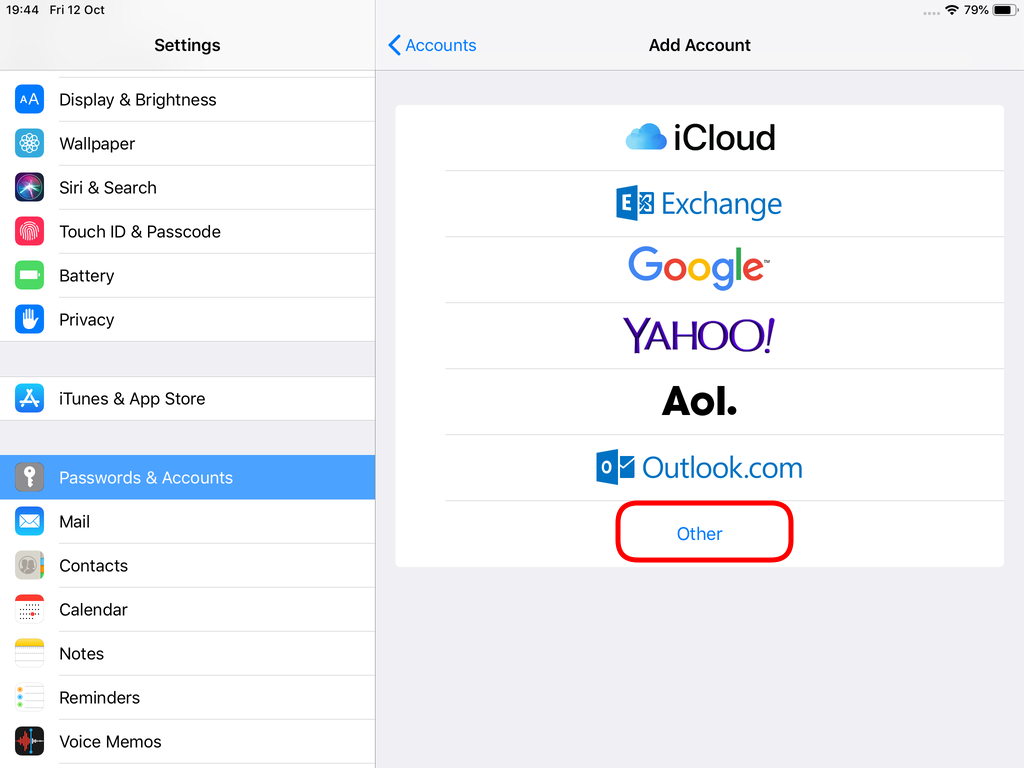
Choose Other
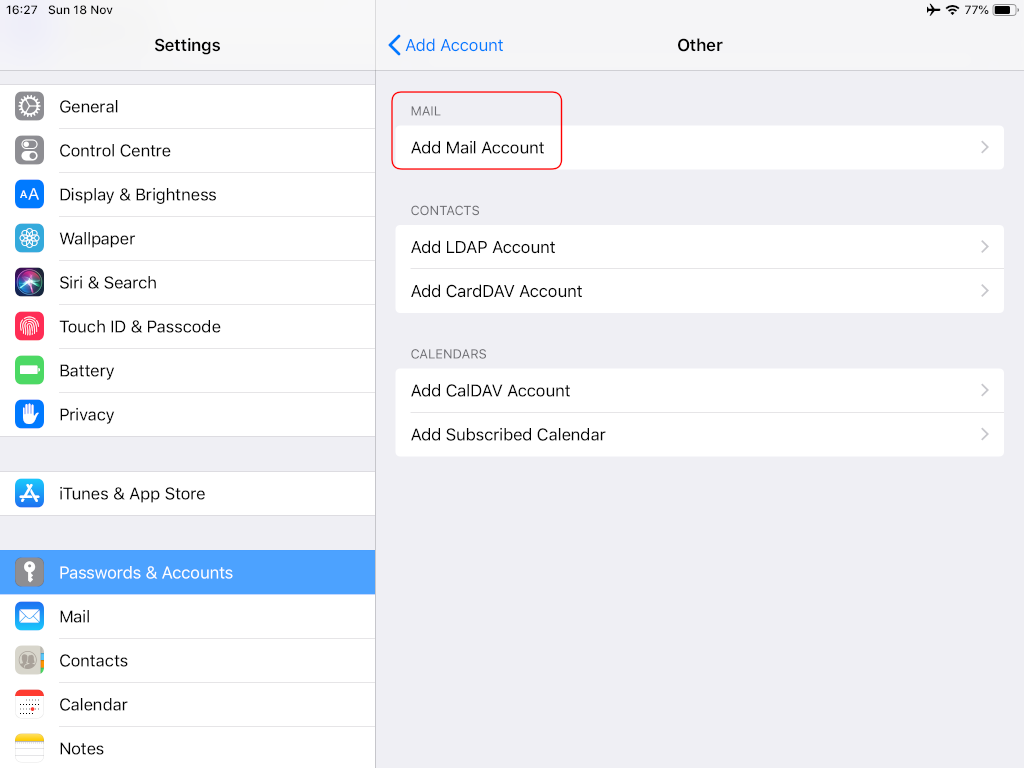
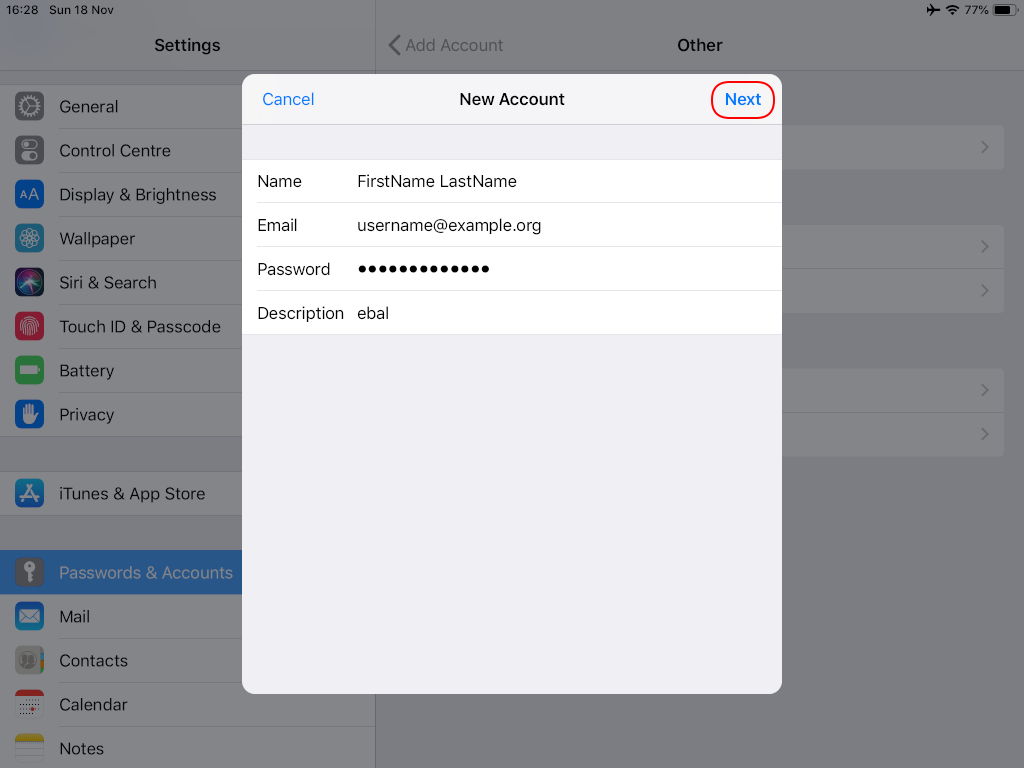
Now the tricky part, you have to click Next and fill the imap & smtp settings.
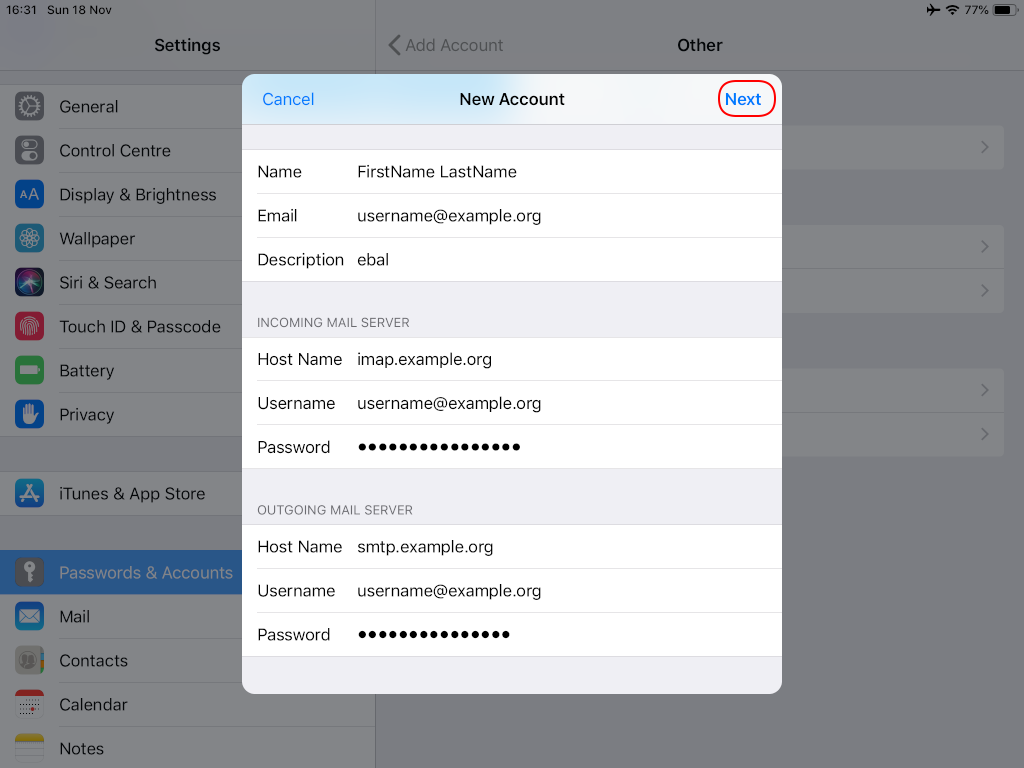
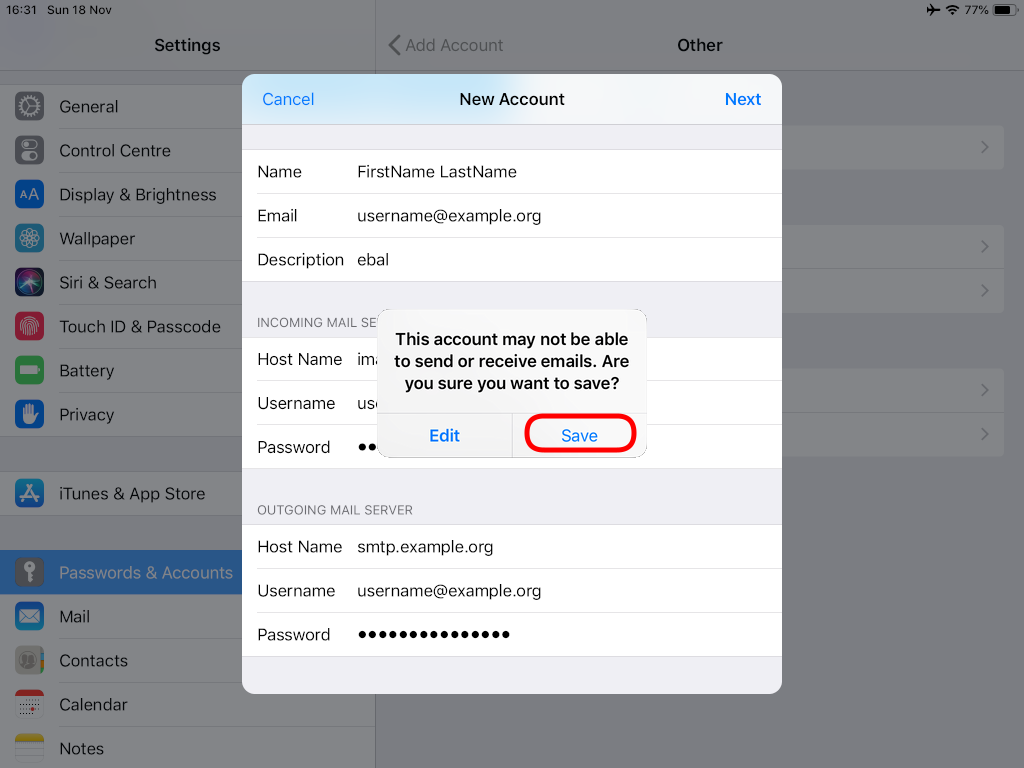
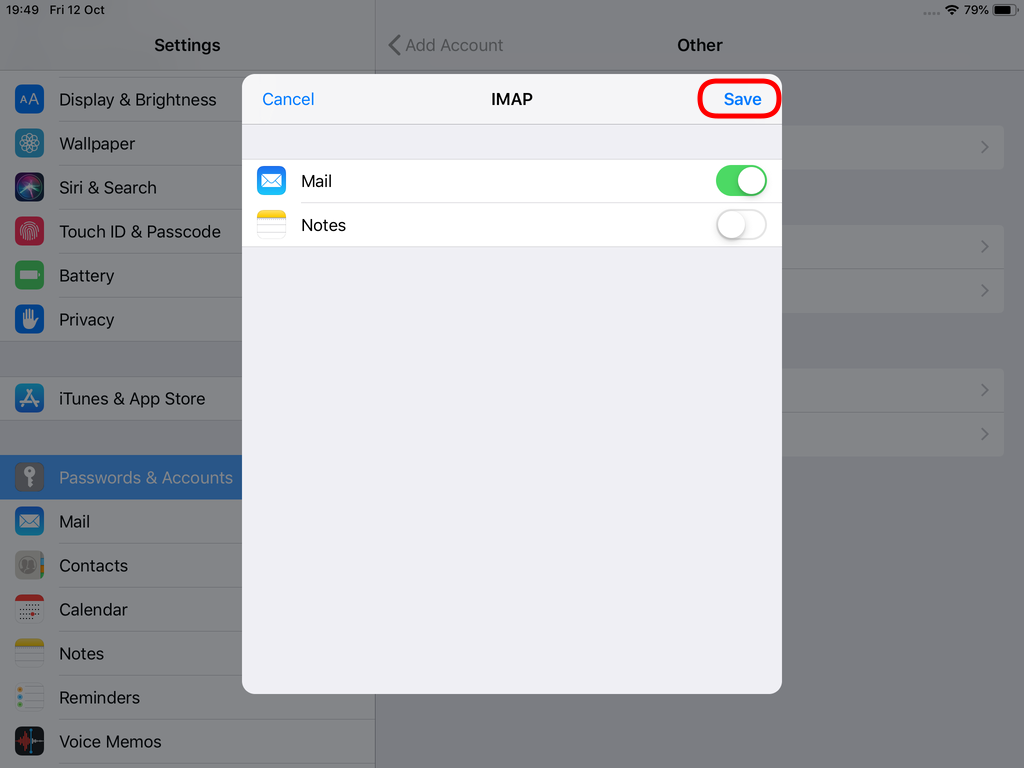
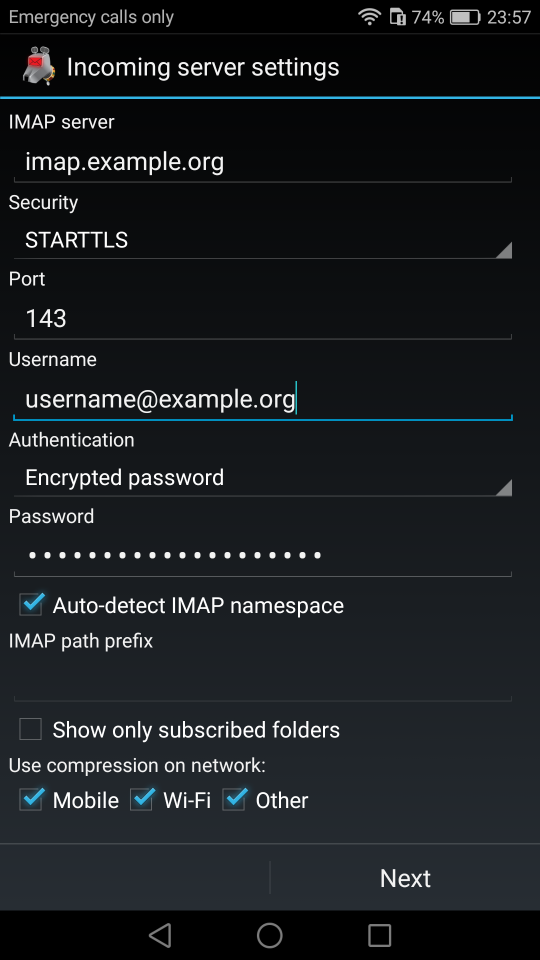
Now we have to go back and change the settings, to enable STARTTLS and encrypted password authentication.
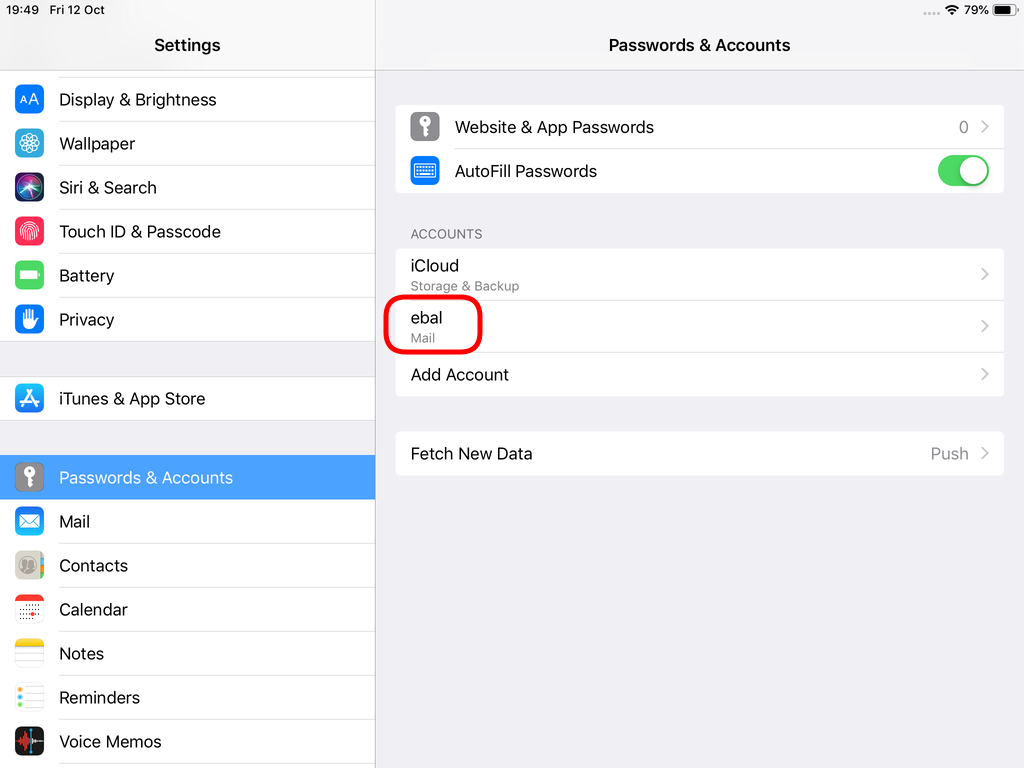
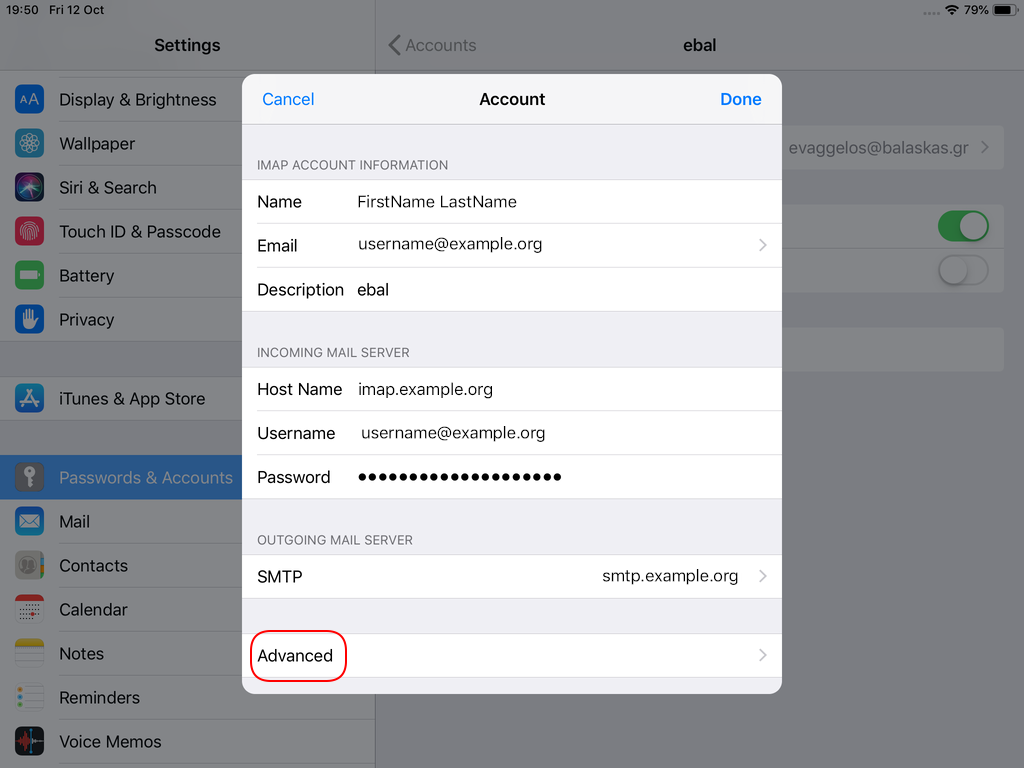
STARTTLS with Encrypted Passwords for Authentication
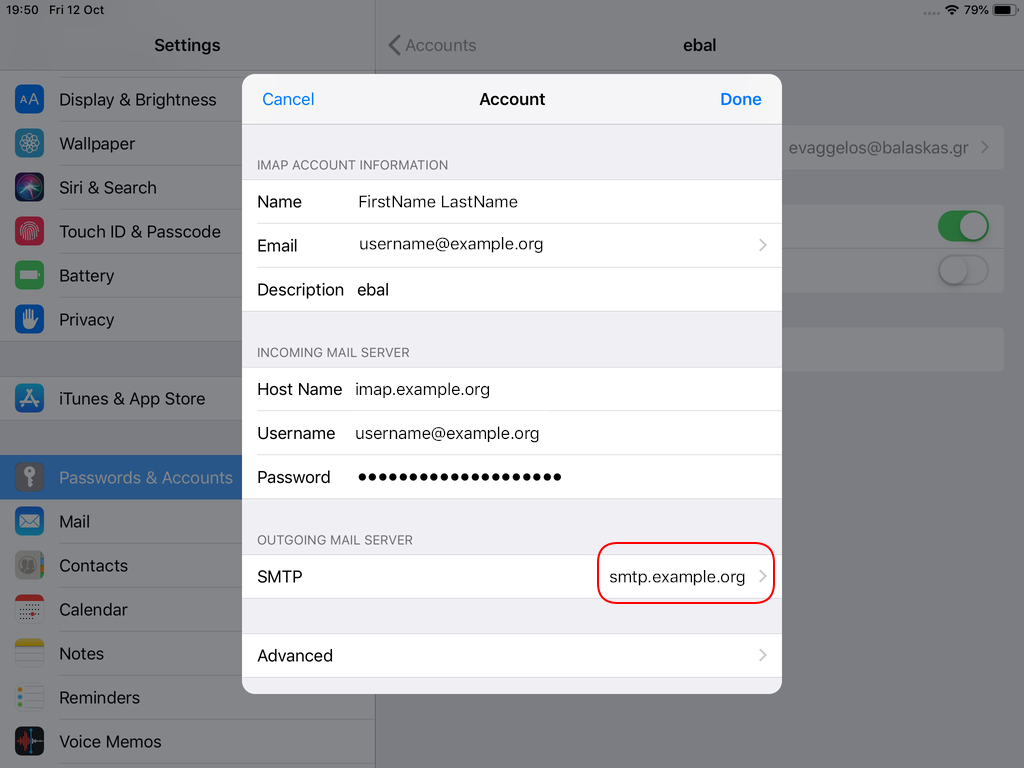
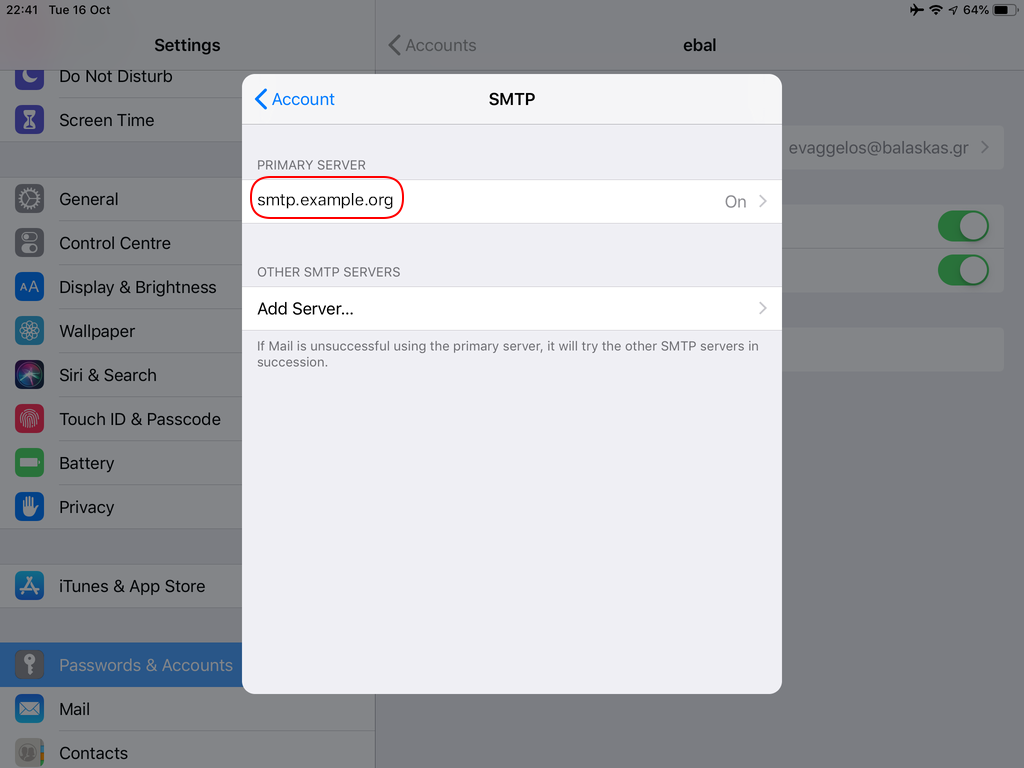
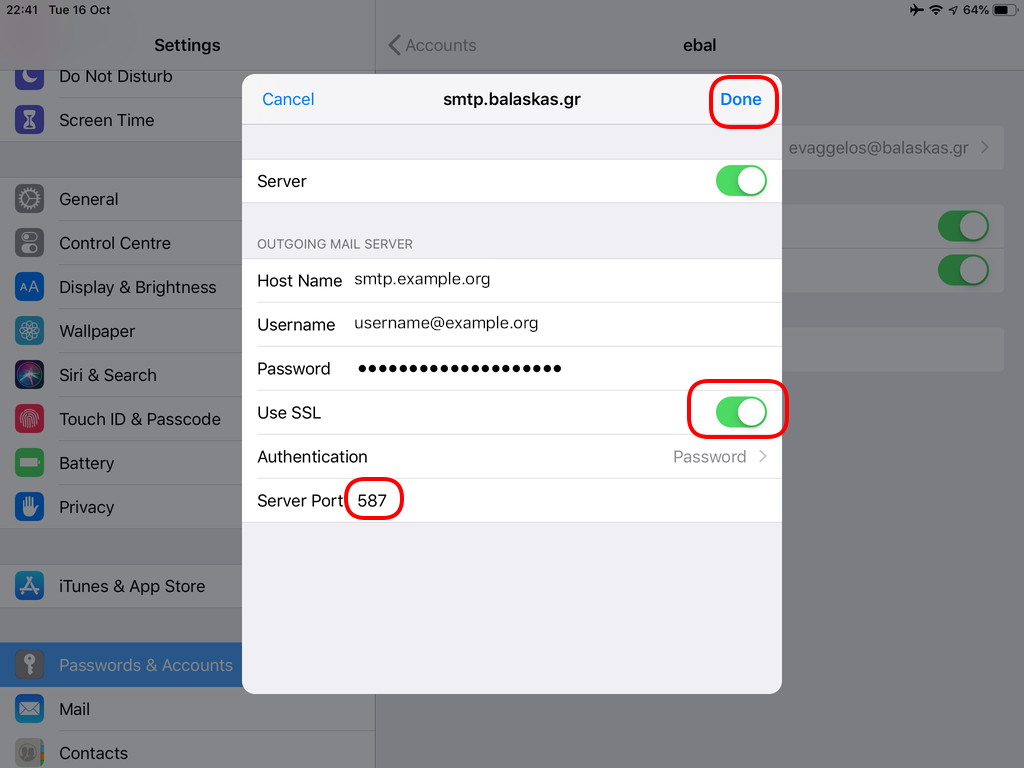
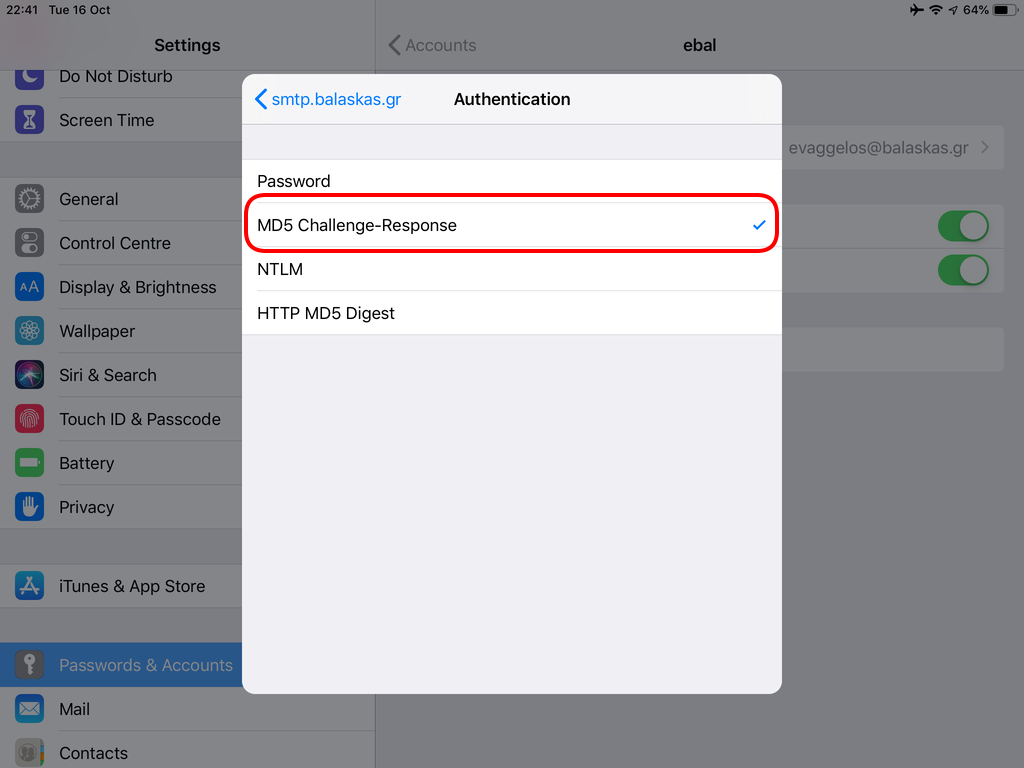
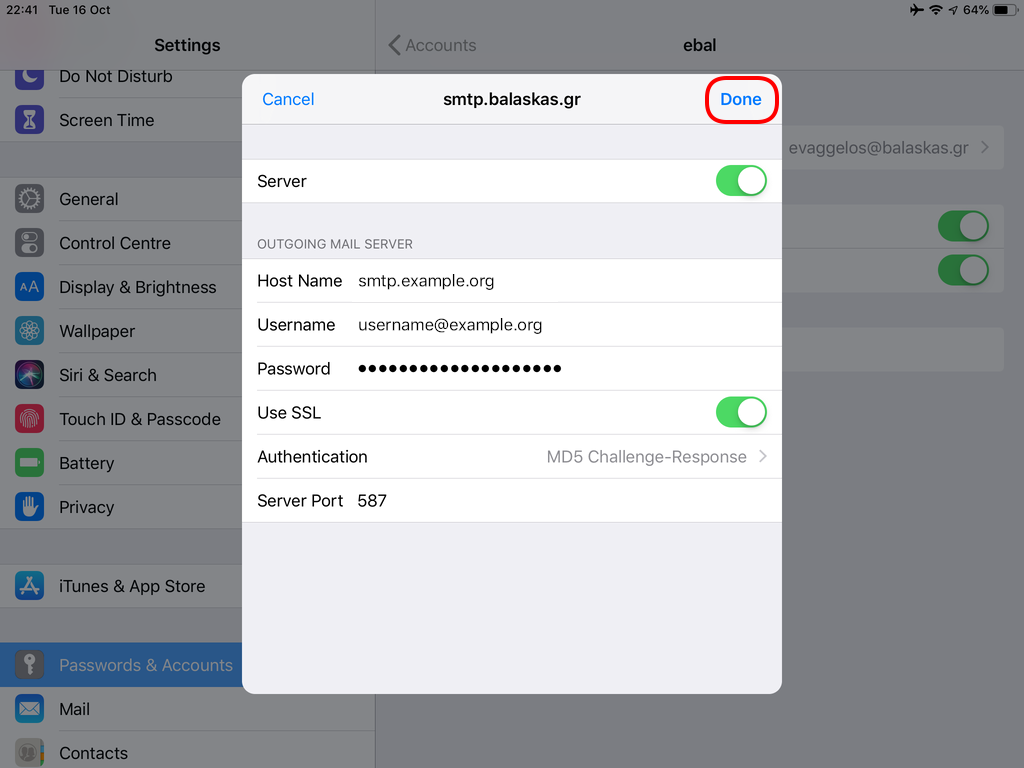
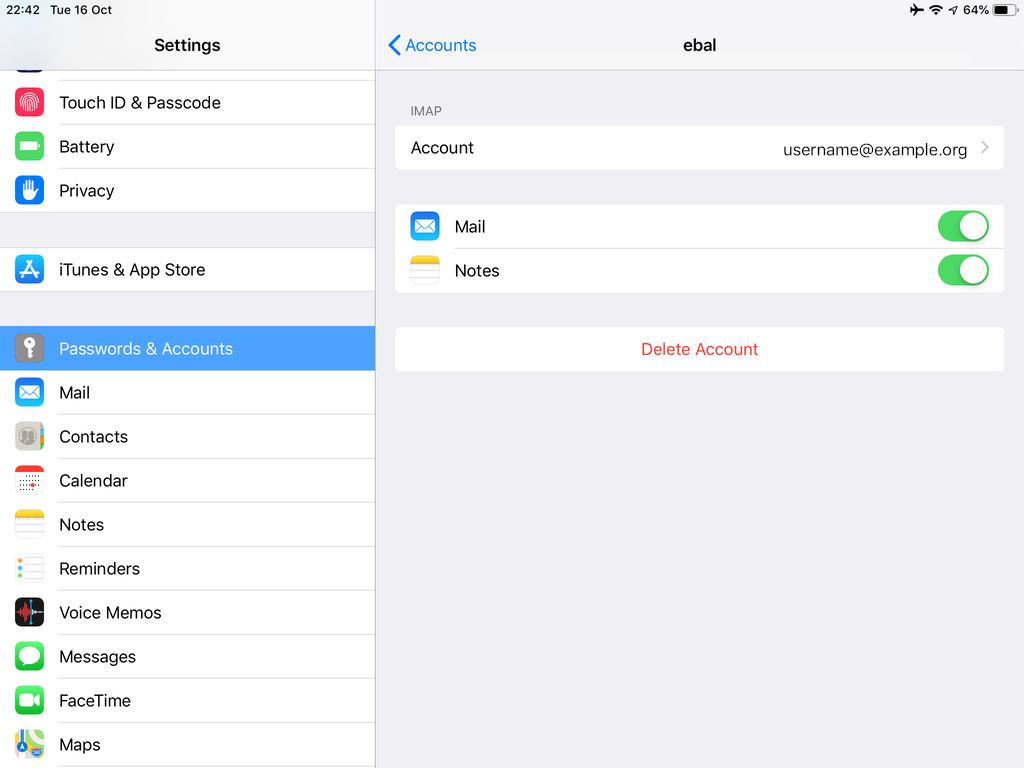
In the home-page of the iPad/iPhone we will see the Mail-Notifications have already fetch some headers.

and finally, open the native mail app:

Contact Server
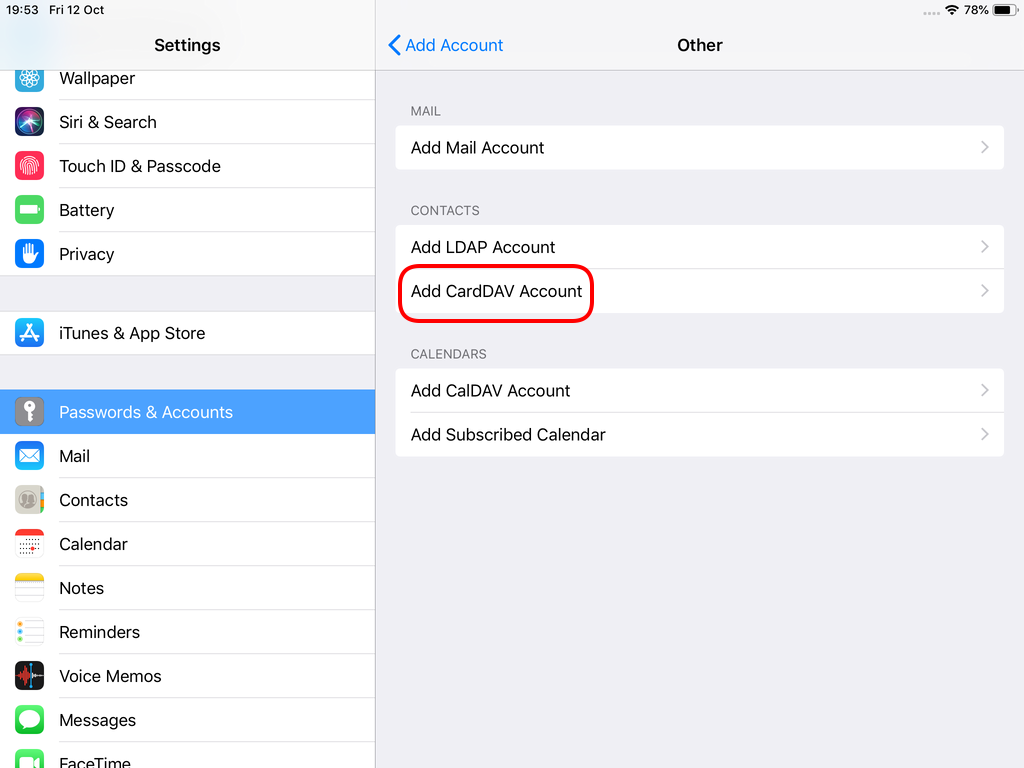
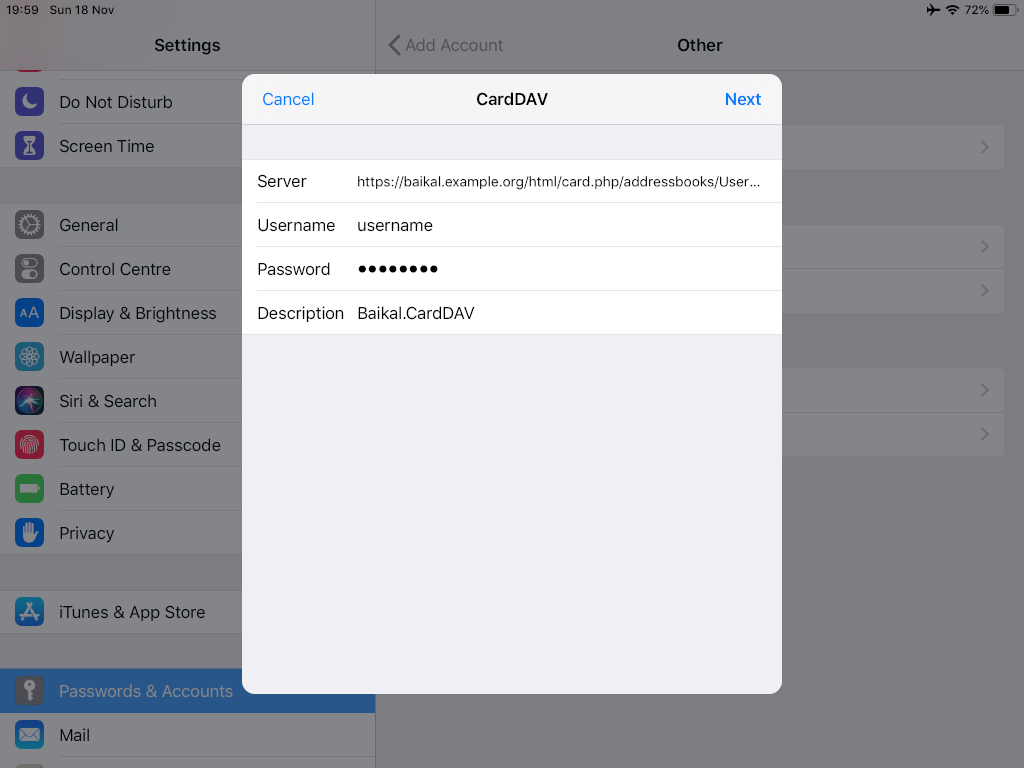
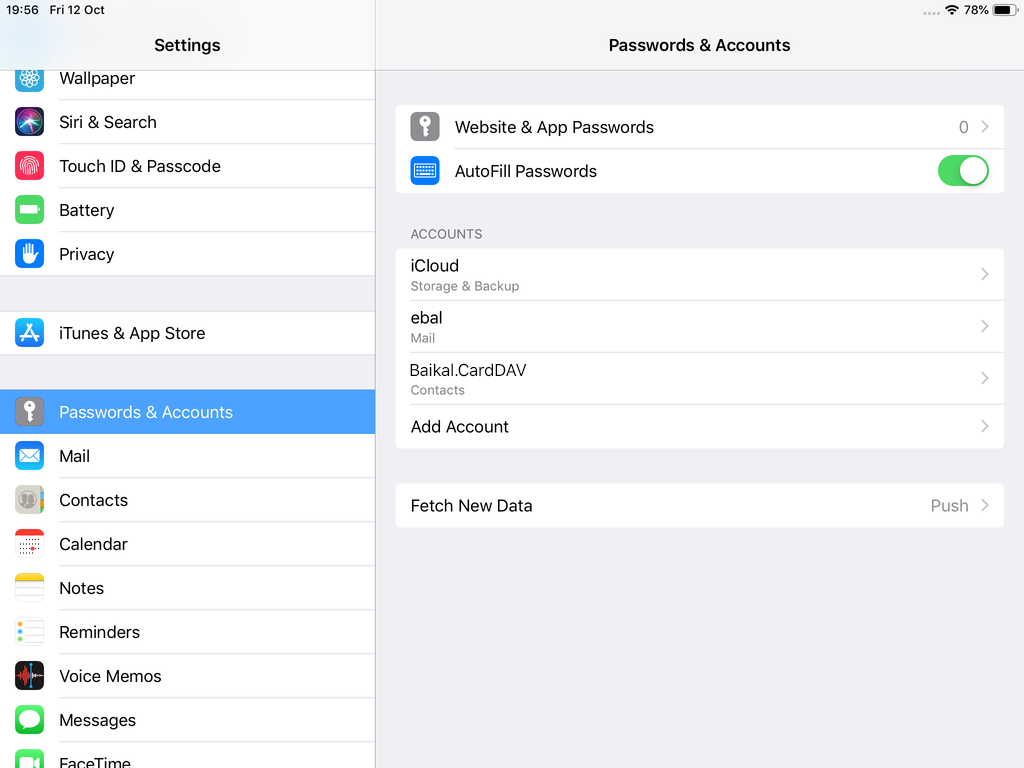
Now ready for setting up the contact account
https://baikal.baikal.example.org/html/card.php/addressbooks/Username/default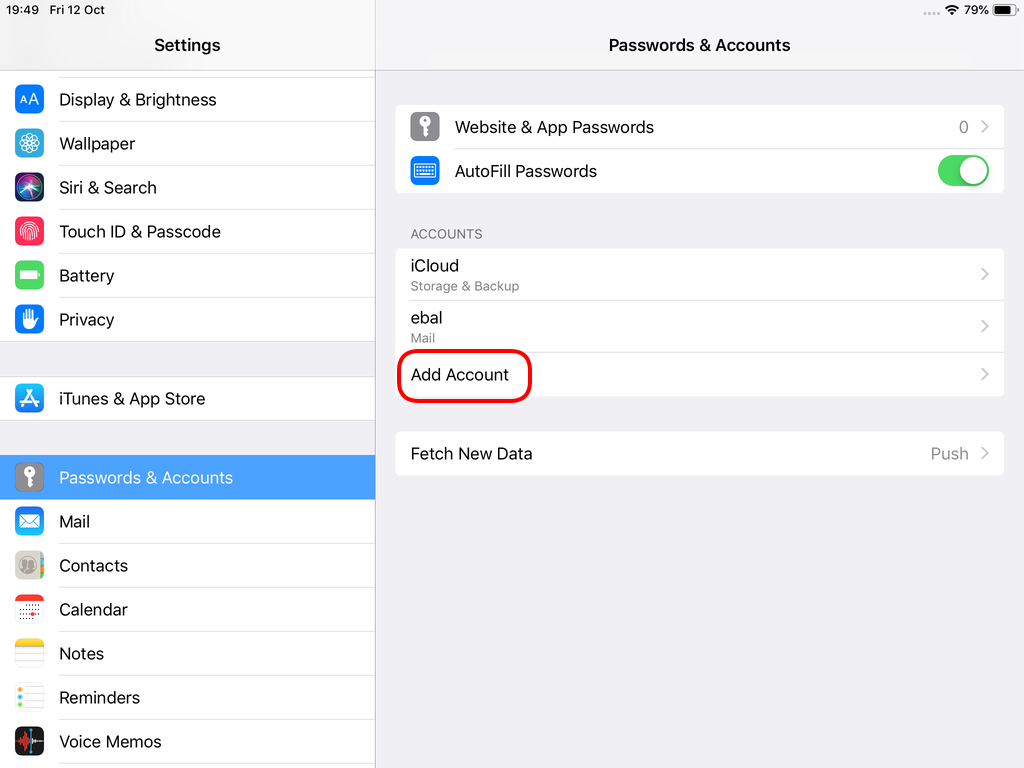
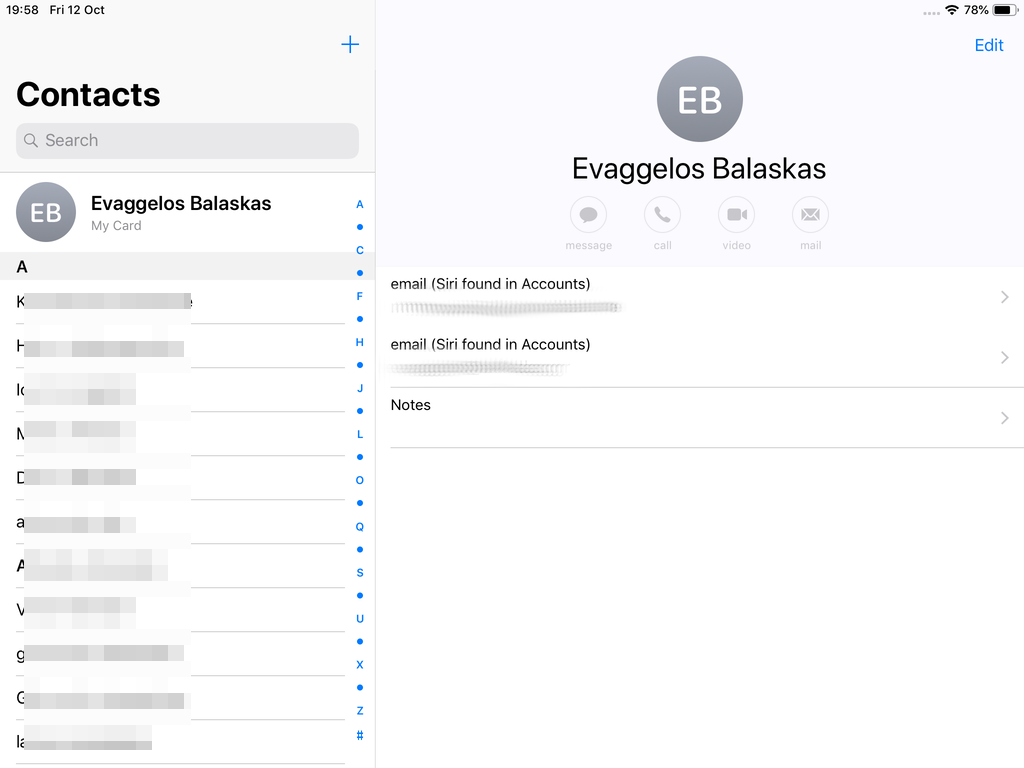
Opening Contact App:
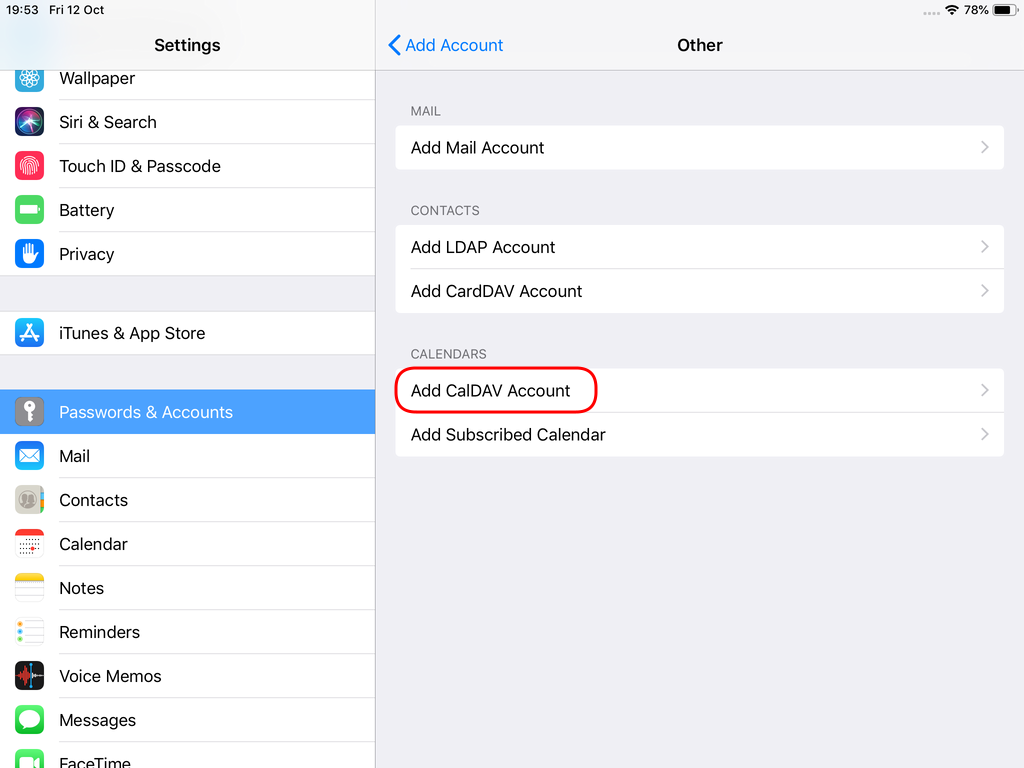
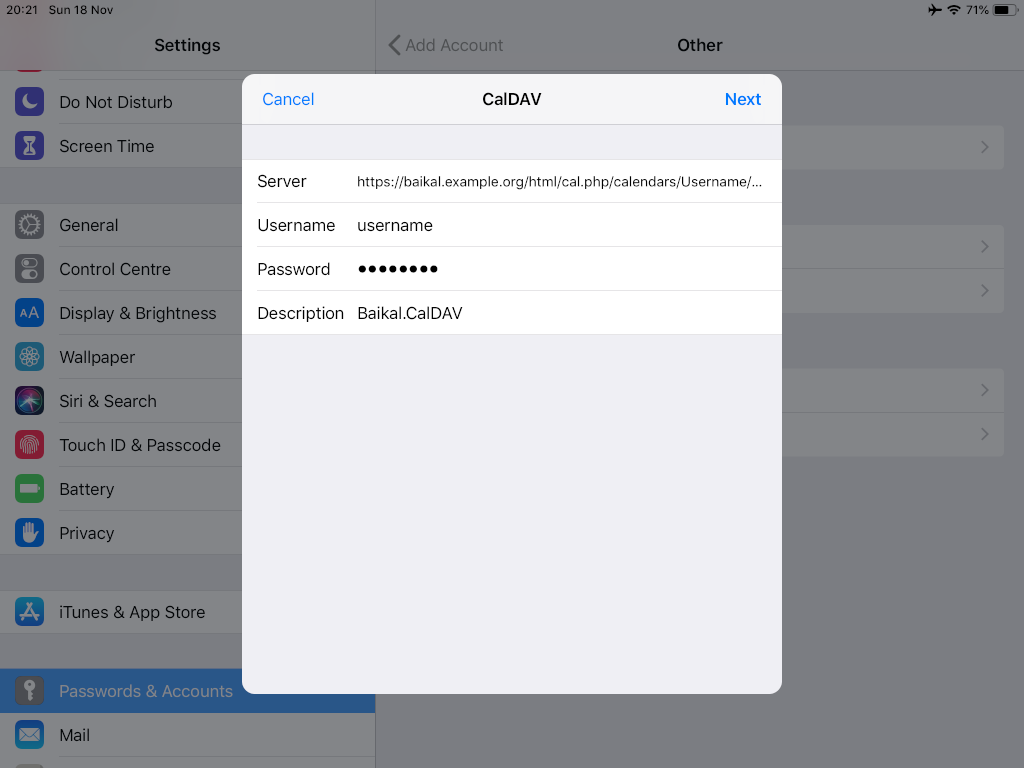
Calendar Server
https://baikal.example.org/html/cal.php/calendars/Username/default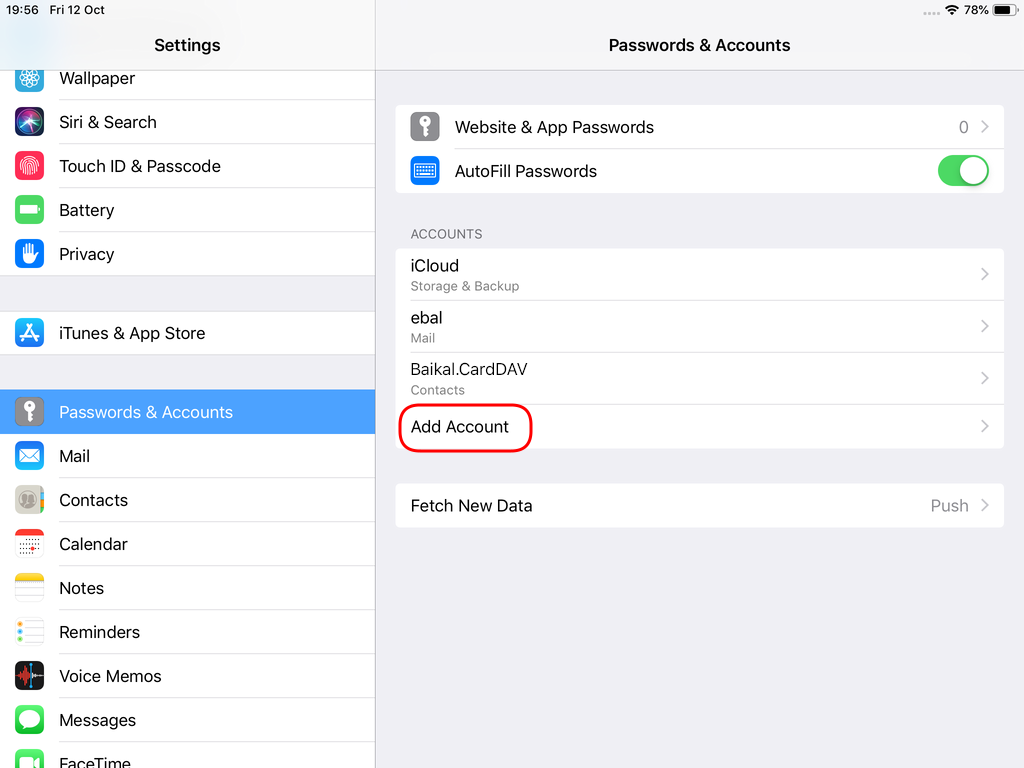

Prologue
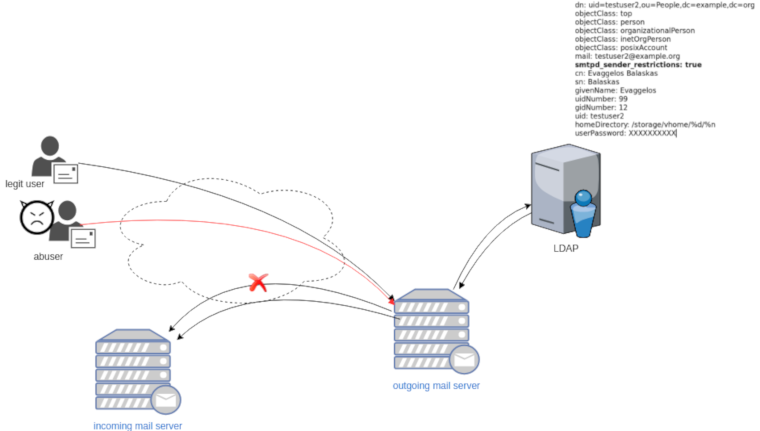
Maintaining a (public) service can be sometimes troublesome. In case of email service, often you need to suspend or restrict users for reasons like SPAM, SCAM or Phishing. You have to deal with inactive or even compromised accounts. Protecting your infrastructure is to protect your active users and the service. In this article I’ll propose a way to restrict messages to authorized addresses when sending an email and get a bounce message explaining why their email was not sent.
Reading Material
The reference documentation when having a Directory Service (LDAP) as our user backend and using Postfix:
LDAP
In this post, we will not get into openldap internals but as reference I’ll show an example user account (this is from my working test lab).
dn: uid=testuser2,ou=People,dc=example,dc=org
objectClass: top
objectClass: person
objectClass: organizationalPerson
objectClass: inetOrgPerson
objectClass: posixAccount
mail: testuser2@example.org
smtpd_sender_restrictions: true
cn: Evaggelos Balaskas
sn: Balaskas
givenName: Evaggelos
uidNumber: 99
gidNumber: 12
uid: testuser2
homeDirectory: /storage/vhome/%d/%n
userPassword: XXXXXXXXXX
as you can see, we have a custom ldap attribute:
smtpd_sender_restrictions: truekeep that in mind for now.
Postfix
The default value of smtpd_sender_restrictions is empty, that means by default the mail server has no sender restrictions. Depending on the policy we either can whitelist or blacklist in postfix restrictions, for the purpose of this blog post, we will only restrict (blacklist) specific user accounts.
ldap_smtpd_sender_restrictions
To do that, let’s create a new file that will talk to our openldap and ask for that specific ldap attribute.
ldap_smtpd_sender_restrictions.cf
server_host = ldap://localhost
server_port = 389
search_base = ou=People,dc=example,dc=org
query_filter = (&(smtpd_sender_restrictions=true)(mail=%s))
result_attribute = uid
result_filter = uid
result_format = REJECT This account is not allowed to send emails, plz talk to abuse@example.org
version = 3
timeout = 5
This is an anonymous bind, as we do not search for any special attribute like password.
Status Codes
The default status code will be: 554 5.7.1
Take a look here for more info: RFC 3463 - Enhanced Mail System Status Codes
Test it
# postmap -q testuser2@example.org ldap:/etc/postfix/ldap_smtpd_sender_restrictions.cf
REJECT This account is not allowed to send emails, plz talk to abuse@example.org
Add -v to extent verbosity
# postmap -v -q testuser2@example.org ldap:/etc/postfix/ldap_smtpd_sender_restrictions.cf
Possible Errors
postmap: fatal: unsupported dictionary type: ldap
Check your postfix setup with postconf -m . The result should be something like this:
btree
cidr
environ
fail
hash
internal
ldap
memcache
nis
proxy
regexp
socketmap
static
tcp
texthash
unix
If not, you need to setup postfix to support the ldap dictionary type.
smtpd_sender_restrictions
Modify the main.cf to add the ldap_smtpd_sender_restrictions.cf
# applied in the context of the MAIL FROM
smtpd_sender_restrictions =
        check_sender_access ldap:/etc/postfix/ldap_smtpd_sender_restrictions.cf
and reload postfix
# postfix reloadIf you keep logs, tail them to see any errors.
Thunderbird
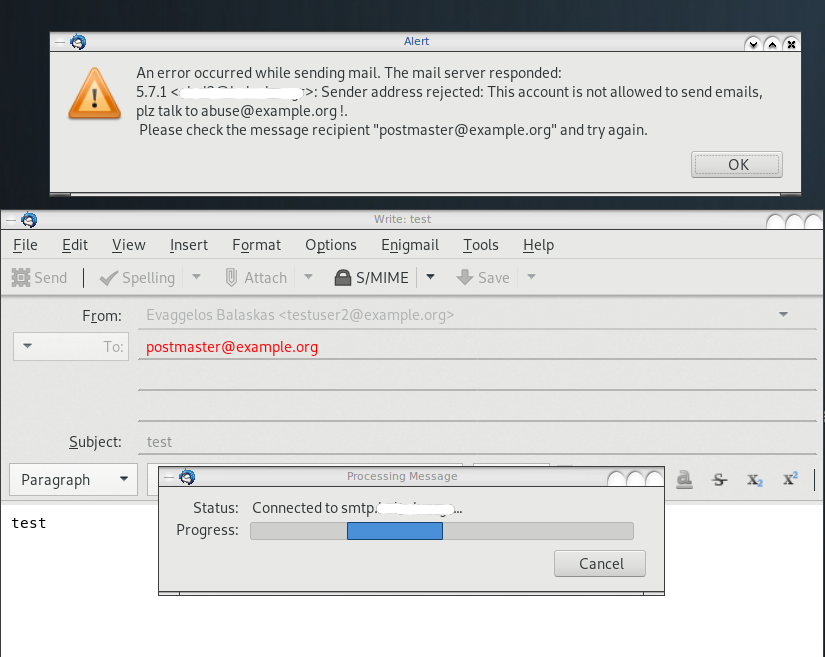
Logs
May 19 13:20:26 centos6 postfix/smtpd[20905]:
NOQUEUE: reject: RCPT from XXXXXXXX[XXXXXXXX]: 554 5.7.1 <testuser2@example.org>:
Sender address rejected: This account is not allowed to send emails, plz talk to abuse@example.org;
from=<testuser2@example.org> to=<postmaster@example.org> proto=ESMTP helo=<[192.168.0.13]>Fighting Spam
Fighting email spam in modern times most of the times looks like this:

Rspamd
Rspamd is a rapid spam filtering system. Written in C with Lua script engine extension seems to be really fast and a really good solution for SOHO environments.
In this blog post, I'’ll try to present you a quickstart guide on working with rspamd on a CentOS 6.9 machine running postfix.
DISCLAIMER: This blog post is from a very technical point of view!
Installation
We are going to install rspamd via know rpm repositories:
Epel Repository
We need to install epel repository first:
# yum -y install http://fedora-mirror01.rbc.ru/pub/epel/6/x86_64/epel-release-6-8.noarch.rpm
Rspamd Repository
Now it is time to setup the rspamd repository:
# curl https://rspamd.com/rpm-stable/centos-6/rspamd.repo -o /etc/yum.repos.d/rspamd.repo
Install the gpg key
# rpm --import http://rspamd.com/rpm-stable/gpg.key
and verify the repository with # yum repolist
repo id     repo name
base        CentOS-6 - Base
epel        Extra Packages for Enterprise Linux 6 - x86_64
extras      CentOS-6 - Extras
rspamd      Rspamd stable repository
updates     CentOS-6 - Updates
Rpm
Now it is time to install rspamd to our linux box:
# yum -y install rspamd
# yum info rspamd

Name        : rspamd
Arch        : x86_64
Version     : 1.6.3
Release     : 1
Size        : 8.7 M
Repo        : installed
From repo   : rspamd
Summary     : Rapid spam filtering system
URL         : https://rspamd.com
License     : BSD2c
Description : Rspamd is a rapid, modular and lightweight spam filter. It is designed to work
            : with big amount of mail and can be easily extended with own filters written in
            : lua.
Init File
We need to correct rspamd init file so that rspamd can find the correct configuration file:
# vim /etc/init.d/rspamd
# ebal, Wed, 06 Sep 2017 00:31:37 +0300
## RSPAMD_CONF_FILE="/etc/rspamd/rspamd.sysvinit.conf"
RSPAMD_CONF_FILE="/etc/rspamd/rspamd.conf"
or
# ln -s /etc/rspamd/rspamd.conf /etc/rspamd/rspamd.sysvinit.conf
Start Rspamd
We are now ready to start for the first time rspamd daemon:
# /etc/init.d/rspamd restart
syntax OK
Stopping rspamd:                                           [FAILED]
Starting rspamd:                                           [  OK  ]
verify that is running:
# ps -e fuwww | egrep -i rsp[a]md
root      1337  0.0  0.7 205564  7164 ?        Ss   20:19   0:00 rspamd: main process
_rspamd   1339  0.0  0.7 206004  8068 ?        S    20:19   0:00  _ rspamd: rspamd_proxy process
_rspamd   1340  0.2  1.2 209392 12584 ?        S    20:19   0:00  _ rspamd: controller process
_rspamd   1341  0.0  1.0 208436 11076 ?        S    20:19   0:00  _ rspamd: normal process
perfect, now it is time to enable rspamd to run on boot:
# chkconfig rspamd on
# chkconfig --list | egrep rspamd
rspamd          0:off   1:off   2:on    3:on    4:on    5:on    6:off
Postfix
In a nutshell, postfix will pass through (filter) an email using the milter protocol to another application before queuing it to one of postfix’s mail queues. Think milter as a bridge that connects two different applications.

Rspamd Proxy
In Rspamd 1.6 Rmilter is obsoleted but rspamd proxy worker supports milter protocol. That means we need to connect our postfix with rspamd_proxy via milter protocol.
Rspamd has a really nice documentation: https://rspamd.com/doc/index.html
On MTA integration you can find more info.
# netstat -ntlp | egrep -i rspamd
output:
tcp        0      0 0.0.0.0:11332               0.0.0.0:*                   LISTEN      1451/rspamd
tcp        0      0 0.0.0.0:11333               0.0.0.0:*                   LISTEN      1451/rspamd
tcp        0      0 127.0.0.1:11334             0.0.0.0:*                   LISTEN      1451/rspamd
tcp        0      0 :::11332                    :::*                        LISTEN      1451/rspamd
tcp        0      0 :::11333                    :::*                        LISTEN      1451/rspamd
tcp        0      0 ::1:11334                   :::*                        LISTEN      1451/rspamd
# egrep -A1 proxy /etc/rspamd/rspamd.conf
worker "rspamd_proxy" {
    bind_socket = "*:11332";
    .include "$CONFDIR/worker-proxy.inc"
    .include(try=true; priority=1,duplicate=merge) "$LOCAL_CONFDIR/local.d/worker-proxy.inc"
    .include(try=true; priority=10) "$LOCAL_CONFDIR/override.d/worker-proxy.inc"
}
Milter
If you want to know all the possibly configuration parameter on postfix for milter setup:
# postconf | egrep -i milter
output:
milter_command_timeout = 30s
milter_connect_macros = j {daemon_name} v
milter_connect_timeout = 30s
milter_content_timeout = 300s
milter_data_macros = i
milter_default_action = tempfail
milter_end_of_data_macros = i
milter_end_of_header_macros = i
milter_helo_macros = {tls_version} {cipher} {cipher_bits} {cert_subject} {cert_issuer}
milter_macro_daemon_name = $myhostname
milter_macro_v = $mail_name $mail_version
milter_mail_macros = i {auth_type} {auth_authen} {auth_author} {mail_addr} {mail_host} {mail_mailer}
milter_protocol = 6
milter_rcpt_macros = i {rcpt_addr} {rcpt_host} {rcpt_mailer}
milter_unknown_command_macros =
non_smtpd_milters =
smtpd_milters =
We are mostly interested in the last two, but it is best to follow rspamd documentation:
# vim /etc/postfix/main.cf
Adding the below configuration lines:
# ebal, Sat, 09 Sep 2017 18:56:02 +0300

## A list of Milter (mail filter) applications for new mail that does not arrive via the Postfix smtpd(8) server.
on_smtpd_milters = inet:127.0.0.1:11332

## A list of Milter (mail filter) applications for new mail that arrives via the Postfix smtpd(8) server.
smtpd_milters = inet:127.0.0.1:11332

## Send macros to mail filter applications
milter_mail_macros = i {auth_type} {auth_authen} {auth_author} {mail_addr} {client_addr} {client_name} {mail_host} {mail_mailer}

## skip mail without checks if something goes wrong, like rspamd is down !
milter_default_action = accept
Reload postfix
# postfix reload
postfix/postfix-script: refreshing the Postfix mail systemTesting
netcat
From a client:
$ nc 192.168.122.96 25
220 centos69.localdomain ESMTP Postfix
EHLO centos69
250-centos69.localdomain
250-PIPELINING
250-SIZE 10240000
250-VRFY
250-ETRN
250-ENHANCEDSTATUSCODES
250-8BITMIME
250 DSN
MAIL FROM: <root@example.org>
250 2.1.0 Ok
RCPT TO: <root@localhost>
250 2.1.5 Ok
DATA
354 End data with <CR><LF>.<CR><LF>
test
.
250 2.0.0 Ok: queued as 4233520144
^]
Logs
Looking through logs may be a difficult task for many, even so it is a task that you have to do.
MailLog
# egrep 4233520144 /var/log/maillog
Sep  9 19:08:01 localhost postfix/smtpd[1960]: 4233520144: client=unknown[192.168.122.1]
Sep  9 19:08:05 localhost postfix/cleanup[1963]: 4233520144: message-id=<>
Sep  9 19:08:05 localhost postfix/qmgr[1932]: 4233520144: from=<root@example.org>, size=217, nrcpt=1 (queue active)
Sep  9 19:08:05 localhost postfix/local[1964]: 4233520144: to=<root@localhost.localdomain>, orig_to=<root@localhost>, relay=local, delay=12, delays=12/0.01/0/0.01, dsn=2.0.0, status=sent (delivered to mailbox)
Sep  9 19:08:05 localhost postfix/qmgr[1932]: 4233520144: removed
Everything seems fine with postfix.
Rspamd Log
# egrep -i 4233520144 /var/log/rspamd/rspamd.log
2017-09-09 19:08:05 #1455(normal) <79a04e>; task; rspamd_message_parse: loaded message; id: <undef>; queue-id: <4233520144>; size: 6; checksum: <a6a8e3835061e53ed251c57ab4f22463>

2017-09-09 19:08:05 #1455(normal) <79a04e>; task; rspamd_task_write_log: id: <undef>, qid: <4233520144>, ip: 192.168.122.1, from: <root@example.org>, (default: F (add header): [9.40/15.00] [MISSING_MID(2.50){},MISSING_FROM(2.00){},MISSING_SUBJECT(2.00){},MISSING_TO(2.00){},MISSING_DATE(1.00){},MIME_GOOD(-0.10){text/plain;},ARC_NA(0.00){},FROM_NEQ_ENVFROM(0.00){;root@example.org;},RCVD_COUNT_ZERO(0.00){0;},RCVD_TLS_ALL(0.00){}]), len: 6, time: 87.992ms real, 4.723ms virtual, dns req: 0, digest: <a6a8e3835061e53ed251c57ab4f22463>, rcpts: <root@localhost>
It works !
Training
If you have already a spam or junk folder is really easy training the Bayesian classifier with rspamc.
I use Maildir, so for my setup the initial training is something like this:
# cd /storage/vmails/balaskas.gr/evaggelos/.Spam/cur/ # find . -type f -exec rspamc learn_spam {} \;
Auto-Training
I’ve read a lot of tutorials that suggest real-time training via dovecot plugins or something similar. I personally think that approach adds complexity and for small companies or personal setup, I prefer using Cron daemon:
@daily /bin/find /storage/vmails/balaskas.gr/evaggelos/.Spam/cur/ -type f -mtime -1 -exec rspamc learn_spam {} \;
That means every day, search for new emails in my spam folder and use them to train rspamd.
Training from mbox
First of all seriously ?
Split mbox
There is a nice and simply way to split a mbox to separated files for rspamc to use them.
# awk '/^From / {i++}{print > "msg"i}' Spam
and then feed rspamc:
# ls -1 msg* | xargs rspamc --verbose learn_spam
Stats
# rspamc stat
Results for command: stat (0.068 seconds)
Messages scanned: 2
Messages with action reject: 0, 0.00%
Messages with action soft reject: 0, 0.00%
Messages with action rewrite subject: 0, 0.00%
Messages with action add header: 2, 100.00%
Messages with action greylist: 0, 0.00%
Messages with action no action: 0, 0.00%
Messages treated as spam: 2, 100.00%
Messages treated as ham: 0, 0.00%
Messages learned: 1859
Connections count: 2
Control connections count: 2157
Pools allocated: 2191
Pools freed: 2170
Bytes allocated: 542k
Memory chunks allocated: 41
Shared chunks allocated: 10
Chunks freed: 0
Oversized chunks: 736
Fuzzy hashes in storage "rspamd.com": 659509399
Fuzzy hashes stored: 659509399
Statfile: BAYES_SPAM type: sqlite3; length: 32.66M; free blocks: 0; total blocks: 430.29k; free: 0.00%; learned: 1859; users: 1; languages: 4
Statfile: BAYES_HAM type: sqlite3; length: 9.22k; free blocks: 0; total blocks: 0; free: 0.00%; learned: 0; users: 1; languages: 1
Total learns: 1859
X-Spamd-Result
To view the spam score in every email, we need to enable extended reporting headers and to do that we need to edit our configuration:
# vim /etc/rspamd/modules.d/milter_headers.conf
and just above use add :
    # ebal, Wed, 06 Sep 2017 01:52:08 +0300
    extended_spam_headers = true;

   use = [];
then reload rspamd:
# /etc/init.d/rspamd reload
syntax OK
Reloading rspamd:                                          [  OK  ]
View Source
If your open the email in view-source then you will see something like this:
X-Rspamd-Queue-Id: D0A5728ABF
X-Rspamd-Server: centos69
X-Spamd-Result: default: False [3.40 / 15.00]
Web Server
Rspamd comes with their own web server. That is really useful if you dont have a web server in your mail server, but it is not recommended.
By-default, rspamd web server is only listening to local connections. We can see that from the below ss output
# ss -lp | egrep -i rspamd
LISTEN     0      128                    :::11332                   :::*        users:(("rspamd",7469,10),("rspamd",7471,10),("rspamd",7472,10),("rspamd",7473,10))
LISTEN     0      128                     *:11332                    *:*        users:(("rspamd",7469,9),("rspamd",7471,9),("rspamd",7472,9),("rspamd",7473,9))
LISTEN     0      128                    :::11333                   :::*        users:(("rspamd",7469,18),("rspamd",7473,18))
LISTEN     0      128                     *:11333                    *:*        users:(("rspamd",7469,16),("rspamd",7473,16))
LISTEN     0      128                   ::1:11334                   :::*        users:(("rspamd",7469,14),("rspamd",7472,14),("rspamd",7473,14))
LISTEN     0      128             127.0.0.1:11334                    *:*        users:(("rspamd",7469,12),("rspamd",7472,12),("rspamd",7473,12))
127.0.0.1:11334
So if you want to change that (dont) you have to edit the rspamd.conf (core file):
# vim +/11334 /etc/rspamd/rspamd.conf
and change this line:
bind_socket = "localhost:11334";to something like this:
bind_socket = "YOUR_SERVER_IP:11334";or use sed:
# sed -i -e 's/localhost:11334/YOUR_SERVER_IP/' /etc/rspamd/rspamd.conf
and then fire up your browser:
Web Password
It is a good tactic to change the default password of this web-gui to something else.
# vim /etc/rspamd/worker-controller.inc
  # password = "q1";
  password = "password";
always a good idea to restart rspamd.
Reverse Proxy
I dont like having exposed any web app without SSL or basic authentication, so I shall put rspamd web server under a reverse proxy (apache).
So on httpd-2.2 the configuration is something like this:
ProxyPreserveHost On

<Location /rspamd>
    AuthName "Rspamd Access"
    AuthType Basic
    AuthUserFile /etc/httpd/rspamd_htpasswd
    Require valid-user

    ProxyPass http://127.0.0.1:11334
    ProxyPassReverse http://127.0.0.1:11334

    Order allow,deny
    Allow from all

</Location>
Http Basic Authentication
You need to create the file that is going to be used to store usernames and password for basic authentication:
# htpasswd -csb /etc/httpd/rspamd_htpasswd rspamd rspamd_passwd
Adding password for user rspamd
restart your apache instance.
bind_socket
Of course for this to work, we need to change the bind socket on rspamd.conf
Dont forget this ;)
bind_socket = "127.0.0.1:11334";Selinux
If there is a problem with selinux, then:
# setsebool -P httpd_can_network_connect=1
or
# setsebool httpd_can_network_connect_db on
Errors ?
If you see an error like this:
IO write error
when running rspamd, then you need explicit tell rspamd to use:
rspamc -h 127.0.0.1:11334
To prevent any future errors, I’ve created a shell wrapper:
/usr/local/bin/rspamc
#!/bin/sh
/usr/bin/rspamc -h 127.0.0.1:11334 $*
Final Thoughts
I am using rspamd for a while know and I am pretty happy with it.
I’ve setup a spamtrap email address to feed my spam folder and let the cron script to train rspamd.
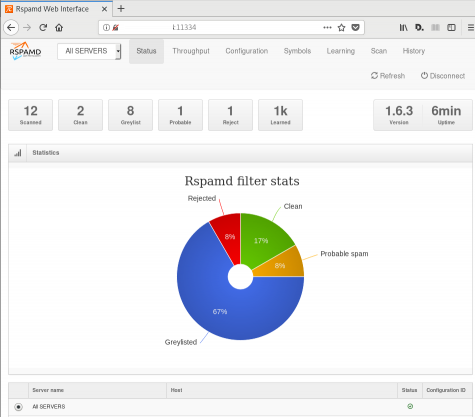
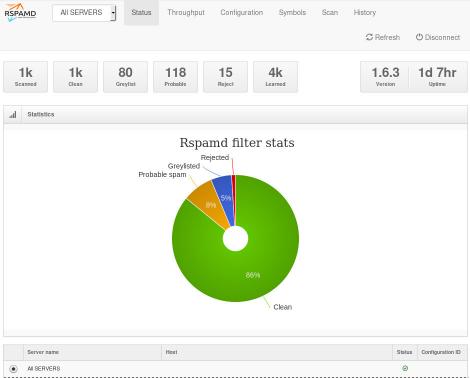
So after a thousand emails:
Prologue
I should have written this post like a decade ago, but laziness got the better of me.
I use TLS with IMAP and SMTP mail server. That means I encrypt the connection by protocol against the mail server and not by port (ssl Vs tls). Although I do not accept any authentication before STARTTLS command is being provided (that means no cleartext passwords in authentication), I was leaving the PLAIN TEXT authentication mechanism in the configuration. That’s not an actual problem unless you are already on the server and you are trying to connect on localhost but I can do better.
LDAP
I use OpenLDAP as my backend authentication database. Before all, the ldap attribute password must be changed from cleartext to CRAM-MD5
Typing the doveadm command from dovecot with the password method:
# doveadm pw
Enter new password:    test
Retype new password:   test
{CRAM-MD5}e02d374fde0dc75a17a557039a3a5338c7743304777dccd376f332bee68d2cf6
will return the CRAM-MD5 hash of our password (test)
Then we need to edit our DN (distinguished name) with ldapvi:
From:
uid=USERNAME,ou=People,dc=example,dc=org
userPassword: test
To:
uid=USERNAME,ou=People,dc=example,dc=org
userPassword: {CRAM-MD5}e02d374fde0dc75a17a557039a3a5338c7743304777dccd376f332bee68d2cf6
Dovecot
Dovecot is not only the imap server but also the “Simple Authentication and Security Layer” aka SASL service. That means that imap & smtp are speaking with dovecot for authentication and dovecot uses ldap as the backend. To change AUTH=PLAIN to cram-md5 we need to do the below change:
file: 10-auth.conf
From:
auth_mechanisms = plain
To:
auth_mechanisms = cram-md5Before restarting dovecot, we need to make one more change. This step took me a couple hours to figure it out! On our dovecot-ldap.conf.ext configuration file, we need to tell dovecot NOT to bind to ldap for authentication but let dovecot to handle the authentication process itself:
From:
# Enable Authentication Binds
# auth_bind = yes
To:
# Enable Authentication Binds
auth_bind = no
To guarantee that the entire connection is protected by TLS encryption, change in 10-ssl.conf the below setting:
From:
ssl = yesTo:
ssl = requiredSSL/TLS is always required, even if non-plaintext authentication mechanisms are used. Any attempt to authenticate before SSL/TLS is enabled will cause an authentication failure.
After that, restart your dovecot instance.
Testing
# telnet example.org imap
Trying 172.12.13.14 ...
Connected to example.org.
Escape character is '^]'.
* OK [CAPABILITY IMAP4rev1 LITERAL+ SASL-IR LOGIN-REFERRALS ID ENABLE IDLE STARTTLS AUTH=CRAM-MD5] Dovecot ready.

1 LOGIN USERNAME@example.org test

1 NO [ALERT] Unsupported authentication mechanism.
^]
telnet> clo
That meas no cleartext authentication is permitted
MUA
Now the hard part, the mail clients:
RainLoop
My default webmail client since v1.10.1.123 supports CRAM-MD5
To verify that, open your application.ini file under your data folder and search for something like that:
    imap_use_auth_plain = On
    imap_use_auth_cram_md5 = On
    smtp_use_auth_plain = On
    smtp_use_auth_cram_md5 = On
as a bonus, rainloop supports STARTTLS and authentication for imap & smtp, even when talking to 127.0.0.1
Thunderbird
K9
Postfix
smtp Vs smtpd
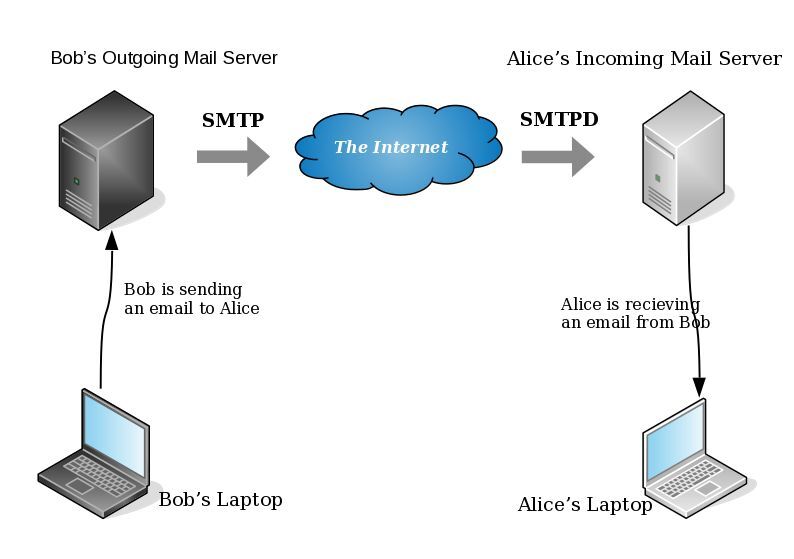
- postfix/smtp
- The SMTP daemon is for sending emails to the Internet (outgoing mail server).
- postfix/smtpd
- The SMTP daemon is for receiving emails from the Internet (incoming mail server).
TLS
Encryption on mail transport is what we call: opportunistic. If both parties (sender’s outgoing mail server & recipient’s incoming mail server) agree to exchange encryption keys, then a secure connection may be used. Otherwise a plain connection will be established. Plain as in non-encrypted aka cleartext over the wire.
SMTP - Outgoing Traffic
In the begging there where only three options in postfix:
- none
- may
- encrypt
The default option on a Centos 6x is none:
# postconf -d | grep smtp_tls_security_level
smtp_tls_security_level =
Nowadays, postfix supports more options, like:
- dane
- verify
- secure
Here is the basic setup, to enable TLS on your outgoing mail server:
smtp_tls_security_level = may
smtp_tls_loglevel = 1
From postfix v2.6 and later, can you disable weak encryption by selecting the cipher suite and protocols you prefer to use:
smtp_tls_ciphers = export
smtp_tls_protocols = !SSLv2, !SSLv3
You can also define where the file that holds all the root certificates on your linux server is, and thus to verify the certificate that provides an incoming mail server:
smtp_tls_CAfile = /etc/pki/tls/certs/ca-bundle.crt
I dont recommend to go higher with your setup, cause (unfortunately) not everyone is using TLS on their incoming mail server!
SMTPD - Incoming Traffic
To enable TLS in your incoming mail server, you need to provide some encryption keys aka certificates!
I use letsencrypt on my server and the below notes are based on that.
Let’s Encrypt
A quick explanation on what exists on your letsencrypt folder:
# ls -1 /etc/letsencrypt/live/example.com/

privkey.pem    ===>  You Private Key
cert.pem       ===>  Your Certificate
chain.pem      ===>  Your Intermediate
fullchain.pem  ===>  Your Certificate with Your Intermediate
Postfix
Below you can find the most basic configuration setup you need for your incoming mail server.
smtpd_tls_ask_ccert = yes
smtpd_tls_security_level = may
smtpd_tls_loglevel = 1
Your mail server is asking for a certificate so that a trusted TLS connection can be established between outgoing and incoming mail server.
The servers must exchange certificates and of course, verify them!
Now, it’s time to present your own domain certificate to the world. Offering only your public certificate cert.pem isnt enough. You have to offer both your certificate and the intermediate’s certificate, so that the sender’s mail server can verify you, by checking the digital signatures on those certificates.
smtpd_tls_cert_file = /etc/letsencrypt/live/example.com/fullchain.pem
smtpd_tls_key_file = /etc/letsencrypt/live/example.com/privkey.pem

smtpd_tls_CAfile = /etc/pki/tls/certs/ca-bundle.crt
smtpd_tls_CApath = /etc/pki/tls/certs
CAfile & CApath helps postfix to verify the sender’s certificate by looking on your linux distribution file, that holds all the root certificates.
And you can also disable weak ciphers and protocols:
smtpd_tls_ciphers = high
smtpd_tls_exclude_ciphers = aNULL, MD5, EXPORT
smtpd_tls_protocols = !SSLv2, !SSLv3
Logs
Here is an example from gmail:
SMTPD - Incoming Mail from Gmail
You can see that there is a trusted TLS connection established From google:
Jun  4 11:52:07 kvm postfix/smtpd[14150]:
        connect from mail-oi0-x236.google.com[2607:f8b0:4003:c06::236]
Jun  4 11:52:08 kvm postfix/smtpd[14150]:
        Trusted TLS connection established from mail-oi0-x236.google.com[2607:f8b0:4003:c06::236]:
        TLSv1.2 with cipher ECDHE-RSA-AES128-GCM-SHA256 (128/128 bits)
Jun  4 11:52:09 kvm postfix/smtpd[14150]:
        4516420F32: client=mail-oi0-x236.google.com[2607:f8b0:4003:c06::236]
Jun  4 11:52:10 kvm postfix/smtpd[14150]:
        disconnect from mail-oi0-x236.google.com[2607:f8b0:4003:c06::236]
SMTP - Outgoing Mail from Gmail
And this is the response To gmail :
Jun  4 12:01:32 kvm postfix/smtpd[14808]:
        initializing the server-side TLS engine
Jun  4 12:01:32 kvm postfix/smtpd[14808]:
        connect from example.com[2a00:1838:20:1::XXXX:XXXX]
Jun  4 12:01:33 kvm postfix/smtpd[14808]:
        setting up TLS connection from example.com[2a00:1838:20:1::XXXX:XXXX]
Jun  4 12:01:33 kvm postfix/smtpd[14808]:
        example.com[2a00:1838:20:1::XXXX:XXXX]: TLS cipher list "aNULL:-aNULL:ALL:!EXPORT:!LOW:!MEDIUM:+RC4:@STRENGTH:!aNULL:!MD5:!EXPORT:!aNULL"
Jun  4 12:01:33 kvm postfix/smtpd[14808]:
        Anonymous TLS connection established from example.com[2a00:1838:20:1::XXXX:XXXX]:
        TLSv1.2 with cipher ECDHE-RSA-AES128-GCM-SHA256 (128/128 bits)
Jun  4 12:01:35 kvm postfix/smtpd[14808]:
        disconnect from example.com[2a00:1838:20:1::XXXX:XXXX]
As you can see -In both cases (sending/receiving)- the mail servers have established a trusted secure TLSv1.2 connection.
The preferred cipher (in both scenarios) is : ECDHE-RSA-AES128-GCM-SHA256
IPv6
Tell postfix to prefer ipv6 Vs ipv4 and use TLS if two mail servers support it !
#IPv6
smtp_address_preference = ipv6
Reading through “Smart Girl’s Guide to Privacy - Practical Tips for Staying Safe Online by Violet Blue” (totally recommend it), there is a great tip in the first few pages:
- Use different email addresses for different online accounts.
… but is it possible ?
Different Passwords
We already know that we need to use a different password for every site. So we use lastpass or password managers for keeping our different passwords safe. We are nowadays used to create/generate complex passwords for every site, but is it absolutely necessary to also have a different email address for every single one ?
Different Email Addresses
Let me be as clear as I can: There is no obvious answer.
If you value your online privacy and your security threat model is set really high, then Yes you also need a different email address.
But it depends entirely on you and how you use your online identity. Perhaps in social media sites (like facebook or twitter) you dont need to give your personal email address, but perhaps on linkedin you want to use your well-known email-identity. So again, it depends on your security thread model.
Another crucial tip: DO NOT cross-connect your online personas from different social medias.
Disposable Email Server
In this blog post, I will try to describe the simple steps you need to take, to create your own personal disposable email server. In simple words, that means that you can dynamically create and use a unique/specific-site-only email address that you can use for sign-up or register to a new site. Using a different email address & a different passwords for every site online, you are making it really difficult for someone to hack you.
Even if someone can get access to this specific website or -somehow- can retrieve your online account (sites are been hacked every day), you are sure that none of your other online accounts/identities can not be accessed too.
DOMAIN
To do that you will need a disposable domain. It does not have to be something clever or even useful. It needs to be something easy to write & remember. In my opinion, just get a cheap domain. If your registar support WHOIS Privacy, then even better. If dont, then try to find a registar that supports WHOIS Privacy but it isnt a blocking issue.
For this blog post I will use: example.org
Catch-All
In theory, we will create a “catch-all” domain/mail server, that will catch and forward all these emails to our current/primary email address.
DNS
So nice, you have a disposable domain. What next ?
You need to setup a new domain dns zone for your disposable domain.
And then add a MX record, like the notes below:
example.org.    86400   IN  MX  0 mail.example.org.
mail.example.org.   86400   IN  A   1.2.3.4
replace 1.2.3.4 with the server’s IP !!
Mail Server
Just install postfix !
My “notable” settings are these below:
# postconf -n

inet_interfaces = all
inet_protocols = all

message_size_limit = 35651584

smtp_address_preference = ipv6

smtpd_banner = The sky above the port was the color of television, tuned to a dead channel

virtual_alias_domains = example.org
virtual_alias_maps = hash:/etc/postfix/virtual
In my /etc/postfix/virtual I have these lines:
@example.org my_email_address@example.net
(dont forget to postmap and reload)
# postmap /etc/postfix/virtual

# postfix reload
…. and …. that is it, actually !!!
a. Be aware the my disposable email server is dual stack.
b. If you need to create an emailing list, try something like this:
list@example.org my_email_address@example.net, my_other_email_address@gmail.com
dont forget to:
# postmap /etc/postfix/virtual
and reload postfix:
# postfix reload
How to use it
From now on, whenever you need to type an email address somewhere, just type a new (random or not) email address with this new disposable domain.
The catch-all setting will FWD any email to your primary email address.
I like to use the below specific pattern: When you need to sign-up to a new site, use the sites url as your new email address.
eg. twitter.com

twittercom@example.org
It’s now obvious that next time you get SPAM, you will know which one to blame (I am not suggesting that twitter is sending spam, it is just an example!).
You can also change your email address from all the sites that you have already subscribe (github, mailing lists, etc etc).
Hope this post has been helpful and easy enough for everyone.
UPDATE Thu Nov 26 11:28:05 EET 2015
Does SPF break forwarding?
(like in mailing lists)
- Yes, it does break forwarding.
So learn from my mistake and think this through.
Wednesday, 25 November 2015
There is a very simply way to add spf [check] support to your postfix setup.
Below are my notes on CentOS 6.7
Step One: install python policy daemon for spf
# yum -y install pypolicyd-spf
Step Two: Create a new postfix service, called spfcheck
# vim + /etc/postfix/master.cf

spfcheck     unix  -       n       n       -       -       spawn
    user=nobody argv=/usr/libexec/postfix/policyd-spf
Step Three: Add a new smtp daemon recipient restrictions
# vim +/^smtpd_recipient_restrictions /etc/postfix/main.cf
smtpd_recipient_restrictions =
    permit_mynetworks,
...
    check_policy_service unix:private/spfcheck
policy_time_limit = 3600
And that’s what we see in the end on a receiver’s source-view email:
Received-SPF: Pass (sender SPF authorized) identity=mailfrom; client-ip=xxx.xxx.xxx.xxx;
helo=server.mydomain.tld; envelope-from=user@mydomain.tld; receiver=username@example.com
where xxx.xxx.xxx.xxx is the IP of the sender mail server
server.mydomain.tld is the name of the sender mail server
user@mydomain.tld is the sender’s email address
and of-course
username@example.com is the receiver’s mail address
You can take a better look on postfix python SPF policy daemon by clicking here: python-postfix-policyd-spf
Dec 1 2014 - Jan 21 2015
top five spammers:
1. adsgreece.com
2. mailendo.com
3. 4udeals.gr
4. eliamep.org
5. mailinglist.gr
Blocked via postfix:
/etc/postfix/header_checks
/massnews\.gr/                  REJECT  "Plz stop sending SPAM id= 1 "
/glc-emea\.com/                 REJECT  "Plz stop sending SPAM id= 2 "
/To:.*info@balaskas\.gr/        REJECT  "Plz stop sending SPAM id= 3 "
/Akis.Angelakis/i       REJECT  "Plz stop sending SPAM id= 4 "
/from.*mailendo.com/            REJECT  "Plz stop sending SPAM id= 5 "
/specisoft\.biz/                REJECT  "Plz stop sending SPAM id= 6 "
/advantech\.gr/                 REJECT  "Plz stop sending SPAM id= 7 "
/adsgreece\.com/                REJECT  "Plz stop sending SPAM id= 8 "
/2020web\.gr/                   REJECT  "Plz stop sending SPAM id= 9 "
/nfs\.gr/                       REJECT  "Plz stop sending SPAM id= 10 "
/polimonotiki/                  REJECT  "Plz stop sending SPAM id= 11 "
/eliamep\.org/                  REJECT  "Plz stop sending SPAM id= 12 "
/ellak\.gr/                     REJECT  "Plz stop sending SPAM id= 13 "
/seminaria\.gr/         REJECT  "Plz stop sending SPAM id= 14 "
/stock-house\.gr/       REJECT  "Plz stop sending SPAM id= 15 "
/Lesfemmes/i            REJECT  "Plz stop sending SPAM id= 16 "
/aldridge\.com/         REJECT  "Plz stop sending SPAM id= 17 "
/inter\.net/            REJECT  "Plz stop sending SPAM id= 18 "
/plexpr\.tk/            REJECT  "Plz stop sending SPAM id= 19 "
/industrydisruptors\.org/   REJECT  "Plz stop sending SPAM id= 20 "
/xinis\.com/            REJECT  "Plz stop sending SPAM id= 21 "
/globalgreece\.gr/      REJECT  "Plz stop sending SPAM id= 22 "
/hostzone\.gr/          REJECT  "Plz stop sending SPAM id= 23 "
/mailinglist\.gr/       REJECT  "Plz stop sending SPAM id= 24 "
/profitconsult\.gr/     REJECT  "Plz stop sending SPAM id= 25 "
/pedersenco\.com/       REJECT  "Plz stop sending SPAM id= 26 "
/diadima\.gr/           REJECT  "Plz stop sending SPAM id= 27 "
/helenco\.gr/           REJECT  "Plz stop sending SPAM id= 28 "
/adplus\.gr/            REJECT  "Plz stop sending SPAM id= 29 "
/entos\.gr/         REJECT  "Plz stop sending SPAM id= 30 "
/4udeals\.gr/           REJECT  "Plz stop sending SPAM id= 31 "
/oncseminars\.gr/       REJECT  "Plz stop sending SPAM id= 32 "
/enimerwsi\.gr/         REJECT  "Plz stop sending SPAM id= 33 "
/eliamep\.gr/           REJECT  "Plz stop sending SPAM id= 34 "
/ymlpsrv\.com/          REJECT  "Plz stop sending SPAM id= 35 "
/dailysoccertip\.com/       REJECT  "Plz stop sending SPAM id= 36 "
/bookbazaar\.gr/        REJECT  "Plz stop sending SPAM id= 37 "
/zizoo\.gr/         REJECT  "Plz stop sending SPAM id= 38 "
/anthemionflowers\.gr/      REJECT  "Plz stop sending SPAM id= 39 "
/kourkouta\.com/        REJECT  "Plz stop sending SPAM id= 40 "
/ipatata\.com/          REJECT  "Plz stop sending SPAM id= 41 "
/ephost\.info/          REJECT  "Plz stop sending SPAM id= 42 "
/kadoikonte\@gmail\.com/    REJECT  "Plz stop sending SPAM id= 43 "
/mandrillapp\.com/      REJECT  "Plz stop sending SPAM id= 44 "
/springer\.com/         REJECT  "Plz stop sending SPAM id= 45 "
/mailchimp\.com/        REJECT  "Plz stop sending SPAM id= 46 "
/altec\.gr/         REJECT  "Plz stop sending SPAM id= 47 "
/winizi\.net/           REJECT  "Plz stop sending SPAM id= 48 "
/sed\.gr/           REJECT  "Plz stop sending SPAM id= 49 "
/pournara\.com/         REJECT  "Plz stop sending SPAM id= 50 "
/emailmarketingnow\.gr/     REJECT  "Plz stop sending SPAM id= 51 "
/entypa\.net/           REJECT  "Plz stop sending SPAM id= 52 "
/4green\.gr/            REJECT  "Plz stop sending SPAM id= 53 "
/imagemail\.eu/         REJECT  "Plz stop sending SPAM id= 54 "
/cbr300r\.bike/         REJECT  "Plz stop sending SPAM id= 55 "
/PRINTEX\ DIGITAL/i        REJECT  "Plz stop sending SPAM id= 56 "
/drassi\.gr/            REJECT  "Plz stop sending SPAM id= 57 "
/mailstudio\.gr/        REJECT  "Plz stop sending SPAM id= 58 "
/extratips\.net/        REJECT  "Plz stop sending SPAM id= 59 "
/crmedia\.gr/           REJECT  "Plz stop sending SPAM id= 60 "
/venan\.gr/         REJECT  "Plz stop sending SPAM id= 61 "
/tonerflow\.info/       REJECT  "Plz stop sending SPAM id= 62 "
/epiteugma\.com/        REJECT  "Plz stop sending SPAM id= 63 "
Nov 2 2014 - Dec 1 2014
Top spammers:
1. adsgreece.com
2. globalgreece.gr
3. nfs.gr
4. specisoft.biz
5. aldridge.com
Blocked via postfix:
/etc/postfix/header_checks
/massnews\.gr/                  REJECT "Plz stop sending SPAM id=1"
/glc-emea\.com/                 REJECT "Plz stop sending SPAM id=2"
/To:.*info@balaskas\.gr/        REJECT "Plz stop sending SPAM id=3"
/Akis.Angelakis/        REJECT "Plz stop sending SPAM id=4"
/from.*mailendo.com/            REJECT "Plz stop sending SPAM id=5"
/specisoft\.biz/                REJECT "Plz stop sending SPAM id=6"
/advantech\.gr/                 REJECT "Plz stop sending SPAM id=7"
/adsgreece\.com/                REJECT "Plz stop sending SPAM id=8"
/2020web\.gr/                   REJECT "Plz stop sending SPAM id=9"
/nfs\.gr/                       REJECT "Plz stop sending SPAM id=10"
/polimonotiki/                  REJECT "Plz stop sending SPAM id=11"
/eliamep\.org/                  REJECT "Plz stop sending SPAM id=12"
/ellak\.gr/                     REJECT "Plz stop sending SPAM id=13"
/seminaria\.gr/         REJECT "Plz stop sending SPAM id=14"
/stock-house\.gr/       REJECT "Plz stop sending SPAM id=15"
/Lesfemmes/i            REJECT "Plz stop sending SPAM id=16"
/aldridge\.com/         REJECT "Plz stop sending SPAM id=17"
/inter\.net/            REJECT "Plz stop sending SPAM id=18"
/plexpr\.tk/            REJECT "Plz stop sending SPAM id=19"
/industrydisruptors\.org/   REJECT "Plz stop sending SPAM id=20"
/xinis\.com/            REJECT "Plz stop sending SPAM id=21"
/globalgreece\.gr/      REJECT "Plz stop sending SPAM id=22"
/hostzone\.gr/          REJECT "Plz stop sending SPAM id=23"
/mailinglist\.gr/       REJECT "Plz stop sending SPAM id=24"
/profitconsult\.gr/     REJECT "Plz stop sending SPAM id=25"
/pedersenco\.com/       REJECT "Plz stop sending SPAM id=26"
/diadima\.gr/           REJECT "Plz stop sending SPAM id=27"
/helenco\.gr/           REJECT "Plz stop sending SPAM id=28"
/adplus\.gr/            REJECT "Plz stop sending SPAM id=29"
/entos\.gr/         REJECT "Plz stop sending SPAM id=30"
/4udeals\.gr/           REJECT "Plz stop sending SPAM id=31"
/oncseminars\.gr/       REJECT "Plz stop sending SPAM id=32"
/enimerwsi\.gr/         REJECT "Plz stop sending SPAM id=33"
Postfix has the ability to DISCARD (or Reject) any email, by using simple regular expressions. This can be done on your incoming or outgoing mail farm and you can either check the header or body of an email.
For me header_checks is a more powerful tool but the main problem with phishing bots is that the headers arent always the same (different IPs, different Froms etc etc).
And on half of them scam situations there is an ugly url or email inside the body of the email.
Our abuse department informed us today for a scam bot that “WANTS YOU TO REPLY TO THEM WITH YOUR PASSWORDS” and we took the appropriate measures against it. None of our outgoing mail servers can be used to send a reply to the abuser mail address.
There is a debate in our team about future incoming of this specific scam bot. We could use body_check to silent DISCARD any new incoming mail but that also make it very difficult for us to communicate with each other.
The main problem is that i cant “report” to my manager about that OR the security/abuse department cant send me any email that has the “BAD email address” inside the body or our mails.
Χρησιμοποιώ dovecot για imap και postfix για λήψη/αποστολή αλληλογραφίας.
Τους χρήστες της υποδομής τους έχω δημιουργήσει σε ένα dovecot userdb αρχείο.
Σε αυτό περιέχονται τα usernames, συνθηματικά πρόσβασης και πληροφορίες που σχετίζονται με το mail τους.
Ένα από αυτά είναι και ο τύπος του λογαριασμού κι ένα άλλο η τοποθεσία στην οποία αποθηκεύονται τα emails.
Στο αρχείο /etc/aliases έχω περασμένα τα FirstName.LastName aliases που δείχνουν στα username.
Το postfix ΔΕΝ έχει ιδέα για τους χρήστες - παρά μόνο για τα aliases.
Το postfix by default στέλνει reject στους Unknown users. Αφού λοιπόν μόνο ο dovecot ξέρει τους χρήστες, το postfix στέλνει reject για όλους.
Μία λύση είναι η δημιουργία ενός dovecot command στο master.cf κι αλλάζοντας το mail transport.
Αυτό όμως ΔΕΝ μου φάνηκε και πολύ καλή ιδέα.
Σε περίπτωση επίθεσης, το postfix θα αναλάβει να προωθήσει όλα τα emails στο dovecot.
Οπότε δεν θα περιορίσει κάτι, απλά θα μεταβιβάσει το πρόβλημα στο dovecot.
Το catch all options ήταν κάποτε (ίσως) λύση, μα πλέον είναι κατά την γνώμη μου λάθος να μπαίνει.
Σκέφτηκα να κάνω χρήση του dovecot-LDA, μα το postfix προσπαθεί να παραδώσει local τα emails επειδή βρήκε τα usernames & τα Ευάγγελος.Μπαλάσκας λογαριασμούς στο /etc/aliases. Έτσι δεν κάνει χρήση του mail_command γιατί χρησιμοποιεί το local.
Έτσι σκέφτηκα ότι η απλούστερη λύση είναι μονάχα η τροποποίηση του /etc/aliases, προσθέτοντας τα usernames με το αντίστοιχο dovecot-lda command
π.χ. “/etc/aliases”
Evaggelos.Balaskas: ebal
ebal: | “/usr/local/libexec/dovecot/deliver -d ebal”
Ακόμα και τώρα που το σκέφτομαι, θεωρώ ότι είναι η καλύτερη και απλούστερη λύση που μπορώ να σκεφτώ.
Μα τα προβλήματά μου, μόλις τώρα ξεκινάνε!!!
Κι όλα αυτά γιατί ο Wietse Venema θεώρησε καλό κάθε service να τρέχει με διαφορετικό χρήστη και να μην έχουν πρόσβαση στα ίδια πράγματα. Στα ίδια πρότυπα λειτουργεί και ο Timo Sirainen (dovecot).
Τώρα δεν φταίει αυτός - το αυτονόητο έκανε. Πρόσθεσε ασφάλεια!
Ο mail owner του postfix είναι ο postfix μα τα δικαιώματα που κληρονομούνται στις διεργασίες είναι του nobody.
Έτσι χθες κατέληξα στο πρόβλημα, πως ο nobody θα μιλήσει με τον dovecot που εκτελείτε ως postfix (για χάρη ευκολίας) . Μα o dovecot deliver πρέπει να μιλήσει στο auth-userdb για να πάρει το mail_location, το οποίο έχει και setuid κι όλα αυτά τρέχουν ως root.
Μα ακόμα κι εάν τα έφτιαξα όλα αυτά … έφτασα στο συμπέρασμα ότι οι virtual users, ανήκουν σε διαφορετικό uid/gid και δεν μπορεί να τα παραδώσει εν τέλη! Οπότε πρέπει να διορθώσω κι αυτό …
Αλλά μετά από όλα αυτά - έπαιξε !!!
Για κάθε αλλαγή στο dovecot userdb, θα πρέπει να κάνω μια παρόμοια αλλαγή στο /etc/aliases. ΑΛΛΑ δεν χρειάζεται να αλλάξω κάτι στην αρχιτεκτονική ή στα configuration files των δαιμόνων.
