Below my personal settings -as of today- for LibreDNS using systemd-resolved service for DNS resolution.
sudo vim /etc/systemd/resolved.conf
basic settings
[Resolve]
DNS=116.202.176.26:854#dot.libredns.gr
DNSOverTLS=yes
FallbackDNS=88.198.92.222
Cache=yes
apply
sudo systemctl restart systemd-resolved.service
verify
resolvectl query analytics.google.com

analytics.google.com: 0.0.0.0                  -- link: eth0

-- Information acquired via protocol DNS in 144.7ms.
-- Data is authenticated: no; Data was acquired via local or encrypted transport: yes
-- Data from: network
Explain Settings
DNS setting
DNS=116.202.176.26:854#dot.libredns.gr
We declare the IP of our DoT service. Using : as a separator we add the no-ads TCP port of DoT, 854. We also need to add our domain in the end to tell systemd-resolved that this IP should respond to dot.libredns.gr
Dns Over TLS
DNSOverTLS=yes
The usually setting is yes. In older systemd versions you can also select opportunistic.
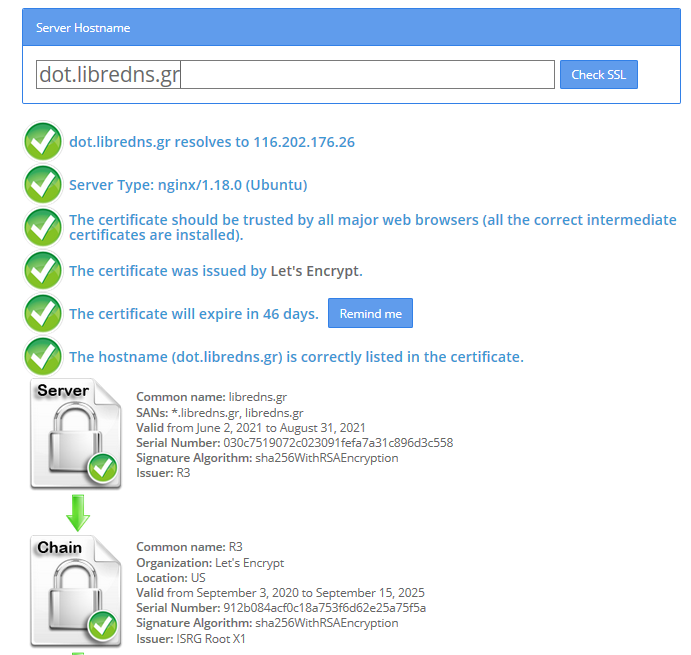
As we are using Lets Encrypt systemd-resolved can not verify (by default) the IP inside the certificate. The type of certificate can verify the domain dot.libredns.gr but we are asking the IP: 116.202.176.26 and this is another type of certificate that is not free. In order to “fix” this , we added the #dot.libredns.gr in the above setting.
FallBack
Yes not everything has Five nines so you may need a fall back dns to .. fall. Be aware this is cleartext traffic! Not encrypted.
FallbackDNS=88.198.92.222
Cache
Last but not least, caching your queries can give provide you with an additional speed when browsing the internet ! You already asked this a few seconds ago, why not caching it on your local system?
Cache=yes
to give you an example
resolvectl query analytics.google.com

analytics.google.com: 0.0.0.0                  -- link: eth0

-- Information acquired via protocol DNS in 144.7ms.
-- Data is authenticated: no; Data was acquired via local or encrypted transport: yes
-- Data from: network
second time:
resolvectl query analytics.google.com
analytics.google.com: 0.0.0.0                  -- link: eth0

-- Information acquired via protocol DNS in 2.3ms.
-- Data is authenticated: no; Data was acquired via local or encrypted transport: yes
-- Data from: cacheIn this blog post I will describe the easiest installation of a DoH/DoT VM for personal use, using dnsdist.
Next I will present a full installation example (from start) with dnsdist and PowerDNS.
Server Notes: Ubuntu 18.04
Client Notes: Archlinux
Every
{{ }}is a variable you need to change.
Do NOT copy/paste without making the changes.
Login to VM
and became root
$ ssh {{ VM }}
$ sudo -i
from now on, we are running commands as root.
TLDR;
dnsdist DoH/DoT
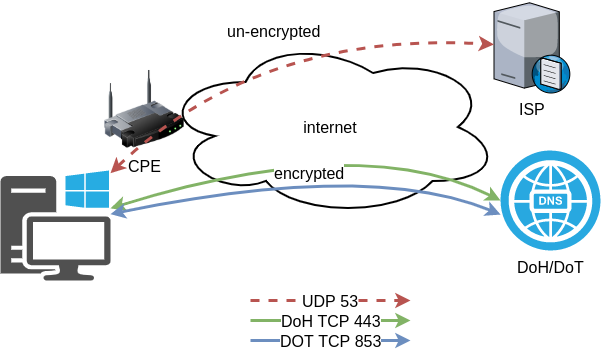
If you just need your own DoH and DoT instance, then dnsdist will forward your cleartext queries to another public DNS server with the below configuration.
cat > /etc/dnsdist/dnsdist.conf <<EOF

-- resets the list to this array
setACL("::/0")
addACL("0.0.0.0/0")

addDOHLocal('0.0.0.0', '/etc/dnsdist/fullchain.pem', '/etc/dnsdist/privkey.pem')
addTLSLocal('0.0.0.0', '/etc/dnsdist/fullchain.pem', '/etc/dnsdist/privkey.pem')

newServer({address="9.9.9.9:53"})
EOF
You will need -of course- to have your certificates before hand.
That’s It !
a DoH/DoT using dnsdist and powerdns
For people that need a more in-depth article, here are my notes on how to setup from scratch an entire VM with powerdns recursor and dnsdist.
Let’s Begin:
Enable PowerDNS Repos
Add key
curl -sL https://repo.powerdns.com/FD380FBB-pub.asc | apt-key add -
OK
Create PowerDNS source list
cat > /etc/apt/sources.list.d/powerdns.list <<EOF
deb [arch=amd64] http://repo.powerdns.com/ubuntu bionic-dnsdist-14 main
deb [arch=amd64] http://repo.powerdns.com/ubuntu bionic-rec-42 main
EOF

cat > /etc/apt/preferences.d/pdns <<EOF
Package: pdns-* dnsdist*
Pin: origin repo.powerdns.com
Pin-Priority: 600
EOF
Update System and Install packages
apt-get update
apt-get -qy install dnsdist pdns-recursor certbot
You may see errors from powerdns, like
failed: E: Sub-process /usr/bin/dpkg returned an error code (1)ignore them for the time being.
PowerDNS Recursor
We are going to setup our recursor first and let’s make it a little interesting.
PowerDNS Configuration
cat > /etc/powerdns/recursor.conf <<EOF
config-dir=/etc/powerdns
hint-file=/etc/powerdns/root.hints
local-address=127.0.0.1
local-port=5353
lua-dns-script=/etc/powerdns/pdns.lua
etc-hosts-file=/etc/powerdns/hosts.txt
export-etc-hosts=on
quiet=yes
setgid=pdns
setuid=pdns
EOF

chmod 0644 /etc/powerdns/recursor.conf
chown pdns:pdns /etc/powerdns/recursor.conf
Create a custom response
This will be handy for testing our dns from cli.
cat > /etc/powerdns/pdns.lua <<EOF
domainame = "test.{{ DOMAIN }}"
response  = "{{ VM_ipv4.address }}"

function nxdomain(dq)
    if dq.qname:equal(domainame) then
        dq.rcode=0 -- make it a normal answer
        dq:addAnswer(pdns.A, response)
        dq.variable = true -- disable packet cache
        return true
    end
    return false
end
EOF

chmod 0644 /etc/powerdns/pdns.lua
chown pdns:pdns /etc/powerdns/pdns.lua
AdBlock
Let’s make it more interesting, block trackers and ads.
cat > /usr/local/bin/update.stevenBlack.hosts.sh <<EOF
#!/bin/bash

# Get StevenBlack hosts
curl -sLo /tmp/hosts.txt https://raw.githubusercontent.com/StevenBlack/hosts/master/hosts

touch /etc/powerdns/hosts.txt

# Get diff
diff -q <(sort -V /etc/powerdns/hosts.txt | column -t) <(sort -V /tmp/hosts.txt | column -t)
DIFF_STATUS=$?

# Get Lines
LINES=`grep -c ^ /tmp/hosts.txt`

# Check & restart if needed
if [ "${LINES}" -gt "200" -a "${DIFF_STATUS}" != "0" ]; then
    mv -f /tmp/hosts.txt /etc/powerdns/hosts.txt
    chmod 0644 /etc/powerdns/hosts.txt
    chown pdns:pdns /etc/powerdns/hosts.txt
    systemctl restart pdns-recursor
fi

# vim: sts=2 sw=2 ts=2 et
EOF

chmod +x /usr/local/bin/update.stevenBlack.hosts.sh
/usr/local/bin/update.stevenBlack.hosts.sh
Be Careful with Copy/Paste. Check the
$dollar sign.
OpenNic Project
Is it possible to make it more interesting ?
Yes! by using OpenNIC Project, instead of the default root NS
cat > /usr/local/bin/update.root.hints.sh <<EOF
#!/bin/bash

# Get root hints
dig . NS @75.127.96.89 | egrep -v '^;|^$' > /tmp/root.hints

touch /etc/powerdns/root.hints

# Get diff
diff -q <(sort -V /etc/powerdns/root.hints | column -t) <(sort -V /tmp/root.hints | column -t)
DIFF_STATUS=$?

# Get Lines
LINES=`grep -c ^ /tmp/root.hints`

# Check & restart if needed
if [ "${LINES}" -gt "20" -a "${DIFF_STATUS}" != "0" ]; then
    mv -f /tmp/root.hints /etc/powerdns/root.hints
    chmod 0644 /etc/powerdns/root.hints
    chown pdns:pdns /etc/powerdns/root.hints
    systemctl restart pdns-recursor
fi

# vim: sts=2 sw=2 ts=2 et
EOF

chmod +x /usr/local/bin/update.root.hints.sh
/usr/local/bin/update.root.hints.sh
dnsdist
dnsdist is a DNS load balancer with enhanced features.
dnsdist configuration
cat > /etc/dnsdist/dnsdist.conf <<EOF
-- resets the list to this array
setACL("::/0")
addACL("0.0.0.0/0")

addDOHLocal('0.0.0.0', '/etc/dnsdist/fullchain.pem', '/etc/dnsdist/privkey.pem')
addTLSLocal('0.0.0.0', '/etc/dnsdist/fullchain.pem', '/etc/dnsdist/privkey.pem')

newServer({address="127.0.0.1:5353"})
EOF
Certbot
Now it is time to get a new certificate with the help of letsencrypt.
Replace
{{ DOMAIN }}with your domain
We need to create the post hook first and this is why we need to copy the certificates under dnsdist folder.
cat > /usr/local/bin/certbot_post_hook.sh <<EOF
#!/bin/bash

cp -f /etc/letsencrypt/live/{{ DOMAIN }}/*pem /etc/dnsdist/
systemctl restart dnsdist.service

# vim: sts=2 sw=2 ts=2 et
EOF

chmod +x /usr/local/bin/certbot_post_hook.sh
and of course create a certbot script.
Caveat: I have the dry-run option in the below script. When you are ready, remove it.
cat > /usr/local/bin/certbot.create.sh <<EOF
#!/bin/bash

certbot --dry-run --agree-tos --standalone certonly --register-unsafely-without-email
    --pre-hook 'systemctl stop dnsdist'
    --post-hook /usr/local/bin/certbot_post_hook.sh
    -d {{ DOMAIN }} -d doh.{{ DOMAIN }} -d dot.{{ DOMAIN }}

# vim: sts=2 sw=2 ts=2 et
EOF

chmod +x /usr/local/bin/certbot.create.sh
Firewall
Now open your firewall to the below TCP Ports:
ufw allow 80/tcp
ufw allow 443/tcp
ufw allow 853/tcp- TCP 80 for certbot
- TCP 443 for dnsdist (DoT) and certbot !
- TCP 853 for dnsdist (DoH)
Let’s Encrypt
When you are ready, run the script
/usr/local/bin/certbot.create.shThat’s it !
Client
For this blog post, my test settings are:
Domain: ipname.me
IP: 88.99.36.45
DoT - Client
From systemd 243+ there is an option to validate certificates on DoT but
systemd-resolved only validates the DNS server certificate if it is issued for the server’s IP address (a rare occurrence).
so it is best to use: opportunistic
/etc/systemd/resolved.conf [Resolve]
DNS=88.99.36.45
FallbackDNS=1.1.1.1
DNSSEC=no
#DNSOverTLS=yes
DNSOverTLS=opportunistic
Cache=yes
ReadEtcHosts=yessystemctl restart systemd-resolved
Query
resolvectl query test.ipname.me test.ipname.me: 88.99.36.45 -- link: eth0
-- Information acquired via protocol DNS in 1.9ms.
-- Data is authenticated: noDoH - Client
Firefox Settings
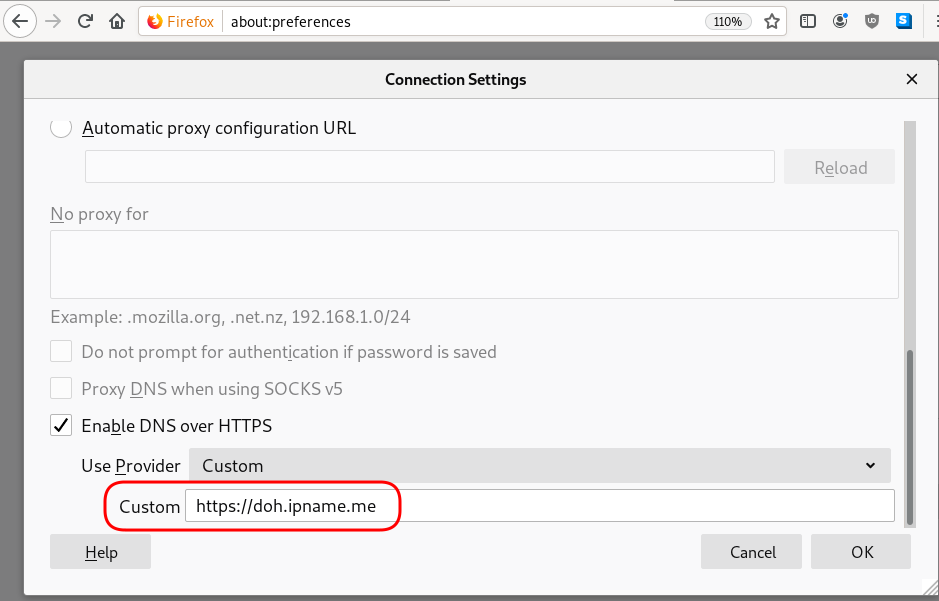
Firefox TRR
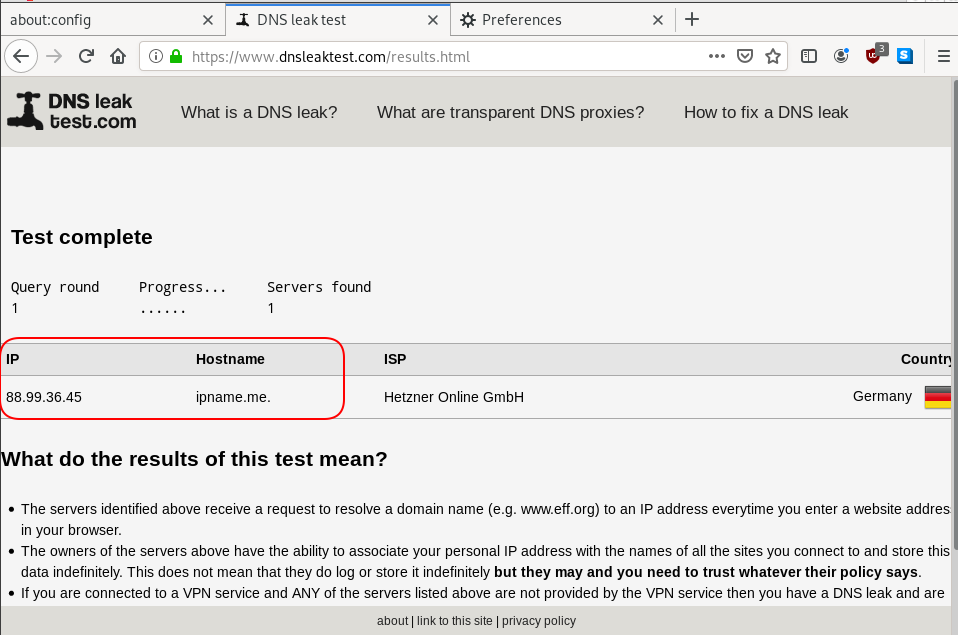
dnsleak
Click on DNS leak test site to verify
LibreOps & LibreDNS
LibreOps announced a new public service: LibreDNS, a new DoH/DoT (DNS over Https/DNS over TLS) free public service for people that want to bypass DNS restrictions and/or want to use TLS in their DNS queries. Firefox has already collaborated with Cloudflare for this case but I believe we can do better than using a centralized public service of a profit-company.
Personal Notes
So here are my personal notes for using LibreDNS in firefox
Firefox
Open Preferences/Options
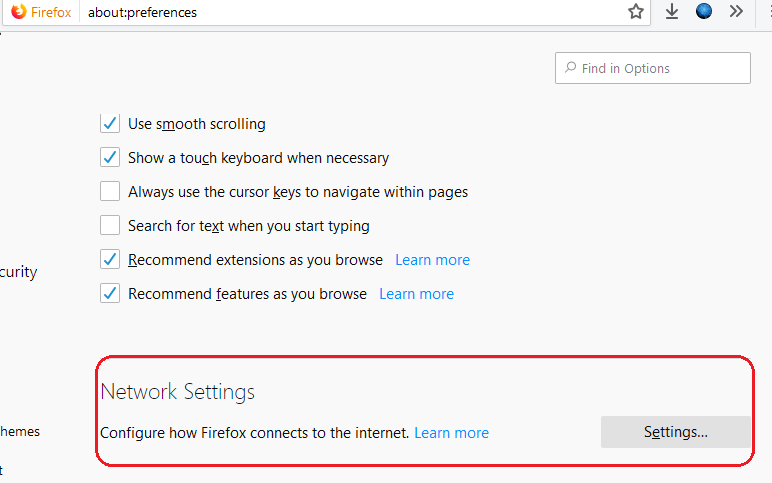
Enable DoH

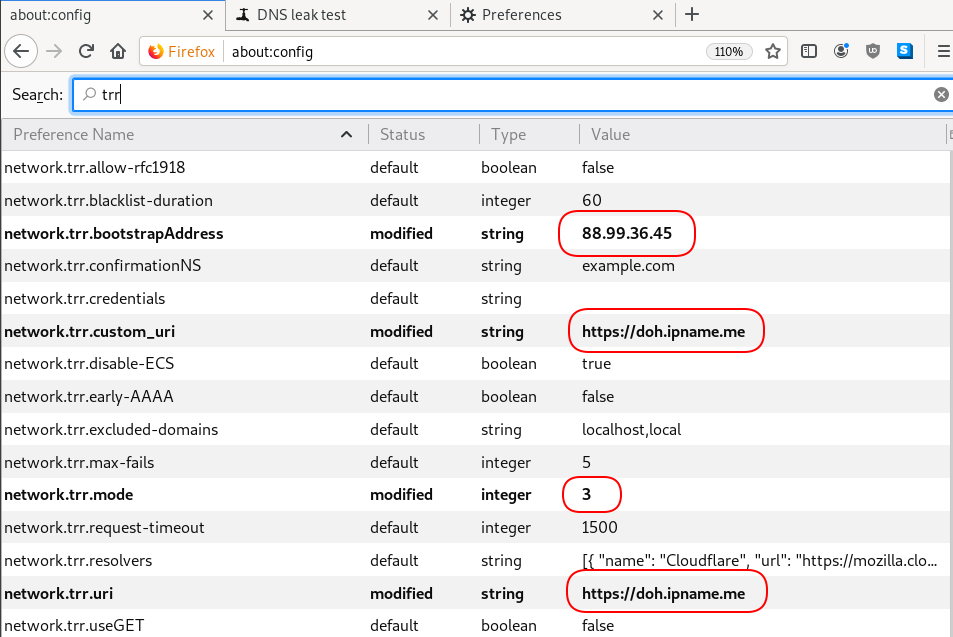
TRR mode 2
Now the tricky part.
TRR mode is 2 when you enable DoH. What does this mean?
2 is when firefox is trying to use DoH but if it fails (or timeout) then firefox will go back to ask your operating system’s DNS.
DoH is a URL, so the first time firefox needs to resolve doh.libredns.gr and it will ask your operating system for that.
host file
There is way to exclude doh.libredns.gr from DoH , and use your /etc/hosts file instead your local DNS and enable TRR mode to 3, which means you will ONLY use DoH service for DNS queries.
# grep doh.libredns.gr /etc/hosts
116.202.176.26 doh.libredns.gr
TRR mode 3
and in
about:config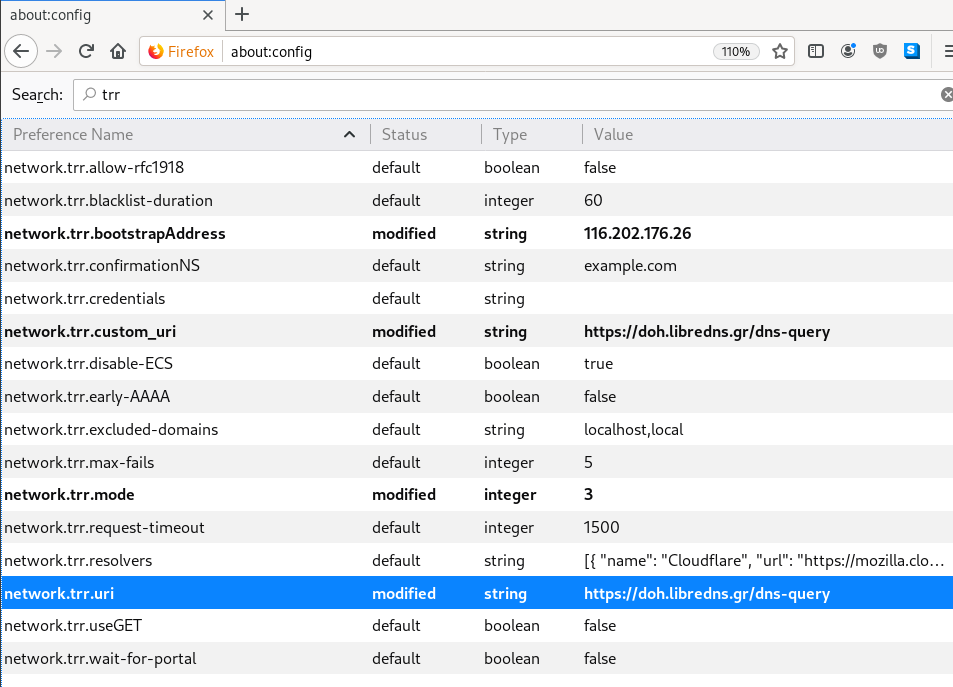
DNS Leak
Try DNS Leak Test to verify that your local ISP is NOT your firefox DNS
Thunderbird
Thunderbird also supports DoH and here are my settings
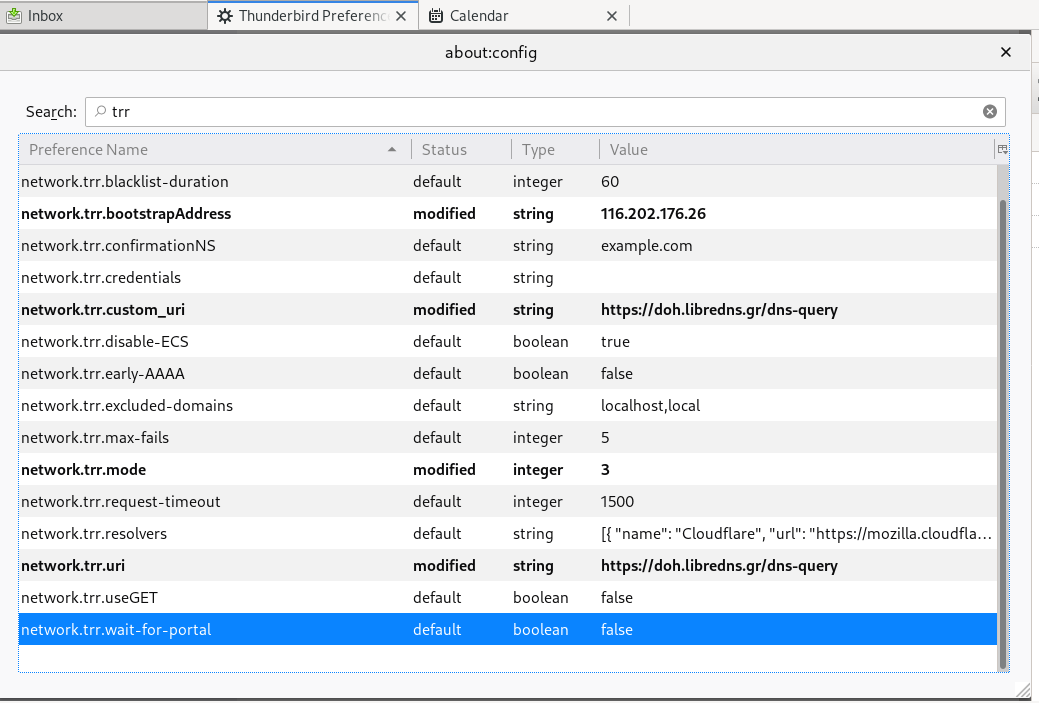
PS: Do not forget, this is NOT a global change, just your firefox will ask libredns for any dns query.