In the last few months of this year, a business question exists in all our minds:
-Can we reduce Cost ?
-Are there any legacy cloud resources that we can remove ?
The answer is YES, it is always Yes. It is part of your Technical Debt (remember that?).
In our case we had to check a few cloud resources, but the most impressive were our Object Storage Service that in the past we were using Buckets and Objects as backup volumes … for databases … database clusters!!
So let’s find out what is our Techinical Debt in our OBS … ~ 1.8PB . One petabyte holds 1000 terabytes (TB), One terabyte holds 1000 gigabytes (GB).
We have confirmed with our colleagues and scheduled the decomissions of these legacy buckets/objects. We’ve noticed that a few of them are in TB sizes with million of objects and in some cases with not a hierarchy structure (paths) so there is an issue with command line tools or web UI tools.
The problem is called LISTING and/or PAGING.
That means we can not list in a POSIX way (nerdsssss) all our objects so we can try delete them. We need to PAGE them in 50 or 100 objects and that means we need to batch our scripts. This could be a very long/time based job.
Then after a couple days of reading manuals (remember these ?), I found that we can create a Lifecycle Policy to our Buckets !!!
But before going on to setup the Lifecycle policy, just a quick reminder how the Object Lifecycle works
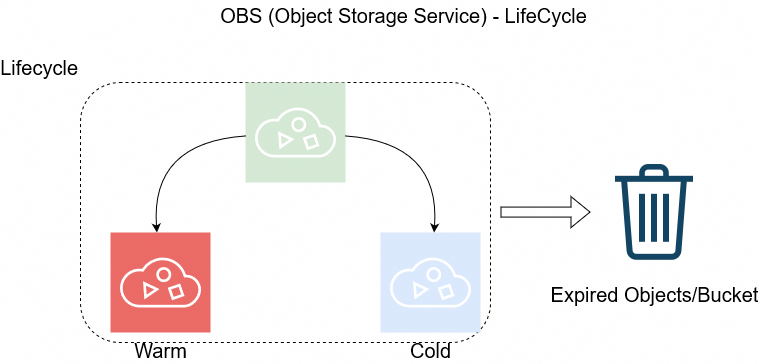
The objects can be in Warm/Cold or in Expired State as buckets support versioning. This has to do with the retention policy of logs/data.
So in order to automatically delete ALL objects from a bucket, we need to setup up the Expire Time to 1 day.
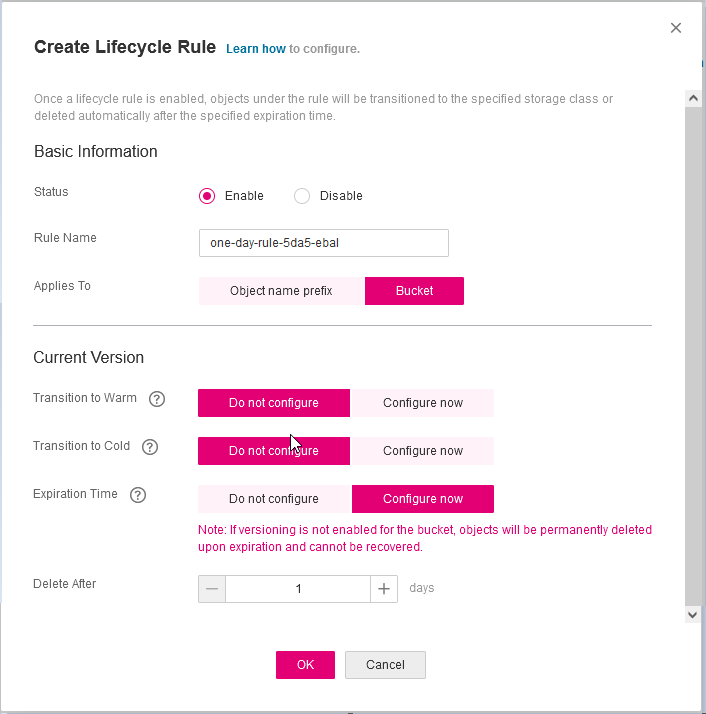
Then you have to wait for 24h and next day
yehhhhhhhhhhhh !
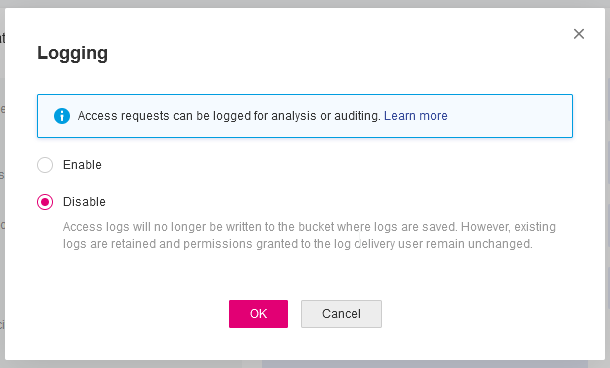
PS. Caveat Remember BEFORE all that, do disable Logging as the default setting is to log every action to a local log path, inside the Bucket.
In this blog post, I’ll try to share my personal notes on how to setup a kubernetes cluster with kubeadm on ubuntu 22.04 LTS Virtual Machines.
I am going to use three (3) Virtual Machines in my local lab. My home lab is based on libvirt Qemu/KVM (Kernel-based Virtual Machine) and I run Terraform as the infrastructure provision tool.
There is a copy of this blog post to github.
https://github.com/ebal/k8s_cluster
If you notice something wrong you can either contact me via the contact page, or open a PR in the github project.
you can also follow me at twitter: https://twitter.com/ebalaskas
Kubernetes, also known as K8s, is an open-source system for automating deployment, scaling, and management of containerized applications.
- Prerequisites
- Git Terraform Code for the kubernetes cluster
- Control-Plane Node
- Ports on the control-plane node
- Firewall on the control-plane node
- Hosts file in the control-plane node
- No Swap on the control-plane node
- Kernel modules on the control-plane node
- NeedRestart on the control-plane node
- Installing a Container Runtime on the control-plane node
- Installing kubeadm, kubelet and kubectl on the control-plane node
- Initializing the control-plane node
- Create user access config to the k8s control-plane node
- Verify the control-plane node
- Install an overlay network provider on the control-plane node
- Verify CoreDNS is running on the control-plane node
- Worker Nodes
- Ports on the worker nodes
- Firewall on the worker nodes
- Hosts file in the worker node
- No Swap on the worker node
- Kernel modules on the worker node
- NeedRestart on the worker node
- Installing a Container Runtime on the worker node
- Installing kubeadm, kubelet and kubectl on the worker node
- Get Token from the control-plane node
- Get Certificate Hash from the control-plane node
- Join Workers to the kubernetes cluster
- Is the kubernetes cluster running ?
- Kubernetes Dashboard
- Install kubernetes dashboard
- Add a Node Port to kubernetes dashboard
- Patch kubernetes-dashboard
- Edit kubernetes-dashboard Service
- Accessing Kubernetes Dashboard
- Create An Authentication Token (RBAC)
- Creating a Service Account
- Creating a ClusterRoleBinding
- Getting a Bearer Token
- Browsing Kubernetes Dashboard
- Nginx App
- That’s it !
Prerequisites
- at least 3 Virtual Machines of Ubuntu 22.04 (one for control-plane, two for worker nodes)
- 2GB (or more) of RAM on each Virtual Machine
- 2 CPUs (or more) on each Virtual Machine
- 20Gb of hard disk on each Virtual Machine
- No SWAP partition/image/file on each Virtual Machine
Git Terraform Code for the kubernetes cluster
I prefer to have a reproducible infrastructure, so I can very fast create and destroy my test lab. My preferable way of doing things is testing on each step, so I pretty much destroy everything, coping and pasting commands and keep on. I use terraform for the create the infrastructure. You can find the code for the entire kubernetes cluster here: k8s cluster - Terraform code.
If you do not use terraform, skip this step!
You can git clone the repo to review and edit it according to your needs.
git clone https://github.com/ebal/k8s_cluster.git
cd tf_libvirt
You will need to make appropriate changes. Open Variables.tf for that. The most important option to change, is the User option. Change it to your github username and it will download and setup the VMs with your public key, instead of mine!
But pretty much, everything else should work out of the box. Change the vmem and vcpu settings to your needs.
Init terraform before running the below shell script.
terraform init
and then run
./start.sh
output should be something like:
...
Apply complete! Resources: 16 added, 0 changed, 0 destroyed.

Outputs:

VMs = [
  "192.168.122.169  k8scpnode",
  "192.168.122.40   k8wrknode1",
  "192.168.122.8    k8wrknode2",
]
Verify that you have ssh access to the VMs
eg.
ssh -l ubuntu 192.168.122.169
replace the IP with what the output gave you.
Ubuntu 22.04 Image
If you noticed in the terraform code, I have the below declaration as the cloud image:
../jammy-server-cloudimg-amd64.img
that means, I’ve already downloaded it, in the upper directory to speed things up!
cd ../
curl -sLO https://cloud-images.ubuntu.com/jammy/current/focal-server-cloudimg-amd64.img
cd -
Control-Plane Node
Let’s us now start the configure of the k8s control-plane node.
Ports on the control-plane node
Kubernetes runs a few services that needs to be accessable from the worker nodes.
| Protocol | Direction | Port Range | Purpose | Used By |
|---|---|---|---|---|
| TCP | Inbound | 6443 | Kubernetes API server | All |
| TCP | Inbound | 2379-2380 | etcd server client API | kube-apiserver, etcd |
| TCP | Inbound | 10250 | Kubelet API | Self, Control plane |
| TCP | Inbound | 10259 | kube-scheduler | Self |
| TCP | Inbound | 10257 | kube-controller-manager | Self |
Although etcd ports are included in control plane section, you can also host your
own etcd cluster externally or on custom ports.
Firewall on the control-plane node
We need to open the necessary ports on the CP’s (control-plane node) firewall.
sudo ufw allow 6443/tcp
sudo ufw allow 2379:2380/tcp
sudo ufw allow 10250/tcp
sudo ufw allow 10259/tcp
sudo ufw allow 10257/tcp

#sudo ufw disable
sudo ufw status
the output should be
To                         Action      From
--                         ------      ----
22/tcp                     ALLOW       Anywhere
6443/tcp                   ALLOW       Anywhere
2379:2380/tcp              ALLOW       Anywhere
10250/tcp                  ALLOW       Anywhere
10259/tcp                  ALLOW       Anywhere
10257/tcp                  ALLOW       Anywhere
22/tcp (v6)                ALLOW       Anywhere (v6)
6443/tcp (v6)              ALLOW       Anywhere (v6)
2379:2380/tcp (v6)         ALLOW       Anywhere (v6)
10250/tcp (v6)             ALLOW       Anywhere (v6)
10259/tcp (v6)             ALLOW       Anywhere (v6)
10257/tcp (v6)             ALLOW       Anywhere (v6)
Hosts file in the control-plane node
We need to update the /etc/hosts with the internal IP and hostname.
This will help when it is time to join the worker nodes.
echo $(hostname -I) $(hostname) | sudo tee -a /etc/hosts
Just a reminder: we need to update the hosts file to all the VMs.
To include all the VMs’ IPs and hostnames.
If you already know them, then your /etc/hosts file should look like this:
192.168.122.169  k8scpnode
192.168.122.40   k8wrknode1
192.168.122.8    k8wrknode2
replace the IPs to yours.
No Swap on the control-plane node
Be sure that SWAP is disabled in all virtual machines!
sudo swapoff -a
and the fstab file should not have any swap entry.
The below command should return nothing.
sudo grep -i swap /etc/fstab
If not, edit the /etc/fstab and remove the swap entry.
If you follow my terraform k8s code example from the above github repo,
you will notice that there isn’t any swap entry in the cloud init (user-data) file.
Nevertheless it is always a good thing to douple check.
Kernel modules on the control-plane node
We need to load the below kernel modules on all k8s nodes, so k8s can create some network magic!
- overlay
- br_netfilter
Run the below bash snippet that will do that, and also will enable the forwarding features of the network.
sudo tee /etc/modules-load.d/kubernetes.conf <<EOF
overlay
br_netfilter
EOF

sudo modprobe overlay
sudo modprobe br_netfilter

sudo lsmod | grep netfilter

sudo tee /etc/sysctl.d/kubernetes.conf <<EOF
net.bridge.bridge-nf-call-ip6tables = 1
net.bridge.bridge-nf-call-iptables = 1
net.ipv4.ip_forward = 1
EOF

sudo sysctl --system
NeedRestart on the control-plane node
Before installing any software, we need to make a tiny change to needrestart program. This will help with the automation of installing packages and will stop asking -via dialog- if we would like to restart the services!
echo "\$nrconf{restart} = 'a';" | sudo tee -a /etc/needrestart/needrestart.conf
Installing a Container Runtime on the control-plane node
It is time to choose which container runtime we are going to use on our k8s cluster. There are a few container runtimes for k8s and in the past docker were used to. Nowadays the most common runtime is the containerd that can also uses the cgroup v2 kernel features. There is also a docker-engine runtime via CRI. Read here for more details on the subject.
curl -sL https://download.docker.com/linux/ubuntu/gpg | sudo gpg --dearmor -o /etc/apt/trusted.gpg.d/docker-keyring.gpg

sudo apt-add-repository -y "deb https://download.docker.com/linux/ubuntu jammy stable"

sleep 5

sudo apt -y install containerd.io

containerd config default                              \
 | sed 's/SystemdCgroup = false/SystemdCgroup = true/' \
 | sudo tee /etc/containerd/config.toml

sudo systemctl restart containerd.service
We have also enabled the
systemd cgroup driverso the control-plane node can use the cgroup v2 features.
Installing kubeadm, kubelet and kubectl on the control-plane node
Install the kubernetes packages (kubedam, kubelet and kubectl) by first adding the k8s repository on our virtual machine. To speed up the next step, we will also download the configuration container images.
sudo curl -sLo /etc/apt/trusted.gpg.d/kubernetes-keyring.gpg https://packages.cloud.google.com/apt/doc/apt-key.gpg

sudo apt-add-repository -y "deb http://apt.kubernetes.io/ kubernetes-xenial main"

sleep 5

sudo apt install -y kubelet kubeadm kubectl

sudo kubeadm config images pull
Initializing the control-plane node
We can now initialize our control-plane node for our kubernetes cluster.
There are a few things we need to be careful about:
- We can specify the control-plane-endpoint if we are planning to have a high available k8s cluster. (we will skip this for now),
- Choose a Pod network add-on (next section) but be aware that CoreDNS (DNS and Service Discovery) will not run till then (later),
- define where is our container runtime socket (we will skip it)
- advertise the API server (we will skip it)
But we will define our Pod Network CIDR to the default value of the Pod network add-on so everything will go smoothly later on.
sudo kubeadm init --pod-network-cidr=10.244.0.0/16
Keep the output in a notepad.
Create user access config to the k8s control-plane node
Our k8s control-plane node is running, so we need to have credentials to access it.
The kubectl reads a configuration file (that has the token), so we copying this from k8s admin.
rm -rf $HOME/.kube

mkdir -p $HOME/.kube

sudo cp -i /etc/kubernetes/admin.conf $HOME/.kube/config

sudo chown $(id -u):$(id -g) $HOME/.kube/config

ls -la $HOME/.kube/config

alias k="kubectl"
Verify the control-plane node
Verify that the kubernets is running.
That means we have a k8s cluster - but only the control-plane node is running.
kubectl cluster-info
#kubectl cluster-info dump

k get nodes -o wide; k get pods  -A -o wide
Install an overlay network provider on the control-plane node
As I mentioned above, in order to use the DNS and Service Discovery services in the kubernetes (CoreDNS) we need to install a Container Network Interface (CNI) based Pod network add-on so that your Pods can communicate with each other.
We will use flannel as the simplest of them.
k apply -f https://raw.githubusercontent.com/coreos/flannel/master/Documentation/kube-flannel.yml
Verify CoreDNS is running on the control-plane node
Verify that the control-plane node is Up & Running and the control-plane pods (as coredns pods) are also running
$ k get nodes -o wide

NAME        STATUS   ROLES           AGE   VERSION   INTERNAL-IP       EXTERNAL-IP   OS-IMAGE             KERNEL-VERSION      CONTAINER-RUNTIME
k8scpnode   Ready    control-plane   54s   v1.25.0   192.168.122.169   <none>        Ubuntu 22.04.1 LTS   5.15.0-46-generic   containerd://1.6.8
$ k get pods -A -o wide

NAMESPACE    NAME                              READY STATUS  RESTARTS AGE IP              NODE      NOMINATED NODE READINESS GATES
kube-flannel kube-flannel-ds-zqv2b             1/1   Running 0        36s 192.168.122.169 k8scpnode <none>         <none>
kube-system  coredns-565d847f94-lg54q          1/1   Running 0        38s 10.244.0.2      k8scpnode <none>         <none>
kube-system  coredns-565d847f94-ms8zk          1/1   Running 0        38s 10.244.0.3      k8scpnode <none>         <none>
kube-system  etcd-k8scpnode                    1/1   Running 0        50s 192.168.122.169 k8scpnode <none>         <none>
kube-system  kube-apiserver-k8scpnode          1/1   Running 0        50s 192.168.122.169 k8scpnode <none>         <none>
kube-system  kube-controller-manager-k8scpnode 1/1   Running 0        50s 192.168.122.169 k8scpnode <none>         <none>
kube-system  kube-proxy-pv7tj                  1/1   Running 0        39s 192.168.122.169 k8scpnode <none>         <none>
kube-system  kube-scheduler-k8scpnode          1/1   Running 0        50s 192.168.122.169 k8scpnode <none>         <none>
That’s it with the control-plane node !
Worker Nodes
The below instructions works pretty much the same on both worker nodes.
I will document the steps for the worker1 node but do the same for the worker2 node.
Ports on the worker nodes
As we learned above on the control-plane section, kubernetes runs a few services
| Protocol | Direction | Port Range | Purpose | Used By |
|---|---|---|---|---|
| TCP | Inbound | 10250 | Kubelet API | Self, Control plane |
| TCP | Inbound | 30000-32767 | NodePort Services | All |
Firewall on the worker nodes
so we need to open the necessary ports on the worker nodes too.
sudo ufw allow 10250/tcp
sudo ufw allow 30000:32767/tcp

sudo ufw status
output should look like
To                         Action      From
--                         ------      ----
22/tcp                     ALLOW       Anywhere
10250/tcp                  ALLOW       Anywhere
30000:32767/tcp            ALLOW       Anywhere
22/tcp (v6)                ALLOW       Anywhere (v6)
10250/tcp (v6)             ALLOW       Anywhere (v6)
30000:32767/tcp (v6)       ALLOW       Anywhere (v6)
The next few steps are pretty much exactly the same as in the control-plane node.
In order to keep this documentation short, I’ll just copy/paste the commands.
Hosts file in the worker node
Update the /etc/hosts file to include the IPs and hostname of all VMs.
192.168.122.169  k8scpnode
192.168.122.40   k8wrknode1
192.168.122.8    k8wrknode2
No Swap on the worker node
sudo swapoff -a
Kernel modules on the worker node
sudo tee /etc/modules-load.d/kubernetes.conf <<EOF
overlay
br_netfilter
EOF

sudo modprobe overlay
sudo modprobe br_netfilter

sudo lsmod | grep netfilter

sudo tee /etc/sysctl.d/kubernetes.conf <<EOF
net.bridge.bridge-nf-call-ip6tables = 1
net.bridge.bridge-nf-call-iptables = 1
net.ipv4.ip_forward = 1
EOF

sudo sysctl --system
NeedRestart on the worker node
echo "\$nrconf{restart} = 'a';" | sudo tee -a /etc/needrestart/needrestart.conf
Installing a Container Runtime on the worker node
curl -sL https://download.docker.com/linux/ubuntu/gpg | sudo gpg --dearmor -o /etc/apt/trusted.gpg.d/docker-keyring.gpg

sudo apt-add-repository -y "deb https://download.docker.com/linux/ubuntu jammy stable"

sleep 5

sudo apt -y install containerd.io

containerd config default                              \
 | sed 's/SystemdCgroup = false/SystemdCgroup = true/' \
 | sudo tee /etc/containerd/config.toml

sudo systemctl restart containerd.service
Installing kubeadm, kubelet and kubectl on the worker node
sudo curl -sLo /etc/apt/trusted.gpg.d/kubernetes-keyring.gpg https://packages.cloud.google.com/apt/doc/apt-key.gpg

sudo apt-add-repository -y "deb http://apt.kubernetes.io/ kubernetes-xenial main"

sleep 5

sudo apt install -y kubelet kubeadm kubectl

sudo kubeadm config images pull
Get Token from the control-plane node
To join nodes to the kubernetes cluster, we need to have a couple of things.
- a token from control-plane node
- the CA certificate hash from the contol-plane node.
If you didnt keep the output the initialization of the control-plane node, that’s okay.
Run the below command in the control-plane node.
sudo kubeadm token list
and we will get the initial token that expires after 24hours.
TOKEN                     TTL         EXPIRES                USAGES                   DESCRIPTION                                                EXTRA GROUPS
zt36bp.uht4cziweef1jo1h   23h         2022-08-31T18:38:16Z   authentication,signing   The default bootstrap token generated by 'kubeadm init'.   system:bootstrappers:kubeadm:default-node-token
In this case is the
zt36bp.uht4cziweef1jo1hGet Certificate Hash from the control-plane node
To get the CA certificate hash from the control-plane-node, we need to run a complicated command:
openssl x509 -pubkey -in /etc/kubernetes/pki/ca.crt | openssl rsa -pubin -outform der 2>/dev/null | openssl dgst -sha256 -hex | sed 's/^.* //'
and in my k8s cluster is:
a4833f8c82953370610efaa5ed93b791337232c3a948b710b2435d747889c085Join Workers to the kubernetes cluster
So now, we can Join our worker nodes to the kubernetes cluster.
Run the below command on both worker nodes:
sudo kubeadm join 192.168.122.169:6443 \
       --token zt36bp.uht4cziweef1jo1h \
       --discovery-token-ca-cert-hash sha256:a4833f8c82953370610efaa5ed93b791337232c3a948b710b2435d747889c085
we get this message
Run ‘kubectl get nodes’ on the control-plane to see this node join the cluster.
Is the kubernetes cluster running ?
We can verify that
kubectl get nodes   -o wide
kubectl get pods -A -o wide
NAME         STATUS   ROLES           AGE     VERSION   INTERNAL-IP       EXTERNAL-IP   OS-IMAGE             KERNEL-VERSION      CONTAINER-RUNTIME
k8scpnode    Ready    control-plane   64m     v1.25.0   192.168.122.169   <none>        Ubuntu 22.04.1 LTS   5.15.0-46-generic   containerd://1.6.8
k8wrknode1   Ready    <none>          2m32s   v1.25.0   192.168.122.40    <none>        Ubuntu 22.04.1 LTS   5.15.0-46-generic   containerd://1.6.8
k8wrknode2   Ready    <none>          2m28s   v1.25.0   192.168.122.8     <none>        Ubuntu 22.04.1 LTS   5.15.0-46-generic   containerd://1.6.8
NAMESPACE NAME READY STATUS RESTARTS AGE IP NODE NOMINATED NODE READINESS GATES
kube-flannel kube-flannel-ds-52g92 1/1 Running 0 2m32s 192.168.122.40 k8wrknode1 <none> <none>
kube-flannel kube-flannel-ds-7qlm7 1/1 Running 0 2m28s 192.168.122.8 k8wrknode2 <none> <none>
kube-flannel kube-flannel-ds-zqv2b 1/1 Running 0 64m 192.168.122.169 k8scpnode <none> <none>
kube-system coredns-565d847f94-lg54q 1/1 Running 0 64m 10.244.0.2 k8scpnode <none> <none>
kube-system coredns-565d847f94-ms8zk 1/1 Running 0 64m 10.244.0.3 k8scpnode <none> <none>
kube-system etcd-k8scpnode 1/1 Running 0 64m 192.168.122.169 k8scpnode <none> <none>
kube-system kube-apiserver-k8scpnode 1/1 Running 0 64m 192.168.122.169 k8scpnode <none> <none>
kube-system kube-controller-manager-k8scpnode 1/1 Running 1 (12m ago) 64m 192.168.122.169 k8scpnode <none> <none>
kube-system kube-proxy-4khw6 1/1 Running 0 2m32s 192.168.122.40 k8wrknode1 <none> <none>
kube-system kube-proxy-gm27l 1/1 Running 0 2m28s 192.168.122.8 k8wrknode2 <none> <none>
kube-system kube-proxy-pv7tj 1/1 Running 0 64m 192.168.122.169 k8scpnode <none> <none>
kube-system kube-scheduler-k8scpnode 1/1 Running 1 (12m ago) 64m 192.168.122.169 k8scpnode <none> <none>
That’s it !
Our k8s cluster is running.
Kubernetes Dashboard
is a general purpose, web-based UI for Kubernetes clusters. It allows users to manage applications running in the cluster and troubleshoot them, as well as manage the cluster itself.
We can proceed by installing a k8s dashboard to our k8s cluster.
Install kubernetes dashboard
One simple way to install the kubernetes-dashboard, is by applying the latest (as of this writing) yaml configuration file.
kubectl apply -f https://raw.githubusercontent.com/kubernetes/dashboard/v2.6.1/aio/deploy/recommended.yaml
the output of the above command should be something like
namespace/kubernetes-dashboard created
serviceaccount/kubernetes-dashboard created
service/kubernetes-dashboard created
secret/kubernetes-dashboard-certs created
secret/kubernetes-dashboard-csrf created
secret/kubernetes-dashboard-key-holder created
configmap/kubernetes-dashboard-settings created
role.rbac.authorization.k8s.io/kubernetes-dashboard created
clusterrole.rbac.authorization.k8s.io/kubernetes-dashboard created
rolebinding.rbac.authorization.k8s.io/kubernetes-dashboard created
clusterrolebinding.rbac.authorization.k8s.io/kubernetes-dashboard created
deployment.apps/kubernetes-dashboard created
service/dashboard-metrics-scraper created
deployment.apps/dashboard-metrics-scraper created
Verify the installation
kubectl get all -n kubernetes-dashboard
NAME                                             READY   STATUS    RESTARTS   AGE
pod/dashboard-metrics-scraper-64bcc67c9c-kvll7   1/1     Running   0          2m16s
pod/kubernetes-dashboard-66c887f759-rr4gn        1/1     Running   0          2m16s

NAME                                TYPE        CLUSTER-IP      EXTERNAL-IP   PORT(S)    AGE
service/dashboard-metrics-scraper   ClusterIP   10.110.25.61    <none>        8000/TCP   2m16s
service/kubernetes-dashboard        ClusterIP   10.100.65.122   <none>        443/TCP    2m16s

NAME                                        READY   UP-TO-DATE   AVAILABLE   AGE
deployment.apps/dashboard-metrics-scraper   1/1     1            1           2m16s
deployment.apps/kubernetes-dashboard        1/1     1            1           2m16s

NAME                                                   DESIRED   CURRENT   READY   AGE
replicaset.apps/dashboard-metrics-scraper-64bcc67c9c   1         1         1       2m16s
replicaset.apps/kubernetes-dashboard-66c887f759        1         1         1       2m16s
Add a Node Port to kubernetes dashboard
Kubernetes Dashboard by default runs on a internal 10.x.x.x IP.
To access the dashboard we need to have a NodePort in the kubernetes-dashboard service.
We can either Patch the service or edit the yaml file.
Patch kubernetes-dashboard
kubectl --namespace kubernetes-dashboard patch svc kubernetes-dashboard -p '{"spec": {"type": "NodePort"}}'
output
service/kubernetes-dashboard patched
verify the service
kubectl get svc -n kubernetes-dashboard
NAME                        TYPE        CLUSTER-IP      EXTERNAL-IP   PORT(S)         AGE
dashboard-metrics-scraper   ClusterIP   10.110.25.61    <none>        8000/TCP        11m
kubernetes-dashboard        NodePort    10.100.65.122   <none>        443:32709/TCP   11m
we can see the 30480 in the kubernetes-dashboard.
Edit kubernetes-dashboard Service
kubectl edit svc -n kubernetes-dashboard kubernetes-dashboard
and chaning the service type from
type: ClusterIPto
type: NodePortAccessing Kubernetes Dashboard
The kubernetes-dashboard has two (2) pods, one (1) for metrics, one (2) for the dashboard.
To access the dashboard, first we need to identify in which Node is running.
kubectl get pods -n kubernetes-dashboard -o wide
NAME                                         READY   STATUS    RESTARTS   AGE     IP           NODE         NOMINATED NODE   READINESS GATES
dashboard-metrics-scraper-64bcc67c9c-fs7pt   1/1     Running   0          2m43s   10.244.1.9   k8wrknode1   <none>           <none>
kubernetes-dashboard-66c887f759-pzt4z        1/1     Running   0          2m44s   10.244.2.9   k8wrknode2   <none>           <none>
In my setup the dashboard pod is running on the worker node 2 and from the /etc/hosts is on the 192.168.122.8 IP.
The NodePort is 32709
k get svc -n kubernetes-dashboard -o wide
So, we can open a new tab on our browser and type:
https://192.168.122.8:32709
and accept the self-signed certificate!
Create An Authentication Token (RBAC)
Last step for the kubernetes-dashboard is to create an authentication token.
Creating a Service Account
Create a new yaml file, with kind: ServiceAccount that has access to kubernetes-dashboard namespace and has name: admin-user.
cat > kubernetes-dashboard.ServiceAccount.yaml <<EOF
apiVersion: v1
kind: ServiceAccount
metadata:
  name: admin-user
  namespace: kubernetes-dashboard

EOF
add this service account to the k8s cluster
kubectl apply -f kubernetes-dashboard.ServiceAccount.yaml
output
serviceaccount/admin-user createdCreating a ClusterRoleBinding
We need to bind the Service Account with the kubernetes-dashboard via Role-based access control.
cat > kubernetes-dashboard.ClusterRoleBinding.yaml <<EOF
apiVersion: rbac.authorization.k8s.io/v1
kind: ClusterRoleBinding
metadata:
  name: admin-user
roleRef:
  apiGroup: rbac.authorization.k8s.io
  kind: ClusterRole
  name: cluster-admin
subjects:
- kind: ServiceAccount
  name: admin-user
  namespace: kubernetes-dashboard

EOF
apply this yaml file
kubectl apply -f kubernetes-dashboard.ClusterRoleBinding.yaml
clusterrolebinding.rbac.authorization.k8s.io/admin-user created
That means, our Service Account User has all the necessary roles to access the kubernetes-dashboard.
Getting a Bearer Token
Final step is to create/get a token for our user.
kubectl -n kubernetes-dashboard create token admin-user
eyJhbGciOiJSUzI1NiIsImtpZCI6Im04M2JOY2k1Yk1hbFBhLVN2cjA4X1pkdktXNldqWkR4bjB6MGpTdFgtVHcifQ.eyJhdWQiOlsiaHR0cHM6Ly9rdWJlcm5ldGVzLmRlZmF1bHQuc3ZjLmNsdXN0ZXIubG9jYWwiXSwiZXhwIjoxNjYxOTU2NDQ1LCJpYXQiOjE2NjE5NTI4NDUsImlzcyI6Imh0dHBzOi8va3ViZXJuZXRlcy5kZWZhdWx0LnN2Yy5jbHVzdGVyLmxvY2FsIiwia3ViZXJuZXRlcy5pbyI6eyJuYW1lc3BhY2UiOiJrdWJlcm5ldGVzLWRhc2hib2FyZCIsInNlcnZpY2VhY2NvdW50Ijp7Im5hbWUiOiJhZG1pbi11c2VyIiwidWlkIjoiN2M4OWIyZDktMGIwYS00ZDg4LTk2Y2EtZDU3NjhjOWU2ZGYxIn19LCJuYmYiOjE2NjE5NTI4NDUsInN1YiI6InN5c3RlbTpzZXJ2aWNlYWNjb3VudDprdWJlcm5ldGVzLWRhc2hib2FyZDphZG1pbi11c2VyIn0.RMRQkZZhcoC5vCvck6hKfqXJ4dfN4JoQyAaClHZvOMI6JgQZEfB2-_Qsh5MfFApJUEit-0TX9r3CzW3JqvB7dmpTPxUQvHK68r82WGveBVp1wF37UyXu_IzxiCQzpCWYr3GcVGAGZVBbhhqNYm765FV02ZA_khHrW3WpB80ikhm_TNLkOS6Llq2UiLFZyHHmjl5pwvGzT7YXZe8s-llZSgc0UenEwPG-82eE279oOy6r4_NltoV1HB3uu0YjUJPlkqAPnHuSfAA7-8A3XAAVHhRQvFPea1qZLc4-oD24AcU0FjWqDMILEyE8zaD2ci8zEQBMoxcf2qmj0wn9cfbZwQ
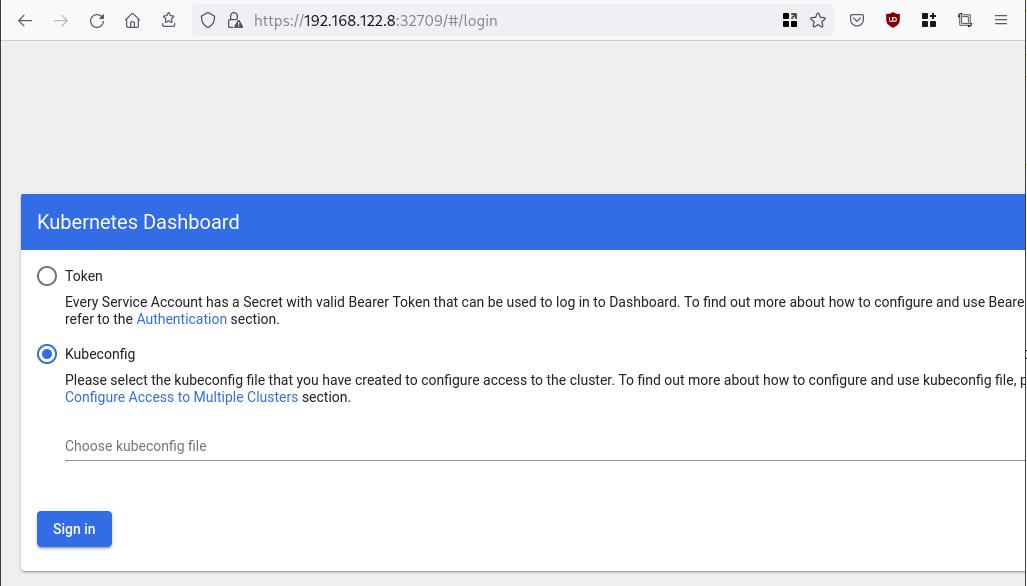
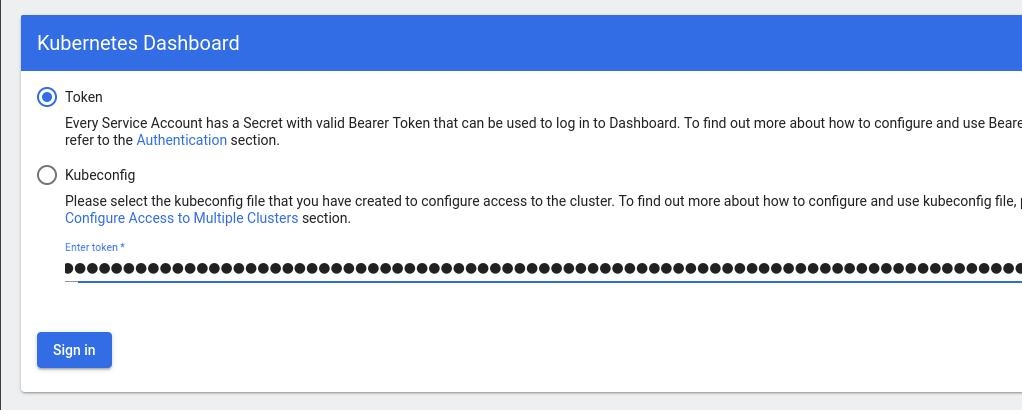
Add this token to the previous login page
Browsing Kubernetes Dashboard
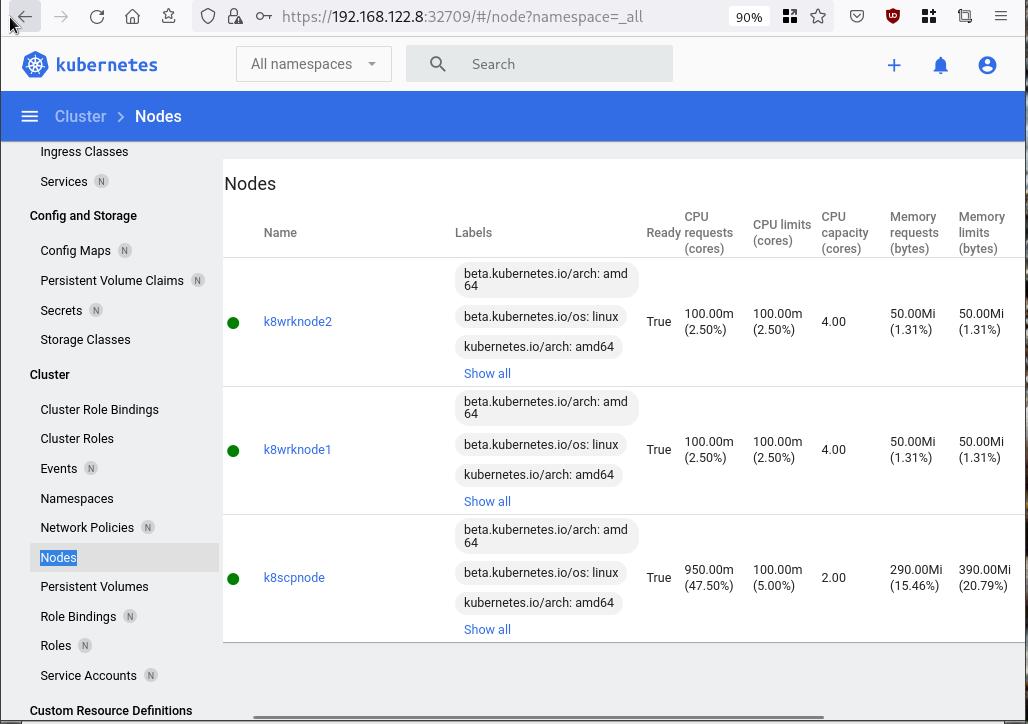
eg. Cluster –> Nodes
Nginx App
Before finishing this blog post, I would also like to share how to install a simple nginx-app as it is customary to do such thing in every new k8s cluster.
But plz excuse me, I will not get into much details.
You should be able to understand the below k8s commands.
Install nginx-app
kubectl create deployment nginx-app --image=nginx --replicas=2
deployment.apps/nginx-app createdGet Deployment
kubectl get deployment nginx-app -o wideNAME READY UP-TO-DATE AVAILABLE AGE CONTAINERS IMAGES SELECTOR
nginx-app 2/2 2 2 64s nginx nginx app=nginx-appExpose Nginx-App
kubectl expose deployment nginx-app --type=NodePort --port=80
service/nginx-app exposedVerify Service nginx-app
kubectl get svc nginx-app -o wide
NAME        TYPE       CLUSTER-IP      EXTERNAL-IP   PORT(S)        AGE   SELECTOR
nginx-app   NodePort   10.98.170.185   <none>        80:31761/TCP   27s   app=nginx-app
Describe Service nginx-app
kubectl describe svc nginx-app
Name:                     nginx-app
Namespace:                default
Labels:                   app=nginx-app
Annotations:              <none>
Selector:                 app=nginx-app
Type:                     NodePort
IP Family Policy:         SingleStack
IP Families:              IPv4
IP:                       10.98.170.185
IPs:                      10.98.170.185
Port:                     <unset>  80/TCP
TargetPort:               80/TCP
NodePort:                 <unset>  31761/TCP
Endpoints:                10.244.1.10:80,10.244.2.10:80
Session Affinity:         None
External Traffic Policy:  Cluster
Events:                   <none>
Curl Nginx-App
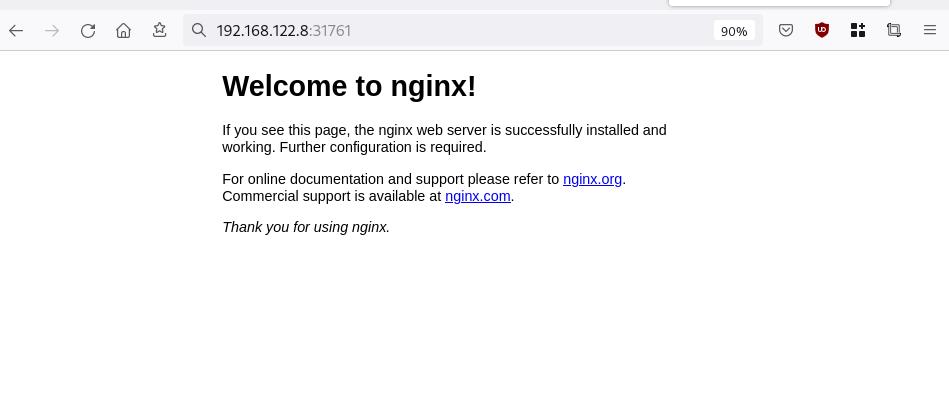
curl http://192.168.122.8:31761
<!DOCTYPE html>
<html>
<head>
<title>Welcome to nginx!</title>
<style>
html { color-scheme: light dark; }
body { width: 35em; margin: 0 auto;
font-family: Tahoma, Verdana, Arial, sans-serif; }
</style>
</head>
<body>
<h1>Welcome to nginx!</h1>
<p>If you see this page, the nginx web server is successfully installed and
working. Further configuration is required.</p>

<p>For online documentation and support please refer to
<a href="http://nginx.org/">nginx.org</a>.<br/>
Commercial support is available at
<a href="http://nginx.com/">nginx.com</a>.</p>

<p><em>Thank you for using nginx.</em></p>
</body>
</html>
Nginx-App from Browser
That’s it !
I hope you enjoyed this blog post.
-ebal
./destroy.sh...
libvirt_domain.domain-ubuntu["k8wrknode1"]: Destroying... [id=446cae2a-ce14-488f-b8e9-f44839091bce]
libvirt_domain.domain-ubuntu["k8scpnode"]: Destroying... [id=51e12abb-b14b-4ab8-b098-c1ce0b4073e3]
time_sleep.wait_for_cloud_init: Destroying... [id=2022-08-30T18:02:06Z]
libvirt_domain.domain-ubuntu["k8wrknode2"]: Destroying... [id=0767fb62-4600-4bc8-a94a-8e10c222b92e]
time_sleep.wait_for_cloud_init: Destruction complete after 0s
libvirt_domain.domain-ubuntu["k8wrknode1"]: Destruction complete after 1s
libvirt_domain.domain-ubuntu["k8scpnode"]: Destruction complete after 1s
libvirt_domain.domain-ubuntu["k8wrknode2"]: Destruction complete after 1s
libvirt_cloudinit_disk.cloud-init["k8wrknode1"]: Destroying... [id=/var/lib/libvirt/images/Jpw2Sg_cloud-init.iso;b8ddfa73-a770-46de-ad16-b0a5a08c8550]
libvirt_cloudinit_disk.cloud-init["k8wrknode2"]: Destroying... [id=/var/lib/libvirt/images/VdUklQ_cloud-init.iso;5511ed7f-a864-4d3f-985a-c4ac07eac233]
libvirt_volume.ubuntu-base["k8scpnode"]: Destroying... [id=/var/lib/libvirt/images/l5Rr1w_ubuntu-base]
libvirt_volume.ubuntu-base["k8wrknode2"]: Destroying... [id=/var/lib/libvirt/images/VdUklQ_ubuntu-base]
libvirt_cloudinit_disk.cloud-init["k8scpnode"]: Destroying... [id=/var/lib/libvirt/images/l5Rr1w_cloud-init.iso;11ef6bb7-a688-4c15-ae33-10690500705f]
libvirt_volume.ubuntu-base["k8wrknode1"]: Destroying... [id=/var/lib/libvirt/images/Jpw2Sg_ubuntu-base]
libvirt_cloudinit_disk.cloud-init["k8wrknode1"]: Destruction complete after 1s
libvirt_volume.ubuntu-base["k8wrknode2"]: Destruction complete after 1s
libvirt_cloudinit_disk.cloud-init["k8scpnode"]: Destruction complete after 1s
libvirt_cloudinit_disk.cloud-init["k8wrknode2"]: Destruction complete after 1s
libvirt_volume.ubuntu-base["k8wrknode1"]: Destruction complete after 1s
libvirt_volume.ubuntu-base["k8scpnode"]: Destruction complete after 2s
libvirt_volume.ubuntu-vol["k8wrknode1"]: Destroying... [id=/var/lib/libvirt/images/Jpw2Sg_ubuntu-vol]
libvirt_volume.ubuntu-vol["k8scpnode"]: Destroying... [id=/var/lib/libvirt/images/l5Rr1w_ubuntu-vol]
libvirt_volume.ubuntu-vol["k8wrknode2"]: Destroying... [id=/var/lib/libvirt/images/VdUklQ_ubuntu-vol]
libvirt_volume.ubuntu-vol["k8scpnode"]: Destruction complete after 0s
libvirt_volume.ubuntu-vol["k8wrknode2"]: Destruction complete after 0s
libvirt_volume.ubuntu-vol["k8wrknode1"]: Destruction complete after 0s
random_id.id["k8scpnode"]: Destroying... [id=l5Rr1w]
random_id.id["k8wrknode2"]: Destroying... [id=VdUklQ]
random_id.id["k8wrknode1"]: Destroying... [id=Jpw2Sg]
random_id.id["k8wrknode2"]: Destruction complete after 0s
random_id.id["k8scpnode"]: Destruction complete after 0s
random_id.id["k8wrknode1"]: Destruction complete after 0s
Destroy complete! Resources: 16 destroyed.
So you build a GitLab project, you created a pipeline and then a scheduler to run every week your pipeline.
And then you realize that you are polluting the internet with deprecated (garbage) things, at some point you have a debug option on, bla bla bla… etc etc.
It is time to clean up your mess!
Create a GitLab API Token
Select scopes: api.
Verify API token
run something like this
export GITLAB_API="glpat-HldkXzyurwBmroAdQCMo"

curl -sL --header "PRIVATE-TOKEN: ${GITLAB_API}" "https://gitlab.com/api/v4/projects?owned=true" | jq .[].path_with_namespace
you should see your projects.
Get your Project ID
create a new bash variable:
export PROJECT="terraform-provider/terraform-provider-hcloud-ci"
and then use the get rest api call
curl -sL --header "PRIVATE-TOKEN: ${GITLAB_API}" "https://gitlab.com/api/v4/projects?owned=true&search=${PROJECT}&search_namespaces=true" | jq -r .[].id
or you can also put the id into a new bash variable:
export ID=$(curl -sL --header "PRIVATE-TOKEN: ${GITLAB_API}" "https://gitlab.com/api/v4/projects?owned=true&search=${PROJECT}&search_namespaces=true" | jq -r .[].id)
View the previous pipelines
curl -sL \
  --header "PRIVATE-TOKEN: ${GITLAB_API}" \
  https://gitlab.com/api/v4/projects/${ID}/pipelines | jq .
Remove deprecated pipelines
just delete them via the API
curl -sL --header "PRIVATE-TOKEN: ${GITLAB_API}"   "https://gitlab.com/api/v4/projects/${ID}/pipelines?per_page=150"  \
 | jq  -r .[].id    \
 | awk '{print "curl -sL --header \"PRIVATE-TOKEN: ${GITLAB_API}\" --request DELETE https://gitlab.com/api/v4/projects/${ID}/pipelines/"$1}'   \
 | sh -x
that’s it !
It’s been a while since I got my hands on python and I came across with an interesting issue of an internal check today, when upgrading an old Proxy Virtual Machine.
Certificate Verify Failed
Suddenly the internal python check was reporting
[SSL: CERTIFICATE_VERIFY_FAILED] certificate verify failed (_ssl.c:727)Python Version
python version before the upgrade was Python 2.7.12 , now is Python 2.7.17
According to the online python documentation:
Changed in version 2.7.9: cafile, capath, cadefault, and context were added.
So something has changed but in both versions the verification for self-signed CA should have the same behavior!
Going down the rabbit hole, seems the most relevant info is in here PEP-0476 but in both cases you have to import SSL and this is not 100% the case !
Nevertheless the default behavior now is to verify the certificate in HTTPS and that is what we need to do!
urllib2 proxy
One of requirements is to check that the proxy is working. URLLIB2 needs a ProxyHandler to do so.
proxy_url = "http://{proxy}/".format(**cfg)
proxy_handler = urllib2.ProxyHandler({ 'http' : proxy_url })
after that, we need to pass the proxy_handler to a build_opener and get the response
opener = urllib2.build_opener(proxy_handler)
response = opener.open(cfg["url"])
return response
This will check an internal URL through our proxy but it will fail when trying to verify the self-signed certificate.
SSL
To enable SSL functionality to python2 we need to import the ssl module
import sslafter that it is simple a case of creating a SSLContext to open the https url.
To create an SSL Context, there is a useful function for common purposes
ssl.create_default_context(purpose=Purpose.SERVER_AUTH, cafile=None, capath=None, cadata=None)¶In our case we can pass our internal self-signed CA file as an argument
ctx = ssl.create_default_context(cafile="/etc/certs/ca.pem")perfect.
Build an HTTPS handler
As we are using an build_opener to pass the proxy handler, but we also need to create an additional handler for the SSL (transport layer) in urllib2.
handler = urllib2.HTTPSHandler(context=ctx)okay, our handler has the SSL Context with the CA file in place.
Build Opener
it is time to stitch everything together
## Create SSLContext with CA file to pass to handler
ctx = ssl.create_default_context(cafile="/etc/csi.certs/vm2csi/ca.pem")

## Create an HTTPS Handler with our custom SSL Context
handler = urllib2.HTTPSHandler(context=ctx)

## Create a Proxy Handler
proxy_handler = urllib2.ProxyHandler({ 'http' : proxy_url })

## Stitch together the proxy and https handlers to build an opener
opener = urllib2.build_opener(proxy_handler,handler)

## Get the response
response = opener.open(cfg["url"])
return response
and now we have a proper internal check!
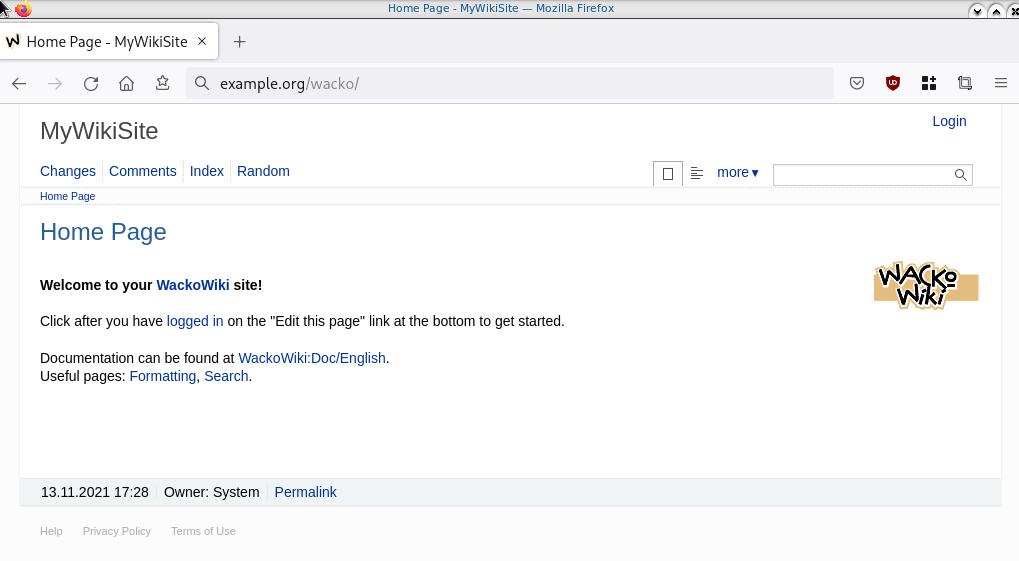
WackoWiki is the wiki of my choice and one of the first opensource project I’ve ever contributed. I still use wackowiki for personal use!
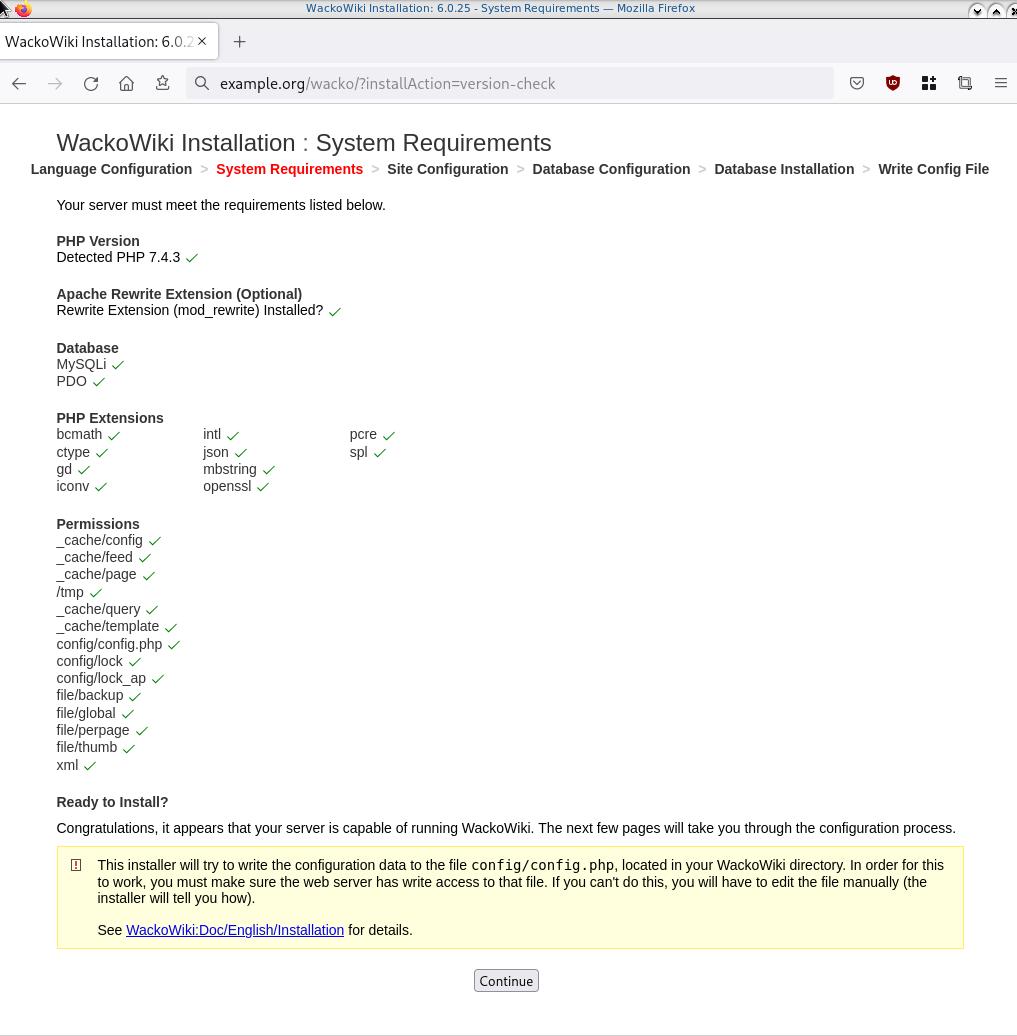
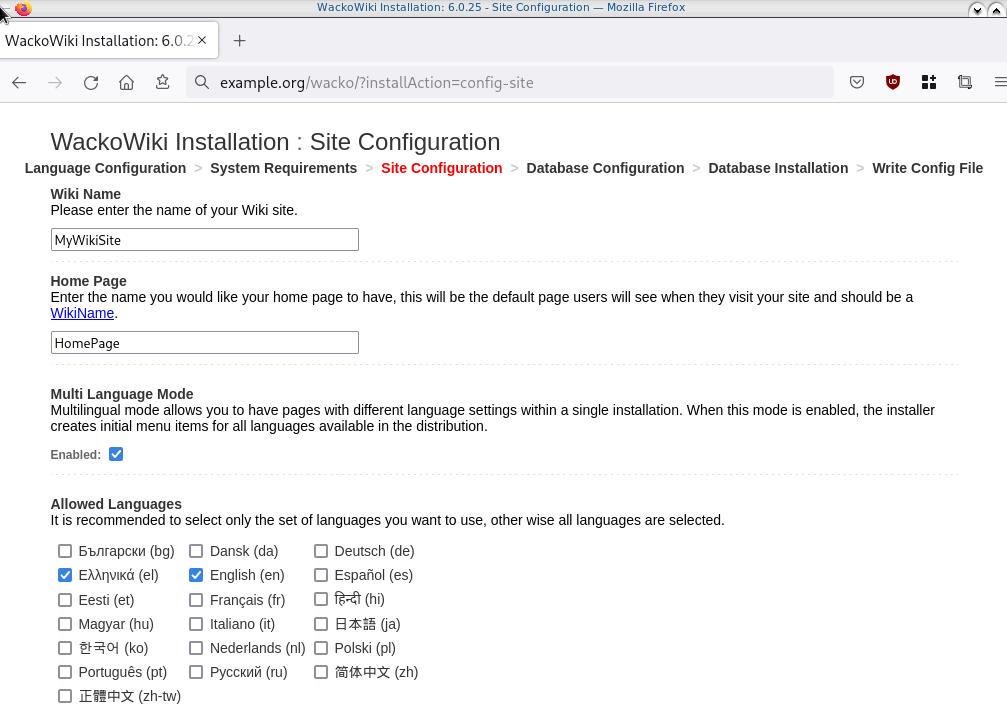
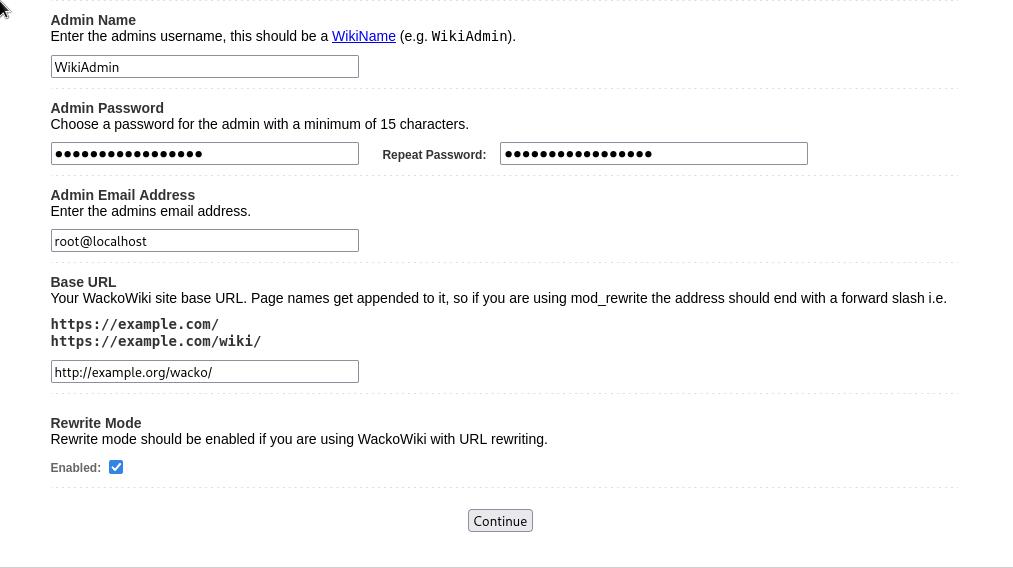
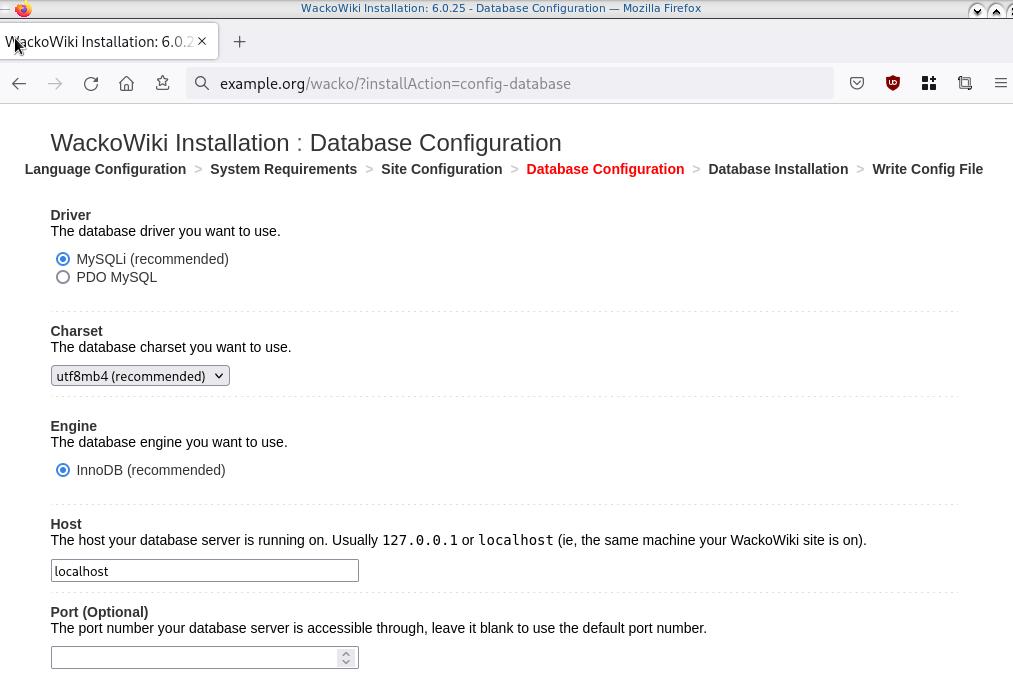
A few days ago, wackowiki released version 6.0.25. In this blog post, I will try to share my experience of installing wackowiki on a new VM ubuntu 20.04 LTS.
Ansible Role
I have updated the WackoWiki Ansible Role on my personal github account to represent all necessary steps of this article.
Terraform files
In order to test/verify wackowiki installation and ansible role, I use a virtual machine on my home lab. To make this fast and reproducable, I have uploaded my terraform files that I used on my lab here: GitHub
Requirements
Ubuntu 20.04 LTS
apt-get update
apt -y install /
       php /
       php-common /
       php-bcmath /
       php-ctype /
       php-gd /
       php-iconv /
       php-json /
       php-mbstring /
       php-mysql /
       apache2 /
       libapache2-mod-php /
       mariadb-server /
       unzip
Apache2
We need to enable mod_reqwrite in apache2 but also to add the appropiate configuration in the default conf in VirtualHost
sudo -i
a2enmod rewrite
vim /etc/apache2/sites-available/000-default.conf
<VirtualHost *:80>
...
    # enable.htaccess
    <Directory /var/www/html/>
        Options Indexes FollowSymLinks MultiViews
        AllowOverride All
        Require all granted
    </Directory>
...
</VirtualHost>
MySQL
wacko.sql
CREATE DATABASE IF NOT EXISTS wacko;
CREATE USER IF NOT EXISTS 'wacko'@'localhost' IDENTIFIED BY 'YOURNEWPASSWORD';
GRANT  ALL PRIVILEGES ON wacko.* TO 'wacko'@'localhost';
FLUSH  PRIVILEGES;
sudo -i
mysql < wacko.sql
Get WackoWiki
curl -sLO https://downloads.sourceforge.net/wackowiki/wacko.6.0.25.zip
unzip wacko.6.0.25.zip
mv wackowiki-6.0.25/wacko /var/www/html/wacko/
chown -R www-data:www-data /var/www/html/wacko/
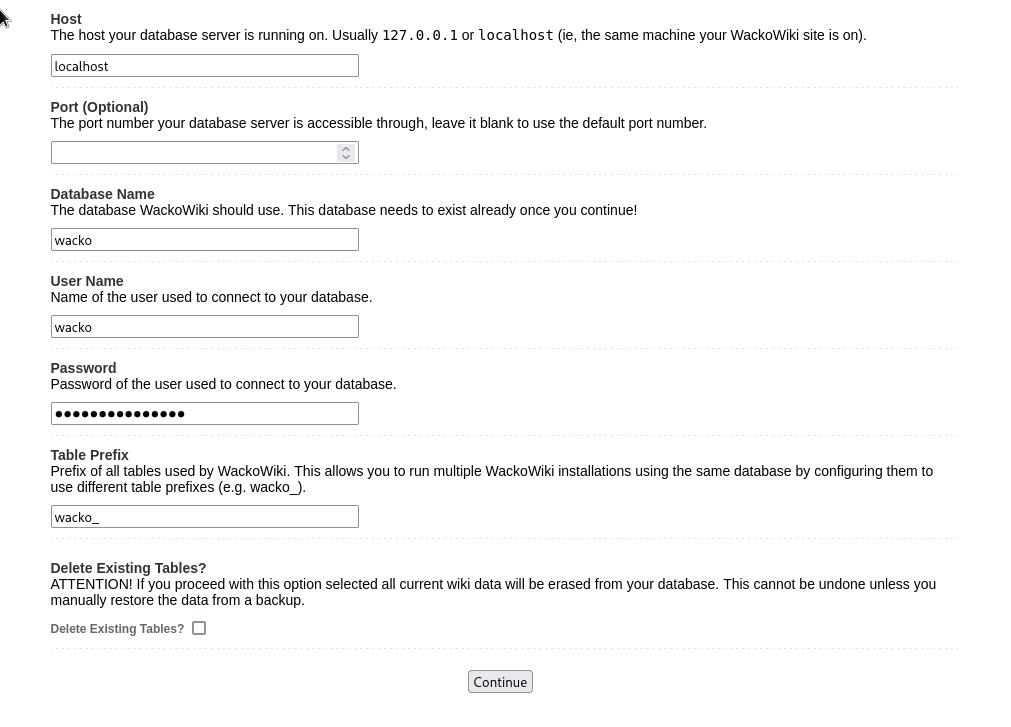
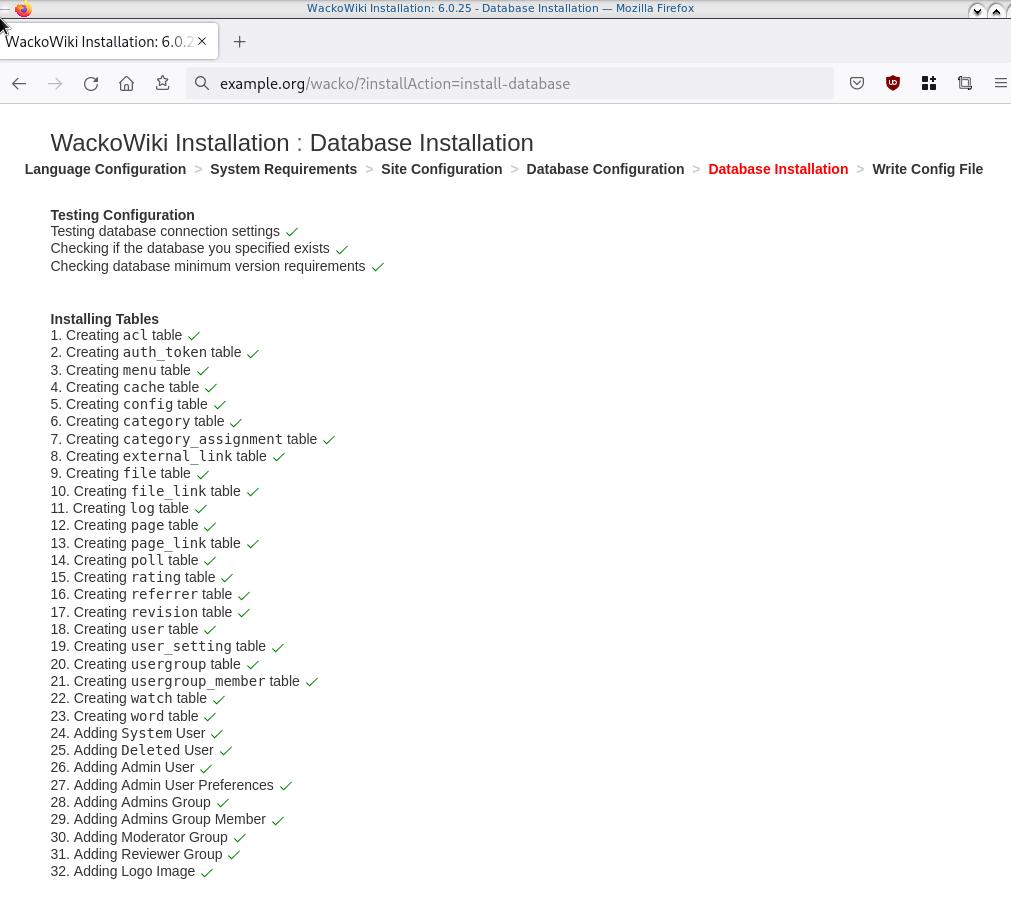
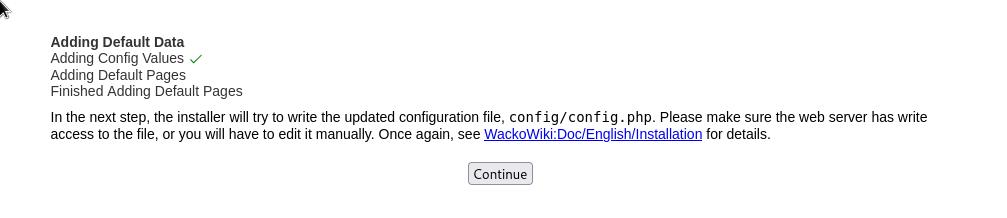
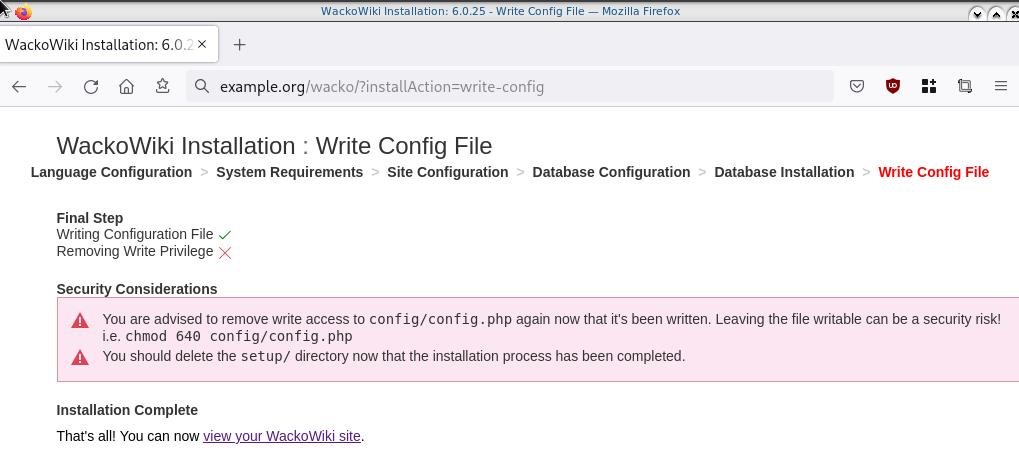
Web Installation

Post Install
Last, we need to remove write permission for the wackowiki configuration file and remove setup folder
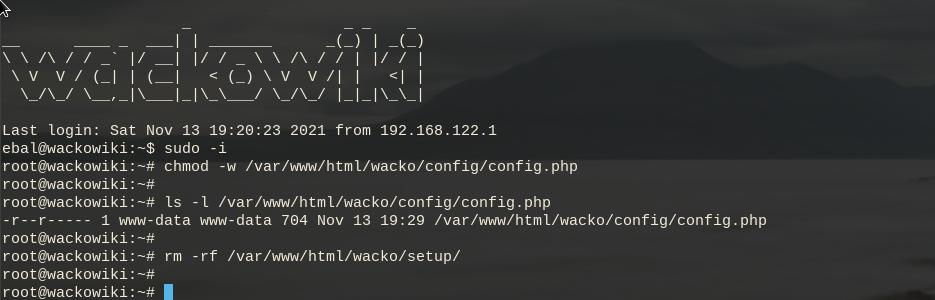
sudo -i
chmod -w /var/www/html/wacko/config/config.php
rm -rf   /var/www/html/wacko/setup/
Simple WackoWiki Walkthrough
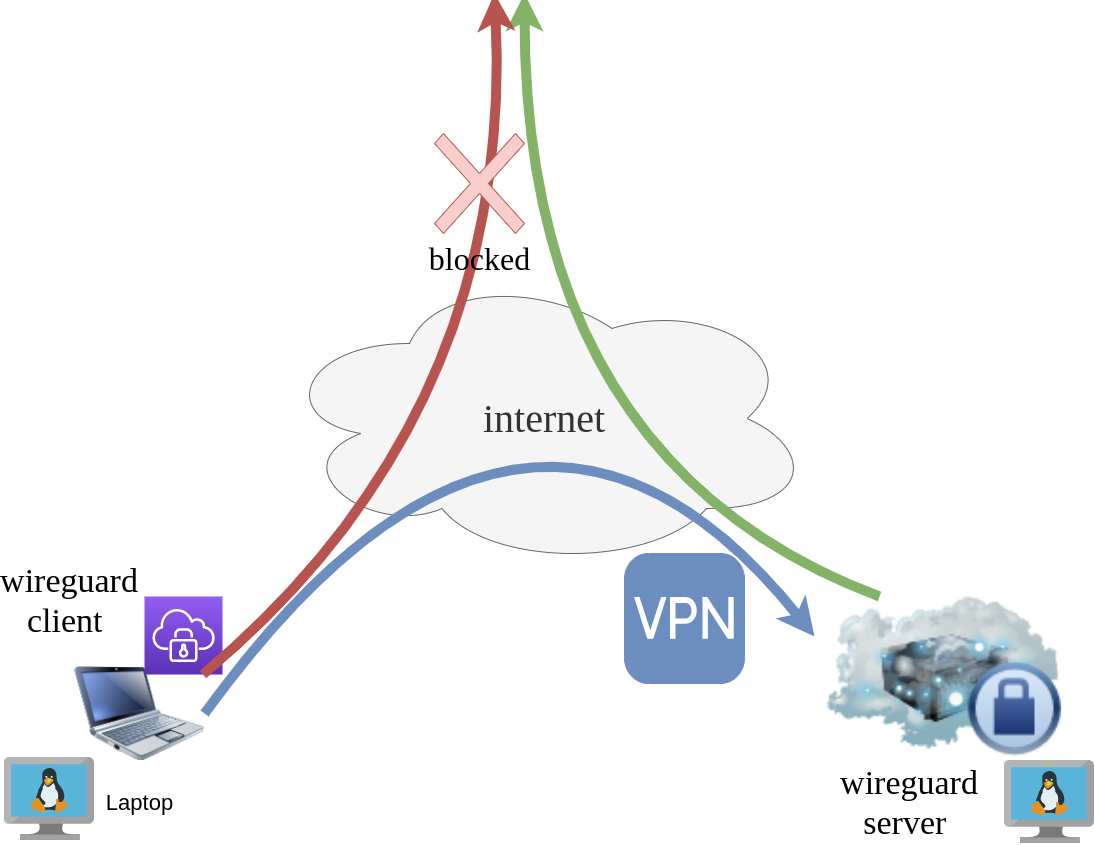
WireGuard: fast, modern, secure VPN tunnel. WireGuard securely encapsulates IP packets over UDP.
Goal
What I would like to achieve, in this article, is to provide a comprehensive guide for a redirect-gateway vpn using wireguard with a twist. The client machine should reach internet through the wireguard vpn server. No other communications should be allowed from the client and that means if we drop the VPN connection, client can not go to the internet.
Intro - Lab Details
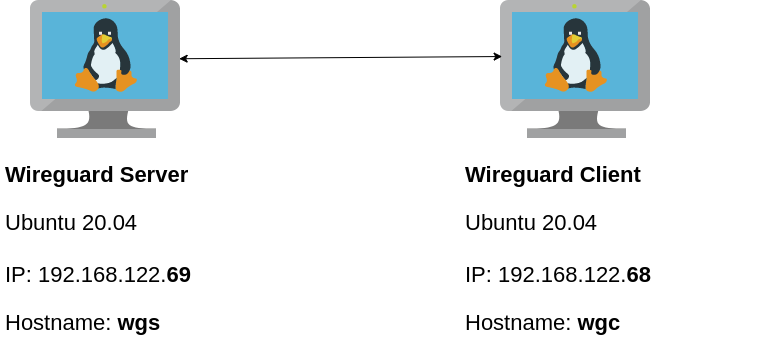
Here are my lab details. This blog post will help you understand all the necessary steps and provide you with a guide to replicate the setup. You should be able to create a wireguard VPN server-client between two points. I will be using ubuntu 20.04 as base images for both virtual machines. I am also using LibVirt and Qemu/KVM running on my archlinux host.
Wireguard Generate Keys
and the importance of them!
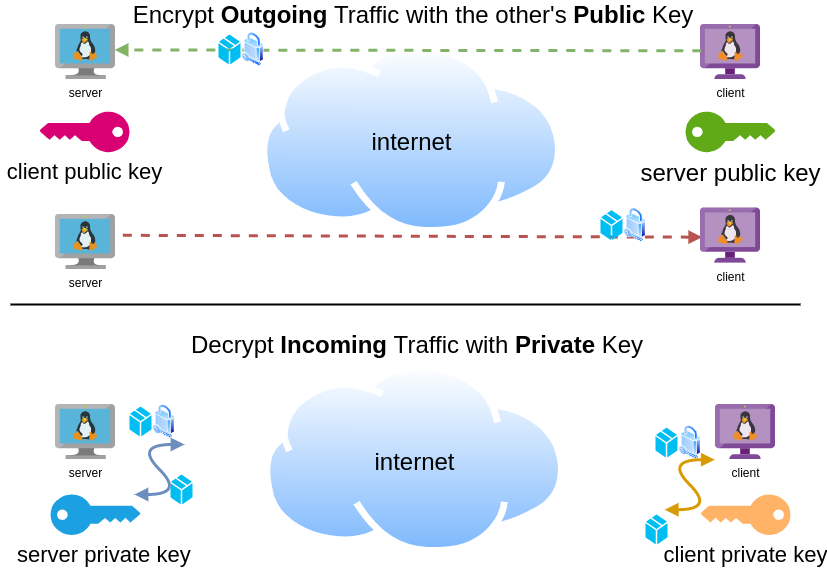
Before we begin, give me a moment to try explaining how the encryption between these two machines, in a high level design works.
Each linux machines creates a pair of keys.
- Private Key
- Public Key
These keys have a unique relationship. You can use your public key to encrypt something but only your private key can decrypt it. That mean, you can share your public keys via an cleartext channel (internet, email, slack). The other parties can use your public key to encrypt traffic towards you, but none other decrypt it. If a malicious actor replace the public keys, you can not decrypt any incoming traffic thus make it impossible to connect to VPN server!

Public - Private Keys
Now each party has the other’s public keys and they can encrypt traffic for each other, BUT only you can decrypt your traffic with your private key. Your private key never leaves your computer.
Hopefully you get the idea.
Wireguard Server - Ubuntu 20.04 LTS
In order to make the guide easy to follow, I will start with the server part.
Server Key Generation
Generate a random private and public key for the server as-root
wg genkey | tee /etc/wireguard/privatekey | wg pubkey > /etc/wireguard/publickeyMake the keys read-only
chmod 0400 /etc/wireguard/*keyList keys
ls -l /etc/wireguard/total 8
-r-------- 1 root root 45 Jul 12 20:29 privatekey
-r-------- 1 root root 45 Jul 12 20:29 publickey
UDP Port & firewall
In order to run a VPN service, you need to choose a random port that wireguard VPN server can listen to it.
eg.
61194open firewall
ufw allow 61194/udpRule added
Rule added (v6)
view more info
ufw status verboseStatus: active
Logging: on (low)
Default: deny (incoming), allow (outgoing), disabled (routed)
New profiles: skip
To Action From
-- ------ ----
22/tcp ALLOW IN Anywhere
61194 ALLOW IN Anywhere
22/tcp (v6) ALLOW IN Anywhere (v6)
61194 (v6) ALLOW IN Anywhere (v6)
So you see, only SSH and our VPN ports are open.
Default Incoming Policy is: DENY.
Wireguard Server Configuration File
Now it is time to create a basic configuration wireguard-server file.
Naming the wireguard interface
Clarification the name of our interface does not matter, you can choose any name. Gets it’s name from the configuration filename! But in order to follow the majority of guides try to use something from wg+. For me it is easier to name wireguard interface:
- wg0
but you may seen it also as
- wg
without a number. All good!
Making a shell script for wireguard server configuration file
Running the below script will create a new configuration file /etc/wireguard/wg0.conf
PRIVATE_KEY=$(cat /etc/wireguard/privatekey)
NETWORK=10.0.8
cat > /etc/wireguard/wg0.conf <<EOF
[Interface]
Address = ${NETWORK}.1/24
ListenPort = 61194
PrivateKey = ${PRIVATE_KEY}
EOF
ls -l /etc/wireguard/wg0.conf
cat /etc/wireguard/wg0.conf
Note I have chosen the network 10.0.8.0/24 for my VPN setup, you can choose any Private Network
10.0.0.0/8 - Class A
172.16.0.0/12 - Class B
192.168.0.0/16 - Class CI chose a Class C (256 IPs) from a /8 (Class A) private network, do not be confused about this. It’s just a Class-C /24 private network.
Let’s make our first test with the server
wg-quick up wg0[#] ip link add wg0 type wireguard
[#] wg setconf wg0 /dev/fd/63
[#] ip -4 address add 10.0.8.1/24 dev wg0
[#] ip link set mtu 1420 up dev wg0
It’s Alive!
Kernel Module
Verify that wireguard is loaded as a kernel module on your system.
lsmod | grep wireguardwireguard 212992 0
ip6_udp_tunnel 16384 1 wireguard
udp_tunnel 16384 1 wireguard
Wireguard is in the Linux kernel since March 2020.
Show IP address
ip address show dev wg03: wg0: <POINTOPOINT,NOARP,UP,LOWER_UP> mtu 1420
qdisc noqueue state UNKNOWN group default qlen 1000
link/none
inet 10.0.8.1/24 scope global wg0
valid_lft forever preferred_lft forever
Listening Connections
Verify that wireguard server listens to our specific UDP port
ss -nulp '( sport = :61194 )' | column -tState Recv-Q Send-Q Local Address:Port Peer Address:Port Process
UNCONN 0 0 0.0.0.0:61194 0.0.0.0:*
UNCONN 0 0 [::]:61194 [::]:*
Show wg0
wg show wg0interface: wg0
public key: <public key>
private key: (hidden)
listening port: 61194
Show Config
wg showconf wg0[Interface]
ListenPort = 61194
PrivateKey = <private key>
Close wireguard
wg-quick down wg0What is IP forwarding
In order for our VPN server to forward our client’s network traffic from the internal interface wg0 to it’s external interface and on top of that, to separate it’s own traffic from client’s traffic, the vpn server needs to masquerade all client’s traffic in a way that knows who to forward and send back traffic to the client. In a nuthshell this is IP forwarding and perhaps the below diagram can explain it a little better.

To do that, we need to enable the IP forward feature on our linux kernel.
sysctl -w net.ipv4.ip_forward=1The above command does not persist the change across reboots. To persist this setting we need to add it, to sysctl configuration. And although many set this option global, we do not need to have to do that!
Wireguard provides four (4) stages, to run our own scripts.
Wireguard stages
- PreUp
- PostUp
- PreDown
- PostDown
So we can choose to enable IP forwarding at wireguard up and disable it on wireguard down.
IP forwarding in wireguard configuration file
PRIVATE_KEY=$(cat /etc/wireguard/privatekey)
NETWORK=10.0.8
cat > /etc/wireguard/wg0.conf <<EOF
[Interface]
Address = ${NETWORK}.1/24
ListenPort = 61194
PrivateKey = ${PRIVATE_KEY}
PreUp = sysctl -w net.ipv4.ip_forward=1
PostDown = sysctl -w net.ipv4.ip_forward=0
EOF
verify above configuration
wg-quick up wg0[#] sysctl -w net.ipv4.ip_forward=1
net.ipv4.ip_forward = 1
[#] ip link add wg0 type wireguard
[#] wg setconf wg0 /dev/fd/63
[#] ip -4 address add 10.0.8.1/24 dev wg0
[#] ip link set mtu 1420 up dev wg0Verify system control setting for IP forward:
sysctl net.ipv4.ip_forwardnet.ipv4.ip_forward = 1
Close wireguard
wg-quick down wg0[#] wg showconf wg0
[#] ip link delete dev wg0
[#] sysctl -w net.ipv4.ip_forward=0
net.ipv4.ip_forward = 0
Verify that now IP Forward is not enabled.
sysctl net.ipv4.ip_forwardnet.ipv4.ip_forward = 0
Routing via firewall rules
Next on our agenda, is to add some additional rules on our firewall. We already enabled IP Forward feature with the above and now it is time to update our firewall so it can masquerade our client’s network traffic.
Default Route
We need to identify the default external network interface on the ubuntu server.
DEF_ROUTE=$(ip -4 -json route list default | jq -r .[0].dev)
usually is eth0 or ensp3 or something similar.
firewall rules
- We need to forward traffic from the internal interface to the external interface
- We need to masquerade the traffic of the client.
iptables -A FORWARD -i %i -o ${DEF_ROUTE} -s ${NETWORK}.0/24 -j ACCEPT
iptables -t nat -A POSTROUTING -s ${NETWORK}.0/24 -o ${DEF_ROUTE} -j MASQUERADE
and also we need to drop these rules when we stop wireguard service
iptables -D FORWARD -i %i -o ${DEF_ROUTE} -s ${NETWORK}.0/24 -j ACCEPT
iptables -t nat -D POSTROUTING -s ${NETWORK}.0/24 -o ${DEF_ROUTE} -j MASQUERADE
See the -D after iptables.
iptables is a CLI (command line interface) for netfilters. So think the above rules as filters on our network traffic.
WG Server Conf
To put everything all together and also use wireguard PostUp and PreDown to
wg genkey | tee /etc/wireguard/privatekey | wg pubkey > /etc/wireguard/publickey
chmod 0400 /etc/wireguard/*key
PRIVATE_KEY=$(cat /etc/wireguard/privatekey)
NETWORK=10.0.8
DEF_ROUTE=$(ip -4 -json route list default | jq -r .[0].dev)
WG_PORT=61194
cat > /etc/wireguard/wg0.conf <<EOF
[Interface]
Address = ${NETWORK}.1/24
ListenPort = ${WG_PORT}
PrivateKey = ${PRIVATE_KEY}
PreUp = sysctl -w net.ipv4.ip_forward=1
PostDown = sysctl -w net.ipv4.ip_forward=0
PostUp = iptables -A FORWARD -i %i -o ${DEF_ROUTE} -s ${NETWORK}.0/24 -j ACCEPT ; iptables -t nat -A POSTROUTING -s ${NETWORK}.0/24 -o ${DEF_ROUTE} -j MASQUERADE
PreDown = iptables -D FORWARD -i %i -o ${DEF_ROUTE} -s ${NETWORK}.0/24 -j ACCEPT ; iptables -t nat -D POSTROUTING -s ${NETWORK}.0/24 -o ${DEF_ROUTE} -j MASQUERADE
EOF
testing up
wg-quick up wg0[#] sysctl -w net.ipv4.ip_forward=1
net.ipv4.ip_forward = 1
[#] ip link add wg0 type wireguard
[#] wg setconf wg0 /dev/fd/63
[#] ip -4 address add 10.0.8.1/24 dev wg0
[#] ip link set mtu 1420 up dev wg0
[#] iptables -A FORWARD -i wg0 -o ens3 -s 10.0.8.0/24 -j ACCEPT ; iptables -t nat -A POSTROUTING -s 10.0.8.0/24 -o ens3 -j MASQUERADE
testing down
wg-quick down wg0[#] iptables -D FORWARD -i wg0 -o ens3 -s 10.0.8.0/24 -j ACCEPT ; iptables -t nat -D POSTROUTING -s 10.0.8.0/24 -o ens3 -j MASQUERADE
[#] ip link delete dev wg0
[#] sysctl -w net.ipv4.ip_forward=0
net.ipv4.ip_forward = 0
Start at boot time
systemctl enable wg-quick@wg0and status
systemctl status wg-quick@wg0Get the wireguard server public key
We have NOT finished yet with the server !
Also we need the output of:
cat /etc/wireguard/publickeyoutput should be something like this:
wr3jUAs2qdQ1Oaxbs1aA0qrNjogY6uqDpLop54WtQI4=Wireguard Client - Ubuntu 20.04 LTS
Now we need to move to our client virtual machine.
It is a lot easier but similar with above commands.
Client Key Generation
Generate a random private and public key for the client
wg genkey | tee /etc/wireguard/privatekey | wg pubkey > /etc/wireguard/publickeyMake the keys read-only
chmod 0400 /etc/wireguard/*keyWireguard Client Configuration File
Need to replace <wireguard server public key> with the output of the above command.
Configuration is similar but simpler from the server
PRIVATE_KEY=$(cat /etc/wireguard/privatekey)
NETWORK=10.0.8
WG_PORT=61194
WGS_IP=$(ip -4 -json route list default | jq -r .[0].prefsrc)
WSG_PUBLIC_KEY="<wireguard server public key>"
cat > /etc/wireguard/wg0.conf <<EOF
[Interface]
Address = ${NETWORK}.2/24
PrivateKey = ${PRIVATE_KEY}
[Peer]
PublicKey = ${WSG_PUBLIC_KEY}
Endpoint = ${WGS_IP}:${WG_PORT}
AllowedIPs = 0.0.0.0/0
EOF
verify
wg-quick up wg0[#] ip link add wg0 type wireguard
[#] wg setconf wg0 /dev/fd/63
[#] ip -4 address add 10.0.8.2/24 dev wg0
[#] ip link set mtu 1420 up dev wg0
[#] wg set wg0 fwmark 51820
[#] ip -4 route add 0.0.0.0/0 dev wg0 table 51820
[#] ip -4 rule add not fwmark 51820 table 51820
[#] ip -4 rule add table main suppress_prefixlength 0
[#] sysctl -q net.ipv4.conf.all.src_valid_mark=1
[#] iptables-restore -n
start client at boot
systemctl enable wg-quick@wg0Get the wireguard client public key
We have finished with the client, but we need the output of:
cat /etc/wireguard/publickeyWireguard Server - Peers
As we mentioned above, we need to exchange public keys of server & client to the other machines in order to encrypt network traffic.
So as we get the client public key and run the below script to the server
WSC_PUBLIC_KEY="<wireguard client public key>"
NETWORK=10.0.8
wg set wg0 peer ${WSC_PUBLIC_KEY} allowed-ips ${NETWORK}.2
after that we can verify that our wireguard server and connect to the wireguard client
wireguard server ping to client
$ ping -c 5 10.0.8.2
PING 10.0.8.2 (10.0.8.2) 56(84) bytes of data.
64 bytes from 10.0.8.2: icmp_seq=1 ttl=64 time=0.714 ms
64 bytes from 10.0.8.2: icmp_seq=2 ttl=64 time=0.456 ms
64 bytes from 10.0.8.2: icmp_seq=3 ttl=64 time=0.557 ms
64 bytes from 10.0.8.2: icmp_seq=4 ttl=64 time=0.620 ms
64 bytes from 10.0.8.2: icmp_seq=5 ttl=64 time=0.563 ms
--- 10.0.8.2 ping statistics ---
5 packets transmitted, 5 received, 0% packet loss, time 4103ms
rtt min/avg/max/mdev = 0.456/0.582/0.714/0.084 ms
wireguard client ping to server
$ ping -c 5 10.0.8.1
PING 10.0.8.1 (10.0.8.1) 56(84) bytes of data.
64 bytes from 10.0.8.1: icmp_seq=1 ttl=64 time=0.752 ms
64 bytes from 10.0.8.1: icmp_seq=2 ttl=64 time=0.639 ms
64 bytes from 10.0.8.1: icmp_seq=3 ttl=64 time=0.622 ms
64 bytes from 10.0.8.1: icmp_seq=4 ttl=64 time=0.625 ms
64 bytes from 10.0.8.1: icmp_seq=5 ttl=64 time=0.597 ms
--- 10.0.8.1 ping statistics ---
5 packets transmitted, 5 received, 0% packet loss, time 4093ms
rtt min/avg/max/mdev = 0.597/0.647/0.752/0.054 ms
wireguard server - Peers at configuration file
Now the final things is to update our wireguard server with the client Peer (or peers).
wg showconf wg0the output should be something like that:
[Interface]
ListenPort = 61194
PrivateKey = <server: private key>
[Peer]
PublicKey = <client: public key>
AllowedIPs = 10.0.8.2/32
Endpoint = 192.168.122.68:52587
We need to append the peer section to our configuration file.
so /etc/wireguard/wg0.conf should look like this:
[Interface]
Address = 10.0.8.1/24
ListenPort = 61194
PrivateKey = <server: private key>
PreUp = sysctl -w net.ipv4.ip_forward=1
PostDown = sysctl -w net.ipv4.ip_forward=0
PostUp = iptables -A FORWARD -i %i -o ens3 -s 10.0.8.0/24 -j ACCEPT ; iptables -t nat -A POSTROUTING -s 10.0.8.0/24 -o ens3 -j MASQUERADE
PreDown = iptables -D FORWARD -i %i -o ens3 -s 10.0.8.0/24 -j ACCEPT ; iptables -t nat -D POSTROUTING -s 10.0.8.0/24 -o ens3 -j MASQUERADE
[Peer]
PublicKey = <client: public key>
AllowedIPs = 10.0.8.2/32
Endpoint = 192.168.122.68:52587
SaveConfig
In None of server or client wireguard configuration file, we didn’t declare this option. If set, then the configuration is saved on the current state of wg0 interface. Very useful !
SaveConfig = trueclient firewall
It is time to introduce our twist!
If you mtr or traceroute our traffic from our client, we will notice that in need our network traffic goes through the wireguard vpn server !
My traceroute [v0.93]
wgc (10.0.8.2) 2021-07-21T22:41:44+0300
Packets Pings
Host Loss% Snt Last Avg Best Wrst StDev
1. 10.0.8.1 0.0% 88 0.6 0.6 0.4 0.8 0.1
2. myhomepc 0.0% 88 0.8 0.8 0.5 1.0 0.1
3. _gateway 0.0% 88 3.8 4.0 3.3 9.6 0.8
...
The first entry is:
1. 10.0.8.1 if we drop our vpn connection.
wg-quick down wg0We still go to the internet.
My traceroute [v0.93]
wgc (192.168.122.68) 2021-07-21T22:45:04+0300
Packets Pings
Host Loss% Snt Last Avg Best Wrst StDev
1. myhomepc 0.0% 1 0.3 0.3 0.3 0.3 0.0
2. _gateway 0.0% 1 3.3 3.3 3.3 3.3 0.0
This is important because in some use cases, we do not want our client to directly or unsupervised talk to the internet.
UFW alternative for the client
So to avoid this issue, we will re-rewrite our firewall rules.
A simple script to do that is the below. Declares the default policy to DENY for everything and only accepts ssh incoming traffic and outgoing traffic through the vpn.
DEF_ROUTE=$(ip -4 -json route list default | jq -r .[0].dev)
WGS_IP=192.168.122.69
WG_PORT=61194
## reset
ufw --force reset
## deny everything!
ufw default deny incoming
ufw default deny outgoing
ufw default deny forward
## allow ssh
ufw allow 22/tcp
## enable
ufw --force enable
## allow traffic out to the vpn server
ufw allow out on ${DEF_ROUTE} to ${WGS_IP} port ${WG_PORT}
## allow tunnel traffic out
ufw allow out on wg+
# ufw status verbose
Status: active
Logging: on (low)
Default: deny (incoming), deny (outgoing), disabled (routed)
New profiles: skip
To Action From
-- ------ ----
22/tcp ALLOW IN Anywhere
22/tcp (v6) ALLOW IN Anywhere (v6)
192.168.122.69 61194 ALLOW OUT Anywhere on ens3
Anywhere ALLOW OUT Anywhere on wg+
Anywhere (v6) ALLOW OUT Anywhere (v6) on wg+
DNS
There is caveat. Please bare with me.
Usually and especially in virtual machines they get DNS setting through a local LAN. We can either allow traffic on the local vlan or update our local DNS setting so it can go only through our VPN
cat > /etc/systemd/resolved.conf <<EOF
[Resolve]
DNS=88.198.92.222
EOF
systemctl restart systemd-resolved
let’s try this
# ping google.com
ping: google.com: Temporary failure in name resolution
Correct, fire up wireguard vpn client
wg-quick up wg0
ping -c4 google.comPING google.com (142.250.185.238) 56(84) bytes of data.
64 bytes from fra16s53-in-f14.1e100.net (142.250.185.238): icmp_seq=1 ttl=115 time=43.5 ms
64 bytes from fra16s53-in-f14.1e100.net (142.250.185.238): icmp_seq=2 ttl=115 time=44.9 ms
64 bytes from fra16s53-in-f14.1e100.net (142.250.185.238): icmp_seq=3 ttl=115 time=43.8 ms
64 bytes from fra16s53-in-f14.1e100.net (142.250.185.238): icmp_seq=4 ttl=115 time=43.0 ms
--- google.com ping statistics ---
4 packets transmitted, 4 received, 0% packet loss, time 3004ms
rtt min/avg/max/mdev = 42.990/43.795/44.923/0.707 ms
mtr shows:
mtr google.com My traceroute [v0.93]
wgc (10.0.8.2) 2021-07-21T23:01:16+0300
Packets Pings
Host Loss% Snt Last Avg Best Wrst StDev
1. 10.0.8.1 0.0% 2 0.6 0.7 0.6 0.7 0.1
2. _gateway 0.0% 1 0.8 0.8 0.8 0.8 0.0
3. 192.168.1.1 0.0% 1 3.8 3.8 3.8 3.8 0.0
drop vpn connection
# wg-quick down wg0
[#] ip -4 rule delete table 51820
[#] ip -4 rule delete table main suppress_prefixlength 0
[#] ip link delete dev wg0
[#] iptables-restore -n
# ping -c4 google.com
ping: google.com: Temporary failure in name resolution
and that is perfect !
No internet access for our client. Only when our vpn connection is up!
WireGuard: fast, modern, secure VPN tunnel
That’s it!
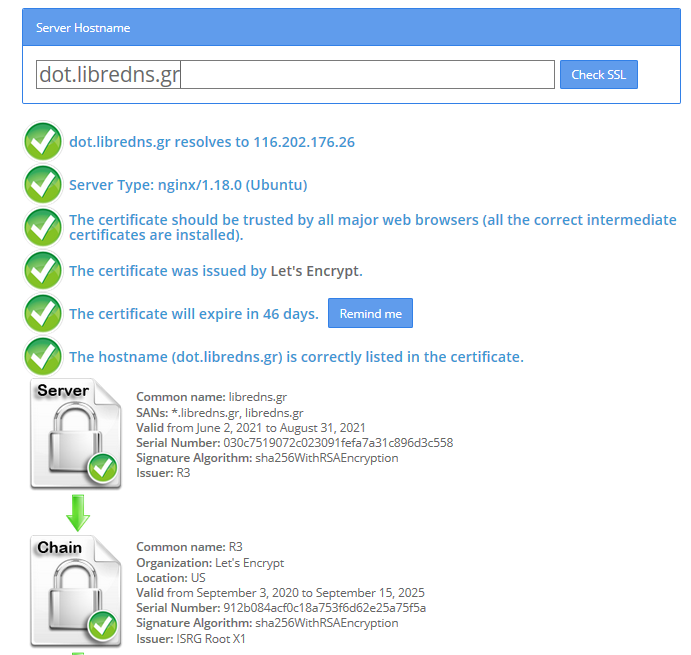
Below my personal settings -as of today- for LibreDNS using systemd-resolved service for DNS resolution.
sudo vim /etc/systemd/resolved.conf
basic settings
[Resolve]
DNS=116.202.176.26:854#dot.libredns.gr
DNSOverTLS=yes
FallbackDNS=88.198.92.222
Cache=yes
apply
sudo systemctl restart systemd-resolved.service
verify
resolvectl query analytics.google.com
analytics.google.com: 0.0.0.0 -- link: eth0
-- Information acquired via protocol DNS in 144.7ms.
-- Data is authenticated: no; Data was acquired via local or encrypted transport: yes
-- Data from: network
Explain Settings
DNS setting
DNS=116.202.176.26:854#dot.libredns.gr
We declare the IP of our DoT service. Using : as a separator we add the no-ads TCP port of DoT, 854. We also need to add our domain in the end to tell systemd-resolved that this IP should respond to dot.libredns.gr
Dns Over TLS
DNSOverTLS=yes
The usually setting is yes. In older systemd versions you can also select opportunistic.
As we are using Lets Encrypt systemd-resolved can not verify (by default) the IP inside the certificate. The type of certificate can verify the domain dot.libredns.gr but we are asking the IP: 116.202.176.26 and this is another type of certificate that is not free. In order to “fix” this , we added the #dot.libredns.gr in the above setting.
FallBack
Yes not everything has Five nines so you may need a fall back dns to .. fall. Be aware this is cleartext traffic! Not encrypted.
FallbackDNS=88.198.92.222
Cache
Last but not least, caching your queries can give provide you with an additional speed when browsing the internet ! You already asked this a few seconds ago, why not caching it on your local system?
Cache=yes
to give you an example
resolvectl query analytics.google.com
analytics.google.com: 0.0.0.0 -- link: eth0
-- Information acquired via protocol DNS in 144.7ms.
-- Data is authenticated: no; Data was acquired via local or encrypted transport: yes
-- Data from: network
second time:
resolvectl query analytics.google.com
analytics.google.com: 0.0.0.0 -- link: eth0
-- Information acquired via protocol DNS in 2.3ms.
-- Data is authenticated: no; Data was acquired via local or encrypted transport: yes
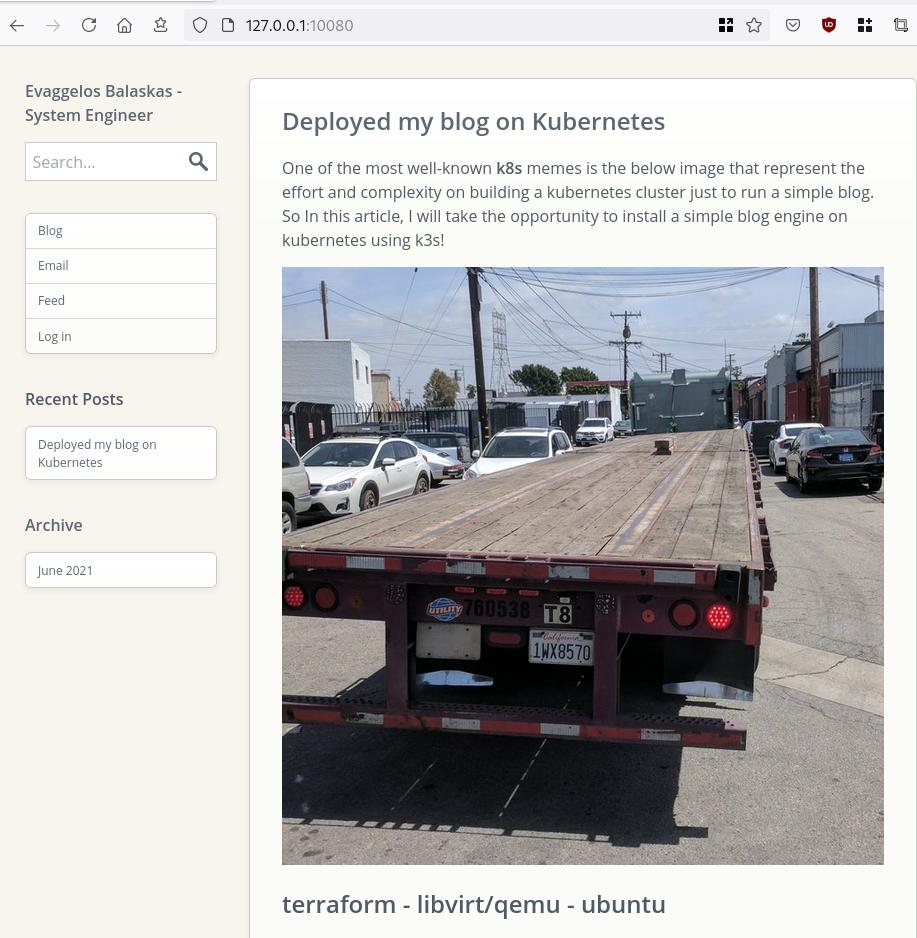
-- Data from: cacheOne of the most well-known k8s memes is the below image that represent the effort and complexity on building a kubernetes cluster just to run a simple blog. So In this article, I will take the opportunity to install a simple blog engine on kubernetes using k3s!

terraform - libvirt/qemu - ubuntu
For this demo, I will be workinig on my local test lab. A libvirt /qemu ubuntu 20.04 virtual machine via terraform. You can find my terraform notes on my github repo tf/0.15/libvirt/0.6.3/ubuntu/20.04.
k3s
k3s is a lightweight, fully compliant kubernetes distribution that can run on a virtual machine, single node.
login to your machine and became root
$ ssh 192.168.122.42 -l ubuntu
$ sudo -i
#
install k3s with one command
curl -sfL https://get.k3s.io | sh -
output should be something like this
[INFO] Finding release for channel stable
[INFO] Using v1.21.1+k3s1 as release
[INFO] Downloading hash https://github.com/k3s-io/k3s/releases/download/v1.21.1+k3s1/sha256sum-amd64.txt
[INFO] Downloading binary https://github.com/k3s-io/k3s/releases/download/v1.21.1+k3s1/k3s
[INFO] Verifying binary download
[INFO] Installing k3s to /usr/local/bin/k3s
[INFO] Creating /usr/local/bin/kubectl symlink to k3s
[INFO] Creating /usr/local/bin/crictl symlink to k3s
[INFO] Creating /usr/local/bin/ctr symlink to k3s
[INFO] Creating killall script /usr/local/bin/k3s-killall.sh
[INFO] Creating uninstall script /usr/local/bin/k3s-uninstall.sh
[INFO] env: Creating environment file /etc/systemd/system/k3s.service.env
[INFO] systemd: Creating service file /etc/systemd/system/k3s.service
[INFO] systemd: Enabling k3s unit
Created symlink /etc/systemd/system/multi-user.target.wants/k3s.service → /etc/systemd/system/k3s.service.
[INFO] systemd: Starting k3s
Firewall Ports
I would propose to open the below network ports so k3s can run smoothly.
Inbound Rules for K3s Server Nodes
| PROTOCOL | PORT | SOURCE | DESCRIPTION |
|---|---|---|---|
| TCP | 6443 | K3s agent nodes | Kubernetes API Server |
| UDP | 8472 | K3s server and agent nodes | Required only for Flannel VXLAN |
| TCP | 10250 | K3s server and agent nodes | Kubelet metrics |
| TCP | 2379-2380 | K3s server nodes | Required only for HA with embedded etcd |
Typically all outbound traffic is allowed.
ufw allow
ufw allow 6443/tcp
ufw allow 8472/udp
ufw allow 10250/tcp
ufw allow 2379/tcp
ufw allow 2380/tcp
full output
# ufw allow 6443/tcp
Rule added
Rule added (v6)
# ufw allow 8472/udp
Rule added
Rule added (v6)
# ufw allow 10250/tcp
Rule added
Rule added (v6)
# ufw allow 2379/tcp
Rule added
Rule added (v6)
# ufw allow 2380/tcp
Rule added
Rule added (v6)
k3s Nodes / Pods / Deployments
verify nodes, roles, pods and deployments
# kubectl get nodes -A
NAME         STATUS   ROLES                  AGE   VERSION
ubuntu2004   Ready    control-plane,master   11m   v1.21.1+k3s1

# kubectl get pods -A
NAMESPACE     NAME                                      READY   STATUS      RESTARTS   AGE
kube-system   helm-install-traefik-crd-8rjcf            0/1     Completed   2          13m
kube-system   helm-install-traefik-lwgcj                0/1     Completed   3          13m
kube-system   svclb-traefik-xtrcw                       2/2     Running     0          5m13s
kube-system   coredns-7448499f4d-6vrb7                  1/1     Running     5          13m
kube-system   traefik-97b44b794-q294l                   1/1     Running     0          5m14s
kube-system   local-path-provisioner-5ff76fc89d-pq5wb   1/1     Running     6          13m
kube-system   metrics-server-86cbb8457f-n4gsf           1/1     Running     6          13m

# kubectl get deployments -A
NAMESPACE     NAME                     READY   UP-TO-DATE   AVAILABLE   AGE
kube-system   coredns                  1/1     1            1           17m
kube-system   traefik                  1/1     1            1           8m50s
kube-system   local-path-provisioner   1/1     1            1           17m
kube-system   metrics-server           1/1     1            1           17m
Helm
Next thing is to install helm. Helm is a package manager for kubernetes, it will make easy to install applications.
curl -sL https://raw.githubusercontent.com/helm/helm/master/scripts/get-helm-3 | bash
output
Downloading https://get.helm.sh/helm-v3.6.0-linux-amd64.tar.gz
Verifying checksum... Done.
Preparing to install helm into /usr/local/bin
helm installed into /usr/local/bin/helm
helm version

version.BuildInfo{Version:"v3.6.0", GitCommit:"7f2df6467771a75f5646b7f12afb408590ed1755", GitTreeState:"clean", GoVersion:"go1.16.3"}
repo added
As a package manager, you can install k8s packages, named charts and you can find a lot of helm charts here https://artifacthub.io/. You can also add/install a single repo, I will explain this later.
# helm repo add nicholaswilde https://nicholaswilde.github.io/helm-charts/

"nicholaswilde" has been added to your repositories

# helm repo update
Hang tight while we grab the latest from your chart repositories...

Successfully got an update from the "nicholaswilde" chart repository
Update Complete. ⎈Happy Helming!⎈
hub Vs repo
basic difference between hub and repo is that hub is the official artifacthub. You can search charts there
helm search hub blogURL CHART VERSION APP VERSION DESCRIPTION
https://artifacthub.io/packages/helm/nicholaswi... 0.1.2 v1.3 Lightweight self-hosted facebook-styled PHP blog.
https://artifacthub.io/packages/helm/nicholaswi... 0.1.2 v2021.02 An ultra-lightweight blogging engine, written i...
https://artifacthub.io/packages/helm/bitnami/dr... 10.2.23 9.1.10 One of the most versatile open source content m...
https://artifacthub.io/packages/helm/bitnami/ghost 13.0.13 4.6.4 A simple, powerful publishing platform that all...
https://artifacthub.io/packages/helm/bitnami/jo... 10.1.10 3.9.27 PHP content management system (CMS) for publish...
https://artifacthub.io/packages/helm/nicholaswi... 0.1.1 0.1.1 A Self-Hosted, Twitter™-like Decentralised micr...
https://artifacthub.io/packages/helm/nicholaswi... 0.1.1 900b76a A self-hosted well uh wiki engine or content ma...
https://artifacthub.io/packages/helm/bitnami/wo... 11.0.13 5.7.2 Web publishing platform for building blogs and ...using a repo, means that you specify charts sources from single (or multiple) repos, usally outside of hub.
helm search repo blogNAME CHART VERSION APP VERSION DESCRIPTION
nicholaswilde/blog 0.1.2 v1.3 Lightweight self-hosted facebook-styled PHP blog.
nicholaswilde/chyrp-lite 0.1.2 v2021.02 An ultra-lightweight blogging engine, written i...
nicholaswilde/twtxt 0.1.1 0.1.1 A Self-Hosted, Twitter™-like Decentralised micr...
nicholaswilde/wiki 0.1.1 900b76a A self-hosted well uh wiki engine or content ma...
Install a blog engine via helm
before we continue with the installation of our blog engine, we need to set the kube config via a shell variable
kube configuration yaml file
export KUBECONFIG=/etc/rancher/k3s/k3s.yaml
kubectl-k3s, already knows where to find this yaml configuration file. kubectl is a link to k3s in our setup
# whereis kubectl
kubectl: /usr/local/bin/kubectl

# ls -l /usr/local/bin/kubectl
lrwxrwxrwx 1 root root 3 Jun  4 23:20 /usr/local/bin/kubectl -> k3s
but not helm that we just installed.
After that we can install our blog engine.
helm install chyrp-lite              \
  --set env.TZ="Europe/Athens"  \
  nicholaswilde/chyrp-lite
output
NAME: chyrp-lite
LAST DEPLOYED: Fri Jun  4 23:46:04 2021
NAMESPACE: default
STATUS: deployed
REVISION: 1
TEST SUITE: None
NOTES:
Get the application URL by running these commands:
  http://chyrp-lite.192.168.1.203.nip.io/
for the time being, ignore nip.io and verify the deployment
# kubectl get deployments
NAME         READY   UP-TO-DATE   AVAILABLE   AGE
chyrp-lite   1/1     1            1           2m15s

# kubectl get pods
NAME                          READY   STATUS    RESTARTS   AGE
chyrp-lite-5c544b455f-d2pzm   1/1     Running   0          2m18s
Port Forwarding
as this is a pod running through k3s inside a virtual machine on our host operating system, in order to visit the blog and finish the installation we need to expose the port.
Let’s find out if there is a service running
kubectl get service chyrp-lite
output
NAME         TYPE        CLUSTER-IP      EXTERNAL-IP   PORT(S)   AGE
chyrp-lite   ClusterIP   10.43.143.250   <none>        80/TCP    11h
okay we have a cluster ip.
you can also verify that our blog engine is running
curl -s 10.43.143.250/install.php | head

<!DOCTYPE html>
<html>
    <head>
        <meta charset="UTF-8">
        <title>Chyrp Lite Installer</title>
        <meta name="viewport" content="width = 800">
        <style type="text/css">
            @font-face {
                font-family: 'Open Sans webfont';
                src: url('./fonts/OpenSans-Regular.woff') format('woff');
and then port forward the pod tcp port to our virtual machine
kubectl port-forward service/chyrp-lite 80
output
Forwarding from 127.0.0.1:80 -> 80
Forwarding from [::1]:80 -> 80
k3s issue with TCP Port 80
Port 80 used by build-in load balancer by default
That means service port 80 will become 10080 on the host, but 8080 will become 8080 without any offset.
So the above command will not work, it will give you an 404 error.
We can disable LoadBalancer (we do not need it for this demo) but it is easier to just forward the service port to 10080
kubectl port-forward service/chyrp-lite 10080:80Forwarding from 127.0.0.1:10080 -> 80
Forwarding from [::1]:10080 -> 80
Handling connection for 10080
Handling connection for 10080
from our virtual machine we can verify
curl -s http://127.0.0.1:10080/install.php | head
it will produce
<!DOCTYPE html>
<html>
    <head>
        <meta charset="UTF-8">
        <title>Chyrp Lite Installer</title>
        <meta name="viewport" content="width = 800">
        <style type="text/css">
            @font-face {
                font-family: 'Open Sans webfont';
                src: url('./fonts/OpenSans-Regular.woff') format('woff');
ssh port forward
So now, we need to forward this TCP port from the virtual machine to our local machine. Using ssh, you should be able to do it like this from another terminal
ssh 192.168.122.42 -l ubuntu -L8080:127.0.0.1:10080
verify it
$ sudo ss -n -t -a 'sport = :10080'

State           Recv-Q          Send-Q                   Local Address:Port                    Peer Address:Port         Process
LISTEN          0               128                          127.0.0.1:10080                        0.0.0.0:*
LISTEN          0               128                              [::1]:10080                           [::]:*

$ curl -s http://localhost:10080/install.php | head

<!DOCTYPE html>
<html>
    <head>
        <meta charset="UTF-8">
        <title>Chyrp Lite Installer</title>
        <meta name="viewport" content="width = 800">
        <style type="text/css">
            @font-face {
                font-family: 'Open Sans webfont';
                src: url('./fonts/OpenSans-Regular.woff') format('woff');
I am forwarding to a high tcp port (> 1024) so my user can open a tcp port, eitherwise I need to be root.
finishing the installation
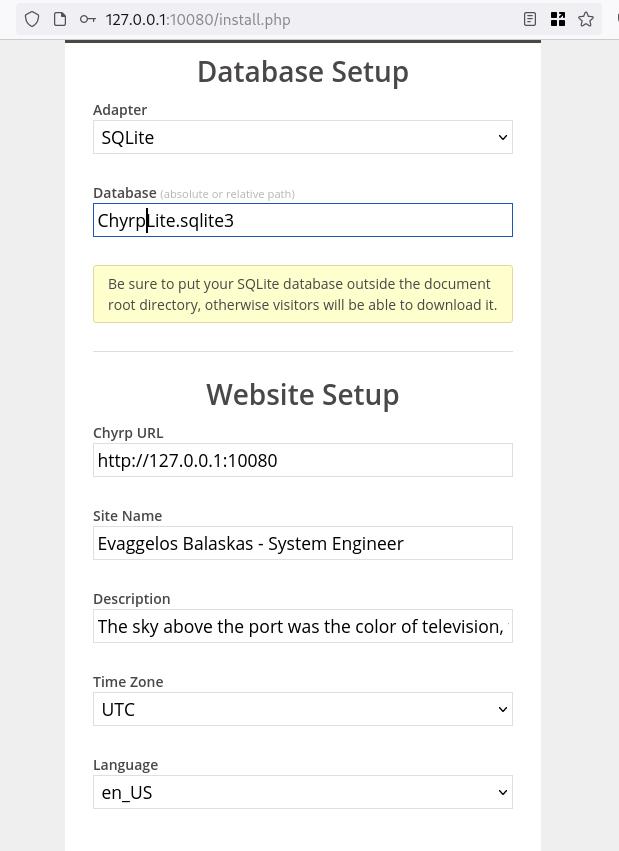
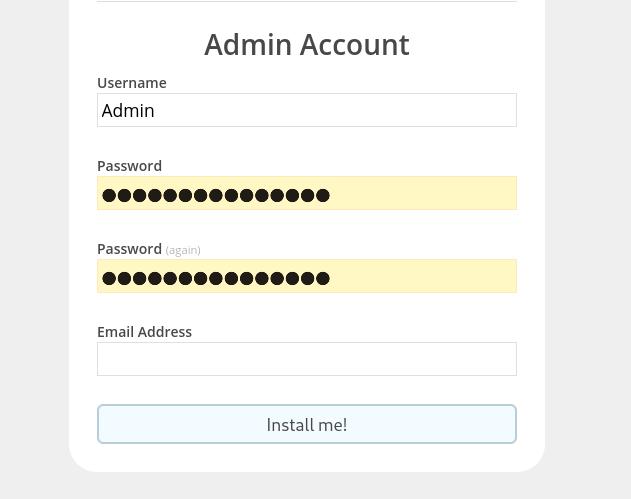
To finish the installation of our blog engine, we need to visit the below url from our browser
Database Setup
Admin Setup
Installation Completed
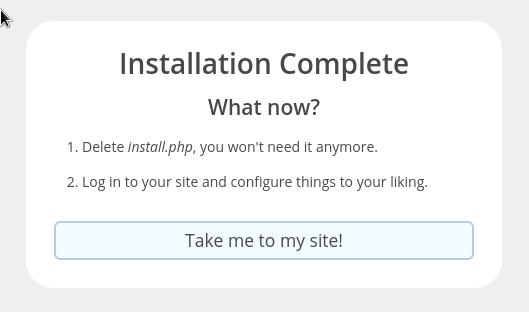
First blog post
that’s it !
I am using archlinux in my WSL for the last two (2) years and the whole experience is quite smooth. I wanted to test native docker will run within WSL and not with the windows docker/container service, so I installed docker. My main purpose is building packages so (for now) I do not need networking/routes or anything else.
WSL
ebal@myworklaptop:~$ uname -a
Linux myworklaptop 4.19.128-microsoft-standard #1 SMP Tue Jun 23 12:58:10 UTC 2020 x86_64 GNU/Linux

ebal@myworklaptop:~$ cat /etc/os-release
NAME="Arch Linux"
PRETTY_NAME="Arch Linux"
ID=arch
BUILD_ID=rolling
ANSI_COLOR="38;2;23;147;209"
HOME_URL="https://www.archlinux.org/"
DOCUMENTATION_URL="https://wiki.archlinux.org/"
SUPPORT_URL="https://bbs.archlinux.org/"
BUG_REPORT_URL="https://bugs.archlinux.org/"
LOGO=archlinux
Docker Install
$ sudo pacman -S docker

$ sudo pacman -Q docker
docker 1:20.10.6-1

$ sudo dockerd -v
Docker version 20.10.6, build 8728dd246c
Run docker
sudo dockerd -D-D is for debug
and now pull an alpine image
ebal@myworklaptop:~$ docker images
REPOSITORY   TAG       IMAGE ID   CREATED   SIZE

ebal@myworklaptop:~$ docker pull alpine:latest
latest: Pulling from library/alpine
540db60ca938: Pull complete
Digest: sha256:69e70a79f2d41ab5d637de98c1e0b055206ba40a8145e7bddb55ccc04e13cf8f
Status: Downloaded newer image for alpine:latest
docker.io/library/alpine:latest

ebal@myworklaptop:~$ docker images
REPOSITORY   TAG       IMAGE ID       CREATED       SIZE
alpine       latest    6dbb9cc54074   2 weeks ago   5.61MB
Test alpine image
docker run -ti alpine:latest ashperform a simple update
# apk update

fetch https://dl-cdn.alpinelinux.org/alpine/v3.13/main/x86_64/APKINDEX.tar.gz
fetch https://dl-cdn.alpinelinux.org/alpine/v3.13/community/x86_64/APKINDEX.tar.gz
v3.13.5-71-gfcabe3349a [https://dl-cdn.alpinelinux.org/alpine/v3.13/main]
v3.13.5-65-g28e7396caa [https://dl-cdn.alpinelinux.org/alpine/v3.13/community]

OK: 13887 distinct packages available
okay, seems that it is working.
Genie Systemd
as many already know, we can not run systemd inside WSL, at least not by default. So here comes genie !
A quick way into a systemd “bottle” for WSL
WSLv2 ONLY.
wsl.exe -l -v

  NAME            STATE           VERSION
* Archlinux       Running         2
  Ubuntu-20.04    Stopped         1
It will work on my arch.
Install Genie
genie comes by default with an archlinux artifact from github
curl -sLO https://github.com/arkane-systems/genie/releases/download/v1.40/genie-systemd-1.40-1-x86_64.pkg.tar.zst

sudo pacman -U genie-systemd-1.40-1-x86_64.pkg.tar.zst
$ pacman -Q genie-systemd
genie-systemd 1.40-1
daemonize
Genie has a dependency of daemonize.
In Archlinux, you can find the latest version of daemonize here:
https://gitlab.com/archlinux_build/daemonize
$ sudo pacman -U daemonize-1.7.8-1-x86_64.pkg.tar.zst

loading packages...
resolving dependencies...
looking for conflicting packages...

Package (1)  New Version  Net Change
daemonize    1.7.8-1        0.03 MiB
Total Installed Size:  0.03 MiB

:: Proceed with installation? [Y/n] y
$ pacman -Q daemonize
daemonize 1.7.8-1Is genie running ?
We can start as-root genie with a new shell:
# genie --version
1.40
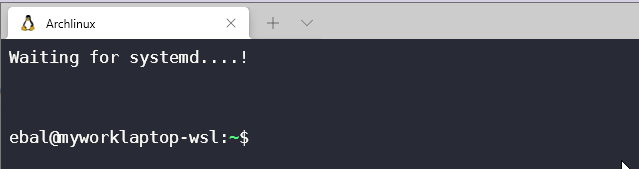
# genie -s
Waiting for systemd....!
# genie -r
running
okay !
Windows Terminal
In order to use systemd-genie by default, we need to run our WSL Archlinux with an initial command.
I use aka.ms/terminal to start/open my WSLv2 Archlinux so I had to edit the “Command Line” Option to this:
wsl.exe -d Archlinux genie -sYou can also verify that your WSL distro is down, with this
wsl.exe --shutdownthen fire up a new WSL distro!
Systemd Service
you can enable & start docker service unit,
$ sudo systemctl enable docker

$ sudo systemctl start  docker
so next time will auto-start:
$ docker images
REPOSITORY   TAG       IMAGE ID       CREATED       SIZE
alpine       latest    6dbb9cc54074   2 weeks ago   5.61MB
systemd
$ ps -e fuwwww | grep -i systemd
root           1  0.1  0.2  21096 10748 ?        Ss   14:27   0:00 systemd
root          29  0.0  0.2  30472 11168 ?        Ss   14:27   0:00 /usr/lib/systemd/systemd-journald
root          38  0.0  0.1  25672  7684 ?        Ss   14:27   0:00 /usr/lib/systemd/systemd-udevd
dbus          63  0.0  0.1  12052  5736 ?        Ss   14:27   0:00 /usr/bin/dbus-daemon --system --address=systemd: --nofork --nopidfile --systemd-activation --syslog-only
root          65  0.0  0.1  14600  7224 ?        Ss   14:27   0:00 /usr/lib/systemd/systemd-logind
root         211  0.0  0.1  14176  6872 ?        Ss   14:27   0:00 /usr/lib/systemd/systemd-machined
ebal         312  0.0  0.0   3164   808 pts/1    S+   14:30   0:00  _ grep -i systemd
ebal         215  0.0  0.2  16036  8956 ?        Ss   14:27   0:00 /usr/lib/systemd/systemd --user
$ systemctl status docker
* docker.service - Docker Application Container Engine
     Loaded: loaded (/usr/lib/systemd/system/docker.service; enabled; vendor preset: disabled)
     Active: active (running) since Sat 2021-05-01 14:27:12 EEST; 3min 22s ago
TriggeredBy: * docker.socket
       Docs: https://docs.docker.com
   Main PID: 64 (dockerd)
      Tasks: 17 (limit: 4715)
     Memory: 167.9M
     CGroup: /system.slice/docker.service
             |-64 /usr/bin/dockerd -H fd://
             `-80 containerd --config /var/run/docker/containerd/containerd.toml --log-level info

May 01 14:27:12 myworklaptop-wsl systemd[1]: Started Docker Application Container Engine.
May 01 14:27:12 myworklaptop-wsl dockerd[64]: time="2021-05-01T14:27:12.303580300+03:00" level=info msg="AP>
that’s it !
I am an archlinux user using Sony WH-1000XM3 bluetooth noise-cancellation headphones. I am also using pulseaudio and it took me a while to switch the bluetooth headphones to HSP/HFP profile so the microphone can work too. Switching the bluetooth profile of your headphones to HeadSet Audio works but it is only monophonic audio and without noise-cancellation and I had to switch to piperwire also. But at least now the microphone works!
I was wondering how distros that by default have already switched to pipewire deal with this situation. So I started a fedora 34 (beta) edition and attached both my bluetooth adapter TP-LINK UB400 v1 and my web camera Logitech HD Webcam C270.
The test should be to open a jitsi meet and a zoom test meeting and verify that my headphones can work without me doing any stranger CLI magic.
tldr; works out of the box !
lsusb
[root@fedora ~]# lsusb

Bus 002 Device 001: ID 1d6b:0003 Linux Foundation 3.0 root hub
Bus 001 Device 004: ID 046d:0825 Logitech, Inc. Webcam C270
Bus 001 Device 003: ID 0a12:0001 Cambridge Silicon Radio, Ltd Bluetooth Dongle (HCI mode)
Bus 001 Device 002: ID 0627:0001 Adomax Technology Co., Ltd QEMU USB Tablet
Bus 001 Device 001: ID 1d6b:0002 Linux Foundation 2.0 root hub
as you can see both usb devices have properly attached to fedora34
kernel
we need Linux kernel > 5.10.x to have a proper support
[root@fedora ~]# uname -a
Linux fedora 5.11.10-300.fc34.x86_64 #1 SMP Thu Mar 25 14:03:32 UTC 2021 x86_64 x86_64 x86_64 GNU/Linux
pipewire
and of-course piperwire installed
[root@fedora ~]# rpm -qa | grep -Ei 'blue|pipe|pulse'

libpipeline-1.5.3-2.fc34.x86_64
pulseaudio-libs-14.2-3.fc34.x86_64
pulseaudio-libs-glib2-14.2-3.fc34.x86_64
pipewire0.2-libs-0.2.7-5.fc34.x86_64
bluez-libs-5.56-4.fc34.x86_64
pipewire-libs-0.3.24-4.fc34.x86_64
pipewire-0.3.24-4.fc34.x86_64
bluez-5.56-4.fc34.x86_64
bluez-obexd-5.56-4.fc34.x86_64
pipewire-gstreamer-0.3.24-4.fc34.x86_64
pipewire-pulseaudio-0.3.24-4.fc34.x86_64
gnome-bluetooth-libs-3.34.5-1.fc34.x86_64
gnome-bluetooth-3.34.5-1.fc34.x86_64
bluez-cups-5.56-4.fc34.x86_64
NetworkManager-bluetooth-1.30.2-1.fc34.x86_64
pipewire-alsa-0.3.24-4.fc34.x86_64
pipewire-jack-audio-connection-kit-0.3.24-4.fc34.x86_64
pipewire-utils-0.3.24-4.fc34.x86_64
screenshots
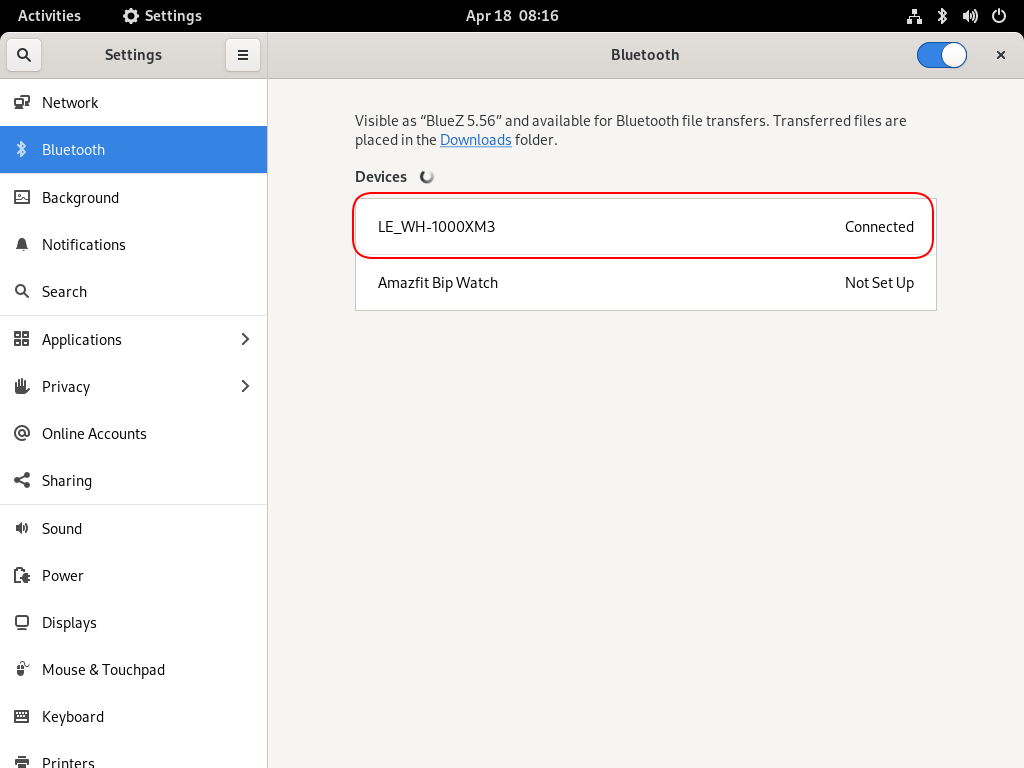
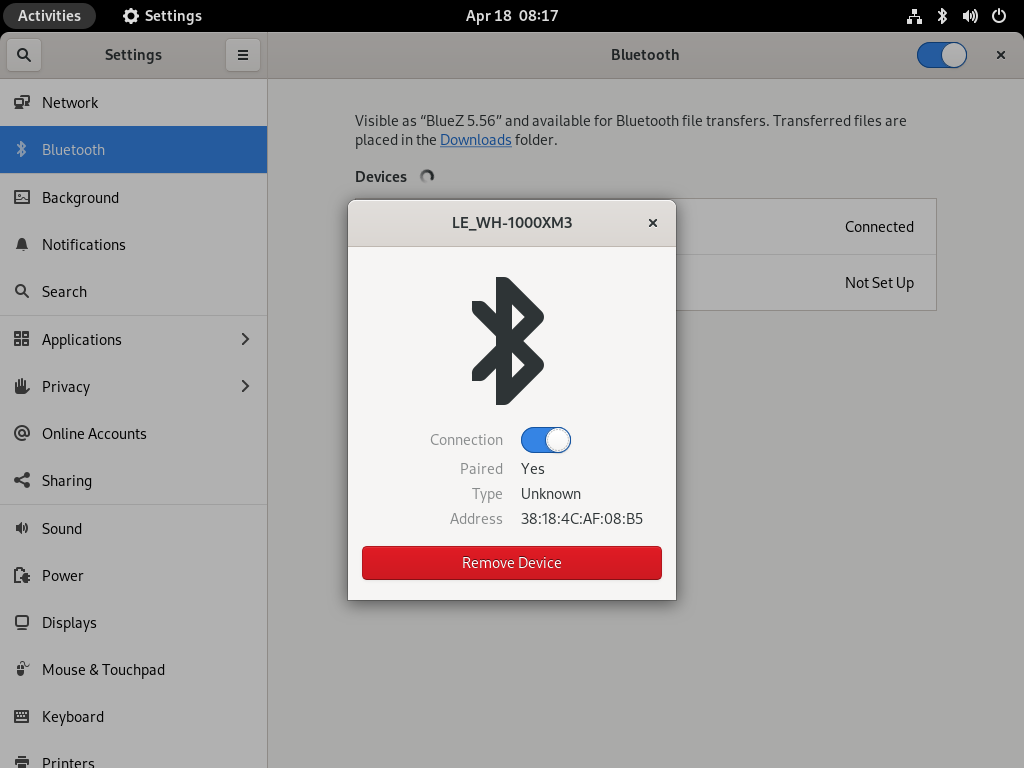
Bluetooth Profiles
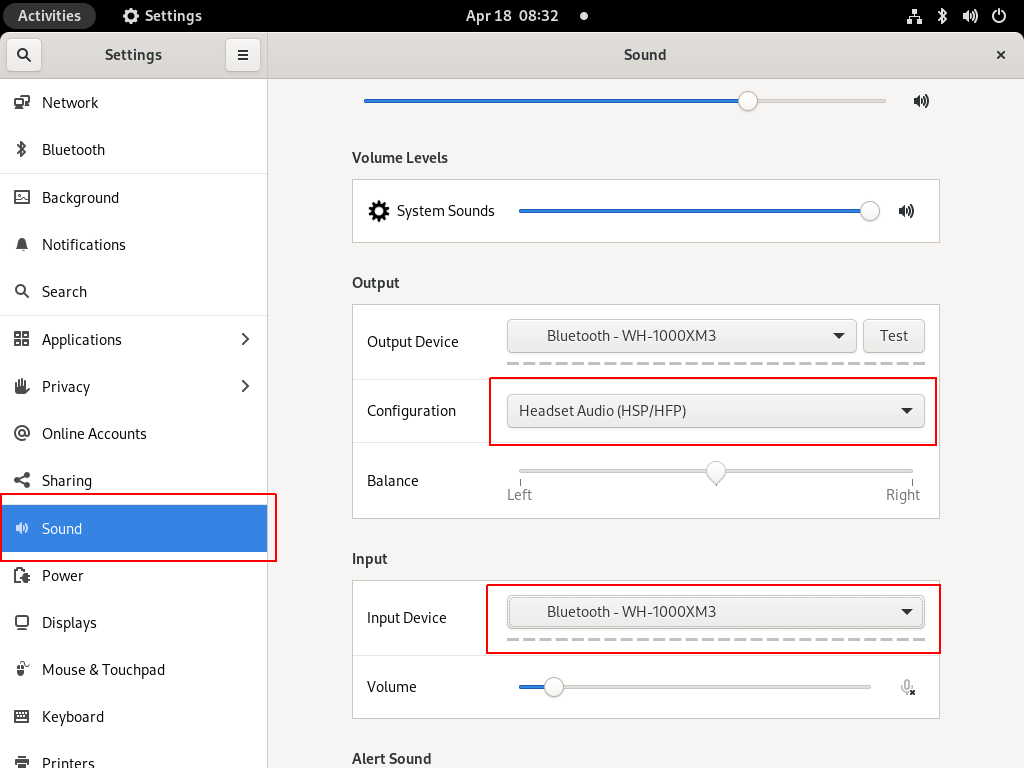
Online Meetings


In WSLv2 there is a way to limit the resources of your linux distro (cpu/memory) to have a better performance on you win10.
To give you an example, this is how it starts on my HP-G5
~$ free -m
               total        used        free      shared  buffcache   available
Mem:           12659          68       12555           0          34       12425
Swap:           4096           0        4096

~$ grep -Ec proc /proc/cpuinfo
8
8 CPU threads, 12G
wslconfig
To define your specs, open cmd and change to your user profile directory
~> cd %UserProfile%
Verify that your WSL distros are stopped:
~> wsl.exe -l -v
  NAME            STATE           VERSION
* Archlinux       Running         2
  Ubuntu-20.04    Stopped         1

~> wsl.exe -t Archlinux -v

~> wsl.exe -l -v
  NAME            STATE           VERSION
* Archlinux       Stopped         2
  Ubuntu-20.04    Stopped         1
and terminate wsl
~> wsl.exe --shutdown
Create a new (or edit your previous) wsl config file
~> notepad.exe .wslconfigMy current setup is
~> type .wslconfig

[wsl2]
memory=4GB   # Limits VM memory in WSL 2 to 4 GB
processors=2 # Makes the WSL 2 VM use two virtual processors
swap=2GB     # How much swap space to add to the WSL2 VM. 0 for no swap file.
swapFile=C:\wsl2-swap.vhdx
as you can see, I want 4GB of RAM and 2 CPU , but also I want a 2GB swap file.
Edit this file according to your needs. The full settings can be found here wsl/wsl-config.
Reminder: you have to shutdown WSL
wsl.exe --shutdown
WSLv2 Limited
Now start your fav linux distro and verify
~$ grep -Ec proc /proc/cpuinfo
2

~$ grep -Ei MemTotal /proc/meminfo
MemTotal:        4028776 kB

~$ free
               total        used        free      shared  buffcache   available
Mem:         4028776       46348     3947056          64       35372     3848616
Swap:        2097152           0     2097152
that’s it !

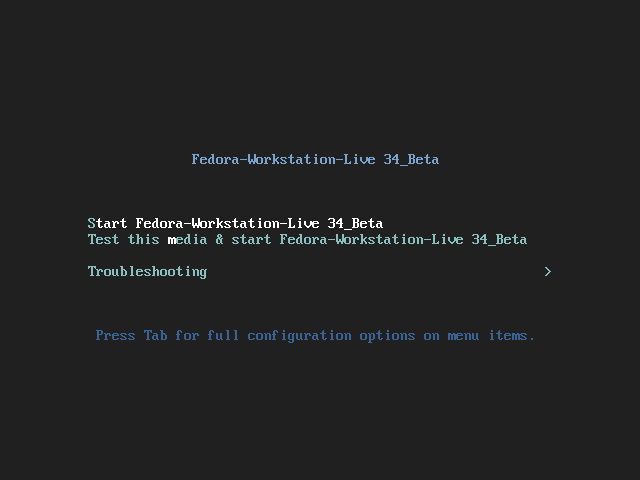
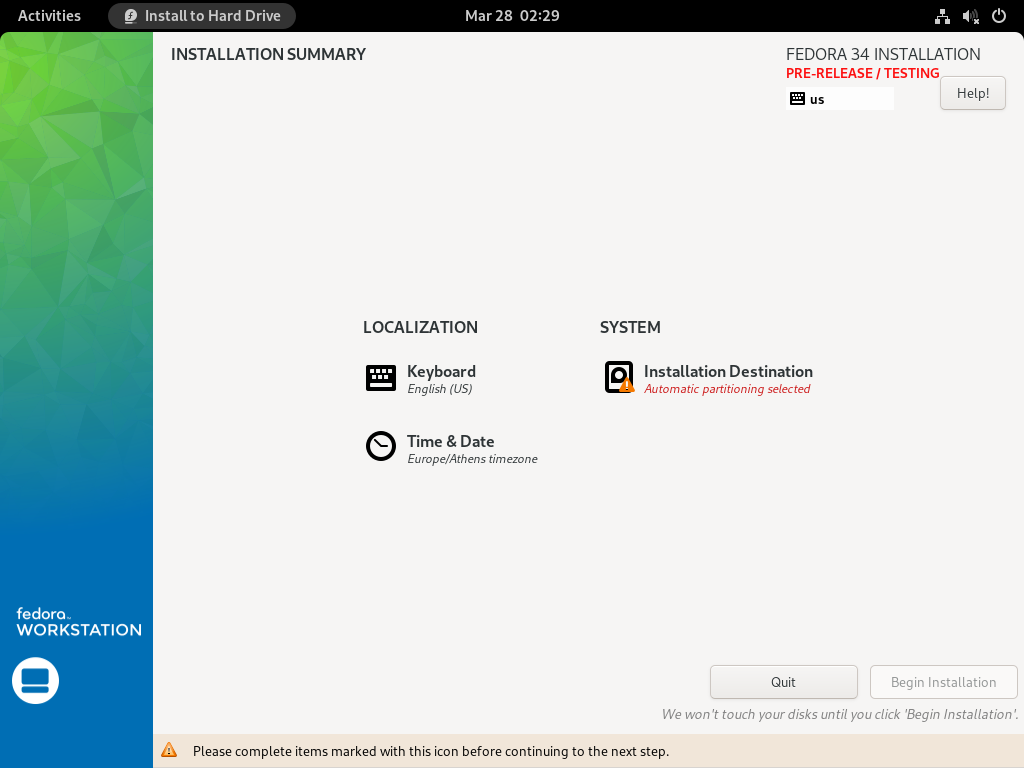

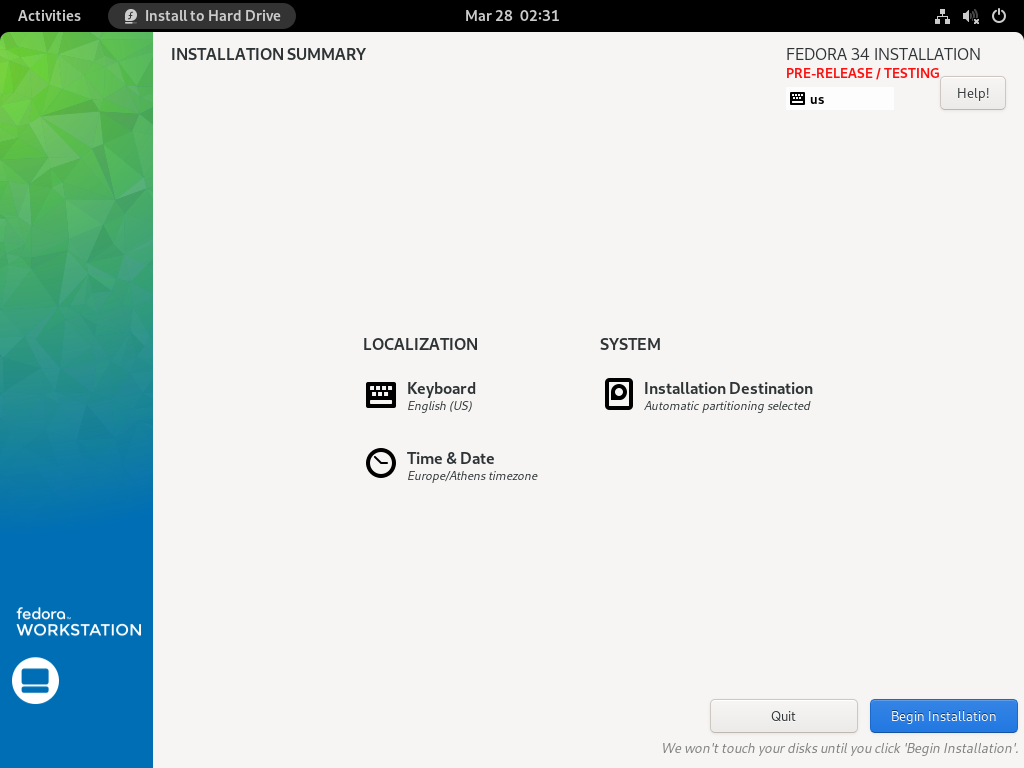
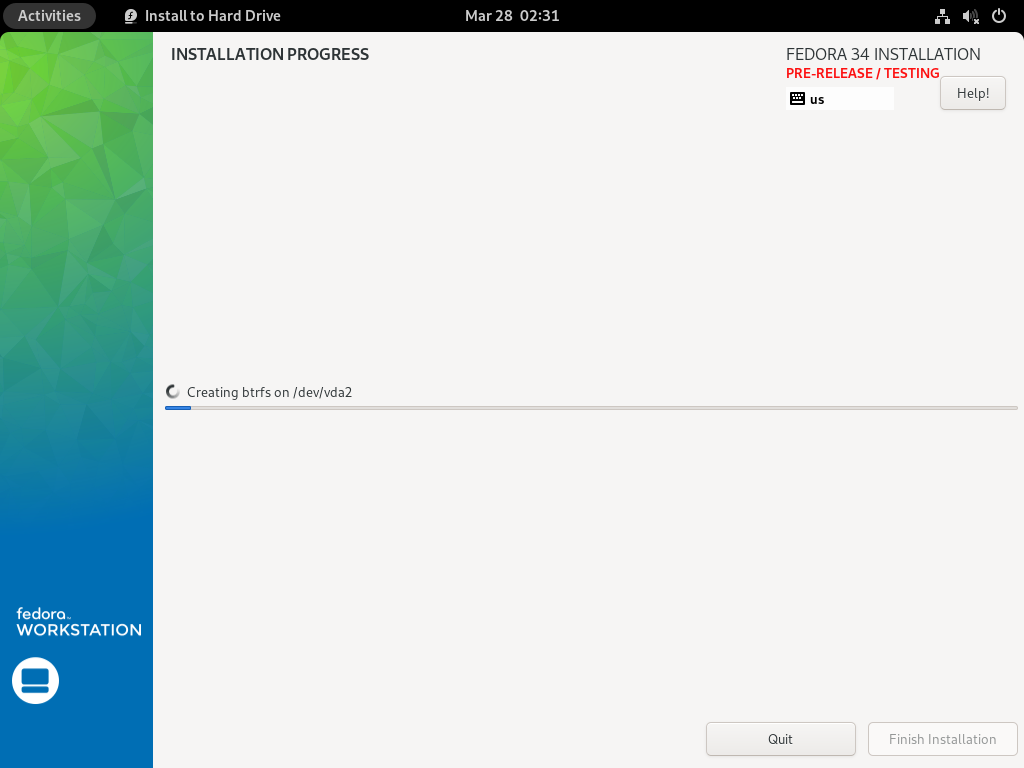

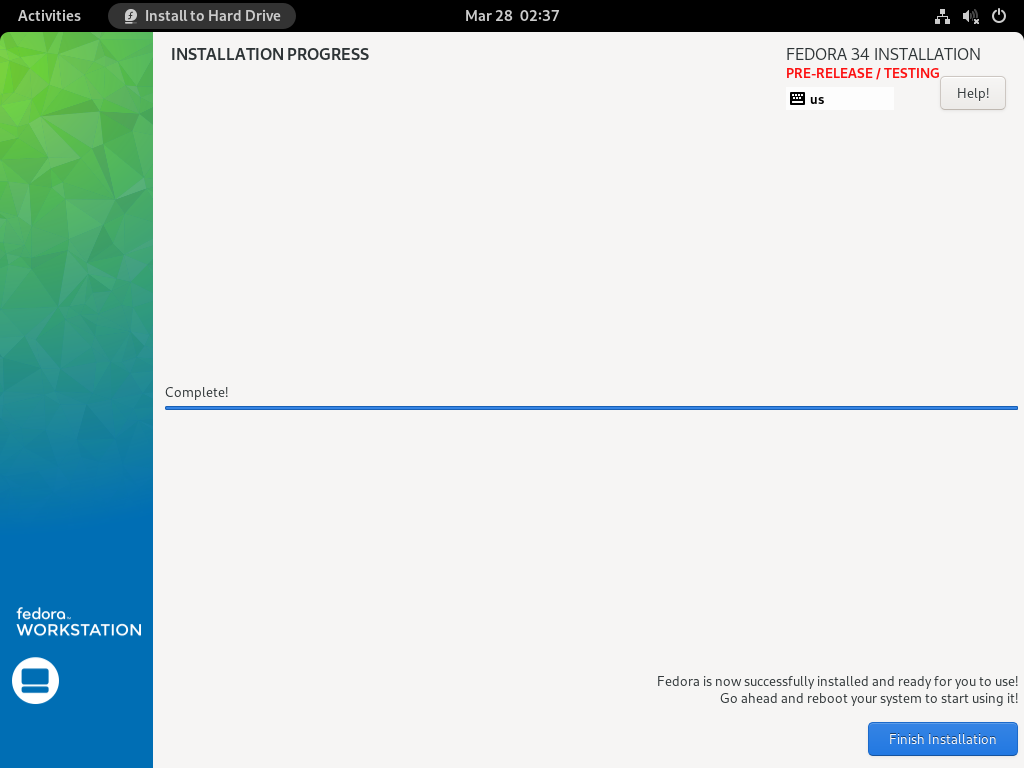


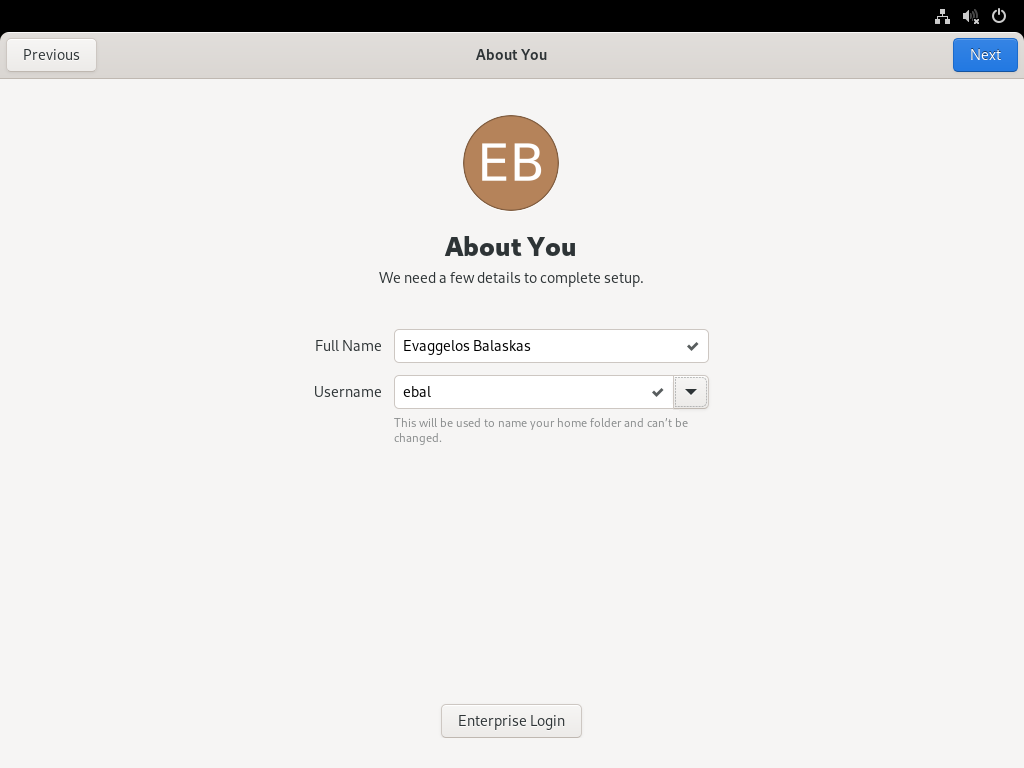


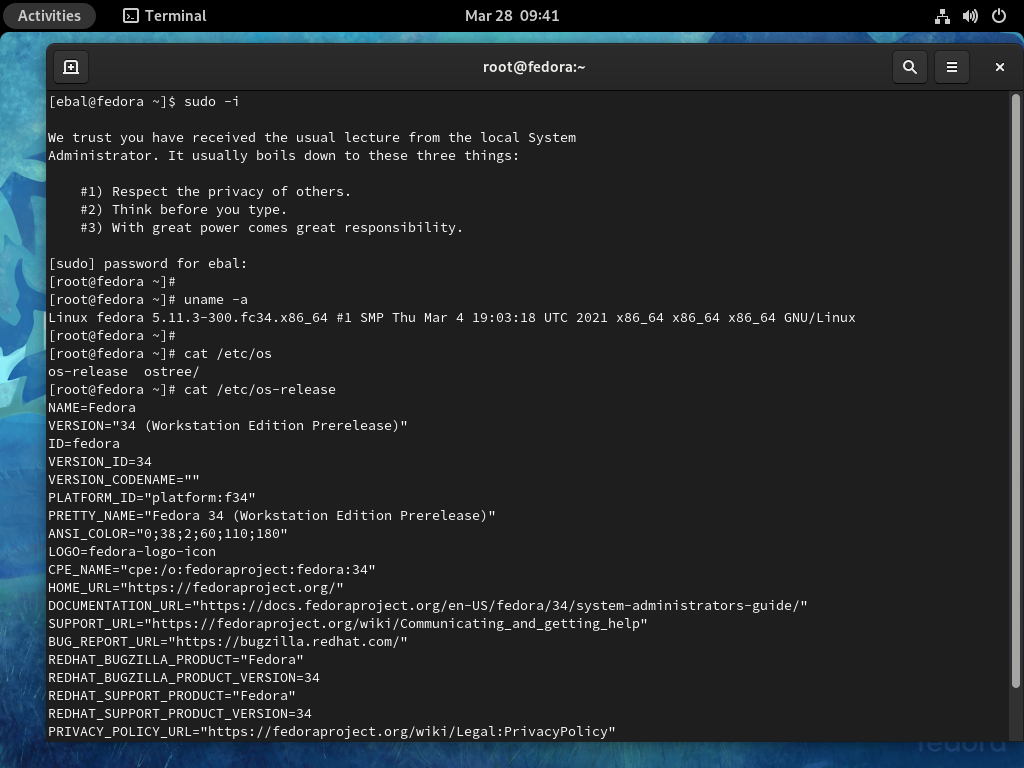


I upgraded my home internet connection and as a result I had to give up my ~15y Static IP. Having an ephemeral Dynamic IP means I need to use a dynamic dns service to access my homepc. Although the ISP’s CPE (router) has a few public dynamic dns services, I chose to create a simple solution on my own self-hosted DNS infra.
There are a couple of ways to do that, PowerDNS supports Dynamic Updates but I do not want to open PowerDNS to the internet for this kind of operations. I just want to use cron with a simple curl over https.
PowerDNS WebAPI
to enable and use the Built-in Webserver and HTTP API we need to update our configuration:
/etc/pdns/pdns.conf
api-key=0123456789ABCDEF
api=yes
and restart powerdns auth server.
verify it
ss -tnl 'sport = :8081'State Recv-Q Send-Q Local Address:Port Peer Address:Port
LISTEN 0 10 127.0.0.1:8081 *:*
WebServer API in PHP
Next to build our API in PHP
Basic Auth
By using https means that the transport layer is encrypted so we only need to create a basic auth mechanism.
<?php
  if ( !isset($_SERVER["PHP_AUTH_USER"]) ) {
      header("WWW-Authenticate: Basic realm='My Realm'");
      header("HTTP/1.0 401 Unauthorized");
      echo "Restricted area: Only Authorized Personnel Are Allowed to Enter This Area";
      exit;
  } else {
    // code goes here
  }
?>
by sending Basic Auth headers, the _SERVER php array variable will contain two extra variables
$_SERVER["PHP_AUTH_USER"]
$_SERVER["PHP_AUTH_PW"]
We do not need to setup an external IDM/LDAP or any other user management system just for this usecase (single user access).
and we can use something like:
<?php
  if (($_SERVER["PHP_AUTH_USER"] == "username") && ($_SERVER["PHP_AUTH_PW"] == "very_secret_password")){
    // code goes here
  }
?>
RRSet Object
We need to create the RRSet Object
here is a simple example
<?php
  $comments = array(
  );

  $record = array(
      array(
          "disabled"  => False,
          "content"   => $_SERVER["REMOTE_ADDR"]
      )
  );

  $rrsets = array(
      array(
          "name"          => "dyndns.example.org.",
          "type"          => "A",
          "ttl"           => 60,
          "changetype"    => "REPLACE",
          "records"       => $record,
          "comments"      => $comments
      )
  );

  $data = array (
      "rrsets" => $rrsets
  );

?>
by running this data set to json_encode should return something like this
{
  "rrsets": [
    {
      "changetype": "REPLACE",
      "comments": [],
      "name": "dyndns.example.org.",
      "records": [
        {
          "content": "1.2.3.4",
          "disabled": false
        }
      ],
      "ttl": 60,
      "type": "A"
    }
  ]
}
be sure to verify that records, comments and rrsets are also arrays !
Stream Context
Next thing to create our stream context
$API_TOKEN = "0123456789ABCDEF";
$URL = "http://127.0.0.1:8081/api/v1/servers/localhost/zones/example.org";

$stream_options = array(
    "http" => array(
        "method"    => "PATCH",
        "header"    => "Content-type: application/json \r\n" .
                        "X-API-Key: $API_TOKEN",
        "content"   => json_encode($data),
        "timeout"   => 3
    )
);

$context = stream_context_create($stream_options);
Be aware of " \r\n" . in header field, this took me more time than it should ! To have multiple header fiels into the http stream, you need (I don’t know why) to carriage return them.
Get Zone details
Before continue, let’s make a small script to verify that we can successfully talk to the PowerDNS HTTP API with php
<?php
  $API_TOKEN = "0123456789ABCDEF";
  $URL = "http://127.0.0.1:8081/api/v1/servers/localhost/zones/example.org";

  $stream_options = array(
      "http" => array(
          "method"    => "GET",
          "header"    => "Content-type: application/jsonrn".
                          "X-API-Key: $API_TOKEN"
      )
  );

  $context = stream_context_create($stream_options);

  echo file_get_contents($URL, false, $context);
?>
by running this:
php get.php | jq .we should get the records of our zone in json format.
Cron Entry
you should be able to put the entire codebase together by now, so let’s work on the last component of our self-hosted dynamic dns server, how to update our record via curl
curl -sL https://username:very_secret_password@example.org/dyndns.phpevery minute should do the trick
# dyndns
* * * * * curl -sL https://username:very_secret_password@example.org/dyndns.php
That’s it !
Hi! I’m writing this article as a mini-HOWTO on how to setup a btrfs-raid1 volume on encrypted disks (luks). This page servers as my personal guide/documentation, althought you can use it with little intervention.
Disclaimer: Be very careful! This is a mini-HOWTO article, do not copy/paste commands. Modify them to fit your environment.
$ date -R
Thu, 03 Dec 2020 07:58:49 +0200

Prologue
I had to replace one of my existing data/media setup (btrfs-raid0) due to some random hardware errors in one of the disks. The existing disks are 7.1y WD 1TB and the new disks are WD Purple 4TB.
Western Digital Green  1TB, about  70€ each, SATA III (6 Gbit/s), 7200 RPM, 64 MB Cache
Western Digital Purple 4TB, about 100€ each, SATA III (6 Gbit/s), 5400 RPM, 64 MB Cache
This will give me about 3.64T (from 1.86T). I had concerns with the slower RPM but in the end of this article, you will see some related stats.
My primarly daily use is streaming media (video/audio/images) via minidlna instead of cifs/nfs (samba), although the service is still up & running.
Disks
It is important to use disks with the exact same size and speed. Usually for Raid 1 purposes, I prefer using the same model. One can argue that diversity of models and manufactures to reduce possible firmware issues of a specific series should be preferable. When working with Raid 1, the most important things to consider are:
- Geometry (size)
- RPM (speed)
and all the disks should have the same specs, otherwise size and speed will downgraded to the smaller and slower disk.
Identify Disks
the two (2) Western Digital Purple 4TB are manufacture model: WDC WD40PURZ
The system sees them as:
$ sudo find /sys/devices -type f -name model -exec cat {} +

WDC WD40PURZ-85A
WDC WD40PURZ-85T
try to identify them from the kernel with list block devices:
$ lsblk

NAME         MAJ:MIN RM   SIZE RO TYPE  MOUNTPOINT
sdc            8:32   0   3.6T  0 disk
sde            8:64   0   3.6T  0 disk
verify it with hwinfo
$ hwinfo --short --disk
disk:
  /dev/sde             WDC WD40PURZ-85A
  /dev/sdc             WDC WD40PURZ-85T

$ hwinfo --block --short

  /dev/sde             WDC WD40PURZ-85A
  /dev/sdc             WDC WD40PURZ-85T
with list hardware:
$ sudo lshw -short | grep disk

/0/100/1f.5/0        /dev/sdc   disk           4TB WDC WD40PURZ-85T
/0/100/1f.5/1        /dev/sde   disk           4TB WDC WD40PURZ-85A

$ sudo lshw -class disk -json | jq -r .[].product

WDC WD40PURZ-85T
WDC WD40PURZ-85A
Luks
Create Random Encrypted keys
I prefer to use random generated keys for the disk encryption. This is also useful for automated scripts (encrypt/decrypt disks) instead of typing a pass phrase.
Create a folder to save the encrypted keys:
$ sudo mkdir -pv /etc/crypttab.keys/
create keys with dd against urandom:
WD40PURZ-85A
$ sudo dd if=/dev/urandom of=/etc/crypttab.keys/WD40PURZ-85A bs=4096 count=1

1+0 records in
1+0 records out
4096 bytes (4.1 kB, 4.0 KiB) copied, 0.00015914 s, 25.7 MB/s
WD40PURZ-85T
$ sudo dd if=/dev/urandom of=/etc/crypttab.keys/WD40PURZ-85T bs=4096 count=1

1+0 records in
1+0 records out
4096 bytes (4.1 kB, 4.0 KiB) copied, 0.000135452 s, 30.2 MB/s
verify two (2) 4k size random keys, exist on the above directory with list files:
$ sudo ls -l /etc/crypttab.keys/WD40PURZ-85*

-rw-r--r-- 1 root root 4096 Dec  3 08:00 /etc/crypttab.keys/WD40PURZ-85A
-rw-r--r-- 1 root root 4096 Dec  3 08:00 /etc/crypttab.keys/WD40PURZ-85T
Format & Encrypt Hard Disks
It is time to format and encrypt the hard disks with Luks
Be very careful, choose the correct disk, type uppercase YES to confirm.
$ sudo  cryptsetup luksFormat /dev/sde --key-file /etc/crypttab.keys/WD40PURZ-85A

WARNING!
========
This will overwrite data on /dev/sde irrevocably.

Are you sure? (Type 'yes' in capital letters): YES
$ sudo  cryptsetup luksFormat /dev/sdc --key-file /etc/crypttab.keys/WD40PURZ-85T

WARNING!
========
This will overwrite data on /dev/sdc irrevocably.

Are you sure? (Type 'yes' in capital letters): YES
Verify Encrypted Disks
print block device attributes:
$ sudo  blkid | tail -2

/dev/sde: UUID="d5800c02-2840-4ba9-9177-4d8c35edffac" TYPE="crypto_LUKS"
/dev/sdc: UUID="2ffb6115-09fb-4385-a3c9-404df3a9d3bd" TYPE="crypto_LUKS"
Open and Decrypt
opening encrypted disks with luks
- WD40PURZ-85A
$ sudo cryptsetup luksOpen /dev/disk/by-uuid/d5800c02-2840-4ba9-9177-4d8c35edffac WD40PURZ-85A -d /etc/crypttab.keys/WD40PURZ-85A
- WD40PURZ-85T
$ sudo cryptsetup luksOpen /dev/disk/by-uuid/2ffb6115-09fb-4385-a3c9-404df3a9d3bd WD40PURZ-85T -d /etc/crypttab.keys/WD40PURZ-85T
Verify Status
- WD40PURZ-85A
$ sudo  cryptsetup status   /dev/mapper/WD40PURZ-85A

/dev/mapper/WD40PURZ-85A is active.

  type:         LUKS2
  cipher:       aes-xts-plain64
  keysize:      512 bits
  key location: keyring
  device:       /dev/sde
  sector size:  512
  offset:       32768 sectors
  size:         7814004400 sectors
  mode:         read/write
- WD40PURZ-85T
$ sudo  cryptsetup status   /dev/mapper/WD40PURZ-85T

/dev/mapper/WD40PURZ-85T is active.

  type:         LUKS2
  cipher:       aes-xts-plain64
  keysize:      512 bits
  key location: keyring
  device:       /dev/sdc
  sector size:  512
  offset:       32768 sectors
  size:         7814004400 sectors
  mode:         read/write
BTRFS
Current disks
$sudo btrfs device stats /mnt/data/

[/dev/mapper/western1T].write_io_errs     28632
[/dev/mapper/western1T].read_io_errs      916948985
[/dev/mapper/western1T].flush_io_errs     0
[/dev/mapper/western1T].corruption_errs   0
[/dev/mapper/western1T].generation_errs   0
[/dev/mapper/western1Tb].write_io_errs    0
[/dev/mapper/western1Tb].read_io_errs     0
[/dev/mapper/western1Tb].flush_io_errs    0
[/dev/mapper/western1Tb].corruption_errs  0
[/dev/mapper/western1Tb].generation_errs  0
There are a lot of write/read errors :(
btrfs version
$ sudo  btrfs --version
btrfs-progs v5.9

$ sudo  mkfs.btrfs --version
mkfs.btrfs, part of btrfs-progs v5.9
Create BTRFS Raid 1 Filesystem
by using mkfs, selecting a disk label, choosing raid1 metadata and data to be on both disks (mirror):
$ sudo mkfs.btrfs
  -L WD40PURZ
  -m raid1
  -d raid1
  /dev/mapper/WD40PURZ-85A
  /dev/mapper/WD40PURZ-85T
or in one-liner (as-root):
mkfs.btrfs -L WD40PURZ -m raid1 -d raid1 /dev/mapper/WD40PURZ-85A /dev/mapper/WD40PURZ-85T
format output
btrfs-progs v5.9
See http://btrfs.wiki.kernel.org for more information.

Label:              WD40PURZ
UUID:               095d3b5c-58dc-4893-a79a-98d56a84d75d
Node size:          16384
Sector size:        4096
Filesystem size:    7.28TiB
Block group profiles:
  Data:             RAID1             1.00GiB
  Metadata:         RAID1             1.00GiB
  System:           RAID1             8.00MiB
SSD detected:       no
Incompat features:  extref, skinny-metadata
Runtime features:
Checksum:           crc32c
Number of devices:  2
Devices:
   ID        SIZE  PATH
    1     3.64TiB  /dev/mapper/WD40PURZ-85A
    2     3.64TiB  /dev/mapper/WD40PURZ-85T
Notice that both disks have the same UUID (Universal Unique IDentifier) number:
UUID: 095d3b5c-58dc-4893-a79a-98d56a84d75dVerify block device
$ blkid | tail -2

/dev/mapper/WD40PURZ-85A: LABEL="WD40PURZ" UUID="095d3b5c-58dc-4893-a79a-98d56a84d75d" UUID_SUB="75c9e028-2793-4e74-9301-2b443d922c40" BLOCK_SIZE="4096" TYPE="btrfs"
/dev/mapper/WD40PURZ-85T: LABEL="WD40PURZ" UUID="095d3b5c-58dc-4893-a79a-98d56a84d75d" UUID_SUB="2ee4ec50-f221-44a7-aeac-aa75de8cdd86" BLOCK_SIZE="4096" TYPE="btrfs"
once more, be aware of the same UUID: 095d3b5c-58dc-4893-a79a-98d56a84d75d on both disks!
Mount new block disk
create a new mount point
$ sudo  mkdir -pv /mnt/WD40PURZ
mkdir: created directory '/mnt/WD40PURZ'
append the below entry in /etc/fstab (as-root)
echo 'UUID=095d3b5c-58dc-4893-a79a-98d56a84d75d /mnt/WD40PURZ auto defaults,noauto,user,exec 0 0' >> /etc/fstab
and finally, mount it!
$ sudo  mount /mnt/WD40PURZ

$ mount | grep WD
/dev/mapper/WD40PURZ-85A on /mnt/WD40PURZ type btrfs (rw,nosuid,nodev,relatime,space_cache,subvolid=5,subvol=/)
Disk Usage
check disk usage and free space for the new encrypted mount point
$ df -h /mnt/WD40PURZ/

Filesystem                Size  Used Avail Use% Mounted on
/dev/mapper/WD40PURZ-85A  3.7T  3.4M  3.7T   1% /mnt/WD40PURZ
btrfs filesystem disk usage
$ btrfs filesystem df /mnt/WD40PURZ | column -t

Data,           RAID1:   total=1.00GiB,  used=512.00KiB
System,         RAID1:   total=8.00MiB,  used=16.00KiB
Metadata,       RAID1:   total=1.00GiB,  used=112.00KiB
GlobalReserve,  single:  total=3.25MiB,  used=0.00B
btrfs filesystem show
$ sudo btrfs filesystem show /mnt/WD40PURZ

Label: 'WD40PURZ'  uuid: 095d3b5c-58dc-4893-a79a-98d56a84d75d
    Total devices 2 FS bytes used 640.00KiB
    devid    1 size 3.64TiB used 2.01GiB path /dev/mapper/WD40PURZ-85A
    devid    2 size 3.64TiB used 2.01GiB path /dev/mapper/WD40PURZ-85T
stats
$ sudo  btrfs device stats /mnt/WD40PURZ/

[/dev/mapper/WD40PURZ-85A].write_io_errs    0
[/dev/mapper/WD40PURZ-85A].read_io_errs     0
[/dev/mapper/WD40PURZ-85A].flush_io_errs    0
[/dev/mapper/WD40PURZ-85A].corruption_errs  0
[/dev/mapper/WD40PURZ-85A].generation_errs  0
[/dev/mapper/WD40PURZ-85T].write_io_errs    0
[/dev/mapper/WD40PURZ-85T].read_io_errs     0
[/dev/mapper/WD40PURZ-85T].flush_io_errs    0
[/dev/mapper/WD40PURZ-85T].corruption_errs  0
[/dev/mapper/WD40PURZ-85T].generation_errs  0
btrfs fi disk usage
btrfs filesystem disk usage
$ sudo  btrfs filesystem usage /mnt/WD40PURZ

Overall:
    Device size:                  7.28TiB
    Device allocated:             4.02GiB
    Device unallocated:           7.27TiB
    Device missing:                 0.00B
    Used:                         1.25MiB
    Free (estimated):             3.64TiB   (min: 3.64TiB)
    Data ratio:                      2.00
    Metadata ratio:                  2.00
    Global reserve:               3.25MiB   (used: 0.00B)
    Multiple profiles:                 no

Data,RAID1: Size:1.00GiB, Used:512.00KiB (0.05%)
   /dev/mapper/WD40PURZ-85A    1.00GiB
   /dev/mapper/WD40PURZ-85T    1.00GiB

Metadata,RAID1: Size:1.00GiB, Used:112.00KiB (0.01%)
   /dev/mapper/WD40PURZ-85A    1.00GiB
   /dev/mapper/WD40PURZ-85T    1.00GiB

System,RAID1: Size:8.00MiB, Used:16.00KiB (0.20%)
   /dev/mapper/WD40PURZ-85A    8.00MiB
   /dev/mapper/WD40PURZ-85T    8.00MiB

Unallocated:
   /dev/mapper/WD40PURZ-85A    3.64TiB
   /dev/mapper/WD40PURZ-85T    3.64TiB
Speed
Using hdparm to test/get some speed stats
$ sudo  hdparm -tT /dev/sde

/dev/sde:
 Timing cached reads:    25224 MB in  1.99 seconds = 12662.08 MB/sec
 Timing buffered disk reads: 544 MB in  3.01 seconds = 181.02 MB/sec

$ sudo  hdparm -tT /dev/sdc

/dev/sdc:
 Timing cached reads:    24852 MB in  1.99 seconds = 12474.20 MB/sec
 Timing buffered disk reads: 534 MB in  3.00 seconds = 177.85 MB/sec

$ sudo  hdparm -tT /dev/disk/by-uuid/095d3b5c-58dc-4893-a79a-98d56a84d75d

/dev/disk/by-uuid/095d3b5c-58dc-4893-a79a-98d56a84d75d:
 Timing cached reads:   25058 MB in  1.99 seconds = 12577.91 MB/sec
 HDIO_DRIVE_CMD(identify) failed: Inappropriate ioctl for device
 Timing buffered disk reads: 530 MB in  3.00 seconds = 176.56 MB/sec
These are the new disks with 5400 rpm, let’s see what the old 7200 rpm disk shows here:
/dev/sdb:
 Timing cached reads:    26052 MB in  1.99 seconds = 13077.22 MB/sec
 Timing buffered disk reads: 446 MB in  3.01 seconds = 148.40 MB/sec

/dev/sdd:
 Timing cached reads:    25602 MB in  1.99 seconds = 12851.19 MB/sec
 Timing buffered disk reads: 420 MB in  3.01 seconds = 139.69 MB/sec
So even that these new disks are 5400 seems to be faster than the old ones !!
Also, I have mounted as read-only the problematic Raid-0 setup.
Rsync
I am now moving some data to measure time
- Folder-A
du -sh /mnt/data/Folder-A/
795G   /mnt/data/Folder-A/
time rsync -P -rax /mnt/data/Folder-A/ Folder-A/
sending incremental file list
created directory Folder-A
./
...

real  163m27.531s
user    8m35.252s
sys 20m56.649s- Folder-B
du -sh /mnt/data/Folder-B/
464G   /mnt/data/Folder-B/
time rsync -P -rax /mnt/data/Folder-B/ Folder-B/
sending incremental file list
created directory Folder-B
./
...
real 102m1.808s
user 7m30.923s
sys 18m24.981s
Control and Monitor Utility for SMART Disks
Last but not least, some smart info with smartmontools
$sudo smartctl -t short /dev/sdc

smartctl 7.1 2019-12-30 r5022 [x86_64-linux-5.4.79-1-lts] (local build)
Copyright (C) 2002-19, Bruce Allen, Christian Franke, www.smartmontools.org

=== START OF OFFLINE IMMEDIATE AND SELF-TEST SECTION ===
Sending command: "Execute SMART Short self-test routine immediately in off-line mode".
Drive command "Execute SMART Short self-test routine immediately in off-line mode" successful.
Testing has begun.
Please wait 2 minutes for test to complete.
Test will complete after Thu Dec  3 08:58:06 2020 EET
Use smartctl -X to abort test.
result :
$sudo smartctl -l selftest /dev/sdc

smartctl 7.1 2019-12-30 r5022 [x86_64-linux-5.4.79-1-lts] (local build)
Copyright (C) 2002-19, Bruce Allen, Christian Franke, www.smartmontools.org

=== START OF READ SMART DATA SECTION ===
SMART Self-test log structure revision number 1
Num  Test_Description    Status                  Remaining  LifeTime(hours)  LBA_of_first_error
# 1  Short offline       Completed without error       00%         1         -
details
$sudo smartctl -A  /dev/sdc

smartctl 7.1 2019-12-30 r5022 [x86_64-linux-5.4.79-1-lts] (local build)
Copyright (C) 2002-19, Bruce Allen, Christian Franke, www.smartmontools.org

=== START OF READ SMART DATA SECTION ===
SMART Attributes Data Structure revision number: 16
Vendor Specific SMART Attributes with Thresholds:
ID# ATTRIBUTE_NAME          FLAG     VALUE WORST THRESH TYPE      UPDATED  WHEN_FAILED RAW_VALUE
  1 Raw_Read_Error_Rate     0x002f   100   253   051    Pre-fail  Always       -       0
  3 Spin_Up_Time            0x0027   100   253   021    Pre-fail  Always       -       0
  4 Start_Stop_Count        0x0032   100   100   000    Old_age   Always       -       1
  5 Reallocated_Sector_Ct   0x0033   200   200   140    Pre-fail  Always       -       0
  7 Seek_Error_Rate         0x002e   100   253   000    Old_age   Always       -       0
  9 Power_On_Hours          0x0032   100   100   000    Old_age   Always       -       1
 10 Spin_Retry_Count        0x0032   100   253   000    Old_age   Always       -       0
 11 Calibration_Retry_Count 0x0032   100   253   000    Old_age   Always       -       0
 12 Power_Cycle_Count       0x0032   100   100   000    Old_age   Always       -       1
192 Power-Off_Retract_Count 0x0032   200   200   000    Old_age   Always       -       0
193 Load_Cycle_Count        0x0032   200   200   000    Old_age   Always       -       1
194 Temperature_Celsius     0x0022   119   119   000    Old_age   Always       -       31
196 Reallocated_Event_Count 0x0032   200   200   000    Old_age   Always       -       0
197 Current_Pending_Sector  0x0032   200   200   000    Old_age   Always       -       0
198 Offline_Uncorrectable   0x0030   100   253   000    Old_age   Offline      -       0
199 UDMA_CRC_Error_Count    0x0032   200   200   000    Old_age   Always       -       0
200 Multi_Zone_Error_Rate   0x0008   100   253   000    Old_age   Offline      -       0
Second disk
$sudo smartctl -t short /dev/sde

smartctl 7.1 2019-12-30 r5022 [x86_64-linux-5.4.79-1-lts] (local build)
Copyright (C) 2002-19, Bruce Allen, Christian Franke, www.smartmontools.org

=== START OF OFFLINE IMMEDIATE AND SELF-TEST SECTION ===
Sending command: "Execute SMART Short self-test routine immediately in off-line mode".
Drive command "Execute SMART Short self-test routine immediately in off-line mode" successful.
Testing has begun.
Please wait 2 minutes for test to complete.
Test will complete after Thu Dec  3 09:00:56 2020 EET
Use smartctl -X to abort test.
selftest results
$sudo smartctl -l selftest /dev/sde

smartctl 7.1 2019-12-30 r5022 [x86_64-linux-5.4.79-1-lts] (local build)
Copyright (C) 2002-19, Bruce Allen, Christian Franke, www.smartmontools.org

=== START OF READ SMART DATA SECTION ===
SMART Self-test log structure revision number 1
Num  Test_Description    Status                  Remaining  LifeTime(hours)  LBA_of_first_error
# 1  Short offline       Completed without error       00%         1         -
details
$sudo smartctl -A  /dev/sde

smartctl 7.1 2019-12-30 r5022 [x86_64-linux-5.4.79-1-lts] (local build)
Copyright (C) 2002-19, Bruce Allen, Christian Franke, www.smartmontools.org

=== START OF READ SMART DATA SECTION ===
SMART Attributes Data Structure revision number: 16
Vendor Specific SMART Attributes with Thresholds:
ID# ATTRIBUTE_NAME          FLAG     VALUE WORST THRESH TYPE      UPDATED  WHEN_FAILED RAW_VALUE
  1 Raw_Read_Error_Rate     0x002f   100   253   051    Pre-fail  Always       -       0
  3 Spin_Up_Time            0x0027   100   253   021    Pre-fail  Always       -       0
  4 Start_Stop_Count        0x0032   100   100   000    Old_age   Always       -       1
  5 Reallocated_Sector_Ct   0x0033   200   200   140    Pre-fail  Always       -       0
  7 Seek_Error_Rate         0x002e   100   253   000    Old_age   Always       -       0
  9 Power_On_Hours          0x0032   100   100   000    Old_age   Always       -       1
 10 Spin_Retry_Count        0x0032   100   253   000    Old_age   Always       -       0
 11 Calibration_Retry_Count 0x0032   100   253   000    Old_age   Always       -       0
 12 Power_Cycle_Count       0x0032   100   100   000    Old_age   Always       -       1
192 Power-Off_Retract_Count 0x0032   200   200   000    Old_age   Always       -       0
193 Load_Cycle_Count        0x0032   200   200   000    Old_age   Always       -       1
194 Temperature_Celsius     0x0022   116   116   000    Old_age   Always       -       34
196 Reallocated_Event_Count 0x0032   200   200   000    Old_age   Always       -       0
197 Current_Pending_Sector  0x0032   200   200   000    Old_age   Always       -       0
198 Offline_Uncorrectable   0x0030   100   253   000    Old_age   Offline      -       0
199 UDMA_CRC_Error_Count    0x0032   200   200   000    Old_age   Always       -       0
200 Multi_Zone_Error_Rate   0x0008   100   253   000    Old_age   Offline      -       0
that’s it !
-ebal
back in ~2001 I was working part time in my uni lab for some extra cash and a chance to gain some additional knowledge on hardware & linux. I feel that I need to make a disclaimer here and share that prior to christmas of ‘99, I did not own a personal computer or a PC as it is better known.
Our tech lab had to format and repair/clone/restore hard disks on a daily basis, as the majority of PCs were failing on a regular interval. That was the result of having 80 to 160 students on 10/15 PCs per lab, running 10/12 hours a day. No one had a dedicated PC/seat. Hard disks were failing left and right. Tech lab had to format/restore them or in case of total failure, order a replacement disk. We had to make these orders in bulk.
So, we had to investigating this issue and report back with a solution as the backlog and cost was notable from our uni. From what we have noticed, over 50% of students did not want to wait for logout and safely shutdown their machines. After saving homework on their floppy disks, most of them, just turned off the power button on the back of the tower power supply. Imaging doing that, on hard disk 20years ago, for about 10 times a day, every day on a common lab.
After brainstorming about possible solutions and workarounds, finding ways to restore faster these hard disks, making poster with “Please safely shutdown this Computer”, an idea was introduced as an experiment.
How about completely remove hard disks from the PCs?
We knew it was possible to boot linux from the local network, but can we boot into a graphical environment? We also had to convince lab professors that some of the lab courses can run under linux like Pascal/C/Fortran/Lisp etc. In the end we had to have a dedicated lab for those diskless PCs.
Challenge was indeed accepted, and we had to provide and present a PoC (proof of concept). The project was well known as LTSP aka the Linux Terminal Server Project. Half of the team was looking into the server part; the other half was working on the client part.
Let us recap for a moment. A PC without a hard disk/operating system, had to boot from network and start into graphical environment. To boot from the network, your bios should have this option. Not an option back then. Then your network card should get some information from the DHCP about tftpd server. Not an option back then. And last your PC should have a proper graphical card that can indeed run X11 (not Xorg, as Xorg was not yet released back then) and remote login to an X server! On top of that CPU & memory was not so “powerful” back then.
I will not get into tech details, this is not that kind of post, but I will share a few details. First, we had to tell the bios to boot from the network card and then we had to program the ROM of the network card. That was not so easy back then. Mostly because not all network cards had a programmable ROM, those were the expensive ones. After that we had to get the boot image from the server, boot into RAM and load the boot menu. Selecting the proper OS, get the kernel and initramfs (if needed for extra drivers) and (pivot) boot into a linux operating system. Finally, we had to auto start in X11 remote login client that was configured to connect to the X11 Server.
diskless boot, etherboot and EPROM configuration, was the game and floppies were the solution! If not mistaken (I may be, don’t remember everything) I think we had to tell the bios to boot from floppy and set the EPROM configuration of the network card and then boot from network to get the initial boot menu. Get the kernel and run X11, login into the X server and run the lab courses to prove that this is working. That was what indeed do! And for another year and a half, my daily computer in the uni was a diskless PII that was booting from network via a floppy disk!
Nowadays you can remote install/format/repair your laptop through the internet, effortless. And my PC had a Turbo button also!!
many thanks to erethon for his help & support on this article.
Working on your home lab, it is quiet often that you need to spawn containers or virtual machines to test or develop something. I was doing this kind of testing with public cloud providers with minimal VMs and for short time of periods to reduce any costs. In this article I will try to explain how to use libvirt -that means kvm- with terraform and provide a simple way to run this on your linux machine.
Be aware this will be a (long) technical article and some experience is needed with kvm/libvirt & terraform but I will try to keep it simple so you can follow the instructions.
Terraform
Install Terraform v0.13 either from your distro or directly from hashicopr’s site.
$ terraform version
Terraform v0.13.2
Libvirt
same thing for libvirt
$ libvirtd --version
libvirtd (libvirt) 6.5.0

$ sudo systemctl is-active libvirtd
active
verify that you have access to libvirt
$ virsh -c qemu:///system version
Compiled against library: libvirt 6.5.0
Using library: libvirt 6.5.0
Using API: QEMU 6.5.0
Running hypervisor: QEMU 5.1.0
Terraform Libvirt Provider
To access the libvirt daemon via terraform, we need the terraform-libvirt provider.
Terraform provider to provision infrastructure with Linux’s KVM using libvirt
The official repo is on GitHub - dmacvicar/terraform-provider-libvirt and you can download a precompiled version for your distro from the repo, or you can download a generic version from my gitlab repo
ebal / terraform-provider-libvirt · GitLab
These are my instructions
mkdir -pv ~/.local/share/terraform/plugins/registry.terraform.io/dmacvicar/libvirt/0.6.2/linux_amd64/
curl -sLo ~/.local/share/terraform/plugins/registry.terraform.io/dmacvicar/libvirt/0.6.2/linux_amd64/terraform-provider-libvirt https://gitlab.com/terraform-provider/terraform-provider-libvirt/-/jobs/artifacts/master/raw/terraform-provider-libvirt/terraform-provider-libvirt?job=run-build
chmod +x ~/.local/share/terraform/plugins/registry.terraform.io/dmacvicar/libvirt/0.6.2/linux_amd64/terraform-provider-libvirt
Terraform Init
Let’s create a new directory and test that everything is fine.
mkdir -pv tf_libvirt
cd !$

cat > Provider.tf <<EOF
terraform {
 required_version = ">= 0.13"
 required_providers {
     libvirt = {
       source  = "dmacvicar/libvirt"
       version = "0.6.2"
     }
 }
}
EOF
$ terraform init

Initializing the backend...

Initializing provider plugins...
- Finding dmacvicar/libvirt versions matching "0.6.2"...
- Installing dmacvicar/libvirt v0.6.2...
- Installed dmacvicar/libvirt v0.6.2 (unauthenticated)

Terraform has been successfully initialized!

You may now begin working with Terraform. Try running "terraform plan" to see
any changes that are required for your infrastructure. All Terraform commands
should now work.

If you ever set or change modules or backend configuration for Terraform,
rerun this command to reinitialize your working directory. If you forget, other
commands will detect it and remind you to do so if necessary.
everything seems okay!
We can verify with tree or find
$ tree -a
.
├── Provider.tf
└── .terraform
    └── plugins
        ├── registry.terraform.io
        │   └── dmacvicar
        │       └── libvirt
        │           └── 0.6.2
        │               └── linux_amd64 -> /home/ebal/.local/share/terraform/plugins/registry.terraform.io/dmacvicar/libvirt/0.6.2/linux_amd64
        └── selections.json

7 directories, 2 files
Provider
but did we actually connect to libvirtd via terraform ?
Short answer: No.
We just told terraform to use this specific provider.
How to connect ?
We need to add the connection libvirt uri to the provider section:
provider "libvirt" {
    uri = "qemu:///system"
}
so our Provider.tf looks like this
terraform {
  required_version = ">= 0.13"
  required_providers {
    libvirt = {
      source  = "dmacvicar/libvirt"
      version = "0.6.2"
    }
  }
}

provider "libvirt" {
  uri = "qemu:///system"
}
Libvirt URI
libvirt is a virtualization api/toolkit that supports multiple drivers and thus you can use libvirt against the below virtualization platforms
- LXC - Linux Containers
- OpenVZ
- QEMU
- VirtualBox
- VMware ESX
- VMware Workstation/Player
- Xen
- Microsoft Hyper-V
- Virtuozzo
- Bhyve - The BSD Hypervisor
Libvirt also supports multiple authentication mechanisms like ssh
virsh -c qemu+ssh://username@host1.example.org/systemso it is really important to properly define the libvirt URI in terraform!
In this article, I will limit it to a local libvirt daemon, but keep in mind you can use a remote libvirt daemon as well.
Volume
Next thing, we need a disk volume!
Volume.tf
resource "libvirt_volume" "ubuntu-2004-vol" {
  name = "ubuntu-2004-vol"
  pool = "default"
  #source = "https://cloud-images.ubuntu.com/focal/current/focal-server-cloudimg-amd64-disk-kvm.img"
  source = "ubuntu-20.04.img"
  format = "qcow2"
}
I have already downloaded this image and verified its checksum, I will use this local image as the base image for my VM’s volume.
By running terraform plan we will see this output:
  # libvirt_volume.ubuntu-2004-vol will be created
  + resource "libvirt_volume" "ubuntu-2004-vol" {
      + format = "qcow2"
      + id     = (known after apply)
      + name   = "ubuntu-2004-vol"
      + pool   = "default"
      + size   = (known after apply)
      + source = "ubuntu-20.04.img"
    }
What we expect is to use this source image and create a new disk volume (copy) and put it to the default disk storage libvirt pool.
Let’s try to figure out what is happening here:
terraform plan -out terraform.out
terraform apply terraform.out
terraform show
# libvirt_volume.ubuntu-2004-vol:
resource "libvirt_volume" "ubuntu-2004-vol" {
format = "qcow2"
id = "/var/lib/libvirt/images/ubuntu-2004-vol"
name = "ubuntu-2004-vol"
pool = "default"
size = 2361393152
source = "ubuntu-20.04.img"
}
and
$ virsh -c qemu:///system vol-list default
Name Path
------------------------------------------------------------
ubuntu-2004-vol /var/lib/libvirt/images/ubuntu-2004-volVolume Size
BE Aware: by this declaration, the produced disk volume image will have the same size as the original source. In this case ~2G of disk.
We will show later in this article how to expand to something larger.
destroy volume
$ terraform destroy
libvirt_volume.ubuntu-2004-vol: Refreshing state... [id=/var/lib/libvirt/images/ubuntu-2004-vol]
An execution plan has been generated and is shown below.
Resource actions are indicated with the following symbols:
- destroy
Terraform will perform the following actions:
# libvirt_volume.ubuntu-2004-vol will be destroyed
- resource "libvirt_volume" "ubuntu-2004-vol" {
- format = "qcow2" -> null
- id = "/var/lib/libvirt/images/ubuntu-2004-vol" -> null
- name = "ubuntu-2004-vol" -> null
- pool = "default" -> null
- size = 2361393152 -> null
- source = "ubuntu-20.04.img" -> null
}
Plan: 0 to add, 0 to change, 1 to destroy.
Do you really want to destroy all resources?
Terraform will destroy all your managed infrastructure, as shown above.
There is no undo. Only 'yes' will be accepted to confirm.
Enter a value: yes
libvirt_volume.ubuntu-2004-vol: Destroying... [id=/var/lib/libvirt/images/ubuntu-2004-vol]
libvirt_volume.ubuntu-2004-vol: Destruction complete after 0s
Destroy complete! Resources: 1 destroyed.
verify
$ virsh -c qemu:///system vol-list default
Name Path
----------------------------------------------------------
reminder: always destroy!
Domain
Believe it or not, we are half way from our first VM!
We need to create a libvirt domain resource.
Domain.tf
cat > Domain.tf <<EOF
resource "libvirt_domain" "ubuntu-2004-vm" {
name = "ubuntu-2004-vm"
memory = "2048"
vcpu = 1
disk {
volume_id = libvirt_volume.ubuntu-2004-vol.id
}
}
EOFApply the new tf plan
terraform plan -out terraform.out
terraform apply terraform.out
$ terraform show
# libvirt_domain.ubuntu-2004-vm:
resource "libvirt_domain" "ubuntu-2004-vm" {
arch = "x86_64"
autostart = false
disk = [
{
block_device = ""
file = ""
scsi = false
url = ""
volume_id = "/var/lib/libvirt/images/ubuntu-2004-vol"
wwn = ""
},
]
emulator = "/usr/bin/qemu-system-x86_64"
fw_cfg_name = "opt/com.coreos/config"
id = "3a4a2b44-5ecd-433c-8645-9bccc831984f"
machine = "pc"
memory = 2048
name = "ubuntu-2004-vm"
qemu_agent = false
running = true
vcpu = 1
}
# libvirt_volume.ubuntu-2004-vol:
resource "libvirt_volume" "ubuntu-2004-vol" {
    format = "qcow2"
    id     = "/var/lib/libvirt/images/ubuntu-2004-vol"
    name   = "ubuntu-2004-vol"
    pool   = "default"
    size   = 2361393152
    source = "ubuntu-20.04.img"
}
Verify via virsh:
$ virsh -c qemu:///system list
Id Name State
--------------------------------
3 ubuntu-2004-vm running
Destroy them!
$ terraform destroy
Do you really want to destroy all resources?
Terraform will destroy all your managed infrastructure, as shown above.
There is no undo. Only 'yes' will be accepted to confirm.
Enter a value: yes
libvirt_domain.ubuntu-2004-vm: Destroying... [id=3a4a2b44-5ecd-433c-8645-9bccc831984f]
libvirt_domain.ubuntu-2004-vm: Destruction complete after 0s
libvirt_volume.ubuntu-2004-vol: Destroying... [id=/var/lib/libvirt/images/ubuntu-2004-vol]
libvirt_volume.ubuntu-2004-vol: Destruction complete after 0s
Destroy complete! Resources: 2 destroyed.
That’s it !
We have successfully created a new VM from a source image that runs on our libvirt environment.
But we can not connect/use or do anything with this instance. Not yet, we need to add a few more things. Like a network interface, a console output and a default cloud-init file to auto-configure the virtual machine.
Variables
Before continuing with the user-data (cloud-init), it is a good time to set up some terraform variables.
cat > Variables.tf <<EOF
variable "domain" {
description = "The domain/host name of the zone"
default = "ubuntu2004"
}
EOF
We are going to use this variable within the user-date yaml file.
Cloud-init
The best way to configure a newly created virtual machine, is via cloud-init and the ability of injecting a user-data.yml file into the virtual machine via terraform-libvirt.
user-data
#cloud-config
#disable_root: true
disable_root: false
chpasswd:
list: |
root:ping
expire: False
# Set TimeZone
timezone: Europe/Athens
hostname: "${hostname}"
# PostInstall
runcmd:
# Remove cloud-init
- apt-get -qqy autoremove --purge cloud-init lxc lxd snapd
- apt-get -y --purge autoremove
- apt -y autoclean
- apt -y clean all
cloud init disk
Terraform will create a new iso by reading the above template file and generate a proper user-data.yaml file. To use this cloud init iso, we need to configure it as a libvirt cloud-init resource.
Cloudinit.tf
data "template_file" "user_data" {
template = file("user-data.yml")
vars = {
hostname = var.domain
}
}
resource "libvirt_cloudinit_disk" "cloud-init" {
name = "cloud-init.iso"
user_data = data.template_file.user_data.rendered
}
and we need to modify our Domain.tf accordingly
cloudinit = libvirt_cloudinit_disk.cloud-init.idTerraform will create and upload this iso disk image into the default libvirt storage pool. And attach it to the virtual machine in the boot process.
At this moment the tf_libvirt directory should look like this:
$ ls -1
Cloudinit.tf
Domain.tf
Provider.tf
ubuntu-20.04.img
user-data.yml
Variables.tf
Volume.tf
To give you an idea, the abstract design is this:

apply
 terraform plan -out terraform.out
 terraform apply terraform.out
$ terraform show
# data.template_file.user_data:
data "template_file" "user_data" {
id = "cc82a7db4c6498aee21a883729fc4be7b84059d3dec69b92a210e046c67a9a00"
rendered = <<~EOT
#cloud-config
#disable_root: true
disable_root: false
chpasswd:
list: |
root:ping
expire: False
# Set TimeZone
timezone: Europe/Athens
hostname: "ubuntu2004"
# PostInstall
runcmd:
# Remove cloud-init
- apt-get -qqy autoremove --purge cloud-init lxc lxd snapd
- apt-get -y --purge autoremove
- apt -y autoclean
- apt -y clean all
EOT
template = <<~EOT
#cloud-config
#disable_root: true
disable_root: false
chpasswd:
list: |
root:ping
expire: False
# Set TimeZone
timezone: Europe/Athens
hostname: "${hostname}"
# PostInstall
runcmd:
# Remove cloud-init
- apt-get -qqy autoremove --purge cloud-init lxc lxd snapd
- apt-get -y --purge autoremove
- apt -y autoclean
- apt -y clean all
EOT
vars = {
"hostname" = "ubuntu2004"
}
}
# libvirt_cloudinit_disk.cloud-init:
resource "libvirt_cloudinit_disk" "cloud-init" {
id = "/var/lib/libvirt/images/cloud-init.iso;5f5cdc31-1d38-39cb-cc72-971e474ca539"
name = "cloud-init.iso"
pool = "default"
user_data = <<~EOT
#cloud-config
#disable_root: true
disable_root: false
chpasswd:
list: |
root:ping
expire: False
# Set TimeZone
timezone: Europe/Athens
hostname: "ubuntu2004"
# PostInstall
runcmd:
# Remove cloud-init
- apt-get -qqy autoremove --purge cloud-init lxc lxd snapd
- apt-get -y --purge autoremove
- apt -y autoclean
- apt -y clean all
EOT
}
# libvirt_domain.ubuntu-2004-vm:
resource "libvirt_domain" "ubuntu-2004-vm" {
arch = "x86_64"
autostart = false
cloudinit = "/var/lib/libvirt/images/cloud-init.iso;5f5ce077-9508-3b8c-273d-02d44443b79c"
disk = [
{
block_device = ""
file = ""
scsi = false
url = ""
volume_id = "/var/lib/libvirt/images/ubuntu-2004-vol"
wwn = ""
},
]
emulator = "/usr/bin/qemu-system-x86_64"
fw_cfg_name = "opt/com.coreos/config"
id = "3ade5c95-30d4-496b-9bcf-a12d63993cfa"
machine = "pc"
memory = 2048
name = "ubuntu-2004-vm"
qemu_agent = false
running = true
vcpu = 1
}
# libvirt_volume.ubuntu-2004-vol:
resource "libvirt_volume" "ubuntu-2004-vol" {
format = "qcow2"
id = "/var/lib/libvirt/images/ubuntu-2004-vol"
name = "ubuntu-2004-vol"
pool = "default"
size = 2361393152
source = "ubuntu-20.04.img"
}
Lots of output , but let me explain it really quick:
generate a user-data file from template, template is populated with variables, create an cloud-init iso, create a volume disk from source, create a virtual machine with this new volume disk and boot it with this cloud-init iso.
Pretty much, that’s it!!!
$ virsh -c qemu:///system vol-list --details default
Name Path Type Capacity Allocation
---------------------------------------------------------------------------------------------
cloud-init.iso /var/lib/libvirt/images/cloud-init.iso file 364.00 KiB 364.00 KiB
ubuntu-2004-vol /var/lib/libvirt/images/ubuntu-2004-vol file 2.20 GiB 537.94 MiB
$ virsh -c qemu:///system list
Id Name State
--------------------------------
1 ubuntu-2004-vm running
destroy
$ terraform destroy -auto-approve
data.template_file.user_data: Refreshing state... [id=cc82a7db4c6498aee21a883729fc4be7b84059d3dec69b92a210e046c67a9a00]
libvirt_volume.ubuntu-2004-vol: Refreshing state... [id=/var/lib/libvirt/images/ubuntu-2004-vol]
libvirt_cloudinit_disk.cloud-init: Refreshing state... [id=/var/lib/libvirt/images/cloud-init.iso;5f5cdc31-1d38-39cb-cc72-971e474ca539]
libvirt_domain.ubuntu-2004-vm: Refreshing state... [id=3ade5c95-30d4-496b-9bcf-a12d63993cfa]
libvirt_cloudinit_disk.cloud-init: Destroying... [id=/var/lib/libvirt/images/cloud-init.iso;5f5cdc31-1d38-39cb-cc72-971e474ca539]
libvirt_domain.ubuntu-2004-vm: Destroying... [id=3ade5c95-30d4-496b-9bcf-a12d63993cfa]
libvirt_cloudinit_disk.cloud-init: Destruction complete after 0s
libvirt_domain.ubuntu-2004-vm: Destruction complete after 0s
libvirt_volume.ubuntu-2004-vol: Destroying... [id=/var/lib/libvirt/images/ubuntu-2004-vol]
libvirt_volume.ubuntu-2004-vol: Destruction complete after 0s
Destroy complete! Resources: 3 destroyed.
Most important detail is:
Resources: 3 destroyed.
- cloud-init.iso
- ubuntu-2004-vol
- ubuntu-2004-vm
Console
but there are a few things still missing.
To add a console for starters so we can connect into this virtual machine!
To do that, we need to re-edit Domain.tf and add a console output:
console {
target_type = "serial"
type = "pty"
target_port = "0"
}
console {
target_type = "virtio"
type = "pty"
target_port = "1"
}
the full file should look like:
resource "libvirt_domain" "ubuntu-2004-vm" {
name = "ubuntu-2004-vm"
memory = "2048"
vcpu = 1
cloudinit = libvirt_cloudinit_disk.cloud-init.id
disk {
volume_id = libvirt_volume.ubuntu-2004-vol.id
}
console {
target_type = "serial"
type = "pty"
target_port = "0"
}
console {
target_type = "virtio"
type = "pty"
target_port = "1"
}
}
Create again the VM with
terraform plan -out terraform.out
terraform apply terraform.out
And test the console:
$ virsh -c qemu:///system console ubuntu-2004-vm
Connected to domain ubuntu-2004-vm
Escape character is ^] (Ctrl + ])
wow!
We have actually logged-in to this VM using the libvirt console!
Virtual Machine
some interesting details
root@ubuntu2004:~# df -h
Filesystem Size Used Avail Use% Mounted on
/dev/root 2.0G 916M 1.1G 46% /
devtmpfs 998M 0 998M 0% /dev
tmpfs 999M 0 999M 0% /dev/shm
tmpfs 200M 392K 200M 1% /run
tmpfs 5.0M 0 5.0M 0% /run/lock
tmpfs 999M 0 999M 0% /sys/fs/cgroup
/dev/vda15 105M 3.9M 101M 4% /boot/efi
tmpfs 200M 0 200M 0% /run/user/0
root@ubuntu2004:~# free -hm
total used free shared buff/cache available
Mem: 2.0Gi 73Mi 1.7Gi 0.0Ki 140Mi 1.8Gi
Swap: 0B 0B 0B
root@ubuntu2004:~# ip a
1: lo: <LOOPBACK,UP,LOWER_UP> mtu 65536 qdisc noqueue state UNKNOWN group default qlen 1000
link/loopback 00:00:00:00:00:00 brd 00:00:00:00:00:00
inet 127.0.0.1/8 scope host lo
valid_lft forever preferred_lft forever
inet6 ::1/128 scope host
valid_lft forever preferred_lft forever
2: tunl0@NONE: <NOARP> mtu 1480 qdisc noop state DOWN group default qlen 1000
link/ipip 0.0.0.0 brd 0.0.0.0
3: sit0@NONE: <NOARP> mtu 1480 qdisc noop state DOWN group default qlen 1000
link/sit 0.0.0.0 brd 0.0.0.0
Do not forget to destroy
$ terraform destroy -auto-approve
data.template_file.user_data: Refreshing state... [id=cc82a7db4c6498aee21a883729fc4be7b84059d3dec69b92a210e046c67a9a00]
libvirt_volume.ubuntu-2004-vol: Refreshing state... [id=/var/lib/libvirt/images/ubuntu-2004-vol]
libvirt_cloudinit_disk.cloud-init: Refreshing state... [id=/var/lib/libvirt/images/cloud-init.iso;5f5ce077-9508-3b8c-273d-02d44443b79c]
libvirt_domain.ubuntu-2004-vm: Refreshing state... [id=69f75b08-1e06-409d-9fd6-f45d82260b51]
libvirt_domain.ubuntu-2004-vm: Destroying... [id=69f75b08-1e06-409d-9fd6-f45d82260b51]
libvirt_domain.ubuntu-2004-vm: Destruction complete after 0s
libvirt_cloudinit_disk.cloud-init: Destroying... [id=/var/lib/libvirt/images/cloud-init.iso;5f5ce077-9508-3b8c-273d-02d44443b79c]
libvirt_volume.ubuntu-2004-vol: Destroying... [id=/var/lib/libvirt/images/ubuntu-2004-vol]
libvirt_cloudinit_disk.cloud-init: Destruction complete after 0s
libvirt_volume.ubuntu-2004-vol: Destruction complete after 0s
Destroy complete! Resources: 3 destroyed.
extend the volume disk
As mentioned above, the volume’s disk size is exactly as the origin source image.
In our case it’s 2G.
What we need to do, is to use the source image as a base for a new volume disk. In our new volume disk, we can declare the size we need.
I would like to make this a user variable: Variables.tf
variable "vol_size" {
description = "The mac & iP address for this VM"
# 10G
default = 10 * 1024 * 1024 * 1024
}
Arithmetic in terraform!!
So the Volume.tf should be:
resource "libvirt_volume" "ubuntu-2004-base" {
name = "ubuntu-2004-base"
pool = "default"
#source = "https://cloud-images.ubuntu.com/focal/current/focal-server-cloudimg-amd64-disk-kvm.img"
source = "ubuntu-20.04.img"
format = "qcow2"
}
resource "libvirt_volume" "ubuntu-2004-vol" {
name = "ubuntu-2004-vol"
pool = "default"
base_volume_id = libvirt_volume.ubuntu-2004-base.id
size = var.vol_size
}
base image –> volume image
test it
terraform plan -out terraform.out
terraform apply terraform.out
$ virsh -c qemu:///system console ubuntu-2004-vm
Connected to domain ubuntu-2004-vm
Escape character is ^] (Ctrl + ])
ubuntu2004 login: root
Password:
Welcome to Ubuntu 20.04.1 LTS (GNU/Linux 5.4.0-1021-kvm x86_64)
* Documentation: https://help.ubuntu.com
* Management: https://landscape.canonical.com
* Support: https://ubuntu.com/advantage
System information as of Sat Sep 12 18:27:46 EEST 2020
System load: 0.29 Memory usage: 6% Processes: 66
Usage of /: 9.3% of 9.52GB Swap usage: 0% Users logged in: 0
0 updates can be installed immediately.
0 of these updates are security updates.
Failed to connect to https://changelogs.ubuntu.com/meta-release-lts. Check your Internet connection or proxy settings
Last login: Sat Sep 12 18:26:37 EEST 2020 on ttyS0
root@ubuntu2004:~# df -h /
Filesystem Size Used Avail Use% Mounted on
/dev/root 9.6G 912M 8.7G 10% /
root@ubuntu2004:~#
10G !
destroy
terraform destroy -auto-approveSwap
I would like to have a swap partition and I will use cloud init to create a swap partition.
modify user-data.yml
# Create swap partition
swap:
filename: /swap.img
size: "auto"
maxsize: 2G
test it
terraform plan -out terraform.out && terraform apply terraform.out$ virsh -c qemu:///system console ubuntu-2004-vm
Connected to domain ubuntu-2004-vm
Escape character is ^] (Ctrl + ])
root@ubuntu2004:~# free -hm
total used free shared buff/cache available
Mem: 2.0Gi 86Mi 1.7Gi 0.0Ki 188Mi 1.8Gi
Swap: 2.0Gi 0B 2.0Gi
root@ubuntu2004:~#
success !!
terraform destroy -auto-approveNetwork
How about internet? network?
Yes, what about it ?
I guess you need to connect to the internets, okay then.
The easiest way is to add this your Domain.tf
network_interface {
network_name = "default"
}
This will use the default network libvirt resource
$ virsh -c qemu:///system net-list
Name State Autostart Persistent
----------------------------------------------------
default active yes yes
if you prefer to directly expose your VM to your local network (be very careful) then replace the above with a macvtap interface. If your ISP router provides dhcp, then your VM will take a random IP from your router.
network_interface {
macvtap = "eth0"
}
test it
terraform plan -out terraform.out && terraform apply terraform.out$ virsh -c qemu:///system console ubuntu-2004-vm
Connected to domain ubuntu-2004-vm
Escape character is ^] (Ctrl + ])
root@ubuntu2004:~#
root@ubuntu2004:~# ip a
1: lo: <LOOPBACK,UP,LOWER_UP> mtu 65536 qdisc noqueue state UNKNOWN group default qlen 1000
link/loopback 00:00:00:00:00:00 brd 00:00:00:00:00:00
inet 127.0.0.1/8 scope host lo
valid_lft forever preferred_lft forever
inet6 ::1/128 scope host
valid_lft forever preferred_lft forever
2: ens3: <BROADCAST,MULTICAST,UP,LOWER_UP> mtu 1500 qdisc pfifo_fast state UP group default qlen 1000
link/ether 52:54:00:36:66:96 brd ff:ff:ff:ff:ff:ff
inet 192.168.122.228/24 brd 192.168.122.255 scope global dynamic ens3
valid_lft 3544sec preferred_lft 3544sec
inet6 fe80::5054:ff:fe36:6696/64 scope link
valid_lft forever preferred_lft forever
3: tunl0@NONE: <NOARP> mtu 1480 qdisc noop state DOWN group default qlen 1000
link/ipip 0.0.0.0 brd 0.0.0.0
4: sit0@NONE: <NOARP> mtu 1480 qdisc noop state DOWN group default qlen 1000
link/sit 0.0.0.0 brd 0.0.0.0
root@ubuntu2004:~# ping -c 5 google.com
PING google.com (172.217.23.142) 56(84) bytes of data.
64 bytes from fra16s18-in-f142.1e100.net (172.217.23.142): icmp_seq=1 ttl=115 time=43.4 ms
64 bytes from fra16s18-in-f142.1e100.net (172.217.23.142): icmp_seq=2 ttl=115 time=43.9 ms
64 bytes from fra16s18-in-f142.1e100.net (172.217.23.142): icmp_seq=3 ttl=115 time=43.0 ms
64 bytes from fra16s18-in-f142.1e100.net (172.217.23.142): icmp_seq=4 ttl=115 time=43.1 ms
64 bytes from fra16s18-in-f142.1e100.net (172.217.23.142): icmp_seq=5 ttl=115 time=43.4 ms
--- google.com ping statistics ---
5 packets transmitted, 5 received, 0% packet loss, time 4005ms
rtt min/avg/max/mdev = 42.977/43.346/43.857/0.311 ms
root@ubuntu2004:~#
destroy
$ terraform destroy -auto-approve
Destroy complete! Resources: 4 destroyed.
SSH
Okay, now that we have network it is possible to setup ssh to our virtual machine and also auto create a user. I would like cloud-init to get my public key from github and setup my user.
disable_root: true
ssh_pwauth: no
users:
- name: ebal
ssh_import_id:
- gh:ebal
shell: /bin/bash
sudo: ALL=(ALL) NOPASSWD:ALL
write_files:
- path: /etc/ssh/sshd_config
content: |
AcceptEnv LANG LC_*
AllowUsers ebal
ChallengeResponseAuthentication no
Compression NO
MaxSessions 3
PasswordAuthentication no
PermitRootLogin no
Port "${sshdport}"
PrintMotd no
Subsystem sftp /usr/lib/openssh/sftp-server
UseDNS no
UsePAM yes
X11Forwarding no
Notice, I have added a new variable called sshdport
Variables.tf
variable "ssh_port" {
description = "The sshd port of the VM"
default = 12345
}
and do not forget to update your cloud-init tf
Cloudinit.tf
data "template_file" "user_data" {
template = file("user-data.yml")
vars = {
hostname = var.domain
sshdport = var.ssh_port
}
}
resource "libvirt_cloudinit_disk" "cloud-init" {
name = "cloud-init.iso"
user_data = data.template_file.user_data.rendered
}
Update VM
I would also like to update & install specific packages to this virtual machine:
# Install packages
packages:
- figlet
- mlocate
- python3-apt
- bash-completion
- ncdu
# Update/Upgrade & Reboot if necessary
package_update: true
package_upgrade: true
package_reboot_if_required: true
# PostInstall
runcmd:
- figlet ${hostname} > /etc/motd
- updatedb
# Firewall
- ufw allow "${sshdport}"/tcp && ufw enable
# Remove cloud-init
- apt-get -y autoremove --purge cloud-init lxc lxd snapd
- apt-get -y --purge autoremove
- apt -y autoclean
- apt -y clean all
Yes, I prefer to uninstall cloud-init at the end.
user-date.yaml
the entire user-date.yaml looks like this:
#cloud-config
disable_root: true
ssh_pwauth: no
users:
- name: ebal
ssh_import_id:
- gh:ebal
shell: /bin/bash
sudo: ALL=(ALL) NOPASSWD:ALL
write_files:
- path: /etc/ssh/sshd_config
content: |
AcceptEnv LANG LC_*
AllowUsers ebal
ChallengeResponseAuthentication no
Compression NO
MaxSessions 3
PasswordAuthentication no
PermitRootLogin no
Port "${sshdport}"
PrintMotd no
Subsystem sftp /usr/lib/openssh/sftp-server
UseDNS no
UsePAM yes
X11Forwarding no
# Set TimeZone
timezone: Europe/Athens
hostname: "${hostname}"
# Create swap partition
swap:
filename: /swap.img
size: "auto"
maxsize: 2G
# Install packages
packages:
- figlet
- mlocate
- python3-apt
- bash-completion
- ncdu
# Update/Upgrade & Reboot if necessary
package_update: true
package_upgrade: true
package_reboot_if_required: true
# PostInstall
runcmd:
- figlet ${hostname} > /etc/motd
- updatedb
# Firewall
- ufw allow "${sshdport}"/tcp && ufw enable
# Remove cloud-init
- apt-get -y autoremove --purge cloud-init lxc lxd snapd
- apt-get -y --purge autoremove
- apt -y autoclean
- apt -y clean all
Output
We need to know the IP to login so create a new terraform file to get the IP
Output.tf
output "IP" {
value = libvirt_domain.ubuntu-2004-vm.network_interface.0.addresses
}
but that means that we need to wait for the dhcp lease. Modify Domain.tf to tell terraform to wait.
network_interface {
network_name = "default"
wait_for_lease = true
}
Plan & Apply
$ terraform plan -out terraform.out && terraform apply terraform.out
Outputs:
IP = [
"192.168.122.79",
]
Verify
$ ssh 192.168.122.79 -p 12345 uptime
19:33:46 up 2 min, 0 users, load average: 0.95, 0.37, 0.14
$ ssh 192.168.122.79 -p 12345
Welcome to Ubuntu 20.04.1 LTS (GNU/Linux 5.4.0-1023-kvm x86_64)
* Documentation: https://help.ubuntu.com
* Management: https://landscape.canonical.com
* Support: https://ubuntu.com/advantage
System information as of Sat Sep 12 19:34:45 EEST 2020
System load: 0.31 Processes: 72
Usage of /: 33.1% of 9.52GB Users logged in: 0
Memory usage: 7% IPv4 address for ens3: 192.168.122.79
Swap usage: 0%
0 updates can be installed immediately.
0 of these updates are security updates.
_ _ ____ ___ ___ _ _
_ _| |__ _ _ _ __ | |_ _ _|___ / _ / _ | || |
| | | | '_ | | | | '_ | __| | | | __) | | | | | | | || |_
| |_| | |_) | |_| | | | | |_| |_| |/ __/| |_| | |_| |__ _|
__,_|_.__/ __,_|_| |_|__|__,_|_____|___/ ___/ |_|
Last login: Sat Sep 12 19:34:37 2020 from 192.168.122.1
ebal@ubuntu2004:~$
ebal@ubuntu2004:~$ df -h /
Filesystem Size Used Avail Use% Mounted on
/dev/root 9.6G 3.2G 6.4G 34% /
ebal@ubuntu2004:~$ free -hm
total used free shared buff/cache available
Mem: 2.0Gi 91Mi 1.7Gi 0.0Ki 197Mi 1.8Gi
Swap: 2.0Gi 0B 2.0Gi
ebal@ubuntu2004:~$ ping -c 5 libreops.cc
PING libreops.cc (185.199.108.153) 56(84) bytes of data.
64 bytes from 185.199.108.153 (185.199.108.153): icmp_seq=1 ttl=55 time=48.4 ms
64 bytes from 185.199.108.153 (185.199.108.153): icmp_seq=2 ttl=55 time=48.7 ms
64 bytes from 185.199.108.153 (185.199.108.153): icmp_seq=3 ttl=55 time=48.5 ms
64 bytes from 185.199.108.153 (185.199.108.153): icmp_seq=4 ttl=55 time=48.3 ms
64 bytes from 185.199.108.153 (185.199.108.153): icmp_seq=5 ttl=55 time=52.8 ms
--- libreops.cc ping statistics ---
5 packets transmitted, 5 received, 0% packet loss, time 4006ms
rtt min/avg/max/mdev = 48.266/49.319/52.794/1.743 ms
what !!!!
awesome
destroy
terraform destroy -auto-approveCustom Network
One last thing I would like to discuss is how to create a new network and provide a specific IP to your VM. This will separate your VMs/lab and it is cheap & easy to setup a new libvirt network.
Network.tf
resource "libvirt_network" "tf_net" {
name = "tf_net"
domain = "libvirt.local"
addresses = ["192.168.123.0/24"]
dhcp {
enabled = true
}
dns {
enabled = true
}
}
and replace network_interface in Domains.tf
network_interface {
network_id = libvirt_network.tf_net.id
network_name = "tf_net"
addresses = ["192.168.123.${var.IP_addr}"]
mac = "52:54:00:b2:2f:${var.IP_addr}"
wait_for_lease = true
}Closely look, there is a new terraform variable
Variables.tf
variable "IP_addr" {
description = "The mac & iP address for this VM"
default = 33
}$ terraform plan -out terraform.out && terraform apply terraform.out
Outputs:
IP = [
"192.168.123.33",
]
$ ssh 192.168.123.33 -p 12345
Welcome to Ubuntu 20.04.1 LTS (GNU/Linux 5.4.0-1021-kvm x86_64)
* Documentation: https://help.ubuntu.com
* Management: https://landscape.canonical.com
* Support: https://ubuntu.com/advantage
System information disabled due to load higher than 1.0
12 updates can be installed immediately.
8 of these updates are security updates.
To see these additional updates run: apt list --upgradable
Last login: Sat Sep 12 19:56:33 2020 from 192.168.123.1
ebal@ubuntu2004:~$ ip addr show ens3
2: ens3: <BROADCAST,MULTICAST,UP,LOWER_UP> mtu 1500 qdisc pfifo_fast state UP group default qlen 1000
link/ether 52:54:00:b2:2f:33 brd ff:ff:ff:ff:ff:ff
inet 192.168.123.33/24 brd 192.168.123.255 scope global dynamic ens3
valid_lft 3491sec preferred_lft 3491sec
inet6 fe80::5054:ff:feb2:2f33/64 scope link
valid_lft forever preferred_lft forever
ebal@ubuntu2004:~$
Terraform files
you can find every terraform example in my github repo
tf/0.13/libvirt/0.6.2/ubuntu/20.04 at master · ebal/tf · GitHub
That’s it!
If you like this article, consider following me on twitter ebalaskas.
[Original Published at Linkedin on October 28, 2018]
The curse of knowledge is a cognitive bias that occurs when an individual, communicating with other individuals, unknowingly assumes that the others have the background to understand.
Let’s talk about documentation
This is the one big elephant in every team’s room.
TLDR; Increment: Documentation
Documentation empowers users and technical teams to function more effectively, and can promote approachability, accessibility, efficiency, innovation, and more stable development.
Bad technical guides can cause frustration, confusion, and distrust in your software, support channels, and even your brand—and they can hinder progress and productivity internally
so to avoid situations like these:

or/and

documentation must exist!
Myths
- Self-documenting code
- No time to write documentation
- There are code examples, what else you need?
- There is a wiki page (or 300.000 pages).
- I’m not a professional writer
- No one reads the manual
Problems
- Maintaining the documentation (up2date)
- Incomplete or Confusing documentation
- Documentation is platform/version oriented
- Engineers who may not be fluent in English (or dont speak your language)
- Too long
- Too short
- Documentation structure
Types of documentation
- Technical Manual (system)
- Tutorial (mini tutorials)
- HowTo (mini howto)
- Library/API documentation (reference)
- Customer Documentation (end user)
- Operations manual
- User manual (support)
- Team documentation
- Project/Software documentation
- Notes
- FAQ
Why Documentation Is Important
Communication is a key to success. Documentation is part of the communication process. We either try to communicate or collaborate with our customers or even within our own team. We use our documentation to inform customers of new feautures and how to use them, to train our internal team (colleagues), collaborate with them, reach-out, help-out, connect, communicate our work with others.
When writing code, documentation should be the “One-Truth” instead of the code repository. I love working with projects that they will not deploy a new feature before updating the documentation first. For example I read the ‘Release Notes for Red Hat’ and the ChangeLog instead of reading myriads of code repositories.
Know Your Audience
Try to answer these questions:
- Who is reading this documentation ?
- Is it for internal or external users/customers ?
- Do they have a dev background ?
- Arey they non-technical people ?
Use personas to create diferrent material. Try to remember this one gold rule:
Audidence should get value from documentation (learning or something).
Guidelines
Here are some guidelines:
- Tell a story
- Use a narative voice
- Try to solve a problem
- Simplify - KISS philosophy
- Focus on approachability and usability
Even on a technical document try to:
- Write documentation agnostic - Independent Platform
- Reproducibility
- Not writing in acronyms and technical jargon (explain)
- Step Approach
- Towards goal achievement
- Routines
UX
A picture is worth a thousand words
so remember to:
- visual representation of the information architecture
- use code examples
- screencasts
- CLI –help output
- usage
- clear error messages
Customers and Users do want to write nothing.
Reducing user input, your project will be more fault tolerant.
Instead of providing a procedure for a deploy pipeline, give them a deploy bot, a next-next-install Gui/Web User-Interface and focus your documentation around that.
Content
So what to include in the documentation.
- How technical should be or not ?
- Use cases ?
- General-Purpose ?
- Article size (small pages are more manageable set to maintain).
- Minimum Viable Content Vs Too much detail
- Help them to understand
imagine your documentation as microservices instead of a huge monolith project.
Usally a well defined structure, looks like this:
- Table of Contents (toc)
- Introduction
- Short Description
- Sections / Modules / Chapters
- Conclusion / Summary
- Glossary
- Index
- References
Tools
I prefer wiki pages instead of a word-document, because of the below features:
- Version
- History
- Portability
- Convertibility
- Accountability
btw if you are using Confluence, there is a Markdown plugin.
Measurements & Feedback
To understand if your documentation is good or not, you need feedback. But first there is an evaluation process of Review. It is the same thing as writing code, you cant review your own code! The first feedback should come within your team.
Use analytics to measure if people reads your documentation, from ‘Hits per page’ to more advance analytics as Matomo (formerly Piwik). Profiling helps you understand your audience. What they like in documentation?
Customer satisfaction (CSat) are important in documentation metrics.
- Was this page helpful? Yes/No
- Allowing customers to submit comments.
- Upvote/Downvote / Like
- or even let them to contribute in your documentation
make it easy for people to share their feedbak and find a way to include their comments in it.
FAQ
Frequently Asked Questions should answering questions in the style of:
- What would customers ask ?
- What if
- How to
FAQ or QA should be really straight forward, short and simple as it can be. You are writing a FAQ because you are here to help customers to learn how to use this specific feature not the entire software. Use links for more detail info, that direct them to your main documentation.
Conclusion
Sharing knowledge & shaping the culture of your team/end users. Your documentation should reflect your customers needs. Everything you do in your business is to satisfy your customers. Documentation is one way to communicate this.
So here are some final points on documentation:
- User Oriented
- Readability
- Comprehensive
- Keep it up to date
[this is a technical blog post, but easy to follow]
recently I had to setup and present my idea of a ssh bastion host. You may have already heard this as jump host or a security ssh hoping station or ssh gateway or even something else.
The main concept
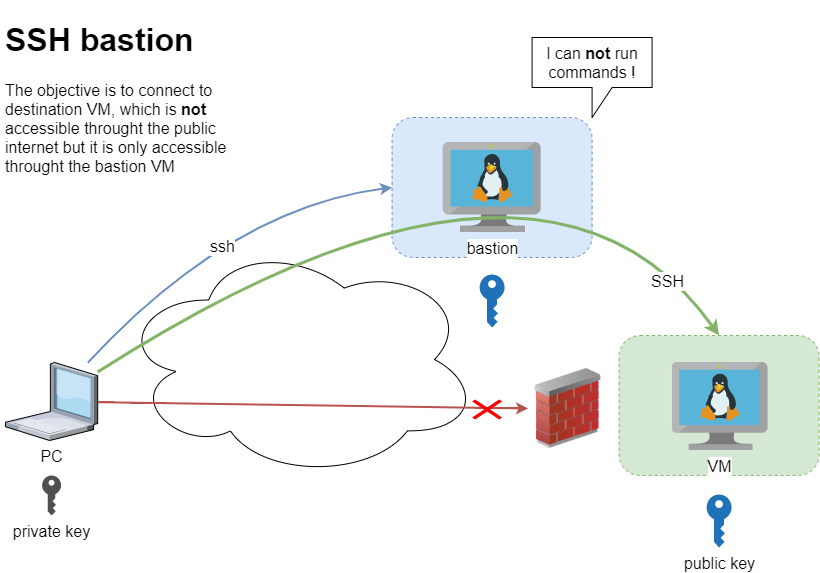
Disclaimer: This is just a proof of concept (PoC). May need a few adjustments.
The destination VM may be on another VPC, perhaps it does not have a public DNS or even a public IP. Think of this VM as not accessible. Only the ssh bastion server can reach this VM. So we need to first reach the bastion.
SSH Config
To begin with, I will share my initial sshd_config to get an idea of my current ssh setup
AcceptEnv LANG LC_*
ChallengeResponseAuthentication no
Compression no
MaxSessions 3
PasswordAuthentication no
PermitRootLogin no
Port 12345
PrintMotd no
Subsystem sftp /usr/lib/openssh/sftp-server
UseDNS no
UsePAM yes
X11Forwarding no
AllowUsers ebal
- I only allow, user ebal to connect via ssh.
- I do not allow the root user to login via ssh.
- I use ssh keys instead of passwords.
This configuration is almost identical to both VMs
- bastion (the name of the VM that acts as a bastion server)
- VM (the name of the destination VM that is behind a DMZ/firewall)
~/.ssh/config
I am using the ssh config file to have an easier user experience when using ssh
Host bastion
Hostname 127.71.16.12
Port 12345
IdentityFile ~/.ssh/id_ed25519.vm
Host vm
Hostname 192.13.13.186
Port 23456
Host *
User ebal
ServerAliveInterval 300
ServerAliveCountMax 10
ConnectTimeout=60
Create a new user to test this
Let us create a new user for testing.
User/Group
$ sudo groupadd ebal_test
$ sudo useradd -g ebal_test -m ebal_test
$ id ebal_test
uid=1000(ebal_test) gid=1000(ebal_test) groups=1000(ebal_test)
Perms
Copy .ssh directory from current user (<== lazy sysadmin)
$ sudo cp -ravx /home/ebal/.ssh/ /home/ebal_test/
$ sudo chown -R ebal_test:ebal_test /home/ebal_test/.ssh
$ sudo ls -la ~ebal_test/.ssh/
total 12
drwxr-x---. 2 ebal_test ebal_test 4096 Sep 20 2019 .
drwx------. 3 ebal_test ebal_test 4096 Jun 23 15:56 ..
-r--r-----. 1 ebal_test ebal_test 181 Sep 20 2019 authorized_keys
$ sudo ls -ld ~ebal_test/.ssh/
drwxr-x---. 2 ebal_test ebal_test 4096 Sep 20 2019 /home/ebal_test/.ssh/
bastion sshd config
Edit the ssh daemon configuration file to append the below entries
cat /etc/ssh/sshd_config
AllowUsers ebal ebal_test
Match User ebal_test
AllowAgentForwarding no
AllowTcpForwarding yes
X11Forwarding no
PermitTunnel no
GatewayPorts no
ForceCommand echo 'This account can only be used for ProxyJump (ssh -J)'
Don’t forget to restart sshd
systemctl restart sshd
As you have seen above, I now allow two (2) users to access the ssh daemon (AllowUsers). This can also work with AllowGroups
Testing bastion
Let’s try to connect to this bastion VM
$ ssh bastion -l ebal_test uptime
This account can only be used for ProxyJump (ssh -J)$ ssh bastion -l ebal_test
This account can only be used for ProxyJump (ssh -J)
Connection to 127.71.16.12 closed.
Interesting …
We can not login into this machine.
Let’s try with our personal user
$ ssh bastion -l ebal uptime
18:49:14 up 3 days, 9:14, 0 users, load average: 0.00, 0.00, 0.00
Perfect.
Let’s try from windows (mobaxterm)
mobaxterm is putty on steroids! There is also a portable version, so there is no need of installation. You can just download and extract it.
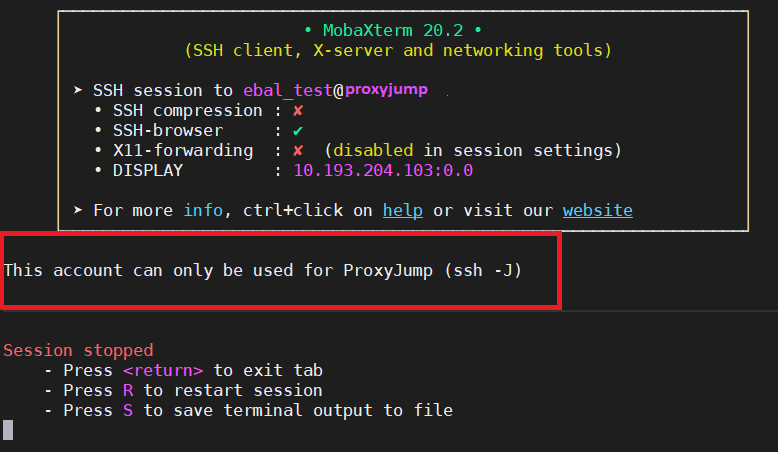
Interesting…
Destination VM
Now it is time to test our access to the destination VM
$ ssh VM
ssh: connect to host 192.13.13.186 port 23456: Connection refused
bastion
$ ssh -J ebal_test@bastion ebal@vm uptime
19:07:25 up 22:24, 2 users, load average: 0.00, 0.01, 0.00
$ ssh -J ebal_test@bastion ebal@vm
Last login: Tue Jun 23 19:05:29 2020 from 94.242.59.170
ebal@vm:~$
ebal@vm:~$ exit
logout
Success !
Explain Command
Using this command
ssh -J ebal_test@bastion ebal@vm
- is telling the ssh client command to use the ProxyJump feature.
- Using the user ebal_test on bastion machine and
- connect with the user ebal on vm.
So we can have different users!
ssh/config
Now, it is time to put everything under our ~./ssh/config file
Host bastion
Hostname 127.71.16.12
Port 12345
User ebal_test
IdentityFile ~/.ssh/id_ed25519.vm
Host vm
Hostname 192.13.13.186
ProxyJump bastion
User ebal
Port 23456
and try again
$ ssh vm uptime
19:17:19 up 22:33, 1 user, load average: 0.22, 0.11, 0.03
mobaxterm with bastion
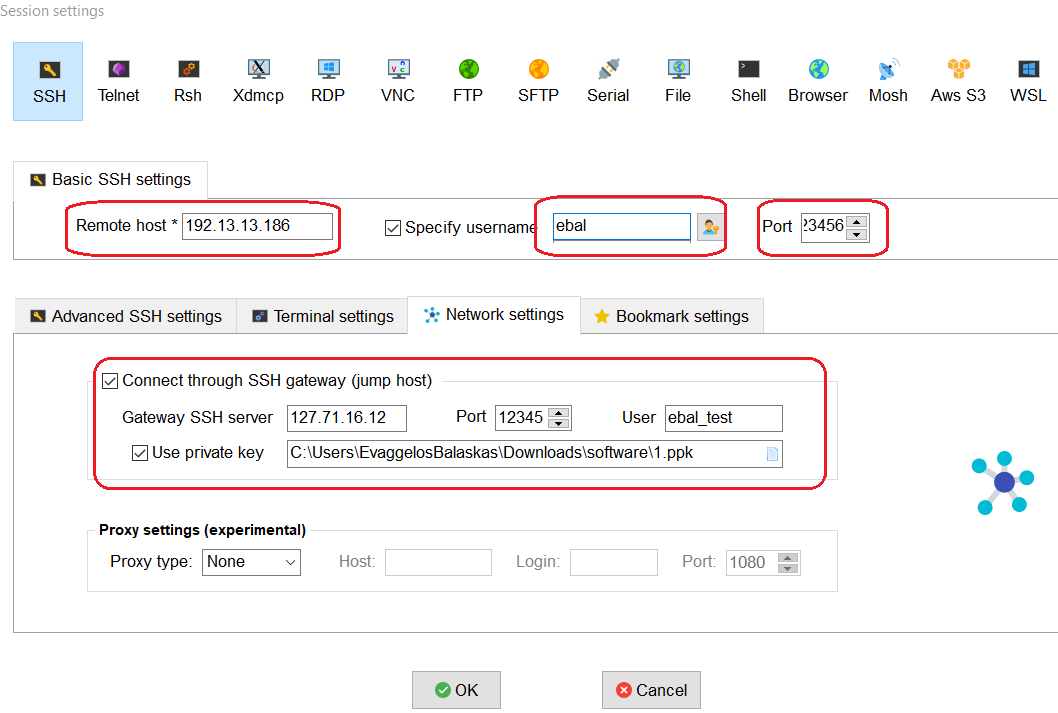
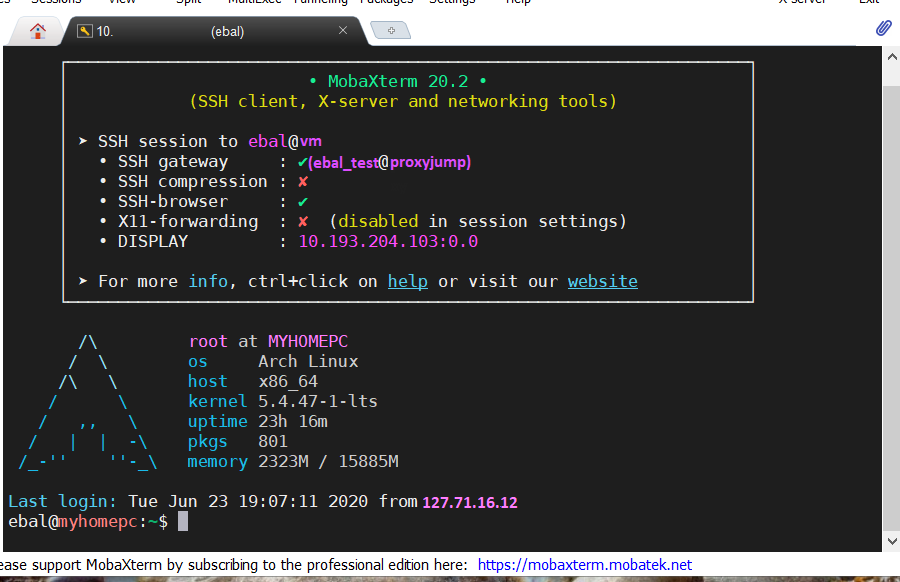
It is a known fact, that my favorite hosting provider is edis. I’ve seen them improving their services all these years, without forgeting their customers. Their support is great and I am really happy working with them.
That said, they dont offer (yet) a public infrastructre API like hetzner, linode or digitalocean but they offer an Auto Installer option to configure your VPS via a post-install shell script, put your ssh key and select your basic OS image.
I am experimenting with this option the last few weeks, but I wanted to use my currect cloud-init configuration file without making many changes. The goal is to produce a VPS image that when finished will be ready to accept my ansible roles without making any addition change or even login to this VPS.
So here is my current solution on how to use the post-install option to provide my current cloud-init configuration!
cloud-init
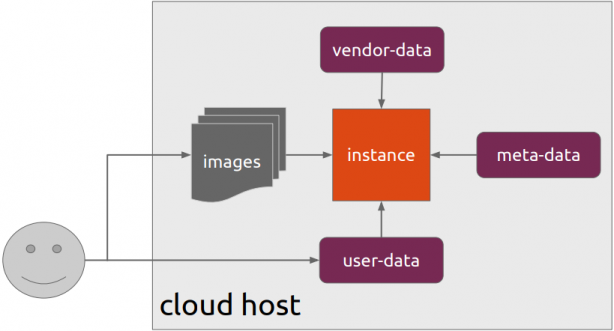
Josh Powers @ DebConf17
I will not get into cloud-init details in this blog post, but tldr; has stages, has modules, you provide your own user-data file (yaml) and it supports datasources. All these things is for telling cloud-init what to do, what to configure and when to configure it (in which step).
NoCloud Seed
I am going to use NoCloud datastore for this experiment.
so I need to configure these two (2) files
/var/lib/cloud/seed/nocloud-net/meta-data
/var/lib/cloud/seed/nocloud-net/user-dataInstall cloud-init
My first entry in the post-install shell script should be
apt-get update && apt-get install cloud-initthus I can be sure of two (2) things. First the VPS has already network access and I dont need to configure it, and second install cloud-init software, just to be sure that is there.
Variables
I try to keep my user-data file very simple but I would like to configure hostname and the sshd port.
HOSTNAME="complimentary"
SSHDPORT=22422
Users
Add a single user, provide a public ssh key for authentication and enable sudo access to this user.
users:
- name: ebal
ssh_import_id:
- gh:ebal
shell: /bin/bash
sudo: ALL=(ALL) NOPASSWD:ALL
Hardening SSH
- Change sshd port
- Disable Root
- Disconnect Idle Sessions
- Disable Password Auth
- Disable X Forwarding
- Allow only User (or group)
write_files:
- path: /etc/ssh/sshd_config
content: |
Port $SSHDPORT
PermitRootLogin no
ChallengeResponseAuthentication no
ClientAliveInterval 600
ClientAliveCountMax 3
UsePAM yes
UseDNS no
X11Forwarding no
PrintMotd no
AcceptEnv LANG LC_*
Subsystem sftp /usr/lib/openssh/sftp-server
PasswordAuthentication no
AllowUsers ebal
enable firewall
ufw allow $SSHDPORT/tcp && ufw enableremove cloud-init
and last but not least, I need to remove cloud-init in the end
apt-get -y autoremove --purge cloud-init lxc lxd snapdPost Install Shell script
let’s put everything together
#!/bin/bash
apt-get update && apt-get install cloud-init
HOSTNAME="complimentary"
SSHDPORT=22422
mkdir -p /var/lib/cloud/seed/nocloud-net
# Meta Data
cat > /var/lib/cloud/seed/nocloud-net/meta-data <<EOF
dsmode: local
EOF
# User Data
cat > /var/lib/cloud/seed/nocloud-net/user-data <<EOF
#cloud-config
disable_root: true
ssh_pwauth: no
users:
- name: ebal
ssh_import_id:
- gh:ebal
shell: /bin/bash
sudo: ALL=(ALL) NOPASSWD:ALL
write_files:
- path: /etc/ssh/sshd_config
content: |
Port $SSHDPORT
PermitRootLogin no
ChallengeResponseAuthentication no
UsePAM yes
UseDNS no
X11Forwarding no
PrintMotd no
AcceptEnv LANG LC_*
Subsystem sftp /usr/lib/openssh/sftp-server
PasswordAuthentication no
AllowUsers ebal
# Set TimeZone
timezone: Europe/Athens
HOSTNAME: $HOSTNAME
# Install packages
packages:
- figlet
- mlocate
- python3-apt
- bash-completion
# Update/Upgrade & Reboot if necessary
package_update: true
package_upgrade: true
package_reboot_if_required: true
# PostInstall
runcmd:
- figlet $HOSTNAME > /etc/motd
- updatedb
# Firewall
- ufw allow $SSHDPORT/tcp && ufw enable
# Remove cloud-init
- apt-get -y autoremove --purge cloud-init lxc lxd snapd
- apt-get -y --purge autoremove
- apt -y autoclean
- apt -y clean all
EOF
cloud-init clean --logs
cloud-init init --local
That’s it !
After a while (needs a few reboot) our VPS is up & running and we can use ansible to configure it.
last days events, made me rethink of this story.
I am not the hero of the story.
I was in my early 20s, working part time on the tech lab of my uni. In this lab I met another student, I will call him Bob instead of his real name. I was just a couple months away to get my degree. He was ten years older than me, still trying to go through the studies to get his. We met and for the next couple of weeks, worked together, both part time in this lab. Bob was deaf. He could speak but due to the fact that he could not hear his voice, the words he made were not very clear. He was struggling with the courses. Bob was able to read lips but you had to speak directly to him and not very fast.
The majority of our courses had custom textbook and they were difficult. Dual courses, theory and lab was not always on the same subject. Theory was about compilers, lab was about pascal (just to get an idea). It was a difficult time for me. Back then (end of ’90s - begging of ’00s) the internet was not the place it is today. To solve a problem, you had to find the reference manual, read it through, understand it and learn from this process. Nowadays most of us are using search engines to copy/paste commands of software solutions. It wasn’t like that back then.
Bob was a good worker. But it was very difficult for him. He could pass some of the labs but he had problems with the theory courses. Ten years of his life in uni. I tried to help him with some of the courses. I was happy I was able to help, he was happy to find someone to help him. But I could not do much. To explain something back then it was not very easy for me. Also I had to slow my speech, find simple words and somehow translate some of the terminology to something that Bob could understand. I wasn’t the best person to do that and he knew it. I don’t know if I ever managed to actually helped him.
One time, I asked him:
- Why are you not attending the theory courses?
he replied
- I can read lips, but it is very difficult to understand if the professor is not speaking directly to me. Also when they turn their back to write something on the board, I can not see their lips. I spent more time guessing what they are trying to explain that the assumption I make is usually wrong. So I can not participate in those classes. I have to read alone from the textbook, buy additional material, search the internet and find someone to help me. We have so many courses that it takes two,three or even more times for me to pass a course. I am trying, but on my own time.
I had never understood the privilege I had, till that moment.
This was a true lesson for me. It was hard, It was difficult. I was in all theory classes, I was active, engaged, worked with other students together, asked gazillion questions and it was still difficult for me. You know what? It was 10times harder for people with a disability ! But I never, ever had any idea, I was looking everything from my perspective and this is not how you build a community or a society. You need empathy and understanding.
He also had some bitterness, it was not fair to him. Understandable but he also was angry with the system. With the systematic exclusion. He had a bad mouth for their peer students and our teachers. He had enough. Some times he wanted to break everything in the lab, instead of fixing it. From time to time, he was depressed, angry but a few times he was also happy. When he worked in the lab, he put his soul in his work but the majority of people didn’t expect much of him and he -sometimes- he would not even try much. This was his life. People saw him as a person with a disability, and treat him like that. He was also proud. Reaching a goal, passing a course, achieving something, overcoming his disability against all odds.
One day, I gather my entire courage to ask him, point blank a very stupid question:
- Why are you still here? Ten years of your life to get a degree? With no help from anyone? I do not think I could do it.
I will never forget his answer. Till this day, I am still thinking about what he said to me.
- When I use the computer, the person on the other side, does not know that I am deaf. They do not judge me by my disability, they actually don’t care at all. They speak to me, as if I am a person.
Lost every word and almost broke into tears.