I’ve been using btrfs for a decade now (yes, than means 10y) on my setup (btw I use ArchLinux). I am using subvolumes and read-only snapshots with btrfs, but I have never created a script to automate my backups.
I KNOW, WHAT WAS I DOING ALL THESE YEARS!!A few days ago, a dear friend asked me something about btrfs snapshots, and that question gave me the nudge to think about my btrfs subvolume snapshots and more specific how to automate them. A day later, I wrote a simple (I think so) script to do automate my backups.
The script as a gist
The script is online as a gist here: BTRFS: Automatic Snapshots Script . In this blog post, I’ll try to describe the requirements and what is my thinking. I waited a couple weeks so the cron (or systemd timer) script run itself and verify that everything works fine. Seems that it does (at least for now) and the behaviour is as expected. I will keep a static copy of my script in this blog post but any future changes should be done in the above gist.
Improvements
The script can be improved by many,many ways (check available space before run, measure the time of running, remove sudo, check if root is running the script, verify the partitions are on btrfs, better debugging, better reporting, etc etc). These are some of the ways of improving the script, I am sure you can think a million more - feel free to sent me your proposals. If I see something I like, I will incorporate them and attribute of-course. But be reminded that I am not driven by smart code, I prefer to have clear and simple code, something that everybody can easily read and understand.
Mount Points
To be completely transparent, I encrypt all my disks (usually with a random keyfile). I use btrfs raid1 on the disks and create many subvolumes on them. Everything exists outside of my primary ssd rootfs disk. So I use a small but fast ssd for my operating system and btrfs-raid1 for my “spinning rust” disks.
BTRFS subvolumes can be mounted as normal partitions and that is exactly what I’ve done with my home and opt. I keep everything that I’ve install outside of my distribution under opt.
This setup is very flexible as I can easy replace the disks when the storage is full by removing one by one of the disks from btrfs-raid1, remove-add the new larger disk, repair-restore raid, then remove the other disk, install the second and (re)balance the entire raid1 on them!
Although this is out of scope, I use a stub archlinux UEFI kernel so I do not have grub and my entire rootfs is also encrypted and btrfs!
mount -o subvolid=10701 LABEL="ST1000DX002" /home
mount -o subvolid=10657 LABEL="ST1000DX002" /opt
Declare variables
# paths MUST end with '/'
btrfs_paths=("/" "/home/" "/opt/")
timestamp=$(date +%Y%m%d_%H%M%S)
keep_snapshots=3
yymmdd="$(date +%Y/%m/%d)"
logfile="/var/log/btrfsSnapshot/${yymmdd}/btrfsSnapshot.log"
The first variable in the script is actually a bash array
btrfs_paths=("/" "/home/" "/opt/")
and all three (3) paths (rootfs, home & opt) are different mount points on different encrypted disks.
MUST end with / (forward slash), either-wise something catastrophic will occur to your system. Be very careful. Please, be very careful!
Next variable is the timestamp we will use, that will create something like
partition_YYYYMMDD_HHMMSS
After that is how many snapshots we would like to keep to our system. You can increase it to whatever you like. But be careful of the storage.
keep_snapshots=3
I like using shortcuts in shell scripts to reduce the long one-liners that some people think that it is alright. I dont, so
yymmdd="$(date +%Y/%m/%d)"
is one of these shortcuts !
Last, I like to have a logfile to review at a later time and see what happened.
logfile="/var/log/btrfsSnapshot/${yymmdd}/btrfsSnapshot.log"
Log Directory
for older dudes -like me- you know that you can not have all your logs under one directory but you need to structure them. The above yymmdd shortcut can help here. As I am too lazy to check if the directory already exist, I just (re)create the log directory that the script will use.
sudo mkdir -p "/var/log/btrfsSnapshot/${yymmdd}/"
For - Loop
We enter to the crucial part of the script. We are going to iterate our btrfs commands in a bash for-loop structure so we can run the same commands for all our partitions (variable: btrfs_paths)
for btrfs_path in "${btrfs_paths[@]}"; do
    <some commands>
done
Snapshot Directory
We need to have our snapshots in a specific location. So I chose .Snapshot/ under each partition. And I am silently (re)creating this directory -again I am lazy, someone should check if the directory/path already exist- just to be sure that the directory exist.
sudo mkdir -p "${btrfs_path}".Snapshot/
I am also using very frequently mlocate (updatedb) so to avoid having multiple (duplicates) in your index, do not forget to update updatedb.conf to exclude the snapshot directories.
PRUNENAMES = ".Snapshot"How many snapshots are there?
Yes, how many ?
In order to learn this, we need to count them. I will try to skip every other subvolume that exist under the path and count only the read-only, snapshots under each partition.
sudo btrfs subvolume list -o -r -s "${btrfs_path}" | grep -c ".Snapshot/"
Delete Previous snapshots
At this point in the script, we are ready to delete all previous snapshots and only keep the latest or to be exact whatever the keep_snapshots variables says we should keep.
To do that, we are going to iterate via a while-loop (this is a nested loop inside the above for-loop)
while [ "${keep_snapshots}" -le "${list_btrfs_snap}" ]
do
  <some commands>
done
considering that the keep_snapshots is an integer, we iterate the delete command less or equal from the list of already btrfs existing snapshots.
Delete Command
To avoid mistakes, we delete by subvolume id and not by the name of the snapshot, under the btrfs path we listed above.
btrfs subvolume delete --subvolid "${prev_btrfs_snap}" "${btrfs_path}"and we log the output of the command into our log
Delete subvolume (no-commit): '//.Snapshot/20221107_091028'
Create a new subvolume snapshot
And now we are going to create a new read-only snapshot under our btrfs subvolume.
btrfs subvolume snapshot -r "${btrfs_path}" "${btrfs_path}.Snapshot/${timestamp}"
the log entry will have something like:
Create a readonly snapshot of '/' in '/.Snapshot/20221111_000001'
That’s it !
Output
Log Directory Structure and output
sudo tree /var/log/btrfsSnapshot/2022/11/
/var/log/btrfsSnapshot/2022/11/
├── 07
│   └── btrfsSnapshot.log
├── 10
│   └── btrfsSnapshot.log
├── 11
│   └── btrfsSnapshot.log
└── 18
    └── btrfsSnapshot.log

4 directories, 4 files
sudo cat /var/log/btrfsSnapshot/2022/11/18/btrfsSnapshot.log
######## Fri, 18 Nov 2022 00:00:01 +0200 ########

Delete subvolume (no-commit): '//.Snapshot/20221107_091040'
Create a readonly snapshot of '/' in '/.Snapshot/20221118_000001'

Delete subvolume (no-commit): '/home//home/.Snapshot/20221107_091040'
Create a readonly snapshot of '/home/' in '/home/.Snapshot/20221118_000001'

Delete subvolume (no-commit): '/opt//opt/.Snapshot/20221107_091040'
Create a readonly snapshot of '/opt/' in '/opt/.Snapshot/20221118_000001'
Mount a read-only subvolume
As something extra for this article, I will mount a read-only subvolume, so you can see how it is done.
$ sudo btrfs subvolume list -o -r -s /

ID 462 gen 5809766 cgen 5809765 top level 5 otime 2022-11-10 18:11:20 path .Snapshot/20221110_181120
ID 463 gen 5810106 cgen 5810105 top level 5 otime 2022-11-11 00:00:01 path .Snapshot/20221111_000001
ID 464 gen 5819886 cgen 5819885 top level 5 otime 2022-11-18 00:00:01 path .Snapshot/20221118_000001

$ sudo mount -o subvolid=462 /media/
mount: /media/: can't find in /etc/fstab.

$ sudo mount -o subvolid=462 LABEL=rootfs /media/

$ df -HP /media/
Filesystem       Size  Used Avail Use% Mounted on
/dev/mapper/ssd  112G  9.1G  102G   9% /media

$ sudo touch /media/etc/ebal
touch: cannot touch '/media/etc/ebal': Read-only file system

$ sudo diff /etc/pacman.d/mirrorlist /media/etc/pacman.d/mirrorlist

294c294
< Server = http://ftp.ntua.gr/pub/linux/archlinux/$repo/os/$arch
---
> #Server = http://ftp.ntua.gr/pub/linux/archlinux/$repo/os/$arch

$ sudo umount /media
The Script
Last, but not least, the full script as was the date of this article.
#!/bin/bash
set -e

# ebal, Mon, 07 Nov 2022 08:49:37 +0200

## 0 0 * * Fri /usr/local/bin/btrfsSnapshot.sh

# paths MUST end with '/'
btrfs_paths=("/" "/home/" "/opt/")
timestamp=$(date +%Y%m%d_%H%M%S)
keep_snapshots=3
yymmdd="$(date +%Y/%m/%d)"
logfile="/var/log/btrfsSnapshot/${yymmdd}/btrfsSnapshot.log"

sudo mkdir -p "/var/log/btrfsSnapshot/${yymmdd}/"

echo "######## $(date -R) ########" | sudo tee -a "${logfile}"
echo "" | sudo tee -a "${logfile}"

for btrfs_path in "${btrfs_paths[@]}"; do

    ## Create Snapshot directory
    sudo mkdir -p "${btrfs_path}".Snapshot/

    ## How many Snapshots are there ?
    list_btrfs_snap=$(sudo btrfs subvolume list -o -r -s "${btrfs_path}" | grep -c ".Snapshot/")

    ## Get oldest rootfs btrfs snapshot
    while [ "${keep_snapshots}" -le "${list_btrfs_snap}" ]
    do
        prev_btrfs_snap=$(sudo btrfs subvolume list -o -r -s  "${btrfs_path}" | grep ".Snapshot/" | sort | head -1 | awk '{print $2}')

        ## Delete a btrfs snapshot by their subvolume id
        sudo btrfs subvolume delete --subvolid "${prev_btrfs_snap}" "${btrfs_path}" | sudo tee -a "${logfile}"

        list_btrfs_snap=$(sudo btrfs subvolume list -o -r -s "${btrfs_path}" | grep -c ".Snapshot/")
    done

    ## Create a new read-only btrfs snapshot
    sudo btrfs subvolume snapshot -r "${btrfs_path}" "${btrfs_path}.Snapshot/${timestamp}" | sudo tee -a "${logfile}"

    echo "" | sudo tee -a "${logfile}"

done
When creating a new Cloud Virtual Machine the cloud provider is copying a virtual disk as the base image (we called it mí̱tra or matrix) and starts your virtual machine from another virtual disk (or volume cloud disk) that in fact is a snapshot of the base image.
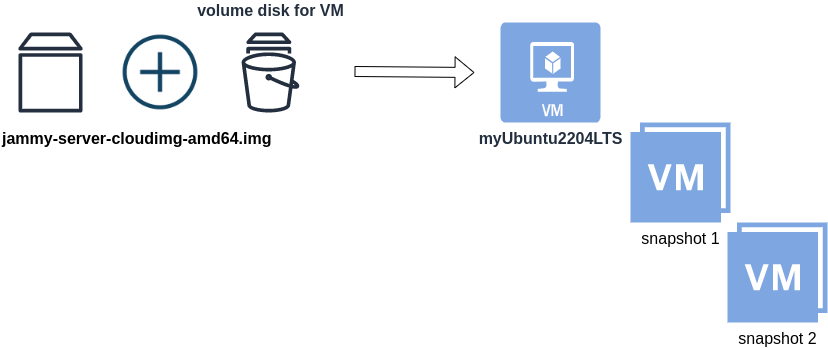
Just for the sake of this example, let us say that the base cloud image is the
jammy-server-cloudimg-amd64.imgWhen creating a new Libvirt (qemu/kvm) virtual machine, you can use this base image to start your VM instead of using an iso to install ubuntu 22.04 LTS. When choosing this image, then all changes will occur to that image and if you want to spawn another virtual machine, you need to (re)download it.
So instead of doing that, the best practice is to copy this image as base and start from a snapshot aka a baking file from that image. It is best because you can always quickly revert all your changes and (re)spawn the VM from the fresh/clean base image. Or you can always create another snapshot and revert if needed.
inspect images
To see how that works here is a local example from my linux machine.
qemu-img info /var/lib/libvirt/images/lEvXLA_tf-base.qcow2
image: /var/lib/libvirt/images/lEvXLA_tf-base.qcow2
file format: qcow2
virtual size: 2.2 GiB (2361393152 bytes)
disk size: 636 MiB
cluster_size: 65536
Format specific information:
    compat: 0.10
    compression type: zlib
    refcount bits: 16
the most important attributes to inspect are
virtual size: 2.2 GiB
disk size: 636 MiB
and the volume disk of my virtual machine
qemu-img info /var/lib/libvirt/images/lEvXLA_tf-vol.qcow2
image: /var/lib/libvirt/images/lEvXLA_tf-vol.qcow2
file format: qcow2
virtual size: 10 GiB (10737418240 bytes)
disk size: 1.6 GiB
cluster_size: 65536
backing file: /var/lib/libvirt/images/lEvXLA_tf-base.qcow2
backing file format: qcow2
Format specific information:
    compat: 0.10
    compression type: zlib
    refcount bits: 16
We see here
virtual size: 10 GiB
disk size: 1.6 GiB
cause I have extended the volume disk size to 10G from 2.2G , doing some updates and install some packages.
Now here is a problem.
I would like to use my own cloud image as base for some projects. It will help me speed things up and also do some common things I am usually doing in every setup.
If I copy the volume disk, then I will copy 1.6G of the snapshot disk. I can not use this as a base image. The volume disk contains only the delta from the base image!
baking file
Let’s first understand a bit better what is happening here
qemu-img info –backing-chain /var/lib/libvirt/images/lEvXLA_tf-vol.qcow2
image: /var/lib/libvirt/images/lEvXLA_tf-vol.qcow2
file format: qcow2
virtual size: 10 GiB (10737418240 bytes)
disk size: 1.6 GiB
cluster_size: 65536
backing file: /var/lib/libvirt/images/lEvXLA_tf-base.qcow2
backing file format: qcow2
Format specific information:
    compat: 0.10
    compression type: zlib
    refcount bits: 16

image: /var/lib/libvirt/images/lEvXLA_tf-base.qcow2
file format: qcow2
virtual size: 2.2 GiB (2361393152 bytes)
disk size: 636 MiB
cluster_size: 65536
Format specific information:
    compat: 0.10
    compression type: zlib
    refcount bits: 16
By inspecting the volume disk, we see that this image is chained to our base image.
disk size: 1.6 GiB
disk size: 636 MiB
Commit Volume
If we want to commit our volume changes to our base images, we need to commit them.
sudo qemu-img commit /var/lib/libvirt/images/lEvXLA_tf-vol.qcow2

Image committed.
Be aware, we commit our changes the volume disk => so our base will get the updates !!
Base Image
We need to see our base image grow we our changes
  disk size: 1.6 GiB
+ disk size: 636 MiB
=
  disk size: 2.11 GiB
and we can verify that by getting the image info (details)
qemu-img info /var/lib/libvirt/images/lEvXLA_tf-base.qcow2
image: /var/lib/libvirt/images/lEvXLA_tf-base.qcow2
file format: qcow2
virtual size: 10 GiB (10737418240 bytes)
disk size: 2.11 GiB
cluster_size: 65536
Format specific information:
    compat: 0.10
    compression type: zlib
    refcount bits: 16
That’s it !
Using Terraform for personal projects, is a good way to create your lab in a reproducible manner. Wherever your lab is, either in the “cloud” aka other’s people computers or in a self-hosted environment, you can run your Infrastructure as code (IaC) instead of performing manual tasks each time.
My preferable way is to use QEMU/KVM (Kernel Virtual Machine) on my libvirt (self-hosted) lab. You can quickly build a k8s cluster or test a few virtual machines with different software, without paying extra money to cloud providers.
Terraform uses a state file to store your entire infra in json format. This file will be the source of truth for your infrastructure. Any changes you make in the code, terraform will figure out what needs to add/destroy and run only what have changed.
Working in a single repository, terraform will create a local state file on your working directory. This is fast and reliable when working alone. When working with a team (either in an opensource project/service or it is something work related) you need to share the state with others. Eitherwise the result will be catastrophic as each person will have no idea of the infrastructure state of the service.
In this blog post, I will try to explain how to use GitLab to store the terraform state into a remote repository by using the tf backend: http which is REST.
Greate a new private GitLab Project
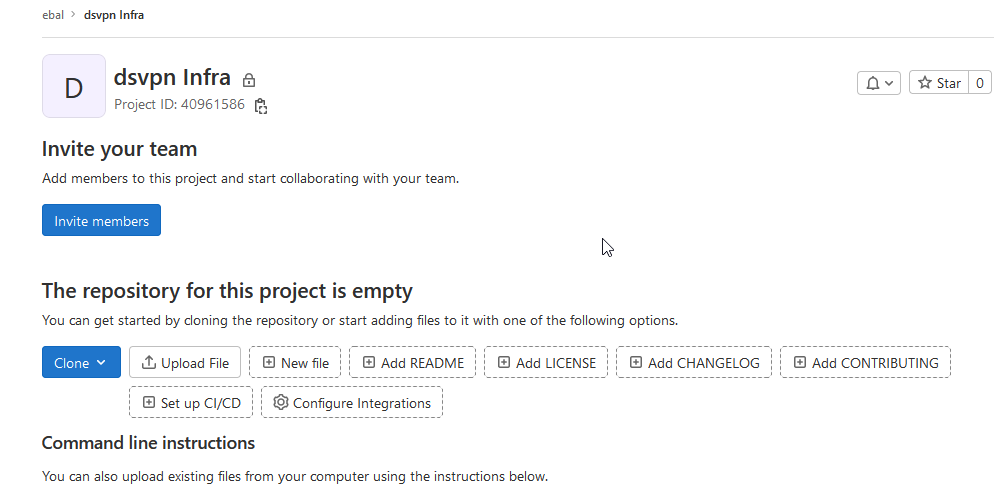
We need the Project ID which is under the project name in the top.
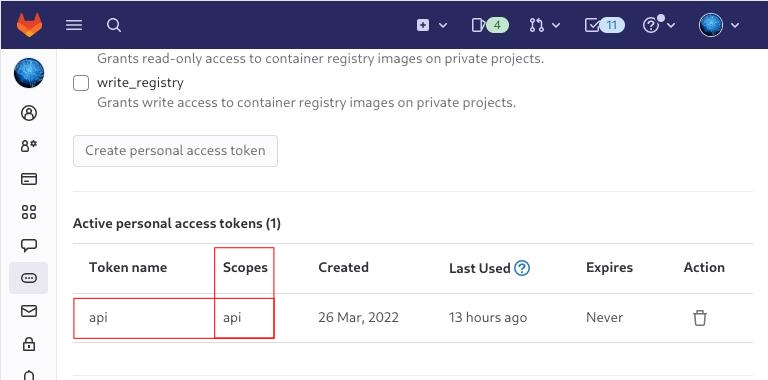
Create a new api token
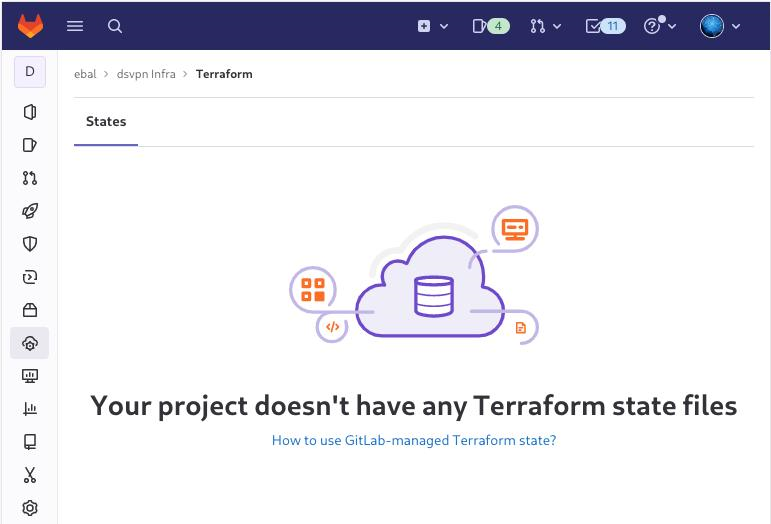
Verify that your Project has the ability to store terraform state files
You are ready to clone the git repository to your system.
Backend
Reading the documentation in the below links
seems that the only thing we need to do, is to expand our terraform project with this:
terraform {
  backend "http" {
  }
}
Doing that, we inform our IaC that our terraform backend should be a remote address.
Took me a while to figure this out, but after re-reading all the necessary documentation materials the idea is to declare your backend on gitlab and to do this, we need to initialize the http backend.
The only Required configuration setting is the remote address and should be something like this:
terraform {
  backend "http" {
    address = "https://gitlab.com/api/v4/projects/<PROJECT_ID>/terraform/state/<STATE_NAME>"
  }
}
Where PROJECT_ID and STATE_NAME are relative to your project.
In this article, we go with
GITLAB_PROJECT_ID="40961586"
GITLAB_TF_STATE_NAME="tf_state"
Terraform does not allow to use variables in the backend http, so the preferable way is to export them to our session.
and we -of course- need the address:
TF_HTTP_ADDRESS="https://gitlab.com/api/v4/projects/${GITLAB_PROJECT_ID}/terraform/state/${GITLAB_TF_STATE_NAME}"
For convience reasons, I will create a file named: terraform.config outside of this git repo
cat > ../terraform.config <<EOF
export -p GITLAB_PROJECT_ID="40961586"
export -p GITLAB_TF_STATE_NAME="tf_state"
export -p GITLAB_URL="https://gitlab.com/api/v4/projects"

# Address
export -p TF_HTTP_ADDRESS="${GITLAB_URL}/${GITLAB_PROJECT_ID}/terraform/state/${GITLAB_TF_STATE_NAME}"

EOF

source ../terraform.config
this should do the trick.
Authentication
In order to authenticate via tf against GitLab to store the tf remote state, we need to also set two additional variables:
# Authentication
TF_HTTP_USERNAME="api"
TF_HTTP_PASSWORD="<TOKEN>"
put them in the above terraform.config file.
Pretty much we are done!
Initialize Terraform
source ../terraform.config

terraform init
Initializing the backend...

Successfully configured the backend "http"! Terraform will automatically
use this backend unless the backend configuration changes.

Initializing provider plugins...
- Finding latest version of hashicorp/http...
- Finding latest version of hashicorp/random...
- Finding latest version of hashicorp/template...
- Finding dmacvicar/libvirt versions matching ">= 0.7.0"...
- Installing hashicorp/random v3.4.3...
- Installed hashicorp/random v3.4.3 (signed by HashiCorp)
- Installing hashicorp/template v2.2.0...
- Installed hashicorp/template v2.2.0 (signed by HashiCorp)
- Installing dmacvicar/libvirt v0.7.0...
- Installed dmacvicar/libvirt v0.7.0 (unauthenticated)
- Installing hashicorp/http v3.2.1...
- Installed hashicorp/http v3.2.1 (signed by HashiCorp)

Terraform has created a lock file .terraform.lock.hcl to record the provider
selections it made above. Include this file in your version control repository
so that Terraform can guarantee to make the same selections by default when
you run "terraform init" in the future.

...

Terraform has been successfully initialized!

You may now begin working with Terraform. Try running "terraform plan" to see
any changes that are required for your infrastructure. All Terraform commands
should now work.

If you ever set or change modules or backend configuration for Terraform,
rerun this command to reinitialize your working directory. If you forget, other
commands will detect it and remind you to do so if necessary.
Remote state
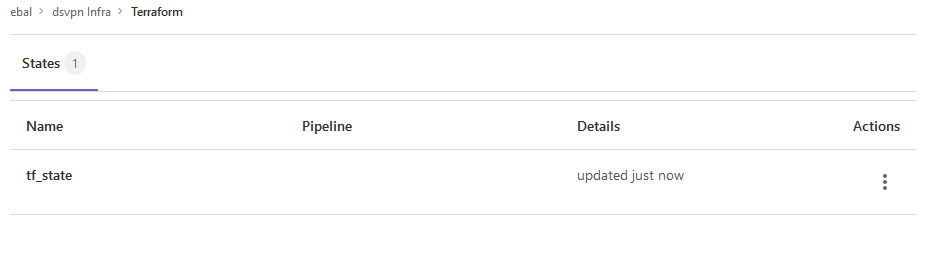
by running
terraform plan
we can now see the remote terraform state in the gitlab
Opening Actions –> Copy terraform init command we can see the below configuration:
export GITLAB_ACCESS_TOKEN=<YOUR-ACCESS-TOKEN>

terraform init
    -backend-config="address=https://gitlab.com/api/v4/projects/40961586/terraform/state/tf_state"
    -backend-config="lock_address=https://gitlab.com/api/v4/projects/40961586/terraform/state/tf_state/lock"
    -backend-config="unlock_address=https://gitlab.com/api/v4/projects/40961586/terraform/state/tf_state/lock"
    -backend-config="username=api"
    -backend-config="password=$GITLAB_ACCESS_TOKEN"
    -backend-config="lock_method=POST"
    -backend-config="unlock_method=DELETE"
    -backend-config="retry_wait_min=5"
Update terraform backend configuration
I dislike running a “long” terraform init command, so we will put these settings to our tf code.
Separating the static changes from the dynamic, our Backend http config can become something like this:
terraform {
  backend "http" {
    lock_method    = "POST"
    unlock_method  = "DELETE"
    retry_wait_min = 5
  }
}
but we need to update our terraform.config once more, to include all the variables of the http backend configuration for locking and unlocking the state.
# Lock
export -p TF_HTTP_LOCK_ADDRESS="${TF_HTTP_ADDRESS}/lock"

# Unlock
export -p TF_HTTP_UNLOCK_ADDRESS="${TF_HTTP_ADDRESS}/lock"
Terraform Config
So here is our entire terraform config file
# GitLab

export -p GITLAB_URL="https://gitlab.com/api/v4/projects"
export -p GITLAB_PROJECT_ID="<>"
export -p GITLAB_TF_STATE_NAME="tf_state"

# Terraform

# Address
export -p TF_HTTP_ADDRESS="${GITLAB_URL}/${GITLAB_PROJECT_ID}/terraform/state/${GITLAB_TF_STATE_NAME}"

# Lock
export -p TF_HTTP_LOCK_ADDRESS="${TF_HTTP_ADDRESS}/lock"

# Unlock
export -p TF_HTTP_UNLOCK_ADDRESS="${TF_HTTP_ADDRESS}/lock"

# Authentication
export -p TF_HTTP_USERNAME="api"
export -p TF_HTTP_PASSWORD="<>"
And pretty much that’s it!
Other Colleagues
So in order our team mates/colleagues want to make changes to this specific gitlab repo (or even extended to include a pipeline) they need
- Git clone the repo
- Edit the terraform.config
- Initialize terraform (terraform init)
And terraform will use the remote state file.