In this short blog post, I will share a few ansible tips:
Run a specific role
ansible -i hosts -m include_role -a name=roles/common all -b
Print Ansible Variables
ansible -m debug -a 'var=vars' 127.0.0.1 | sed "1 s/^.*$/{/" | jq .
Ansible Conditionals
Variable contains string
matching string in a variable
  vars:
      var1: "hello world"

  - debug:
        msg: " {{ var1 }} "
    when:  ........
old way
when: var1.find("hello") != -1deprecated way
when: var1 | search("hello")Correct way
when: var1 is search("hello")Multiple Conditionals
Logical And
      when:
        - ansible_distribution == "Archlinux"
        - ansible_hostname is search("myhome")
Numeric Conditionals
getting variable from command line (or from somewhere else)
   -  set_fact:
       my_variable_keepday: "{{ keepday | default(7)  | int }}"

    - name: something
      debug:
        msg: "keepday : {{  my_variable_keepday }}"
      when:
        - my_variable_keepday|int >= 0
        - my_variable_keepday|int <= 10
Validate Time variable with ansible
I need to validate a variable. It should be ‘%H:%M:%S’
My work-around is to convert it to datetime so that I can validate it:
  tasks:
    - debug:
        msg: "{{ startTime | to_datetime('%H:%M:%S') }}"
First example: 21:30:15
True: "msg": "1900-01-01 21:30:15"
Second example: ‘25:00:00′
could not be converted to an dict.
The error was: time data '25:00:00' does not match format '%H:%M:%S'
This article will show how to install Arch Linux in Windows 10 under Windows Subsystem for Linux.
WSL
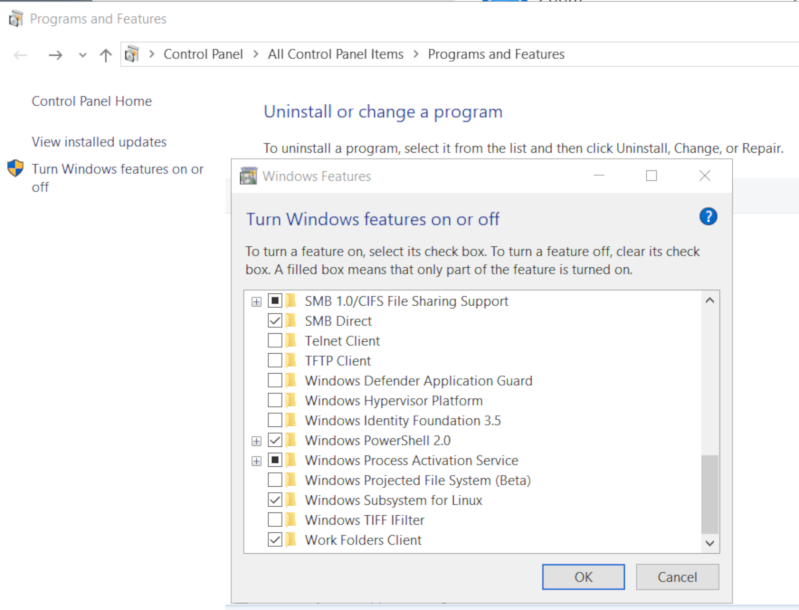
Prerequisite is to have enabled WSL on your Win10 and already reboot your machine.
You can enable WSL :
- Windows Settings
- Apps
- Apps & features
- Related settings -> Programs and Features (bottom)
- Turn Windows features on or off (left)

Store
After rebooting your Win10, you can use Microsoft Store to install a Linux distribution like Ubuntu. Archlinux is not an official supported linux distribution thus this guide !
Launcher
The easiest way to install Archlinux (or any Linux distro) is to download the wsldl from github. This project provides a generic Launcher.exe and any rootfs as source base. First thing is to rename Launcher.exe to Archlinux.exe.
ebal@myworklaptop:~$ mkdir -pv Archlinux
mkdir: created directory 'Archlinux'

ebal@myworklaptop:~$ cd Archlinux/

ebal@myworklaptop:~/Archlinux$ curl -sL -o Archlinux.exe https://github.com/yuk7/wsldl/releases/download/18122700/Launcher.exe
ebal@myworklaptop:~/Archlinux$ ls -l
total 320
-rw-rw-rw- 1 ebal ebal 143147 Feb 21 20:40 Archlinux.exe
RootFS
Next step is to download the latest archlinux root filesystem and create a new rootfs.tar.gz archive file, as wsldl uses this type.
ebal@myworklaptop:~/Archlinux$ curl -sLO http://ftp.otenet.gr/linux/archlinux/iso/latest/archlinux-bootstrap-2019.02.01-x86_64.tar.gz

ebal@myworklaptop:~/Archlinux$ ls -l
total 147392
-rw-rw-rw- 1 ebal ebal    143147 Feb 21 20:40 Archlinux.exe
-rw-rw-rw- 1 ebal ebal 149030552 Feb 21 20:42 archlinux-bootstrap-2019.02.01-x86_64.tar.gz

ebal@myworklaptop:~/Archlinux$ sudo tar xf archlinux-bootstrap-2019.02.01-x86_64.tar.gz

ebal@myworklaptop:~/Archlinux$  cd root.x86_64/

ebal@myworklaptop:~/Archlinux/root.x86_64$ ls
README  bin  boot  dev  etc  home  lib  lib64  mnt  opt  proc  root  run  sbin  srv  sys  tmp  usr  var

ebal@myworklaptop:~/Archlinux/root.x86_64$  sudo tar czf rootfs.tar.gz .
tar: .: file changed as we read it

ebal@myworklaptop:~/Archlinux/root.x86_64$ ls
README  bin  boot  dev  etc  home  lib  lib64  mnt  opt  proc  root  rootfs.tar.gz  run  sbin  srv  sys  tmp  usr  var

ebal@myworklaptop:~/Archlinux/root.x86_64$ du -sh rootfs.tar.gz
144M    rootfs.tar.gz

ebal@myworklaptop:~/Archlinux/root.x86_64$ sudo mv rootfs.tar.gz ../

ebal@myworklaptop:~/Archlinux/root.x86_64$ cd ..
ebal@myworklaptop:~/Archlinux$ ls
Archlinux.exe  archlinux-bootstrap-2019.02.01-x86_64.tar.gz  root.x86_64  rootfs.tar.gz

ebal@myworklaptop:~/Archlinux$
ebal@myworklaptop:~/Archlinux$ ls
Archlinux.exe  rootfs.tar.gz

ebal@myworklaptop:~$ mv Archlinux/ /mnt/c/Users/EvaggelosBalaskas/Downloads/ArchlinuxWSL
ebal@myworklaptop:~$
As you can see, I do a little clean up and I move the directory under windows filesystem.
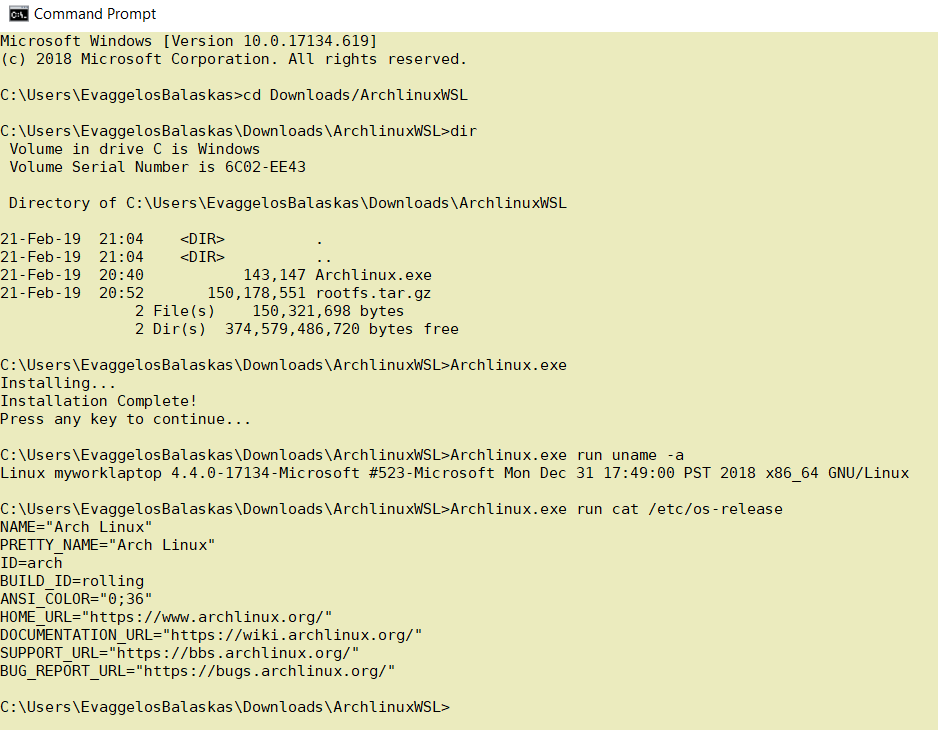
Install & Verify

Microsoft Windows [Version 10.0.17134.619]
(c) 2018 Microsoft Corporation. All rights reserved.

C:UsersEvaggelosBalaskas>cd Downloads/ArchlinuxWSL

C:UsersEvaggelosBalaskasDownloadsArchlinuxWSL>dir
 Volume in drive C is Windows
 Volume Serial Number is 6C02-EE43

 Directory of C:UsersEvaggelosBalaskasDownloadsArchlinuxWSL

21-Feb-19  21:04    <DIR>          .
21-Feb-19  21:04    <DIR>          ..
21-Feb-19  20:40           143,147 Archlinux.exe
21-Feb-19  20:52       150,178,551 rootfs.tar.gz
               2 File(s)    150,321,698 bytes
               2 Dir(s)  374,579,486,720 bytes free

C:UsersEvaggelosBalaskasDownloadsArchlinuxWSL>Archlinux.exe
Installing...
Installation Complete!
Press any key to continue...

C:UsersEvaggelosBalaskasDownloadsArchlinuxWSL>Archlinux.exe run uname -a
Linux myworklaptop 4.4.0-17134-Microsoft #523-Microsoft Mon Dec 31 17:49:00 PST 2018 x86_64 GNU/Linux

C:UsersEvaggelosBalaskasDownloadsArchlinuxWSL>Archlinux.exe run cat /etc/os-release
NAME="Arch Linux"
PRETTY_NAME="Arch Linux"
ID=arch
BUILD_ID=rolling
ANSI_COLOR="0;36"
HOME_URL="https://www.archlinux.org/"
DOCUMENTATION_URL="https://wiki.archlinux.org/"
SUPPORT_URL="https://bbs.archlinux.org/"
BUG_REPORT_URL="https://bugs.archlinux.org/"

C:UsersEvaggelosBalaskasDownloadsArchlinuxWSL>Archlinux.exe run bash
[root@myworklaptop ArchlinuxWSL]#
[root@myworklaptop ArchlinuxWSL]# exit
Archlinux
C:UsersEvaggelosBalaskasDownloadsArchlinuxWSL>Archlinux.exe run bash
[root@myworklaptop ArchlinuxWSL]#

[root@myworklaptop ArchlinuxWSL]# date
Thu Feb 21 21:41:41 STD 2019
Remember, archlinux by default does not have any configuration. So you need to configure this instance !
Here are some basic configuration:
[root@myworklaptop ArchlinuxWSL]# echo nameserver 8.8.8.8 > /etc/resolv.conf

[root@myworklaptop ArchlinuxWSL]# cat > /etc/pacman.d/mirrorlist <<EOF
Server = http://ftp.otenet.gr/linux/archlinux/$repo/os/$arch
EOF

[root@myworklaptop ArchlinuxWSL]#  pacman-key --init

[root@myworklaptop ArchlinuxWSL]#  pacman-key --populate

[root@myworklaptop ArchlinuxWSL]# pacman -Syy
you are pretty much ready to use archlinux inside your windows 10 !!
Remove
You can remove Archlinux by simple:
Archlinux.exe clean
Default User
There is a simple way to use Archlinux within Windows Subsystem for Linux , by connecting with a default user.
But before configure ArchWSL, we need to create this user inside the archlinux instance:
[root@myworklaptop ArchWSL]# useradd -g 374 -u 374 ebal

[root@myworklaptop ArchWSL]# id ebal
uid=374(ebal) gid=374(ebal) groups=374(ebal)

[root@myworklaptop ArchWSL]# cp -rav /etc/skel/ /home/ebal
'/etc/skel/' -> '/home/ebal'
'/etc/skel/.bashrc' -> '/home/ebal/.bashrc'
'/etc/skel/.bash_profile' -> '/home/ebal/.bash_profile'
'/etc/skel/.bash_logout' -> '/home/ebal/.bash_logout'

chown -R ebal:ebal /home/ebal/
then exit the linux app and run:
> Archlinux.exe config --default-user ebaland try to login again:
> Archlinux.exe run bash
[ebal@myworklaptop ArchWSL]$

[ebal@myworklaptop ArchWSL]$ cd ~

ebal@myworklaptop ~$ pwd -P
/home/ebal
Flatpak is a software utility for software deployment, package management, and application virtualization for Linux desktop computers. It provides a sandbox environment in which users can run applications in isolation from the rest of the system.
… in a nutshell, it is an isolate software bundle package which you can run with restricted permissions!
User Vs System
We can install flatpak applications for system-wide or for single-user. The last part does not need administrative access or any special permissions.
To use flatpak as a user, we have to add --user next to every flatpak command.
Applications
A flatpak application has a manifest that describes dependancies & permissions.
Repositories
A repository contains a list of application manifests & the flatpak package (code).
Branches
One of the best features of flatpak, is that we can have multile versions of a specific application. This is being done by using a different branch or version (like git). Most common branch is default.
Add flathub
To use/install a flatpak application, we have first to add a remote flatpack repository localy.
The most well-known flatpak repository is called: flathub
flatpak remote-add --user flathub https://dl.flathub.org/repo/flathub.flatpakrepo
Search Applications
$ flatpak search --user Signal
Description                                                                                     Application                                 Version              Branch              Remotes
Signal - Private messenger for the desktop                                                      org.signal.Signal                           1.20.0               stable              flathub
Install package as user
The default syntax of install packages is:
repository - application
$ flatpak install --user -y flathub com.dropbox.Client
$ flatpak install --user -y flathub org.signal.Signal
List
See how many packages to you have installed
$ flatpak list
Application
___________

com.dropbox.Client
com.jetbrains.PyCharm-Community
com.slack.Slack
com.visualstudio.code.oss
io.atom.Atom
org.signal.Signal
Run
To execute a flatpak application :
flatpak run com.slack.Slack
flatpak run org.signal.Signal
Update
and finally how to update your flatpack packages:
$ flatpak --user -y update
Remove Unused Packages
$ flatpak uninstall --user --unused
Uninstall flatpak package
$ flatpak uninstall --user com.visualstudio.code.oss
TLDR; Exit status value does not change when using redirection.
~> false
~> echo $?
1

~> true
~> echo $?
0

~> false > /dev/null
~> echo $?
1

~> true > /dev/null
~> echo $?
0

~> false 1> /dev/null
~> echo $?
1

~> true 1> /dev/null
~> echo $?
0

~> false 2> /dev/null
~> echo $?
1

~> true 2> /dev/null
~> echo $?
0

~> false &> /dev/null
~> echo $?
1

~> true &> /dev/null
~> echo $?
0

~> false 2>&1 >/dev/null
~> echo $?
1

~> true 2>&1 /dev/null
~> echo $?
0

~> false < /dev/null > /dev/null
~> echo $?
1

~> true < /dev/null > /dev/null
~> echo $?
0