WireGuard: fast, modern, secure VPN tunnel. WireGuard securely encapsulates IP packets over UDP.
Goal
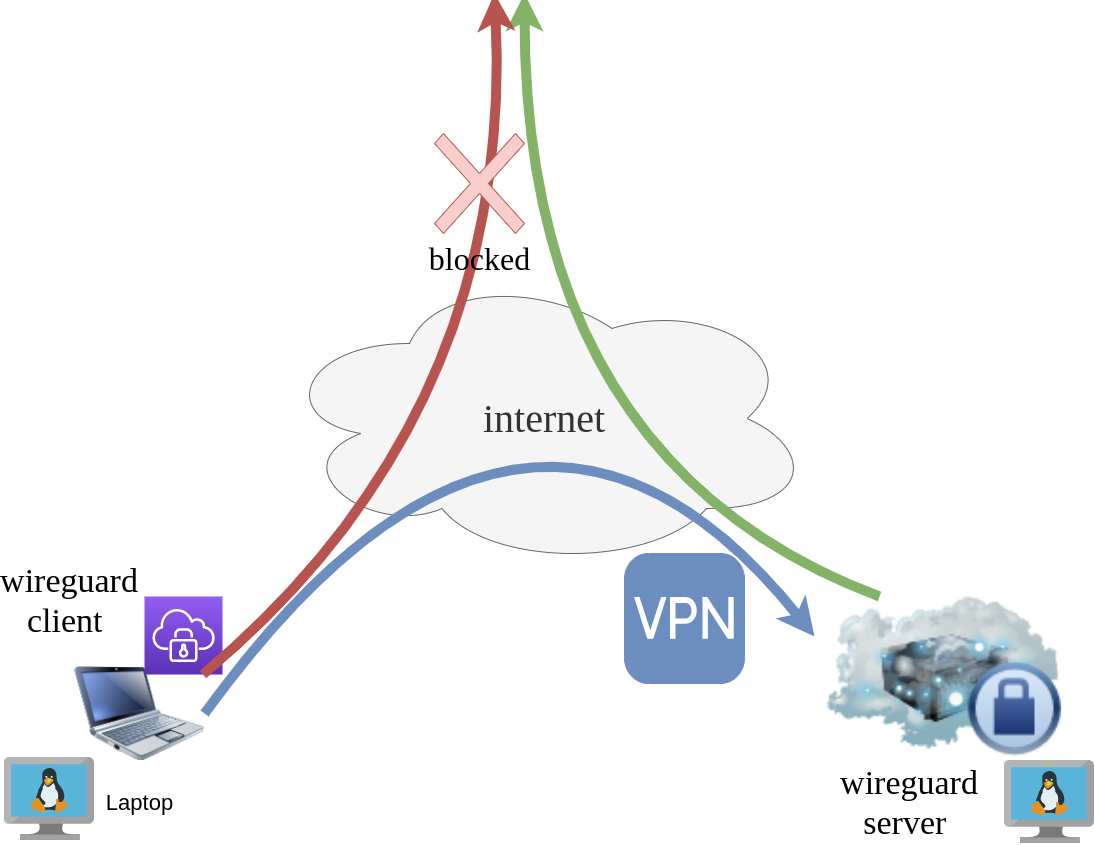
What I would like to achieve, in this article, is to provide a comprehensive guide for a redirect-gateway vpn using wireguard with a twist. The client machine should reach internet through the wireguard vpn server. No other communications should be allowed from the client and that means if we drop the VPN connection, client can not go to the internet.
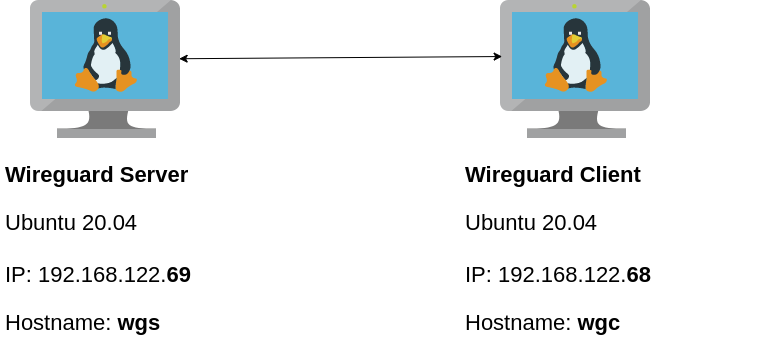
Intro - Lab Details
Here are my lab details. This blog post will help you understand all the necessary steps and provide you with a guide to replicate the setup. You should be able to create a wireguard VPN server-client between two points. I will be using ubuntu 20.04 as base images for both virtual machines. I am also using LibVirt and Qemu/KVM running on my archlinux host.
Wireguard Generate Keys
and the importance of them!
Before we begin, give me a moment to try explaining how the encryption between these two machines, in a high level design works.
Each linux machines creates a pair of keys.
- Private Key
- Public Key
These keys have a unique relationship. You can use your public key to encrypt something but only your private key can decrypt it. That mean, you can share your public keys via an cleartext channel (internet, email, slack). The other parties can use your public key to encrypt traffic towards you, but none other decrypt it. If a malicious actor replace the public keys, you can not decrypt any incoming traffic thus make it impossible to connect to VPN server!

Public - Private Keys
Now each party has the other’s public keys and they can encrypt traffic for each other, BUT only you can decrypt your traffic with your private key. Your private key never leaves your computer.
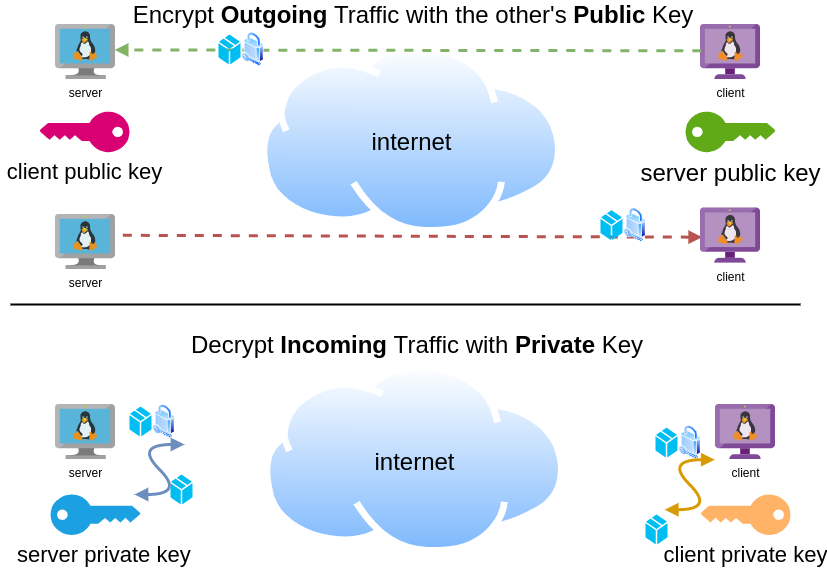
Hopefully you get the idea.
Wireguard Server - Ubuntu 20.04 LTS
In order to make the guide easy to follow, I will start with the server part.
Server Key Generation
Generate a random private and public key for the server as-root
wg genkey | tee /etc/wireguard/privatekey | wg pubkey > /etc/wireguard/publickeyMake the keys read-only
chmod 0400 /etc/wireguard/*keyList keys
ls -l /etc/wireguard/total 8
-r-------- 1 root root 45 Jul 12 20:29 privatekey
-r-------- 1 root root 45 Jul 12 20:29 publickey
UDP Port & firewall
In order to run a VPN service, you need to choose a random port that wireguard VPN server can listen to it.
eg.
61194open firewall
ufw allow 61194/udpRule added
Rule added (v6)
view more info
ufw status verboseStatus: active
Logging: on (low)
Default: deny (incoming), allow (outgoing), disabled (routed)
New profiles: skip
To Action From
-- ------ ----
22/tcp ALLOW IN Anywhere
61194 ALLOW IN Anywhere
22/tcp (v6) ALLOW IN Anywhere (v6)
61194 (v6) ALLOW IN Anywhere (v6)
So you see, only SSH and our VPN ports are open.
Default Incoming Policy is: DENY.
Wireguard Server Configuration File
Now it is time to create a basic configuration wireguard-server file.
Naming the wireguard interface
Clarification the name of our interface does not matter, you can choose any name. Gets it’s name from the configuration filename! But in order to follow the majority of guides try to use something from wg+. For me it is easier to name wireguard interface:
- wg0
but you may seen it also as
- wg
without a number. All good!
Making a shell script for wireguard server configuration file
Running the below script will create a new configuration file /etc/wireguard/wg0.conf
PRIVATE_KEY=$(cat /etc/wireguard/privatekey)
NETWORK=10.0.8

cat > /etc/wireguard/wg0.conf <<EOF
[Interface]
Address = ${NETWORK}.1/24
ListenPort = 61194
PrivateKey = ${PRIVATE_KEY}

EOF

ls -l /etc/wireguard/wg0.conf
cat   /etc/wireguard/wg0.conf
Note I have chosen the network 10.0.8.0/24 for my VPN setup, you can choose any Private Network
10.0.0.0/8     - Class A
172.16.0.0/12  - Class B
192.168.0.0/16 - Class C
I chose a Class C (256 IPs) from a /8 (Class A) private network, do not be confused about this. It’s just a Class-C /24 private network.
Let’s make our first test with the server
wg-quick up wg0[#] ip link add wg0 type wireguard
[#] wg setconf wg0 /dev/fd/63
[#] ip -4 address add 10.0.8.1/24 dev wg0
[#] ip link set mtu 1420 up dev wg0
It’s Alive!
Kernel Module
Verify that wireguard is loaded as a kernel module on your system.
lsmod | grep wireguardwireguard 212992 0
ip6_udp_tunnel 16384 1 wireguard
udp_tunnel 16384 1 wireguard
Wireguard is in the Linux kernel since March 2020.
Show IP address
ip address show dev wg03: wg0: <POINTOPOINT,NOARP,UP,LOWER_UP> mtu 1420
qdisc noqueue state UNKNOWN group default qlen 1000
link/none
inet 10.0.8.1/24 scope global wg0
valid_lft forever preferred_lft forever
Listening Connections
Verify that wireguard server listens to our specific UDP port
ss -nulp '( sport = :61194 )' | column -tState Recv-Q Send-Q Local Address:Port Peer Address:Port Process
UNCONN 0 0 0.0.0.0:61194 0.0.0.0:*
UNCONN 0 0 [::]:61194 [::]:*
Show wg0
wg show wg0interface: wg0
public key: <public key>
private key: (hidden)
listening port: 61194
Show Config
wg showconf wg0[Interface]
ListenPort = 61194
PrivateKey = <private key>
Close wireguard
wg-quick down wg0What is IP forwarding
In order for our VPN server to forward our client’s network traffic from the internal interface wg0 to it’s external interface and on top of that, to separate it’s own traffic from client’s traffic, the vpn server needs to masquerade all client’s traffic in a way that knows who to forward and send back traffic to the client. In a nuthshell this is IP forwarding and perhaps the below diagram can explain it a little better.

To do that, we need to enable the IP forward feature on our linux kernel.
sysctl -w net.ipv4.ip_forward=1The above command does not persist the change across reboots. To persist this setting we need to add it, to sysctl configuration. And although many set this option global, we do not need to have to do that!
Wireguard provides four (4) stages, to run our own scripts.
Wireguard stages
- PreUp
- PostUp
- PreDown
- PostDown
So we can choose to enable IP forwarding at wireguard up and disable it on wireguard down.
IP forwarding in wireguard configuration file
PRIVATE_KEY=$(cat /etc/wireguard/privatekey)
NETWORK=10.0.8
cat > /etc/wireguard/wg0.conf <<EOF
[Interface]
Address = ${NETWORK}.1/24
ListenPort = 61194
PrivateKey = ${PRIVATE_KEY}
PreUp = sysctl -w net.ipv4.ip_forward=1
PostDown = sysctl -w net.ipv4.ip_forward=0
EOF
verify above configuration
wg-quick up wg0[#] sysctl -w net.ipv4.ip_forward=1
net.ipv4.ip_forward = 1
[#] ip link add wg0 type wireguard
[#] wg setconf wg0 /dev/fd/63
[#] ip -4 address add 10.0.8.1/24 dev wg0
[#] ip link set mtu 1420 up dev wg0Verify system control setting for IP forward:
sysctl net.ipv4.ip_forwardnet.ipv4.ip_forward = 1
Close wireguard
wg-quick down wg0[#] wg showconf wg0
[#] ip link delete dev wg0
[#] sysctl -w net.ipv4.ip_forward=0
net.ipv4.ip_forward = 0
Verify that now IP Forward is not enabled.
sysctl net.ipv4.ip_forwardnet.ipv4.ip_forward = 0
Routing via firewall rules
Next on our agenda, is to add some additional rules on our firewall. We already enabled IP Forward feature with the above and now it is time to update our firewall so it can masquerade our client’s network traffic.
Default Route
We need to identify the default external network interface on the ubuntu server.
DEF_ROUTE=$(ip -4 -json route list default | jq -r .[0].dev)
usually is eth0 or ensp3 or something similar.
firewall rules
- We need to forward traffic from the internal interface to the external interface
- We need to masquerade the traffic of the client.
iptables -A FORWARD -i %i -o ${DEF_ROUTE} -s ${NETWORK}.0/24 -j ACCEPT

iptables -t nat -A POSTROUTING -s ${NETWORK}.0/24 -o ${DEF_ROUTE} -j MASQUERADE
and also we need to drop these rules when we stop wireguard service
iptables -D FORWARD -i %i -o ${DEF_ROUTE} -s ${NETWORK}.0/24 -j ACCEPT

iptables -t nat -D POSTROUTING -s ${NETWORK}.0/24 -o ${DEF_ROUTE} -j MASQUERADE
See the -D after iptables.
iptables is a CLI (command line interface) for netfilters. So think the above rules as filters on our network traffic.
WG Server Conf
To put everything all together and also use wireguard PostUp and PreDown to
wg genkey | tee /etc/wireguard/privatekey | wg pubkey > /etc/wireguard/publickey

chmod 0400 /etc/wireguard/*key

PRIVATE_KEY=$(cat /etc/wireguard/privatekey)
NETWORK=10.0.8
DEF_ROUTE=$(ip -4 -json route list default | jq  -r .[0].dev)
WG_PORT=61194

cat > /etc/wireguard/wg0.conf <<EOF
[Interface]
Address    = ${NETWORK}.1/24
ListenPort = ${WG_PORT}
PrivateKey = ${PRIVATE_KEY}

PreUp    = sysctl -w net.ipv4.ip_forward=1
PostDown = sysctl -w net.ipv4.ip_forward=0

PostUp  = iptables -A FORWARD -i %i -o ${DEF_ROUTE} -s ${NETWORK}.0/24 -j ACCEPT ; iptables -t nat -A POSTROUTING -s ${NETWORK}.0/24 -o ${DEF_ROUTE} -j MASQUERADE
PreDown = iptables -D FORWARD -i %i -o ${DEF_ROUTE} -s ${NETWORK}.0/24 -j ACCEPT ; iptables -t nat -D POSTROUTING -s ${NETWORK}.0/24 -o ${DEF_ROUTE} -j MASQUERADE

EOF
testing up
wg-quick up wg0[#] sysctl -w net.ipv4.ip_forward=1
net.ipv4.ip_forward = 1
[#] ip link add wg0 type wireguard
[#] wg setconf wg0 /dev/fd/63
[#] ip -4 address add 10.0.8.1/24 dev wg0
[#] ip link set mtu 1420 up dev wg0
[#] iptables -A FORWARD -i wg0 -o ens3 -s 10.0.8.0/24 -j ACCEPT ; iptables -t nat -A POSTROUTING -s 10.0.8.0/24 -o ens3 -j MASQUERADE
testing down
wg-quick down wg0[#] iptables -D FORWARD -i wg0 -o ens3 -s 10.0.8.0/24 -j ACCEPT ; iptables -t nat -D POSTROUTING -s 10.0.8.0/24 -o ens3 -j MASQUERADE
[#] ip link delete dev wg0
[#] sysctl -w net.ipv4.ip_forward=0
net.ipv4.ip_forward = 0
Start at boot time
systemctl enable wg-quick@wg0and status
systemctl status wg-quick@wg0Get the wireguard server public key
We have NOT finished yet with the server !
Also we need the output of:
cat /etc/wireguard/publickeyoutput should be something like this:
wr3jUAs2qdQ1Oaxbs1aA0qrNjogY6uqDpLop54WtQI4=Wireguard Client - Ubuntu 20.04 LTS
Now we need to move to our client virtual machine.
It is a lot easier but similar with above commands.
Client Key Generation
Generate a random private and public key for the client
wg genkey | tee /etc/wireguard/privatekey | wg pubkey > /etc/wireguard/publickeyMake the keys read-only
chmod 0400 /etc/wireguard/*keyWireguard Client Configuration File
Need to replace <wireguard server public key> with the output of the above command.
Configuration is similar but simpler from the server
PRIVATE_KEY=$(cat /etc/wireguard/privatekey)
NETWORK=10.0.8
WG_PORT=61194
WGS_IP=$(ip -4 -json route list default | jq -r .[0].prefsrc)
WSG_PUBLIC_KEY="<wireguard server public key>"

cat > /etc/wireguard/wg0.conf <<EOF
[Interface]
Address    = ${NETWORK}.2/24
PrivateKey = ${PRIVATE_KEY}

[Peer]
PublicKey  = ${WSG_PUBLIC_KEY}
Endpoint   = ${WGS_IP}:${WG_PORT}
AllowedIPs = 0.0.0.0/0

EOF
verify
wg-quick up wg0[#] ip link add wg0 type wireguard
[#] wg setconf wg0 /dev/fd/63
[#] ip -4 address add 10.0.8.2/24 dev wg0
[#] ip link set mtu 1420 up dev wg0
[#] wg set wg0 fwmark 51820
[#] ip -4 route add 0.0.0.0/0 dev wg0 table 51820
[#] ip -4 rule add not fwmark 51820 table 51820
[#] ip -4 rule add table main suppress_prefixlength 0
[#] sysctl -q net.ipv4.conf.all.src_valid_mark=1
[#] iptables-restore -n
start client at boot
systemctl enable wg-quick@wg0Get the wireguard client public key
We have finished with the client, but we need the output of:
cat /etc/wireguard/publickeyWireguard Server - Peers
As we mentioned above, we need to exchange public keys of server & client to the other machines in order to encrypt network traffic.
So as we get the client public key and run the below script to the server
WSC_PUBLIC_KEY="<wireguard client public key>"
NETWORK=10.0.8

wg set wg0 peer ${WSC_PUBLIC_KEY} allowed-ips ${NETWORK}.2
after that we can verify that our wireguard server and connect to the wireguard client
wireguard server ping to client
$ ping -c 5 10.0.8.2

PING 10.0.8.2 (10.0.8.2) 56(84) bytes of data.
64 bytes from 10.0.8.2: icmp_seq=1 ttl=64 time=0.714 ms
64 bytes from 10.0.8.2: icmp_seq=2 ttl=64 time=0.456 ms
64 bytes from 10.0.8.2: icmp_seq=3 ttl=64 time=0.557 ms
64 bytes from 10.0.8.2: icmp_seq=4 ttl=64 time=0.620 ms
64 bytes from 10.0.8.2: icmp_seq=5 ttl=64 time=0.563 ms

--- 10.0.8.2 ping statistics ---
5 packets transmitted, 5 received, 0% packet loss, time 4103ms
rtt min/avg/max/mdev = 0.456/0.582/0.714/0.084 ms
wireguard client ping to server
$ ping -c 5 10.0.8.1

PING 10.0.8.1 (10.0.8.1) 56(84) bytes of data.
64 bytes from 10.0.8.1: icmp_seq=1 ttl=64 time=0.752 ms
64 bytes from 10.0.8.1: icmp_seq=2 ttl=64 time=0.639 ms
64 bytes from 10.0.8.1: icmp_seq=3 ttl=64 time=0.622 ms
64 bytes from 10.0.8.1: icmp_seq=4 ttl=64 time=0.625 ms
64 bytes from 10.0.8.1: icmp_seq=5 ttl=64 time=0.597 ms

--- 10.0.8.1 ping statistics ---
5 packets transmitted, 5 received, 0% packet loss, time 4093ms
rtt min/avg/max/mdev = 0.597/0.647/0.752/0.054 ms
wireguard server - Peers at configuration file
Now the final things is to update our wireguard server with the client Peer (or peers).
wg showconf wg0the output should be something like that:
[Interface]
ListenPort = 61194
PrivateKey = <server: private key>

[Peer]
PublicKey = <client: public key>
AllowedIPs = 10.0.8.2/32
Endpoint = 192.168.122.68:52587
We need to append the peer section to our configuration file.
so /etc/wireguard/wg0.conf should look like this:
[Interface]
Address    = 10.0.8.1/24
ListenPort = 61194
PrivateKey = <server: private key>

PreUp    = sysctl -w net.ipv4.ip_forward=1
PostDown = sysctl -w net.ipv4.ip_forward=0

PostUp  = iptables -A FORWARD -i %i -o ens3 -s 10.0.8.0/24 -j ACCEPT ; iptables -t nat -A POSTROUTING -s 10.0.8.0/24 -o ens3 -j MASQUERADE
PreDown = iptables -D FORWARD -i %i -o ens3 -s 10.0.8.0/24 -j ACCEPT ; iptables -t nat -D POSTROUTING -s 10.0.8.0/24 -o ens3 -j MASQUERADE

[Peer]
PublicKey = <client: public key>
AllowedIPs = 10.0.8.2/32
Endpoint = 192.168.122.68:52587
SaveConfig
In None of server or client wireguard configuration file, we didn’t declare this option. If set, then the configuration is saved on the current state of wg0 interface. Very useful !
SaveConfig = trueclient firewall
It is time to introduce our twist!
If you mtr or traceroute our traffic from our client, we will notice that in need our network traffic goes through the wireguard vpn server !
               My traceroute  [v0.93]
wgc (10.0.8.2)                        2021-07-21T22:41:44+0300

                          Packets               Pings
 Host                Loss%   Snt   Last   Avg  Best  Wrst StDev
 1. 10.0.8.1         0.0%    88    0.6   0.6   0.4   0.8   0.1
 2. myhomepc         0.0%    88    0.8   0.8   0.5   1.0   0.1
 3. _gateway         0.0%    88    3.8   4.0   3.3   9.6   0.8
 ...
The first entry is:
1. 10.0.8.1 if we drop our vpn connection.
wg-quick down wg0We still go to the internet.
                     My traceroute  [v0.93]
wgc (192.168.122.68)                     2021-07-21T22:45:04+0300

                            Packets               Pings
 Host                   Loss%   Snt   Last   Avg  Best  Wrst StDev
 1. myhomepc             0.0%     1    0.3   0.3   0.3   0.3   0.0
 2. _gateway             0.0%     1    3.3   3.3   3.3   3.3   0.0
This is important because in some use cases, we do not want our client to directly or unsupervised talk to the internet.
UFW alternative for the client
So to avoid this issue, we will re-rewrite our firewall rules.
A simple script to do that is the below. Declares the default policy to DENY for everything and only accepts ssh incoming traffic and outgoing traffic through the vpn.
DEF_ROUTE=$(ip -4 -json route list default | jq -r .[0].dev)
WGS_IP=192.168.122.69
WG_PORT=61194

## reset
ufw --force reset

## deny everything!

ufw default deny incoming
ufw default deny outgoing
ufw default deny forward

## allow ssh
ufw allow 22/tcp

## enable
ufw --force enable

## allow traffic out to the vpn server
ufw allow out on ${DEF_ROUTE} to ${WGS_IP} port ${WG_PORT}

## allow tunnel traffic out
ufw allow out on wg+
# ufw status verbose

Status: active
Logging: on (low)
Default: deny (incoming), deny (outgoing), disabled (routed)
New profiles: skip

To                         Action      From
--                         ------      ----
22/tcp                     ALLOW IN    Anywhere
22/tcp (v6)                ALLOW IN    Anywhere (v6)

192.168.122.69 61194       ALLOW OUT   Anywhere on ens3
Anywhere                   ALLOW OUT   Anywhere on wg+
Anywhere (v6)              ALLOW OUT   Anywhere (v6) on wg+
DNS
There is caveat. Please bare with me.
Usually and especially in virtual machines they get DNS setting through a local LAN. We can either allow traffic on the local vlan or update our local DNS setting so it can go only through our VPN
cat > /etc/systemd/resolved.conf <<EOF
[Resolve]
DNS=88.198.92.222

EOF

systemctl restart systemd-resolved
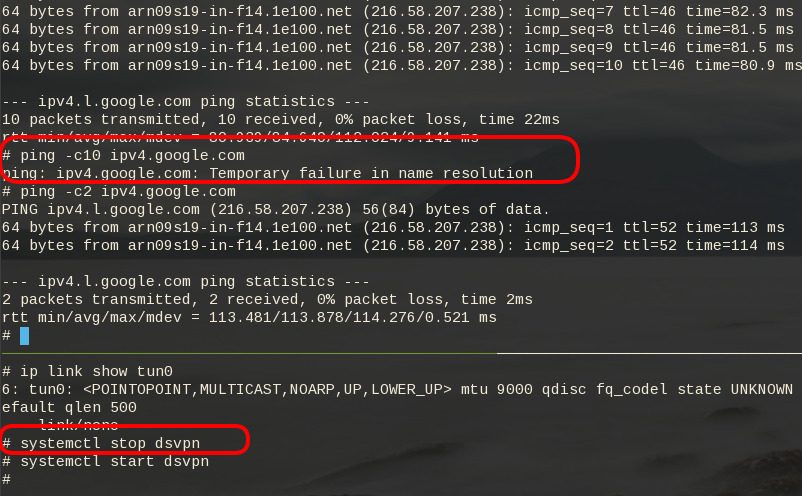
let’s try this
# ping google.com
ping: google.com: Temporary failure in name resolution
Correct, fire up wireguard vpn client
wg-quick up wg0

ping -c4 google.com
PING google.com (142.250.185.238) 56(84) bytes of data.
64 bytes from fra16s53-in-f14.1e100.net (142.250.185.238): icmp_seq=1 ttl=115 time=43.5 ms
64 bytes from fra16s53-in-f14.1e100.net (142.250.185.238): icmp_seq=2 ttl=115 time=44.9 ms
64 bytes from fra16s53-in-f14.1e100.net (142.250.185.238): icmp_seq=3 ttl=115 time=43.8 ms
64 bytes from fra16s53-in-f14.1e100.net (142.250.185.238): icmp_seq=4 ttl=115 time=43.0 ms
--- google.com ping statistics ---
4 packets transmitted, 4 received, 0% packet loss, time 3004ms
rtt min/avg/max/mdev = 42.990/43.795/44.923/0.707 ms
mtr shows:
mtr google.com My traceroute [v0.93]
wgc (10.0.8.2) 2021-07-21T23:01:16+0300
Packets Pings
Host Loss% Snt Last Avg Best Wrst StDev
1. 10.0.8.1 0.0% 2 0.6 0.7 0.6 0.7 0.1
2. _gateway 0.0% 1 0.8 0.8 0.8 0.8 0.0
3. 192.168.1.1 0.0% 1 3.8 3.8 3.8 3.8 0.0
drop vpn connection
# wg-quick down wg0

[#] ip -4 rule delete table 51820
[#] ip -4 rule delete table main suppress_prefixlength 0
[#] ip link delete dev wg0
[#] iptables-restore -n
# ping -c4 google.com
ping: google.com: Temporary failure in name resolution
and that is perfect !
No internet access for our client. Only when our vpn connection is up!
WireGuard: fast, modern, secure VPN tunnel
That’s it!
DSVPN is designed to address the most common use case for using a VPN
Works with TCP, blocks IPv6 leaks, redirect-gateway out-of-the-box!
last updated: 20190810
- iptables rules example added
- change vpn.key to dsvpn.key
- add base64 example for easy copy/transfer across machines

dsvpn binary
I keep a personal gitlab CI for dsvpn here: DSVPN
Compile
Notes on the latest ubuntu:18.04 docker image:
# git clone https://github.com/jedisct1/dsvpn.git
Cloning into 'dsvpn'...
remote: Enumerating objects: 88, done.
remote: Counting objects: 100% (88/88), done.
remote: Compressing objects: 100% (59/59), done.
remote: Total 478 (delta 47), reused 65 (delta 29), pack-reused 390
Receiving objects: 100% (478/478), 93.24 KiB | 593.00 KiB/s, done.
Resolving deltas: 100% (311/311), done.

# cd dsvpn

# ls
LICENSE  Makefile  README.md  include  logo.png  src

# make
cc -march=native -Ofast -Wall -W -Wshadow -Wmissing-prototypes -Iinclude -o dsvpn src/dsvpn.c src/charm.c src/os.c
strip dsvpn

# ldd dsvpn
linux-vdso.so.1 (0x00007ffd409ba000)
libc.so.6 => /lib/x86_64-linux-gnu/libc.so.6 (0x00007fd78480b000)
/lib64/ld-linux-x86-64.so.2 (0x00007fd784e03000)

# ls -l dsvpn
-rwxr-xr-x 1 root root 26840 Jul 20 15:51 dsvpn
Just copy the dsvpn binary to your machines.
Symmetric Key
dsvpn uses symmetric-key cryptography, that means both machines uses the same encyrpted key.
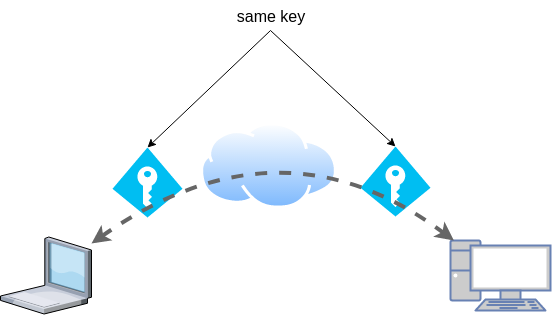
dd if=/dev/urandom of=dsvpn.key count=1 bs=32
Copy the key to both machines using a secure media, like ssh.
base64
An easy way is to convert key to base64
cat dsvpn.key | base64
ZqMa31qBLrfjjNUfhGj8ADgzmo8+FqlyTNJPBzk/x4k=on the other machine:
echo ZqMa31qBLrfjjNUfhGj8ADgzmo8+FqlyTNJPBzk/x4k= | base64 -d > dsvpn.key
Server
It is very easy to run dsvpn in server mode:
eg.
dsvpn server dsvpn.key auto
Interface: [tun0]
net.ipv4.ip_forward = 1
Listening to *:443
ip addr show tun0
4: tun0: <POINTOPOINT,MULTICAST,NOARP,UP,LOWER_UP> mtu 9000 qdisc fq_codel state UNKNOWN group default qlen 500
    link/none
    inet 192.168.192.254 peer 192.168.192.1/32 scope global tun0
       valid_lft forever preferred_lft forever
I prefer to use 10.8.0.0/24 CIDR in my VPNs, so in my VPN setup:
dsvpn server /root/dsvpn.key auto 443 auto 10.8.0.254 10.8.0.2
Using 10.8.0.254 as the VPN Server IP.
systemd service unit - server
I’ve created a simple systemd script dsvpn_server.service
or you can copy it from here:
/etc/systemd/system/dsvpn.service
[Unit]
Description=Dead Simple VPN - Server

[Service]
ExecStart=/usr/local/bin/dsvpn server /root/dsvpn.key auto 443 auto 10.8.0.254 10.8.0.2
Restart=always
RestartSec=20

[Install]
WantedBy=network.target
and then:
systemctl enable dsvpn.service
systemctl  start dsvpn.service
Client
It is also easy to run dsvpn in client mode:
eg.
dsvpn client dsvpn.key 93.184.216.34
# dsvpn client dsvpn.key 93.184.216.34
Interface: [tun0]
Trying to reconnect
Connecting to 93.184.216.34:443...
net.ipv4.tcp_congestion_control = bbr
Connected
ip addr show tun0
4: tun0: <POINTOPOINT,MULTICAST,NOARP,UP,LOWER_UP> mtu 9000 qdisc fq_codel state UNKNOWN group default qlen 500
    link/none
    inet 192.168.192.1 peer 192.168.192.254/32 scope global tun0
       valid_lft forever preferred_lft forever
dsvpn works in redict-gateway mode,
so it will apply routing rules to pass all the network traffic through the VPN.
ip route list
0.0.0.0/1 via 192.168.192.254 dev tun0
default via 192.168.122.1 dev eth0 proto static
93.184.216.34 via 192.168.122.1 dev eth0
128.0.0.0/1 via 192.168.192.254 dev tun0
192.168.122.0/24 dev eth0 proto kernel scope link src 192.168.122.69
192.168.192.254  dev tun0 proto kernel scope link src 192.168.192.1
As I mentioned above, I prefer to use 10.8.0.0/24 CIDR in my VPNs, so in my VPN client:
dsvpn client /root/dsvpn.key 93.184.216.34 443 auto 10.8.0.2 10.8.0.254
Using 10.8.0.2 as the VPN Client IP.
ip addr show tun0
11: tun0: <POINTOPOINT,MULTICAST,NOARP,UP,LOWER_UP> mtu 9000 qdisc fq_codel state UNKNOWN group default qlen 500
    link/none
    inet 10.8.0.2 peer 10.8.0.254/32 scope global tun0
       valid_lft forever preferred_lft forever
systemd service unit - client
I’ve also created a simple systemd script for the client dsvpn_client.service
or you can copy it from here:
/etc/systemd/system/dsvpn.service
[Unit]
Description=Dead Simple VPN - Client

[Service]
ExecStart=/usr/local/bin/dsvpn client /root/dsvpn.key 93.184.216.34 443 auto 10.8.0.2 10.8.0.254
Restart=always
RestartSec=20

[Install]
WantedBy=network.target
and then:
systemctl enable dsvpn.service
systemctl  start dsvpn.service
and here is an MTR from the client:
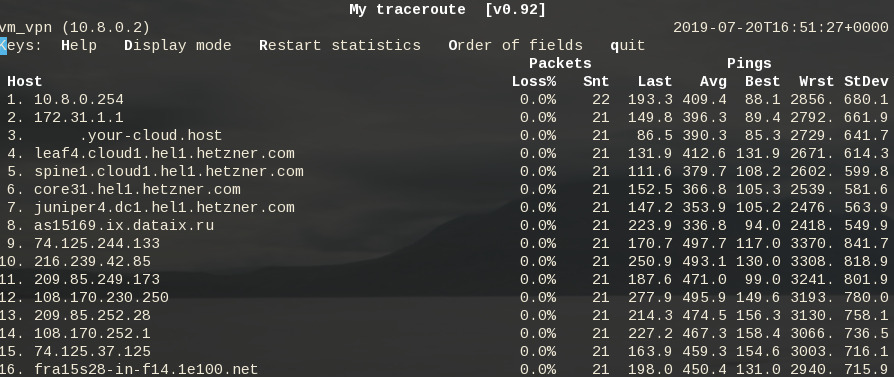
Enjoy !
firewall
It is important to protect your traffic from network leaks. That mean, sometimes, we do not want our network traffic to pass through our provider if the vpn server/client went down. To prevent any network leak, here is an example of iptables rules for a virtual machine:
# Empty iptables rule file
*filter
:INPUT   ACCEPT [0:0]
:FORWARD ACCEPT [0:0]
:OUTPUT  ACCEPT [0:0]

-A INPUT -i lo -j ACCEPT
-A INPUT -m conntrack --ctstate RELATED,ESTABLISHED -j ACCEPT
-A INPUT -m conntrack --ctstate INVALID -j DROP
-A INPUT -p icmp --icmp-type 8 -m conntrack --ctstate NEW -j ACCEPT

# LibVirt
-A INPUT -i eth0 -s 192.168.122.0/24 -j ACCEPT

# Reject incoming traffic
-A INPUT -j REJECT

# DSVPN
-A OUTPUT -p tcp -m tcp -o eth0 -d 93.184.216.34 --dport 443 -j ACCEPT
# LibVirt
-A OUTPUT -o eth0 -d 192.168.122.0/24 -j ACCEPT
# Allow tun
-A OUTPUT -o tun+ -j ACCEPT

# Reject outgoing traffic
-A OUTPUT -p tcp -j REJECT --reject-with tcp-reset
-A OUTPUT -p udp -j REJECT --reject-with icmp-port-unreachable

COMMIT
Here is the prefable output: