![]()
In many companies, nagios is the de-facto monitoring tool. Even with new modern alternatives solutions, this opensource project, still, has a large amount of implementations in place. This guide is based on a “clean/fresh” CentOS 6.9 virtual machine.
Epel
An official nagios repository exist in this address: https://repo.nagios.com/
I prefer to install nagios via the EPEL repository:
# yum -y install http://fedora-mirror01.rbc.ru/pub/epel/6/x86_64/epel-release-6-8.noarch.rpm
# yum info nagios | grep Version
Version     : 4.3.2
# yum -y install nagios
Selinux
Every online manual, suggest to disable selinux with nagios. There is a reason for that ! but I will try my best to provide info on how to keep selinux enforced. To write our own nagios selinux policies the easy way, we need one more package:
# yum -y install policycoreutils-python
Starting nagios:
# /etc/init.d/nagios restart
will show us some initial errors in /var/log/audit/audit.log selinux log file
Filtering the results:
# egrep denied /var/log/audit/audit.log | audit2allow
will display something like this:
#============= nagios_t ==============
allow nagios_t initrc_tmp_t:file write;
allow nagios_t self:capability chown;
To create a policy file based on your errors:
# egrep denied /var/log/audit/audit.log | audit2allow -a -M nagios_t
and to enable it:
# semodule -i nagios_t.pp
BE AWARE this is not the only problem with selinux, but I will provide more details in few moments.
Nagios
Now we are ready to start the nagios daemon:
# /etc/init.d/nagios restart
filtering the processes of our system:
# ps -e fuwww | egrep na[g]ios
nagios    2149  0.0  0.1  18528  1720 ?        Ss   19:37   0:00 /usr/sbin/nagios -d /etc/nagios/nagios.cfg
nagios    2151  0.0  0.0      0     0 ?        Z    19:37   0:00  _ [nagios] <defunct>
nagios    2152  0.0  0.0      0     0 ?        Z    19:37   0:00  _ [nagios] <defunct>
nagios    2153  0.0  0.0      0     0 ?        Z    19:37   0:00  _ [nagios] <defunct>
nagios    2154  0.0  0.0      0     0 ?        Z    19:37   0:00  _ [nagios] <defunct>
nagios    2155  0.0  0.0  18076   712 ?        S    19:37   0:00  _ /usr/sbin/nagios -d /etc/nagios/nagios.cfg
super!
Apache
Now it is time to start our web server apache:
# /etc/init.d/httpd restart
Starting httpd: httpd: apr_sockaddr_info_get() failed
httpd: Could not reliably determine the server's fully qualified domain name, using 127.0.0.1 for ServerName
This is a common error, and means that we need to define a ServerName in our apache configuration.
First, we give an name to our host file:
# vim /etc/hosts
for this guide, I ‘ll go with the centos69 but you can edit that according your needs:
127.0.0.1 localhost localhost.localdomain localhost4 localhost4.localdomain4 centos69then we need to edit the default apache configuration file:
# vim /etc/httpd/conf/httpd.conf
#ServerName www.example.com:80
ServerName centos69
and restart the process:
# /etc/init.d/httpd restart
Stopping httpd:      [  OK  ]
Starting httpd:      [  OK  ]
We can see from the netstat command that is running:
# netstat -ntlp | grep 80
tcp 0 0 :::80 :::* LISTEN 2729/httpd Firewall
It is time to fix our firewall and open the default http port, so that we can view the nagios from our browser.
That means, we need to fix our iptables !
# iptables -A INPUT -m state --state NEW -m tcp -p tcp --dport 80 -j ACCEPT
this is want we need. To a more permanent solution, we need to edit the default iptables configuration file:
# vim /etc/sysconfig/iptables
and add the below entry on INPUT chain section:
-A INPUT -m state --state NEW -m tcp -p tcp --dport 80 -j ACCEPTWeb Browser
We are ready to fire up our web browser and type the address of our nagios server.
Mine is on a local machine with the IP: 129.168.122.96, so
http://192.168.122.96/nagios/
User Authentication
The default user authentication credentials are:
nagiosadmin // nagiosadminbut we can change them!
From our command line, we type something similar:
# htpasswd -sb /etc/nagios/passwd nagiosadmin e4j9gDkk6LXncCdDg
so that htpasswd will update the default nagios password entry on the /etc/nagios/passwd with something else, preferable random and difficult password.
ATTENTION: e4j9gDkk6LXncCdDg is just that, a random password that I created for this document only. Create your own and dont tell anyone!
Selinux, Part Two
at this moment and if you are tail-ing the selinux audit file, you will see some more error msgs.
Below, you will see my nagios_t selinux policy file with all the things that are needed for nagios to run properly - at least at the moment.!
module nagios_t 1.0;

require {
        type nagios_t;
        type initrc_tmp_t;
        type nagios_spool_t;
        type nagios_system_plugin_t;
        type nagios_exec_t;
        type httpd_nagios_script_t;
        class capability chown;
        class file { write read open execute_no_trans getattr };
}

#============= httpd_nagios_script_t ==============
allow httpd_nagios_script_t nagios_spool_t:file { open read getattr };

#============= nagios_t ==============
allow nagios_t initrc_tmp_t:file write;
allow nagios_t nagios_exec_t:file execute_no_trans;
allow nagios_t self:capability chown;

#============= nagios_system_plugin_t ==============
allow nagios_system_plugin_t nagios_exec_t:file getattr;
Edit your nagios_t.te file accordingly and then build your selinux policy:
# make -f /usr/share/selinux/devel/Makefile
You are ready to update the previous nagios selinux policy :
# semodule -i nagios_t.pp
Selinux - Nagios package
So … there is an rpm package with the name: nagios-selinux on Version: 4.3.2
you can install it, but does not resolve all the selinux errors in audit file ….. so ….
I think my way is better, cause you can understand some things better and have more flexibility on defining your selinux policy
Nagios Plugins
Nagios is the core process, daemon. We need the nagios plugins - the checks !
You can do something like this:
# yum install nagios-plugins-all.x86_64
but I dont recommend it.
These are the defaults :
nagios-plugins-load-2.2.1-4git.el6.x86_64
nagios-plugins-ping-2.2.1-4git.el6.x86_64
nagios-plugins-disk-2.2.1-4git.el6.x86_64
nagios-plugins-procs-2.2.1-4git.el6.x86_64
nagios-plugins-users-2.2.1-4git.el6.x86_64
nagios-plugins-http-2.2.1-4git.el6.x86_64
nagios-plugins-swap-2.2.1-4git.el6.x86_64
nagios-plugins-ssh-2.2.1-4git.el6.x86_64
# yum -y install nagios-plugins-load nagios-plugins-ping nagios-plugins-disk nagios-plugins-procs nagios-plugins-users nagios-plugins-http nagios-plugins-swap nagios-plugins-ssh
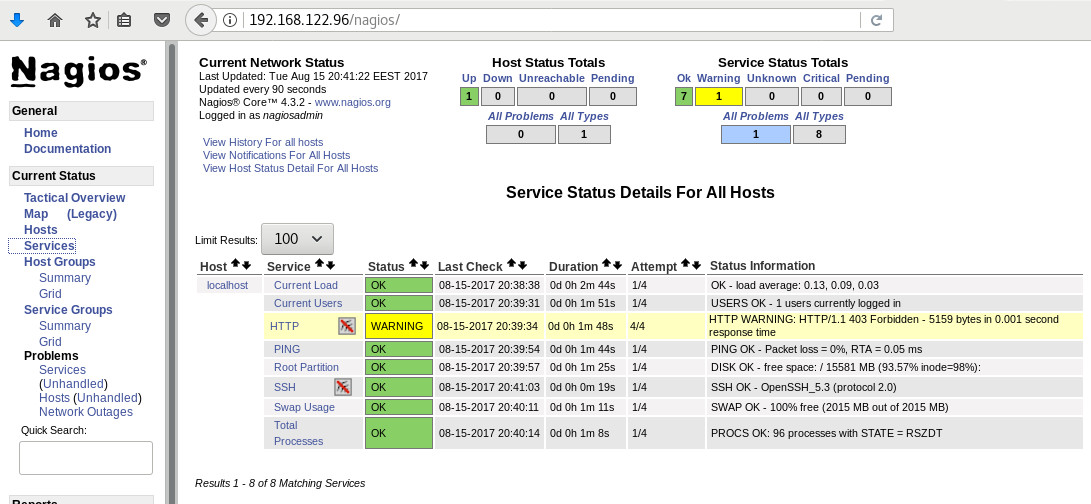
and if everything is going as planned, you will see something like this:

PNP4Nagios
It is time, to add pnp4nagios a simple graphing tool and get read the nagios performance data and represent them to graphs.
# yum info pnp4nagios | grep Version
Version     : 0.6.22
# yum -y install pnp4nagios
We must not forget to restart our web server:
# /etc/init.d/httpd restart
Bulk Mode with NPCD
I’ve spent toooooo much time to understand why the default Synchronous does not work properly with nagios v4x and pnp4nagios v0.6x
In the end … this is what it works - so try not to re-invent the wheel , as I tried to do and lost so many hours.
Performance Data
We need to tell nagios to gather performance data from their check:
# vim +/process_performance_data /etc/nagios/nagios.cfg
process_performance_data=1
We also need to tell nagios, what to do with this data:
nagios.cfg
# *** the template definition differs from the one in the original nagios.cfg
#
service_perfdata_file=/var/log/pnp4nagios/service-perfdata
service_perfdata_file_template=DATATYPE::SERVICEPERFDATAtTIMET::$TIMET$tHOSTNAME::$HOSTNAME$tSERVICEDESC::$SERVICEDESC$tSERVICEPERFDATA::$SERVICEPERFDATA$tSERVICECHECKCOMMAND::$SERVICECHECKCOMMAND$tHOSTSTATE::$HOSTSTATE$tHOSTSTATETYPE::$HOSTSTATETYPE$tSERVICESTATE::$SERVICESTATE$tSERVICESTATETYPE::$SERVICESTATETYPE$
service_perfdata_file_mode=a
service_perfdata_file_processing_interval=15
service_perfdata_file_processing_command=process-service-perfdata-file

# *** the template definition differs from the one in the original nagios.cfg
#
host_perfdata_file=/var/log/pnp4nagios/host-perfdata
host_perfdata_file_template=DATATYPE::HOSTPERFDATAtTIMET::$TIMET$tHOSTNAME::$HOSTNAME$tHOSTPERFDATA::$HOSTPERFDATA$tHOSTCHECKCOMMAND::$HOSTCHECKCOMMAND$tHOSTSTATE::$HOSTSTATE$tHOSTSTATETYPE::$HOSTSTATETYPE$
host_perfdata_file_mode=a
host_perfdata_file_processing_interval=15
host_perfdata_file_processing_command=process-host-perfdata-file
Commands
In the above configuration, we introduced two new commands
service_perfdata_file_processing_command  &
host_perfdata_file_processing_command
We need to define them in the /etc/nagios/objects/commands.cfg file :
#
# Bulk with NPCD mode
#
define command {
       command_name    process-service-perfdata-file
       command_line    /bin/mv /var/log/pnp4nagios/service-perfdata /var/spool/pnp4nagios/service-perfdata.$TIMET$
}

define command {
       command_name    process-host-perfdata-file
       command_line    /bin/mv /var/log/pnp4nagios/host-perfdata /var/spool/pnp4nagios/host-perfdata.$TIMET$
}
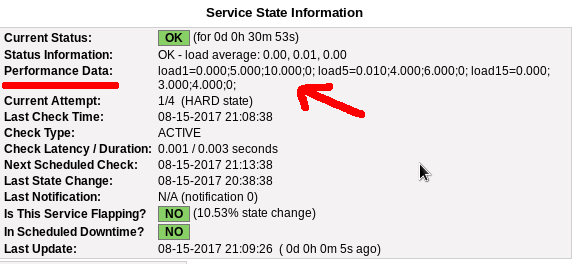
If everything have gone right … then you will be able to see on a nagios check something like this:

Verify
Verify your pnp4nagios setup:
# wget -c http://verify.pnp4nagios.org/verify_pnp_config

# perl verify_pnp_config -m bulk+npcd -c /etc/nagios/nagios.cfg -p /etc/pnp4nagios/
NPCD
The NPCD daemon (Nagios Performance C Daemon) is the daemon/process that will translate the gathered performance data to graphs, so let’s started it:
# /etc/init.d/npcd restart
Stopping npcd:                                             [FAILED]
Starting npcd:                                             [  OK  ]
You should see some warnings but not any critical errors.
Templates
Two new template definition should be created, one for the host and one for the service:
/etc/nagios/objects/templates.cfg
define host {
   name       host-pnp
   action_url /pnp4nagios/index.php/graph?host=$HOSTNAME$&srv=_HOST_' class='tips' rel='/pnp4nagios/index.php/popup?host=$HOSTNAME$&srv=_HOST_
   register   0
}

define service {
   name       srv-pnp
   action_url /pnp4nagios/graph?host=$HOSTNAME$&srv=$SERVICEDESC$' class='tips' rel='/pnp4nagios/popup?host=$HOSTNAME$&srv=$SERVICEDESC$
   register   0
}
Host Definition
Now we need to apply the host-pnp template to our system:
so this configuration: /etc/nagios/objects/localhost.cfg
define host{
        use                     linux-server            ; Name of host template to use
                                                        ; This host definition will inherit all variables that are defined
                                                        ; in (or inherited by) the linux-server host template definition.
        host_name               localhost
        alias                   localhost
        address                 127.0.0.1
        }
becomes:
define host{
        use                     linux-server,host-pnp            ; Name of host template to use
                                                        ; This host definition will inherit all variables that are defined
                                                        ; in (or inherited by) the linux-server host template definition.
        host_name               localhost
        alias                   localhost
        address                 127.0.0.1
        }
Service Definition
And we finally must append the pnp4nagios service template to our services:
srv-pnp
define service{
        use                             local-service,srv-pnp         ; Name of service template to use
        host_name                       localhost
Graphs
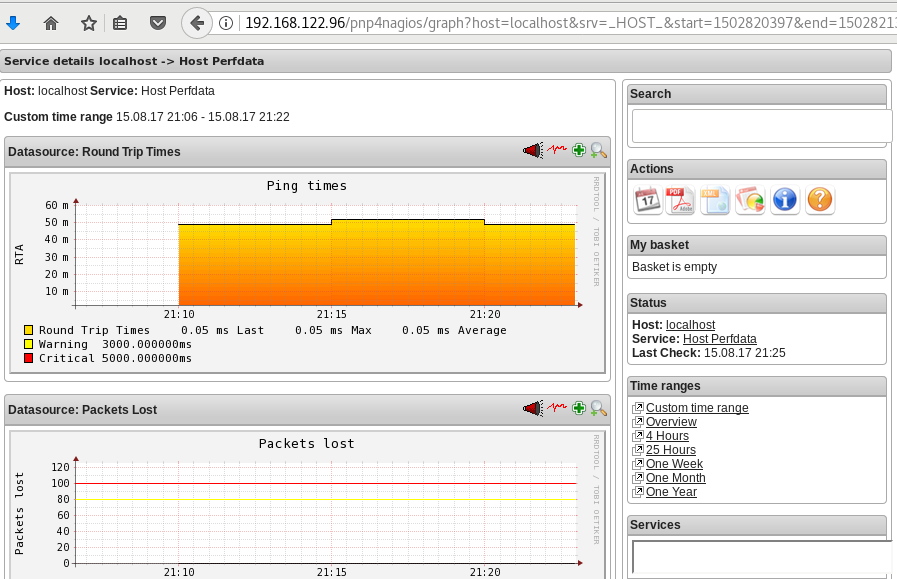
We should be able to see graphs like these:

Happy Measurements!
appendix
These are some extra notes on the above article, you need to take in mind:
Services
# chkconfig httpd on
# chkconfig iptables on
# chkconfig nagios on
# chkconfig npcd on
PHP
If you are not running the default php version on your system, it is possible to get this error msg:
Non-static method nagios_Core::SummaryLink()There is a simply solution for that, you need to modify the index file to exclude the deprecated php error msgs:
# vim +/^error_reporting /usr/share/nagios/html/pnp4nagios/index.php
// error_reporting(E_ALL & ~E_STRICT);
error_reporting(E_ALL & ~E_STRICT & ~E_DEPRECATED);
I have found a few difficulties with pnp4nagios and SElinux:
So here are my notes:
module httpd_pnp4nagios 1.0;

require {
        type httpd_t;
        type nagios_var_lib_t;
        class dir       { getattr search open read };
        class file      { getattr open read };
}

#============= httpd_t ==============
allow httpd_t nagios_var_lib_t:dir      { getattr search open read };
allow httpd_t nagios_var_lib_t:file     { getattr open read };
With the above policy we give privileges on httpd to directories with the tag nagios_var_lib_t (like /var/lib/pnp4nagios/ ).
Checking the module:
# checkmodule -M -m -o httpd_pnp4nagios.mod httpd_pnp4nagios.te
Creating the module:
# semodule_package -o httpd_pnp4nagios.pp -m httpd_pnp4nagios.mod
And finally install the policy:
# semodule -i httpd_pnp4nagios.pp
A customer of mine, had me approached to install a virtualization solution at his company.
The first goal was portability the second productivity.
I had to find a way (transparent from their employes) to remove their work environment from their hardware.
Productivity is easy … just remove any unnecessary software and keep their desktops as clean as they can be.
“Attention Span” is the big monster.
I found that with no-sound they couldnt listen to youtube or to internet radio stations or mp3 and they had to install a radio at their office.
One radio station, one music for all. That approach was much better than every other solution i could figure out.
Imaging a work space with 15 people, how every one wants to listen to a different music/news, youtube or whatever.
That was noise - and noise is the enemy!
As for portability - we dont want to use this old hardware - was easy enough too.
I’ve built a tinycorelinux image and convert every PC to a thin or thick client.
RDP to their Terminal Server was the only thing i had to ensure is working.
Dnsmasq is the simplest and best solution to do that (PXE).
created /tftpboot/ dir and worked my way through that.
I used fedora cause it is a virtualization box with all the latest versions of software.
I wanted to test fedora and selinux wasnt so bad after all.
Till the latest upgrade!
/tftpboot                                          directory          system_u:object_r:tftpdir_t:s0
/tftpboot/.*                                       all files          system_u:object_r:tftpdir_t:s0
dnsmasq now needs dnsmasq_t
type=AVC msg=audit(1349450414.500:20456): avc: denied { read } for pid=27175 comm="dnsmasq" name="tftpboot" dev="dm-1" ino=524451 scontext=system_u:system_r:dnsmasq_t:s0 tcontext=unconfined_u:object_r:tftpdir_t:s0 tclass=dir
relabeling is out of question.
The solution is to transfer all the necessaries files to a new directory that
semanage fcontext -l
doesnt marked as something else and chcon the entire directory (recursive) to label to dnsmasq_t all files and dirs.
or to add a new policy rule that accepts dnsmasq_t for /tftpboot directory
or DISABLE selinux cause you’ll never now what else will through to you !
Its unacceptable to make such core changes without have a plan for backwards compatibility or a way to inform your faithful admin that he/shee will have a problem because you have destroyed everything he/she built the last year!.