When creating a new Cloud Virtual Machine the cloud provider is copying a virtual disk as the base image (we called it mí̱tra or matrix) and starts your virtual machine from another virtual disk (or volume cloud disk) that in fact is a snapshot of the base image.
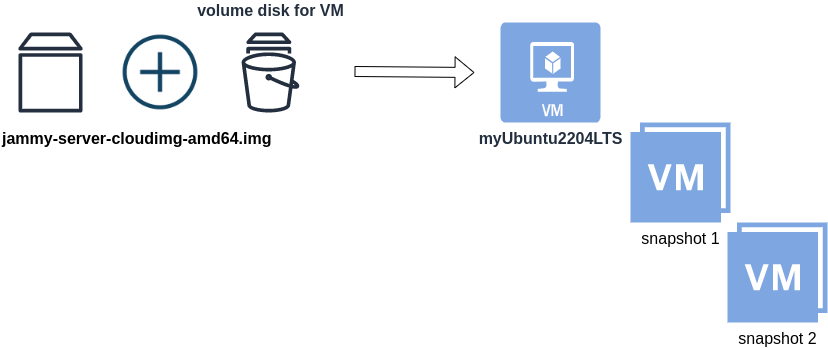
Just for the sake of this example, let us say that the base cloud image is the
jammy-server-cloudimg-amd64.imgWhen creating a new Libvirt (qemu/kvm) virtual machine, you can use this base image to start your VM instead of using an iso to install ubuntu 22.04 LTS. When choosing this image, then all changes will occur to that image and if you want to spawn another virtual machine, you need to (re)download it.
So instead of doing that, the best practice is to copy this image as base and start from a snapshot aka a baking file from that image. It is best because you can always quickly revert all your changes and (re)spawn the VM from the fresh/clean base image. Or you can always create another snapshot and revert if needed.
inspect images
To see how that works here is a local example from my linux machine.
qemu-img info /var/lib/libvirt/images/lEvXLA_tf-base.qcow2
image: /var/lib/libvirt/images/lEvXLA_tf-base.qcow2
file format: qcow2
virtual size: 2.2 GiB (2361393152 bytes)
disk size: 636 MiB
cluster_size: 65536
Format specific information:
    compat: 0.10
    compression type: zlib
    refcount bits: 16
the most important attributes to inspect are
virtual size: 2.2 GiB
disk size: 636 MiB
and the volume disk of my virtual machine
qemu-img info /var/lib/libvirt/images/lEvXLA_tf-vol.qcow2
image: /var/lib/libvirt/images/lEvXLA_tf-vol.qcow2
file format: qcow2
virtual size: 10 GiB (10737418240 bytes)
disk size: 1.6 GiB
cluster_size: 65536
backing file: /var/lib/libvirt/images/lEvXLA_tf-base.qcow2
backing file format: qcow2
Format specific information:
    compat: 0.10
    compression type: zlib
    refcount bits: 16
We see here
virtual size: 10 GiB
disk size: 1.6 GiB
cause I have extended the volume disk size to 10G from 2.2G , doing some updates and install some packages.
Now here is a problem.
I would like to use my own cloud image as base for some projects. It will help me speed things up and also do some common things I am usually doing in every setup.
If I copy the volume disk, then I will copy 1.6G of the snapshot disk. I can not use this as a base image. The volume disk contains only the delta from the base image!
baking file
Let’s first understand a bit better what is happening here
qemu-img info –backing-chain /var/lib/libvirt/images/lEvXLA_tf-vol.qcow2
image: /var/lib/libvirt/images/lEvXLA_tf-vol.qcow2
file format: qcow2
virtual size: 10 GiB (10737418240 bytes)
disk size: 1.6 GiB
cluster_size: 65536
backing file: /var/lib/libvirt/images/lEvXLA_tf-base.qcow2
backing file format: qcow2
Format specific information:
    compat: 0.10
    compression type: zlib
    refcount bits: 16

image: /var/lib/libvirt/images/lEvXLA_tf-base.qcow2
file format: qcow2
virtual size: 2.2 GiB (2361393152 bytes)
disk size: 636 MiB
cluster_size: 65536
Format specific information:
    compat: 0.10
    compression type: zlib
    refcount bits: 16
By inspecting the volume disk, we see that this image is chained to our base image.
disk size: 1.6 GiB
disk size: 636 MiB
Commit Volume
If we want to commit our volume changes to our base images, we need to commit them.
sudo qemu-img commit /var/lib/libvirt/images/lEvXLA_tf-vol.qcow2

Image committed.
Be aware, we commit our changes the volume disk => so our base will get the updates !!
Base Image
We need to see our base image grow we our changes
  disk size: 1.6 GiB
+ disk size: 636 MiB
=
  disk size: 2.11 GiB
and we can verify that by getting the image info (details)
qemu-img info /var/lib/libvirt/images/lEvXLA_tf-base.qcow2
image: /var/lib/libvirt/images/lEvXLA_tf-base.qcow2
file format: qcow2
virtual size: 10 GiB (10737418240 bytes)
disk size: 2.11 GiB
cluster_size: 65536
Format specific information:
    compat: 0.10
    compression type: zlib
    refcount bits: 16
That’s it !
many thanks to erethon for his help & support on this article.
Working on your home lab, it is quiet often that you need to spawn containers or virtual machines to test or develop something. I was doing this kind of testing with public cloud providers with minimal VMs and for short time of periods to reduce any costs. In this article I will try to explain how to use libvirt -that means kvm- with terraform and provide a simple way to run this on your linux machine.
Be aware this will be a (long) technical article and some experience is needed with kvm/libvirt & terraform but I will try to keep it simple so you can follow the instructions.
Terraform
Install Terraform v0.13 either from your distro or directly from hashicopr’s site.
$ terraform version
Terraform v0.13.2
Libvirt
same thing for libvirt
$ libvirtd --version
libvirtd (libvirt) 6.5.0

$ sudo systemctl is-active libvirtd
active
verify that you have access to libvirt
$ virsh -c qemu:///system version
Compiled against library: libvirt 6.5.0
Using library: libvirt 6.5.0
Using API: QEMU 6.5.0
Running hypervisor: QEMU 5.1.0
Terraform Libvirt Provider
To access the libvirt daemon via terraform, we need the terraform-libvirt provider.
Terraform provider to provision infrastructure with Linux’s KVM using libvirt
The official repo is on GitHub - dmacvicar/terraform-provider-libvirt and you can download a precompiled version for your distro from the repo, or you can download a generic version from my gitlab repo
ebal / terraform-provider-libvirt · GitLab
These are my instructions
mkdir -pv ~/.local/share/terraform/plugins/registry.terraform.io/dmacvicar/libvirt/0.6.2/linux_amd64/
curl -sLo ~/.local/share/terraform/plugins/registry.terraform.io/dmacvicar/libvirt/0.6.2/linux_amd64/terraform-provider-libvirt https://gitlab.com/terraform-provider/terraform-provider-libvirt/-/jobs/artifacts/master/raw/terraform-provider-libvirt/terraform-provider-libvirt?job=run-build
chmod +x ~/.local/share/terraform/plugins/registry.terraform.io/dmacvicar/libvirt/0.6.2/linux_amd64/terraform-provider-libvirt
Terraform Init
Let’s create a new directory and test that everything is fine.
mkdir -pv tf_libvirt
cd !$

cat > Provider.tf <<EOF
terraform {
 required_version = ">= 0.13"
 required_providers {
     libvirt = {
       source  = "dmacvicar/libvirt"
       version = "0.6.2"
     }
 }
}
EOF
$ terraform init

Initializing the backend...

Initializing provider plugins...
- Finding dmacvicar/libvirt versions matching "0.6.2"...
- Installing dmacvicar/libvirt v0.6.2...
- Installed dmacvicar/libvirt v0.6.2 (unauthenticated)

Terraform has been successfully initialized!

You may now begin working with Terraform. Try running "terraform plan" to see
any changes that are required for your infrastructure. All Terraform commands
should now work.

If you ever set or change modules or backend configuration for Terraform,
rerun this command to reinitialize your working directory. If you forget, other
commands will detect it and remind you to do so if necessary.
everything seems okay!
We can verify with tree or find
$ tree -a
.
├── Provider.tf
└── .terraform
    └── plugins
        ├── registry.terraform.io
        │   └── dmacvicar
        │       └── libvirt
        │           └── 0.6.2
        │               └── linux_amd64 -> /home/ebal/.local/share/terraform/plugins/registry.terraform.io/dmacvicar/libvirt/0.6.2/linux_amd64
        └── selections.json

7 directories, 2 files
Provider
but did we actually connect to libvirtd via terraform ?
Short answer: No.
We just told terraform to use this specific provider.
How to connect ?
We need to add the connection libvirt uri to the provider section:
provider "libvirt" {
    uri = "qemu:///system"
}
so our Provider.tf looks like this
terraform {
  required_version = ">= 0.13"
  required_providers {
    libvirt = {
      source  = "dmacvicar/libvirt"
      version = "0.6.2"
    }
  }
}

provider "libvirt" {
  uri = "qemu:///system"
}
Libvirt URI
libvirt is a virtualization api/toolkit that supports multiple drivers and thus you can use libvirt against the below virtualization platforms
- LXC - Linux Containers
- OpenVZ
- QEMU
- VirtualBox
- VMware ESX
- VMware Workstation/Player
- Xen
- Microsoft Hyper-V
- Virtuozzo
- Bhyve - The BSD Hypervisor
Libvirt also supports multiple authentication mechanisms like ssh
virsh -c qemu+ssh://username@host1.example.org/systemso it is really important to properly define the libvirt URI in terraform!
In this article, I will limit it to a local libvirt daemon, but keep in mind you can use a remote libvirt daemon as well.
Volume
Next thing, we need a disk volume!
Volume.tf
resource "libvirt_volume" "ubuntu-2004-vol" {
  name = "ubuntu-2004-vol"
  pool = "default"
  #source = "https://cloud-images.ubuntu.com/focal/current/focal-server-cloudimg-amd64-disk-kvm.img"
  source = "ubuntu-20.04.img"
  format = "qcow2"
}
I have already downloaded this image and verified its checksum, I will use this local image as the base image for my VM’s volume.
By running terraform plan we will see this output:
  # libvirt_volume.ubuntu-2004-vol will be created
  + resource "libvirt_volume" "ubuntu-2004-vol" {
      + format = "qcow2"
      + id     = (known after apply)
      + name   = "ubuntu-2004-vol"
      + pool   = "default"
      + size   = (known after apply)
      + source = "ubuntu-20.04.img"
    }
What we expect is to use this source image and create a new disk volume (copy) and put it to the default disk storage libvirt pool.
Let’s try to figure out what is happening here:
terraform plan -out terraform.out
terraform apply terraform.out
terraform show
# libvirt_volume.ubuntu-2004-vol:
resource "libvirt_volume" "ubuntu-2004-vol" {
format = "qcow2"
id = "/var/lib/libvirt/images/ubuntu-2004-vol"
name = "ubuntu-2004-vol"
pool = "default"
size = 2361393152
source = "ubuntu-20.04.img"
}
and
$ virsh -c qemu:///system vol-list default
Name Path
------------------------------------------------------------
ubuntu-2004-vol /var/lib/libvirt/images/ubuntu-2004-volVolume Size
BE Aware: by this declaration, the produced disk volume image will have the same size as the original source. In this case ~2G of disk.
We will show later in this article how to expand to something larger.
destroy volume
$ terraform destroy
libvirt_volume.ubuntu-2004-vol: Refreshing state... [id=/var/lib/libvirt/images/ubuntu-2004-vol]
An execution plan has been generated and is shown below.
Resource actions are indicated with the following symbols:
- destroy
Terraform will perform the following actions:
# libvirt_volume.ubuntu-2004-vol will be destroyed
- resource "libvirt_volume" "ubuntu-2004-vol" {
- format = "qcow2" -> null
- id = "/var/lib/libvirt/images/ubuntu-2004-vol" -> null
- name = "ubuntu-2004-vol" -> null
- pool = "default" -> null
- size = 2361393152 -> null
- source = "ubuntu-20.04.img" -> null
}
Plan: 0 to add, 0 to change, 1 to destroy.
Do you really want to destroy all resources?
Terraform will destroy all your managed infrastructure, as shown above.
There is no undo. Only 'yes' will be accepted to confirm.
Enter a value: yes
libvirt_volume.ubuntu-2004-vol: Destroying... [id=/var/lib/libvirt/images/ubuntu-2004-vol]
libvirt_volume.ubuntu-2004-vol: Destruction complete after 0s
Destroy complete! Resources: 1 destroyed.
verify
$ virsh -c qemu:///system vol-list default
Name Path
----------------------------------------------------------
reminder: always destroy!
Domain
Believe it or not, we are half way from our first VM!
We need to create a libvirt domain resource.
Domain.tf
cat > Domain.tf <<EOF
resource "libvirt_domain" "ubuntu-2004-vm" {
name = "ubuntu-2004-vm"
memory = "2048"
vcpu = 1
disk {
volume_id = libvirt_volume.ubuntu-2004-vol.id
}
}
EOFApply the new tf plan
terraform plan -out terraform.out
terraform apply terraform.out
$ terraform show
# libvirt_domain.ubuntu-2004-vm:
resource "libvirt_domain" "ubuntu-2004-vm" {
arch = "x86_64"
autostart = false
disk = [
{
block_device = ""
file = ""
scsi = false
url = ""
volume_id = "/var/lib/libvirt/images/ubuntu-2004-vol"
wwn = ""
},
]
emulator = "/usr/bin/qemu-system-x86_64"
fw_cfg_name = "opt/com.coreos/config"
id = "3a4a2b44-5ecd-433c-8645-9bccc831984f"
machine = "pc"
memory = 2048
name = "ubuntu-2004-vm"
qemu_agent = false
running = true
vcpu = 1
}
# libvirt_volume.ubuntu-2004-vol:
resource "libvirt_volume" "ubuntu-2004-vol" {
    format = "qcow2"
    id     = "/var/lib/libvirt/images/ubuntu-2004-vol"
    name   = "ubuntu-2004-vol"
    pool   = "default"
    size   = 2361393152
    source = "ubuntu-20.04.img"
}
Verify via virsh:
$ virsh -c qemu:///system list
Id Name State
--------------------------------
3 ubuntu-2004-vm running
Destroy them!
$ terraform destroy
Do you really want to destroy all resources?
Terraform will destroy all your managed infrastructure, as shown above.
There is no undo. Only 'yes' will be accepted to confirm.
Enter a value: yes
libvirt_domain.ubuntu-2004-vm: Destroying... [id=3a4a2b44-5ecd-433c-8645-9bccc831984f]
libvirt_domain.ubuntu-2004-vm: Destruction complete after 0s
libvirt_volume.ubuntu-2004-vol: Destroying... [id=/var/lib/libvirt/images/ubuntu-2004-vol]
libvirt_volume.ubuntu-2004-vol: Destruction complete after 0s
Destroy complete! Resources: 2 destroyed.
That’s it !
We have successfully created a new VM from a source image that runs on our libvirt environment.
But we can not connect/use or do anything with this instance. Not yet, we need to add a few more things. Like a network interface, a console output and a default cloud-init file to auto-configure the virtual machine.
Variables
Before continuing with the user-data (cloud-init), it is a good time to set up some terraform variables.
cat > Variables.tf <<EOF
variable "domain" {
description = "The domain/host name of the zone"
default = "ubuntu2004"
}
EOF
We are going to use this variable within the user-date yaml file.
Cloud-init
The best way to configure a newly created virtual machine, is via cloud-init and the ability of injecting a user-data.yml file into the virtual machine via terraform-libvirt.
user-data
#cloud-config
#disable_root: true
disable_root: false
chpasswd:
list: |
root:ping
expire: False
# Set TimeZone
timezone: Europe/Athens
hostname: "${hostname}"
# PostInstall
runcmd:
# Remove cloud-init
- apt-get -qqy autoremove --purge cloud-init lxc lxd snapd
- apt-get -y --purge autoremove
- apt -y autoclean
- apt -y clean all
cloud init disk
Terraform will create a new iso by reading the above template file and generate a proper user-data.yaml file. To use this cloud init iso, we need to configure it as a libvirt cloud-init resource.
Cloudinit.tf
data "template_file" "user_data" {
template = file("user-data.yml")
vars = {
hostname = var.domain
}
}
resource "libvirt_cloudinit_disk" "cloud-init" {
name = "cloud-init.iso"
user_data = data.template_file.user_data.rendered
}
and we need to modify our Domain.tf accordingly
cloudinit = libvirt_cloudinit_disk.cloud-init.idTerraform will create and upload this iso disk image into the default libvirt storage pool. And attach it to the virtual machine in the boot process.
At this moment the tf_libvirt directory should look like this:
$ ls -1
Cloudinit.tf
Domain.tf
Provider.tf
ubuntu-20.04.img
user-data.yml
Variables.tf
Volume.tf
To give you an idea, the abstract design is this:

apply
 terraform plan -out terraform.out
 terraform apply terraform.out
$ terraform show
# data.template_file.user_data:
data "template_file" "user_data" {
id = "cc82a7db4c6498aee21a883729fc4be7b84059d3dec69b92a210e046c67a9a00"
rendered = <<~EOT
#cloud-config
#disable_root: true
disable_root: false
chpasswd:
list: |
root:ping
expire: False
# Set TimeZone
timezone: Europe/Athens
hostname: "ubuntu2004"
# PostInstall
runcmd:
# Remove cloud-init
- apt-get -qqy autoremove --purge cloud-init lxc lxd snapd
- apt-get -y --purge autoremove
- apt -y autoclean
- apt -y clean all
EOT
template = <<~EOT
#cloud-config

#disable_root: true
disable_root: false
chpasswd:
  list: |
       root:ping
  expire: False

# Set TimeZone
timezone: Europe/Athens

hostname: "${hostname}"

# PostInstall
runcmd:
  # Remove cloud-init
  - apt-get -qqy autoremove --purge cloud-init lxc lxd snapd
  - apt-get -y --purge autoremove
  - apt -y autoclean
  - apt -y clean all
EOT
vars = {
"hostname" = "ubuntu2004"
}
}
# libvirt_cloudinit_disk.cloud-init:
resource "libvirt_cloudinit_disk" "cloud-init" {
id = "/var/lib/libvirt/images/cloud-init.iso;5f5cdc31-1d38-39cb-cc72-971e474ca539"
name = "cloud-init.iso"
pool = "default"
user_data = <<~EOT
#cloud-config
#disable_root: true
disable_root: false
chpasswd:
list: |
root:ping
expire: False
# Set TimeZone
timezone: Europe/Athens
hostname: "ubuntu2004"
# PostInstall
runcmd:
# Remove cloud-init
- apt-get -qqy autoremove --purge cloud-init lxc lxd snapd
- apt-get -y --purge autoremove
- apt -y autoclean
- apt -y clean all
EOT
}
# libvirt_domain.ubuntu-2004-vm:
resource "libvirt_domain" "ubuntu-2004-vm" {
arch = "x86_64"
autostart = false
cloudinit = "/var/lib/libvirt/images/cloud-init.iso;5f5ce077-9508-3b8c-273d-02d44443b79c"
disk = [
{
block_device = ""
file = ""
scsi = false
url = ""
volume_id = "/var/lib/libvirt/images/ubuntu-2004-vol"
wwn = ""
},
]
emulator = "/usr/bin/qemu-system-x86_64"
fw_cfg_name = "opt/com.coreos/config"
id = "3ade5c95-30d4-496b-9bcf-a12d63993cfa"
machine = "pc"
memory = 2048
name = "ubuntu-2004-vm"
qemu_agent = false
running = true
vcpu = 1
}
# libvirt_volume.ubuntu-2004-vol:
resource "libvirt_volume" "ubuntu-2004-vol" {
format = "qcow2"
id = "/var/lib/libvirt/images/ubuntu-2004-vol"
name = "ubuntu-2004-vol"
pool = "default"
size = 2361393152
source = "ubuntu-20.04.img"
}
Lots of output , but let me explain it really quick:
generate a user-data file from template, template is populated with variables, create an cloud-init iso, create a volume disk from source, create a virtual machine with this new volume disk and boot it with this cloud-init iso.
Pretty much, that’s it!!!
$ virsh -c qemu:///system vol-list --details default
Name Path Type Capacity Allocation
---------------------------------------------------------------------------------------------
cloud-init.iso /var/lib/libvirt/images/cloud-init.iso file 364.00 KiB 364.00 KiB
ubuntu-2004-vol /var/lib/libvirt/images/ubuntu-2004-vol file 2.20 GiB 537.94 MiB
$ virsh -c qemu:///system list
Id Name State
--------------------------------
1 ubuntu-2004-vm running
destroy
$ terraform destroy -auto-approve
data.template_file.user_data: Refreshing state... [id=cc82a7db4c6498aee21a883729fc4be7b84059d3dec69b92a210e046c67a9a00]
libvirt_volume.ubuntu-2004-vol: Refreshing state... [id=/var/lib/libvirt/images/ubuntu-2004-vol]
libvirt_cloudinit_disk.cloud-init: Refreshing state... [id=/var/lib/libvirt/images/cloud-init.iso;5f5cdc31-1d38-39cb-cc72-971e474ca539]
libvirt_domain.ubuntu-2004-vm: Refreshing state... [id=3ade5c95-30d4-496b-9bcf-a12d63993cfa]
libvirt_cloudinit_disk.cloud-init: Destroying... [id=/var/lib/libvirt/images/cloud-init.iso;5f5cdc31-1d38-39cb-cc72-971e474ca539]
libvirt_domain.ubuntu-2004-vm: Destroying... [id=3ade5c95-30d4-496b-9bcf-a12d63993cfa]
libvirt_cloudinit_disk.cloud-init: Destruction complete after 0s
libvirt_domain.ubuntu-2004-vm: Destruction complete after 0s
libvirt_volume.ubuntu-2004-vol: Destroying... [id=/var/lib/libvirt/images/ubuntu-2004-vol]
libvirt_volume.ubuntu-2004-vol: Destruction complete after 0s
Destroy complete! Resources: 3 destroyed.
Most important detail is:
Resources: 3 destroyed.
- cloud-init.iso
- ubuntu-2004-vol
- ubuntu-2004-vm
Console
but there are a few things still missing.
To add a console for starters so we can connect into this virtual machine!
To do that, we need to re-edit Domain.tf and add a console output:
console {
target_type = "serial"
type = "pty"
target_port = "0"
}
console {
target_type = "virtio"
type = "pty"
target_port = "1"
}
the full file should look like:
resource "libvirt_domain" "ubuntu-2004-vm" {
name = "ubuntu-2004-vm"
memory = "2048"
vcpu = 1
cloudinit = libvirt_cloudinit_disk.cloud-init.id
disk {
volume_id = libvirt_volume.ubuntu-2004-vol.id
}
console {
target_type = "serial"
type = "pty"
target_port = "0"
}
console {
target_type = "virtio"
type = "pty"
target_port = "1"
}
}
Create again the VM with
terraform plan -out terraform.out
terraform apply terraform.out
And test the console:
$ virsh -c qemu:///system console ubuntu-2004-vm
Connected to domain ubuntu-2004-vm
Escape character is ^] (Ctrl + ])
wow!
We have actually logged-in to this VM using the libvirt console!
Virtual Machine
some interesting details
root@ubuntu2004:~# df -h
Filesystem Size Used Avail Use% Mounted on
/dev/root 2.0G 916M 1.1G 46% /
devtmpfs 998M 0 998M 0% /dev
tmpfs 999M 0 999M 0% /dev/shm
tmpfs 200M 392K 200M 1% /run
tmpfs 5.0M 0 5.0M 0% /run/lock
tmpfs 999M 0 999M 0% /sys/fs/cgroup
/dev/vda15 105M 3.9M 101M 4% /boot/efi
tmpfs 200M 0 200M 0% /run/user/0
root@ubuntu2004:~# free -hm
total used free shared buff/cache available
Mem: 2.0Gi 73Mi 1.7Gi 0.0Ki 140Mi 1.8Gi
Swap: 0B 0B 0B
root@ubuntu2004:~# ip a
1: lo: <LOOPBACK,UP,LOWER_UP> mtu 65536 qdisc noqueue state UNKNOWN group default qlen 1000
link/loopback 00:00:00:00:00:00 brd 00:00:00:00:00:00
inet 127.0.0.1/8 scope host lo
valid_lft forever preferred_lft forever
inet6 ::1/128 scope host
valid_lft forever preferred_lft forever
2: tunl0@NONE: <NOARP> mtu 1480 qdisc noop state DOWN group default qlen 1000
link/ipip 0.0.0.0 brd 0.0.0.0
3: sit0@NONE: <NOARP> mtu 1480 qdisc noop state DOWN group default qlen 1000
link/sit 0.0.0.0 brd 0.0.0.0
Do not forget to destroy
$ terraform destroy -auto-approve
data.template_file.user_data: Refreshing state... [id=cc82a7db4c6498aee21a883729fc4be7b84059d3dec69b92a210e046c67a9a00]
libvirt_volume.ubuntu-2004-vol: Refreshing state... [id=/var/lib/libvirt/images/ubuntu-2004-vol]
libvirt_cloudinit_disk.cloud-init: Refreshing state... [id=/var/lib/libvirt/images/cloud-init.iso;5f5ce077-9508-3b8c-273d-02d44443b79c]
libvirt_domain.ubuntu-2004-vm: Refreshing state... [id=69f75b08-1e06-409d-9fd6-f45d82260b51]
libvirt_domain.ubuntu-2004-vm: Destroying... [id=69f75b08-1e06-409d-9fd6-f45d82260b51]
libvirt_domain.ubuntu-2004-vm: Destruction complete after 0s
libvirt_cloudinit_disk.cloud-init: Destroying... [id=/var/lib/libvirt/images/cloud-init.iso;5f5ce077-9508-3b8c-273d-02d44443b79c]
libvirt_volume.ubuntu-2004-vol: Destroying... [id=/var/lib/libvirt/images/ubuntu-2004-vol]
libvirt_cloudinit_disk.cloud-init: Destruction complete after 0s
libvirt_volume.ubuntu-2004-vol: Destruction complete after 0s
Destroy complete! Resources: 3 destroyed.
extend the volume disk
As mentioned above, the volume’s disk size is exactly as the origin source image.
In our case it’s 2G.
What we need to do, is to use the source image as a base for a new volume disk. In our new volume disk, we can declare the size we need.
I would like to make this a user variable: Variables.tf
variable "vol_size" {
description = "The mac & iP address for this VM"
# 10G
default = 10 * 1024 * 1024 * 1024
}
Arithmetic in terraform!!
So the Volume.tf should be:
resource "libvirt_volume" "ubuntu-2004-base" {
name = "ubuntu-2004-base"
pool = "default"
#source = "https://cloud-images.ubuntu.com/focal/current/focal-server-cloudimg-amd64-disk-kvm.img"
source = "ubuntu-20.04.img"
format = "qcow2"
}
resource "libvirt_volume" "ubuntu-2004-vol" {
name = "ubuntu-2004-vol"
pool = "default"
base_volume_id = libvirt_volume.ubuntu-2004-base.id
size = var.vol_size
}
base image –> volume image
test it
terraform plan -out terraform.out
terraform apply terraform.out
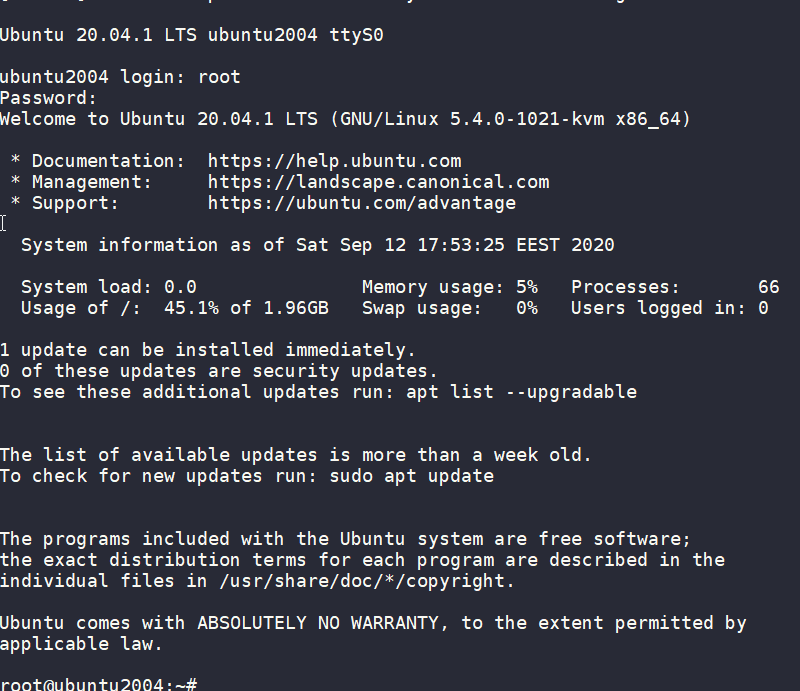
$ virsh -c qemu:///system console ubuntu-2004-vm
Connected to domain ubuntu-2004-vm
Escape character is ^] (Ctrl + ])
ubuntu2004 login: root
Password:
Welcome to Ubuntu 20.04.1 LTS (GNU/Linux 5.4.0-1021-kvm x86_64)
* Documentation: https://help.ubuntu.com
* Management: https://landscape.canonical.com
* Support: https://ubuntu.com/advantage
System information as of Sat Sep 12 18:27:46 EEST 2020
System load: 0.29 Memory usage: 6% Processes: 66
Usage of /: 9.3% of 9.52GB Swap usage: 0% Users logged in: 0
0 updates can be installed immediately.
0 of these updates are security updates.
Failed to connect to https://changelogs.ubuntu.com/meta-release-lts. Check your Internet connection or proxy settings
Last login: Sat Sep 12 18:26:37 EEST 2020 on ttyS0
root@ubuntu2004:~# df -h /
Filesystem Size Used Avail Use% Mounted on
/dev/root 9.6G 912M 8.7G 10% /
root@ubuntu2004:~#
10G !
destroy
terraform destroy -auto-approveSwap
I would like to have a swap partition and I will use cloud init to create a swap partition.
modify user-data.yml
# Create swap partition
swap:
  filename: /swap.img
  size: "auto"
  maxsize: 2G
test it
terraform plan -out terraform.out && terraform apply terraform.out$ virsh -c qemu:///system console ubuntu-2004-vm
Connected to domain ubuntu-2004-vm
Escape character is ^] (Ctrl + ])
root@ubuntu2004:~# free -hm
total used free shared buff/cache available
Mem: 2.0Gi 86Mi 1.7Gi 0.0Ki 188Mi 1.8Gi
Swap: 2.0Gi 0B 2.0Gi
root@ubuntu2004:~#
success !!
terraform destroy -auto-approveNetwork
How about internet? network?
Yes, what about it ?
I guess you need to connect to the internets, okay then.
The easiest way is to add this your Domain.tf
  network_interface {
    network_name = "default"
  }
This will use the default network libvirt resource
$ virsh -c qemu:///system net-list

 Name              State    Autostart   Persistent
----------------------------------------------------
 default           active   yes         yes
if you prefer to directly expose your VM to your local network (be very careful) then replace the above with a macvtap interface. If your ISP router provides dhcp, then your VM will take a random IP from your router.
network_interface {
  macvtap = "eth0"
}
test it
terraform plan -out terraform.out && terraform apply terraform.out$ virsh -c qemu:///system console ubuntu-2004-vm
Connected to domain ubuntu-2004-vm
Escape character is ^] (Ctrl + ])
root@ubuntu2004:~#
root@ubuntu2004:~# ip a
1: lo: <LOOPBACK,UP,LOWER_UP> mtu 65536 qdisc noqueue state UNKNOWN group default qlen 1000
link/loopback 00:00:00:00:00:00 brd 00:00:00:00:00:00
inet 127.0.0.1/8 scope host lo
valid_lft forever preferred_lft forever
inet6 ::1/128 scope host
valid_lft forever preferred_lft forever
2: ens3: <BROADCAST,MULTICAST,UP,LOWER_UP> mtu 1500 qdisc pfifo_fast state UP group default qlen 1000
link/ether 52:54:00:36:66:96 brd ff:ff:ff:ff:ff:ff
inet 192.168.122.228/24 brd 192.168.122.255 scope global dynamic ens3
valid_lft 3544sec preferred_lft 3544sec
inet6 fe80::5054:ff:fe36:6696/64 scope link
valid_lft forever preferred_lft forever
3: tunl0@NONE: <NOARP> mtu 1480 qdisc noop state DOWN group default qlen 1000
link/ipip 0.0.0.0 brd 0.0.0.0
4: sit0@NONE: <NOARP> mtu 1480 qdisc noop state DOWN group default qlen 1000
link/sit 0.0.0.0 brd 0.0.0.0
root@ubuntu2004:~# ping -c 5 google.com
PING google.com (172.217.23.142) 56(84) bytes of data.
64 bytes from fra16s18-in-f142.1e100.net (172.217.23.142): icmp_seq=1 ttl=115 time=43.4 ms
64 bytes from fra16s18-in-f142.1e100.net (172.217.23.142): icmp_seq=2 ttl=115 time=43.9 ms
64 bytes from fra16s18-in-f142.1e100.net (172.217.23.142): icmp_seq=3 ttl=115 time=43.0 ms
64 bytes from fra16s18-in-f142.1e100.net (172.217.23.142): icmp_seq=4 ttl=115 time=43.1 ms
64 bytes from fra16s18-in-f142.1e100.net (172.217.23.142): icmp_seq=5 ttl=115 time=43.4 ms
--- google.com ping statistics ---
5 packets transmitted, 5 received, 0% packet loss, time 4005ms
rtt min/avg/max/mdev = 42.977/43.346/43.857/0.311 ms
root@ubuntu2004:~#
destroy
$ terraform destroy -auto-approve

Destroy complete! Resources: 4 destroyed.
SSH
Okay, now that we have network it is possible to setup ssh to our virtual machine and also auto create a user. I would like cloud-init to get my public key from github and setup my user.
disable_root: true
ssh_pwauth: no

users:
  - name: ebal
    ssh_import_id:
      - gh:ebal
    shell: /bin/bash
    sudo: ALL=(ALL) NOPASSWD:ALL

write_files:
  - path: /etc/ssh/sshd_config
    content: |
        AcceptEnv LANG LC_*
        AllowUsers ebal
        ChallengeResponseAuthentication no
        Compression NO
        MaxSessions 3
        PasswordAuthentication no
        PermitRootLogin no
        Port "${sshdport}"
        PrintMotd no
        Subsystem sftp  /usr/lib/openssh/sftp-server
        UseDNS no
        UsePAM yes
        X11Forwarding no
Notice, I have added a new variable called sshdport
Variables.tf
variable "ssh_port" {
  description = "The sshd port of the VM"
  default     = 12345
}
and do not forget to update your cloud-init tf
Cloudinit.tf
data "template_file" "user_data" {
  template = file("user-data.yml")
  vars = {
    hostname = var.domain
    sshdport = var.ssh_port
  }
}

resource "libvirt_cloudinit_disk" "cloud-init" {
  name           = "cloud-init.iso"
  user_data      = data.template_file.user_data.rendered
}
Update VM
I would also like to update & install specific packages to this virtual machine:
# Install packages
packages:
  - figlet
  - mlocate
  - python3-apt
  - bash-completion
  - ncdu

# Update/Upgrade & Reboot if necessary
package_update: true
package_upgrade: true
package_reboot_if_required: true

# PostInstall
runcmd:
  - figlet ${hostname} > /etc/motd
  - updatedb
  # Firewall
  - ufw allow "${sshdport}"/tcp && ufw enable
  # Remove cloud-init
  - apt-get -y autoremove --purge cloud-init lxc lxd snapd
  - apt-get -y --purge autoremove
  - apt -y autoclean
  - apt -y clean all
Yes, I prefer to uninstall cloud-init at the end.
user-date.yaml
the entire user-date.yaml looks like this:
#cloud-config
disable_root: true
ssh_pwauth: no

users:
  - name: ebal
    ssh_import_id:
      - gh:ebal
    shell: /bin/bash
    sudo: ALL=(ALL) NOPASSWD:ALL

write_files:
  - path: /etc/ssh/sshd_config
    content: |
        AcceptEnv LANG LC_*
        AllowUsers ebal
        ChallengeResponseAuthentication no
        Compression NO
        MaxSessions 3
        PasswordAuthentication no
        PermitRootLogin no
        Port "${sshdport}"
        PrintMotd no
        Subsystem sftp  /usr/lib/openssh/sftp-server
        UseDNS no
        UsePAM yes
        X11Forwarding no

# Set TimeZone
timezone: Europe/Athens

hostname: "${hostname}"

# Create swap partition
swap:
  filename: /swap.img
  size: "auto"
  maxsize: 2G

# Install packages
packages:
  - figlet
  - mlocate
  - python3-apt
  - bash-completion
  - ncdu

# Update/Upgrade & Reboot if necessary
package_update: true
package_upgrade: true
package_reboot_if_required: true

# PostInstall
runcmd:
  - figlet ${hostname} > /etc/motd
  - updatedb
  # Firewall
  - ufw allow "${sshdport}"/tcp && ufw enable
  # Remove cloud-init
  - apt-get -y autoremove --purge cloud-init lxc lxd snapd
  - apt-get -y --purge autoremove
  - apt -y autoclean
  - apt -y clean all
Output
We need to know the IP to login so create a new terraform file to get the IP
Output.tf
output "IP" {
  value = libvirt_domain.ubuntu-2004-vm.network_interface.0.addresses
}
but that means that we need to wait for the dhcp lease. Modify Domain.tf to tell terraform to wait.
  network_interface {
    network_name = "default"
    wait_for_lease = true
  }
Plan & Apply
$ terraform plan -out terraform.out && terraform apply terraform.out

Outputs:

IP = [
  "192.168.122.79",
]
Verify
$ ssh 192.168.122.79 -p 12345 uptime
 19:33:46 up 2 min,  0 users,  load average: 0.95, 0.37, 0.14
$ ssh 192.168.122.79 -p 12345
Welcome to Ubuntu 20.04.1 LTS (GNU/Linux 5.4.0-1023-kvm x86_64)

 * Documentation:  https://help.ubuntu.com
 * Management:     https://landscape.canonical.com
 * Support:        https://ubuntu.com/advantage

  System information as of Sat Sep 12 19:34:45 EEST 2020

  System load:  0.31              Processes:             72
  Usage of /:   33.1% of 9.52GB   Users logged in:       0
  Memory usage: 7%                IPv4 address for ens3: 192.168.122.79
  Swap usage:   0%

0 updates can be installed immediately.
0 of these updates are security updates.

       _                 _         ____   ___   ___  _  _
 _   _| |__  _   _ _ __ | |_ _   _|___  / _  / _ | || |
| | | | '_ | | | | '_ | __| | | | __) | | | | | | | || |_
| |_| | |_) | |_| | | | | |_| |_| |/ __/| |_| | |_| |__   _|
 __,_|_.__/ __,_|_| |_|__|__,_|_____|___/ ___/   |_|

Last login: Sat Sep 12 19:34:37 2020 from 192.168.122.1

ebal@ubuntu2004:~$
ebal@ubuntu2004:~$ df -h /
Filesystem      Size  Used Avail Use% Mounted on
/dev/root       9.6G  3.2G  6.4G  34% /

ebal@ubuntu2004:~$ free -hm
              total        used        free      shared  buff/cache   available
Mem:          2.0Gi        91Mi       1.7Gi       0.0Ki       197Mi       1.8Gi
Swap:         2.0Gi          0B       2.0Gi

ebal@ubuntu2004:~$ ping -c 5 libreops.cc
PING libreops.cc (185.199.108.153) 56(84) bytes of data.
64 bytes from 185.199.108.153 (185.199.108.153): icmp_seq=1 ttl=55 time=48.4 ms
64 bytes from 185.199.108.153 (185.199.108.153): icmp_seq=2 ttl=55 time=48.7 ms
64 bytes from 185.199.108.153 (185.199.108.153): icmp_seq=3 ttl=55 time=48.5 ms
64 bytes from 185.199.108.153 (185.199.108.153): icmp_seq=4 ttl=55 time=48.3 ms
64 bytes from 185.199.108.153 (185.199.108.153): icmp_seq=5 ttl=55 time=52.8 ms

--- libreops.cc ping statistics ---
5 packets transmitted, 5 received, 0% packet loss, time 4006ms
rtt min/avg/max/mdev = 48.266/49.319/52.794/1.743 ms
what !!!!
awesome
destroy
terraform destroy -auto-approveCustom Network
One last thing I would like to discuss is how to create a new network and provide a specific IP to your VM. This will separate your VMs/lab and it is cheap & easy to setup a new libvirt network.
Network.tf
resource "libvirt_network" "tf_net" {
  name      = "tf_net"
  domain    = "libvirt.local"
  addresses = ["192.168.123.0/24"]
  dhcp {
    enabled = true
  }
  dns {
    enabled = true
  }
}
and replace network_interface in Domains.tf
  network_interface {
    network_id     = libvirt_network.tf_net.id
    network_name   = "tf_net"
    addresses      = ["192.168.123.${var.IP_addr}"]
    mac            = "52:54:00:b2:2f:${var.IP_addr}"
    wait_for_lease = true
  }
Closely look, there is a new terraform variable
Variables.tf
variable "IP_addr" {
  description = "The mac & iP address for this VM"
  default     = 33
}
$ terraform plan -out terraform.out && terraform apply terraform.out
Outputs:
IP = [
"192.168.123.33",
]
$ ssh 192.168.123.33 -p 12345
Welcome to Ubuntu 20.04.1 LTS (GNU/Linux 5.4.0-1021-kvm x86_64)

 * Documentation:  https://help.ubuntu.com
 * Management:     https://landscape.canonical.com
 * Support:        https://ubuntu.com/advantage

 System information disabled due to load higher than 1.0

12 updates can be installed immediately.
8 of these updates are security updates.
To see these additional updates run: apt list --upgradable

Last login: Sat Sep 12 19:56:33 2020 from 192.168.123.1

ebal@ubuntu2004:~$ ip addr show ens3
2: ens3: <BROADCAST,MULTICAST,UP,LOWER_UP> mtu 1500 qdisc pfifo_fast state UP group default qlen 1000
    link/ether 52:54:00:b2:2f:33 brd ff:ff:ff:ff:ff:ff
    inet 192.168.123.33/24 brd 192.168.123.255 scope global dynamic ens3
       valid_lft 3491sec preferred_lft 3491sec
    inet6 fe80::5054:ff:feb2:2f33/64 scope link
       valid_lft forever preferred_lft forever
ebal@ubuntu2004:~$
Terraform files
you can find every terraform example in my github repo
tf/0.13/libvirt/0.6.2/ubuntu/20.04 at master · ebal/tf · GitHub
That’s it!
If you like this article, consider following me on twitter ebalaskas.
Cloud-init is the defacto multi-distribution package that handles early initialization of a cloud instance
This article is a mini-HowTo use cloud-init with centos7 in your own libvirt qemu/kvm lab, instead of using a public cloud provider.
How Cloud-init works
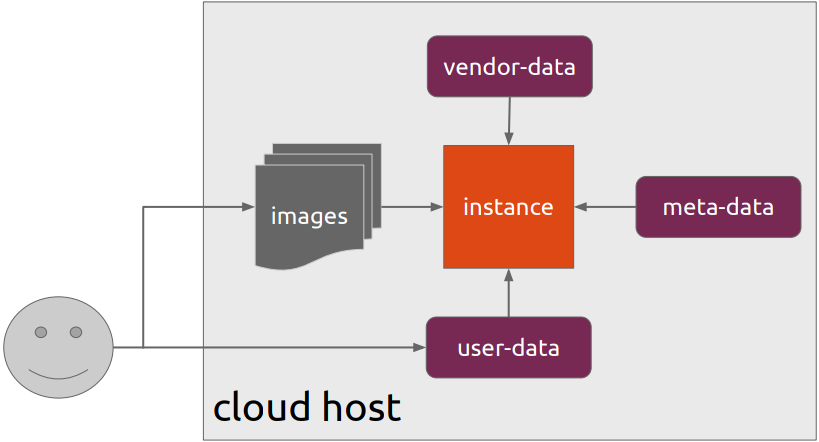
Josh Powers @ DebConf17
How really works?
Cloud-init has Boot Stages
- Generator
- Local
- Network
- Config
- Final
and supports modules to extend configuration and support.
Here is a brief list of modules (sorted by name):
- bootcmd
- final-message
- growpart
- keys-to-console
- locale
- migrator
- mounts
- package-update-upgrade-install
- phone-home
- power-state-change
- puppet
- resizefs
- rsyslog
- runcmd
- scripts-per-boot
- scripts-per-instance
- scripts-per-once
- scripts-user
- set_hostname
- set-passwords
- ssh
- ssh-authkey-fingerprints
- timezone
- update_etc_hosts
- update_hostname
- users-groups
- write-files
- yum-add-repo
Gist
Cloud-init example using a Generic Cloud CentOS-7 on a libvirtd qmu/kvm lab · GitHub
Generic Cloud CentOS 7
You can find a plethora of centos7 cloud images here:
Download the latest version
$ curl -LO http://cloud.centos.org/centos/7/images/CentOS-7-x86_64-GenericCloud.qcow2.xz
Uncompress file
$ xz -v --keep -d CentOS-7-x86_64-GenericCloud.qcow2.xz
Check cloud image
$ qemu-img info CentOS-7-x86_64-GenericCloud.qcow2
image: CentOS-7-x86_64-GenericCloud.qcow2
file format: qcow2
virtual size: 8.0G (8589934592 bytes)
disk size: 863M
cluster_size: 65536
Format specific information:
    compat: 0.10
    refcount bits: 16
The default image is 8G.
If you need to resize it, check below in this article.
Create metadata file
meta-data are data that comes from the cloud provider itself. In this example, I will use static network configuration.
cat > meta-data <<EOF
instance-id: testingcentos7
local-hostname: testingcentos7

network-interfaces: |
  iface eth0 inet static
  address 192.168.122.228
  network 192.168.122.0
  netmask 255.255.255.0
  broadcast 192.168.122.255
  gateway 192.168.122.1

# vim:syntax=yaml
EOF
Crete cloud-init (userdata) file
user-data are data that comes from you aka the user.
cat > user-data <<EOF
#cloud-config

# Set default user and their public ssh key
# eg. https://github.com/ebal.keys
users:
  - name: ebal
    ssh-authorized-keys:
      - `curl -s -L https://github.com/ebal.keys`
    sudo: ALL=(ALL) NOPASSWD:ALL

# Enable cloud-init modules
cloud_config_modules:
  - resolv_conf
  - runcmd
  - timezone
  - package-update-upgrade-install

# Set TimeZone
timezone: Europe/Athens

# Set DNS
manage_resolv_conf: true
resolv_conf:
  nameservers: ['9.9.9.9']

# Install packages
packages:
  - mlocate
  - vim
  - epel-release

# Update/Upgrade & Reboot if necessary
package_update: true
package_upgrade: true
package_reboot_if_required: true

# Remove cloud-init
runcmd:
  - yum -y remove cloud-init
  - updatedb

# Configure where output will go
output:
  all: ">> /var/log/cloud-init.log"

# vim:syntax=yaml
EOF
Create the cloud-init ISO
When using libvirt with qemu/kvm the most common way to pass the meta-data/user-data to cloud-init, is through an iso (cdrom).
$ genisoimage -output cloud-init.iso -volid cidata -joliet -rock user-data meta-data
or
$ mkisofs -o cloud-init.iso -V cidata -J -r user-data meta-data
Provision new virtual machine
Finally run this as root:
# virt-install
    --name centos7_test
    --memory 2048
    --vcpus 1
    --metadata description="My centos7 cloud-init test"
    --import
    --disk CentOS-7-x86_64-GenericCloud.qcow2,format=qcow2,bus=virtio
    --disk cloud-init.iso,device=cdrom
    --network bridge=virbr0,model=virtio
    --os-type=linux
    --os-variant=centos7.0
    --noautoconsole
The List of Os Variants
There is an interesting command to find out all the os variants that are being supported by libvirt in your lab:
eg. CentOS
$ osinfo-query os | grep CentOS
centos6.0  |  CentOS  6.0  |  6.0  |  http://centos.org/centos/6.0
centos6.1  |  CentOS  6.1  |  6.1  |  http://centos.org/centos/6.1
centos6.2  |  CentOS  6.2  |  6.2  |  http://centos.org/centos/6.2
centos6.3  |  CentOS  6.3  |  6.3  |  http://centos.org/centos/6.3
centos6.4  |  CentOS  6.4  |  6.4  |  http://centos.org/centos/6.4
centos6.5  |  CentOS  6.5  |  6.5  |  http://centos.org/centos/6.5
centos6.6  |  CentOS  6.6  |  6.6  |  http://centos.org/centos/6.6
centos6.7  |  CentOS  6.7  |  6.7  |  http://centos.org/centos/6.7
centos6.8  |  CentOS  6.8  |  6.8  |  http://centos.org/centos/6.8
centos6.9  |  CentOS  6.9  |  6.9  |  http://centos.org/centos/6.9
centos7.0  |  CentOS  7.0  |  7.0  |  http://centos.org/centos/7.0
DHCP
If you are not using a static network configuration scheme, then to identify the IP of your cloud instance, type:
$ virsh net-dhcp-leases default
 Expiry Time           MAC address         Protocol   IP address           Hostname   Client ID or DUID
---------------------------------------------------------------------------------------------------------
 2018-11-17 15:40:31   52:54:00:57:79:3e   ipv4       192.168.122.144/24   -          -
Resize
The easiest way to grow/resize your virtual machine is via qemu-img command:
$ qemu-img resize CentOS-7-x86_64-GenericCloud.qcow2 20G
Image resized.$ qemu-img info CentOS-7-x86_64-GenericCloud.qcow2
image: CentOS-7-x86_64-GenericCloud.qcow2
file format: qcow2
virtual size: 20G (21474836480 bytes)
disk size: 870M
cluster_size: 65536
Format specific information:
    compat: 0.10
    refcount bits: 16
You can add the below lines into your user-data file
growpart:
  mode: auto
  devices: ['/']
  ignore_growroot_disabled: false
The result:
[root@testingcentos7 ebal]# df -h /
Filesystem      Size  Used Avail Use% Mounted on
/dev/vda1        20G  870M   20G   5% /
Default cloud-init.cfg
For reference, this is the default centos7 cloud-init configuration file.
# /etc/cloud/cloud.cfg users:
- default
disable_root: 1
ssh_pwauth: 0
mount_default_fields: [~, ~, 'auto', 'defaults,nofail', '0', '2']
resize_rootfs_tmp: /dev
ssh_deletekeys: 0
ssh_genkeytypes: ~
syslog_fix_perms: ~
cloud_init_modules:
- migrator
- bootcmd
- write-files
- growpart
- resizefs
- set_hostname
- update_hostname
- update_etc_hosts
- rsyslog
- users-groups
- ssh
cloud_config_modules:
- mounts
- locale
- set-passwords
- rh_subscription
- yum-add-repo
- package-update-upgrade-install
- timezone
- puppet
- chef
- salt-minion
- mcollective
- disable-ec2-metadata
- runcmd
cloud_final_modules:
- rightscale_userdata
- scripts-per-once
- scripts-per-boot
- scripts-per-instance
- scripts-user
- ssh-authkey-fingerprints
- keys-to-console
- phone-home
- final-message
- power-state-change
system_info:
default_user:
name: centos
lock_passwd: true
gecos: Cloud User
groups: [wheel, adm, systemd-journal]
sudo: ["ALL=(ALL) NOPASSWD:ALL"]
shell: /bin/bash
distro: rhel
paths:
cloud_dir: /var/lib/cloud
templates_dir: /etc/cloud/templates
ssh_svcname: sshd
# vim:syntax=yamlI’ve found that the best way to test something in virtualization is through snapshots.
But why snapshot the running/active virtual machine and not the backup/clone virtual machine ?
# virsh list --all
 Id    Name                           State
----------------------------------------------------
 -     winxp                          running
 -     winxpclone                 shut off
Check the clone disk format:
# qemu-img info winxpclone.disk
image: winxpclone.disk
file format: raw
virtual size: 5.0G (5368709120 bytes)
disk size: 3.1G
And remember to convert the raw disk to qcow2 first:
# qemu-img convert -f raw winxpclone.disk -O qcow2 winxpclone.qcow2
And then edit your clone:
# virsh edit winxpclone
to use the qcow2 disk
and finally:
# virsh snapshot-create winxpclone
Domain snapshot 1341315833 created
List the snapshots:
# virsh snapshot-list winxpclone
 Name                 Creation Time             State
------------------------------------------------------------
 1341315833           2012-07-03 14:43:53 +0300 shutoff
I needed to clone a virtual win2003 machine to a nas storage.
My storage is a lvm partition.
A. Suspend the virtual machine:
# virsh suspend win2003
B. Clone the virtual machine:
# virt-clone -d -o win2003 -n win2003clone -f /nas/storage/win2003clone.raw
This command will change the name, UUID, mac address and of course storage source.
C. Resume the virtual machine:
# virsh resume win2003
Remember that you have to change the IP of the clone, so that will not conflict with the original.
Some extra tips:
If you need to change something before the clone procedure, dump the xml from the virtual machine:
- Dump xml
# virsh dumpxml win2003 > win2003clone.xml
- Edit xml
# vim win2003clone.xml
- Clone the virtual machine
# virt-clone -d --original-xml=/home/ebal/win2003.clone.xml -n win2003clone -f /nas/storage/win2003clone.raw --force
Dynamic allocation of a virtual hard disk to a virtual machine:
# lvcreate -L 80G -n vg01/data
# virsh attach-disk win2008 /dev/vg_telekvm/profiles vdb
You need to attach a usb device to a libvirt domain without rebooting the virtual machine.
Lets figure this together:
- Locate the usb device:
# lsusb -v

  idVendor           0x0781 SanDisk Corp.
  idProduct          0x5567 Cruzer Blade
- Build the below XML:
usb_device.xml
    <hostdev mode='subsystem' type='usb' managed='yes'>
      <source>
        <vendor id='0x0781'/>
        <product id='0x5567'/>
      </source>
    </hostdev>
- Attach device
# virsh attach-device VIRTUAL_MACHINE usb_device.xml
and if you want to de-attach:
- De-attache device
# virsh detach-device VIRTUAL_MACHINE usb_device.xml