In this blog post you will find my personal notes on how to setup a Kubernetes as a Service (KaaS). I will be using Terraform to create the infrastructure on Hetzner’s VMs, Rancher for KaaS and Helm to install the first application on Kubernetes.
Many thanks to dear friend: adamo for his help.
Terraform
Let’s build our infrastructure!
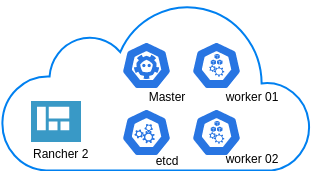
We are going to use terraform to build 5 VMs
- One (1) master
- One (1) etcd
- Two (2) workers
- One (1) for the Web dashboard
I will not go to much details about terraform, but to have a basic idea
Provider.tf
provider "hcloud" {
    token = var.hcloud_token
}
Hetzner.tf
data "template_file" "userdata" {
  template = "${file("user-data.yml")}"
  vars = {
    hostname = var.domain
    sshdport = var.ssh_port
  }
}

resource "hcloud_server" "node" {
  count       = 5
  name        = "rke-${count.index}"
  image       = "ubuntu-18.04"
  server_type = "cx11"
  user_data   = data.template_file.userdata.rendered
}
Output.tf
output "IPv4" {
  value = hcloud_server.node.*.ipv4_address
}
In my user-data (cloud-init) template, the most important lines are these
  - usermod -a -G docker deploy
  - ufw allow 6443/tcp
  - ufw allow 2379/tcp
  - ufw allow 2380/tcp
  - ufw allow 80/tcp
  - ufw allow 443/tcp
build infra
$ terraform init
$ terraform plan
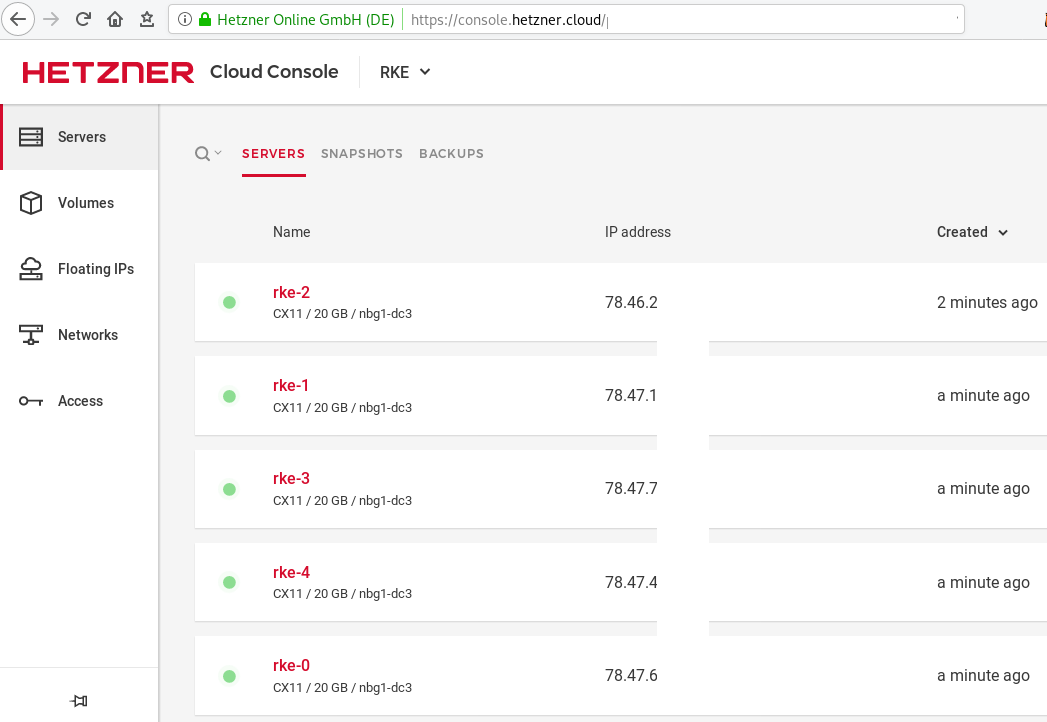
$ terraform applyoutput
IPv4 = [
  "78.47.6x.yyy",
  "78.47.1x.yyy",
  "78.46.2x.yyy",
  "78.47.7x.yyy",
  "78.47.4x.yyy",
]
In the end we will see something like this on hetzner cloud
Rancher Kubernetes Engine
Take a look here for more details about what is required and important on using rke: Requirements.
We are going to use the rke aka the Rancher Kubernetes Engine, an extremely simple, lightning fast Kubernetes installer that works everywhere.
download
Download the latest binary from github:
Release Release v1.0.0
$ curl -sLO https://github.com/rancher/rke/releases/download/v1.0.0/rke_linux-amd64
$ chmod +x rke_linux-amd64
$ sudo mv rke_linux-amd64 /usr/local/bin/rke
version
$ rke --version

rke version v1.0.0
rke config
We are ready to configure our Kubernetes Infrastructure using the first 4 VMs.
$ rke configmaster
[+] Cluster Level SSH Private Key Path [~/.ssh/id_rsa]:
[+] Number of Hosts [1]: 4
[+] SSH Address of host (1) [none]: 78.47.6x.yyy
[+] SSH Port of host (1) [22]:
[+] SSH Private Key Path of host (78.47.6x.yyy) [none]:
[-] You have entered empty SSH key path, trying fetch from SSH key parameter
[+] SSH Private Key of host (78.47.6x.yyy) [none]:
[-] You have entered empty SSH key, defaulting to cluster level SSH key: ~/.ssh/id_rsa
[+] SSH User of host (78.47.6x.yyy) [ubuntu]:
[+] Is host (78.47.6x.yyy) a Control Plane host (y/n)? [y]:
[+] Is host (78.47.6x.yyy) a Worker host (y/n)? [n]: n
[+] Is host (78.47.6x.yyy) an etcd host (y/n)? [n]: n
[+] Override Hostname of host (78.47.6x.yyy) [none]: rke-master
[+] Internal IP of host (78.47.6x.yyy) [none]:
[+] Docker socket path on host (78.47.6x.yyy) [/var/run/docker.sock]:
etcd
[+] SSH Address of host (2) [none]: 78.47.1x.yyy
[+] SSH Port of host (2) [22]:
[+] SSH Private Key Path of host (78.47.1x.yyy) [none]:
[-] You have entered empty SSH key path, trying fetch from SSH key parameter
[+] SSH Private Key of host (78.47.1x.yyy) [none]:
[-] You have entered empty SSH key, defaulting to cluster level SSH key: ~/.ssh/id_rsa
[+] SSH User of host (78.47.1x.yyy) [ubuntu]:
[+] Is host (78.47.1x.yyy) a Control Plane host (y/n)? [y]: n
[+] Is host (78.47.1x.yyy) a Worker host (y/n)? [n]: n
[+] Is host (78.47.1x.yyy) an etcd host (y/n)? [n]: y
[+] Override Hostname of host (78.47.1x.yyy) [none]: rke-etcd
[+] Internal IP of host (78.47.1x.yyy) [none]:
[+] Docker socket path on host (78.47.1x.yyy) [/var/run/docker.sock]:
workers
worker-01
[+] SSH Address of host (3) [none]: 78.46.2x.yyy
[+] SSH Port of host (3) [22]:
[+] SSH Private Key Path of host (78.46.2x.yyy) [none]:
[-] You have entered empty SSH key path, trying fetch from SSH key parameter
[+] SSH Private Key of host (78.46.2x.yyy) [none]:
[-] You have entered empty SSH key, defaulting to cluster level SSH key: ~/.ssh/id_rsa
[+] SSH User of host (78.46.2x.yyy) [ubuntu]:
[+] Is host (78.46.2x.yyy) a Control Plane host (y/n)? [y]: n
[+] Is host (78.46.2x.yyy) a Worker host (y/n)? [n]: y
[+] Is host (78.46.2x.yyy) an etcd host (y/n)? [n]: n
[+] Override Hostname of host (78.46.2x.yyy) [none]: rke-worker-01
[+] Internal IP of host (78.46.2x.yyy) [none]:
[+] Docker socket path on host (78.46.2x.yyy) [/var/run/docker.sock]:
worker-02
[+] SSH Address of host (4) [none]: 78.47.4x.yyy
[+] SSH Port of host (4) [22]:
[+] SSH Private Key Path of host (78.47.4x.yyy) [none]:
[-] You have entered empty SSH key path, trying fetch from SSH key parameter
[+] SSH Private Key of host (78.47.4x.yyy) [none]:
[-] You have entered empty SSH key, defaulting to cluster level SSH key: ~/.ssh/id_rsa
[+] SSH User of host (78.47.4x.yyy) [ubuntu]:
[+] Is host (78.47.4x.yyy) a Control Plane host (y/n)? [y]: n
[+] Is host (78.47.4x.yyy) a Worker host (y/n)? [n]: y
[+] Is host (78.47.4x.yyy) an etcd host (y/n)? [n]: n
[+] Override Hostname of host (78.47.4x.yyy) [none]: rke-worker-02
[+] Internal IP of host (78.47.4x.yyy) [none]:
[+] Docker socket path on host (78.47.4x.yyy) [/var/run/docker.sock]:
Network Plugin Type
[+] Network Plugin Type (flannel, calico, weave, canal) [canal]: rke_config
[+] Authentication Strategy [x509]:
[+] Authorization Mode (rbac, none) [rbac]: none
[+] Kubernetes Docker image [rancher/hyperkube:v1.16.3-rancher1]:
[+] Cluster domain [cluster.local]:
[+] Service Cluster IP Range [10.43.0.0/16]:
[+] Enable PodSecurityPolicy [n]:
[+] Cluster Network CIDR [10.42.0.0/16]:
[+] Cluster DNS Service IP [10.43.0.10]:
[+] Add addon manifest URLs or YAML files [no]:
cluster.yml
the rke config will produce a cluster yaml file, for us to review or edit in case of misconfigure
$ ls -l cluster.yml
-rw-r----- 1 ebal ebal 4720 Dec  7 20:57 cluster.yml
rke up
We are ready to setup our KaaS by running:
$ rke upINFO[0000] Running RKE version: v1.0.0
INFO[0000] Initiating Kubernetes cluster
INFO[0000] [dialer] Setup tunnel for host [78.47.6x.yyy]
INFO[0000] [dialer] Setup tunnel for host [78.47.1x.yyy]
INFO[0000] [dialer] Setup tunnel for host [78.46.2x.yyy]
INFO[0000] [dialer] Setup tunnel for host [78.47.7x.yyy]
...
INFO[0329] [dns] DNS provider coredns deployed successfully
INFO[0329] [addons] Setting up Metrics Server
INFO[0329] [addons] Saving ConfigMap for addon rke-metrics-addon to Kubernetes
INFO[0329] [addons] Successfully saved ConfigMap for addon rke-metrics-addon to Kubernetes
INFO[0329] [addons] Executing deploy job rke-metrics-addon
INFO[0335] [addons] Metrics Server deployed successfully
INFO[0335] [ingress] Setting up nginx ingress controller
INFO[0335] [addons] Saving ConfigMap for addon rke-ingress-controller to Kubernetes
INFO[0335] [addons] Successfully saved ConfigMap for addon rke-ingress-controller to Kubernetes
INFO[0335] [addons] Executing deploy job rke-ingress-controller
INFO[0341] [ingress] ingress controller nginx deployed successfully
INFO[0341] [addons] Setting up user addons
INFO[0341] [addons] no user addons defined
INFO[0341] Finished building Kubernetes cluster successfully Kubernetes
The output of rke will produce a local kube config cluster yaml file for us to connect to kubernetes cluster.
kube_config_cluster.ymlLet’s test our k8s !
$ kubectl --kubeconfig=kube_config_cluster.yml get nodes -A
NAME           STATUS   ROLES          AGE    VERSION
rke-etcd       Ready    etcd           2m5s   v1.16.3
rke-master     Ready    controlplane   2m6s   v1.16.3
rke-worker-1   Ready    worker         2m4s   v1.16.3
rke-worker-2   Ready    worker         2m2s   v1.16.3

$ kubectl --kubeconfig=kube_config_cluster.yml get pods -A
NAMESPACE       NAME                                      READY   STATUS      RESTARTS   AGE
ingress-nginx   default-http-backend-67cf578fc4-nlbb6     1/1     Running     0          96s
ingress-nginx   nginx-ingress-controller-7scft            1/1     Running     0          96s
ingress-nginx   nginx-ingress-controller-8bmmm            1/1     Running     0          96s
kube-system     canal-4x58t                               2/2     Running     0          114s
kube-system     canal-fbr2w                               2/2     Running     0          114s
kube-system     canal-lhz4x                               2/2     Running     1          114s
kube-system     canal-sffwm                               2/2     Running     0          114s
kube-system     coredns-57dc77df8f-9h648                  1/1     Running     0          24s
kube-system     coredns-57dc77df8f-pmtvk                  1/1     Running     0          107s
kube-system     coredns-autoscaler-7774bdbd85-qhs9g       1/1     Running     0          106s
kube-system     metrics-server-64f6dffb84-txglk           1/1     Running     0          101s
kube-system     rke-coredns-addon-deploy-job-9dhlx        0/1     Completed   0          110s
kube-system     rke-ingress-controller-deploy-job-jq679   0/1     Completed   0          98s
kube-system     rke-metrics-addon-deploy-job-nrpjm        0/1     Completed   0          104s
kube-system     rke-network-plugin-deploy-job-x7rt9       0/1     Completed   0          117s

$ kubectl --kubeconfig=kube_config_cluster.yml get componentstatus
NAME                 AGE
controller-manager   <unknown>
scheduler            <unknown>
etcd-0               <unknown>             <unknown>

$ kubectl --kubeconfig=kube_config_cluster.yml get deployments -A
NAMESPACE       NAME                   READY   UP-TO-DATE   AVAILABLE   AGE
ingress-nginx   default-http-backend   1/1     1            1           2m58s
kube-system     coredns                2/2     2            2           3m9s
kube-system     coredns-autoscaler     1/1     1            1           3m8s
kube-system     metrics-server         1/1     1            1           3m4s

$ kubectl --kubeconfig=kube_config_cluster.yml get ns
NAME              STATUS   AGE
default           Active   4m28s
ingress-nginx     Active   3m24s
kube-node-lease   Active   4m29s
kube-public       Active   4m29s
kube-system       Active   4m29s
Rancer2
Now login to the 5th VM we have in Hetzner:
ssh "78.47.4x.yyy" -l ubuntu -p zzzzand install the stable version of Rancher2
$ docker run -d
    --restart=unless-stopped
    -p 80:80 -p 443:443
    --name rancher2
    -v /opt/rancher:/var/lib/rancher
    rancher/rancher:stable
    --acme-domain k8s.ipname.me
Caveat: I have create a domain and assigned to this hostname the IP of the latest VMs!
Now I can use letsencrypt with rancher via acme-domain.
verify
$ docker images -a
REPOSITORY          TAG                 IMAGE ID            CREATED             SIZE
rancher/rancher     stable              5ebba94410d8        10 days ago         654MB

$ docker ps -a -a
CONTAINER ID        IMAGE                    COMMAND                  CREATED             STATUS              PORTS                                      NAMES
8f798fb8184c        rancher/rancher:stable   "entrypoint.sh --acm…"   17 seconds ago      Up 15 seconds       0.0.0.0:80->80/tcp, 0.0.0.0:443->443/tcp   rancher2
Access
Before we continue, we need to give access to these VMs so they can communicate with each other. In cloud you can create a VPC with the correct security groups. But with VMs the easiest way is to do something like this:
sudo ufw allow from "78.47.6x.yyy",
sudo ufw allow from "78.47.1x.yyy",
sudo ufw allow from "78.46.2x.yyy",
sudo ufw allow from "78.47.7x.yyy",
sudo ufw allow from "78.47.4x.yyy",
Dashboard
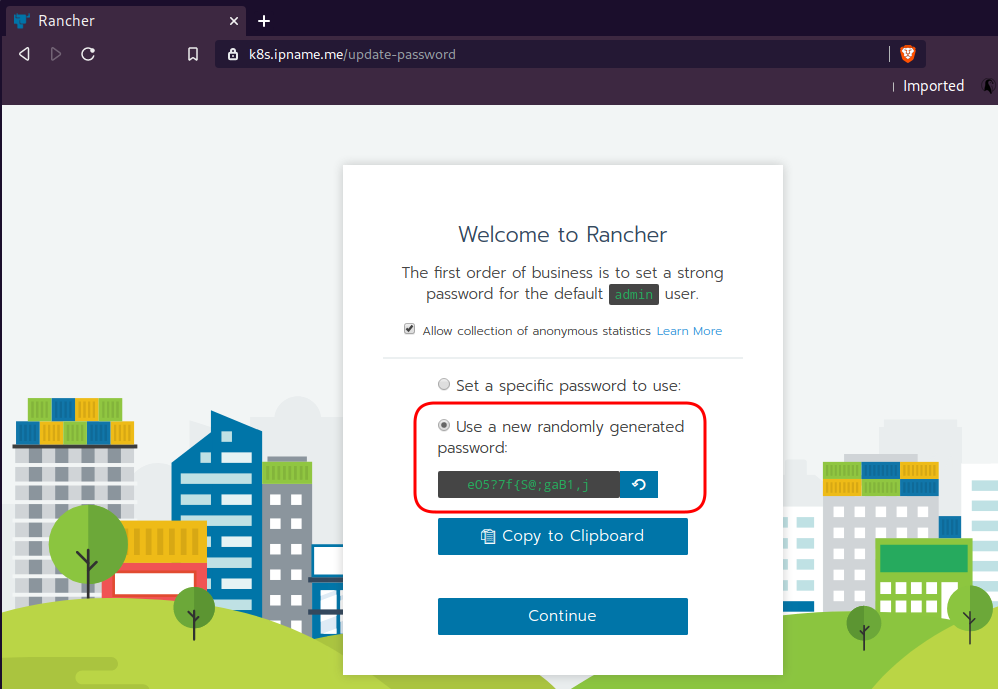
Open your browser and type the IP of your rancher2 VM:
https://78.47.4x.yyyor (in my case):
https://k8s.ipname.meand follow the below instructions


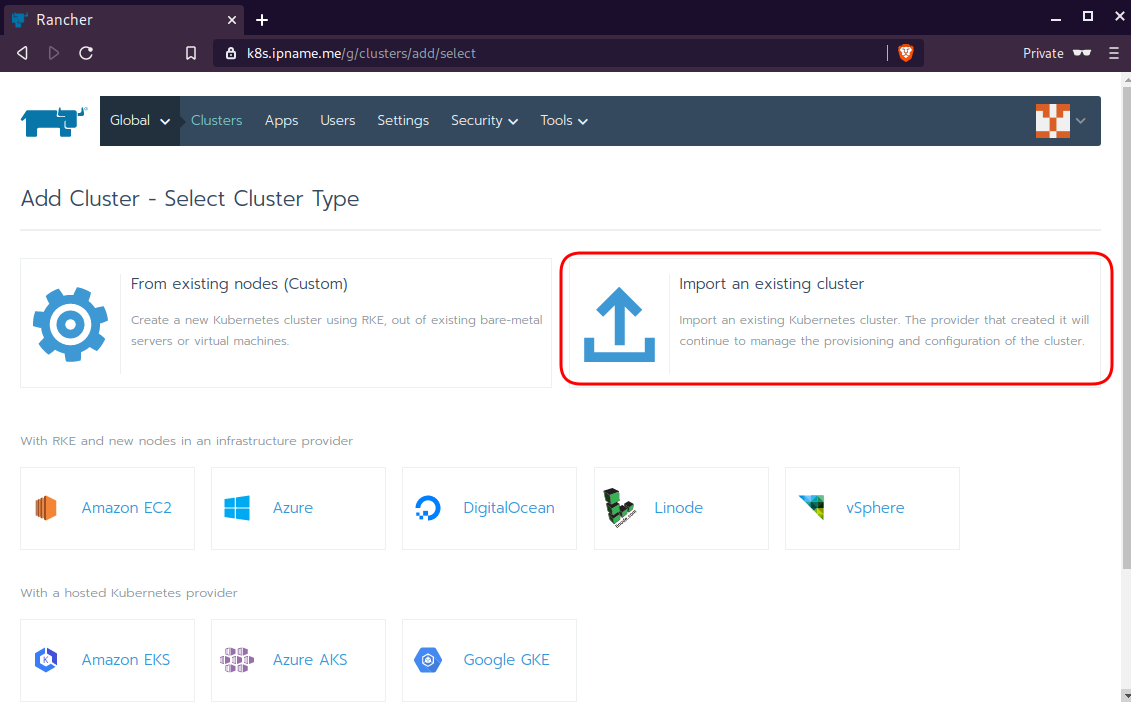
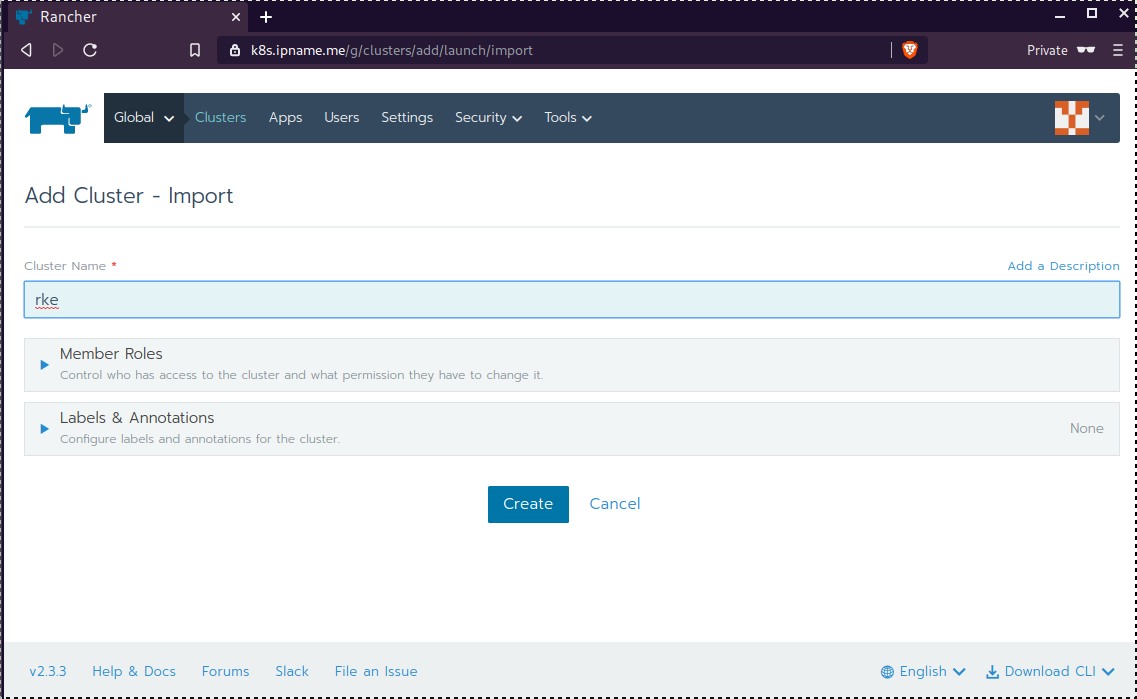
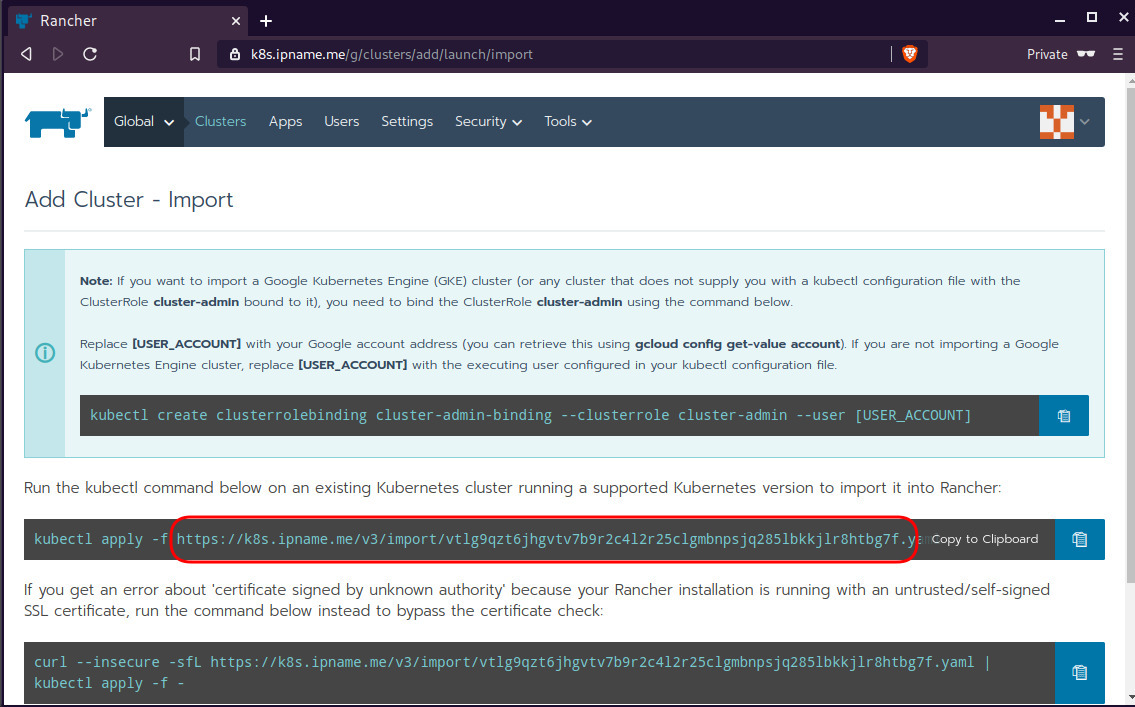
Connect cluster with Rancher2
Download the racnher2 yaml file to your local directory:
$ curl -sLo rancher2.yaml https://k8s.ipname.me/v3/import/nk6p4mg9tzggqscrhh8bzbqdt4447fsffwfm8lms5ghr8r498lngtp.yamlAnd apply this yaml file to your kubernetes cluster:
$ kubectl --kubeconfig=kube_config_cluster.yml apply -f rancher2.yaml

clusterrole.rbac.authorization.k8s.io/proxy-clusterrole-kubeapiserver unchanged
clusterrolebinding.rbac.authorization.k8s.io/proxy-role-binding-kubernetes-master unchanged
namespace/cattle-system unchanged
serviceaccount/cattle unchanged
clusterrolebinding.rbac.authorization.k8s.io/cattle-admin-binding unchanged
secret/cattle-credentials-2704c5f created
clusterrole.rbac.authorization.k8s.io/cattle-admin configured
deployment.apps/cattle-cluster-agent configured
daemonset.apps/cattle-node-agent configured
Web Gui

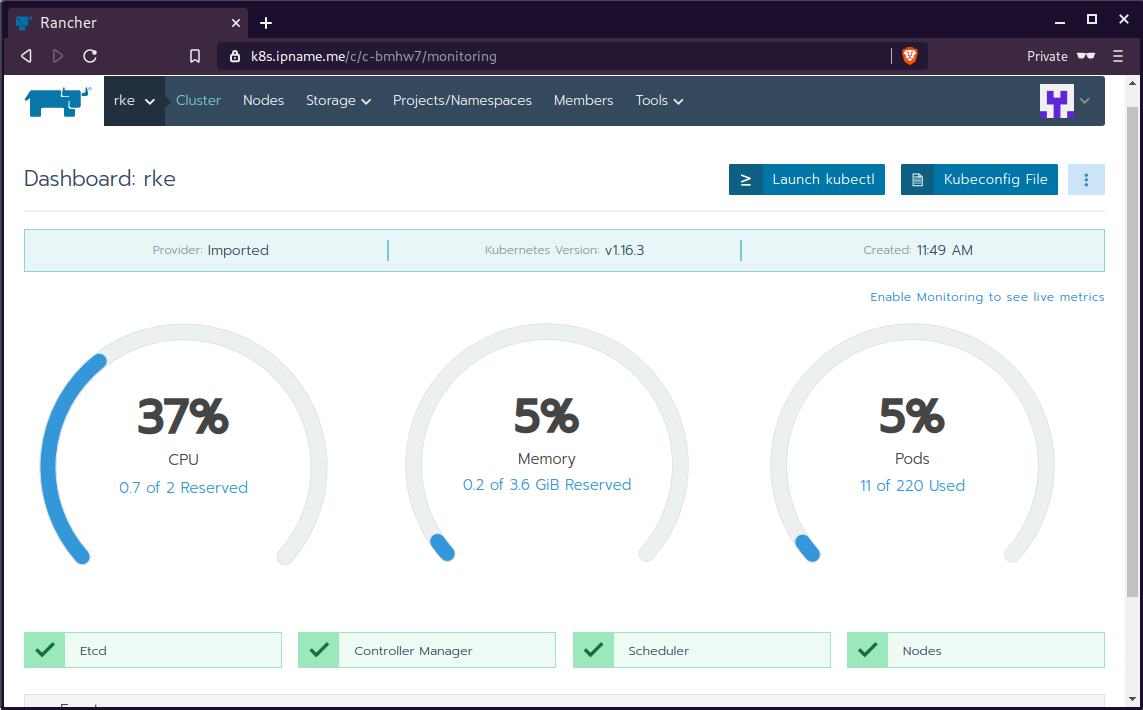
kubectl config
We can now use the Rancher kubectl config by downloading from here:
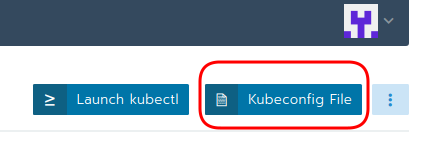
In this post, it is rancher2.config.yml
helm
Final step is to use helm to install an application to our kubernetes cluster
download and install
$ curl -sfL https://get.helm.sh/helm-v3.0.1-linux-amd64.tar.gz | tar -zxf -

$ chmod +x linux-amd64/helm
$ sudo mv linux-amd64/helm /usr/local/bin/
Add Repo
$ helm repo add stable https://kubernetes-charts.storage.googleapis.com/
"stable" has been added to your repositories

$ helm repo update
Hang tight while we grab the latest from your chart repositories...
...
Successfully got an update from the "stable" chart repository
Update Complete. ⎈ Happy Helming!⎈
weave-scope
Install weave scope to rancher:
$ helm --kubeconfig rancher2.config.yml install stable/weave-scope --generate-nameNAME: weave-scope-1575800948
LAST DEPLOYED: Sun Dec 8 12:29:12 2019
NAMESPACE: default
STATUS: deployed
REVISION: 1
NOTES:
You should now be able to access the Scope frontend in your web browser, by
using kubectl port-forward:
kubectl -n default port-forward $(kubectl -n default get endpoints
weave-scope-1575800948-weave-scope -o jsonpath='{.subsets[0].addresses[0].targetRef.name}') 8080:4040
then browsing to http://localhost:8080/.
For more details on using Weave Scope, see the Weave Scope documentation:
https://www.weave.works/docs/scope/latest/introducing/Proxy
Last, we are going to use kubectl to create a forwarder
$ kubectl --kubeconfig=rancher2.config.yml -n default port-forward $(kubectl --kubeconfig=rancher2.config.yml -n default get endpoints weave-scope-1575800948-weave-scope -o jsonpath='{.subsets[0].addresses[0].targetRef.name}') 8080:4040
Forwarding from 127.0.0.1:8080 -> 4040
Forwarding from [::1]:8080 -> 4040
Open your browser in this url:
http://localhost:8080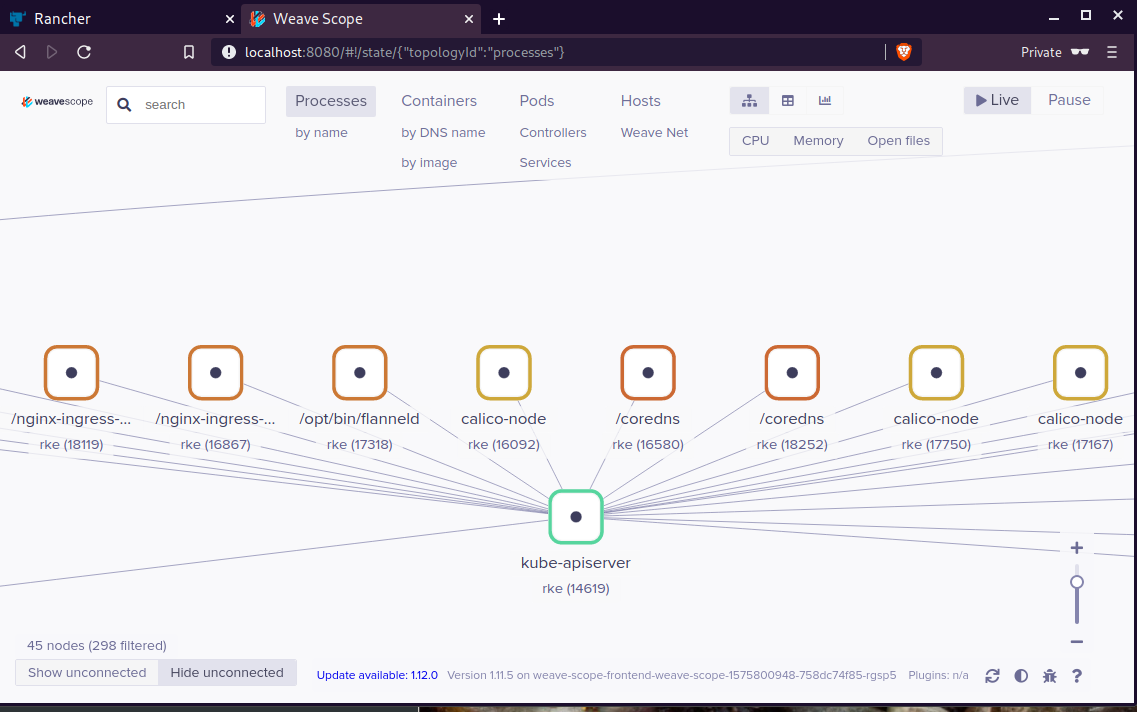
That’s it !
Using Terraform by HashiCorp and cloud-init on Hetzner cloud provider.
Nowadays with the help of modern tools, we use our infrastructure as code. This approach is very useful because we can have Immutable design with our infra by declaring the state would like our infra to be. This also provide us with flexibility and a more generic way on how to handle our infra as lego bricks, especially on scaling.
UPDATE: 2019.01.22
Hetzner
We need to create an Access API Token within a new project under the console of hetzner cloud.
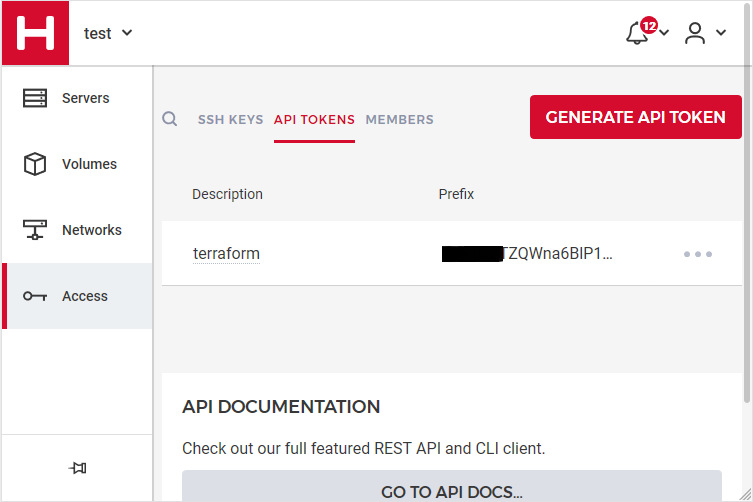
Copy this token and with that in place we can continue with terraform.
For the purposes of this article, I am going to use as the API token: 01234567890
Install Terraform
the latest terraform version at the time of writing this blog post is: v.11.11
$ curl -sL https://releases.hashicorp.com/terraform/0.11.11/terraform_0.11.11_linux_amd64.zip |
   bsdtar -xf- && chmod +x terraform
$ sudo mv terraform /usr/local/bin/
and verify it
$ terraform versionTerraform v0.11.11
Terraform Provider for Hetzner Cloud
To use the hetzner cloud via terraform, we need the terraform-provider-hcloud plugin.
hcloud, is part of terraform providers repository. So the first time of initialize our project, terraform will download this plugin locally.
Initializing provider plugins...
- Checking for available provider plugins on https://releases.hashicorp.com...
- Downloading plugin for provider "hcloud" (1.7.0)...
...
* provider.hcloud: version = "~> 1.7"
Compile hcloud
If you like, you can always build hcloud from the source code.
There are notes on how to build the plugin here Terraform Hetzner Cloud provider.
GitLab CI
or you can even download the artifact from my gitlab-ci repo.
Plugin directory
You will find the terraform hcloud plugin under your current directory:
./.terraform/plugins/linux_amd64/terraform-provider-hcloud_v1.7.0_x4
I prefer to copy the tf plugins centralized under my home directory:
$ mkdir -pv ~/.terraform/plugins/linux_amd64/
$ mv ./.terraform/plugins/linux_amd64/terraform-provider-hcloud_v1.7.0_x4 ~/.terraform.d/plugins/linux_amd64/terraform-provider-hcloud
or if you choose the artifact from gitlab:
$ curl -sL -o ~/.terraform/plugins/linux_amd64/terraform-provider-hcloud https://gitlab.com/ebal/terraform-provider-hcloud-ci/-/jobs/artifacts/master/raw/bin/terraform-provider-hcloud?job=run-buildThat said, when working with multiple terraform projects you may be in a position that you need different versions of the same tf-plugin. In that case it is better to have them under your current working directory/project instead of your home directory. Perhaps one project needs v1.2.3 and another v4.5.6 of the same tf-plugin.
Hetzner Cloud API
Here is a few examples on how to use the Hetzner Cloud API:
$ export -p API_TOKEN="01234567890"
$ curl -sH "Authorization: Bearer $API_TOKEN" https://api.hetzner.cloud/v1/datacenters | jq -r .datacenters[].name
fsn1-dc8
nbg1-dc3
hel1-dc2
fsn1-dc14
$ curl -sH "Authorization: Bearer $API_TOKEN" https://api.hetzner.cloud/v1/locations | jq -r .locations[].name
fsn1
nbg1
hel1$ curl -sH "Authorization: Bearer $API_TOKEN" https://api.hetzner.cloud/v1/images | jq -r .images[].name
ubuntu-16.04
debian-9
centos-7
fedora-27
ubuntu-18.04
fedora-28
hetzner.tf
At this point, we are ready to write our terraform file.
It can be as simple as this (CentOS 7):
# Set the variable value in *.tfvars file
# or using -var="hcloud_token=..." CLI option
variable "hcloud_token" {}

# Configure the Hetzner Cloud Provider
provider "hcloud" {
  token = "${var.hcloud_token}"
}

# Create a new server running centos
resource "hcloud_server" "node1" {
  name = "node1"
  image = "centos-7"
  server_type = "cx11"
}
Project_Ebal
or a more complex config: Ubuntu 18.04 LTS
# Project_Ebal
variable "hcloud_token" {}

# Configure the Hetzner Cloud Provider
provider "hcloud" {
  token = "${var.hcloud_token}"
}

# Create a new server running centos
resource "hcloud_server" "Project_Ebal" {
  name = "ebal_project"
  image = "ubuntu-18.04"
  server_type = "cx11"
  location = "nbg1"
}
Repository Structure
Although in this blog post we have a small and simple example of using hetzner cloud with terraform, on larger projects is usually best to have separated terraform files for variables, code and output. For more info, you can take a look here: VCS Repository Structure - Workspaces
  ├── variables.tf
  ├── main.tf
  ├── outputs.tf
Cloud-init
To use cloud-init with hetzner is very simple.
We just need to add this declaration user_data = "${file("user-data.yml")}" to terraform file.
So our previous tf is now this:
# Project_Ebal
variable "hcloud_token" {}

# Configure the Hetzner Cloud Provider
provider "hcloud" {
  token = "${var.hcloud_token}"
}

# Create a new server running centos
resource "hcloud_server" "Project_Ebal" {
  name = "ebal_project"
  image = "ubuntu-18.04"
  server_type = "cx11"
  location = "nbg1"
  user_data = "${file("user-data.yml")}"
}
to get the IP_Address of the virtual machine, I would also like to have an output declaration:
output "ipv4_address" {
  value = "${hcloud_server.ebal_project.ipv4_address}"
}
Clout-init
You will find more notes on cloud-init on a previous blog post: Cloud-init with CentOS 7.
below is an example of user-data.yml
#cloud-config

disable_root: true
ssh_pwauth: no

users:
  - name: ubuntu
    ssh_import_id:
     - gh:ebal
    shell: /bin/bash
    sudo: ALL=(ALL) NOPASSWD:ALL

# Set TimeZone
timezone: Europe/Athens

# Install packages
packages:
  - mlocate
  - vim
  - figlet

# Update/Upgrade & Reboot if necessary
package_update: true
package_upgrade: true
package_reboot_if_required: true

# Remove cloud-init
runcmd:
  - figlet Project_Ebal > /etc/motd
  - updatedb
Terraform
First thing with terraform is to initialize our environment.
Init
$ terraform init
Initializing provider plugins...

Terraform has been successfully initialized!

You may now begin working with Terraform. Try running "terraform plan" to see
any changes that are required for your infrastructure. All Terraform commands
should now work.

If you ever set or change modules or backend configuration for Terraform,
rerun this command to reinitialize your working directory. If you forget, other
commands will detect it and remind you to do so if necessary.
Plan
Of course it is not necessary to plan and then plan with out.
You can skip this step, here exist only for documentation purposes.
$ terraform plan
Refreshing Terraform state in-memory prior to plan...
The refreshed state will be used to calculate this plan, but will not be
persisted to local or remote state storage.

------------------------------------------------------------------------

An execution plan has been generated and is shown below.
Resource actions are indicated with the following symbols:
  + create

Terraform will perform the following actions:

  + hcloud_server.ebal_project
      id:            <computed>
      backup_window: <computed>
      backups:       "false"
      datacenter:    <computed>
      image:         "ubuntu-18.04"
      ipv4_address:  <computed>
      ipv6_address:  <computed>
      ipv6_network:  <computed>
      keep_disk:     "false"
      location:      "nbg1"
      name:          "ebal_project"
      server_type:   "cx11"
      status:        <computed>
      user_data:     "sk6134s+ys+wVdGITc+zWhbONYw="

Plan: 1 to add, 0 to change, 0 to destroy.

------------------------------------------------------------------------

Note: You didn't specify an "-out" parameter to save this plan, so Terraform
can't guarantee that exactly these actions will be performed if
"terraform apply" is subsequently run.
Out
$ terraform plan -out terraform.tfplan
Refreshing Terraform state in-memory prior to plan...
The refreshed state will be used to calculate this plan, but will not be
persisted to local or remote state storage.

------------------------------------------------------------------------

An execution plan has been generated and is shown below.
Resource actions are indicated with the following symbols:
  + create

Terraform will perform the following actions:

  + hcloud_server.ebal_project
      id:            <computed>
      backup_window: <computed>
      backups:       "false"
      datacenter:    <computed>
      image:         "ubuntu-18.04"
      ipv4_address:  <computed>
      ipv6_address:  <computed>
      ipv6_network:  <computed>
      keep_disk:     "false"
      location:      "nbg1"
      name:          "ebal_project"
      server_type:   "cx11"
      status:        <computed>
      user_data:     "sk6134s+ys+wVdGITc+zWhbONYw="

Plan: 1 to add, 0 to change, 0 to destroy.

------------------------------------------------------------------------

This plan was saved to: terraform.tfplan

To perform exactly these actions, run the following command to apply:
    terraform apply "terraform.tfplan"
Apply
$ terraform apply "terraform.tfplan"
hcloud_server.ebal_project: Creating...
  backup_window: "" => "<computed>"
  backups:       "" => "false"
  datacenter:    "" => "<computed>"
  image:         "" => "ubuntu-18.04"
  ipv4_address:  "" => "<computed>"
  ipv6_address:  "" => "<computed>"
  ipv6_network:  "" => "<computed>"
  keep_disk:     "" => "false"
  location:      "" => "nbg1"
  name:          "" => "ebal_project"
  server_type:   "" => "cx11"
  status:        "" => "<computed>"
  user_data:     "" => "sk6134s+ys+wVdGITc+zWhbONYw="
hcloud_server.ebal_project: Still creating... (10s elapsed)
hcloud_server.ebal_project: Still creating... (20s elapsed)
hcloud_server.ebal_project: Creation complete after 23s (ID: 1676988)

Apply complete! Resources: 1 added, 0 changed, 0 destroyed.

Outputs:

ipv4_address = 1.2.3.4
SSH and verify cloud-init
$ ssh 1.2.3.4 -l ubuntu
Welcome to Ubuntu 18.04.1 LTS (GNU/Linux 4.15.0-43-generic x86_64)

 * Documentation:  https://help.ubuntu.com
 * Management:     https://landscape.canonical.com
 * Support:        https://ubuntu.com/advantage

  System information as of Fri Jan 18 12:17:14 EET 2019

  System load:  0.41              Processes:           89
  Usage of /:   9.7% of 18.72GB   Users logged in:     0
  Memory usage: 8%                IP address for eth0: 1.2.3.4
  Swap usage:   0%

0 packages can be updated.
0 updates are security updates.

Destroy
Be Careful without providing a specific terraform out plan, terraform will destroy every tfplan within your working directory/project. So it is always a good practice to explicit destroy a specify resource/tfplan.
$ terraform destroy should better be:
$ terraform destroy -out terraform.tfplan
hcloud_server.ebal_project: Refreshing state... (ID: 1676988)

An execution plan has been generated and is shown below.
Resource actions are indicated with the following symbols:
  - destroy

Terraform will perform the following actions:

  - hcloud_server.ebal_project

Plan: 0 to add, 0 to change, 1 to destroy.

Do you really want to destroy all resources?
  Terraform will destroy all your managed infrastructure, as shown above.
  There is no undo. Only 'yes' will be accepted to confirm.

  Enter a value: yes

hcloud_server.ebal_project: Destroying... (ID: 1676988)
hcloud_server.ebal_project: Destruction complete after 1s

Destroy complete! Resources: 1 destroyed.
That’s it !