a blog post series to my homelab

check here for Introduction to Traefik - Part Two
Part Three
In this blog post series, I will connect several docker containers and a virtual machine behind the Traefik reverse proxy on my homelab, and set up Let’s Encrypt for TLS.
In this article, I will try to connect a virtual machine to the Traefik reverse proxy. In Linux, Docker containers and virtual machines (VMs) run on different networks due to the way their networking is set up. To enable communication between Docker containers and VMs, we need to configure somekind of network bridging, port forwarding, or use a common network interface that allows them to communicate with each other. To simplify the setup, I will try to put Traefik docker container to a common network with the virtual machine.
Disclaimer: This homelab is intended for testing and learning purposes, as are the services we’ll explore. Make sure it fits your needs; I’m not suggesting you copy/paste everything here as-is. In the end, I may decide to delete this homelab and create a new one! But for now, let’s enjoy this journey together. Thank you!
I’ve also made a short video to accompany this blog post:

Virtual Machine
I use Qemu/KVM (kernel virtual machine) in my home lab. I also use terraform with libvirtd to automate my entire setup. That said, this post is not about that !
For the purpose of this article, I created an ubuntu 24.04 LTS running transmission service. It’s IP is: 192.168.122.79 and listens to TCP Port: 9091. Transmission also has configured with a Basic Auth authentication mechanism which username and password are the defaults: transmission:transmission.
Setup diagram
something similar to the below scheme
                       ┌────┐
                       │    │
                       │    │   192.168.122.x:9091
                       │    │
    ┌────┐             │    │        ┌───────┐
    │    │             │    │        │       │
    │    │  ─────────► │    ├───────►│       │
  ┌─└────┘─┐           │    │        │       │
  └────────┘           │    │        └───────┘
  192.168.1.3          │    │            VM
                       │    │
                       │    │        ┌──┐┌──┐
                       │    ├───────►│  ││  │whoami
                       └────┘        └──┘└──┘   172.19.0.x
                                     ┌──┐┌──┐
                       Traefik       │  ││  │
                                     └──┘└──┘
                                      docker
                                     containers
Traefik Network Mode
By default the network mode in docker compose is bridge mode which isolates the docker containers from the host. In the bridge mode our docker containers can communicate with each other directly.
But we need to either bridge our VM network (192.168.122.x/24) to the 172.19.0.x/24 network, or—what seems easier to me—change Traefik’s network mode from bridge to host.
In docker compose yaml file, in traefik service we need to make two changes:
first add the host network mode:
    # Very important in order to access the VM
    network_mode: host
and by using host we can now remove any port declaration
remove:
    ports:
      # The Web UI (enabled by --api.insecure=true)
      - 8080:8080
      # The HTTP port
      - 80:80
so our docker-compose.yml now looks like:
---
services:
  traefik:
    image: traefik:v3.3
    container_name: traefik
    hostname: traefik
    env_file:
      - path: ./.env
        required: true
    restart: unless-stopped
    volumes:
      - ./traefik:/etc/traefik
      - /var/run/docker.sock:/var/run/docker.sock:ro
    # Add health check
    healthcheck:
      test: curl -s --fail http://127.0.0.1:8080/ping
      interval: 30s
      retries: 3
      timeout: 10s
      start_period: 10s
    # Very important in order to access the VM
    network_mode: host

  # A container that exposes an API to show its IP address
  whoami:
    image: traefik/whoami
    container_name: whoami
    hostname: whoami
    depends_on:
      - traefik
    labels:
        - "traefik.enable=true"                                       # To enable whoami to Traefik
        - "traefik.http.routers.whoami.rule=Host(`whoami.localhost`)" # Declare the host rule for this service
        - "traefik.http.routers.whoami.entrypoints=web"               # Declare the EntryPoint
Start services:
docker compose up -dTest whoami
let us test now if whoami service works
curl -H Host:whoami.localhost http://127.0.0.1output:
Hostname: whoami
IP: 127.0.0.1
IP: ::1
IP: 172.19.0.2
RemoteAddr: 172.19.0.1:43968
GET / HTTP/1.1
Host: whoami.localhost
User-Agent: curl/8.12.1
Accept: */*
Accept-Encoding: gzip
X-Forwarded-For: 127.0.0.1
X-Forwarded-Host: whoami.localhost
X-Forwarded-Port: 80
X-Forwarded-Proto: http
X-Forwarded-Server: traefik
X-Real-Ip: 127.0.0.1
okay, seems it works are before.
Transmission
as mentioned above, our transmission application runs on the virtual machine. It is protected by a Basic Authentication setup and listens on a TCP port.
Let’s test the connection:
curl 192.168.122.79:9091result is:
<h1>401: Unauthorized</h1>To add Basic Auth to curl is simple:
curl -u transmission:transmission 192.168.122.79:9091now the output is:
<h1>301: Moved Permanently</h1>we can add -v to see more details:
curl -v -u transmission:transmission 192.168.122.79:9091full output:
*   Trying 192.168.122.79:9091...
* Connected to 192.168.122.79 (192.168.122.79) port 9091
* using HTTP/1.x
* Server auth using Basic with user 'transmission'
> GET / HTTP/1.1
> Host: 192.168.122.79:9091
> Authorization: Basic dHJhbnNtaXNzaW9uOnRyYW5zbWlzc2lvbg==
> User-Agent: curl/8.12.1
> Accept: */*
>
* Request completely sent off
< HTTP/1.1 301 Moved Permanently
< Server: Transmission
< Access-Control-Allow-Origin: *
< Location: /transmission/web/
< Date: Thu, 27 Feb 2025 15:47:02 GMT
< Content-Length: 31
< Content-Type: text/html; charset=ISO-8859-1
<
* Connection #0 to host 192.168.122.79 left intact
<h1>301: Moved Permanently</h1>
The Location section is interesting: Location: /transmission/web/
Authorization header
by looking very careful the above output, we see that curl uses the Authorization header for Basic Auth.
This is interesting and we can use this.
Let’s try the command:
curl -H "Authorization: Basic dHJhbnNtaXNzaW9uOnRyYW5zbWlzc2lvbg==" http://192.168.122.79:9091/output:
<h1>301: Moved Permanently</h1>okay !
So, another way to access transmission is via Authorization header. Curl sends the credentials through base64 encoding, which can be reproduced by
echo -n "transmission:transmission" | base64and we verify the output:
dHJhbnNtaXNzaW9uOnRyYW5zbWlzc2lvbg==Traefik file provider
For the purpose of this lab, we want to access the application on the VM from localhost without providing any credentials, with Traefik handling everything.
                                    ┌─────────┐
http://localhost/transmission/ ---> | Traefik | --> VM (IP:PORT + Basic Auth)/transmision/
                                    └─────────┘
To do that, we need to introduce a PathPrefix Rule to Traefik so it redirects every request for /transmission to the VM. And what a better place to introduce the file provider on our static Traefik configuration
    # Enable file provider
    file:
        directory: /etc/traefik/dynamic/
        watch: true
under our docker provider.
so the entire traefik/traefik.yml should look like:
# The /ping health-check URL
ping: {

}

# API and dashboard configuration
api:
    insecure: true

# Debug log
log:
    filePath: /etc/traefik/traefik.log
    level: DEBUG

# Enable EntryPoints
entryPoints:
    web:
        address: ":80"
        reusePort: true

# Providers
providers:
    # Enable docker provider
    docker:
        exposedByDefault: false

    # Enable file provider
    file:
        directory: /etc/traefik/dynamic/
        watch: true
Dynamic Directory
I am sure you have already noticed that we also have introduced a new directory under our Traefik folder and instructed Traefik to watch it. This is extremely useful because Traefik will automatically reload any configuration in that folder without the need to restart (stop/start or down/up) the Traefik service.
As this change is on static configuration, we need to stop/start the services:
docker compose downCreate the dynamic directory:
mkdir -pv ./traefik/dynamic/

ls -la ./traefik/dynamic/
and
docker compose up -dTraefik Design
To help you understand how traefik works,
                    HTTP        HTTP

┌───────────┐      ┌──────┐   ┌──────────┐   ┌───────┐
│           │      │      │   │          │   │       │
│EntryPoints│ ───► │Routes│──►│Middleware│──►│Service│
│           │      │      │   │          │   │       │
└───────────┘      └──────┘   └──────────┘   └───────┘
We have alredy explained EntryPoints on our previous article, so we are going to focus on routers, middlewares and services.
Traefik Services
To avoid any complicated explanation, the Traefik Service is the final destination of an HTTP request.
For our example, should look like the below config. Please be aware, the <service name> is a placeholder for later.
http:
  services:
    <service-name>:
      loadBalancer:
        servers:
          - url: 'http://192.168.122.79:9091'
Traefik Middlewares
As we already mentioned above, we need to send login credentials to transmission. Be aware <middleware name> is a place holder for later.
http:
  middlewares:
    <middlewar-name>:
      headers:
        customRequestHeaders:
          Authorization: "Basic dHJhbnNtaXNzaW9uOnRyYW5zbWlzc2lvbg=="
Traefik Routes
Traefik HTTP Routes are part of Traefik’s dynamic configuration and define how HTTP requests are handled and routed to the correct services.
Which means the routers is the component that connects everything (EntryPoint, Middleware, and Service) together. This is also where we add our PathPrefix rule for the Transmission location.
Be aware <router|service|middleware name> is a place holder for later.
eg.
http:
  routers:
    <router-name>>:
      entryPoints: web
      service: <service-name>
      rule: PathPrefix(`/transmission`)
      middlewares:
        - <middleware-name>>
Traefik dynamic configuration
We are ready to pull things together.
Create a file named transmission yaml under the dynamic configuration directory:
./traefik/dynamic/transmission.yml
http:

  middlewares:
    middleware-transmission:
      headers:
        customRequestHeaders:
          Authorization: "Basic dHJhbnNtaXNzaW9uOnRyYW5zbWlzc2lvbg=="

  routers:
    router-transmission:
      entryPoints: web
      service: service-transmission
      rule: PathPrefix(`/transmission`)
      middlewares:
        - middleware-transmission

  services:
    service-transmission:
      loadBalancer:
        servers:
          - url: 'http://192.168.122.79:9091'
NO need to restart our services with dynamic configuration!
Test Traefik new transmission route
from command line
curl localhost/transmission/output:
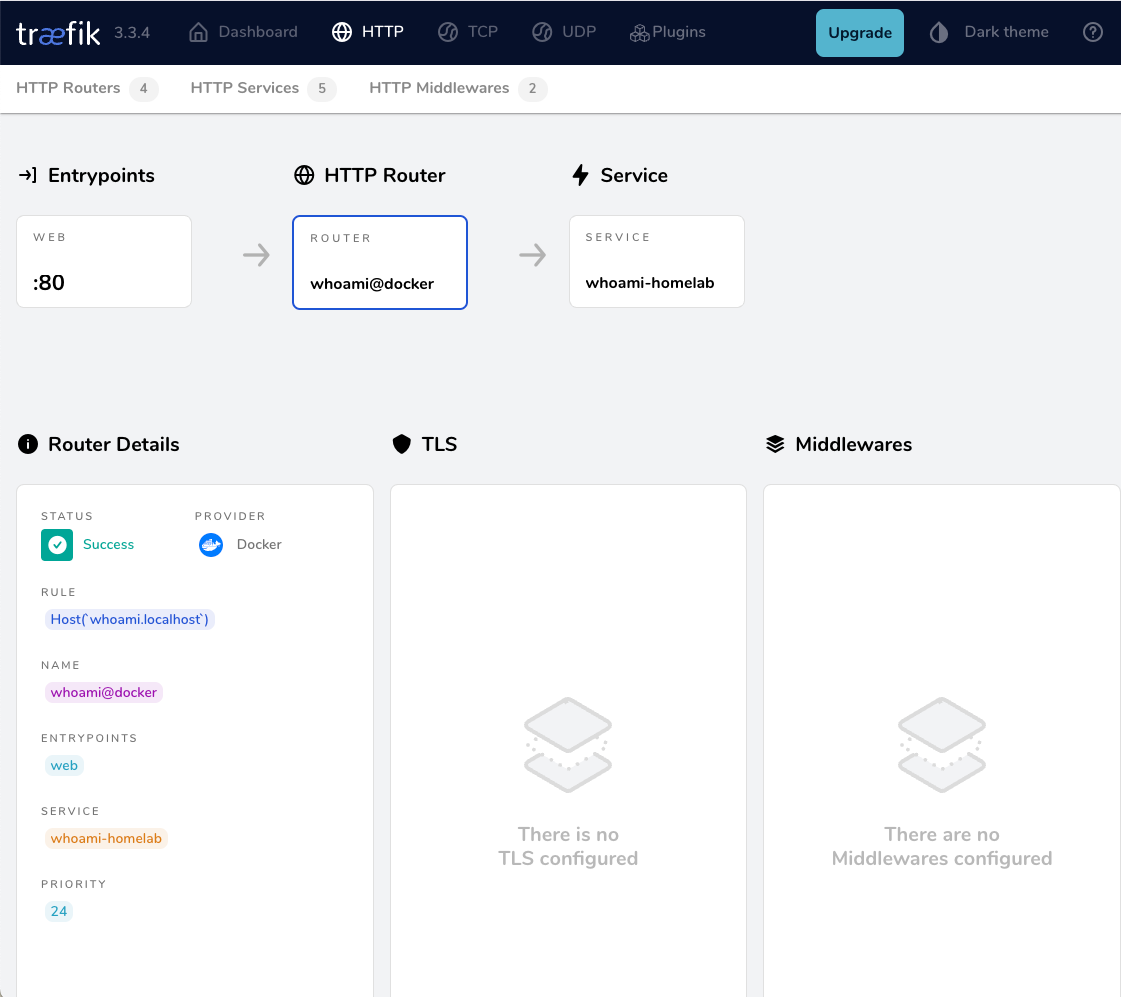
<h1>301: Moved Permanently</h1>from dashboard
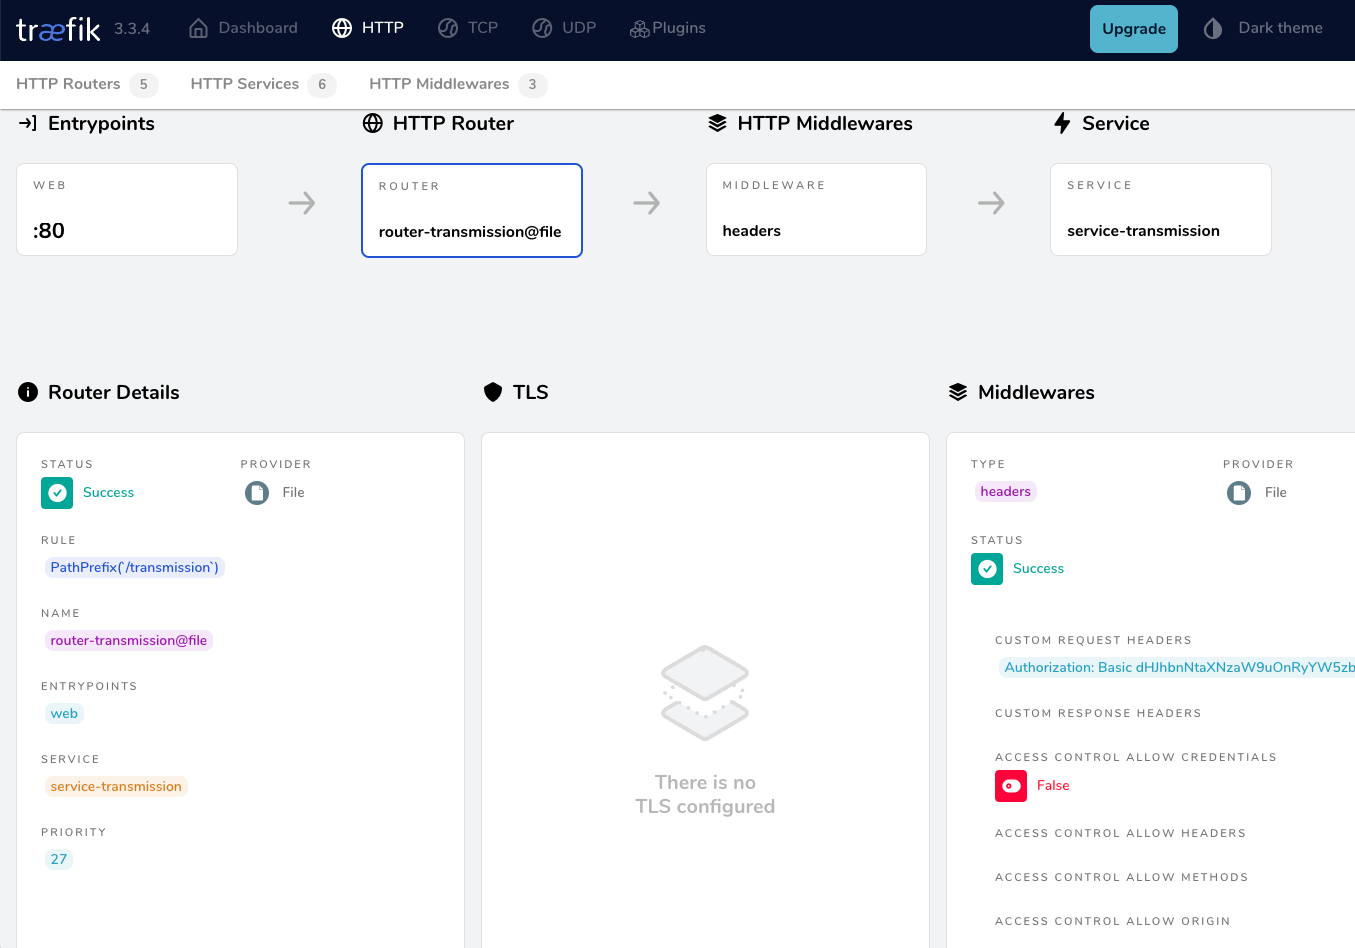
from browser
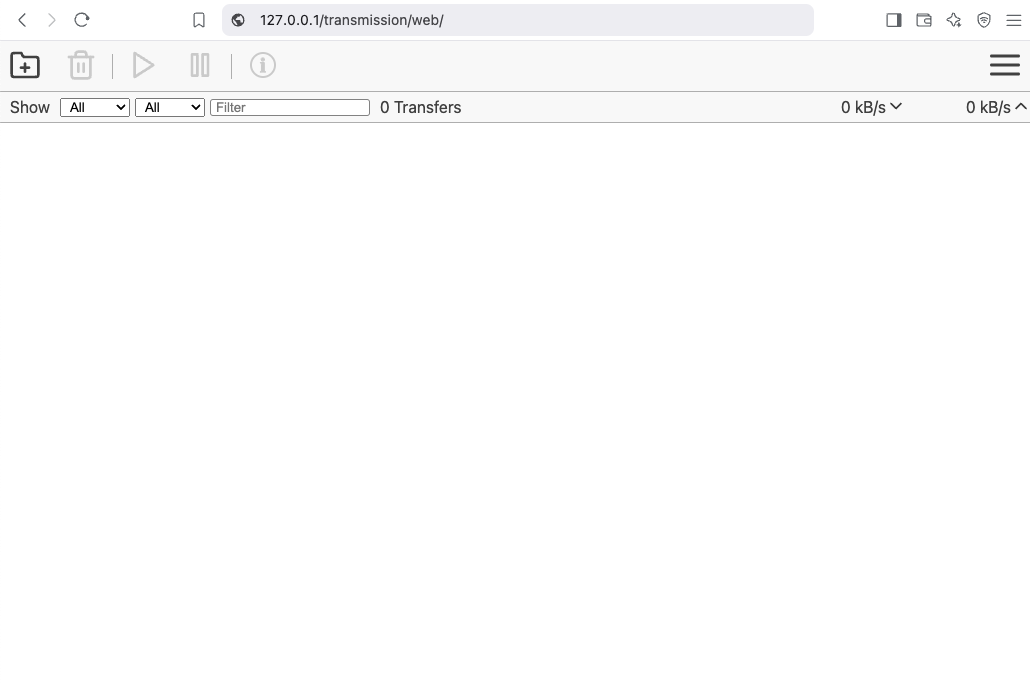
That’s It !!
docker compose down
a blog post series to my homelab
check here for Introduction to Traefik - Part One
Part Two
In this blog post series, I will connect several docker containers and a virtual machine behind the Traefik reverse proxy on my homelab, and set up Let’s Encrypt for TLS. In this post, I will connect our first docker container to the Traefik reverse proxy for testing and to learn how to do this.
I’ve also made a short video to accompany this blog post:

WhoAmI?
Traefik, whoami is often used as a simple test service to demonstrate how Traefik handles routing, especially when using dynamic routing and reverse proxy setups.
  # A container that exposes an API to show its IP address
  whoami:
    image: traefik/whoami
    container_name: whoami
    hostname: whoami
our updated docker compose file should look like:
docker-compose.yml
---
services:
  traefik:
    image: traefik:v3.3
    container_name: traefik
    hostname: traefik
    env_file:
      - path: ./.env
        required: true
    restart: unless-stopped
    ports:
      # The Web UI (enabled by --api.insecure=true)
      - 8080:8080
      # The HTTP port
      - 80:80
    volumes:
      - ./traefik:/etc/traefik
      - /var/run/docker.sock:/var/run/docker.sock:ro

  # A container that exposes an API to show its IP address
  whoami:
    image: traefik/whoami
    container_name: whoami
    hostname: whoami
Start all the services
docker compose up -doutput:
$ docker compose up -d
[+] Running 3/3
 ✔ Network homelab_default  Created    0.3s
 ✔ Container whoami         Started    2.2s
 ✔ Container traefik        Started    2.3s
Test WhoAmI - the wrong way
We can test our traefik reverse proxy with
curl -H Host:whoami.localhost http://127.0.0.1but the result should be:
404 page not foundWhy ?
We have not yet changed our traefik configuration file to enable an EntryPoint. EntryPoints are the network entry points into Traefik.
So let’s go back one step.
docker compose down
Traefik Configuration
The simplest approach is to update our configuration file and add a new EntryPoint. However, I’d like to take this opportunity to expand our configuration a little.
EntryPoints are Static Configuration, so they must be included on traefik.yml file.
## Static configuration
entryPoints:
  web:
   address: ":80"
so traefik/traefik.yml should look like:
# API and dashboard configuration
api:
  insecure: true

## Static configuration
entryPoints:
  web:
   address: ":80"
That should work, but given the opportunity, let’s enhance our Traefik configuration by including:
Ping
# The /ping health-check URL
ping: {

}
It would be useful to add a health check in the Docker Compose file later on.
Logs
This is how to enable the DEBUG (or INFO - just replace the verb in level)
# Debug log
log:
  filePath: /etc/traefik/traefik.log
  level: DEBUG
Docker provider
I want to explicitly include the Docker provider with a caveat: I don’t want to automatically expose all my docker containers behind Traefik. Instead, I prefer to manually add each docker container that I want to expose to the internet, rather than exposing all of them by default.
providers:
  # Enable docker provider
  docker: {
    exposedByDefault: false
  }
Traefik Configuration file updated
and now traefik/traefik.yml looks like:
# The /ping health-check URL
ping: {

}

# API and dashboard configuration
api:
    insecure: true

# Debug log
log:
    filePath: /etc/traefik/traefik.log
    level: DEBUG

# Enable EntryPoints
entryPoints:
    web:
        address: ":80"
        reusePort: true

# Providers
providers:
    # Enable docker provider
    docker: {
        exposedByDefault: false
    }
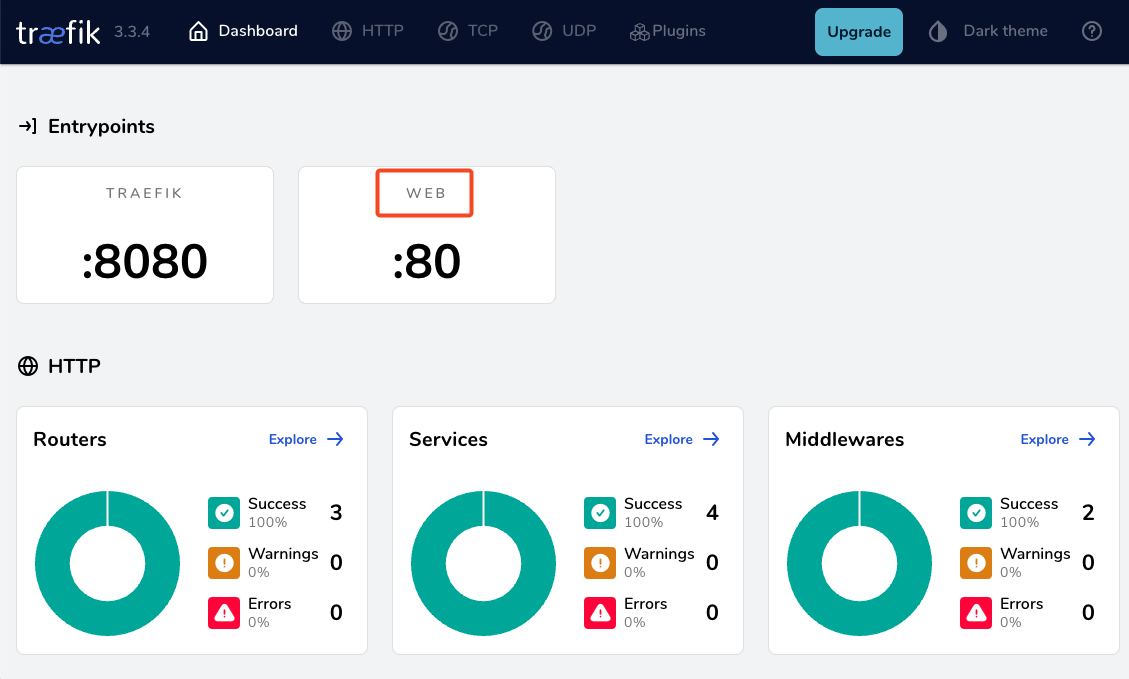
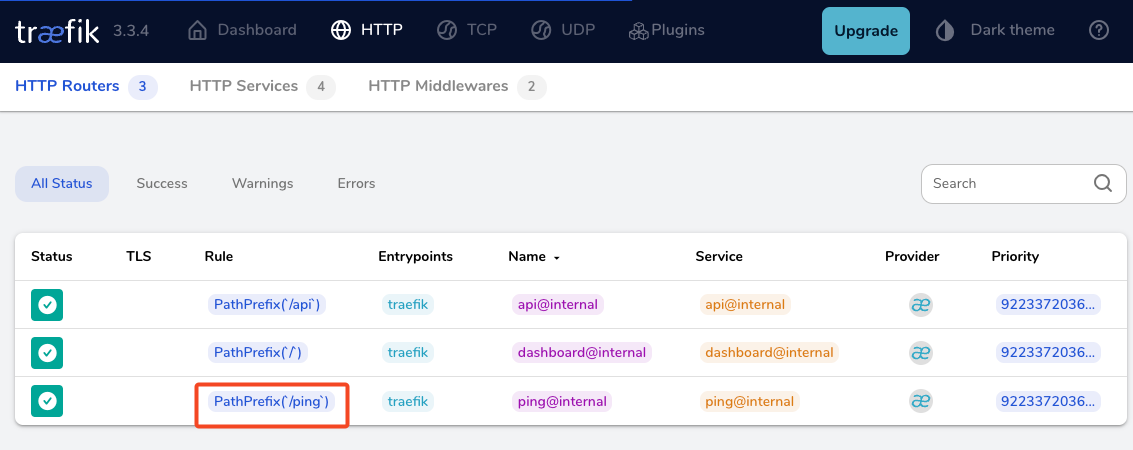
by running
docker compose up traefik -dwe can review Traefik dashboard with the new web EntryPoint and ping
WhoAmI - the correct way
okay, we now have our EntryPoint in Traefik but we need to explicit expose our whoami docker container and in order to do that, we need to add some labels!
  # A container that exposes an API to show its IP address
  whoami:
    image: traefik/whoami
    container_name: whoami
    hostname: whoami
    labels:
        - "traefik.enable=true" # To enable whoami to Traefik
        - "traefik.http.routers.whoami.rule=Host(`whoami.localhost`)" # Declare the host rule for this service
        - "traefik.http.routers.whoami.entrypoints=web" # Declare the EntryPoint
let’s put everything together:
---
services:
  traefik:
    image: traefik:v3.3
    container_name: traefik
    hostname: traefik
    env_file:
      - path: ./.env
        required: true
    restart: unless-stopped
    ports:
      # The Web UI (enabled by --api.insecure=true)
      - 8080:8080
      # The HTTP port
      - 80:80
    volumes:
      - ./traefik:/etc/traefik
      - /var/run/docker.sock:/var/run/docker.sock:ro

  # A container that exposes an API to show its IP address
  whoami:
    image: traefik/whoami
    container_name: whoami
    hostname: whoami
    labels:
        - "traefik.enable=true" # To enable whoami to Traefik
        - "traefik.http.routers.whoami.rule=Host(`whoami.localhost`)" # Declare the host rule for this service
        - "traefik.http.routers.whoami.entrypoints=web" # Declare the EntryPoint
docker compose up -d
Test Who Am I
curl -H Host:whoami.localhost http://127.0.0.1output:
Hostname: whoami
IP: 127.0.0.1
IP: ::1
IP: 172.19.0.3
RemoteAddr: 172.19.0.2:41276
GET / HTTP/1.1
Host: whoami.localhost
User-Agent: curl/8.12.1
Accept: */*
Accept-Encoding: gzip
X-Forwarded-For: 172.19.0.1
X-Forwarded-Host: whoami.localhost
X-Forwarded-Port: 80
X-Forwarded-Proto: http
X-Forwarded-Server: traefik
X-Real-Ip: 172.19.0.1
Health Checks and Depends
before finishing this article, I would like to include two more things.
Traefik Health Check
We added above the ping section on Traefik configuration, it is time to use it. On our docker compose configuration file, we can add a health check section for Traefik service.
We can test this from our command line
curl -s --fail http://127.0.0.1:8080/pingthe result should be an OK !
and we can extend the Traefik service to include this
    healthcheck:
      test: curl -s --fail http://127.0.0.1:8080/ping
      interval: 30s
      retries: 3
      timeout: 10s
      start_period: 10s
Depends On
The above health check option can be used to specify service dependencies in docker compose, so we can ensure that the whoami docker service starts after Traefik.
    depends_on:
      - traefik
that means our docker compose yaml file should look like:
---
services:
  traefik:
    image: traefik:v3.3
    container_name: traefik
    hostname: traefik
    env_file:
      - path: ./.env
        required: true
    restart: unless-stopped
    ports:
      # The Web UI (enabled by --api.insecure=true)
      - 8080:8080
      # The HTTP port
      - 80:80
    volumes:
      - ./traefik:/etc/traefik
      - /var/run/docker.sock:/var/run/docker.sock:ro
    # Add health check
    healthcheck:
      test: curl -s --fail http://127.0.0.1:8080/ping
      interval: 30s
      retries: 3
      timeout: 10s
      start_period: 10s

  # A container that exposes an API to show its IP address
  whoami:
    image: traefik/whoami
    container_name: whoami
    hostname: whoami
    depends_on:
      - traefik
    labels:
        - "traefik.enable=true"                                       # To enable whoami to Traefik
        - "traefik.http.routers.whoami.rule=Host(`whoami.localhost`)" # Declare the host rule for this service
        - "traefik.http.routers.whoami.entrypoints=web"               # Declare the EntryPoint
a blog post series to my homelab

Part One
In this blog post, I will start by walking you through the process of setting up Traefik as a reverse proxy for your homelab. My setup involves using a virtual machine connected via a point-to-point VPN to a cloud VPS, along with several Docker containers on my homelab for various tasks and learning purposes. The goal is to expose only Traefik to the internet, which will then provide access to my internal homelab. For certain applications, I also use Tailscale, which I prefer not to expose directly to the internet. In short, I have a complex internal homelab setup, and in this post, we’ll simplify it!
I’ve made a short video to accompany this blog post:

docker compose
To begin, we need to set up a basic Docker Compose YAML file.
As of the time of writing this blog post, the latest Traefik Docker container image is version 3.3. It is best to declare a specific version instead of using “latest” tag.
image: traefik:v3.3Using an .env file in a Docker Compose configuration is important for several reasons, as for configure variables, secrets and it is easy to reuse though several services and to avoid hardcoding values. For traefik is important so we can configure the docker GID in order traefil to be able to use the docker socket.
eg. .env
# This is my user id
PUID=1001
# This is my docker group id
PGID=142
UMASK="002"
TZ="Europe/Athens"
DNS="88.198.92.222"
Next interesting topic is the volumes section.
I would like to mount a local directory for the traefik configuration, which I will later use with the dynamic file provider. Additionally, to enable Traefik to recongize our (future) docker images, we need to mount the docker socket too.
    volumes:
      - ./traefik:/etc/traefik
      - /var/run/docker.sock:/var/run/docker.sock
to conclude, here is a very basic docker compose yaml file:
docker-compose.yml
---
services:
  traefik:
    image: traefik:v3.3
    container_name: traefik
    hostname: traefik
    env_file:
      - path: ./.env
        required: true
    restart: unless-stopped
    ports:
      # The Web UI (enabled by --api.insecure=true)
      - 8080:8080
      # The HTTP port
      - 80:80
    volumes:
      - ./traefik:/etc/traefik
      - /var/run/docker.sock:/var/run/docker.sock
pull traefik docker image
we can explicitly get the Traefik docker container image
docker compose pull traefiktraefik configuration file
we also need to create the configuration file by enabling the API and the dashboard for now.
Create the directory and file
traefik/traefik.yml
and write this:
# API and dashboard configuration
api:
  insecure: true
Start traefik docker
We are ready start and run our Traefik docker container:
docker compose upresult is something like:
[+] Running 2/2
 ✔ Network homelab_default  Created       0.3s
 ✔ Container traefik        Created       0.4s
Attaching to traefik
To stop traefik from docker compose, we need to open a new terminal and type from the same directory
docker compose downor, we ca run the docker compose and detach it so it runs on the background:
docker compose up traefik -dThis is going to be useful for the future as we starting each service one by one.
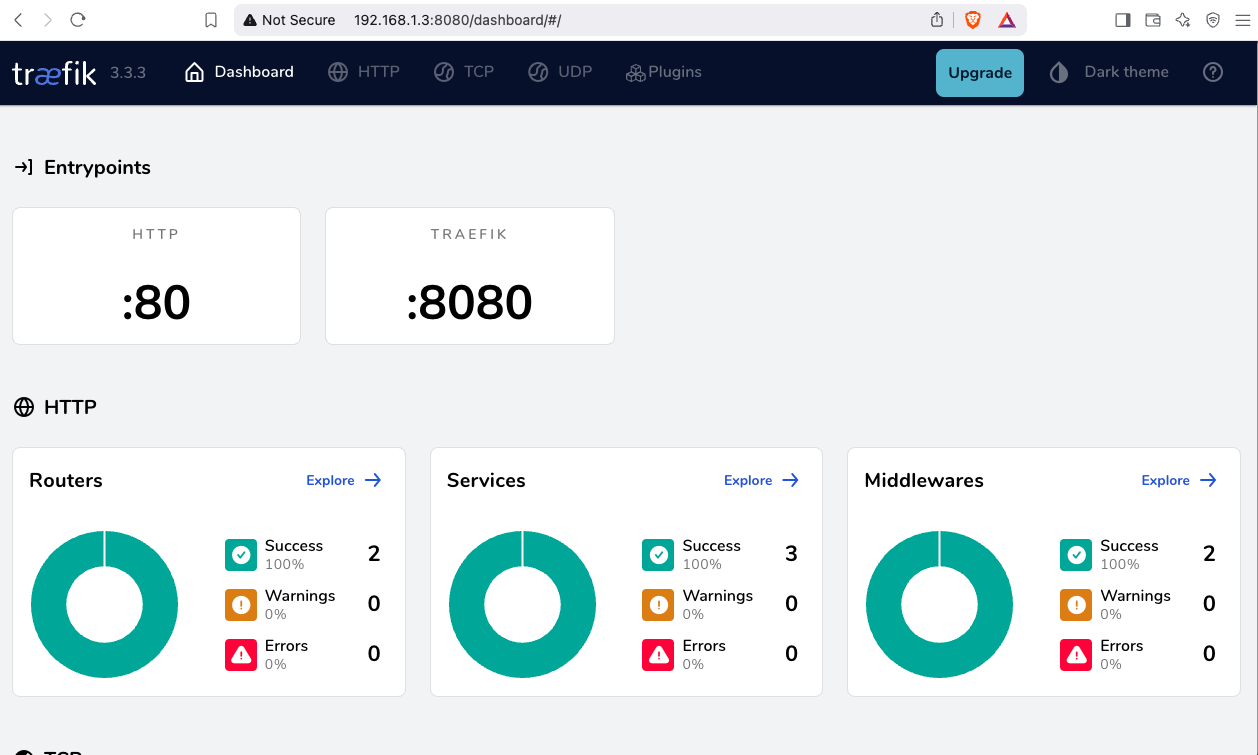
Test traefik
Open your browser and click on: http://127.0.0.1:8080
you will see something like:
Migrate legacy openldap to a docker container.
Prologue
I maintain a couple of legacy EOL CentOS 6.x SOHO servers to different locations. Stability on those systems is unparalleled and is -mainly- the reason of keeping them in production, as they run almost a decade without a major issue.
But I need to do a modernization of these legacy systems. So I must prepare a migration plan. Initial goal was to migrate everything to ansible roles. Although, I’ve walked down this path a few times in the past, the result is not something desirable. A plethora of configuration files and custom scripts. Not easily maintainable for future me.
Current goal is to setup a minimal setup for the underlying operating system, that I can easily upgrade through it’s LTS versions and separate the services from it. Keep the configuration on a git repository and deploy docker containers via docker-compose.
In this blog post, I will document the openldap service. I had some is issues against bitnami/openldap docker container so the post is also a kind of documentation.
Preparation
Two different cases, in one I have the initial ldif files (without the data) and on the second node I only have the data in ldifs but not the initial schema. So, I need to create for both locations a combined ldif that will contain the schema and data.
And that took me more time that it should! I could not get the service running correctly and I experimented with ldap exports till I found something that worked against bitnami/openldap notes and environment variables.
ldapsearch command
In /root/.ldap_conf I keep the environment variables as Base, Bind and Admin Password (only root user can read them).
cat /usr/local/bin/lds #!/bin/bash
source /root/.ldap_conf
/usr/bin/ldapsearch
-o ldif-wrap=no
-H ldap://$HOST
-D $BIND
-b $BASE
-LLL -x
-w $PASS $*
sudo lds > /root/openldap_export.ldif
Bitnami/openldap
GitHub page of bitnami/openldap has extensive documentation and a lot of environment variables you need to setup, to run an openldap service. Unfortunately, it took me quite a while, in order to find the proper configuration to import ldif from my current openldap service.
Through the years bitnami has made a few changes in libopenldap.sh which produced a frustrated period for me to review the shell script and understand what I need to do.
I would like to explain it in simplest terms here and hopefully someone will find it easier to migrate their openldap.
TL;DR
The correct way:
Create local directories
mkdir -pv {ldif,openldap}Place your openldap_export.ldif to the local ldif directory, and start openldap service with:
docker compose up---
services:
openldap:
image: bitnami/openldap:2.6
container_name: openldap
env_file:
- path: ./ldap.env
volumes:
- ./openldap:/bitnami/openldap
- ./ldifs:/ldifs
ports:
- 1389:1389
restart: always
volumes:
data:
driver: local
driver_opts:
device: /storage/docker
Your environmental configuration file, should look like:
cat ldap.env LDAP_ADMIN_USERNAME="admin"
LDAP_ADMIN_PASSWORD="testtest"
LDAP_ROOT="dc=example,dc=org"
LDAP_ADMIN_DN="cn=admin,$ LDAP_ROOT"
LDAP_SKIP_DEFAULT_TREE=yes
Below we are going to analyze and get into details of bitnami/openldap docker container and process.
OpenLDAP Version in docker container images.
Bitnami/openldap docker containers -at the time of writing- represent the below OpenLDAP versions:
bitnami/openldap:2    -> OpenLDAP: slapd 2.4.58
bitnami/openldap:2.5  -> OpenLDAP: slapd 2.5.17
bitnami/openldap:2.6  -> OpenLDAP: slapd 2.6.7
list images
docker images -a
REPOSITORY         TAG       IMAGE ID       CREATED        SIZE
bitnami/openldap   2.6       bf93eace348a   30 hours ago   160MB
bitnami/openldap   2.5       9128471b9c2c   2 days ago     160MB
bitnami/openldap   2         3c1b9242f419   2 years ago    151MB
Initial run without skipping default tree
As mentioned above the problem was with LDAP environment variables and LDAP_SKIP_DEFAULT_TREE was in the middle of those.
cat ldap.env LDAP_ADMIN_USERNAME="admin"
LDAP_ADMIN_PASSWORD="testtest"
LDAP_ROOT="dc=example,dc=org"
LDAP_ADMIN_DN="cn=admin,$ LDAP_ROOT"
LDAP_SKIP_DEFAULT_TREE=no
for testing: always empty ./openldap/ directory
docker compose up -dBy running ldapsearch (see above) the results are similar to below data
ldsdn: dc=example,dc=org
objectClass: dcObject
objectClass: organization
dc: example
o: example
dn: ou=users,dc=example,dc=org
objectClass: organizationalUnit
ou: users
dn: cn=user01,ou=users,dc=example,dc=org
cn: User1
cn: user01
sn: Bar1
objectClass: inetOrgPerson
objectClass: posixAccount
objectClass: shadowAccount
userPassword:: Yml0bmFtaTE=
uid: user01
uidNumber: 1000
gidNumber: 1000
homeDirectory: /home/user01
dn: cn=user02,ou=users,dc=example,dc=org
cn: User2
cn: user02
sn: Bar2
objectClass: inetOrgPerson
objectClass: posixAccount
objectClass: shadowAccount
userPassword:: Yml0bmFtaTI=
uid: user02
uidNumber: 1001
gidNumber: 1001
homeDirectory: /home/user02
dn: cn=readers,ou=users,dc=example,dc=org
cn: readers
objectClass: groupOfNames
member: cn=user01,ou=users,dc=example,dc=org
member: cn=user02,ou=users,dc=example,dc=org
so as you can see, they create some default users and groups.
Initial run with skipping default tree
Now, let’s skip creating the default users/groups.
cat ldap.env LDAP_ADMIN_USERNAME="admin"
LDAP_ADMIN_PASSWORD="testtest"
LDAP_ROOT="dc=example,dc=org"
LDAP_ADMIN_DN="cn=admin,$ LDAP_ROOT"
LDAP_SKIP_DEFAULT_TREE=yes
(always empty ./openldap/ directory )
docker compose up -dldapsearch now returns:
No such object (32)That puzzled me … a lot !
Conclusion
It does NOT matter if you place your ldif schema file and data and populate the LDAP variables with bitnami/openldap. Or use ANY other LDAP variable from bitnami/openldap reference manual.
The correct method is to SKIP default tree and place your export ldif to the local ldif directory. Nothing else worked.
Took me almost 4 days to figure it out and I had to read the libopenldap.sh.
That’s it !