Prologue – Why do this at all?
Running services at home is fun. Running them securely and reliably is where things get interesting.
In my homelab, I run many applications, like Immich on a legacy PC, behind a residential ISP connection, dynamic IPs, and without opening ports on my router. This setup provides my test lab and a way to play and learn without the use of any cloud. At the same time, I want to use some of my internal services from the internet as securely as I can.
This post describes how to achieve exactly that using:
- Tailscale as a secure private network between hosts
- DNS-01 Let’s Encrypt challenges for automated TLS
- A remote homelab service (Immich) reachable only over Tailscale
Important: The DNS record must exist before Traefik requests certificates.
High-level architecture
Before diving into configs, let’s clarify the flow:
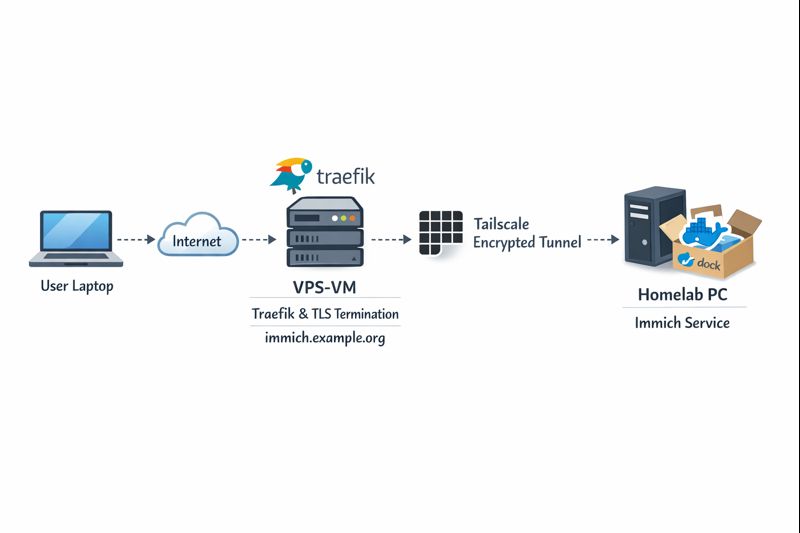
Key points:
- DNS entry (eg. immich.example.org) exists before Traefik starts, enabling ACME issuance
- Traefik as an internet-facing reverse proxy - Only Traefik is exposed to the internet
- Immich listens on a private Tailscale IP (100.x.x.x)
- Valid TLS certificates from Let’s Encrypt - TLS is terminated at Traefik
- No inbound firewall rules on my home network - No port forwarding on the home router
- Minimal attack surface
- Clean separation between edge and internal services
Why not expose Immich directly?
Opening ports on a home router comes with downsides:
- Public IP changes
- Consumer-grade firewalling
- Direct exposure of application vulnerabilities
- Harder TLS automation
This setup avoids all of that.
Why Tailscale?
Tailscale gives you:
- WireGuard-based encryption by default
- Stable private IPs
- Mutual authentication
- No inbound NAT rules
- Fine-grained ACLs (optional, but recommended)
Even if Traefik were compromised, the blast radius is limited to what it can access over Tailscale.
Why DNS-01 instead of HTTP-01?
DNS-01 lets Traefik:
- Obtain certificates without the backend being reachable
- Issue certs before the service is live
- Avoid exposing port 80 on internal services
This is especially useful when the backend is private or remote.
Prerequisites
Before starting, make sure you have:
- A domain name (e.g.
example.org) - A DNS provider supported by Traefik (LuaDNS in this case)
- A public server (VPS, cloud VM) for Traefik
-
Tailscale installed on:
- The Traefik host
- Your homelab / home PC
-
A DNS record:
immich.example.org → <Traefik public IP>
Important: The DNS record must exist before Traefik requests certificates.
Traefik setup (edge host)
Docker Compose
Traefik runs as a standalone service on the edge host:
---
services:
  traefik:
    image: traefik:v3.6
    container_name: traefik
    hostname: traefik
    env_file:
      - ./.env
    environment:
      - TRAEFIK_CERTIFICATESRESOLVERS_LETSENCRYPT_ACME_EMAIL=${LUADNS_API_USERNAME}
    restart: unless-stopped
    ports:
      - 8080:8080 # Dashboard (secured, no insecure mode)
      - 80:80     # HTTP
      - 443:443   # HTTPS
    volumes:
      - ./certs:/certs             # For static certificates
      - ./etc_traefik:/etc/traefik # Traefik configuration files
      - /var/run/docker.sock:/var/run/docker.sock:ro  # So that Traefik can listen to the Docker events
    healthcheck:
      test: ["CMD", "traefik", "healthcheck"]
      interval: 30s
      retries: 3
      timeout: 10s
      start_period: 10s
Static Traefik configuration (traefik.yml)
This file defines entrypoints, providers, logging, and ACME:
ping: {}

api:
  dashboard: true
  insecure: false

log:
  filePath: /etc/traefik/traefik.log
  level: INFO

entryPoints:
  web:
    address: ":80"
    reusePort: true
  websecure:
    address: ":443"
    reusePort: true

providers:
  docker:
    exposedByDefault: false
  file:
    directory: /etc/traefik/dynamic/
    watch: true
We explicitly disable auto-exposure of Docker containers and rely on file-based dynamic config to have more control on which docker services we want traefik to “see”.
Let’s Encrypt via DNS-01 (LuaDNS)
certificatesResolvers:
  letsencrypt:
    acme:
      email: ""
      storage: "/certs/acme.json"
      caServer: https://acme-v02.api.letsencrypt.org/directory
      dnsChallenge:
        provider: luadns
        delayBeforeCheck: 0
        resolvers:
          - "8.8.8.8:53"
          - "1.1.1.1:53"
Why this matters:
- Certificates can be issued even if Immich is offline
- No need for port 80 reachability
- Works cleanly with private backends
Dynamic routing to Immich over Tailscale
This is where the magic happens.
Dynamic config (dynamic/immich.yml)
http:
  routers:
    immich:
      rule: 'Host(`immich.example.org`)'
      entryPoints: ["websecure"]
      service: "immich"
      tls:
        certResolver: letsencrypt

  services:
    immich:
      loadBalancer:
        servers:
          - url: "http://100.80.90.101:2283"
        passHostHeader: true
Explanation:
Host()rule matches your public domain- TLS is terminated at Traefik
- Backend URL is a Tailscale IP
- No exposure of Immich to the public internet
Homelab: Immich setup
On the home PC, Immich runs normally, bound to a local port:
ports:
  - '2283:2283'
Make sure to use the docker-compose.yml of the current release:
This port does not need to be:
- Exposed to the internet
- Forwarded on your router
- Secured with TLS
It only needs to be reachable from the Traefik host via Tailscale.
Verifying the setup
Visit: https://immich.example.org
You should get a valid Let’s Encrypt certificate and a working Immich UI.

Hardening ideas (recommended)
Once this works, consider:
- Tailscale ACLs limiting Traefik → Immich access
- Middleware for:
- Security headers
- Rate limiting
- IP allowlists
- Traefik dashboard behind auth
- Separate internal / external entrypoints
That's it !
🎉 If you want a self‑contained, production‑ready reverse proxy that automatically provisions TLS certificates from Let’s Encrypt and uses LuaDNS as the DNS provider, you’re in the right place.
Below you’ll find a step‑by‑step guide that walks through:
- Installing the required containers
- Configuring Traefik with LuaDNS DNS‑Challenge
- Running the stack and verifying everything works
TL;DR – Copy the files, set your environment variables, run
docker compose up -d, and point a browser tohttps://<your‑hostname>.
📁 Project Layout
traefik/
├── certs/                # ACME certificates will be stored here
├── docker-compose.yml    # Docker‑Compose definition
├── .env                  # Environment variables for the stack
└── etc_traefik/
    └── traefik.yml       # Traefik configuration
    └── dynamic/          # Dynamic Traefik configuration will be stored here
        └── whoami.yml    # WhoAmI configuration
Why this structure?
certs/– keeps the ACME JSON file outside the container so it survives restarts.etc_traefik/– keeps the Traefik config in a dedicated folder for clarity..env– central place to store secrets and other runtime values.
🔧 Step 1 – Prepare Your Environment
1. Install Docker & Docker‑Compose
If you don’t already have them:
# Debian/Ubuntu
sudo apt update && sudo apt install docker.io docker-compose-plugin

# Verify
docker --version
docker compose version
2. Clone or Create the Project Folder
mkdir -p traefik/certs traefik/etc_traefik/dynamic
cd traefik
⚙️ Step 2 – Create the Configuration Files
1. docker-compose.yml
services:
  traefik:
    image: traefik:v3.5
    container_name: traefik
    hostname: traefik

    env_file:
      - ./.env
    environment:
      - TRAEFIK_CERTIFICATESRESOLVERS_LETSENCRYPT_ACME_EMAIL=${LUADNS_API_USERNAME}

    restart: unless-stopped

    # Expose HTTP, HTTPS and the dashboard
    ports:
      - "8080:8080"  # Dashboard (insecure)
      - "80:80"
      - "443:443"

    volumes:
      - ./certs:/certs
      - ./etc_traefik:/etc/traefik
      - /var/run/docker.sock:/var/run/docker.sock:ro

    healthcheck:
      test: ["CMD", "traefik", "healthcheck"]
      interval: 30s
      retries: 3
      timeout: 10s
      start_period: 10s

  whoami:
    image: traefik/whoami
    container_name: whoami
    hostname: whoami
    depends_on:
      traefik:
        condition: service_healthy

    labels:
      - "traefik.enable=true"
Why
whoami?
It’s a simple container that prints the request metadata. Perfect for testing TLS, routing and DNS‑Challenge.
2. .env
UMASK="002"
TZ="Europe/Athens"

# LuaDNS credentials (replace with your own)
LUADNS_API_TOKEN="<Your LuaDNS API key>"
LUADNS_API_USERNAME="<Your Email Address>"

# Hostname you want to expose
MYHOSTNAME=whoami.example.org

# (Optional) LibreDNS server used for challenge verification
DNS="88.198.92.222"
Important – Do not commit your
.envto version control.
Use a.gitignoreentry or environment‑variable injection on your host.
3. etc_traefik/traefik.yml
# Ping endpoint for health checks
ping: {}

# Dashboard & API
api:
  dashboard: true
  insecure: true   # `true` only for dev; enable auth in prod

# Logging
log:
  filePath: /etc/traefik/traefik.log
  level: DEBUG

# Entry points (HTTP & HTTPS)
entryPoints:
  web:
    address: ":80"
    reusePort: true
  websecure:
    address: ":443"
    reusePort: true

# Docker provider – disable auto‑exposure
providers:
  docker:
    exposedByDefault: false

    # Enable file provider
    file:
        directory: /etc/traefik/dynamic/
        watch: true

# ACME resolver using LuaDNS
certificatesResolvers:
  letsencrypt:
    acme:
      # Will read from TRAEFIK_CERTIFICATESRESOLVERS_LETSENCRYPT_ACME_EMAIL
      # Or your add your email address directly !
      email: ""
      storage: "/certs/acme.json"
      # Uncomment the following line for production
      ## caServer: https://acme-v02.api.letsencrypt.org/directory
      # Staging environment (for testing only)
      caServer: https://acme-staging-v02.api.letsencrypt.org/directory
      dnsChallenge:
        provider: luadns
        delayBeforeCheck: 0
        resolvers:
          - "8.8.8.8:53"
          - "1.1.1.1:53"
Key points
storagepoints to the sharedcerts/folder.- We’re using the staging Let’s Encrypt server – change it to production when you’re ready.
dnsChallenge.provideris set toluadns; Traefik will automatically look for a LuaDNS plugin.
4. etc_traefik/dynamic/whoami.yml
http:
  routers:
    whoami:
      rule: 'Host(`{{ env "MYHOSTNAME" }}`)'
      entryPoints: ["websecure"]
      service: "whoami"
      tls:
        certResolver: letsencrypt
  services:
    whoami:
      loadBalancer:
        servers:
          - url: "http://whoami:80"
🔐 Step 3 – Run the Stack
docker compose up -dDocker will:
- Pull
traefik:v3.5andtraefik/whoami. - Create the containers, mount volumes, and start Traefik.
- Trigger a DNS‑Challenge for
whoami.example.org(via LuaDNS). - Request an ACME certificate from Let’s Encrypt.
Tip – Use
docker compose logs -f traefikto watch the ACME process in real time.
🚀 Step 4 – Verify Everything Works
-
Open a browser and go to https://whoami.example.org
(replace with whatever you set inMYHOSTNAME). -
You should see a JSON response similar to:
Hostname: whoami
IP: 127.0.0.1
IP: ::1
IP: 172.19.0.3
RemoteAddr: 172.19.0.2:54856
GET / HTTP/1.1
Host: whoami.example.org
User-Agent: Mozilla/5.0 (Macintosh; Intel Mac OS X 10_15_7) AppleWebKit/537.36 (KHTML, like Gecko) Chrome/141.0.0.0 Safari/537.36
Accept: text/html,application/xhtml+xml,application/xml;q=0.9,image/avif,image/webp,image/apng,*/*;q=0.8
Accept-Encoding: gzip, deflate, br, zstd
Accept-Language: en-GB,en;q=0.6
Cache-Control: max-age=0
Priority: u=0, i
Sec-Ch-Ua: "Brave";v="141", "Not?A_Brand";v="8", "Chromium";v="141"
Sec-Ch-Ua-Mobile: ?0
Sec-Ch-Ua-Platform: "macOS"
Sec-Fetch-Dest: document
Sec-Fetch-Mode: navigate
Sec-Fetch-Site: none
Sec-Fetch-User: ?1
Sec-Gpc: 1
Upgrade-Insecure-Requests: 1
X-Forwarded-For: 602.13.13.18
X-Forwarded-Host: whoami.example.org
X-Forwarded-Port: 443
X-Forwarded-Proto: https
X-Forwarded-Server: traefik
X-Real-Ip: 602.13.13.18
-
In the browser’s developer tools → Security tab, confirm the certificate is issued by Let’s Encrypt and that it is valid.
-
Inspect the Traefik dashboard at http://localhost:8080 (you’ll see the
whoamirouter and its TLS configuration).
🎯 What’s Next?
| Feature | How to enable |
|---|---|
| HTTPS‑only | Add - "traefik.http.middlewares.redirectscheme.scheme=https" to the router and use it as a middlewares label. |
| Auth on dashboard | Use Traefik’s built‑in auth middlewares or an external provider. |
| Automatic renewal | Traefik handles it automatically; just keep the stack running. |
| Production CA | Switch caServer to the production URL in traefik.yml. |
by making the change here:
      # Uncomment the following line for production
      caServer: https://acme-v02.api.letsencrypt.org/directory
      ## caServer: https://acme-staging-v02.api.letsencrypt.org/directory
Final Thoughts
Using Traefik with LuaDNS gives you:
- Zero‑configuration TLS that renews automatically.
- Fast DNS challenges thanks to LuaDNS’s low‑latency API.
- Docker integration – just add labels to any container and it’s instantly exposed.
Happy routing! 🚀
That’s it !
PS. These are my personal notes from my home lab; AI was used to structure and format the final version of this blog post.
Original Post is here:
https://balaskas.gr/blog/2025/10/10/setting-up-traefik-and-lets-encrypt-acme-with-luadns-in-docker/
🚀 Curious about trying out a Large Language Model (LLM) like Mistral directly on your own macbook?
Here’s a simple step-by-step guide I used on my MacBook M1 Pro. No advanced technical skills required, but some techinal command-line skills are needed. Just follow the commands and you’ll be chatting with an AI model in no time.
🧰 What We’ll Need
- LLM: A CLI utility and Python library for interacting with Large Language Models → a command-line tool and Python library that makes it easy to install and run language models.
- Mistral → a modern open-source language model you can run locally.
- Python virtual environment → a safe “sandbox” where we install the tools without messing with the rest of the system.
- MacBook → All Apple Silicon MacBooks (M1, M2, M3, M4 chips) feature an integrated GPU on the same chip as the CPU.
🧑🔬 About Mistral 7B
Mistral 7B is a 7-billion parameter large language model, trained to be fast, efficient, and good at following instructions.
Technical requirements (approximate):
- Full precision model (FP16) → ~13–14 GB of RAM (fits best on a server or high-end GPU).
- Quantized model (4-bit, like the one we use here) → ~4 GB of RAM, which makes it practical for a MacBook or laptop.
- Disk storage → the 4-bit model download is around 4–5 GB.
- CPU/GPU → runs on Apple Silicon (M1/M2/M3) CPUs and GPUs thanks to the MLX library. It can also run on Intel Macs, though it may be slower.
👉 In short:
With the 4-bit quantized version, you can run Mistral smoothly on a modern MacBook with 8 GB RAM or more. The more memory and cores you have, the faster it runs.
⚙️ Step 1: Create a Virtual Environment
We’ll create a clean workspace just for this project.
python3 -m venv ~/.venvs/llm

source ~/.venvs/llm/bin/activate
👉 What happens here:
python3 -m venvcreates a new isolated environment namedllm.source .../activateswitches you into that environment, so all installs stay inside it.
📦 Step 2: Install the LLM Tool
Now, let’s install LLM.
pip install -U llm👉 This gives us the llm command we’ll use to talk to models.
🛠️ Step 3: Install Extra Dependencies
Mistral needs a few extra packages:
pip install mlx

pip install sentencepiece
👉 mlx is Apple’s library that helps models run efficiently on Mac.
👉 sentencepiece helps the model break down text into tokens (words/pieces).
🔌 Step 4: Install the Mistral Plugin
We now connect LLM with Mistral:
llm install llm-mlx👉 This installs the llm-mlx plugin, which allows LLM to use Mistral models via Apple’s MLX framework.
Verify the plugin with this
llm pluginsresult should look like that:
[
  {
    "name": "llm-mlx",
    "hooks": [
      "register_commands",
      "register_models"
    ],
    "version": "0.4"
  }
]
⬇️ Step 5: Download the Model
Now for the fun part — downloading Mistral 7B.
llm mlx download-model mlx-community/Mistral-7B-Instruct-v0.3-4bit👉 This pulls down the model from the community in a compressed, 4-bit version (smaller and faster to run on laptops).
Verify the model is on your system:
llm models | grep -i mistraloutput should be something similar with this:
MlxModel: mlx-community/Mistral-7B-Instruct-v0.3-4bit (aliases: m7)🏷️ Step 6: Set a Shortcut (Alias)
Typing the full model name is long and annoying. Let’s create a shortcut:
llm aliases set m7 mlx-community/Mistral-7B-Instruct-v0.3-4bit👉 From now on, we can just use -m m7 instead of the full model name.
💡 Step 7: One last thing
if you are using Homebrew then most probably you already have OpenSSL on your system, if you do not know what we are talking about, then you are using LibreSSL and you need to make a small change:
pip install "urllib3<2"only if you are using brew run:
brew install openssl@3💬 Step 8: Ask Your First Question
Time to chat with Mistral!
llm -m m7 'Capital of Greece ?'
👉 Expected result:
The model should respond with:
Athens🎉 Congratulations — you’ve just run a powerful AI model locally on your Mac!
👨💻 A More Technical Example
Mistral isn’t only for trivia — it can help with real command-line tasks too.
For example, let’s ask it something more advanced:
llm -m m7 'On Arch Linux, give only the bash command using find
 that lists files in the current directory larger than 1 GB,
 do not cross filesystem boundaries. Output file sizes in
 human-readable format with GB units along with the file paths.
 Return only the command.'
👉 Mistral responds with:
find . -type f -size +1G -exec du -sh {} +
💡 What this does:
find . -type f -size +1G→ finds files bigger than 1 GB in the current folder.-exec ls -lhS {} ;→ runslson each file to display the size in human-readable format (GB).
This is the kind of real-world productivity boost you get by running models locally.
Full text example output:
This command will find all files (
-type f) larger than 1 GB (-size +1G) in the current directory (.) and execute thedu -shcommand on each file to display the file size in a human-readable format with GB units (-h). The+after-exectellsfindto execute the command once for each set of found files, instead of once for each file.
🌟 Why This Is Cool
- 🔒 No internet needed once the model is downloaded.
- 🕵️ Privacy: your text never leaves your laptop.
- 🧪 Flexible: you can try different open-source models, not just Mistral.
though it won’t be as fast as running it in the cloud.
That’s it !
PS. These are my personal notes from my home lab; AI was used to structure and format the final version of this blog post.
🖥️ I’ve been playing around with the python cli LLM and Perplexity, trying to get a setup that works nicely from the command line. Below are my notes, with what worked, what I stumbled on, and how you can replicate it.
📌 Background & Why
I like working with tools that let me automate or assist me with shell commands, especially when exploring files, searching, or scripting stuff. LLM + Perplexity give me that power: AI suggestions + execution.
If you’re new to this, it helps you avoid googling every little thing, but still keeps you in control.
Also, I have a Perplexity Pro account, and I want to learn how to use it from my Linux command line.
⚙️ Setup: Step by Step
1️⃣ Prepare a Python virtual environment
I prefer isolating things so I don’t mess up my global Python. Here’s how I did it by creating a new python virtual environment and activate it:
PROJECT="llm"

python3 -m venv ~/.venvs/${PROJECT}
source ~/.venvs/${PROJECT}/bin/activate

# Install llm project
pip install -U ${PROJECT}
This gives you a clean llm install.
2️⃣ Get Perplexity API key 🔑
You’ll need an API key from Perplexity to use their model via LLM.
-
Go to Perplexity.ai 🌐
-
Sign in / register
-
Go to your API keys page: https://www.perplexity.ai/account/api/keys
-
Copy your key
Be careful, in order to get the API, you need to type your Bank Card details. In my account, I have a free tier of 5 USD. You can review your tokens via the Usage metrics in Api Billing section.
3️⃣ Install plugins for LLM 🧩
I used two plugins:
-
⚡
llm-cmd— for LLM to suggest/run shell commands -
🔍
llm-perplexity— so LLM can use Perplexity as a model provider
Commands:
llm install llm-cmd

llm install llm-perplexity
Check what’s installed:
llm plugins
Sample output:
[
  {
    "name": "llm-cmd",
    "hooks": [
      "register_commands"
    ],
    "version": "0.2a0"
  },
  {
    "name": "llm-perplexity",
    "hooks": [
      "register_models"
    ],
    "version": "2025.6.0"
  }
]
4️⃣ Configure your Perplexity key inside LLM 🔐
Tell LLM your Perplexity key so it can use it:
❯ llm keys set perplexity
# then paste your API key when prompted
Verify:
❯ llm keys
perplexity
You should just see “perplexity” listed (or the key name), meaning it is stored.
Available models inside LLM 🔐
Verify and view what are the available models to use:
llm models
the result on my setup, with perplexity enabled is:
OpenAI Chat: gpt-4o (aliases: 4o)
OpenAI Chat: chatgpt-4o-latest (aliases: chatgpt-4o)
OpenAI Chat: gpt-4o-mini (aliases: 4o-mini)
OpenAI Chat: gpt-4o-audio-preview
OpenAI Chat: gpt-4o-audio-preview-2024-12-17
OpenAI Chat: gpt-4o-audio-preview-2024-10-01
OpenAI Chat: gpt-4o-mini-audio-preview
OpenAI Chat: gpt-4o-mini-audio-preview-2024-12-17
OpenAI Chat: gpt-4.1 (aliases: 4.1)
OpenAI Chat: gpt-4.1-mini (aliases: 4.1-mini)
OpenAI Chat: gpt-4.1-nano (aliases: 4.1-nano)
OpenAI Chat: gpt-3.5-turbo (aliases: 3.5, chatgpt)
OpenAI Chat: gpt-3.5-turbo-16k (aliases: chatgpt-16k, 3.5-16k)
OpenAI Chat: gpt-4 (aliases: 4, gpt4)
OpenAI Chat: gpt-4-32k (aliases: 4-32k)
OpenAI Chat: gpt-4-1106-preview
OpenAI Chat: gpt-4-0125-preview
OpenAI Chat: gpt-4-turbo-2024-04-09
OpenAI Chat: gpt-4-turbo (aliases: gpt-4-turbo-preview, 4-turbo, 4t)
OpenAI Chat: gpt-4.5-preview-2025-02-27
OpenAI Chat: gpt-4.5-preview (aliases: gpt-4.5)
OpenAI Chat: o1
OpenAI Chat: o1-2024-12-17
OpenAI Chat: o1-preview
OpenAI Chat: o1-mini
OpenAI Chat: o3-mini
OpenAI Chat: o3
OpenAI Chat: o4-mini
OpenAI Chat: gpt-5
OpenAI Chat: gpt-5-mini
OpenAI Chat: gpt-5-nano
OpenAI Chat: gpt-5-2025-08-07
OpenAI Chat: gpt-5-mini-2025-08-07
OpenAI Chat: gpt-5-nano-2025-08-07
OpenAI Completion: gpt-3.5-turbo-instruct (aliases: 3.5-instruct, chatgpt-instruct)
Perplexity: sonar-deep-research
Perplexity: sonar-reasoning-pro
Perplexity: sonar-reasoning
Perplexity: sonar-pro
Perplexity: sonar
Perplexity: r1-1776
Default: gpt-4o-mini
as of this blog post date written.
🚀 First Use: Asking LLM to Suggest a Shell Command
okay, here is where things get fun.
I started with something simply, identify all files that are larger than 1GB and I tried this prompt:
llm -m sonar-pro cmd "find all files in this local directory that are larger than 1GB"
It responded with something like:
Multiline command - Meta-Enter or Esc Enter to execute
> find . -type f -size +1G -exec ls -lh {} ;

  ## Citations:
  [1] https://tecadmin.net/find-all-files-larger-than-1gb-size-in-linux/
  [2] https://chemicloud.com/kb/article/find-and-list-files-bigger-or-smaller-than-in-linux/
  [3] https://manage.accuwebhosting.com/knowledgebase/3647/How-to-Find-All-Files-Larger-than-1GB-in-Linux.html
  [4] https://hcsonline.com/support/resources/blog/find-files-larger-than-1gb-command-line

Aborted!
I did not want to execute this, so I interrupted the process.
💡 Tip: Always review AI-suggested commands before running them — especially if they involve find /, rm -rf, or anything destructive.
📂 Example: Running the command manually
If you decide to run manually, you might do:
find . -xdev -type f -size +1G -exec ls -lh {} ;
My output was like:
-rw-r--r-- 1 ebal ebal 3.5G Jun  9 11:20 ./.cache/colima/caches/9efdd392c203dc39a21e37036e2405fbf5b0c3093c55f49c713ba829c2b1f5b5.raw
-rw-r--r-- 1 ebal ebal 13G Jun  9 11:58 ./.local/share/rancher-desktop/lima/0/diffdisk
Cool way to find big files, especially if disk is filling up 💾.
🤔 Things I Learned / Caveats
-
⚠️ AI-suggested commands are helpful, but sometimes they assume things (permissions, paths) that I didn’t expect.
-
🐍 Using a virtual env helps avoid version mismatches.
-
🔄 The plugins sometimes need updates; keep track of version changes.
-
🔑 Be careful with your API key — don’t commit it anywhere.
✅ Summary & What’s Next
So, after doing this:
-
🛠️ Got
llmworking with Perplexity -
📜 Asked for shell commands
-
👀 Reviewed + tested output manually
Next, I would like to run Ollama in my home lab. I don’t have a GPU yet, so I’ll have to settle for Docker on an old CPU, which means things will be slow and require some patience. I also want to play around with mixing an LLM and tools like Agno framework to set up a self-hosted agentic solution for everyday use.
That’s it !
PS. These are my personal notes from my home lab; AI was used to structure and format the final version of this blog post.
Managing SSL/TLS certificates for your domains can be effortless with the right tools. In this post, I’ll walk you through using acme.sh and LuaDNS to issue wildcard certificates for your domain.
Let’s dive into the step-by-step process of setting up DNS-based validation using the LuaDNS API.
📋 Prerequisites
- You own a domain and manage its DNS records with LuaDNS.
- You have
acme.shinstalled. - You’ve generated an API token from your LuaDNS account.
🧼 Step 1: Clean Up Old Certificates (Optional)
If you’ve previously issued a certificate for your domain and want to start fresh, you can remove it with:
acme.sh --remove -d balaskas.grThis will remove the certificate metadata from acme.sh, but not delete the actual files. You’ll find those under:
/root/.acme.sh/balaskas.grFeel free to delete them manually if needed.
🔑 Step 2: Set Your LuaDNS API Credentials
Log into your LuaDNS account and generate your API token from:
👉 https://api.luadns.com/settings
Then export your credentials in your shell session:
export LUA_Email="youremail@example.com"
export LUA_Key="your_luadns_api_key"
Example:
export LUA_Email="api.luadns@example.org"
export LUA_Key="a86ee24d7087ad83dc51dadbd35b31e4"
📜 Step 3: Issue the Wildcard Certificate
Now you can issue a certificate using DNS-01 validation via the LuaDNS API:
acme.sh --issue --dns dns_lua -d balaskas.gr -d *.balaskas.gr --server letsencryptThis command will:
- Use Let’s Encrypt as the Certificate Authority.
- Add two DNS TXT records (
_acme-challenge.balaskas.gr) using LuaDNS API. - Perform domain validation.
- Remove the TXT records after verification.
- Issue and store the certificate.
Sample output will include steps like:
Adding txt value: ... for domain: _acme-challenge.balaskas.gr
The txt record is added: Success.
Verifying: balaskas.gr
Verifying: *.balaskas.gr
Success
Removing DNS records.
Cert success.
You’ll find the certificate and key files in:
/root/.acme.sh/balaskas.gr/File paths:
- Certificate:
balaskas.gr.cer - Private Key:
balaskas.gr.key - CA Chain:
ca.cer - Full Chain:
fullchain.cer
✅ Step 4: Verify the Certificate
You can check your currently managed certificates with:
acme.sh --cron --listOutput should look like:
Main_Domain        KeyLength  SAN_Domains            CA                    Created                       Renew
balaskas.gr       ""         *.balaskas.gr         LetsEncrypt.org       Thu Apr 17 14:39:24 UTC 2025  Mon Jun 16 14:39:24 UTC 2025
🎉 Done!
That’s it! You’ve successfully issued and installed a wildcard SSL certificate using acme.sh with LuaDNS.
You can now automate renewals via cron, and integrate the certificate into your web server or load balancer.
🔁 Bonus Tip: Enable Auto-Renewal
acme.sh is cron-friendly. Just make sure your environment has access to the LUA_Key and LUA_Email variables, either by exporting them in a script or storing them in a config file.
Let me know if you’d like this blog post exported or published to a static site generator (like Hugo, Jekyll, or Hexo) or posted somewhere specific!
That’s it !
This blog post was made with chatgpt
a blog post series to my homelab

check here for Introduction to Traefik - Part Two
Part Three
In this blog post series, I will connect several docker containers and a virtual machine behind the Traefik reverse proxy on my homelab, and set up Let’s Encrypt for TLS.
In this article, I will try to connect a virtual machine to the Traefik reverse proxy. In Linux, Docker containers and virtual machines (VMs) run on different networks due to the way their networking is set up. To enable communication between Docker containers and VMs, we need to configure somekind of network bridging, port forwarding, or use a common network interface that allows them to communicate with each other. To simplify the setup, I will try to put Traefik docker container to a common network with the virtual machine.
Disclaimer: This homelab is intended for testing and learning purposes, as are the services we’ll explore. Make sure it fits your needs; I’m not suggesting you copy/paste everything here as-is. In the end, I may decide to delete this homelab and create a new one! But for now, let’s enjoy this journey together. Thank you!
I’ve also made a short video to accompany this blog post:

Virtual Machine
I use Qemu/KVM (kernel virtual machine) in my home lab. I also use terraform with libvirtd to automate my entire setup. That said, this post is not about that !
For the purpose of this article, I created an ubuntu 24.04 LTS running transmission service. It’s IP is: 192.168.122.79 and listens to TCP Port: 9091. Transmission also has configured with a Basic Auth authentication mechanism which username and password are the defaults: transmission:transmission.
Setup diagram
something similar to the below scheme
                       ┌────┐
                       │    │
                       │    │   192.168.122.x:9091
                       │    │
    ┌────┐             │    │        ┌───────┐
    │    │             │    │        │       │
    │    │  ─────────► │    ├───────►│       │
  ┌─└────┘─┐           │    │        │       │
  └────────┘           │    │        └───────┘
  192.168.1.3          │    │            VM
                       │    │
                       │    │        ┌──┐┌──┐
                       │    ├───────►│  ││  │whoami
                       └────┘        └──┘└──┘   172.19.0.x
                                     ┌──┐┌──┐
                       Traefik       │  ││  │
                                     └──┘└──┘
                                      docker
                                     containers
Traefik Network Mode
By default the network mode in docker compose is bridge mode which isolates the docker containers from the host. In the bridge mode our docker containers can communicate with each other directly.
But we need to either bridge our VM network (192.168.122.x/24) to the 172.19.0.x/24 network, or—what seems easier to me—change Traefik’s network mode from bridge to host.
In docker compose yaml file, in traefik service we need to make two changes:
first add the host network mode:
    # Very important in order to access the VM
    network_mode: host
and by using host we can now remove any port declaration
remove:
    ports:
      # The Web UI (enabled by --api.insecure=true)
      - 8080:8080
      # The HTTP port
      - 80:80
so our docker-compose.yml now looks like:
---
services:
  traefik:
    image: traefik:v3.3
    container_name: traefik
    hostname: traefik
    env_file:
      - path: ./.env
        required: true
    restart: unless-stopped
    volumes:
      - ./traefik:/etc/traefik
      - /var/run/docker.sock:/var/run/docker.sock:ro
    # Add health check
    healthcheck:
      test: curl -s --fail http://127.0.0.1:8080/ping
      interval: 30s
      retries: 3
      timeout: 10s
      start_period: 10s
    # Very important in order to access the VM
    network_mode: host

  # A container that exposes an API to show its IP address
  whoami:
    image: traefik/whoami
    container_name: whoami
    hostname: whoami
    depends_on:
      - traefik
    labels:
        - "traefik.enable=true"                                       # To enable whoami to Traefik
        - "traefik.http.routers.whoami.rule=Host(`whoami.localhost`)" # Declare the host rule for this service
        - "traefik.http.routers.whoami.entrypoints=web"               # Declare the EntryPoint
Start services:
docker compose up -dTest whoami
let us test now if whoami service works
curl -H Host:whoami.localhost http://127.0.0.1output:
Hostname: whoami
IP: 127.0.0.1
IP: ::1
IP: 172.19.0.2
RemoteAddr: 172.19.0.1:43968
GET / HTTP/1.1
Host: whoami.localhost
User-Agent: curl/8.12.1
Accept: */*
Accept-Encoding: gzip
X-Forwarded-For: 127.0.0.1
X-Forwarded-Host: whoami.localhost
X-Forwarded-Port: 80
X-Forwarded-Proto: http
X-Forwarded-Server: traefik
X-Real-Ip: 127.0.0.1
okay, seems it works are before.
Transmission
as mentioned above, our transmission application runs on the virtual machine. It is protected by a Basic Authentication setup and listens on a TCP port.
Let’s test the connection:
curl 192.168.122.79:9091result is:
<h1>401: Unauthorized</h1>To add Basic Auth to curl is simple:
curl -u transmission:transmission 192.168.122.79:9091now the output is:
<h1>301: Moved Permanently</h1>we can add -v to see more details:
curl -v -u transmission:transmission 192.168.122.79:9091full output:
*   Trying 192.168.122.79:9091...
* Connected to 192.168.122.79 (192.168.122.79) port 9091
* using HTTP/1.x
* Server auth using Basic with user 'transmission'
> GET / HTTP/1.1
> Host: 192.168.122.79:9091
> Authorization: Basic dHJhbnNtaXNzaW9uOnRyYW5zbWlzc2lvbg==
> User-Agent: curl/8.12.1
> Accept: */*
>
* Request completely sent off
< HTTP/1.1 301 Moved Permanently
< Server: Transmission
< Access-Control-Allow-Origin: *
< Location: /transmission/web/
< Date: Thu, 27 Feb 2025 15:47:02 GMT
< Content-Length: 31
< Content-Type: text/html; charset=ISO-8859-1
<
* Connection #0 to host 192.168.122.79 left intact
<h1>301: Moved Permanently</h1>
The Location section is interesting: Location: /transmission/web/
Authorization header
by looking very careful the above output, we see that curl uses the Authorization header for Basic Auth.
This is interesting and we can use this.
Let’s try the command:
curl -H "Authorization: Basic dHJhbnNtaXNzaW9uOnRyYW5zbWlzc2lvbg==" http://192.168.122.79:9091/output:
<h1>301: Moved Permanently</h1>okay !
So, another way to access transmission is via Authorization header. Curl sends the credentials through base64 encoding, which can be reproduced by
echo -n "transmission:transmission" | base64and we verify the output:
dHJhbnNtaXNzaW9uOnRyYW5zbWlzc2lvbg==Traefik file provider
For the purpose of this lab, we want to access the application on the VM from localhost without providing any credentials, with Traefik handling everything.
                                    ┌─────────┐
http://localhost/transmission/ ---> | Traefik | --> VM (IP:PORT + Basic Auth)/transmision/
                                    └─────────┘
To do that, we need to introduce a PathPrefix Rule to Traefik so it redirects every request for /transmission to the VM. And what a better place to introduce the file provider on our static Traefik configuration
    # Enable file provider
    file:
        directory: /etc/traefik/dynamic/
        watch: true
under our docker provider.
so the entire traefik/traefik.yml should look like:
# The /ping health-check URL
ping: {

}

# API and dashboard configuration
api:
    insecure: true

# Debug log
log:
    filePath: /etc/traefik/traefik.log
    level: DEBUG

# Enable EntryPoints
entryPoints:
    web:
        address: ":80"
        reusePort: true

# Providers
providers:
    # Enable docker provider
    docker:
        exposedByDefault: false

    # Enable file provider
    file:
        directory: /etc/traefik/dynamic/
        watch: true
Dynamic Directory
I am sure you have already noticed that we also have introduced a new directory under our Traefik folder and instructed Traefik to watch it. This is extremely useful because Traefik will automatically reload any configuration in that folder without the need to restart (stop/start or down/up) the Traefik service.
As this change is on static configuration, we need to stop/start the services:
docker compose downCreate the dynamic directory:
mkdir -pv ./traefik/dynamic/

ls -la ./traefik/dynamic/
and
docker compose up -dTraefik Design
To help you understand how traefik works,
                    HTTP        HTTP

┌───────────┐      ┌──────┐   ┌──────────┐   ┌───────┐
│           │      │      │   │          │   │       │
│EntryPoints│ ───► │Routes│──►│Middleware│──►│Service│
│           │      │      │   │          │   │       │
└───────────┘      └──────┘   └──────────┘   └───────┘
We have alredy explained EntryPoints on our previous article, so we are going to focus on routers, middlewares and services.
Traefik Services
To avoid any complicated explanation, the Traefik Service is the final destination of an HTTP request.
For our example, should look like the below config. Please be aware, the <service name> is a placeholder for later.
http:
  services:
    <service-name>:
      loadBalancer:
        servers:
          - url: 'http://192.168.122.79:9091'
Traefik Middlewares
As we already mentioned above, we need to send login credentials to transmission. Be aware <middleware name> is a place holder for later.
http:
  middlewares:
    <middlewar-name>:
      headers:
        customRequestHeaders:
          Authorization: "Basic dHJhbnNtaXNzaW9uOnRyYW5zbWlzc2lvbg=="
Traefik Routes
Traefik HTTP Routes are part of Traefik’s dynamic configuration and define how HTTP requests are handled and routed to the correct services.
Which means the routers is the component that connects everything (EntryPoint, Middleware, and Service) together. This is also where we add our PathPrefix rule for the Transmission location.
Be aware <router|service|middleware name> is a place holder for later.
eg.
http:
  routers:
    <router-name>>:
      entryPoints: web
      service: <service-name>
      rule: PathPrefix(`/transmission`)
      middlewares:
        - <middleware-name>>
Traefik dynamic configuration
We are ready to pull things together.
Create a file named transmission yaml under the dynamic configuration directory:
./traefik/dynamic/transmission.yml
http:

  middlewares:
    middleware-transmission:
      headers:
        customRequestHeaders:
          Authorization: "Basic dHJhbnNtaXNzaW9uOnRyYW5zbWlzc2lvbg=="

  routers:
    router-transmission:
      entryPoints: web
      service: service-transmission
      rule: PathPrefix(`/transmission`)
      middlewares:
        - middleware-transmission

  services:
    service-transmission:
      loadBalancer:
        servers:
          - url: 'http://192.168.122.79:9091'
NO need to restart our services with dynamic configuration!
Test Traefik new transmission route
from command line
curl localhost/transmission/output:
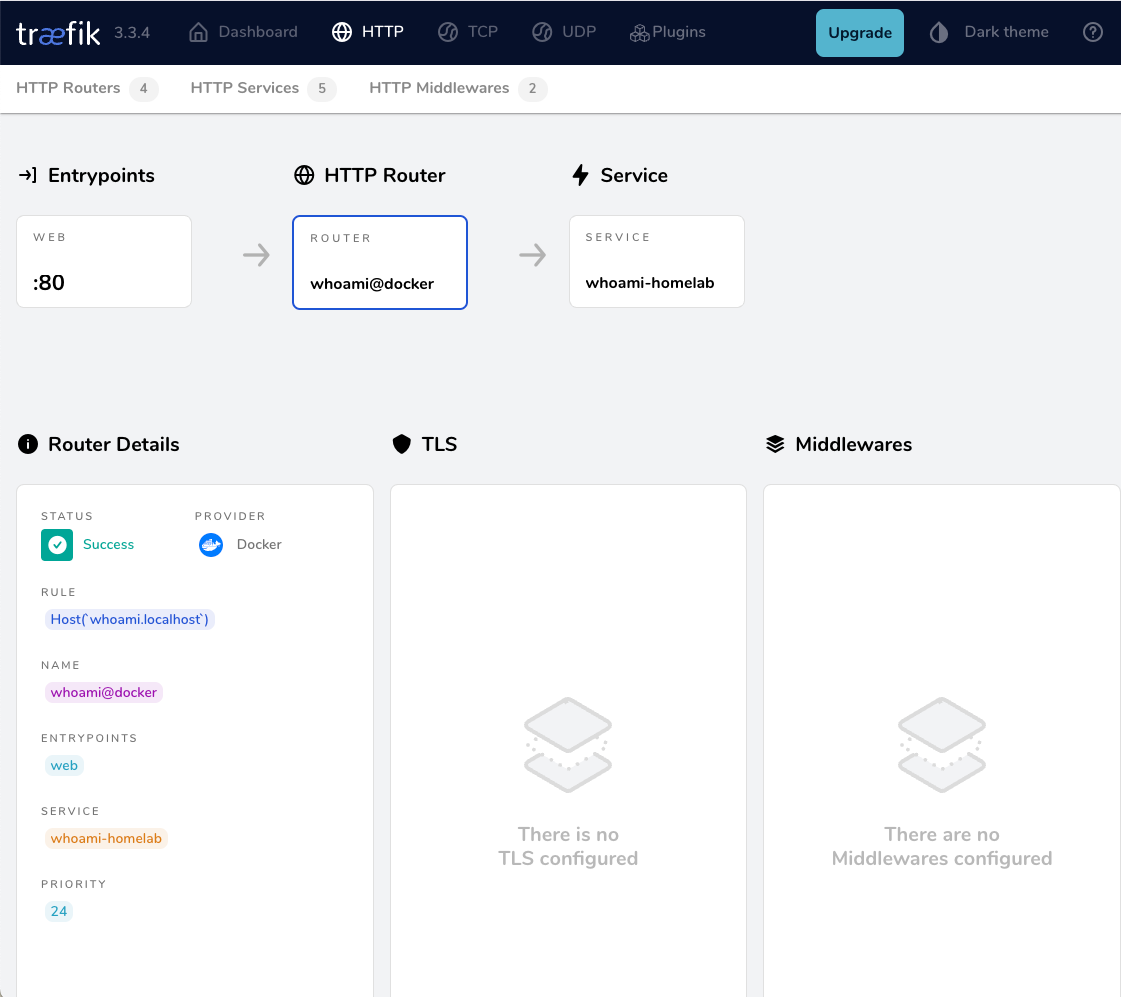
<h1>301: Moved Permanently</h1>from dashboard
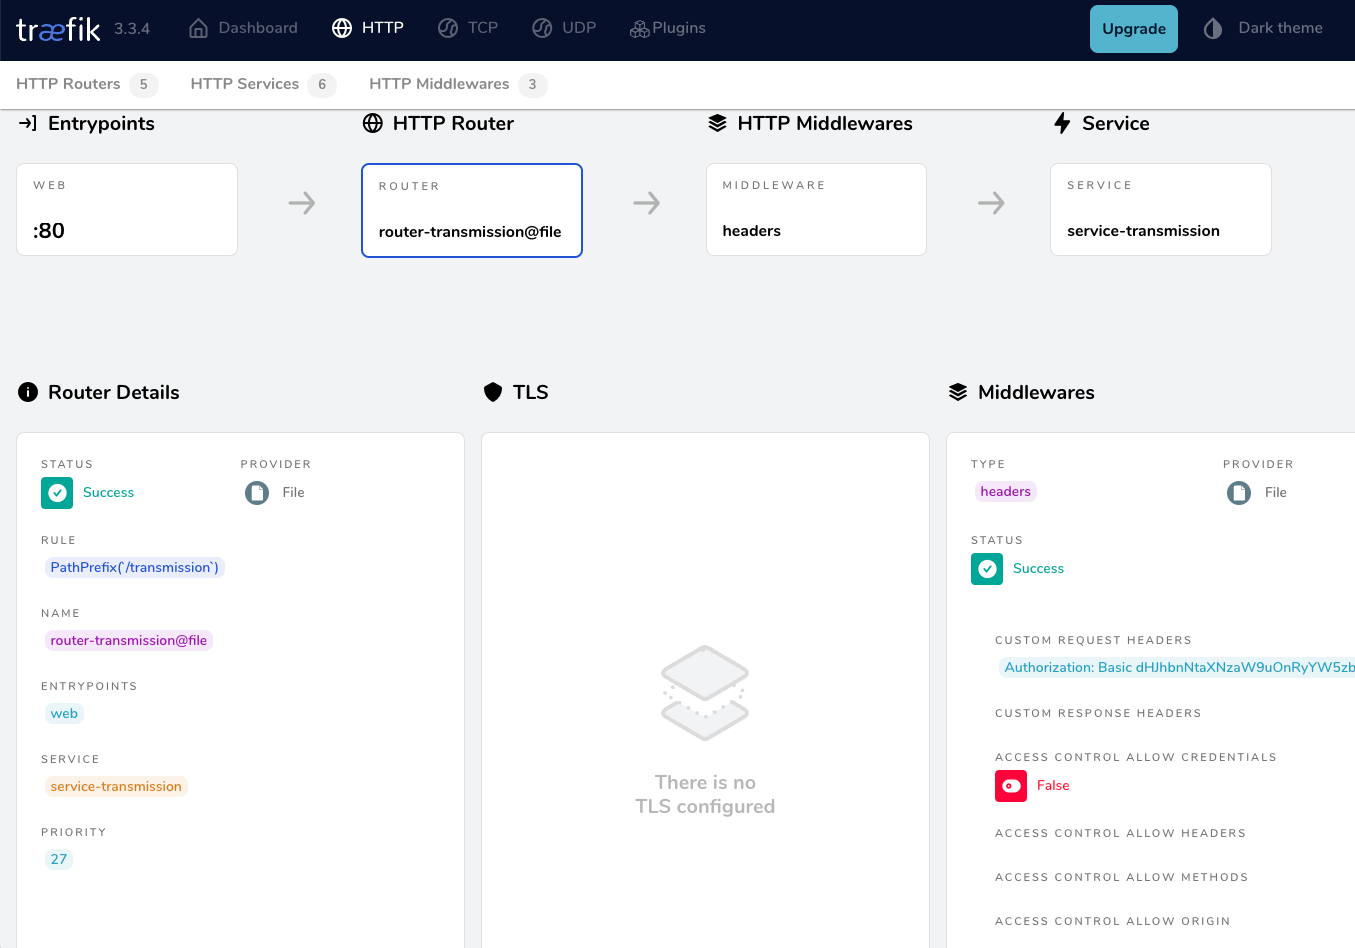
from browser
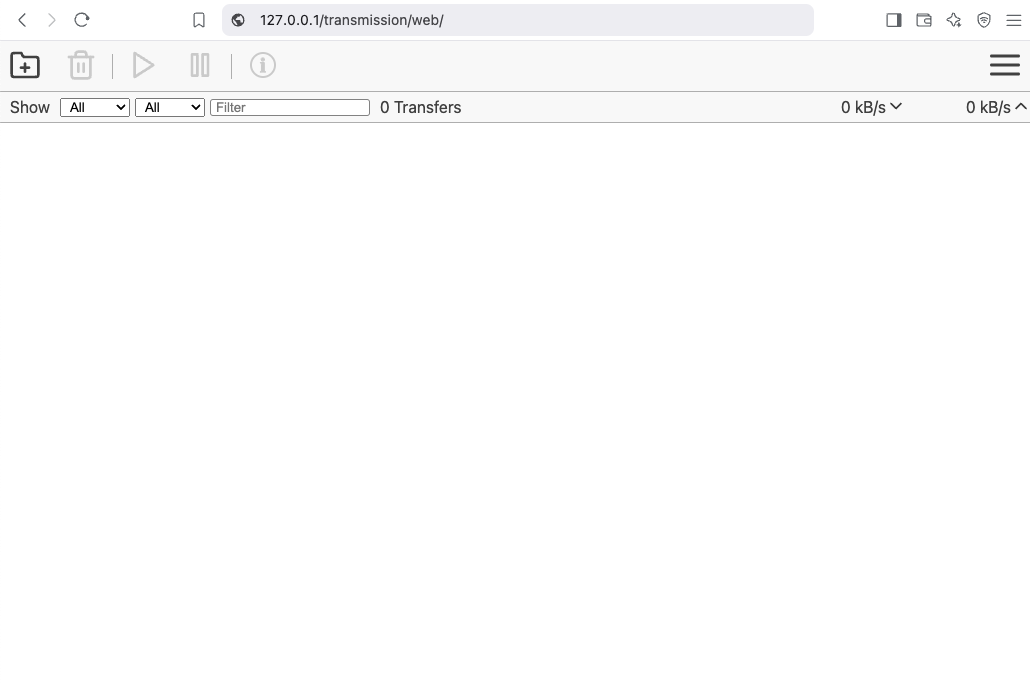
That’s It !!
docker compose down
a blog post series to my homelab
check here for Introduction to Traefik - Part One
Part Two
In this blog post series, I will connect several docker containers and a virtual machine behind the Traefik reverse proxy on my homelab, and set up Let’s Encrypt for TLS. In this post, I will connect our first docker container to the Traefik reverse proxy for testing and to learn how to do this.
I’ve also made a short video to accompany this blog post:

WhoAmI?
Traefik, whoami is often used as a simple test service to demonstrate how Traefik handles routing, especially when using dynamic routing and reverse proxy setups.
  # A container that exposes an API to show its IP address
  whoami:
    image: traefik/whoami
    container_name: whoami
    hostname: whoami
our updated docker compose file should look like:
docker-compose.yml
---
services:
  traefik:
    image: traefik:v3.3
    container_name: traefik
    hostname: traefik
    env_file:
      - path: ./.env
        required: true
    restart: unless-stopped
    ports:
      # The Web UI (enabled by --api.insecure=true)
      - 8080:8080
      # The HTTP port
      - 80:80
    volumes:
      - ./traefik:/etc/traefik
      - /var/run/docker.sock:/var/run/docker.sock:ro

  # A container that exposes an API to show its IP address
  whoami:
    image: traefik/whoami
    container_name: whoami
    hostname: whoami
Start all the services
docker compose up -doutput:
$ docker compose up -d
[+] Running 3/3
 ✔ Network homelab_default  Created    0.3s
 ✔ Container whoami         Started    2.2s
 ✔ Container traefik        Started    2.3s
Test WhoAmI - the wrong way
We can test our traefik reverse proxy with
curl -H Host:whoami.localhost http://127.0.0.1but the result should be:
404 page not foundWhy ?
We have not yet changed our traefik configuration file to enable an EntryPoint. EntryPoints are the network entry points into Traefik.
So let’s go back one step.
docker compose down
Traefik Configuration
The simplest approach is to update our configuration file and add a new EntryPoint. However, I’d like to take this opportunity to expand our configuration a little.
EntryPoints are Static Configuration, so they must be included on traefik.yml file.
## Static configuration
entryPoints:
  web:
   address: ":80"
so traefik/traefik.yml should look like:
# API and dashboard configuration
api:
  insecure: true

## Static configuration
entryPoints:
  web:
   address: ":80"
That should work, but given the opportunity, let’s enhance our Traefik configuration by including:
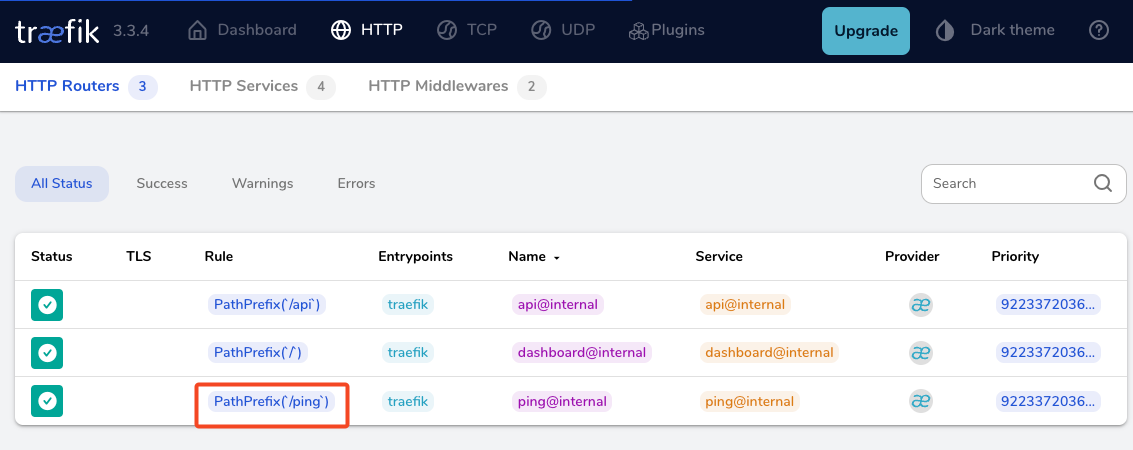
Ping
# The /ping health-check URL
ping: {

}
It would be useful to add a health check in the Docker Compose file later on.
Logs
This is how to enable the DEBUG (or INFO - just replace the verb in level)
# Debug log
log:
  filePath: /etc/traefik/traefik.log
  level: DEBUG
Docker provider
I want to explicitly include the Docker provider with a caveat: I don’t want to automatically expose all my docker containers behind Traefik. Instead, I prefer to manually add each docker container that I want to expose to the internet, rather than exposing all of them by default.
providers:
  # Enable docker provider
  docker: {
    exposedByDefault: false
  }
Traefik Configuration file updated
and now traefik/traefik.yml looks like:
# The /ping health-check URL
ping: {

}

# API and dashboard configuration
api:
    insecure: true

# Debug log
log:
    filePath: /etc/traefik/traefik.log
    level: DEBUG

# Enable EntryPoints
entryPoints:
    web:
        address: ":80"
        reusePort: true

# Providers
providers:
    # Enable docker provider
    docker: {
        exposedByDefault: false
    }
by running
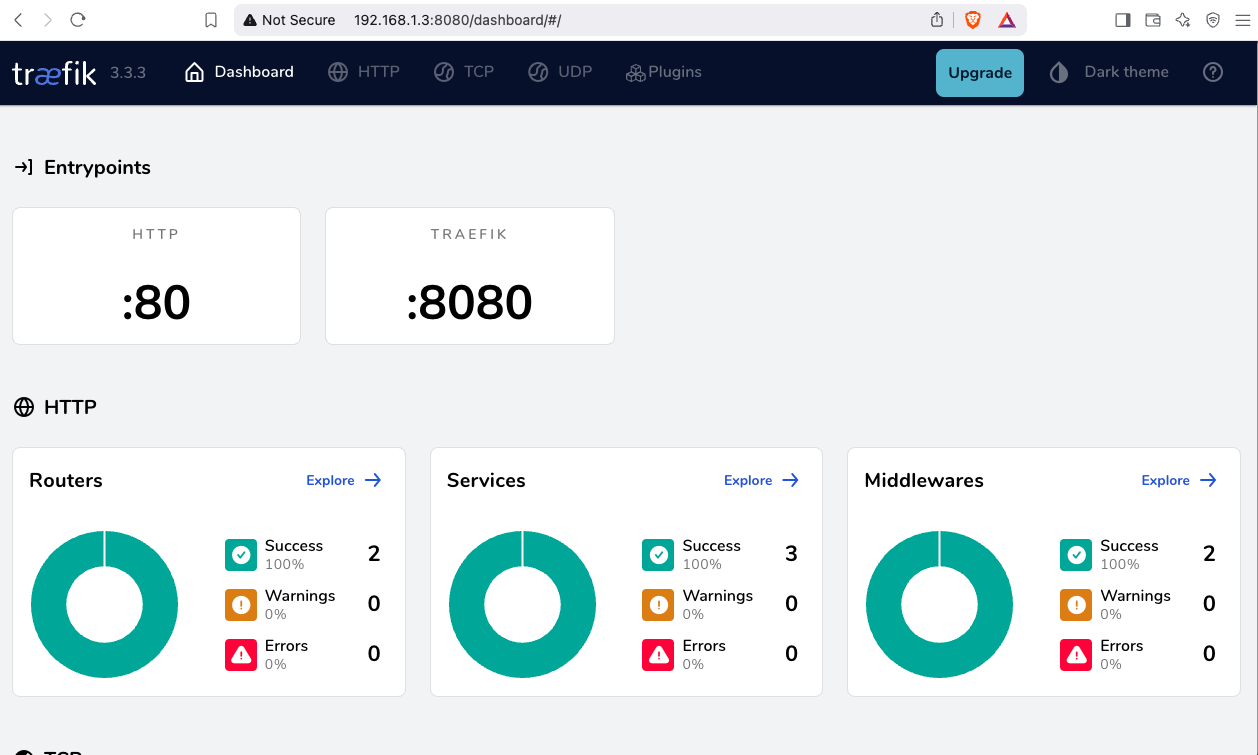
docker compose up traefik -dwe can review Traefik dashboard with the new web EntryPoint and ping
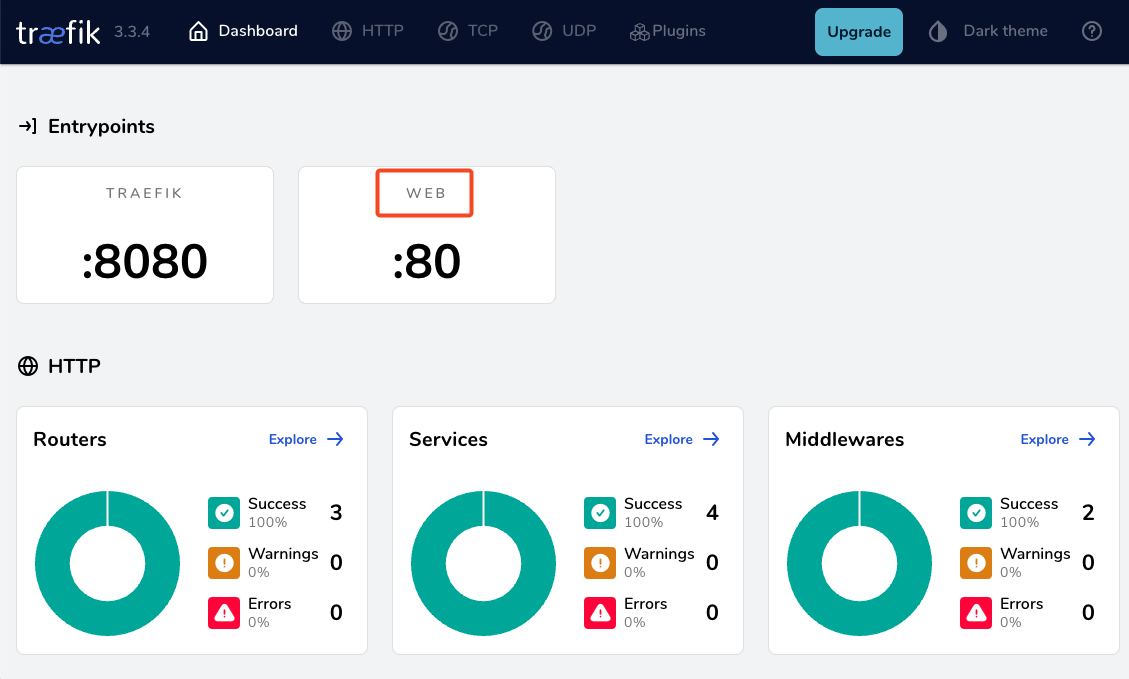
WhoAmI - the correct way
okay, we now have our EntryPoint in Traefik but we need to explicit expose our whoami docker container and in order to do that, we need to add some labels!
  # A container that exposes an API to show its IP address
  whoami:
    image: traefik/whoami
    container_name: whoami
    hostname: whoami
    labels:
        - "traefik.enable=true" # To enable whoami to Traefik
        - "traefik.http.routers.whoami.rule=Host(`whoami.localhost`)" # Declare the host rule for this service
        - "traefik.http.routers.whoami.entrypoints=web" # Declare the EntryPoint
let’s put everything together:
---
services:
  traefik:
    image: traefik:v3.3
    container_name: traefik
    hostname: traefik
    env_file:
      - path: ./.env
        required: true
    restart: unless-stopped
    ports:
      # The Web UI (enabled by --api.insecure=true)
      - 8080:8080
      # The HTTP port
      - 80:80
    volumes:
      - ./traefik:/etc/traefik
      - /var/run/docker.sock:/var/run/docker.sock:ro

  # A container that exposes an API to show its IP address
  whoami:
    image: traefik/whoami
    container_name: whoami
    hostname: whoami
    labels:
        - "traefik.enable=true" # To enable whoami to Traefik
        - "traefik.http.routers.whoami.rule=Host(`whoami.localhost`)" # Declare the host rule for this service
        - "traefik.http.routers.whoami.entrypoints=web" # Declare the EntryPoint
docker compose up -d
Test Who Am I
curl -H Host:whoami.localhost http://127.0.0.1output:
Hostname: whoami
IP: 127.0.0.1
IP: ::1
IP: 172.19.0.3
RemoteAddr: 172.19.0.2:41276
GET / HTTP/1.1
Host: whoami.localhost
User-Agent: curl/8.12.1
Accept: */*
Accept-Encoding: gzip
X-Forwarded-For: 172.19.0.1
X-Forwarded-Host: whoami.localhost
X-Forwarded-Port: 80
X-Forwarded-Proto: http
X-Forwarded-Server: traefik
X-Real-Ip: 172.19.0.1
Health Checks and Depends
before finishing this article, I would like to include two more things.
Traefik Health Check
We added above the ping section on Traefik configuration, it is time to use it. On our docker compose configuration file, we can add a health check section for Traefik service.
We can test this from our command line
curl -s --fail http://127.0.0.1:8080/pingthe result should be an OK !
and we can extend the Traefik service to include this
    healthcheck:
      test: curl -s --fail http://127.0.0.1:8080/ping
      interval: 30s
      retries: 3
      timeout: 10s
      start_period: 10s
Depends On
The above health check option can be used to specify service dependencies in docker compose, so we can ensure that the whoami docker service starts after Traefik.
    depends_on:
      - traefik
that means our docker compose yaml file should look like:
---
services:
  traefik:
    image: traefik:v3.3
    container_name: traefik
    hostname: traefik
    env_file:
      - path: ./.env
        required: true
    restart: unless-stopped
    ports:
      # The Web UI (enabled by --api.insecure=true)
      - 8080:8080
      # The HTTP port
      - 80:80
    volumes:
      - ./traefik:/etc/traefik
      - /var/run/docker.sock:/var/run/docker.sock:ro
    # Add health check
    healthcheck:
      test: curl -s --fail http://127.0.0.1:8080/ping
      interval: 30s
      retries: 3
      timeout: 10s
      start_period: 10s

  # A container that exposes an API to show its IP address
  whoami:
    image: traefik/whoami
    container_name: whoami
    hostname: whoami
    depends_on:
      - traefik
    labels:
        - "traefik.enable=true"                                       # To enable whoami to Traefik
        - "traefik.http.routers.whoami.rule=Host(`whoami.localhost`)" # Declare the host rule for this service
        - "traefik.http.routers.whoami.entrypoints=web"               # Declare the EntryPoint
a blog post series to my homelab

Part One
In this blog post, I will start by walking you through the process of setting up Traefik as a reverse proxy for your homelab. My setup involves using a virtual machine connected via a point-to-point VPN to a cloud VPS, along with several Docker containers on my homelab for various tasks and learning purposes. The goal is to expose only Traefik to the internet, which will then provide access to my internal homelab. For certain applications, I also use Tailscale, which I prefer not to expose directly to the internet. In short, I have a complex internal homelab setup, and in this post, we’ll simplify it!
I’ve made a short video to accompany this blog post:

docker compose
To begin, we need to set up a basic Docker Compose YAML file.
As of the time of writing this blog post, the latest Traefik Docker container image is version 3.3. It is best to declare a specific version instead of using “latest” tag.
image: traefik:v3.3Using an .env file in a Docker Compose configuration is important for several reasons, as for configure variables, secrets and it is easy to reuse though several services and to avoid hardcoding values. For traefik is important so we can configure the docker GID in order traefil to be able to use the docker socket.
eg. .env
# This is my user id
PUID=1001
# This is my docker group id
PGID=142
UMASK="002"
TZ="Europe/Athens"
DNS="88.198.92.222"
Next interesting topic is the volumes section.
I would like to mount a local directory for the traefik configuration, which I will later use with the dynamic file provider. Additionally, to enable Traefik to recongize our (future) docker images, we need to mount the docker socket too.
    volumes:
      - ./traefik:/etc/traefik
      - /var/run/docker.sock:/var/run/docker.sock
to conclude, here is a very basic docker compose yaml file:
docker-compose.yml
---
services:
  traefik:
    image: traefik:v3.3
    container_name: traefik
    hostname: traefik
    env_file:
      - path: ./.env
        required: true
    restart: unless-stopped
    ports:
      # The Web UI (enabled by --api.insecure=true)
      - 8080:8080
      # The HTTP port
      - 80:80
    volumes:
      - ./traefik:/etc/traefik
      - /var/run/docker.sock:/var/run/docker.sock
pull traefik docker image
we can explicitly get the Traefik docker container image
docker compose pull traefiktraefik configuration file
we also need to create the configuration file by enabling the API and the dashboard for now.
Create the directory and file
traefik/traefik.yml
and write this:
# API and dashboard configuration
api:
  insecure: true
Start traefik docker
We are ready start and run our Traefik docker container:
docker compose upresult is something like:
[+] Running 2/2
 ✔ Network homelab_default  Created       0.3s
 ✔ Container traefik        Created       0.4s
Attaching to traefik
To stop traefik from docker compose, we need to open a new terminal and type from the same directory
docker compose downor, we ca run the docker compose and detach it so it runs on the background:
docker compose up traefik -dThis is going to be useful for the future as we starting each service one by one.
Test traefik
Open your browser and click on: http://127.0.0.1:8080
you will see something like: