WackoWiki is the wiki of my choice and one of the first opensource project I’ve ever contributed. I still use wackowiki for personal use!
A few days ago, wackowiki released version 6.0.25. In this blog post, I will try to share my experience of installing wackowiki on a new VM ubuntu 20.04 LTS.
Ansible Role
I have updated the WackoWiki Ansible Role on my personal github account to represent all necessary steps of this article.
Terraform files
In order to test/verify wackowiki installation and ansible role, I use a virtual machine on my home lab. To make this fast and reproducable, I have uploaded my terraform files that I used on my lab here: GitHub
Requirements
Ubuntu 20.04 LTS
apt-get update
apt -y install /
       php /
       php-common /
       php-bcmath /
       php-ctype /
       php-gd /
       php-iconv /
       php-json /
       php-mbstring /
       php-mysql /
       apache2 /
       libapache2-mod-php /
       mariadb-server /
       unzip
Apache2
We need to enable mod_reqwrite in apache2 but also to add the appropiate configuration in the default conf in VirtualHost
sudo -i
a2enmod rewrite
vim /etc/apache2/sites-available/000-default.conf
<VirtualHost *:80>
...
    # enable.htaccess
    <Directory /var/www/html/>
        Options Indexes FollowSymLinks MultiViews
        AllowOverride All
        Require all granted
    </Directory>
...
</VirtualHost>
MySQL
wacko.sql
CREATE DATABASE IF NOT EXISTS wacko;
CREATE USER IF NOT EXISTS 'wacko'@'localhost' IDENTIFIED BY 'YOURNEWPASSWORD';
GRANT  ALL PRIVILEGES ON wacko.* TO 'wacko'@'localhost';
FLUSH  PRIVILEGES;
sudo -i
mysql < wacko.sql
Get WackoWiki
curl -sLO https://downloads.sourceforge.net/wackowiki/wacko.6.0.25.zip
unzip wacko.6.0.25.zip
mv wackowiki-6.0.25/wacko /var/www/html/wacko/
chown -R www-data:www-data /var/www/html/wacko/
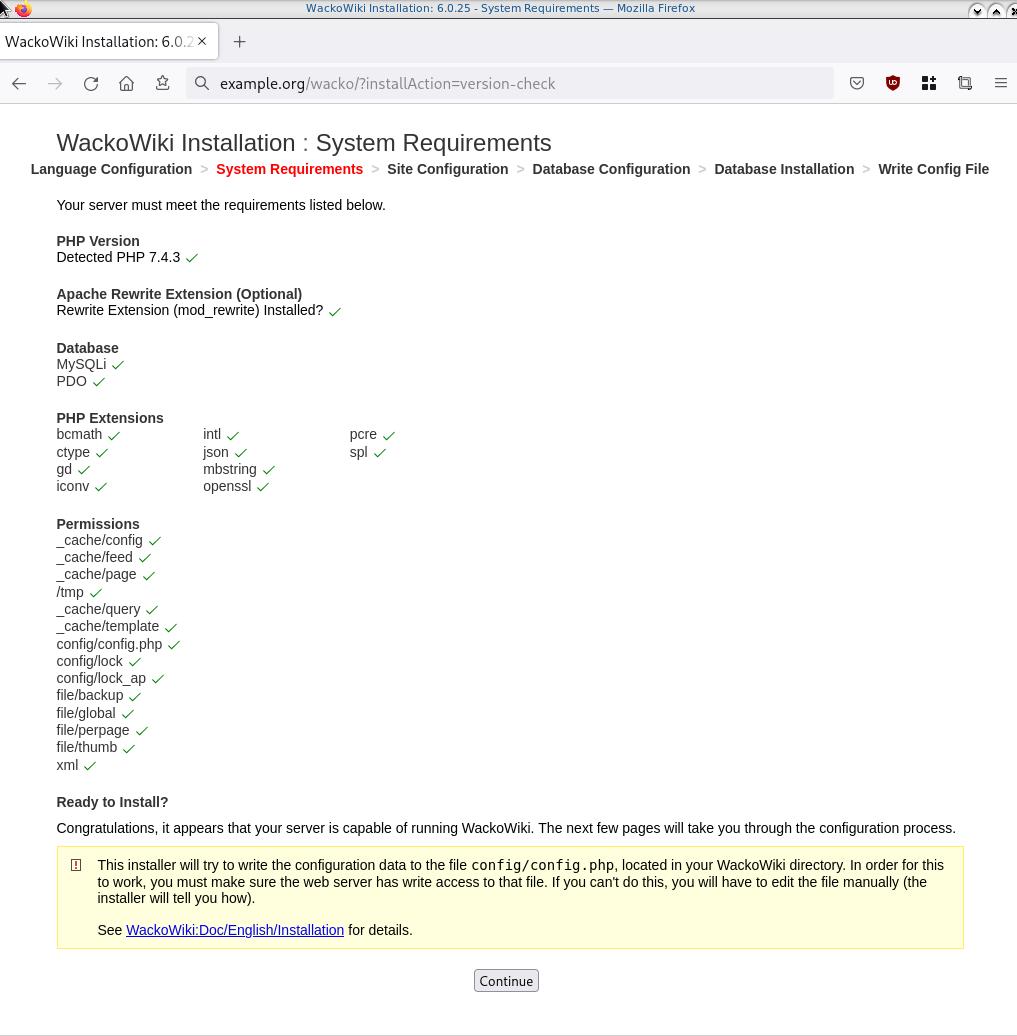
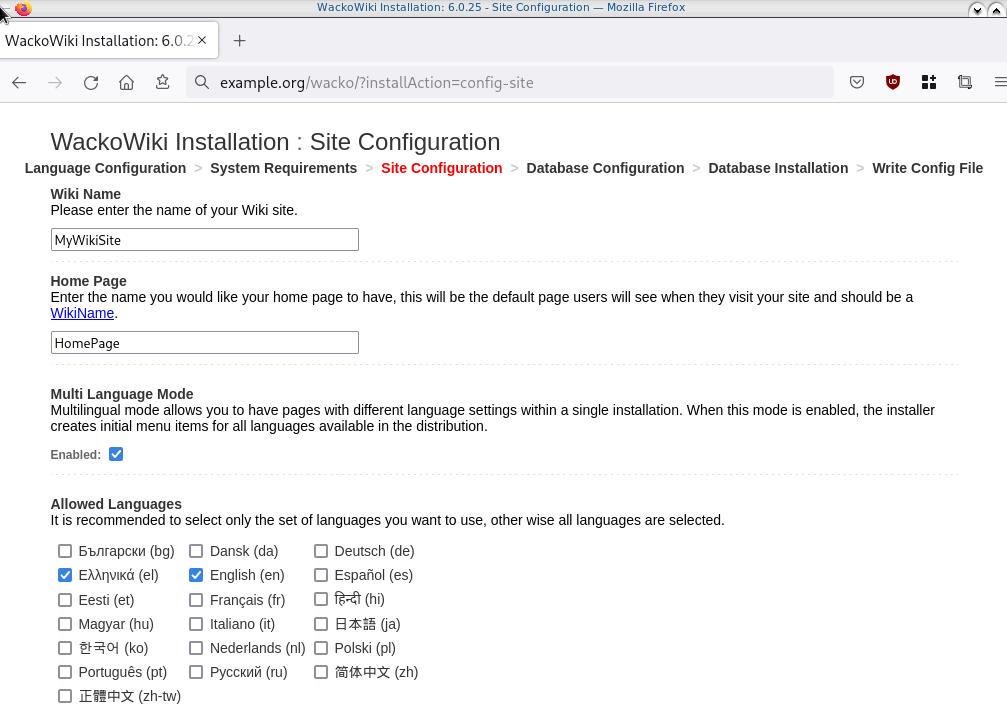
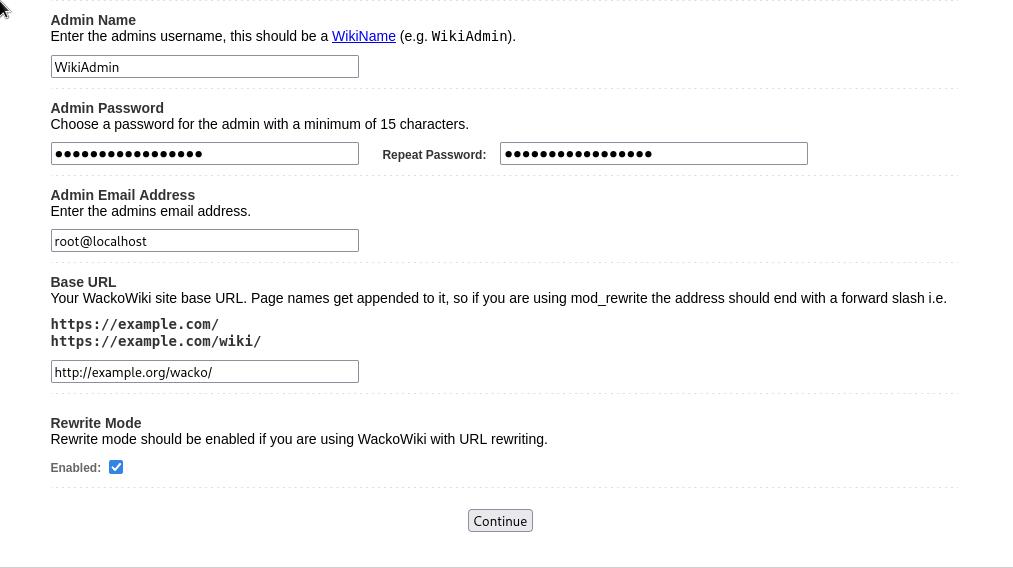
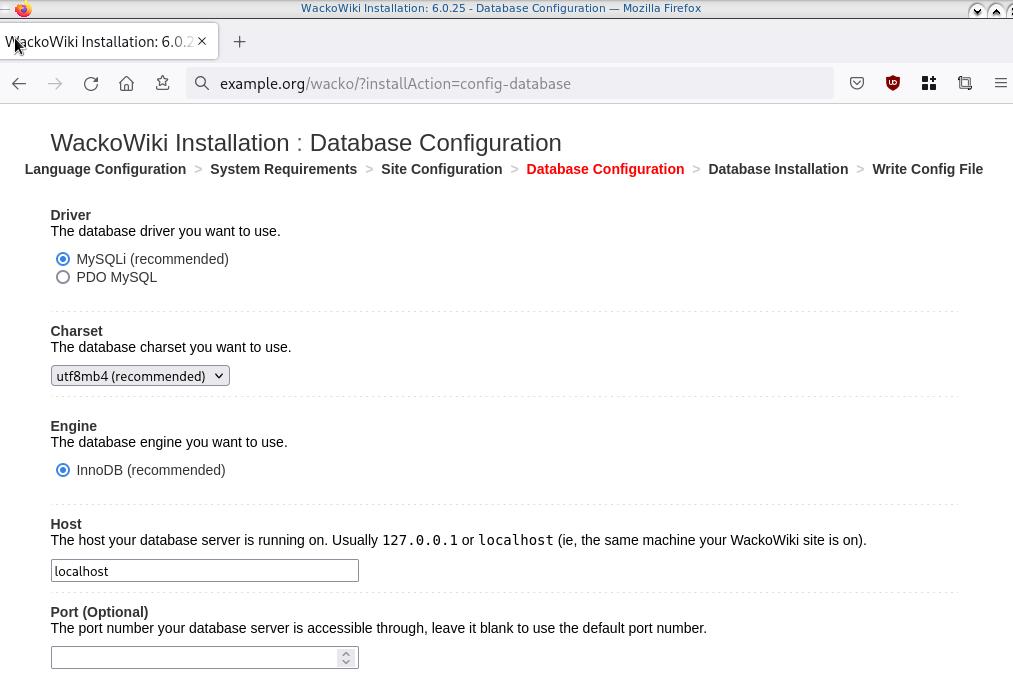
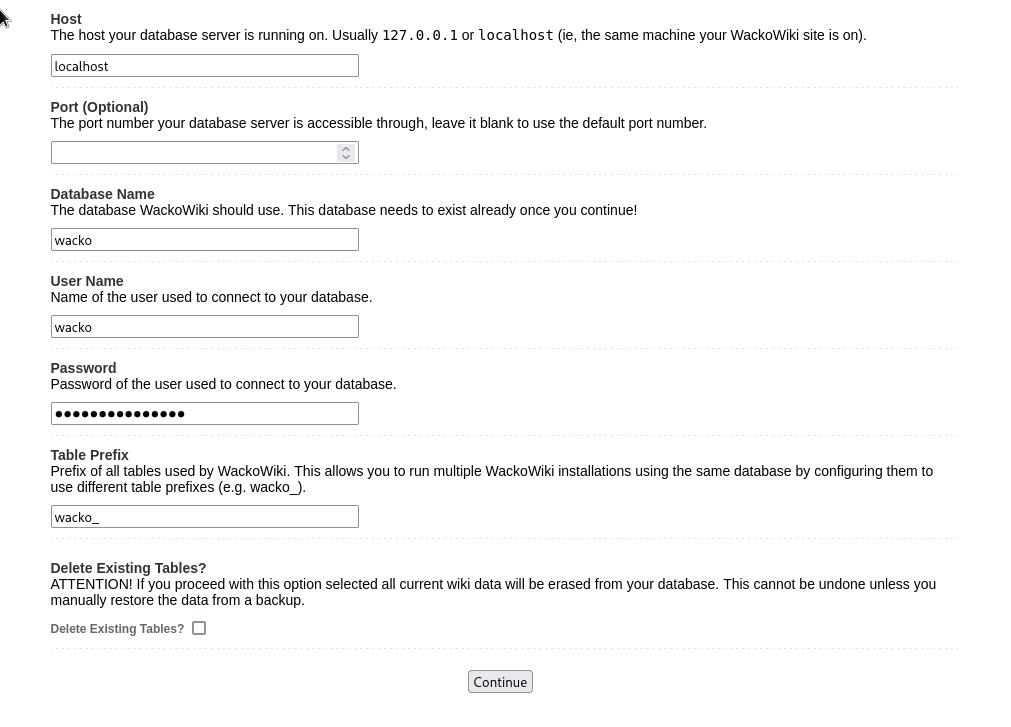
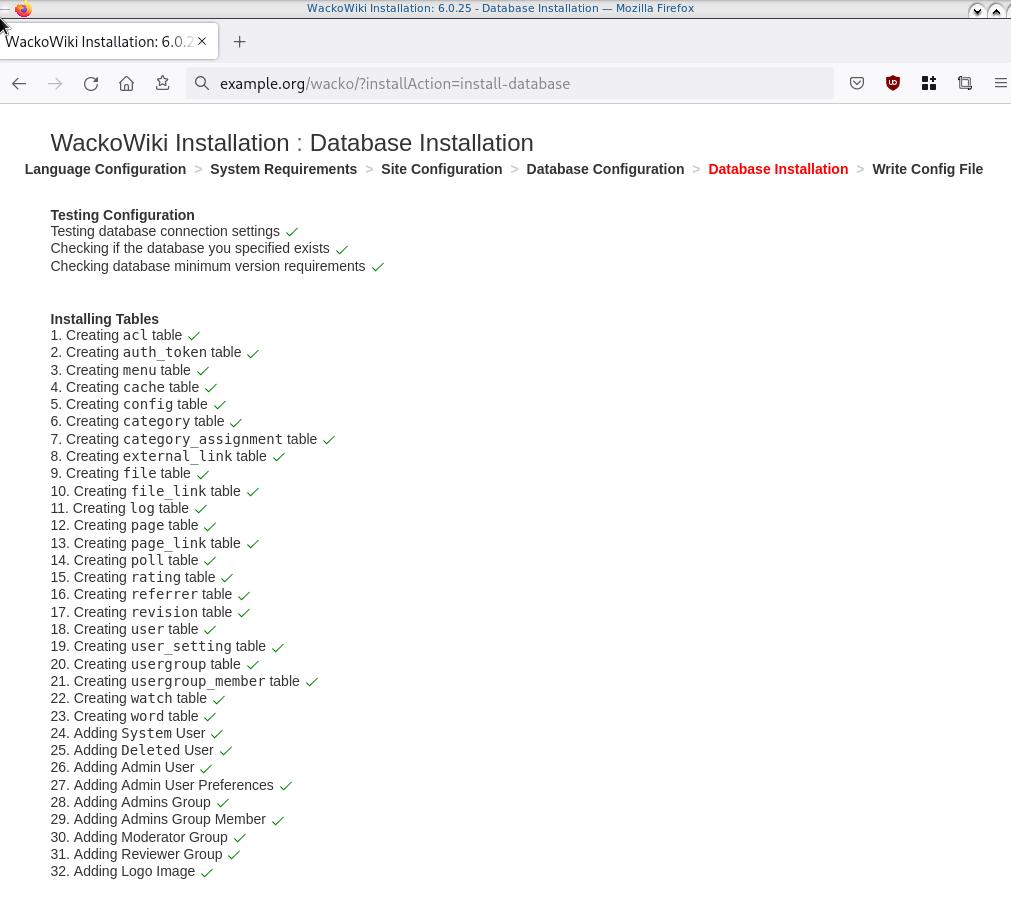
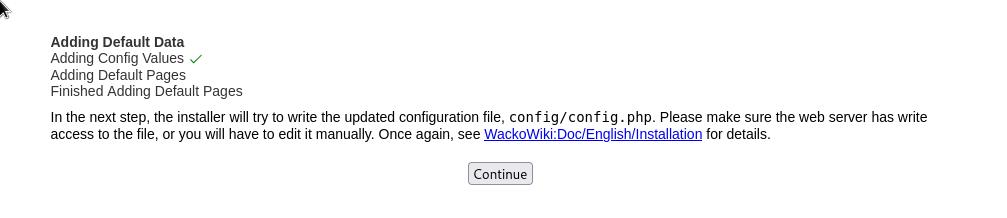
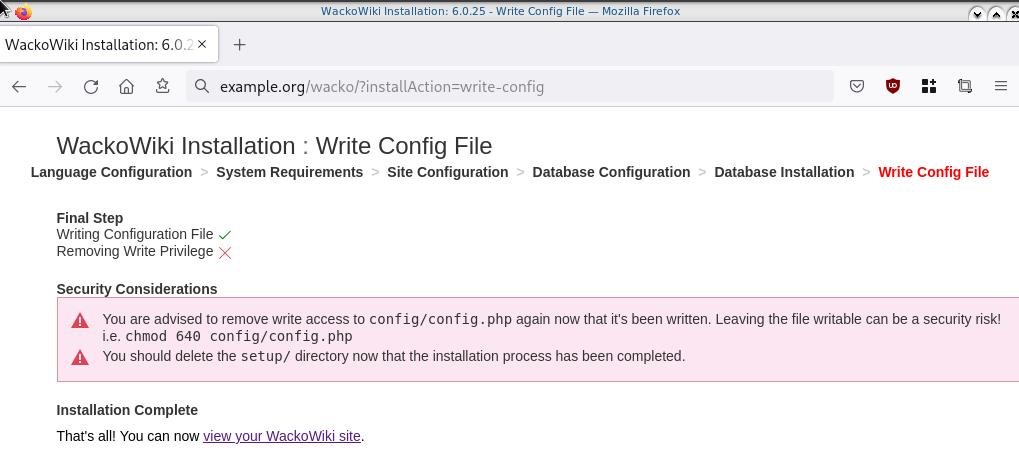
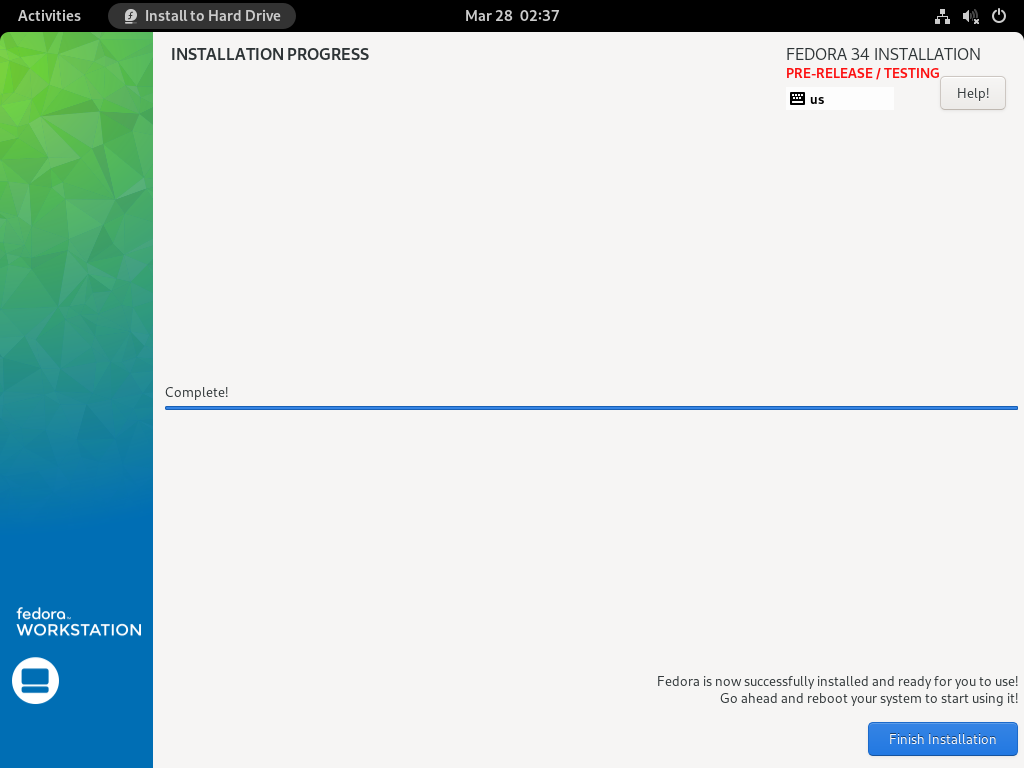
Web Installation

Post Install
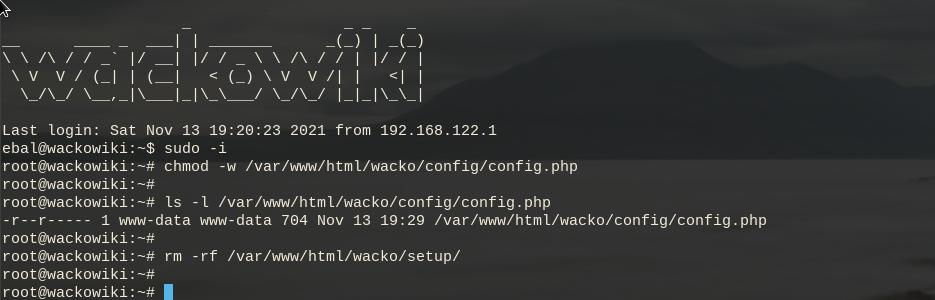
Last, we need to remove write permission for the wackowiki configuration file and remove setup folder
sudo -i
chmod -w /var/www/html/wacko/config/config.php
rm -rf   /var/www/html/wacko/setup/
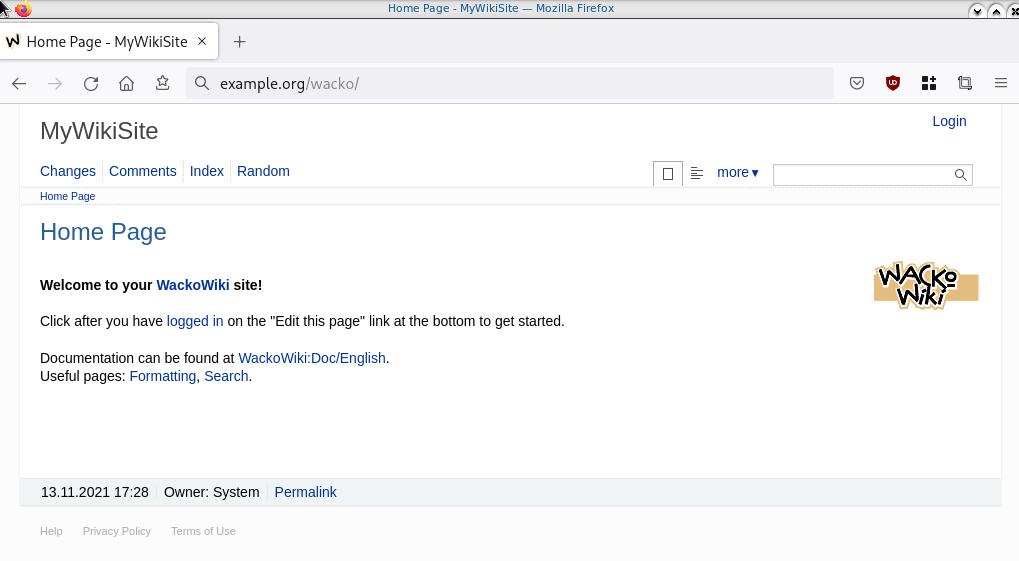
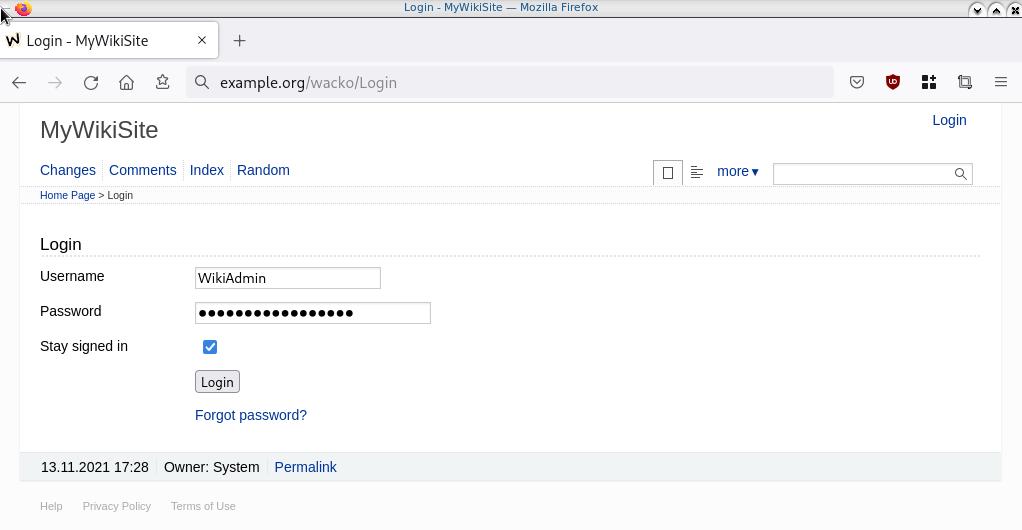
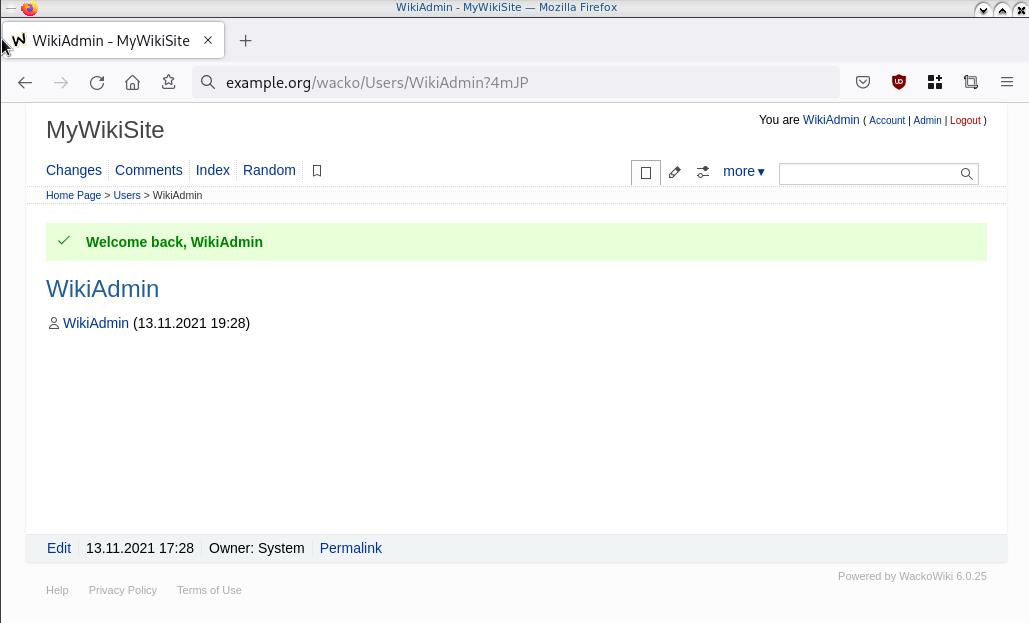
Simple WackoWiki Walkthrough
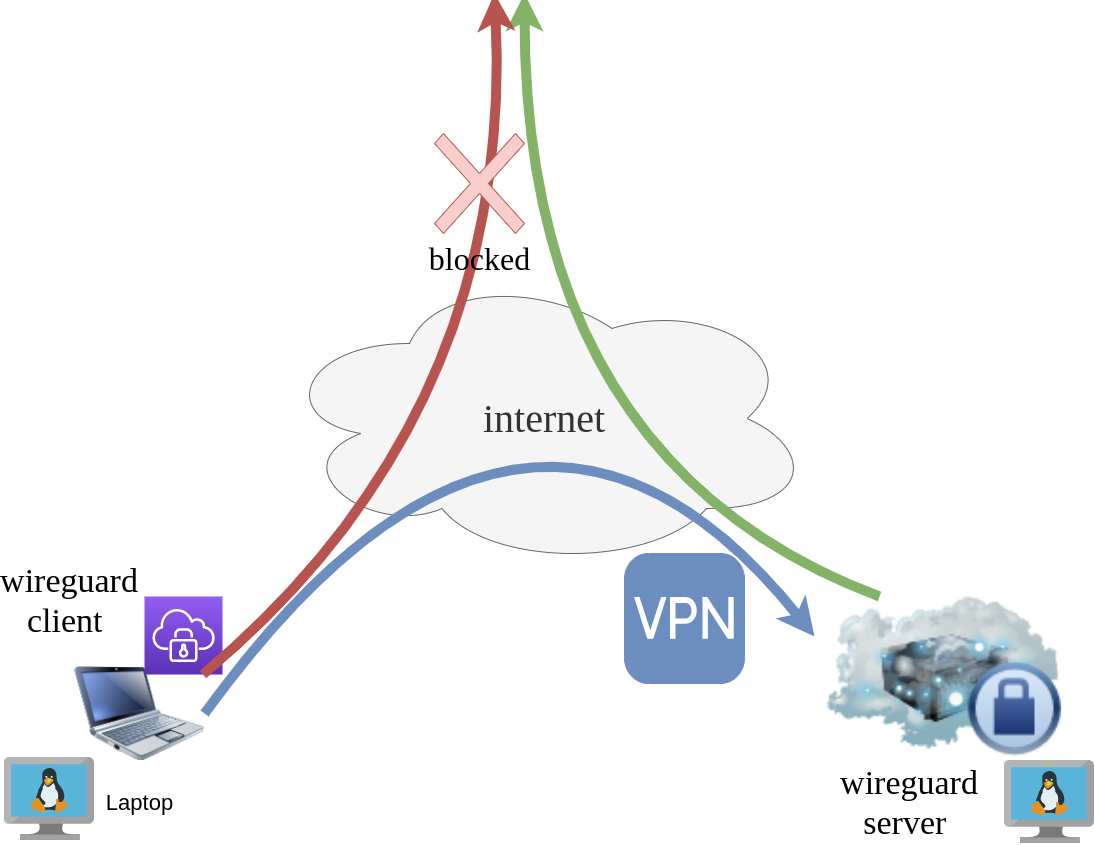
WireGuard: fast, modern, secure VPN tunnel. WireGuard securely encapsulates IP packets over UDP.
Goal
What I would like to achieve, in this article, is to provide a comprehensive guide for a redirect-gateway vpn using wireguard with a twist. The client machine should reach internet through the wireguard vpn server. No other communications should be allowed from the client and that means if we drop the VPN connection, client can not go to the internet.
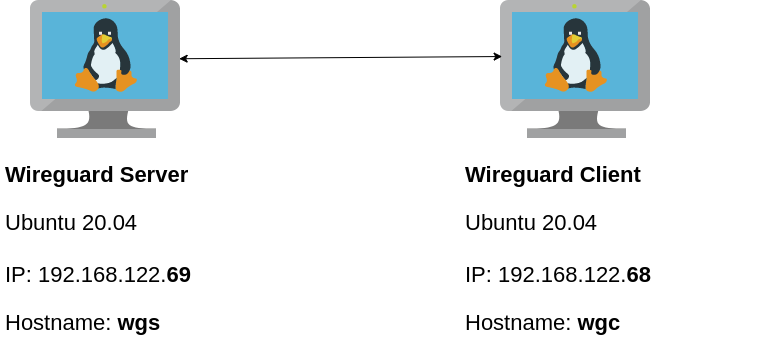
Intro - Lab Details
Here are my lab details. This blog post will help you understand all the necessary steps and provide you with a guide to replicate the setup. You should be able to create a wireguard VPN server-client between two points. I will be using ubuntu 20.04 as base images for both virtual machines. I am also using LibVirt and Qemu/KVM running on my archlinux host.
Wireguard Generate Keys
and the importance of them!
Before we begin, give me a moment to try explaining how the encryption between these two machines, in a high level design works.
Each linux machines creates a pair of keys.
- Private Key
- Public Key
These keys have a unique relationship. You can use your public key to encrypt something but only your private key can decrypt it. That mean, you can share your public keys via an cleartext channel (internet, email, slack). The other parties can use your public key to encrypt traffic towards you, but none other decrypt it. If a malicious actor replace the public keys, you can not decrypt any incoming traffic thus make it impossible to connect to VPN server!

Public - Private Keys
Now each party has the other’s public keys and they can encrypt traffic for each other, BUT only you can decrypt your traffic with your private key. Your private key never leaves your computer.
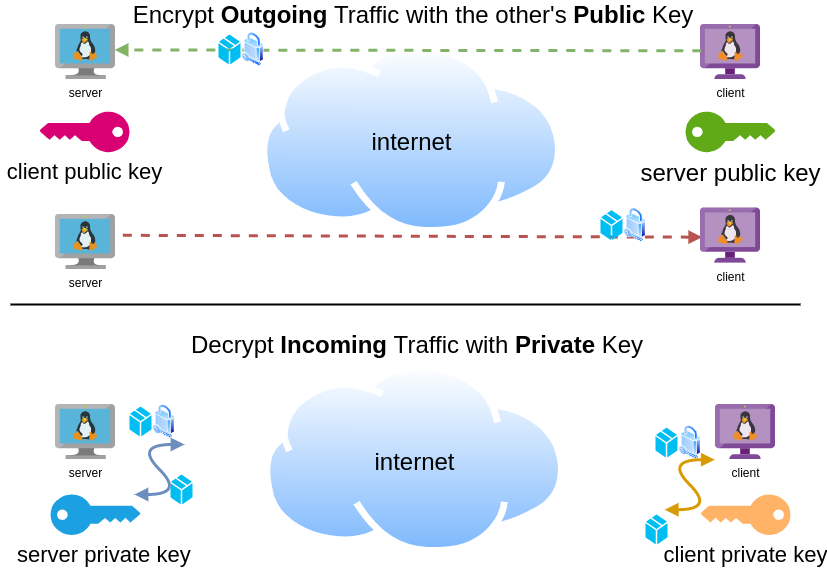
Hopefully you get the idea.
Wireguard Server - Ubuntu 20.04 LTS
In order to make the guide easy to follow, I will start with the server part.
Server Key Generation
Generate a random private and public key for the server as-root
wg genkey | tee /etc/wireguard/privatekey | wg pubkey > /etc/wireguard/publickeyMake the keys read-only
chmod 0400 /etc/wireguard/*keyList keys
ls -l /etc/wireguard/total 8
-r-------- 1 root root 45 Jul 12 20:29 privatekey
-r-------- 1 root root 45 Jul 12 20:29 publickey
UDP Port & firewall
In order to run a VPN service, you need to choose a random port that wireguard VPN server can listen to it.
eg.
61194open firewall
ufw allow 61194/udpRule added
Rule added (v6)
view more info
ufw status verboseStatus: active
Logging: on (low)
Default: deny (incoming), allow (outgoing), disabled (routed)
New profiles: skip
To Action From
-- ------ ----
22/tcp ALLOW IN Anywhere
61194 ALLOW IN Anywhere
22/tcp (v6) ALLOW IN Anywhere (v6)
61194 (v6) ALLOW IN Anywhere (v6)
So you see, only SSH and our VPN ports are open.
Default Incoming Policy is: DENY.
Wireguard Server Configuration File
Now it is time to create a basic configuration wireguard-server file.
Naming the wireguard interface
Clarification the name of our interface does not matter, you can choose any name. Gets it’s name from the configuration filename! But in order to follow the majority of guides try to use something from wg+. For me it is easier to name wireguard interface:
- wg0
but you may seen it also as
- wg
without a number. All good!
Making a shell script for wireguard server configuration file
Running the below script will create a new configuration file /etc/wireguard/wg0.conf
PRIVATE_KEY=$(cat /etc/wireguard/privatekey)
NETWORK=10.0.8
cat > /etc/wireguard/wg0.conf <<EOF
[Interface]
Address = ${NETWORK}.1/24
ListenPort = 61194
PrivateKey = ${PRIVATE_KEY}
EOF
ls -l /etc/wireguard/wg0.conf
cat /etc/wireguard/wg0.conf
Note I have chosen the network 10.0.8.0/24 for my VPN setup, you can choose any Private Network
10.0.0.0/8 - Class A
172.16.0.0/12 - Class B
192.168.0.0/16 - Class CI chose a Class C (256 IPs) from a /8 (Class A) private network, do not be confused about this. It’s just a Class-C /24 private network.
Let’s make our first test with the server
wg-quick up wg0[#] ip link add wg0 type wireguard
[#] wg setconf wg0 /dev/fd/63
[#] ip -4 address add 10.0.8.1/24 dev wg0
[#] ip link set mtu 1420 up dev wg0
It’s Alive!
Kernel Module
Verify that wireguard is loaded as a kernel module on your system.
lsmod | grep wireguardwireguard 212992 0
ip6_udp_tunnel 16384 1 wireguard
udp_tunnel 16384 1 wireguard
Wireguard is in the Linux kernel since March 2020.
Show IP address
ip address show dev wg03: wg0: <POINTOPOINT,NOARP,UP,LOWER_UP> mtu 1420
qdisc noqueue state UNKNOWN group default qlen 1000
link/none
inet 10.0.8.1/24 scope global wg0
valid_lft forever preferred_lft forever
Listening Connections
Verify that wireguard server listens to our specific UDP port
ss -nulp '( sport = :61194 )' | column -tState Recv-Q Send-Q Local Address:Port Peer Address:Port Process
UNCONN 0 0 0.0.0.0:61194 0.0.0.0:*
UNCONN 0 0 [::]:61194 [::]:*
Show wg0
wg show wg0interface: wg0
public key: <public key>
private key: (hidden)
listening port: 61194
Show Config
wg showconf wg0[Interface]
ListenPort = 61194
PrivateKey = <private key>
Close wireguard
wg-quick down wg0What is IP forwarding
In order for our VPN server to forward our client’s network traffic from the internal interface wg0 to it’s external interface and on top of that, to separate it’s own traffic from client’s traffic, the vpn server needs to masquerade all client’s traffic in a way that knows who to forward and send back traffic to the client. In a nuthshell this is IP forwarding and perhaps the below diagram can explain it a little better.

To do that, we need to enable the IP forward feature on our linux kernel.
sysctl -w net.ipv4.ip_forward=1The above command does not persist the change across reboots. To persist this setting we need to add it, to sysctl configuration. And although many set this option global, we do not need to have to do that!
Wireguard provides four (4) stages, to run our own scripts.
Wireguard stages
- PreUp
- PostUp
- PreDown
- PostDown
So we can choose to enable IP forwarding at wireguard up and disable it on wireguard down.
IP forwarding in wireguard configuration file
PRIVATE_KEY=$(cat /etc/wireguard/privatekey)
NETWORK=10.0.8
cat > /etc/wireguard/wg0.conf <<EOF
[Interface]
Address = ${NETWORK}.1/24
ListenPort = 61194
PrivateKey = ${PRIVATE_KEY}
PreUp = sysctl -w net.ipv4.ip_forward=1
PostDown = sysctl -w net.ipv4.ip_forward=0
EOF
verify above configuration
wg-quick up wg0[#] sysctl -w net.ipv4.ip_forward=1
net.ipv4.ip_forward = 1
[#] ip link add wg0 type wireguard
[#] wg setconf wg0 /dev/fd/63
[#] ip -4 address add 10.0.8.1/24 dev wg0
[#] ip link set mtu 1420 up dev wg0Verify system control setting for IP forward:
sysctl net.ipv4.ip_forwardnet.ipv4.ip_forward = 1
Close wireguard
wg-quick down wg0[#] wg showconf wg0
[#] ip link delete dev wg0
[#] sysctl -w net.ipv4.ip_forward=0
net.ipv4.ip_forward = 0
Verify that now IP Forward is not enabled.
sysctl net.ipv4.ip_forwardnet.ipv4.ip_forward = 0
Routing via firewall rules
Next on our agenda, is to add some additional rules on our firewall. We already enabled IP Forward feature with the above and now it is time to update our firewall so it can masquerade our client’s network traffic.
Default Route
We need to identify the default external network interface on the ubuntu server.
DEF_ROUTE=$(ip -4 -json route list default | jq -r .[0].dev)
usually is eth0 or ensp3 or something similar.
firewall rules
- We need to forward traffic from the internal interface to the external interface
- We need to masquerade the traffic of the client.
iptables -A FORWARD -i %i -o ${DEF_ROUTE} -s ${NETWORK}.0/24 -j ACCEPT
iptables -t nat -A POSTROUTING -s ${NETWORK}.0/24 -o ${DEF_ROUTE} -j MASQUERADE
and also we need to drop these rules when we stop wireguard service
iptables -D FORWARD -i %i -o ${DEF_ROUTE} -s ${NETWORK}.0/24 -j ACCEPT
iptables -t nat -D POSTROUTING -s ${NETWORK}.0/24 -o ${DEF_ROUTE} -j MASQUERADE
See the -D after iptables.
iptables is a CLI (command line interface) for netfilters. So think the above rules as filters on our network traffic.
WG Server Conf
To put everything all together and also use wireguard PostUp and PreDown to
wg genkey | tee /etc/wireguard/privatekey | wg pubkey > /etc/wireguard/publickey
chmod 0400 /etc/wireguard/*key
PRIVATE_KEY=$(cat /etc/wireguard/privatekey)
NETWORK=10.0.8
DEF_ROUTE=$(ip -4 -json route list default | jq -r .[0].dev)
WG_PORT=61194
cat > /etc/wireguard/wg0.conf <<EOF
[Interface]
Address = ${NETWORK}.1/24
ListenPort = ${WG_PORT}
PrivateKey = ${PRIVATE_KEY}
PreUp = sysctl -w net.ipv4.ip_forward=1
PostDown = sysctl -w net.ipv4.ip_forward=0
PostUp = iptables -A FORWARD -i %i -o ${DEF_ROUTE} -s ${NETWORK}.0/24 -j ACCEPT ; iptables -t nat -A POSTROUTING -s ${NETWORK}.0/24 -o ${DEF_ROUTE} -j MASQUERADE
PreDown = iptables -D FORWARD -i %i -o ${DEF_ROUTE} -s ${NETWORK}.0/24 -j ACCEPT ; iptables -t nat -D POSTROUTING -s ${NETWORK}.0/24 -o ${DEF_ROUTE} -j MASQUERADE
EOF
testing up
wg-quick up wg0[#] sysctl -w net.ipv4.ip_forward=1
net.ipv4.ip_forward = 1
[#] ip link add wg0 type wireguard
[#] wg setconf wg0 /dev/fd/63
[#] ip -4 address add 10.0.8.1/24 dev wg0
[#] ip link set mtu 1420 up dev wg0
[#] iptables -A FORWARD -i wg0 -o ens3 -s 10.0.8.0/24 -j ACCEPT ; iptables -t nat -A POSTROUTING -s 10.0.8.0/24 -o ens3 -j MASQUERADE
testing down
wg-quick down wg0[#] iptables -D FORWARD -i wg0 -o ens3 -s 10.0.8.0/24 -j ACCEPT ; iptables -t nat -D POSTROUTING -s 10.0.8.0/24 -o ens3 -j MASQUERADE
[#] ip link delete dev wg0
[#] sysctl -w net.ipv4.ip_forward=0
net.ipv4.ip_forward = 0
Start at boot time
systemctl enable wg-quick@wg0and status
systemctl status wg-quick@wg0Get the wireguard server public key
We have NOT finished yet with the server !
Also we need the output of:
cat /etc/wireguard/publickeyoutput should be something like this:
wr3jUAs2qdQ1Oaxbs1aA0qrNjogY6uqDpLop54WtQI4=Wireguard Client - Ubuntu 20.04 LTS
Now we need to move to our client virtual machine.
It is a lot easier but similar with above commands.
Client Key Generation
Generate a random private and public key for the client
wg genkey | tee /etc/wireguard/privatekey | wg pubkey > /etc/wireguard/publickeyMake the keys read-only
chmod 0400 /etc/wireguard/*keyWireguard Client Configuration File
Need to replace <wireguard server public key> with the output of the above command.
Configuration is similar but simpler from the server
PRIVATE_KEY=$(cat /etc/wireguard/privatekey)
NETWORK=10.0.8
WG_PORT=61194
WGS_IP=$(ip -4 -json route list default | jq -r .[0].prefsrc)
WSG_PUBLIC_KEY="<wireguard server public key>"
cat > /etc/wireguard/wg0.conf <<EOF
[Interface]
Address = ${NETWORK}.2/24
PrivateKey = ${PRIVATE_KEY}
[Peer]
PublicKey = ${WSG_PUBLIC_KEY}
Endpoint = ${WGS_IP}:${WG_PORT}
AllowedIPs = 0.0.0.0/0
EOF
verify
wg-quick up wg0[#] ip link add wg0 type wireguard
[#] wg setconf wg0 /dev/fd/63
[#] ip -4 address add 10.0.8.2/24 dev wg0
[#] ip link set mtu 1420 up dev wg0
[#] wg set wg0 fwmark 51820
[#] ip -4 route add 0.0.0.0/0 dev wg0 table 51820
[#] ip -4 rule add not fwmark 51820 table 51820
[#] ip -4 rule add table main suppress_prefixlength 0
[#] sysctl -q net.ipv4.conf.all.src_valid_mark=1
[#] iptables-restore -n
start client at boot
systemctl enable wg-quick@wg0Get the wireguard client public key
We have finished with the client, but we need the output of:
cat /etc/wireguard/publickeyWireguard Server - Peers
As we mentioned above, we need to exchange public keys of server & client to the other machines in order to encrypt network traffic.
So as we get the client public key and run the below script to the server
WSC_PUBLIC_KEY="<wireguard client public key>"
NETWORK=10.0.8
wg set wg0 peer ${WSC_PUBLIC_KEY} allowed-ips ${NETWORK}.2
after that we can verify that our wireguard server and connect to the wireguard client
wireguard server ping to client
$ ping -c 5 10.0.8.2
PING 10.0.8.2 (10.0.8.2) 56(84) bytes of data.
64 bytes from 10.0.8.2: icmp_seq=1 ttl=64 time=0.714 ms
64 bytes from 10.0.8.2: icmp_seq=2 ttl=64 time=0.456 ms
64 bytes from 10.0.8.2: icmp_seq=3 ttl=64 time=0.557 ms
64 bytes from 10.0.8.2: icmp_seq=4 ttl=64 time=0.620 ms
64 bytes from 10.0.8.2: icmp_seq=5 ttl=64 time=0.563 ms
--- 10.0.8.2 ping statistics ---
5 packets transmitted, 5 received, 0% packet loss, time 4103ms
rtt min/avg/max/mdev = 0.456/0.582/0.714/0.084 ms
wireguard client ping to server
$ ping -c 5 10.0.8.1
PING 10.0.8.1 (10.0.8.1) 56(84) bytes of data.
64 bytes from 10.0.8.1: icmp_seq=1 ttl=64 time=0.752 ms
64 bytes from 10.0.8.1: icmp_seq=2 ttl=64 time=0.639 ms
64 bytes from 10.0.8.1: icmp_seq=3 ttl=64 time=0.622 ms
64 bytes from 10.0.8.1: icmp_seq=4 ttl=64 time=0.625 ms
64 bytes from 10.0.8.1: icmp_seq=5 ttl=64 time=0.597 ms
--- 10.0.8.1 ping statistics ---
5 packets transmitted, 5 received, 0% packet loss, time 4093ms
rtt min/avg/max/mdev = 0.597/0.647/0.752/0.054 ms
wireguard server - Peers at configuration file
Now the final things is to update our wireguard server with the client Peer (or peers).
wg showconf wg0the output should be something like that:
[Interface]
ListenPort = 61194
PrivateKey = <server: private key>
[Peer]
PublicKey = <client: public key>
AllowedIPs = 10.0.8.2/32
Endpoint = 192.168.122.68:52587
We need to append the peer section to our configuration file.
so /etc/wireguard/wg0.conf should look like this:
[Interface]
Address = 10.0.8.1/24
ListenPort = 61194
PrivateKey = <server: private key>
PreUp = sysctl -w net.ipv4.ip_forward=1
PostDown = sysctl -w net.ipv4.ip_forward=0
PostUp = iptables -A FORWARD -i %i -o ens3 -s 10.0.8.0/24 -j ACCEPT ; iptables -t nat -A POSTROUTING -s 10.0.8.0/24 -o ens3 -j MASQUERADE
PreDown = iptables -D FORWARD -i %i -o ens3 -s 10.0.8.0/24 -j ACCEPT ; iptables -t nat -D POSTROUTING -s 10.0.8.0/24 -o ens3 -j MASQUERADE
[Peer]
PublicKey = <client: public key>
AllowedIPs = 10.0.8.2/32
Endpoint = 192.168.122.68:52587
SaveConfig
In None of server or client wireguard configuration file, we didn’t declare this option. If set, then the configuration is saved on the current state of wg0 interface. Very useful !
SaveConfig = trueclient firewall
It is time to introduce our twist!
If you mtr or traceroute our traffic from our client, we will notice that in need our network traffic goes through the wireguard vpn server !
My traceroute [v0.93]
wgc (10.0.8.2) 2021-07-21T22:41:44+0300
Packets Pings
Host Loss% Snt Last Avg Best Wrst StDev
1. 10.0.8.1 0.0% 88 0.6 0.6 0.4 0.8 0.1
2. myhomepc 0.0% 88 0.8 0.8 0.5 1.0 0.1
3. _gateway 0.0% 88 3.8 4.0 3.3 9.6 0.8
...
The first entry is:
1. 10.0.8.1 if we drop our vpn connection.
wg-quick down wg0We still go to the internet.
My traceroute [v0.93]
wgc (192.168.122.68) 2021-07-21T22:45:04+0300
Packets Pings
Host Loss% Snt Last Avg Best Wrst StDev
1. myhomepc 0.0% 1 0.3 0.3 0.3 0.3 0.0
2. _gateway 0.0% 1 3.3 3.3 3.3 3.3 0.0
This is important because in some use cases, we do not want our client to directly or unsupervised talk to the internet.
UFW alternative for the client
So to avoid this issue, we will re-rewrite our firewall rules.
A simple script to do that is the below. Declares the default policy to DENY for everything and only accepts ssh incoming traffic and outgoing traffic through the vpn.
DEF_ROUTE=$(ip -4 -json route list default | jq -r .[0].dev)
WGS_IP=192.168.122.69
WG_PORT=61194
## reset
ufw --force reset
## deny everything!
ufw default deny incoming
ufw default deny outgoing
ufw default deny forward
## allow ssh
ufw allow 22/tcp
## enable
ufw --force enable
## allow traffic out to the vpn server
ufw allow out on ${DEF_ROUTE} to ${WGS_IP} port ${WG_PORT}
## allow tunnel traffic out
ufw allow out on wg+
# ufw status verbose
Status: active
Logging: on (low)
Default: deny (incoming), deny (outgoing), disabled (routed)
New profiles: skip
To Action From
-- ------ ----
22/tcp ALLOW IN Anywhere
22/tcp (v6) ALLOW IN Anywhere (v6)
192.168.122.69 61194 ALLOW OUT Anywhere on ens3
Anywhere ALLOW OUT Anywhere on wg+
Anywhere (v6) ALLOW OUT Anywhere (v6) on wg+
DNS
There is caveat. Please bare with me.
Usually and especially in virtual machines they get DNS setting through a local LAN. We can either allow traffic on the local vlan or update our local DNS setting so it can go only through our VPN
cat > /etc/systemd/resolved.conf <<EOF
[Resolve]
DNS=88.198.92.222
EOF
systemctl restart systemd-resolved
let’s try this
# ping google.com
ping: google.com: Temporary failure in name resolution
Correct, fire up wireguard vpn client
wg-quick up wg0
ping -c4 google.comPING google.com (142.250.185.238) 56(84) bytes of data.
64 bytes from fra16s53-in-f14.1e100.net (142.250.185.238): icmp_seq=1 ttl=115 time=43.5 ms
64 bytes from fra16s53-in-f14.1e100.net (142.250.185.238): icmp_seq=2 ttl=115 time=44.9 ms
64 bytes from fra16s53-in-f14.1e100.net (142.250.185.238): icmp_seq=3 ttl=115 time=43.8 ms
64 bytes from fra16s53-in-f14.1e100.net (142.250.185.238): icmp_seq=4 ttl=115 time=43.0 ms
--- google.com ping statistics ---
4 packets transmitted, 4 received, 0% packet loss, time 3004ms
rtt min/avg/max/mdev = 42.990/43.795/44.923/0.707 ms
mtr shows:
mtr google.com My traceroute [v0.93]
wgc (10.0.8.2) 2021-07-21T23:01:16+0300
Packets Pings
Host Loss% Snt Last Avg Best Wrst StDev
1. 10.0.8.1 0.0% 2 0.6 0.7 0.6 0.7 0.1
2. _gateway 0.0% 1 0.8 0.8 0.8 0.8 0.0
3. 192.168.1.1 0.0% 1 3.8 3.8 3.8 3.8 0.0
drop vpn connection
# wg-quick down wg0
[#] ip -4 rule delete table 51820
[#] ip -4 rule delete table main suppress_prefixlength 0
[#] ip link delete dev wg0
[#] iptables-restore -n
# ping -c4 google.com
ping: google.com: Temporary failure in name resolution
and that is perfect !
No internet access for our client. Only when our vpn connection is up!
WireGuard: fast, modern, secure VPN tunnel
That’s it!
Below my personal settings -as of today- for LibreDNS using systemd-resolved service for DNS resolution.
sudo vim /etc/systemd/resolved.conf
basic settings
[Resolve]
DNS=116.202.176.26:854#dot.libredns.gr
DNSOverTLS=yes
FallbackDNS=88.198.92.222
Cache=yes
apply
sudo systemctl restart systemd-resolved.service
verify
resolvectl query analytics.google.com
analytics.google.com: 0.0.0.0 -- link: eth0
-- Information acquired via protocol DNS in 144.7ms.
-- Data is authenticated: no; Data was acquired via local or encrypted transport: yes
-- Data from: network
Explain Settings
DNS setting
DNS=116.202.176.26:854#dot.libredns.gr
We declare the IP of our DoT service. Using : as a separator we add the no-ads TCP port of DoT, 854. We also need to add our domain in the end to tell systemd-resolved that this IP should respond to dot.libredns.gr
Dns Over TLS
DNSOverTLS=yes
The usually setting is yes. In older systemd versions you can also select opportunistic.
As we are using Lets Encrypt systemd-resolved can not verify (by default) the IP inside the certificate. The type of certificate can verify the domain dot.libredns.gr but we are asking the IP: 116.202.176.26 and this is another type of certificate that is not free. In order to “fix” this , we added the #dot.libredns.gr in the above setting.
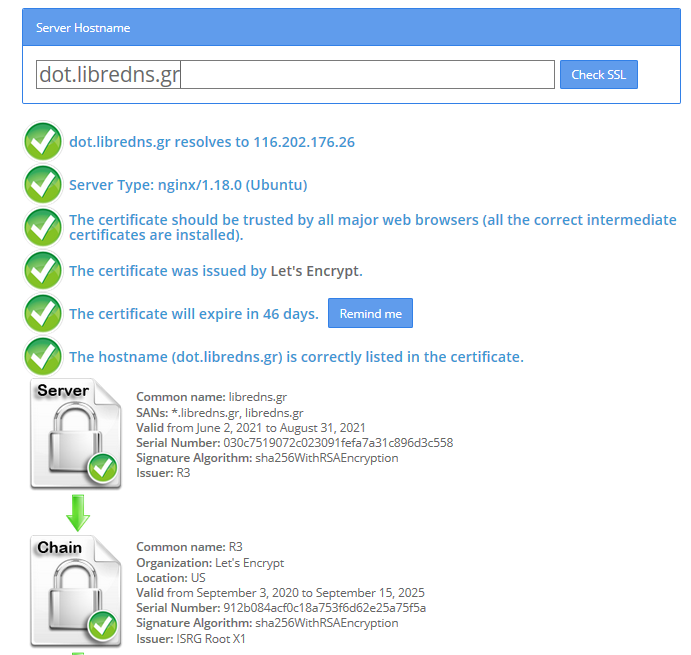
FallBack
Yes not everything has Five nines so you may need a fall back dns to .. fall. Be aware this is cleartext traffic! Not encrypted.
FallbackDNS=88.198.92.222
Cache
Last but not least, caching your queries can give provide you with an additional speed when browsing the internet ! You already asked this a few seconds ago, why not caching it on your local system?
Cache=yes
to give you an example
resolvectl query analytics.google.com
analytics.google.com: 0.0.0.0 -- link: eth0
-- Information acquired via protocol DNS in 144.7ms.
-- Data is authenticated: no; Data was acquired via local or encrypted transport: yes
-- Data from: network
second time:
resolvectl query analytics.google.com
analytics.google.com: 0.0.0.0 -- link: eth0
-- Information acquired via protocol DNS in 2.3ms.
-- Data is authenticated: no; Data was acquired via local or encrypted transport: yes
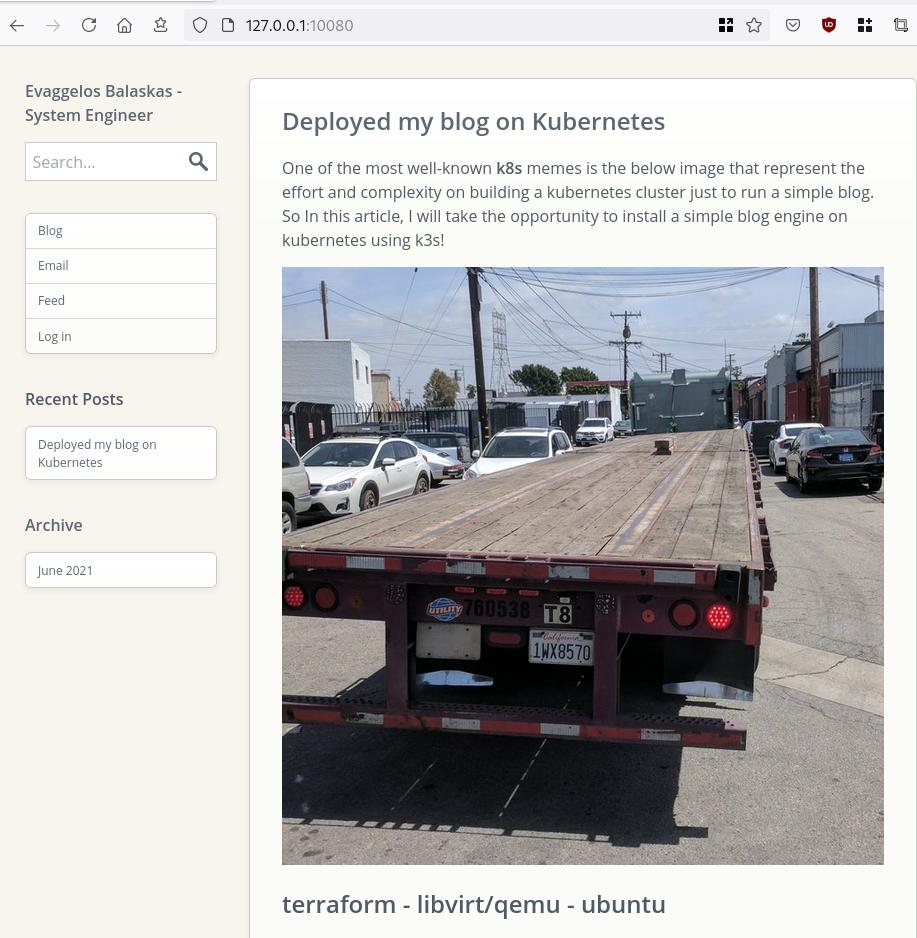
-- Data from: cacheOne of the most well-known k8s memes is the below image that represent the effort and complexity on building a kubernetes cluster just to run a simple blog. So In this article, I will take the opportunity to install a simple blog engine on kubernetes using k3s!

terraform - libvirt/qemu - ubuntu
For this demo, I will be workinig on my local test lab. A libvirt /qemu ubuntu 20.04 virtual machine via terraform. You can find my terraform notes on my github repo tf/0.15/libvirt/0.6.3/ubuntu/20.04.
k3s
k3s is a lightweight, fully compliant kubernetes distribution that can run on a virtual machine, single node.
login to your machine and became root
$ ssh 192.168.122.42 -l ubuntu
$ sudo -i
#
install k3s with one command
curl -sfL https://get.k3s.io | sh -
output should be something like this
[INFO] Finding release for channel stable
[INFO] Using v1.21.1+k3s1 as release
[INFO] Downloading hash https://github.com/k3s-io/k3s/releases/download/v1.21.1+k3s1/sha256sum-amd64.txt
[INFO] Downloading binary https://github.com/k3s-io/k3s/releases/download/v1.21.1+k3s1/k3s
[INFO] Verifying binary download
[INFO] Installing k3s to /usr/local/bin/k3s
[INFO] Creating /usr/local/bin/kubectl symlink to k3s
[INFO] Creating /usr/local/bin/crictl symlink to k3s
[INFO] Creating /usr/local/bin/ctr symlink to k3s
[INFO] Creating killall script /usr/local/bin/k3s-killall.sh
[INFO] Creating uninstall script /usr/local/bin/k3s-uninstall.sh
[INFO] env: Creating environment file /etc/systemd/system/k3s.service.env
[INFO] systemd: Creating service file /etc/systemd/system/k3s.service
[INFO] systemd: Enabling k3s unit
Created symlink /etc/systemd/system/multi-user.target.wants/k3s.service → /etc/systemd/system/k3s.service.
[INFO] systemd: Starting k3s
Firewall Ports
I would propose to open the below network ports so k3s can run smoothly.
Inbound Rules for K3s Server Nodes
| PROTOCOL | PORT | SOURCE | DESCRIPTION |
|---|---|---|---|
| TCP | 6443 | K3s agent nodes | Kubernetes API Server |
| UDP | 8472 | K3s server and agent nodes | Required only for Flannel VXLAN |
| TCP | 10250 | K3s server and agent nodes | Kubelet metrics |
| TCP | 2379-2380 | K3s server nodes | Required only for HA with embedded etcd |
Typically all outbound traffic is allowed.
ufw allow
ufw allow 6443/tcp
ufw allow 8472/udp
ufw allow 10250/tcp
ufw allow 2379/tcp
ufw allow 2380/tcp
full output
# ufw allow 6443/tcp
Rule added
Rule added (v6)
# ufw allow 8472/udp
Rule added
Rule added (v6)
# ufw allow 10250/tcp
Rule added
Rule added (v6)
# ufw allow 2379/tcp
Rule added
Rule added (v6)
# ufw allow 2380/tcp
Rule added
Rule added (v6)
k3s Nodes / Pods / Deployments
verify nodes, roles, pods and deployments
# kubectl get nodes -A
NAME         STATUS   ROLES                  AGE   VERSION
ubuntu2004   Ready    control-plane,master   11m   v1.21.1+k3s1

# kubectl get pods -A
NAMESPACE     NAME                                      READY   STATUS      RESTARTS   AGE
kube-system   helm-install-traefik-crd-8rjcf            0/1     Completed   2          13m
kube-system   helm-install-traefik-lwgcj                0/1     Completed   3          13m
kube-system   svclb-traefik-xtrcw                       2/2     Running     0          5m13s
kube-system   coredns-7448499f4d-6vrb7                  1/1     Running     5          13m
kube-system   traefik-97b44b794-q294l                   1/1     Running     0          5m14s
kube-system   local-path-provisioner-5ff76fc89d-pq5wb   1/1     Running     6          13m
kube-system   metrics-server-86cbb8457f-n4gsf           1/1     Running     6          13m

# kubectl get deployments -A
NAMESPACE     NAME                     READY   UP-TO-DATE   AVAILABLE   AGE
kube-system   coredns                  1/1     1            1           17m
kube-system   traefik                  1/1     1            1           8m50s
kube-system   local-path-provisioner   1/1     1            1           17m
kube-system   metrics-server           1/1     1            1           17m
Helm
Next thing is to install helm. Helm is a package manager for kubernetes, it will make easy to install applications.
curl -sL https://raw.githubusercontent.com/helm/helm/master/scripts/get-helm-3 | bash
output
Downloading https://get.helm.sh/helm-v3.6.0-linux-amd64.tar.gz
Verifying checksum... Done.
Preparing to install helm into /usr/local/bin
helm installed into /usr/local/bin/helm
helm version

version.BuildInfo{Version:"v3.6.0", GitCommit:"7f2df6467771a75f5646b7f12afb408590ed1755", GitTreeState:"clean", GoVersion:"go1.16.3"}
repo added
As a package manager, you can install k8s packages, named charts and you can find a lot of helm charts here https://artifacthub.io/. You can also add/install a single repo, I will explain this later.
# helm repo add nicholaswilde https://nicholaswilde.github.io/helm-charts/

"nicholaswilde" has been added to your repositories

# helm repo update
Hang tight while we grab the latest from your chart repositories...

Successfully got an update from the "nicholaswilde" chart repository
Update Complete. ⎈Happy Helming!⎈
hub Vs repo
basic difference between hub and repo is that hub is the official artifacthub. You can search charts there
helm search hub blogURL CHART VERSION APP VERSION DESCRIPTION
https://artifacthub.io/packages/helm/nicholaswi... 0.1.2 v1.3 Lightweight self-hosted facebook-styled PHP blog.
https://artifacthub.io/packages/helm/nicholaswi... 0.1.2 v2021.02 An ultra-lightweight blogging engine, written i...
https://artifacthub.io/packages/helm/bitnami/dr... 10.2.23 9.1.10 One of the most versatile open source content m...
https://artifacthub.io/packages/helm/bitnami/ghost 13.0.13 4.6.4 A simple, powerful publishing platform that all...
https://artifacthub.io/packages/helm/bitnami/jo... 10.1.10 3.9.27 PHP content management system (CMS) for publish...
https://artifacthub.io/packages/helm/nicholaswi... 0.1.1 0.1.1 A Self-Hosted, Twitter™-like Decentralised micr...
https://artifacthub.io/packages/helm/nicholaswi... 0.1.1 900b76a A self-hosted well uh wiki engine or content ma...
https://artifacthub.io/packages/helm/bitnami/wo... 11.0.13 5.7.2 Web publishing platform for building blogs and ...using a repo, means that you specify charts sources from single (or multiple) repos, usally outside of hub.
helm search repo blogNAME CHART VERSION APP VERSION DESCRIPTION
nicholaswilde/blog 0.1.2 v1.3 Lightweight self-hosted facebook-styled PHP blog.
nicholaswilde/chyrp-lite 0.1.2 v2021.02 An ultra-lightweight blogging engine, written i...
nicholaswilde/twtxt 0.1.1 0.1.1 A Self-Hosted, Twitter™-like Decentralised micr...
nicholaswilde/wiki 0.1.1 900b76a A self-hosted well uh wiki engine or content ma...
Install a blog engine via helm
before we continue with the installation of our blog engine, we need to set the kube config via a shell variable
kube configuration yaml file
export KUBECONFIG=/etc/rancher/k3s/k3s.yaml
kubectl-k3s, already knows where to find this yaml configuration file. kubectl is a link to k3s in our setup
# whereis kubectl
kubectl: /usr/local/bin/kubectl

# ls -l /usr/local/bin/kubectl
lrwxrwxrwx 1 root root 3 Jun  4 23:20 /usr/local/bin/kubectl -> k3s
but not helm that we just installed.
After that we can install our blog engine.
helm install chyrp-lite              \
  --set env.TZ="Europe/Athens"  \
  nicholaswilde/chyrp-lite
output
NAME: chyrp-lite
LAST DEPLOYED: Fri Jun  4 23:46:04 2021
NAMESPACE: default
STATUS: deployed
REVISION: 1
TEST SUITE: None
NOTES:
Get the application URL by running these commands:
  http://chyrp-lite.192.168.1.203.nip.io/
for the time being, ignore nip.io and verify the deployment
# kubectl get deployments
NAME         READY   UP-TO-DATE   AVAILABLE   AGE
chyrp-lite   1/1     1            1           2m15s

# kubectl get pods
NAME                          READY   STATUS    RESTARTS   AGE
chyrp-lite-5c544b455f-d2pzm   1/1     Running   0          2m18s
Port Forwarding
as this is a pod running through k3s inside a virtual machine on our host operating system, in order to visit the blog and finish the installation we need to expose the port.
Let’s find out if there is a service running
kubectl get service chyrp-lite
output
NAME         TYPE        CLUSTER-IP      EXTERNAL-IP   PORT(S)   AGE
chyrp-lite   ClusterIP   10.43.143.250   <none>        80/TCP    11h
okay we have a cluster ip.
you can also verify that our blog engine is running
curl -s 10.43.143.250/install.php | head

<!DOCTYPE html>
<html>
    <head>
        <meta charset="UTF-8">
        <title>Chyrp Lite Installer</title>
        <meta name="viewport" content="width = 800">
        <style type="text/css">
            @font-face {
                font-family: 'Open Sans webfont';
                src: url('./fonts/OpenSans-Regular.woff') format('woff');
and then port forward the pod tcp port to our virtual machine
kubectl port-forward service/chyrp-lite 80
output
Forwarding from 127.0.0.1:80 -> 80
Forwarding from [::1]:80 -> 80
k3s issue with TCP Port 80
Port 80 used by build-in load balancer by default
That means service port 80 will become 10080 on the host, but 8080 will become 8080 without any offset.
So the above command will not work, it will give you an 404 error.
We can disable LoadBalancer (we do not need it for this demo) but it is easier to just forward the service port to 10080
kubectl port-forward service/chyrp-lite 10080:80Forwarding from 127.0.0.1:10080 -> 80
Forwarding from [::1]:10080 -> 80
Handling connection for 10080
Handling connection for 10080
from our virtual machine we can verify
curl -s http://127.0.0.1:10080/install.php | head
it will produce
<!DOCTYPE html>
<html>
    <head>
        <meta charset="UTF-8">
        <title>Chyrp Lite Installer</title>
        <meta name="viewport" content="width = 800">
        <style type="text/css">
            @font-face {
                font-family: 'Open Sans webfont';
                src: url('./fonts/OpenSans-Regular.woff') format('woff');
ssh port forward
So now, we need to forward this TCP port from the virtual machine to our local machine. Using ssh, you should be able to do it like this from another terminal
ssh 192.168.122.42 -l ubuntu -L8080:127.0.0.1:10080
verify it
$ sudo ss -n -t -a 'sport = :10080'

State           Recv-Q          Send-Q                   Local Address:Port                    Peer Address:Port         Process
LISTEN          0               128                          127.0.0.1:10080                        0.0.0.0:*
LISTEN          0               128                              [::1]:10080                           [::]:*

$ curl -s http://localhost:10080/install.php | head

<!DOCTYPE html>
<html>
    <head>
        <meta charset="UTF-8">
        <title>Chyrp Lite Installer</title>
        <meta name="viewport" content="width = 800">
        <style type="text/css">
            @font-face {
                font-family: 'Open Sans webfont';
                src: url('./fonts/OpenSans-Regular.woff') format('woff');
I am forwarding to a high tcp port (> 1024) so my user can open a tcp port, eitherwise I need to be root.
finishing the installation
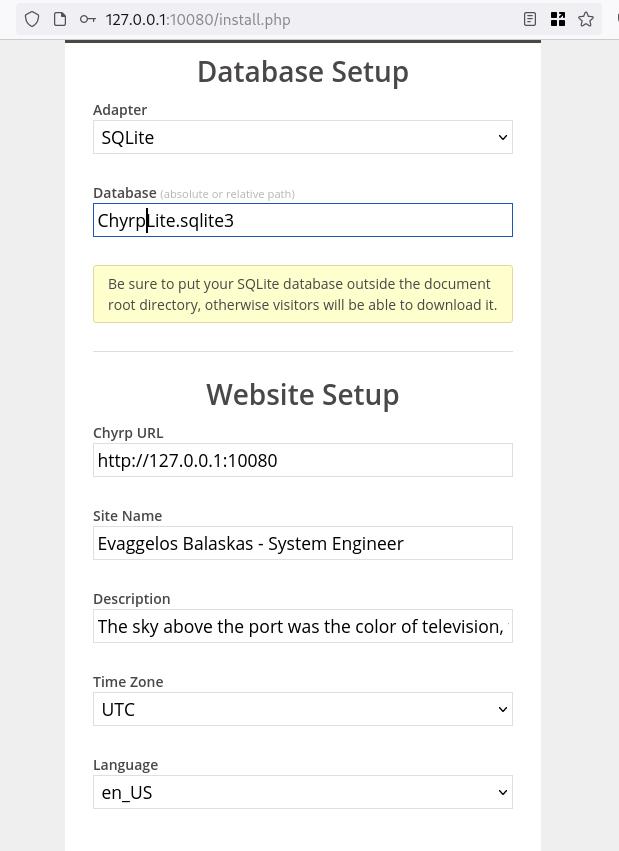
To finish the installation of our blog engine, we need to visit the below url from our browser
Database Setup
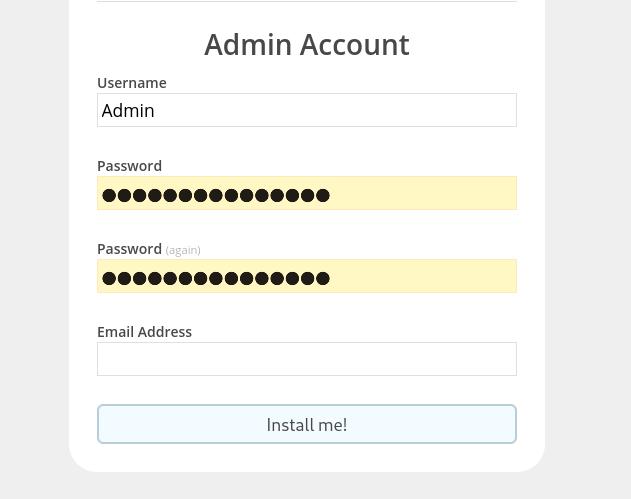
Admin Setup
Installation Completed

First blog post
that’s it !
I am using archlinux in my WSL for the last two (2) years and the whole experience is quite smooth. I wanted to test native docker will run within WSL and not with the windows docker/container service, so I installed docker. My main purpose is building packages so (for now) I do not need networking/routes or anything else.
WSL
ebal@myworklaptop:~$ uname -a
Linux myworklaptop 4.19.128-microsoft-standard #1 SMP Tue Jun 23 12:58:10 UTC 2020 x86_64 GNU/Linux

ebal@myworklaptop:~$ cat /etc/os-release
NAME="Arch Linux"
PRETTY_NAME="Arch Linux"
ID=arch
BUILD_ID=rolling
ANSI_COLOR="38;2;23;147;209"
HOME_URL="https://www.archlinux.org/"
DOCUMENTATION_URL="https://wiki.archlinux.org/"
SUPPORT_URL="https://bbs.archlinux.org/"
BUG_REPORT_URL="https://bugs.archlinux.org/"
LOGO=archlinux
Docker Install
$ sudo pacman -S docker

$ sudo pacman -Q docker
docker 1:20.10.6-1

$ sudo dockerd -v
Docker version 20.10.6, build 8728dd246c
Run docker
sudo dockerd -D-D is for debug
and now pull an alpine image
ebal@myworklaptop:~$ docker images
REPOSITORY   TAG       IMAGE ID   CREATED   SIZE

ebal@myworklaptop:~$ docker pull alpine:latest
latest: Pulling from library/alpine
540db60ca938: Pull complete
Digest: sha256:69e70a79f2d41ab5d637de98c1e0b055206ba40a8145e7bddb55ccc04e13cf8f
Status: Downloaded newer image for alpine:latest
docker.io/library/alpine:latest

ebal@myworklaptop:~$ docker images
REPOSITORY   TAG       IMAGE ID       CREATED       SIZE
alpine       latest    6dbb9cc54074   2 weeks ago   5.61MB
Test alpine image
docker run -ti alpine:latest ashperform a simple update
# apk update

fetch https://dl-cdn.alpinelinux.org/alpine/v3.13/main/x86_64/APKINDEX.tar.gz
fetch https://dl-cdn.alpinelinux.org/alpine/v3.13/community/x86_64/APKINDEX.tar.gz
v3.13.5-71-gfcabe3349a [https://dl-cdn.alpinelinux.org/alpine/v3.13/main]
v3.13.5-65-g28e7396caa [https://dl-cdn.alpinelinux.org/alpine/v3.13/community]

OK: 13887 distinct packages available
okay, seems that it is working.
Genie Systemd
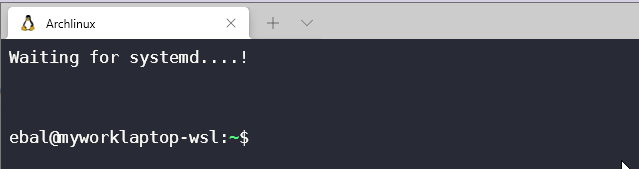
as many already know, we can not run systemd inside WSL, at least not by default. So here comes genie !
A quick way into a systemd “bottle” for WSL
WSLv2 ONLY.
wsl.exe -l -v

  NAME            STATE           VERSION
* Archlinux       Running         2
  Ubuntu-20.04    Stopped         1
It will work on my arch.
Install Genie
genie comes by default with an archlinux artifact from github
curl -sLO https://github.com/arkane-systems/genie/releases/download/v1.40/genie-systemd-1.40-1-x86_64.pkg.tar.zst

sudo pacman -U genie-systemd-1.40-1-x86_64.pkg.tar.zst
$ pacman -Q genie-systemd
genie-systemd 1.40-1
daemonize
Genie has a dependency of daemonize.
In Archlinux, you can find the latest version of daemonize here:
https://gitlab.com/archlinux_build/daemonize
$ sudo pacman -U daemonize-1.7.8-1-x86_64.pkg.tar.zst

loading packages...
resolving dependencies...
looking for conflicting packages...

Package (1)  New Version  Net Change
daemonize    1.7.8-1        0.03 MiB
Total Installed Size:  0.03 MiB

:: Proceed with installation? [Y/n] y
$ pacman -Q daemonize
daemonize 1.7.8-1Is genie running ?
We can start as-root genie with a new shell:
# genie --version
1.40

# genie -s
Waiting for systemd....!

# genie -r
running
okay !
Windows Terminal
In order to use systemd-genie by default, we need to run our WSL Archlinux with an initial command.
I use aka.ms/terminal to start/open my WSLv2 Archlinux so I had to edit the “Command Line” Option to this:
wsl.exe -d Archlinux genie -sYou can also verify that your WSL distro is down, with this
wsl.exe --shutdownthen fire up a new WSL distro!
Systemd Service
you can enable & start docker service unit,
$ sudo systemctl enable docker

$ sudo systemctl start  docker
so next time will auto-start:
$ docker images
REPOSITORY   TAG       IMAGE ID       CREATED       SIZE
alpine       latest    6dbb9cc54074   2 weeks ago   5.61MB
systemd
$ ps -e fuwwww | grep -i systemd
root           1  0.1  0.2  21096 10748 ?        Ss   14:27   0:00 systemd
root          29  0.0  0.2  30472 11168 ?        Ss   14:27   0:00 /usr/lib/systemd/systemd-journald
root          38  0.0  0.1  25672  7684 ?        Ss   14:27   0:00 /usr/lib/systemd/systemd-udevd
dbus          63  0.0  0.1  12052  5736 ?        Ss   14:27   0:00 /usr/bin/dbus-daemon --system --address=systemd: --nofork --nopidfile --systemd-activation --syslog-only
root          65  0.0  0.1  14600  7224 ?        Ss   14:27   0:00 /usr/lib/systemd/systemd-logind
root         211  0.0  0.1  14176  6872 ?        Ss   14:27   0:00 /usr/lib/systemd/systemd-machined
ebal         312  0.0  0.0   3164   808 pts/1    S+   14:30   0:00  _ grep -i systemd
ebal         215  0.0  0.2  16036  8956 ?        Ss   14:27   0:00 /usr/lib/systemd/systemd --user
$ systemctl status docker
* docker.service - Docker Application Container Engine
     Loaded: loaded (/usr/lib/systemd/system/docker.service; enabled; vendor preset: disabled)
     Active: active (running) since Sat 2021-05-01 14:27:12 EEST; 3min 22s ago
TriggeredBy: * docker.socket
       Docs: https://docs.docker.com
   Main PID: 64 (dockerd)
      Tasks: 17 (limit: 4715)
     Memory: 167.9M
     CGroup: /system.slice/docker.service
             |-64 /usr/bin/dockerd -H fd://
             `-80 containerd --config /var/run/docker/containerd/containerd.toml --log-level info

May 01 14:27:12 myworklaptop-wsl systemd[1]: Started Docker Application Container Engine.
May 01 14:27:12 myworklaptop-wsl dockerd[64]: time="2021-05-01T14:27:12.303580300+03:00" level=info msg="AP>
that’s it !
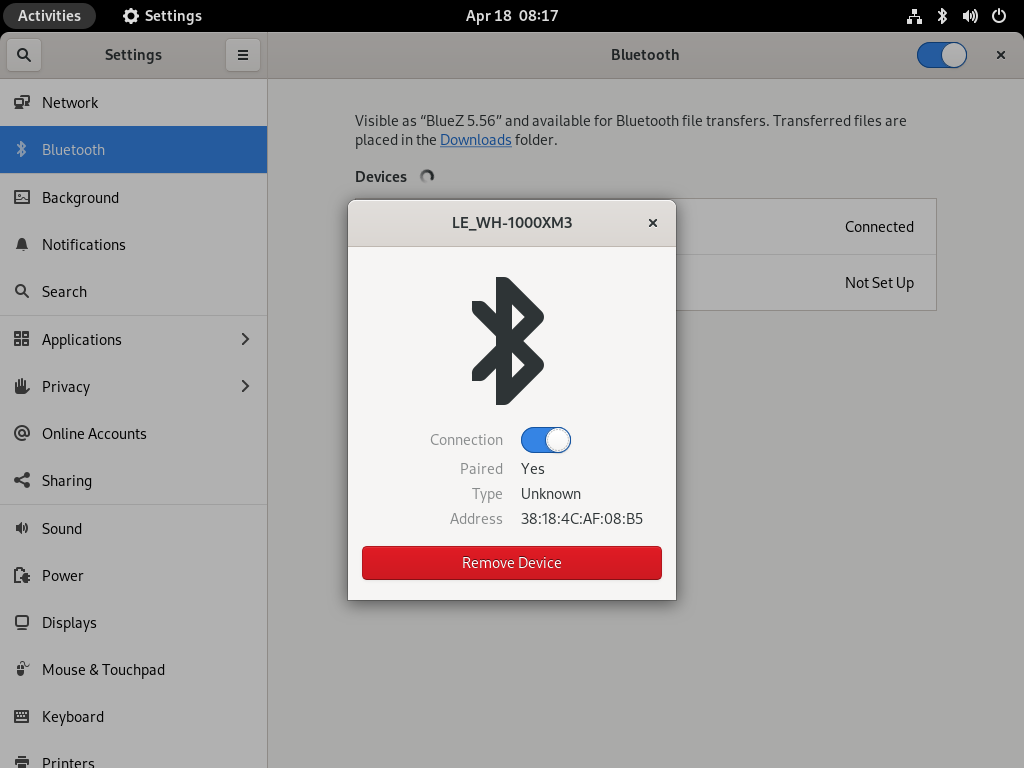
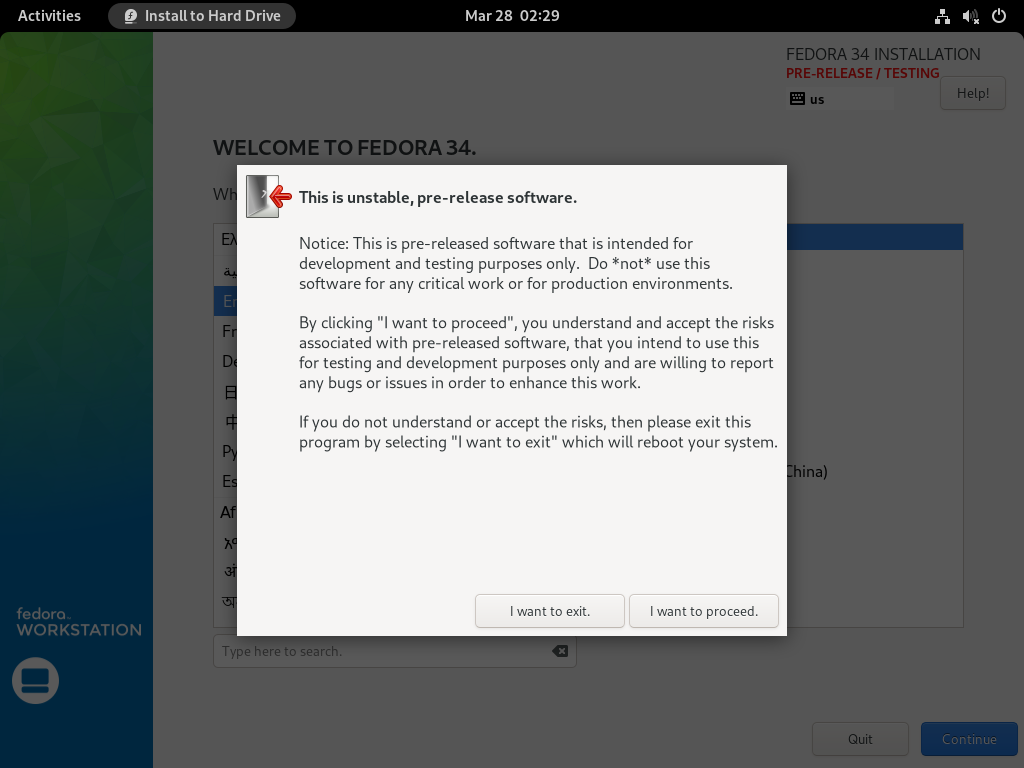
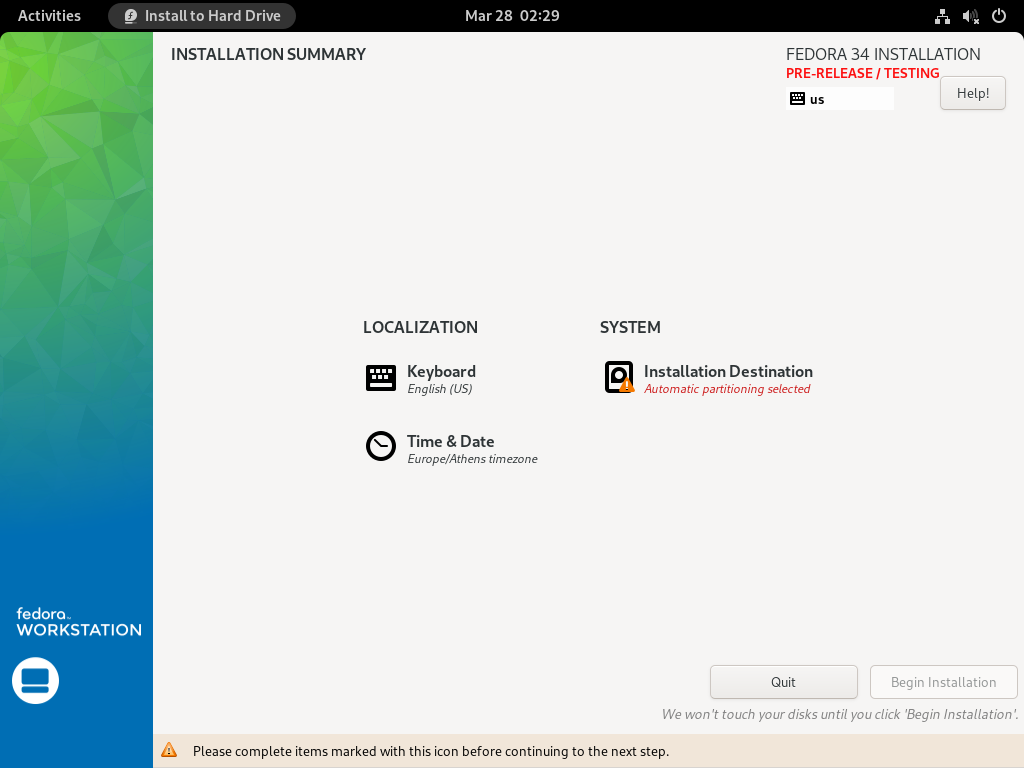
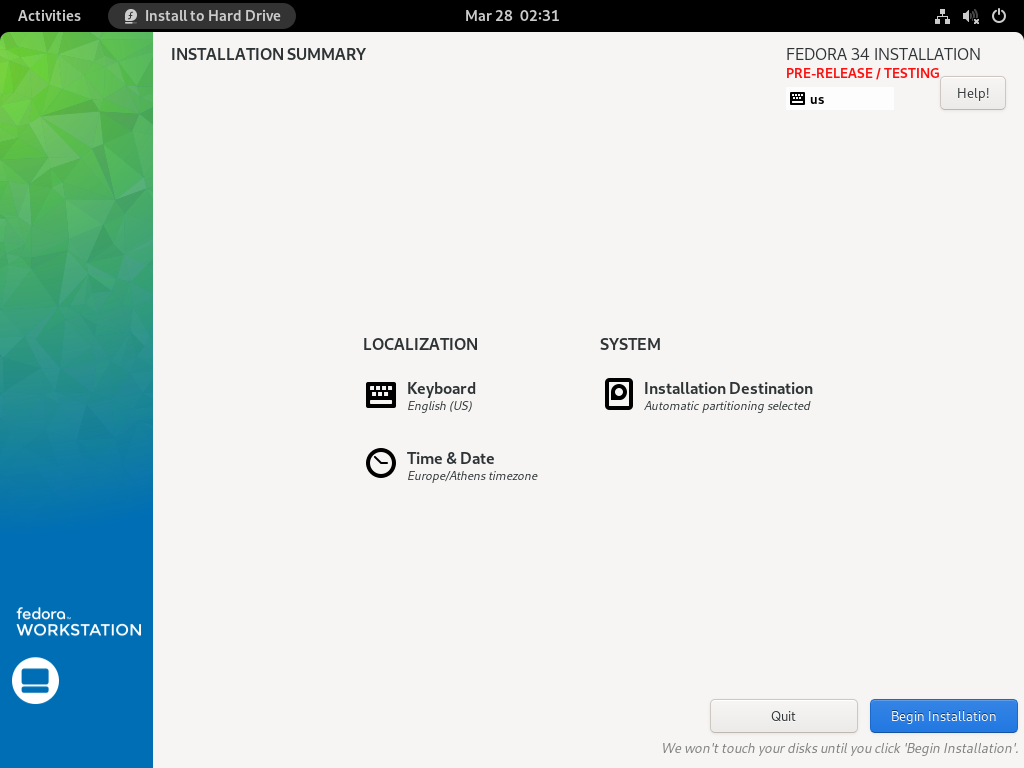
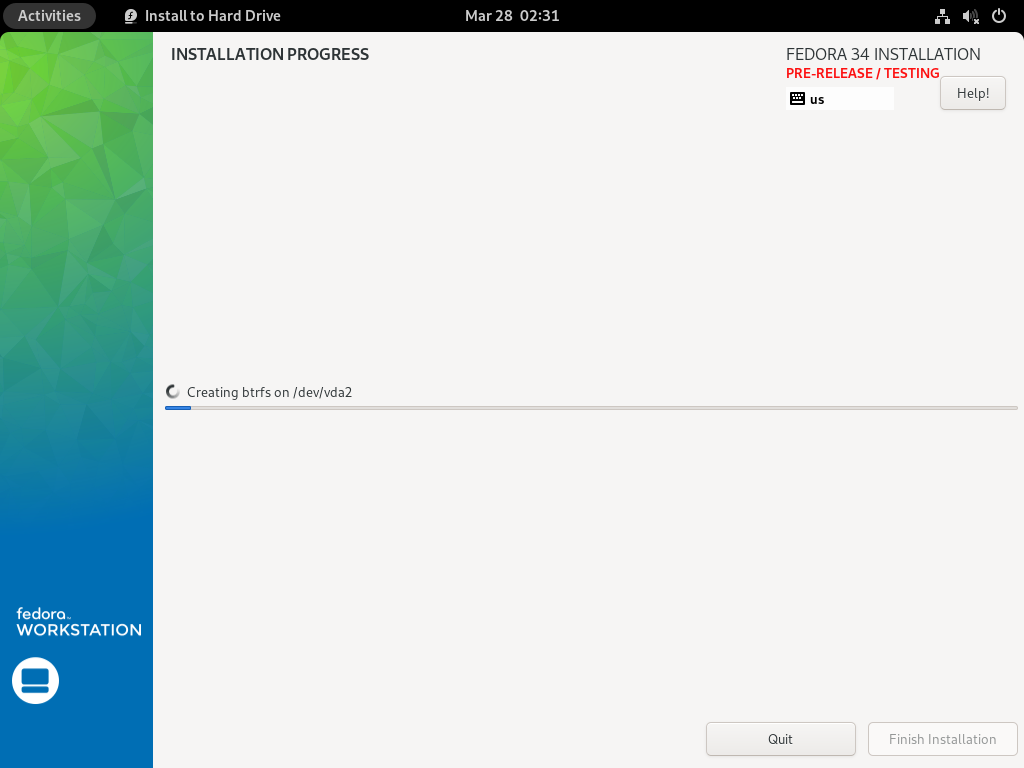
I am an archlinux user using Sony WH-1000XM3 bluetooth noise-cancellation headphones. I am also using pulseaudio and it took me a while to switch the bluetooth headphones to HSP/HFP profile so the microphone can work too. Switching the bluetooth profile of your headphones to HeadSet Audio works but it is only monophonic audio and without noise-cancellation and I had to switch to piperwire also. But at least now the microphone works!
I was wondering how distros that by default have already switched to pipewire deal with this situation. So I started a fedora 34 (beta) edition and attached both my bluetooth adapter TP-LINK UB400 v1 and my web camera Logitech HD Webcam C270.
The test should be to open a jitsi meet and a zoom test meeting and verify that my headphones can work without me doing any stranger CLI magic.
tldr; works out of the box !
lsusb
[root@fedora ~]# lsusb

Bus 002 Device 001: ID 1d6b:0003 Linux Foundation 3.0 root hub
Bus 001 Device 004: ID 046d:0825 Logitech, Inc. Webcam C270
Bus 001 Device 003: ID 0a12:0001 Cambridge Silicon Radio, Ltd Bluetooth Dongle (HCI mode)
Bus 001 Device 002: ID 0627:0001 Adomax Technology Co., Ltd QEMU USB Tablet
Bus 001 Device 001: ID 1d6b:0002 Linux Foundation 2.0 root hub
as you can see both usb devices have properly attached to fedora34
kernel
we need Linux kernel > 5.10.x to have a proper support
[root@fedora ~]# uname -a
Linux fedora 5.11.10-300.fc34.x86_64 #1 SMP Thu Mar 25 14:03:32 UTC 2021 x86_64 x86_64 x86_64 GNU/Linux
pipewire
and of-course piperwire installed
[root@fedora ~]# rpm -qa | grep -Ei 'blue|pipe|pulse'

libpipeline-1.5.3-2.fc34.x86_64
pulseaudio-libs-14.2-3.fc34.x86_64
pulseaudio-libs-glib2-14.2-3.fc34.x86_64
pipewire0.2-libs-0.2.7-5.fc34.x86_64
bluez-libs-5.56-4.fc34.x86_64
pipewire-libs-0.3.24-4.fc34.x86_64
pipewire-0.3.24-4.fc34.x86_64
bluez-5.56-4.fc34.x86_64
bluez-obexd-5.56-4.fc34.x86_64
pipewire-gstreamer-0.3.24-4.fc34.x86_64
pipewire-pulseaudio-0.3.24-4.fc34.x86_64
gnome-bluetooth-libs-3.34.5-1.fc34.x86_64
gnome-bluetooth-3.34.5-1.fc34.x86_64
bluez-cups-5.56-4.fc34.x86_64
NetworkManager-bluetooth-1.30.2-1.fc34.x86_64
pipewire-alsa-0.3.24-4.fc34.x86_64
pipewire-jack-audio-connection-kit-0.3.24-4.fc34.x86_64
pipewire-utils-0.3.24-4.fc34.x86_64
screenshots
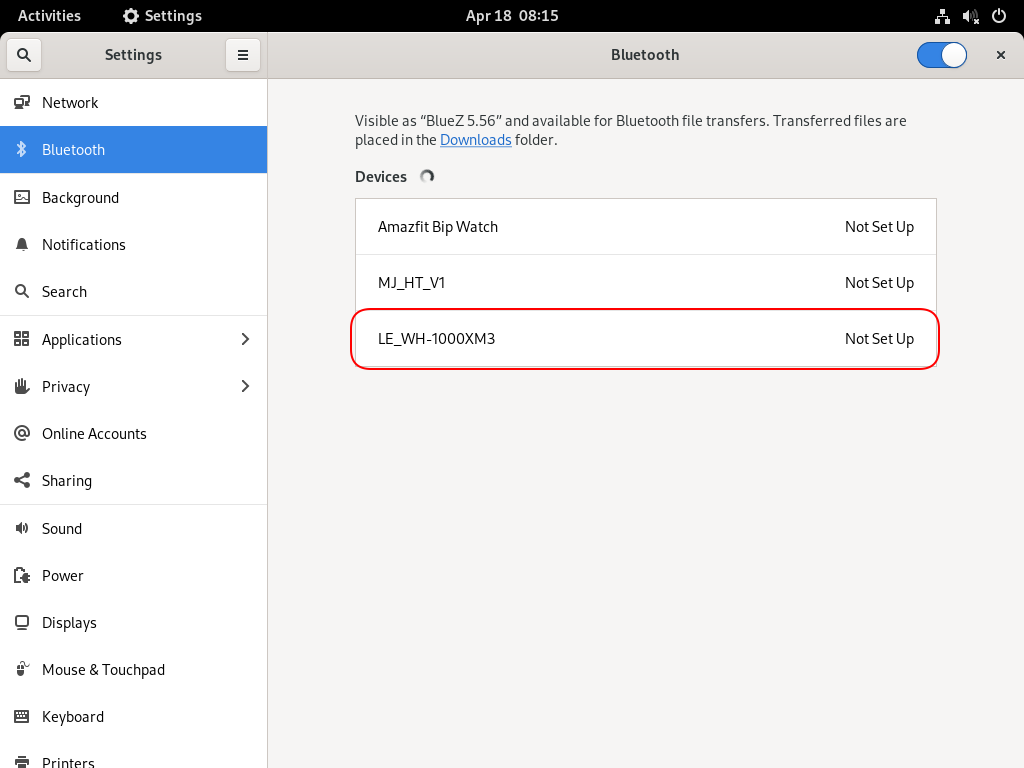
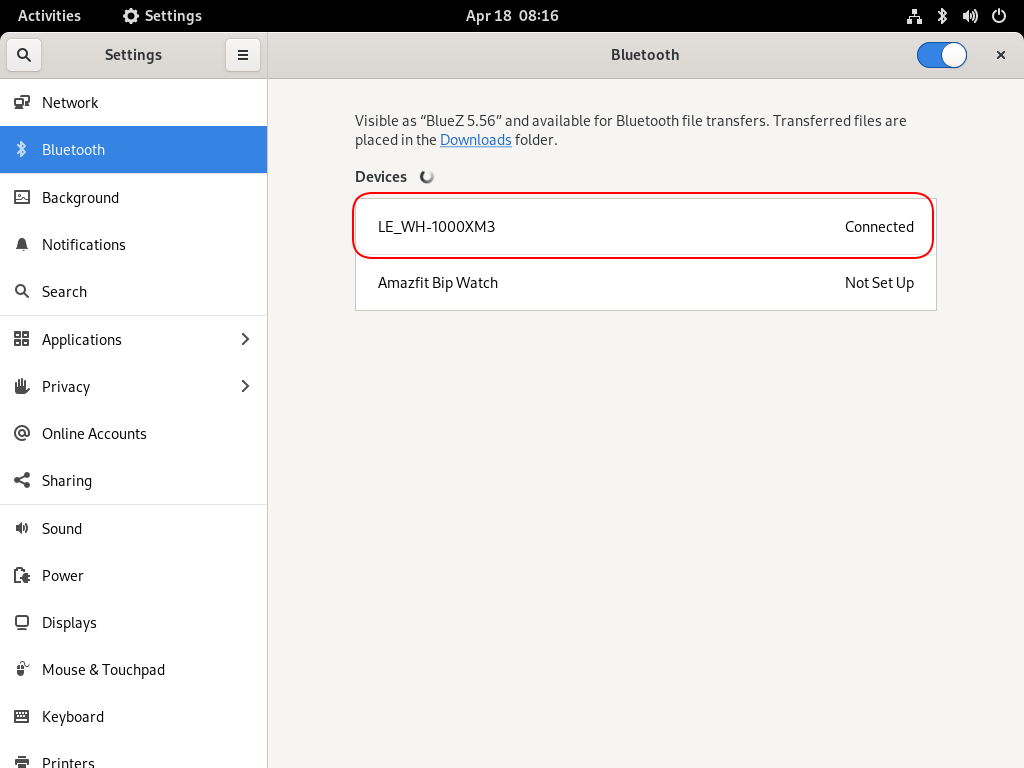
Bluetooth Profiles
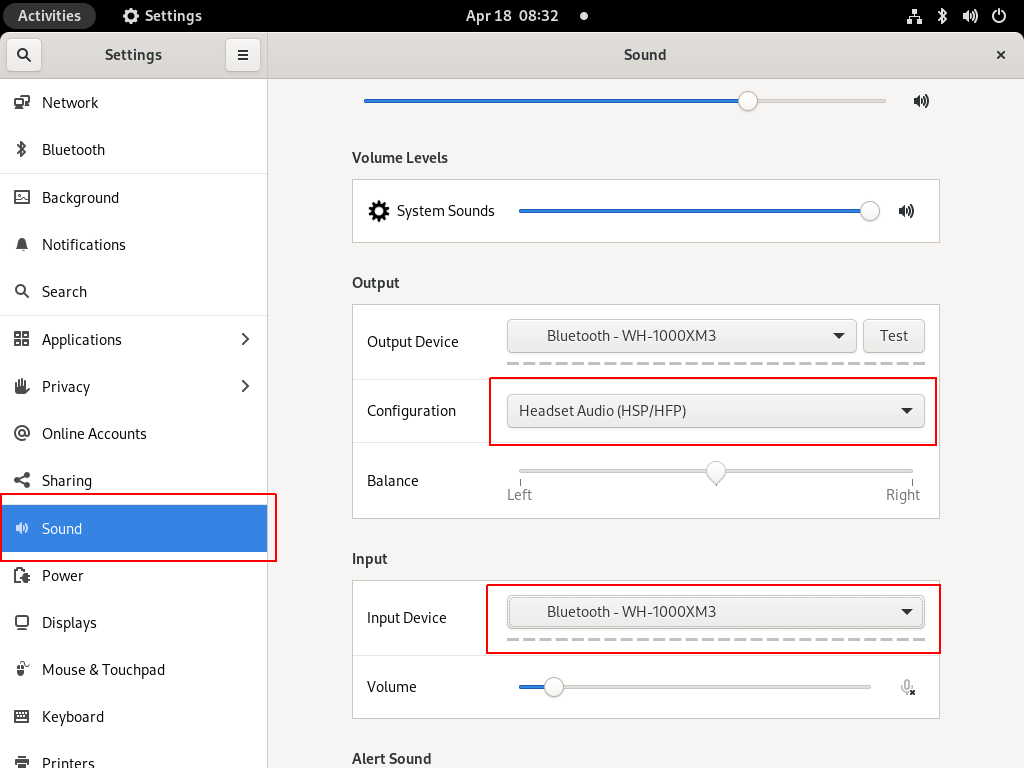
Online Meetings


In WSLv2 there is a way to limit the resources of your linux distro (cpu/memory) to have a better performance on you win10.
To give you an example, this is how it starts on my HP-G5
~$ free -m
               total        used        free      shared  buffcache   available
Mem:           12659          68       12555           0          34       12425
Swap:           4096           0        4096

~$ grep -Ec proc /proc/cpuinfo
8
8 CPU threads, 12G
wslconfig
To define your specs, open cmd and change to your user profile directory
~> cd %UserProfile%
Verify that your WSL distros are stopped:
~> wsl.exe -l -v
  NAME            STATE           VERSION
* Archlinux       Running         2
  Ubuntu-20.04    Stopped         1

~> wsl.exe -t Archlinux -v

~> wsl.exe -l -v
  NAME            STATE           VERSION
* Archlinux       Stopped         2
  Ubuntu-20.04    Stopped         1
and terminate wsl
~> wsl.exe --shutdown
Create a new (or edit your previous) wsl config file
~> notepad.exe .wslconfigMy current setup is
~> type .wslconfig

[wsl2]
memory=4GB   # Limits VM memory in WSL 2 to 4 GB
processors=2 # Makes the WSL 2 VM use two virtual processors
swap=2GB     # How much swap space to add to the WSL2 VM. 0 for no swap file.
swapFile=C:\wsl2-swap.vhdx
as you can see, I want 4GB of RAM and 2 CPU , but also I want a 2GB swap file.
Edit this file according to your needs. The full settings can be found here wsl/wsl-config.
Reminder: you have to shutdown WSL
wsl.exe --shutdown
WSLv2 Limited
Now start your fav linux distro and verify
~$ grep -Ec proc /proc/cpuinfo
2

~$ grep -Ei MemTotal /proc/meminfo
MemTotal:        4028776 kB

~$ free
               total        used        free      shared  buffcache   available
Mem:         4028776       46348     3947056          64       35372     3848616
Swap:        2097152           0     2097152
that’s it !


I upgraded my home internet connection and as a result I had to give up my ~15y Static IP. Having an ephemeral Dynamic IP means I need to use a dynamic dns service to access my homepc. Although the ISP’s CPE (router) has a few public dynamic dns services, I chose to create a simple solution on my own self-hosted DNS infra.
There are a couple of ways to do that, PowerDNS supports Dynamic Updates but I do not want to open PowerDNS to the internet for this kind of operations. I just want to use cron with a simple curl over https.
PowerDNS WebAPI
to enable and use the Built-in Webserver and HTTP API we need to update our configuration:
/etc/pdns/pdns.conf
api-key=0123456789ABCDEF
api=yes
and restart powerdns auth server.
verify it
ss -tnl 'sport = :8081'State Recv-Q Send-Q Local Address:Port Peer Address:Port
LISTEN 0 10 127.0.0.1:8081 *:*
WebServer API in PHP
Next to build our API in PHP
Basic Auth
By using https means that the transport layer is encrypted so we only need to create a basic auth mechanism.
<?php
  if ( !isset($_SERVER["PHP_AUTH_USER"]) ) {
      header("WWW-Authenticate: Basic realm='My Realm'");
      header("HTTP/1.0 401 Unauthorized");
      echo "Restricted area: Only Authorized Personnel Are Allowed to Enter This Area";
      exit;
  } else {
    // code goes here
  }
?>
by sending Basic Auth headers, the _SERVER php array variable will contain two extra variables
$_SERVER["PHP_AUTH_USER"]
$_SERVER["PHP_AUTH_PW"]
We do not need to setup an external IDM/LDAP or any other user management system just for this usecase (single user access).
and we can use something like:
<?php
  if (($_SERVER["PHP_AUTH_USER"] == "username") && ($_SERVER["PHP_AUTH_PW"] == "very_secret_password")){
    // code goes here
  }
?>
RRSet Object
We need to create the RRSet Object
here is a simple example
<?php
  $comments = array(
  );

  $record = array(
      array(
          "disabled"  => False,
          "content"   => $_SERVER["REMOTE_ADDR"]
      )
  );

  $rrsets = array(
      array(
          "name"          => "dyndns.example.org.",
          "type"          => "A",
          "ttl"           => 60,
          "changetype"    => "REPLACE",
          "records"       => $record,
          "comments"      => $comments
      )
  );

  $data = array (
      "rrsets" => $rrsets
  );

?>
by running this data set to json_encode should return something like this
{
  "rrsets": [
    {
      "changetype": "REPLACE",
      "comments": [],
      "name": "dyndns.example.org.",
      "records": [
        {
          "content": "1.2.3.4",
          "disabled": false
        }
      ],
      "ttl": 60,
      "type": "A"
    }
  ]
}
be sure to verify that records, comments and rrsets are also arrays !
Stream Context
Next thing to create our stream context
$API_TOKEN = "0123456789ABCDEF";
$URL = "http://127.0.0.1:8081/api/v1/servers/localhost/zones/example.org";

$stream_options = array(
    "http" => array(
        "method"    => "PATCH",
        "header"    => "Content-type: application/json \r\n" .
                        "X-API-Key: $API_TOKEN",
        "content"   => json_encode($data),
        "timeout"   => 3
    )
);

$context = stream_context_create($stream_options);
Be aware of " \r\n" . in header field, this took me more time than it should ! To have multiple header fiels into the http stream, you need (I don’t know why) to carriage return them.
Get Zone details
Before continue, let’s make a small script to verify that we can successfully talk to the PowerDNS HTTP API with php
<?php
  $API_TOKEN = "0123456789ABCDEF";
  $URL = "http://127.0.0.1:8081/api/v1/servers/localhost/zones/example.org";

  $stream_options = array(
      "http" => array(
          "method"    => "GET",
          "header"    => "Content-type: application/jsonrn".
                          "X-API-Key: $API_TOKEN"
      )
  );

  $context = stream_context_create($stream_options);

  echo file_get_contents($URL, false, $context);
?>
by running this:
php get.php | jq .we should get the records of our zone in json format.
Cron Entry
you should be able to put the entire codebase together by now, so let’s work on the last component of our self-hosted dynamic dns server, how to update our record via curl
curl -sL https://username:very_secret_password@example.org/dyndns.phpevery minute should do the trick
# dyndns
* * * * * curl -sL https://username:very_secret_password@example.org/dyndns.php
That’s it !