Previously on … Network Namespaces - Part Two we provided internet access to the namespace, enabled a different DNS than our system and run a graphical application (xterm/firefox) from within.
The scope of this article is to run vpn service from this namespace. We will run a vpn-client and try to enable firewall rules inside.
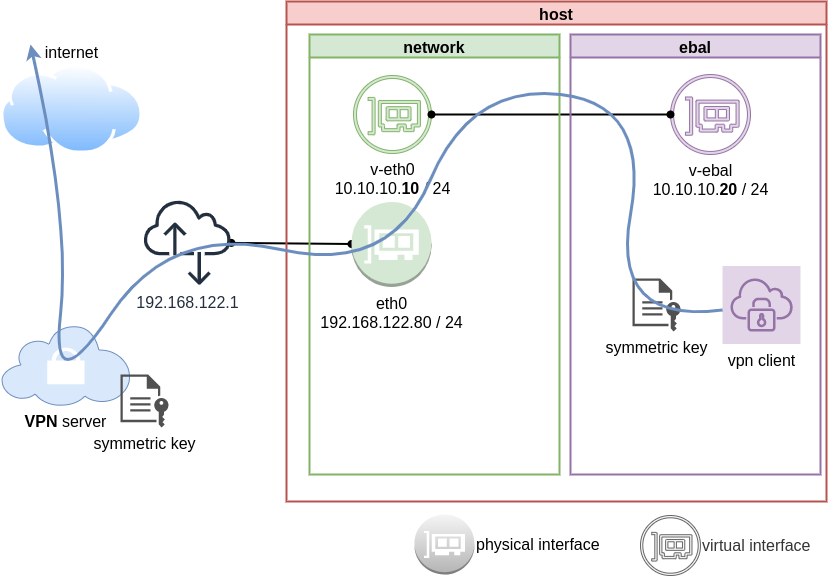
dsvpn
My VPN choice of preference is dsvpn and you can read in the below blog post, how to setup it.
dsvpn is a TCP, point-to-point VPN, using a symmetric key.
The instructions in this article will give you an understanding how to run a different vpn service.
Find your external IP
Before running the vpn client, let’s see what is our current external IP address
ip netns exec ebal curl ifconfig.co
62.103.103.103
The above IP is an example.
IP address and route of the namespace
ip netns exec ebal ip address show v-ebal
375: v-ebal@if376: <BROADCAST,MULTICAST,UP,LOWER_UP> mtu 1500 qdisc noqueue state UP group default qlen 1000
    link/ether c2:f3:a4:8a:41:47 brd ff:ff:ff:ff:ff:ff link-netnsid 0
    inet 10.10.10.20/24 scope global v-ebal
       valid_lft forever preferred_lft forever
    inet6 fe80::c0f3:a4ff:fe8a:4147/64 scope link
       valid_lft forever preferred_lft forever
ip netns exec ebal ip route show
default via 10.10.10.10 dev v-ebal
10.10.10.0/24 dev v-ebal proto kernel scope link src 10.10.10.20
Firefox
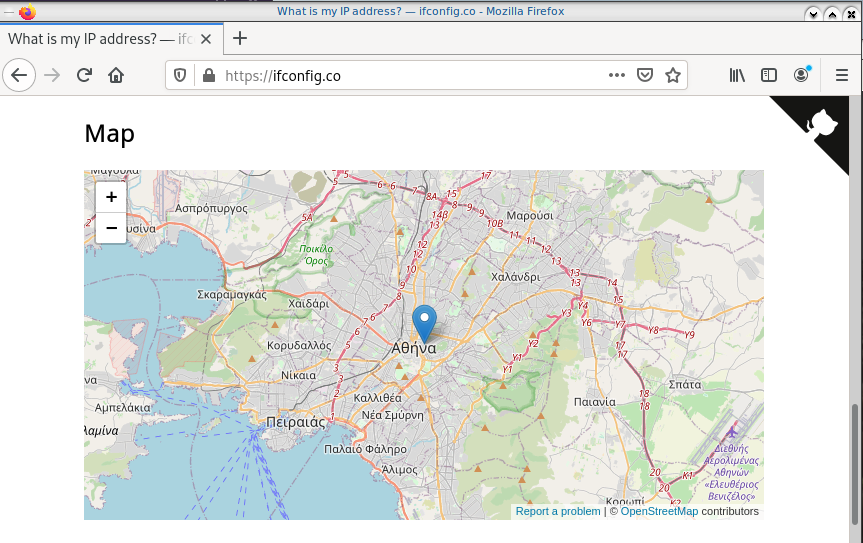
Open firefox (see part-two) and visit ifconfig.co we noticed see that the location of our IP is based in Athens, Greece.
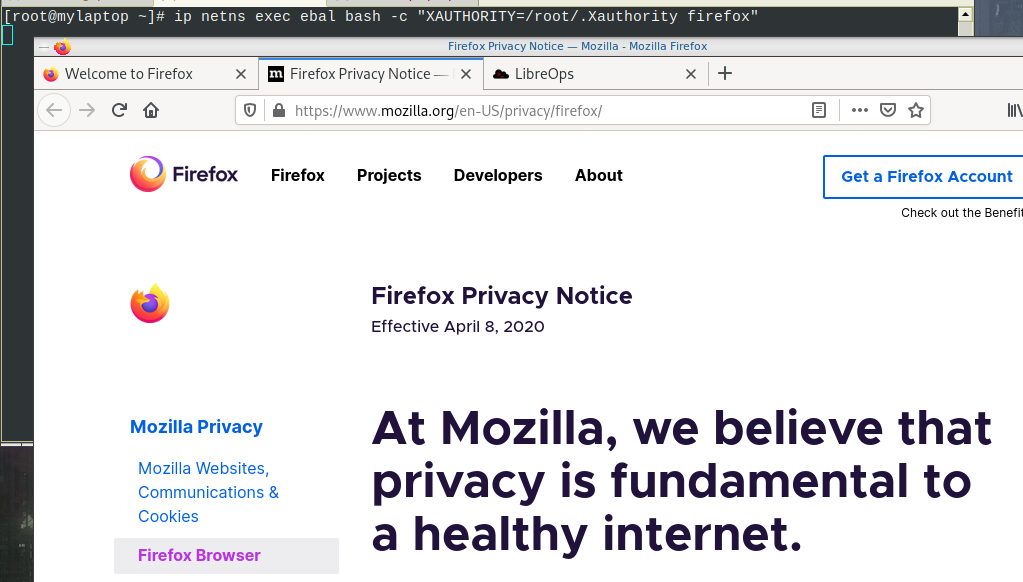
ip netns exec ebal bash -c "XAUTHORITY=/root/.Xauthority firefox"
Run VPN client
We have the symmetric key dsvpn.key and we know the VPN server’s IP.
ip netns exec ebal dsvpn client dsvpn.key 93.184.216.34 443
Interface: [tun0]
Trying to reconnect
Connecting to 93.184.216.34:443...
net.ipv4.tcp_congestion_control = bbr
Connected
Host
We can not see this tunnel vpn interface from our host machine
# ip link
1: lo: <LOOPBACK,UP,LOWER_UP> mtu 65536 qdisc noqueue state UNKNOWN mode DEFAULT group default qlen 1000
    link/loopback 00:00:00:00:00:00 brd 00:00:00:00:00:00
2: eth0: <BROADCAST,MULTICAST,UP,LOWER_UP> mtu 1500 qdisc fq_codel state UP mode DEFAULT group default qlen 1000
    link/ether 94:de:80:6a:de:0e brd ff:ff:ff:ff:ff:ff

376: v-eth0@if375: <BROADCAST,MULTICAST,UP,LOWER_UP> mtu 1500 qdisc noqueue state UP mode DEFAULT group default qlen 1000
    link/ether 1a:f7:c2:fb:60:ea brd ff:ff:ff:ff:ff:ff link-netns ebal
netns
but it exists inside the namespace, we can see tun0 interface here
ip netns exec ebal ip link
1: lo: <LOOPBACK> mtu 65536 qdisc noop state DOWN mode DEFAULT group default qlen 1000
    link/loopback 00:00:00:00:00:00 brd 00:00:00:00:00:00

3: tun0: <POINTOPOINT,MULTICAST,NOARP,UP,LOWER_UP> mtu 9000 qdisc fq_codel state UNKNOWN mode DEFAULT group default qlen 500
    link/none

375: v-ebal@if376: <BROADCAST,MULTICAST,UP,LOWER_UP> mtu 1500 qdisc noqueue state UP mode DEFAULT group default qlen 1000
    link/ether c2:f3:a4:8a:41:47 brd ff:ff:ff:ff:ff:ff link-netnsid 0
Find your external IP again
Checking your external internet IP from within the namespace
ip netns exec ebal curl ifconfig.co
93.184.216.34Firefox netns
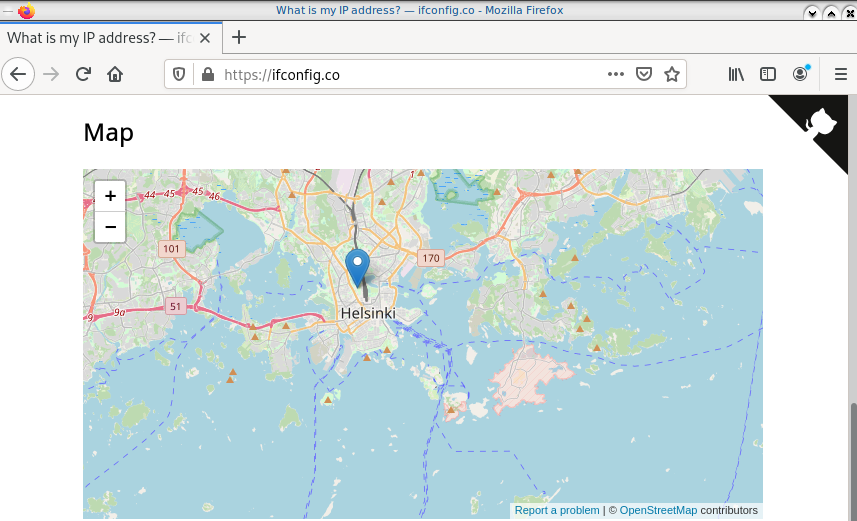
running again firefox, we will noticed that our the location of our IP is based in Helsinki (vpn server’s location).
ip netns exec ebal bash -c "XAUTHORITY=/root/.Xauthority firefox"
systemd
We can wrap the dsvpn client under a systemcd service
[Unit]
Description=Dead Simple VPN - Client

[Service]
ExecStart=ip netns exec ebal /usr/local/bin/dsvpn client /root/dsvpn.key 93.184.216.34 443
Restart=always
RestartSec=20

[Install]
WantedBy=network.target
Start systemd service
systemctl start dsvpn.service
Verify
ip -n ebal a
1: lo: <LOOPBACK> mtu 65536 qdisc noop state DOWN group default qlen 1000
    link/loopback 00:00:00:00:00:00 brd 00:00:00:00:00:00

4: tun0: <POINTOPOINT,MULTICAST,NOARP,UP,LOWER_UP> mtu 9000 qdisc fq_codel state UNKNOWN group default qlen 500
    link/none
    inet 192.168.192.1 peer 192.168.192.254/32 scope global tun0
       valid_lft forever preferred_lft forever
    inet6 64:ff9b::c0a8:c001 peer 64:ff9b::c0a8:c0fe/96 scope global
       valid_lft forever preferred_lft forever
    inet6 fe80::ee69:bdd8:3554:d81/64 scope link stable-privacy
       valid_lft forever preferred_lft forever

375: v-ebal@if376: <BROADCAST,MULTICAST,UP,LOWER_UP> mtu 1500 qdisc noqueue state UP group default qlen 1000
    link/ether c2:f3:a4:8a:41:47 brd ff:ff:ff:ff:ff:ff link-netnsid 0
    inet 10.10.10.20/24 scope global v-ebal
       valid_lft forever preferred_lft forever
    inet6 fe80::c0f3:a4ff:fe8a:4147/64 scope link
       valid_lft forever preferred_lft forever
ip -n ebal route
default via 10.10.10.10 dev v-ebal
10.10.10.0/24 dev v-ebal proto kernel scope link src 10.10.10.20
192.168.192.254 dev tun0 proto kernel scope link src 192.168.192.1
Firewall
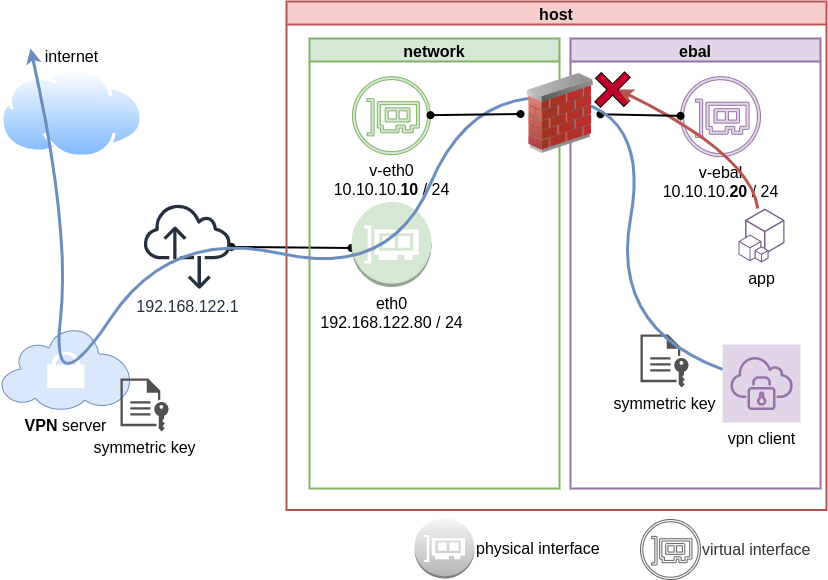
We can also have different firewall policies for each namespace
outside
# iptables -nvL | wc -l
127
inside
ip netns exec ebal iptables -nvL
Chain INPUT (policy ACCEPT 9 packets, 2547 bytes)
 pkts bytes target     prot opt in     out     source        destination

Chain FORWARD (policy ACCEPT 0 packets, 0 bytes)
 pkts bytes target     prot opt in     out     source        destination

Chain OUTPUT (policy ACCEPT 2 packets, 216 bytes)
 pkts bytes target     prot opt in     out     source        destination
So for the VPN service running inside the namespace, we can REJECT every network traffic, except the traffic towards our VPN server and of course the veth interface (point-to-point) to our host machine.
iptable rules
Enter the namespace
inside
ip netns exec ebal bash
Before
verify that iptables rules are clear
iptables -nvL
Chain INPUT (policy ACCEPT 25 packets, 7373 bytes)
 pkts bytes target     prot opt in     out     source        destination

Chain FORWARD (policy ACCEPT 0 packets, 0 bytes)
 pkts bytes target     prot opt in     out     source        destination

Chain OUTPUT (policy ACCEPT 4 packets, 376 bytes)
 pkts bytes target     prot opt in     out     source        destination
Enable firewall
./iptables.netns.ebal.sh
The content of this file
## iptable rules

iptables -A INPUT -i lo -j ACCEPT
iptables -A INPUT -m conntrack --ctstate RELATED,ESTABLISHED -j ACCEPT
iptables -A INPUT -m conntrack --ctstate INVALID -j DROP
iptables -A INPUT -p icmp --icmp-type 8 -m conntrack --ctstate NEW -j ACCEPT

## netns - incoming
iptables -A INPUT -i v-ebal -s 10.0.0.0/8 -j ACCEPT

## Reject incoming traffic
iptables -A INPUT -j REJECT

## DSVPN
iptables -A OUTPUT -p tcp -m tcp -o v-ebal -d 93.184.216.34 --dport 443 -j ACCEPT

## net-ns outgoing
iptables -A OUTPUT -o v-ebal -d 10.0.0.0/8 -j ACCEPT

## Allow tun
iptables -A OUTPUT -o tun+ -j ACCEPT

## Reject outgoing traffic
iptables -A OUTPUT -p tcp -j REJECT --reject-with tcp-reset
iptables -A OUTPUT -p udp -j REJECT --reject-with icmp-port-unreachable
After
iptables -nvL
Chain INPUT (policy ACCEPT 0 packets, 0 bytes)
 pkts bytes target     prot opt in     out     source        destination
    0     0 ACCEPT     all  --  lo     *       0.0.0.0/0     0.0.0.0/0
    0     0 ACCEPT     all  --  *      *       0.0.0.0/0     0.0.0.0/0     ctstate RELATED,ESTABLISHED
    0     0 DROP       all  --  *      *       0.0.0.0/0     0.0.0.0/0     ctstate INVALID
    0     0 ACCEPT     icmp --  *      *       0.0.0.0/0     0.0.0.0/0     icmptype 8 ctstate NEW
    1   349 ACCEPT     all  --  v-ebal *       10.0.0.0/8    0.0.0.0/0
    0     0 REJECT     all  --  *      *       0.0.0.0/0     0.0.0.0/0     reject-with icmp-port-unreachable
    0     0 ACCEPT     all  --  lo     *       0.0.0.0/0     0.0.0.0/0
    0     0 ACCEPT     all  --  *      *       0.0.0.0/0     0.0.0.0/0     ctstate RELATED,ESTABLISHED
    0     0 DROP       all  --  *      *       0.0.0.0/0     0.0.0.0/0     ctstate INVALID
    0     0 ACCEPT     icmp --  *      *       0.0.0.0/0     0.0.0.0/0     icmptype 8 ctstate NEW
    0     0 ACCEPT     all  --  v-ebal *       10.0.0.0/8    0.0.0.0/0
    0     0 REJECT     all  --  *      *       0.0.0.0/0     0.0.0.0/0     reject-with icmp-port-unreachable

Chain FORWARD (policy ACCEPT 0 packets, 0 bytes)
 pkts bytes target     prot opt in     out     source        destination

Chain OUTPUT (policy ACCEPT 0 packets, 0 bytes)
 pkts bytes target     prot opt in     out     source        destination
    0     0 ACCEPT     tcp  --  *      v-ebal  0.0.0.0/0     95.216.215.96 tcp dpt:8443
    0     0 ACCEPT     all  --  *      v-ebal  0.0.0.0/0     10.0.0.0/8
    0     0 ACCEPT     all  --  *      tun+    0.0.0.0/0     0.0.0.0/0
    0     0 REJECT     tcp  --  *      *       0.0.0.0/0     0.0.0.0/0     reject-with tcp-reset
    0     0 REJECT     udp  --  *      *       0.0.0.0/0     0.0.0.0/0     reject-with icmp-port-unreachable
    0     0 ACCEPT     tcp  --  *      v-ebal  0.0.0.0/0     95.216.215.96 tcp dpt:8443
    0     0 ACCEPT     all  --  *      v-ebal  0.0.0.0/0     10.0.0.0/8
    0     0 ACCEPT     all  --  *      tun+    0.0.0.0/0     0.0.0.0/0
    0     0 REJECT     tcp  --  *      *       0.0.0.0/0     0.0.0.0/0     reject-with tcp-reset
    0     0 REJECT     udp  --  *      *       0.0.0.0/0     0.0.0.0/0     reject-with icmp-port-unreachable
PS: We reject tcp/udp traffic (last 2 linew), but allow icmp (ping).
End of part three.
Previously on… Network Namespaces - Part One we discussed how to create an isolated network namespace and use a veth interfaces to talk between the host system and the namespace.
In this article we continue our story and we will try to connect that namespace to the internet.
recap previous commands
ip netns add ebal
ip link add v-eth0 type veth peer name v-ebal
ip link set v-ebal netns ebal
ip addr add 10.10.10.10/24 dev v-eth0
ip netns exec ebal ip addr add 10.10.10.20/24 dev v-ebal
ip link set v-eth0 up
ip netns exec ebal ip link set v-ebal up
Access namespace
ip netns exec ebal bash
# ip a
1: lo: <LOOPBACK> mtu 65536 qdisc noop state DOWN group default qlen 1000
    link/loopback 00:00:00:00:00:00 brd 00:00:00:00:00:00

3: v-ebal@if4: <BROADCAST,MULTICAST,UP,LOWER_UP> mtu 1500 qdisc noqueue state UP group default qlen 1000
    link/ether e2:07:60:da:d5:cf brd ff:ff:ff:ff:ff:ff link-netnsid 0
    inet 10.10.10.20/24 scope global v-ebal
       valid_lft forever preferred_lft forever
    inet6 fe80::e007:60ff:feda:d5cf/64 scope link
       valid_lft forever preferred_lft forever

# ip r
10.10.10.0/24 dev v-ebal proto kernel scope link src 10.10.10.20
Ping Veth
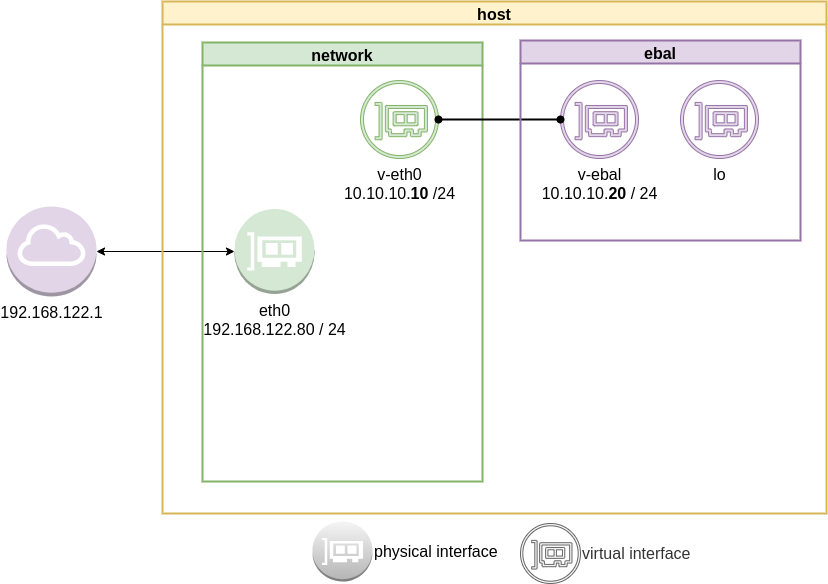
It’s not a gateway, this is a point-to-point connection.
# ping -c3 10.10.10.10

PING 10.10.10.10 (10.10.10.10) 56(84) bytes of data.
64 bytes from 10.10.10.10: icmp_seq=1 ttl=64 time=0.415 ms
64 bytes from 10.10.10.10: icmp_seq=2 ttl=64 time=0.107 ms
64 bytes from 10.10.10.10: icmp_seq=3 ttl=64 time=0.126 ms

--- 10.10.10.10 ping statistics ---
3 packets transmitted, 3 received, 0% packet loss, time 2008ms
rtt min/avg/max/mdev = 0.107/0.216/0.415/0.140 ms
Ping internet
trying to access anything else …
ip netns exec ebal ping -c2 192.168.122.80
ip netns exec ebal ping -c2 192.168.122.1
ip netns exec ebal ping -c2 8.8.8.8
ip netns exec ebal ping -c2 google.com
root@ubuntu2004:~# ping 192.168.122.80
ping: connect: Network is unreachable

root@ubuntu2004:~# ping 8.8.8.8
ping: connect: Network is unreachable

root@ubuntu2004:~# ping google.com
ping: google.com: Temporary failure in name resolution

root@ubuntu2004:~# exit
exit
exit from namespace.
Gateway
We need to define a gateway route from within the namespace
ip netns exec ebal ip route add default via 10.10.10.10
root@ubuntu2004:~# ip netns exec ebal ip route list
default via 10.10.10.10 dev v-ebal
10.10.10.0/24 dev v-ebal proto kernel scope link src 10.10.10.20
test connectivity - system
we can reach the host system, but we can not visit anything else
# ip netns exec ebal ping -c1 192.168.122.80
PING 192.168.122.80 (192.168.122.80) 56(84) bytes of data.
64 bytes from 192.168.122.80: icmp_seq=1 ttl=64 time=0.075 ms

--- 192.168.122.80 ping statistics ---
1 packets transmitted, 1 received, 0% packet loss, time 0ms
rtt min/avg/max/mdev = 0.075/0.075/0.075/0.000 ms

# ip netns exec ebal ping -c3 192.168.122.80
PING 192.168.122.80 (192.168.122.80) 56(84) bytes of data.
64 bytes from 192.168.122.80: icmp_seq=1 ttl=64 time=0.026 ms
64 bytes from 192.168.122.80: icmp_seq=2 ttl=64 time=0.128 ms
64 bytes from 192.168.122.80: icmp_seq=3 ttl=64 time=0.126 ms

--- 192.168.122.80 ping statistics ---
3 packets transmitted, 3 received, 0% packet loss, time 2033ms
rtt min/avg/max/mdev = 0.026/0.093/0.128/0.047 ms

# ip netns exec ebal ping -c3 8.8.8.8
PING 8.8.8.8 (8.8.8.8) 56(84) bytes of data.

--- 8.8.8.8 ping statistics ---
3 packets transmitted, 0 received, 100% packet loss, time 2044ms

root@ubuntu2004:~# ip netns exec ebal ping -c3 google.com
ping: google.com: Temporary failure in name resolution
Forward
What is the issue here ?
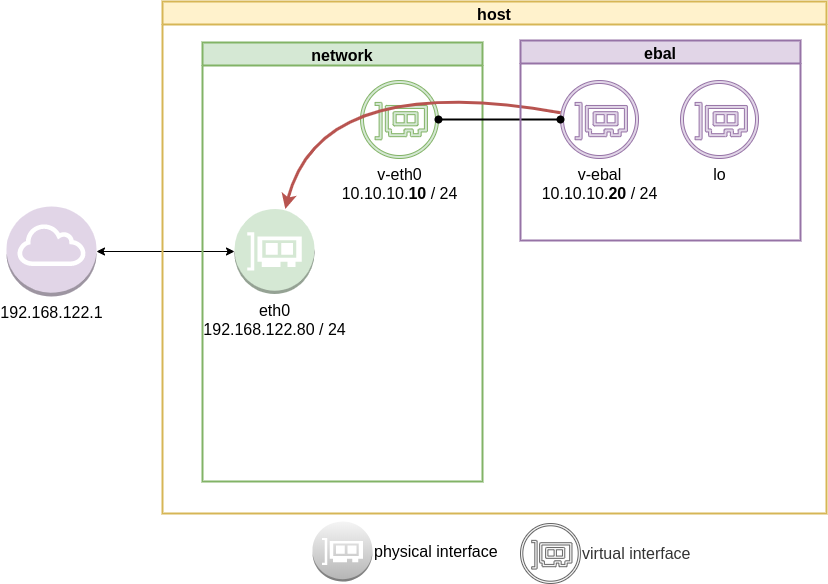
We added a default route to the network namespace. Traffic will start from our v-ebal (veth interface inside the namespace), goes to the v-eth0 (veth interface to our system) and then … then nothing.
The eth0 receive the network packages but does not know what to do with them. We need to create a forward rule to our host, so the eth0 network interface will know to forward traffic from the namespace to the next hop.
echo 1 > /proc/sys/net/ipv4/ip_forward
or
sysctl -w net.ipv4.ip_forward=1
permanent forward
If we need to permanent tell the eth0 to always forward traffic, then we need to edit /etc/sysctl.conf and add below line:
net.ipv4.ip_forward = 1
To enable this option without reboot our system
sysctl -p /etc/sysctl.conf
verify
root@ubuntu2004:~# sysctl net.ipv4.ip_forward
net.ipv4.ip_forward = 1
Masquerade
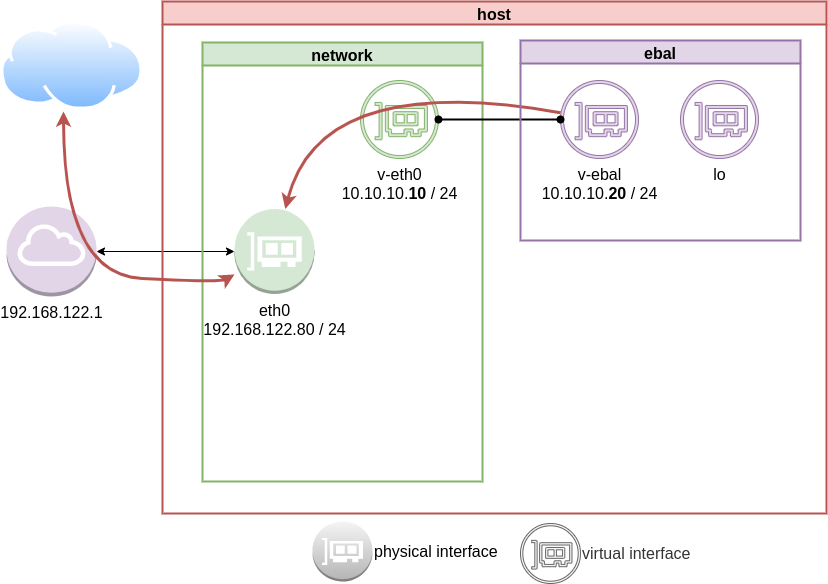
but if we test again, we will notice that nothing happened. Actually something indeed happened but not what we expected. At this moment, eth0 knows how to forward network packages to the next hope (perhaps next hope is the router or internet gateway) but next hop will get a package from an unknown network.
Remember that our internal network, is 10.10.10.20 with a point-to-point connection to 10.10.10.10. So there is no way for network 192.168.122.0/24 to know how to talk to 10.0.0.0/8.
We have to Masquerade all packages that come from 10.0.0.0/8 and the easiest way to do this if via iptables.
Using the postrouting nat table. That means the outgoing traffic with source 10.0.0.0/8 will have a mask, will pretend to be from 192.168.122.80 (eth0) before going to the next hop (gateway).
# iptables --table nat --flush
iptables --table nat --append POSTROUTING --source 10.0.0.0/8 --jump MASQUERADE
iptables --table nat --list
Chain PREROUTING (policy ACCEPT)
target     prot opt source               destination

Chain INPUT (policy ACCEPT)
target     prot opt source               destination

Chain OUTPUT (policy ACCEPT)
target     prot opt source               destination

Chain POSTROUTING (policy ACCEPT)
target     prot opt source               destination
MASQUERADE  all  --  10.0.0.0/8           anywhere
Test connectivity
test again the namespace connectivity
# ip netns exec ebal ping -c2 192.168.122.80
PING 192.168.122.80 (192.168.122.80) 56(84) bytes of data.
64 bytes from 192.168.122.80: icmp_seq=1 ttl=64 time=0.054 ms
64 bytes from 192.168.122.80: icmp_seq=2 ttl=64 time=0.139 ms

--- 192.168.122.80 ping statistics ---
2 packets transmitted, 2 received, 0% packet loss, time 1017ms
rtt min/avg/max/mdev = 0.054/0.096/0.139/0.042 ms

# ip netns exec ebal ping -c2 192.168.122.1
PING 192.168.122.1 (192.168.122.1) 56(84) bytes of data.
64 bytes from 192.168.122.1: icmp_seq=1 ttl=63 time=0.242 ms
64 bytes from 192.168.122.1: icmp_seq=2 ttl=63 time=0.636 ms

--- 192.168.122.1 ping statistics ---
2 packets transmitted, 2 received, 0% packet loss, time 1015ms
rtt min/avg/max/mdev = 0.242/0.439/0.636/0.197 ms

# ip netns exec ebal ping -c2 8.8.8.8
PING 8.8.8.8 (8.8.8.8) 56(84) bytes of data.
64 bytes from 8.8.8.8: icmp_seq=1 ttl=51 time=57.8 ms
64 bytes from 8.8.8.8: icmp_seq=2 ttl=51 time=58.0 ms

--- 8.8.8.8 ping statistics ---
2 packets transmitted, 2 received, 0% packet loss, time 1001ms
rtt min/avg/max/mdev = 57.805/57.896/57.988/0.091 ms

# ip netns exec ebal ping -c2 google.com
ping: google.com: Temporary failure in name resolution
success
DNS
almost!
If you carefully noticed above, ping on the IP works.
But no with name resolution.
netns - resolv
Reading ip-netns manual
# man ip-netns | tbl | grep resolv

  resolv.conf for a network namespace used to isolate your vpn you would name it /etc/netns/myvpn/resolv.conf.
we can create a resolver configuration file on this location:
/etc/netns/<namespace>/resolv.conf
mkdir -pv /etc/netns/ebal/
echo nameserver 88.198.92.222 > /etc/netns/ebal/resolv.conf
I am using radicalDNS for this namespace.
Verify DNS
# ip netns exec ebal cat /etc/resolv.conf
nameserver 88.198.92.222
Connect to the namespace
ip netns exec ebal bash
root@ubuntu2004:~# cat /etc/resolv.conf
nameserver 88.198.92.222

root@ubuntu2004:~# ping -c 5 ipv4.balaskas.gr
PING ipv4.balaskas.gr (158.255.214.14) 56(84) bytes of data.
64 bytes from ns14.balaskas.gr (158.255.214.14): icmp_seq=1 ttl=50 time=64.3 ms
64 bytes from ns14.balaskas.gr (158.255.214.14): icmp_seq=2 ttl=50 time=64.2 ms
64 bytes from ns14.balaskas.gr (158.255.214.14): icmp_seq=3 ttl=50 time=66.9 ms
64 bytes from ns14.balaskas.gr (158.255.214.14): icmp_seq=4 ttl=50 time=63.8 ms
64 bytes from ns14.balaskas.gr (158.255.214.14): icmp_seq=5 ttl=50 time=63.3 ms

--- ipv4.balaskas.gr ping statistics ---
5 packets transmitted, 5 received, 0% packet loss, time 4006ms
rtt min/avg/max/mdev = 63.344/64.502/66.908/1.246 ms

root@ubuntu2004:~# ping -c3 google.com
PING google.com (172.217.22.46) 56(84) bytes of data.
64 bytes from fra15s16-in-f14.1e100.net (172.217.22.46): icmp_seq=1 ttl=51 time=57.4 ms
64 bytes from fra15s16-in-f14.1e100.net (172.217.22.46): icmp_seq=2 ttl=51 time=55.4 ms
64 bytes from fra15s16-in-f14.1e100.net (172.217.22.46): icmp_seq=3 ttl=51 time=55.2 ms

--- google.com ping statistics ---
3 packets transmitted, 3 received, 0% packet loss, time 2003ms
rtt min/avg/max/mdev = 55.209/55.984/57.380/0.988 ms
bonus - run firefox from within namespace
xterm
start with something simple first, like xterm
ip netns exec ebal xterm
or
ip netns exec ebal xterm -fa liberation -fs 11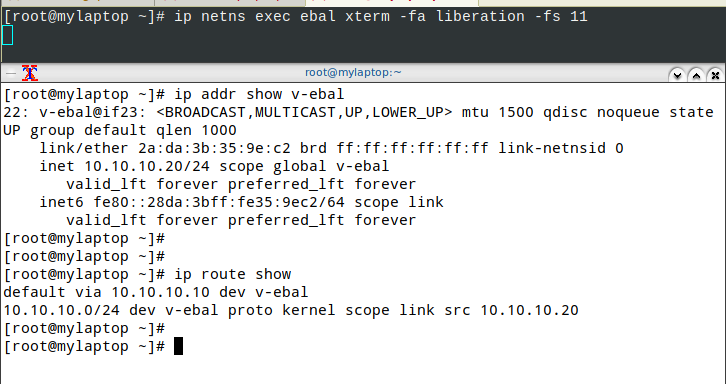
test firefox
trying to run firefox within this namespace, will produce an error
# ip netns exec ebal firefox
Running Firefox as root in a regular user's session is not supported.  ($XAUTHORITY is /home/ebal/.Xauthority which is owned by ebal.)
and xauth info will inform us, that the current Xauthority file is owned by our local user.
# xauth info
Authority file:       /home/ebal/.Xauthority
File new:             no
File locked:          no
Number of entries:    4
Changes honored:      yes
Changes made:         no
Current input:        (argv):1
okay, get inside this namespace
ip netns exec ebal bash
and provide a new authority file for firefox
XAUTHORITY=/root/.Xauthority firefox
# XAUTHORITY=/root/.Xauthority firefox

No protocol specified
Unable to init server: Could not connect: Connection refused
Error: cannot open display: :0.0
xhost
xhost provide access control to the Xorg graphical server.
By default should look like this:
$ xhost
access control enabled, only authorized clients can connect
We can also disable access control
xhost +
but what we need to do, is to disable access control on local
xhost +local:
firefox
and if we do all that
ip netns exec ebal bash -c "XAUTHORITY=/root/.Xauthority firefox"
End of part two
Have you ever wondered how containers work on the network level? How they isolate resources and network access? Linux namespaces is the magic behind all these and in this blog post, I will try to explain how to setup your own private, isolated network stack on your linux box.
notes based on ubuntu:20.04, root access.
current setup
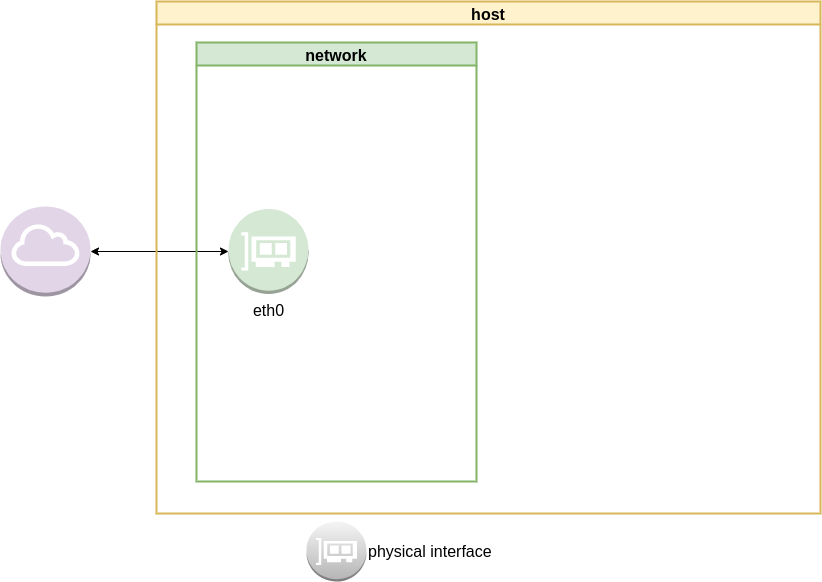
Our current setup is similar to this
List ethernet cards
ip address list
1: lo: <LOOPBACK,UP,LOWER_UP> mtu 65536 qdisc noqueue state UNKNOWN group default qlen 1000
    link/loopback 00:00:00:00:00:00 brd 00:00:00:00:00:00
    inet 127.0.0.1/8 scope host lo
       valid_lft forever preferred_lft forever
    inet6 ::1/128 scope host
       valid_lft forever preferred_lft forever
2: eth0: <BROADCAST,MULTICAST,UP,LOWER_UP> mtu 1500 qdisc fq_codel state UP group default qlen 1000
    link/ether 52:54:00:ea:50:87 brd ff:ff:ff:ff:ff:ff
    inet 192.168.122.80/24 brd 192.168.122.255 scope global eth0
       valid_lft forever preferred_lft forever
    inet6 fe80::5054:ff:feea:5087/64 scope link
       valid_lft forever preferred_lft forever
List routing table
ip route list
default via 192.168.122.1 dev eth0 proto static
192.168.122.0/24 dev eth0 proto kernel scope link src 192.168.122.80
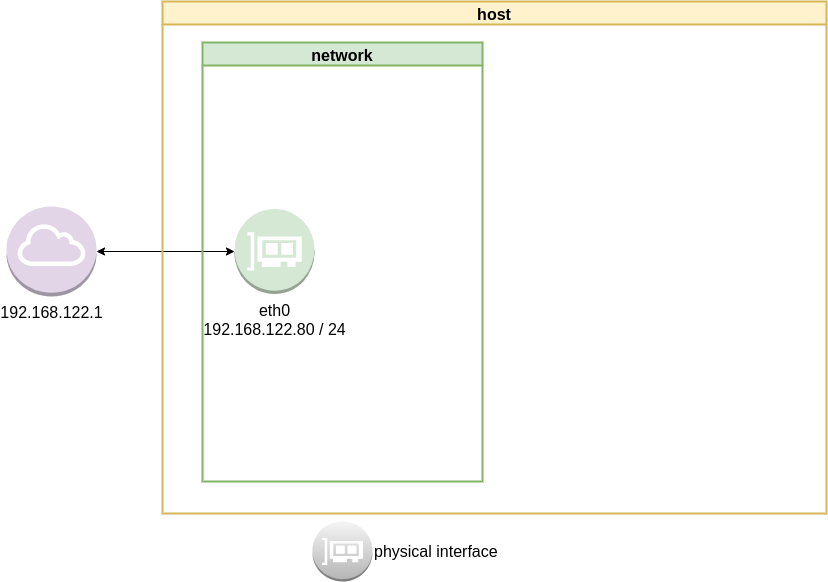
Checking internet access and dns
ping -c 5 libreops.cc
PING libreops.cc (185.199.111.153) 56(84) bytes of data.
64 bytes from 185.199.111.153 (185.199.111.153): icmp_seq=1 ttl=54 time=121 ms
64 bytes from 185.199.111.153 (185.199.111.153): icmp_seq=2 ttl=54 time=124 ms
64 bytes from 185.199.111.153 (185.199.111.153): icmp_seq=3 ttl=54 time=182 ms
64 bytes from 185.199.111.153 (185.199.111.153): icmp_seq=4 ttl=54 time=162 ms
64 bytes from 185.199.111.153 (185.199.111.153): icmp_seq=5 ttl=54 time=168 ms

--- libreops.cc ping statistics ---
5 packets transmitted, 5 received, 0% packet loss, time 4004ms
rtt min/avg/max/mdev = 121.065/151.405/181.760/24.299 ms
linux network namespace management
In this article we will use the below programs:
so, let us start working with network namespaces.
list
To view the network namespaces, we can type:
ip netns
ip netns list
This will return nothing, an empty list.
help
So quicly view the help of ip-netns
# ip netns help

Usage:  ip netns list
  ip netns add NAME
  ip netns attach NAME PID
  ip netns set NAME NETNSID
  ip [-all] netns delete [NAME]
  ip netns identify [PID]
  ip netns pids NAME
  ip [-all] netns exec [NAME] cmd ...
  ip netns monitor
  ip netns list-id [target-nsid POSITIVE-INT] [nsid POSITIVE-INT]
NETNSID := auto | POSITIVE-INT
monitor
To monitor in real time any changes, we can open a new terminal and type:
ip netns monitor
Add a new namespace
ip netns add ebal
List namespaces
ip netns list
root@ubuntu2004:~# ip netns add ebal
root@ubuntu2004:~# ip netns list
ebal
We have one namespace
Delete Namespace
ip netns del ebal
Full example
root@ubuntu2004:~# ip netns
root@ubuntu2004:~# ip netns list
root@ubuntu2004:~# ip netns add ebal
root@ubuntu2004:~# ip netns list
ebal
root@ubuntu2004:~# ip netns
ebal
root@ubuntu2004:~# ip netns del ebal
root@ubuntu2004:~#
root@ubuntu2004:~# ip netns
root@ubuntu2004:~# ip netns list
root@ubuntu2004:~#
monitor
root@ubuntu2004:~# ip netns monitor
add ebal
delete ebal
Directory
When we create a new network namespace, it creates an object under /var/run/netns/.
root@ubuntu2004:~# ls -l /var/run/netns/
total 0
-r--r--r-- 1 root root 0 May  9 16:44 ebal
exec
We can run commands inside a namespace.
eg.
ip netns exec ebal ip a
root@ubuntu2004:~# ip netns exec ebal ip a
1: lo: <LOOPBACK> mtu 65536 qdisc noop state DOWN group default qlen 1000
    link/loopback 00:00:00:00:00:00 brd 00:00:00:00:00:00
bash
we can also open a shell inside the namespace and run commands throught the shell.
eg.
root@ubuntu2004:~# ip netns exec ebal bash

root@ubuntu2004:~# ip a
1: lo: <LOOPBACK> mtu 65536 qdisc noop state DOWN group default qlen 1000
    link/loopback 00:00:00:00:00:00 brd 00:00:00:00:00:00

root@ubuntu2004:~# exit
exit
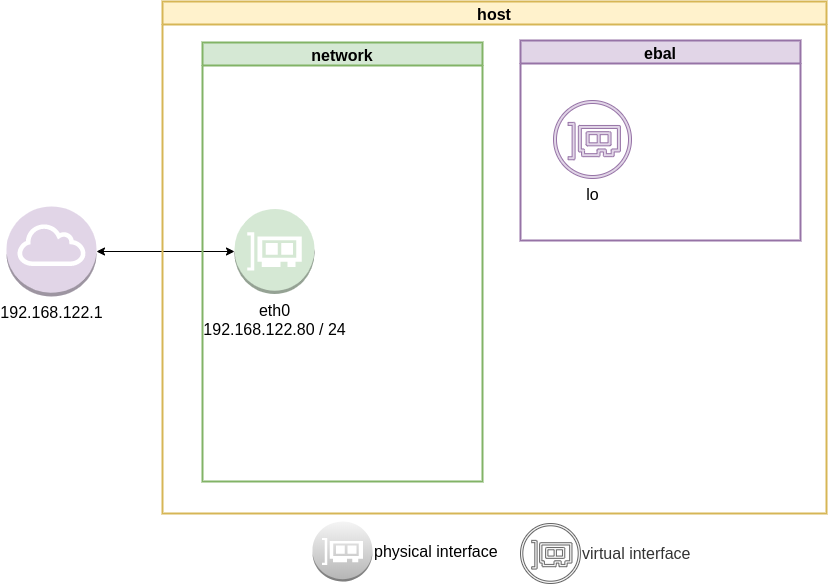
as you can see, the namespace is isolated from our system. It has only one local interface and nothing else.
We can bring up the loopback interface up
root@ubuntu2004:~# ip link set lo up

root@ubuntu2004:~# ip a
1: lo: <LOOPBACK,UP,LOWER_UP> mtu 65536 qdisc noqueue state UNKNOWN group default qlen 1000
    link/loopback 00:00:00:00:00:00 brd 00:00:00:00:00:00
    inet 127.0.0.1/8 scope host lo
       valid_lft forever preferred_lft forever
    inet6 ::1/128 scope host
       valid_lft forever preferred_lft forever

root@ubuntu2004:~# ip r
veth
The veth devices are virtual Ethernet devices. They can act as tunnels between network namespaces to create a bridge to a physical network device in another namespace, but can also be used as standalone network devices.
Think Veth as a physical cable that connects two different computers. Every veth is the end of this cable.
So we need 2 virtual interfaces to connect our system and the new namespace.
ip link add v-eth0 type veth peer name v-ebal
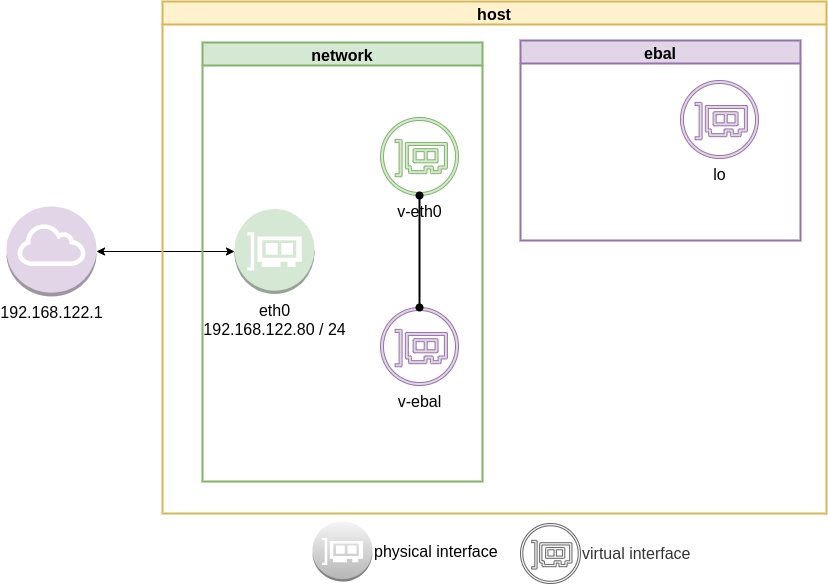
eg.
root@ubuntu2004:~# ip link add v-eth0 type veth peer name v-ebal

root@ubuntu2004:~# ip a
1: lo: <LOOPBACK,UP,LOWER_UP> mtu 65536 qdisc noqueue state UNKNOWN group default qlen 1000
    link/loopback 00:00:00:00:00:00 brd 00:00:00:00:00:00
    inet 127.0.0.1/8 scope host lo
       valid_lft forever preferred_lft forever
    inet6 ::1/128 scope host
       valid_lft forever preferred_lft forever

2: eth0: <BROADCAST,MULTICAST,UP,LOWER_UP> mtu 1500 qdisc fq_codel state UP group default qlen 1000
    link/ether 52:54:00:ea:50:87 brd ff:ff:ff:ff:ff:ff
    inet 192.168.122.80/24 brd 192.168.122.255 scope global eth0
       valid_lft forever preferred_lft forever
    inet6 fe80::5054:ff:feea:5087/64 scope link
       valid_lft forever preferred_lft forever

3: v-ebal@v-eth0: <BROADCAST,MULTICAST,M-DOWN> mtu 1500 qdisc noop state DOWN group default qlen 1000
    link/ether d6:86:88:3f:eb:42 brd ff:ff:ff:ff:ff:ff

4: v-eth0@v-ebal: <BROADCAST,MULTICAST,M-DOWN> mtu 1500 qdisc noop state DOWN group default qlen 1000
    link/ether 3e:85:9b:dd:c7:96 brd ff:ff:ff:ff:ff:ff
Attach veth0 to namespace
Now we are going to move one virtual interface (one end of the cable) to the new network namespace
ip link set v-ebal netns ebal
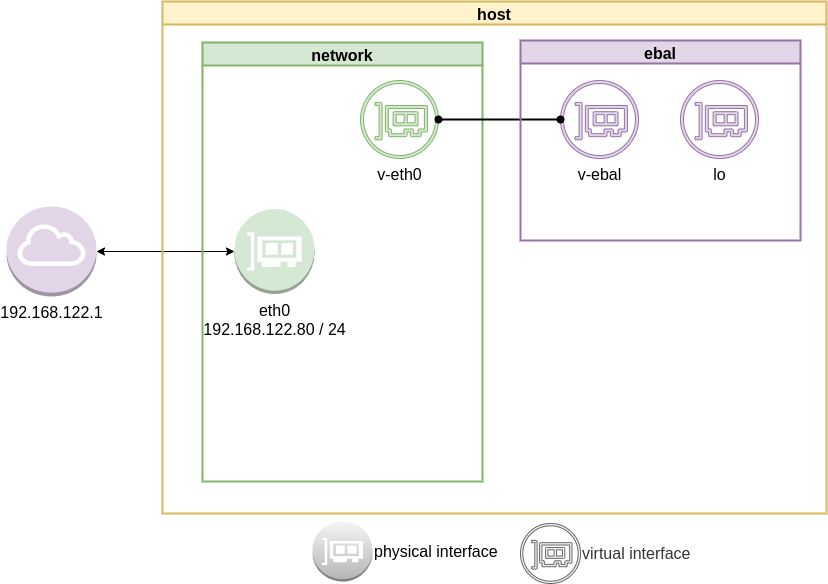
we will see that the interface is not showing on our system
root@ubuntu2004:~# ip a
1: lo: <LOOPBACK,UP,LOWER_UP> mtu 65536 qdisc noqueue state UNKNOWN group default qlen 1000
    link/loopback 00:00:00:00:00:00 brd 00:00:00:00:00:00
    inet 127.0.0.1/8 scope host lo
       valid_lft forever preferred_lft forever
    inet6 ::1/128 scope host
       valid_lft forever preferred_lft forever

2: eth0: <BROADCAST,MULTICAST,UP,LOWER_UP> mtu 1500 qdisc fq_codel state UP group default qlen 1000
    link/ether 52:54:00:ea:50:87 brd ff:ff:ff:ff:ff:ff
    inet 192.168.122.80/24 brd 192.168.122.255 scope global eth0
       valid_lft forever preferred_lft forever
    inet6 fe80::5054:ff:feea:5087/64 scope link
       valid_lft forever preferred_lft forever

4: v-eth0@if3: <BROADCAST,MULTICAST> mtu 1500 qdisc noop state DOWN group default qlen 1000
    link/ether 3e:85:9b:dd:c7:96 brd ff:ff:ff:ff:ff:ff link-netns ebal
inside the namespace
root@ubuntu2004:~# ip netns exec ebal ip a

1: lo: <LOOPBACK,UP,LOWER_UP> mtu 65536 qdisc noqueue state UNKNOWN group default qlen 1000
    link/loopback 00:00:00:00:00:00 brd 00:00:00:00:00:00
    inet 127.0.0.1/8 scope host lo
       valid_lft forever preferred_lft forever
    inet6 ::1/128 scope host
       valid_lft forever preferred_lft forever

3: v-ebal@if4: <BROADCAST,MULTICAST> mtu 1500 qdisc noop state DOWN group default qlen 1000
    link/ether d6:86:88:3f:eb:42 brd ff:ff:ff:ff:ff:ff link-netnsid 0
Connect the two virtual interfaces
outside
ip addr add 10.10.10.10/24 dev v-eth0
root@ubuntu2004:~# ip a
1: lo: <LOOPBACK,UP,LOWER_UP> mtu 65536 qdisc noqueue state UNKNOWN group default qlen 1000
    link/loopback 00:00:00:00:00:00 brd 00:00:00:00:00:00
    inet 127.0.0.1/8 scope host lo
       valid_lft forever preferred_lft forever
    inet6 ::1/128 scope host
       valid_lft forever preferred_lft forever

2: eth0: <BROADCAST,MULTICAST,UP,LOWER_UP> mtu 1500 qdisc fq_codel state UP group default qlen 1000
    link/ether 52:54:00:ea:50:87 brd ff:ff:ff:ff:ff:ff
    inet 192.168.122.80/24 brd 192.168.122.255 scope global eth0
       valid_lft forever preferred_lft forever
    inet6 fe80::5054:ff:feea:5087/64 scope link
       valid_lft forever preferred_lft forever

4: v-eth0@if3: <BROADCAST,MULTICAST> mtu 1500 qdisc noop state DOWN group default qlen 1000
    link/ether 3e:85:9b:dd:c7:96 brd ff:ff:ff:ff:ff:ff link-netns ebal
    inet 10.10.10.10/24 scope global v-eth0
       valid_lft forever preferred_lft forever
inside
ip netns exec ebal ip addr add 10.10.10.20/24 dev v-ebal
root@ubuntu2004:~# ip netns exec ebal ip a

1: lo: <LOOPBACK,UP,LOWER_UP> mtu 65536 qdisc noqueue state UNKNOWN group default qlen 1000
    link/loopback 00:00:00:00:00:00 brd 00:00:00:00:00:00
    inet 127.0.0.1/8 scope host lo
       valid_lft forever preferred_lft forever
    inet6 ::1/128 scope host
       valid_lft forever preferred_lft forever

3: v-ebal@if4: <BROADCAST,MULTICAST> mtu 1500 qdisc noop state DOWN group default qlen 1000
    link/ether d6:86:88:3f:eb:42 brd ff:ff:ff:ff:ff:ff link-netnsid 0
    inet 10.10.10.20/24 scope global v-ebal
       valid_lft forever preferred_lft forever
Both Interfaces are down!
But both interfaces are down, now we need to set up both interfaces:
outside
ip link set v-eth0 up
root@ubuntu2004:~# ip link set v-eth0 up

root@ubuntu2004:~# ip link show v-eth0
4: v-eth0@if3: <NO-CARRIER,BROADCAST,MULTICAST,UP> mtu 1500 qdisc noqueue state LOWERLAYERDOWN mode DEFAULT group default qlen 1000
    link/ether 3e:85:9b:dd:c7:96 brd ff:ff:ff:ff:ff:ff link-netns ebal
inside
ip netns exec ebal ip link set v-ebal up
root@ubuntu2004:~# ip netns exec ebal ip link set v-ebal up

root@ubuntu2004:~# ip netns exec ebal ip link show v-ebal
3: v-ebal@if4: <BROADCAST,MULTICAST,UP,LOWER_UP> mtu 1500 qdisc noqueue state UP mode DEFAULT group default qlen 1000
    link/ether d6:86:88:3f:eb:42 brd ff:ff:ff:ff:ff:ff link-netnsid 0
did it worked?
Let’s first see our routing table:
outside
root@ubuntu2004:~# ip r
default via 192.168.122.1 dev eth0 proto static
10.10.10.0/24 dev v-eth0 proto kernel scope link src 10.10.10.10
192.168.122.0/24 dev eth0 proto kernel scope link src 192.168.122.80
inside
root@ubuntu2004:~# ip netns exec ebal ip r
10.10.10.0/24 dev v-ebal proto kernel scope link src 10.10.10.20
Ping !
outside
root@ubuntu2004:~# ping -c 5 10.10.10.20
PING 10.10.10.20 (10.10.10.20) 56(84) bytes of data.
64 bytes from 10.10.10.20: icmp_seq=1 ttl=64 time=0.028 ms
64 bytes from 10.10.10.20: icmp_seq=2 ttl=64 time=0.042 ms
64 bytes from 10.10.10.20: icmp_seq=3 ttl=64 time=0.052 ms
64 bytes from 10.10.10.20: icmp_seq=4 ttl=64 time=0.042 ms
64 bytes from 10.10.10.20: icmp_seq=5 ttl=64 time=0.071 ms

--- 10.10.10.20 ping statistics ---
5 packets transmitted, 5 received, 0% packet loss, time 4098ms
rtt min/avg/max/mdev = 0.028/0.047/0.071/0.014 ms
inside
root@ubuntu2004:~# ip netns exec ebal bash
root@ubuntu2004:~#
root@ubuntu2004:~# ping -c 5 10.10.10.10
PING 10.10.10.10 (10.10.10.10) 56(84) bytes of data.
64 bytes from 10.10.10.10: icmp_seq=1 ttl=64 time=0.046 ms
64 bytes from 10.10.10.10: icmp_seq=2 ttl=64 time=0.042 ms
64 bytes from 10.10.10.10: icmp_seq=3 ttl=64 time=0.041 ms
64 bytes from 10.10.10.10: icmp_seq=4 ttl=64 time=0.044 ms
64 bytes from 10.10.10.10: icmp_seq=5 ttl=64 time=0.053 ms

--- 10.10.10.10 ping statistics ---
5 packets transmitted, 5 received, 0% packet loss, time 4088ms
rtt min/avg/max/mdev = 0.041/0.045/0.053/0.004 ms
root@ubuntu2004:~# exit
exit
It worked !!

End of part one.
Cloudflare has released an Argo Tunnel client named: cloudflared. It’s also a DNS over HTTPS (DoH) client and in this blog post, I will describe how to use cloudflared with LibreDNS, a public encrypted DNS service that people can use to maintain the secrecy of their DNS traffic, but also circumvent censorship.
Notes based on ubuntu 20.04, as root
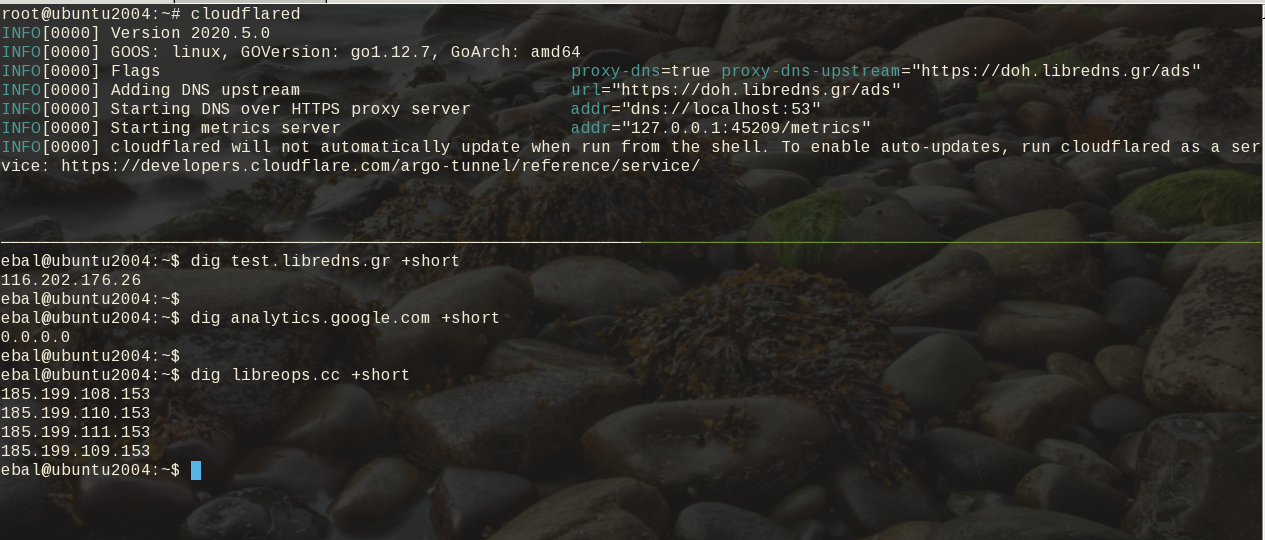
Download and install latest stable version
curl -sLO https://bin.equinox.io/c/VdrWdbjqyF/cloudflared-stable-linux-amd64.tgz

tar xf cloudflared-stable-linux-amd64.tgz

ls -l
total 61160
-rwxr-xr-x 1 root root 43782944 May  6 03:45 cloudflared
-rw-r--r-- 1 root root 18839814 May  6 19:42 cloudflared-stable-linux-amd64.tgz

mv cloudflared /usr/local/bin/
check version
# cloudflared --version
cloudflared version 2020.5.0 (built 2020-05-06-0335 UTC)
doh support
# cloudflared proxy-dns --help
NAME:
   cloudflared proxy-dns - Run a DNS over HTTPS proxy server.

USAGE:
   cloudflared proxy-dns [command options]
LibreDNS Endpoints
LibreDNS has two endpoints:
- dns-query
- ads
The latest blocks trackers/ads etc.
standalone
We can use cloudflared as standalone for testing, here is on a non standard TCP port:
cloudflared proxy-dns --upstream https://doh.libredns.gr/ads --port 5454
INFO[0000] Adding DNS upstream                   url="https://doh.libredns.gr/ads"
INFO[0000] Starting DNS over HTTPS proxy server  addr="dns://localhost:5454"
INFO[0000] Starting metrics server               addr="127.0.0.1:41717/metrics"
Testing ads endpoint
$ dig @127.0.0.1 -p 5454 +short analytics.google.com
0.0.0.0
$ dig @127.0.0.1 -p 5454 +short google.com
216.58.210.14
$ dig @127.0.0.1 -p 5454 +short test.libredns.gr
116.202.176.26
conf
We have verified that cloudflared works with libredns, so let us create a configuration file.
By default, cloudflared is trying to find one of the below files (replace root with your user):
- /root/.cloudflared/config.yaml
- /root/.cloudflared/config.yml
- /root/.cloudflare-warp/config.yaml
- /root/cloudflare-warp/config.yaml
- /root/.cloudflare-warp/config.yml
- /root/cloudflare-warp/config.yml
- /usr/local/etc/cloudflared/config.yml
The most promising file is:
- /usr/local/etc/cloudflared/config.yml
Create the configuration file
mkdir -pv /usr/local/etc/cloudflared
cat > /usr/local/etc/cloudflared/config.yml << EOF
proxy-dns: true
proxy-dns-upstream:
 - https://doh.libredns.gr/dns-query
EOF
or for ads endpoint
mkdir -pv /usr/local/etc/cloudflared
cat > /usr/local/etc/cloudflared/config.yml << EOF
proxy-dns: true
proxy-dns-upstream:
 - https://doh.libredns.gr/ads
EOF
Testing
# cloudflared

INFO[0000] Version 2020.5.0
INFO[0000] GOOS: linux, GOVersion: go1.12.7, GoArch: amd64
INFO[0000] Flags                                         proxy-dns=true proxy-dns-upstream="https://doh.libredns.gr/ads"
INFO[0000] Adding DNS upstream                           url="https://doh.libredns.gr/ads"
INFO[0000] Starting DNS over HTTPS proxy server          addr="dns://localhost:53"
INFO[0000] Starting metrics server                       addr="127.0.0.1:33519/metrics"
INFO[0000] cloudflared will not automatically update when run from the shell. To enable auto-updates, run cloudflared as a service: https://developers.cloudflare.com/argo-tunnel/reference/service/
$ dig test.libredns.gr +short
116.202.176.26
Service
if you are a use of Argo Tunnel and you have a cloudflare account, then you login and get your cert.pem key. Then (and only then) you can install cloudflared as a service by:
cloudflared service installand you can use /etc/cloudflared or /usr/local/etc/cloudflared/ and must have two files:
- cert.pem and
- config.yml (the above file)
That’s it !