The purpose of this blog post is to act as a visual guide/tutorial on how to setup an iOS device (iPad or iPhone) using the native apps against a custom Linux Mail, Calendar & Contact server.
Disclaimer: I wrote this blog post after 36hours with an apple device. I have never had any previous encagement with an apple product. Huge culture change & learning curve. Be aware, that the below notes may not apply to your setup.
Original creation date: Friday 12 Oct 2018
Last Update: Sunday 18 Nov 2018
Linux Mail Server
Notes are based on the below setup:
- CentOS 6.10
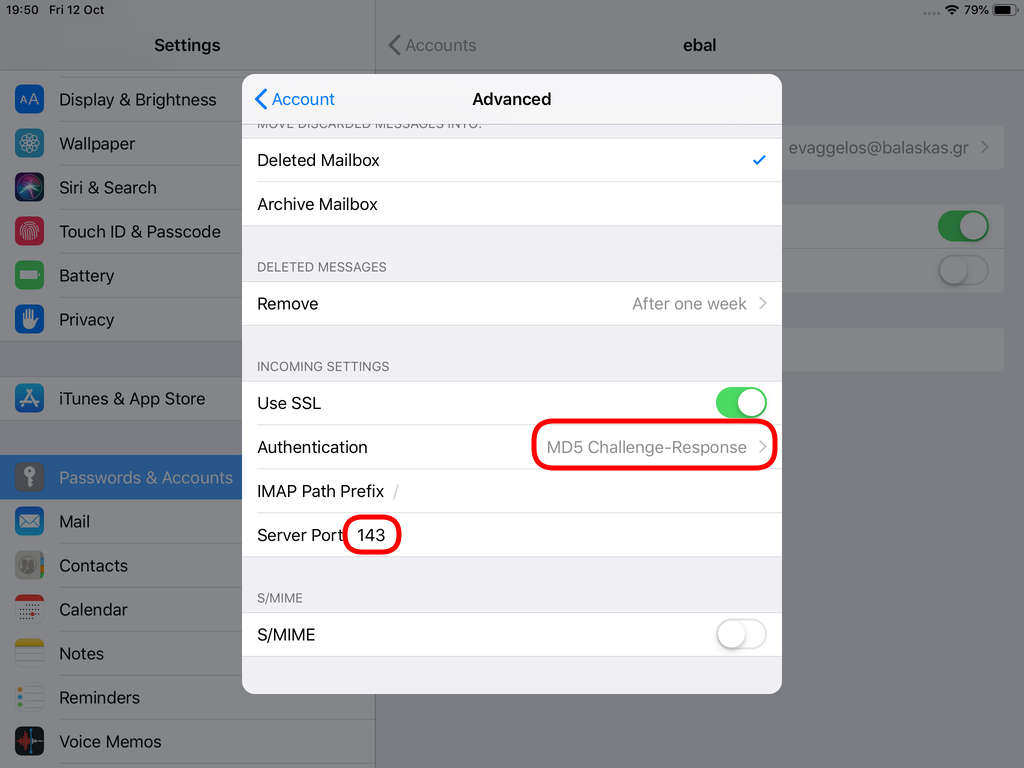
- Dovecot IMAP server with STARTTLS (TCP Port: 143) with Encrypted Password Authentication.
- Postfix SMTP with STARTTLS (TCP Port: 587) with Encrypted Password Authentication.
- Baïkal as Calendar & Contact server.
Thunderbird
Thunderbird settings for imap / smtp over STARTTLS and encrypted authentication

Baikal
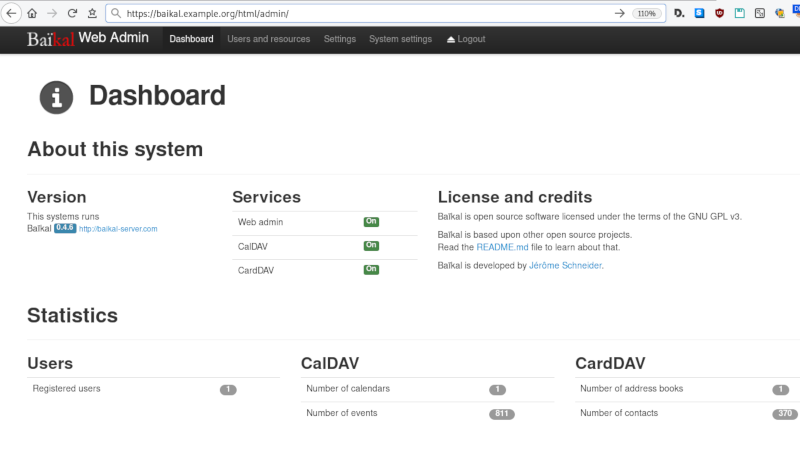
Dashboard
CardDAV
contact URI for user Username
https://baikal.baikal.example.org/html/card.php/addressbooks/Username/defaultCalDAV
calendar URI for user Username
https://baikal.example.org/html/cal.php/calendars/Username/default
iOS
There is a lot of online documentation but none in one place. Random Stack Overflow articles & posts in the internet. It took me almost an entire day (and night) to figure things out. In the end, I enabled debug mode on my dovecot/postifx & apache web server. After that, throught trail and error, I managed to setup both iPhone & iPad using only native apps.
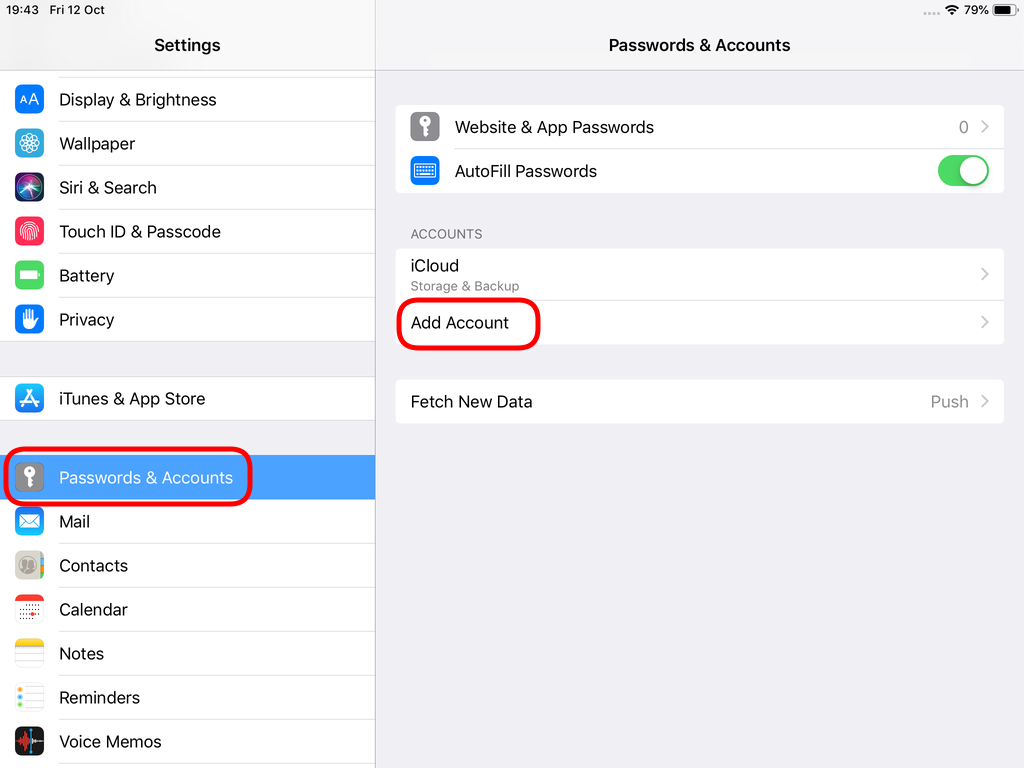
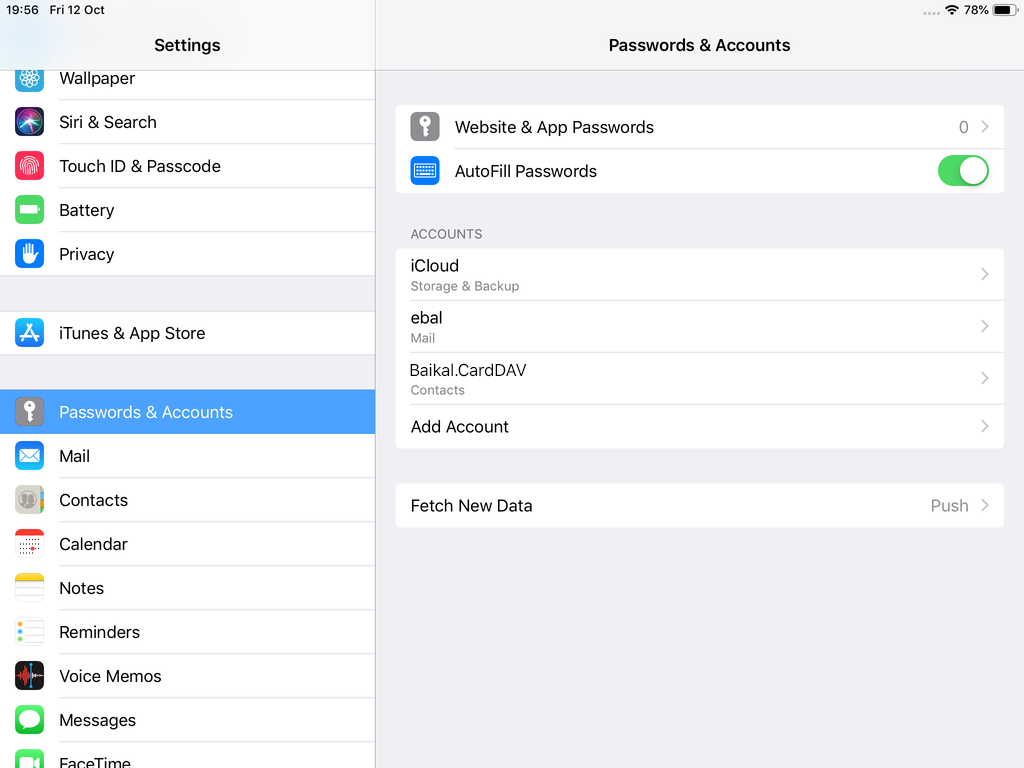
Open Password & Accounts & click on New Account
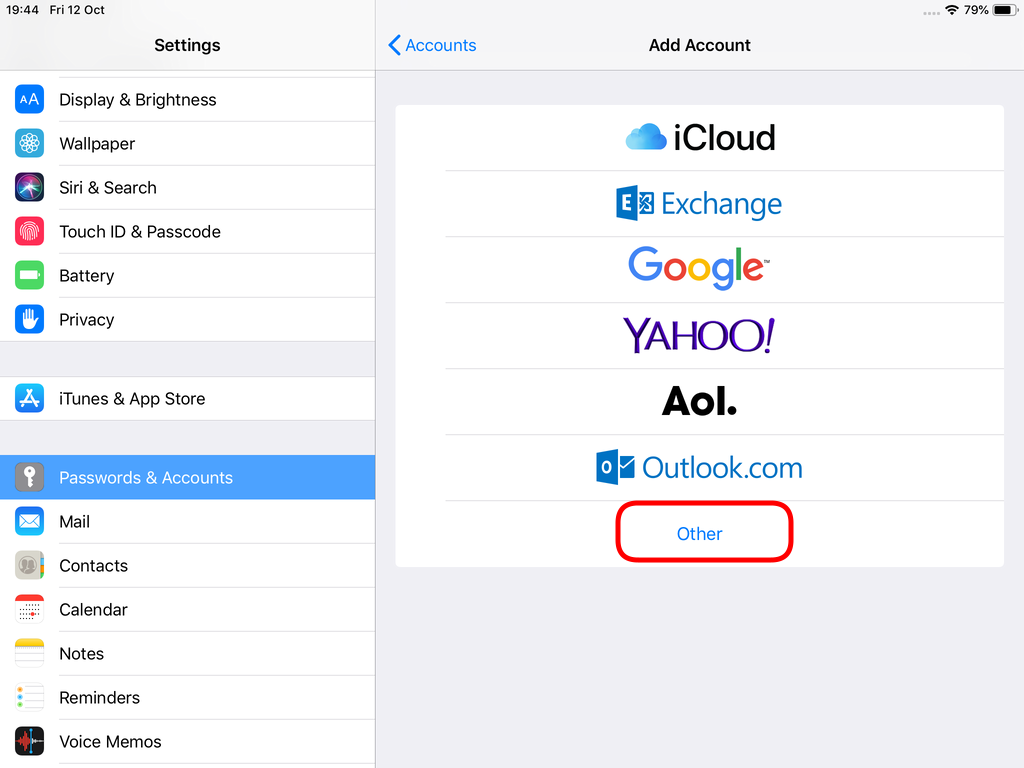
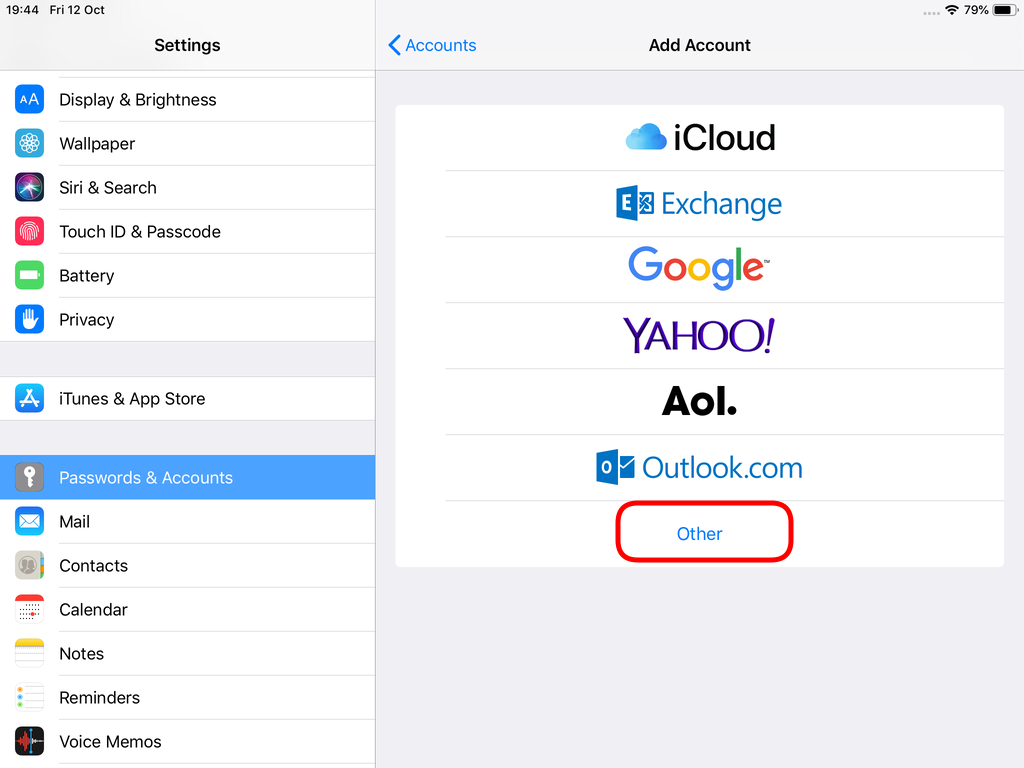
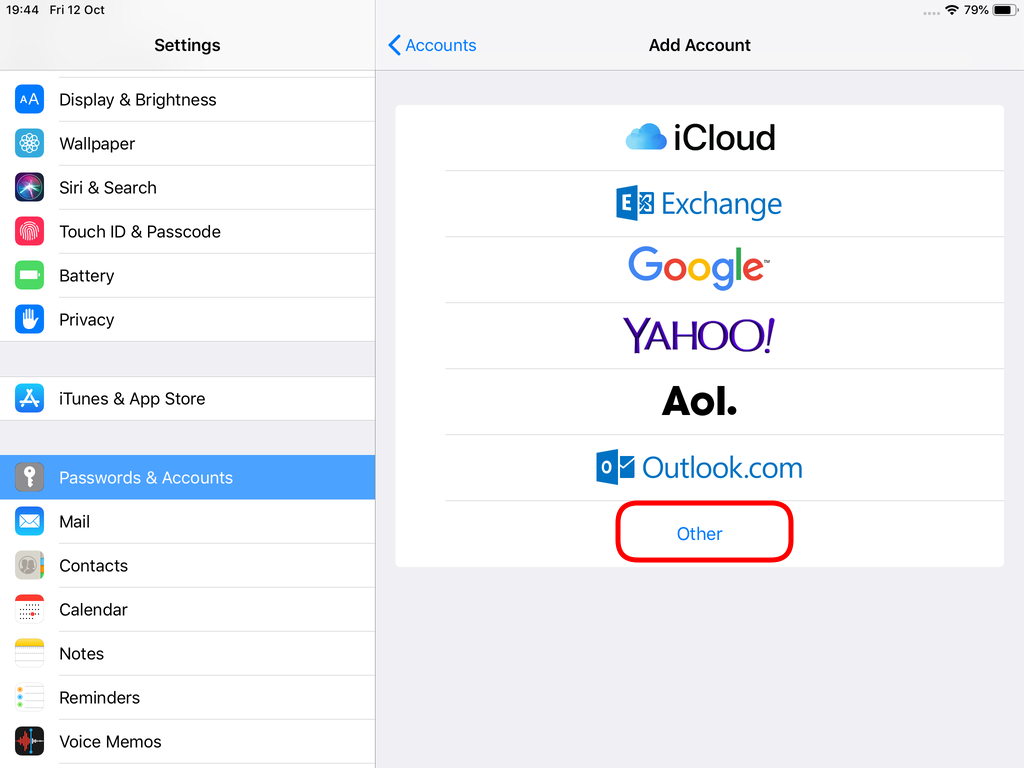
Choose Other
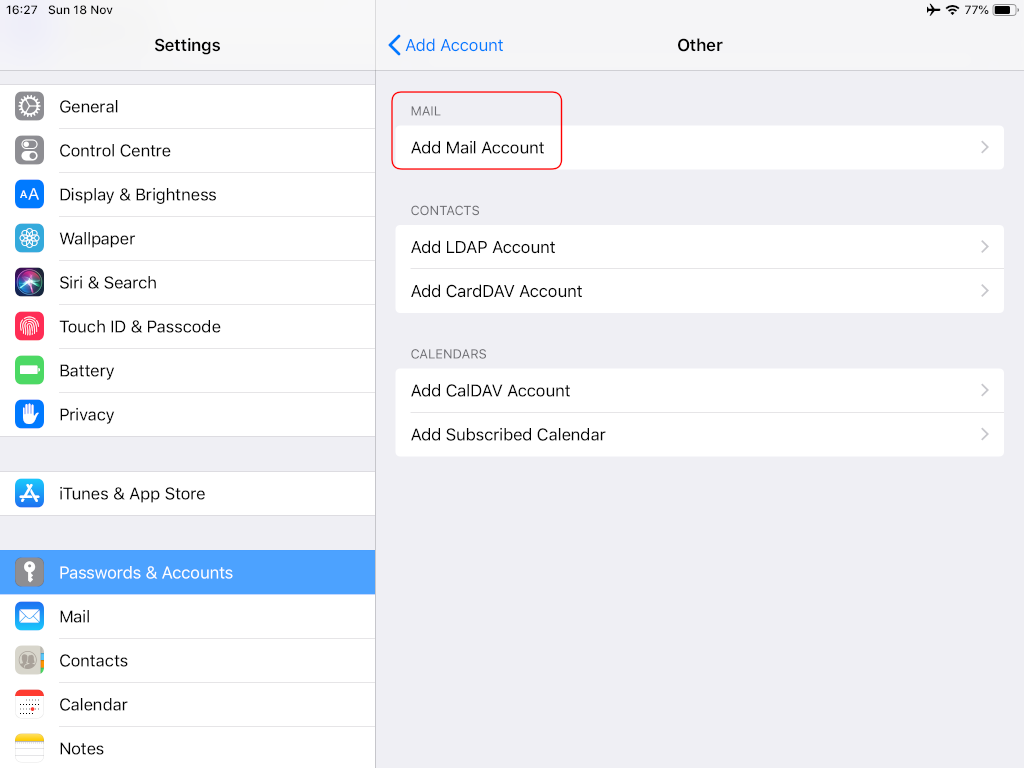
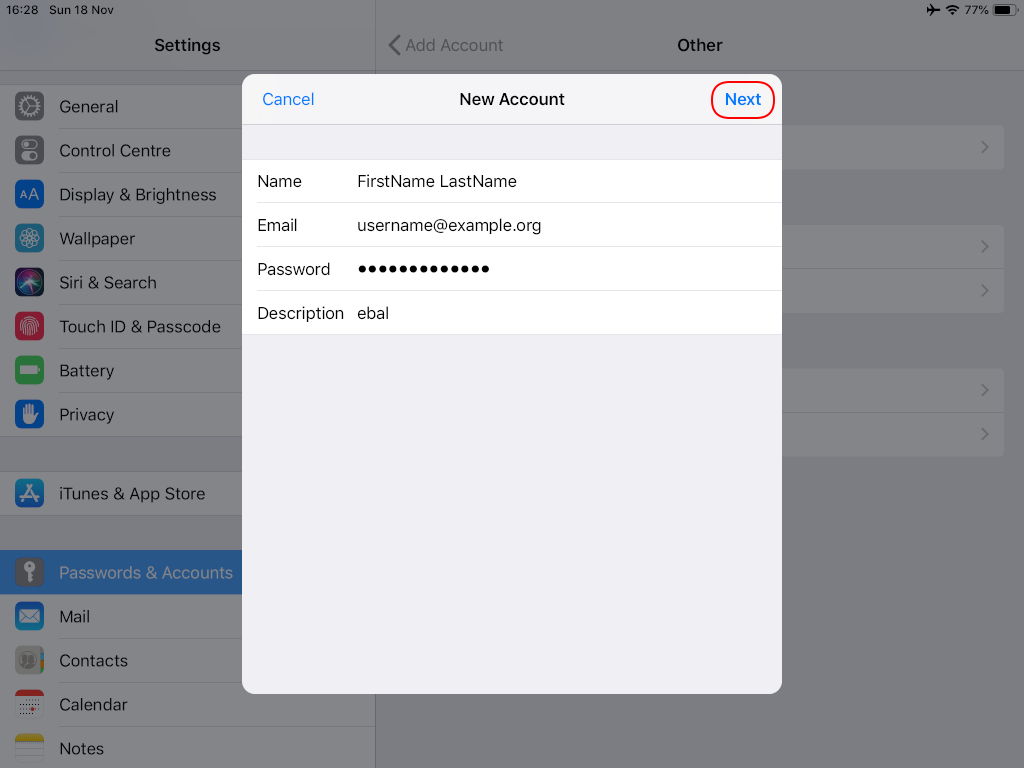
Now the tricky part, you have to click Next and fill the imap & smtp settings.
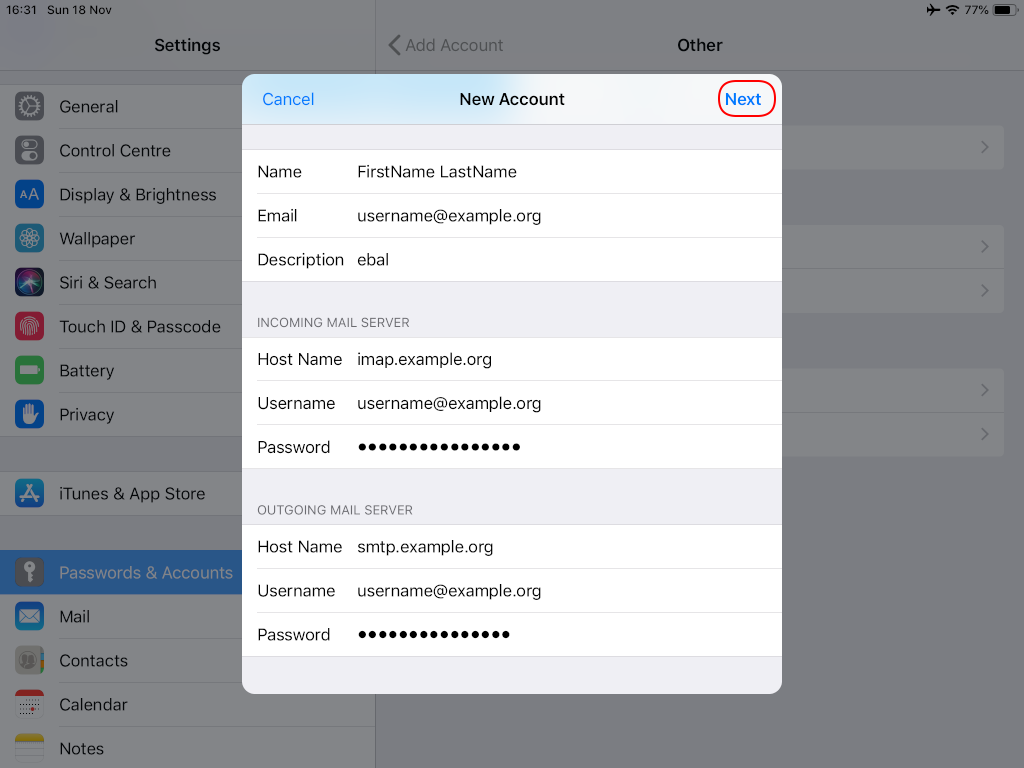
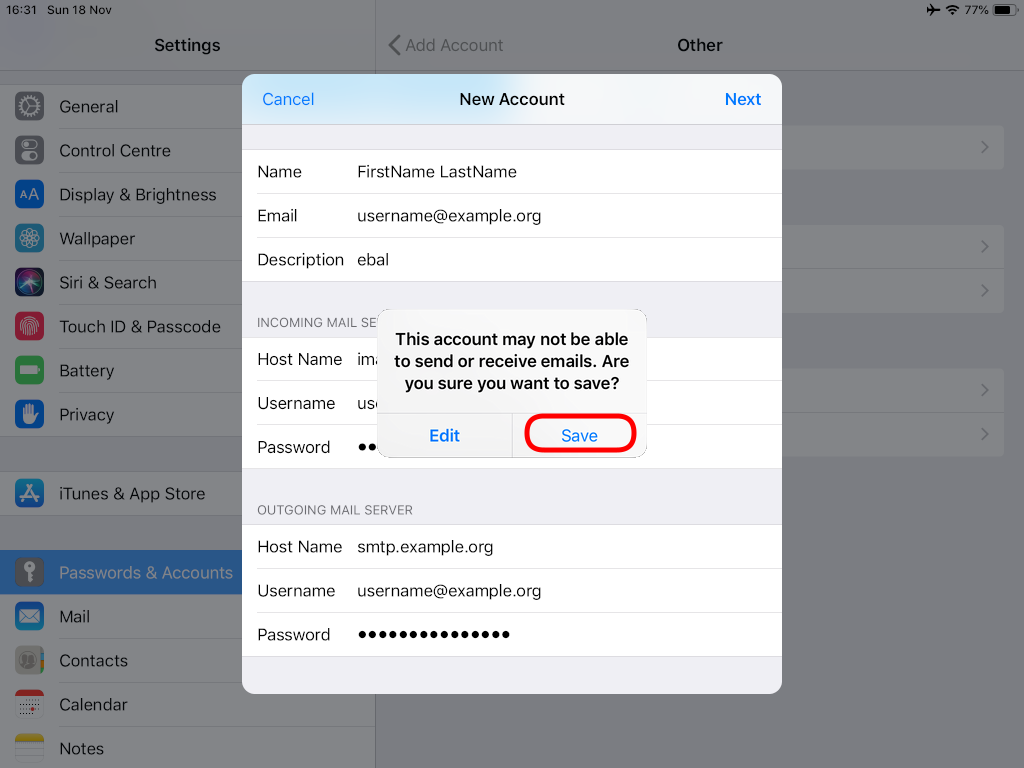
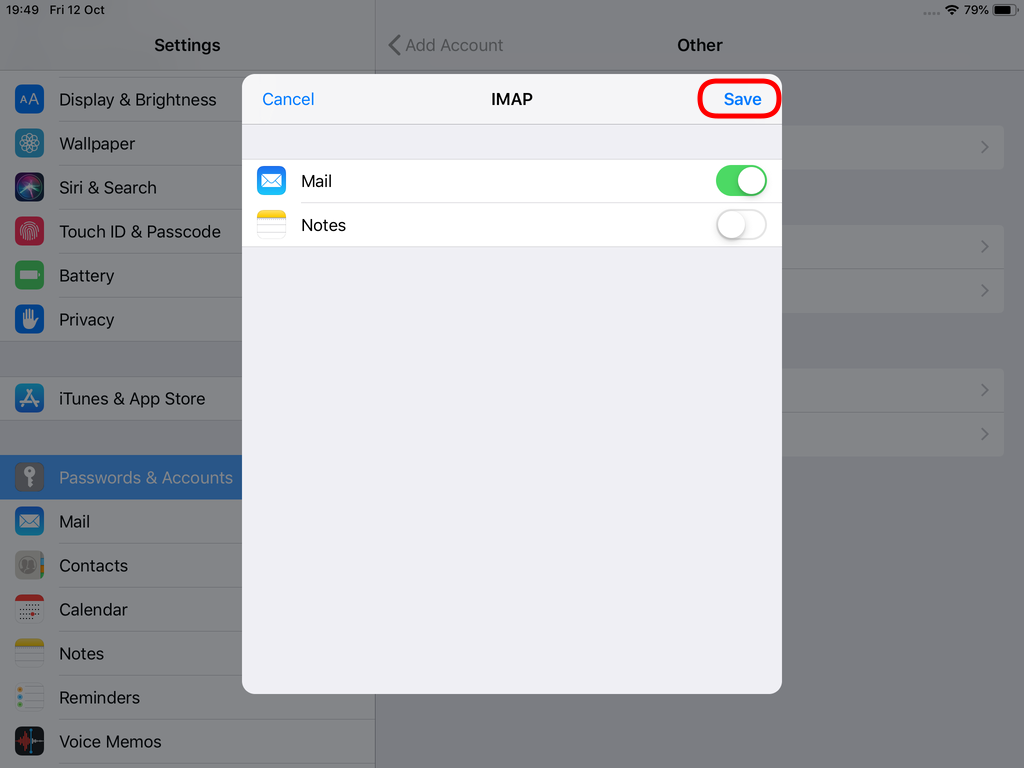
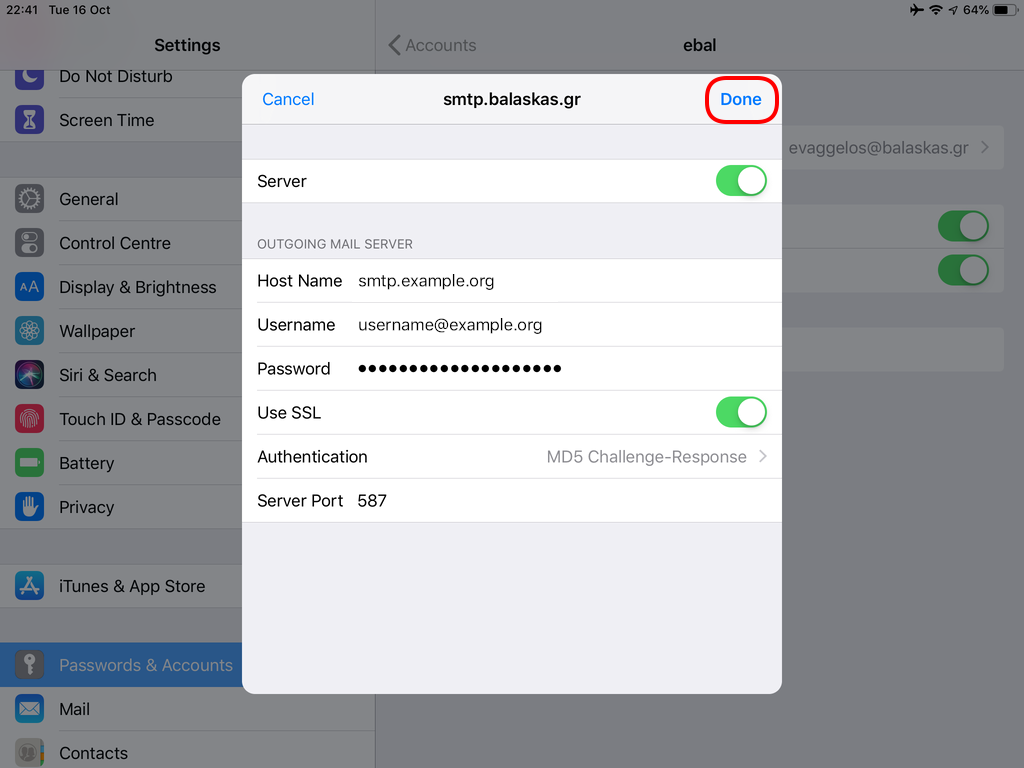
Now we have to go back and change the settings, to enable STARTTLS and encrypted password authentication.
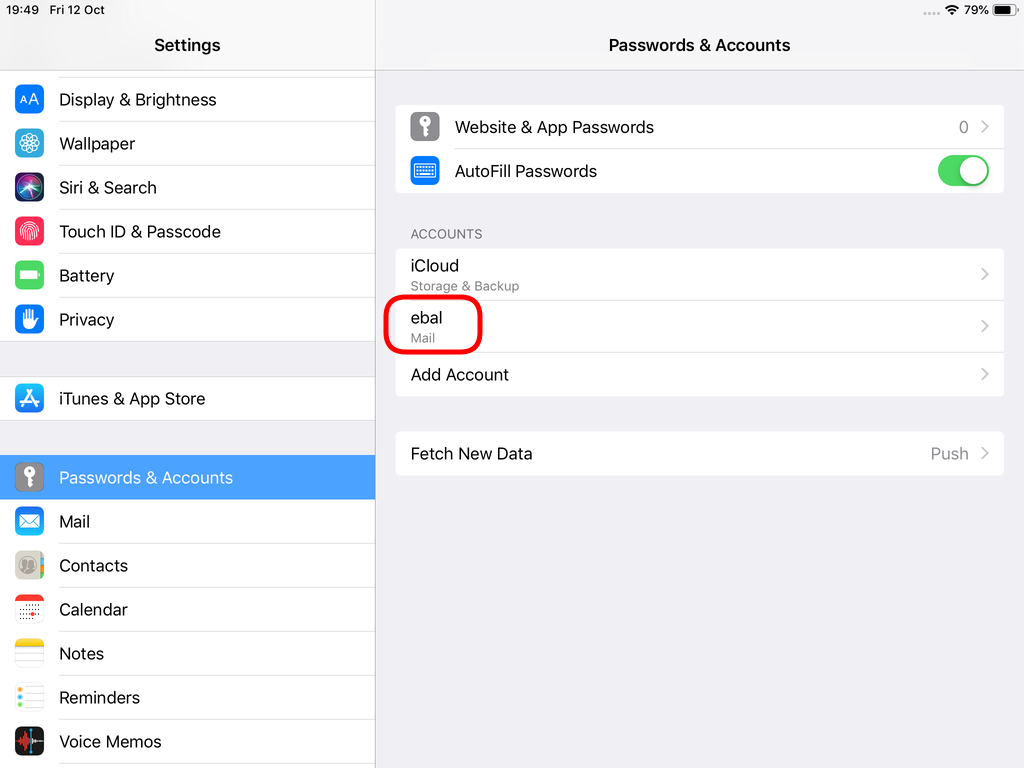
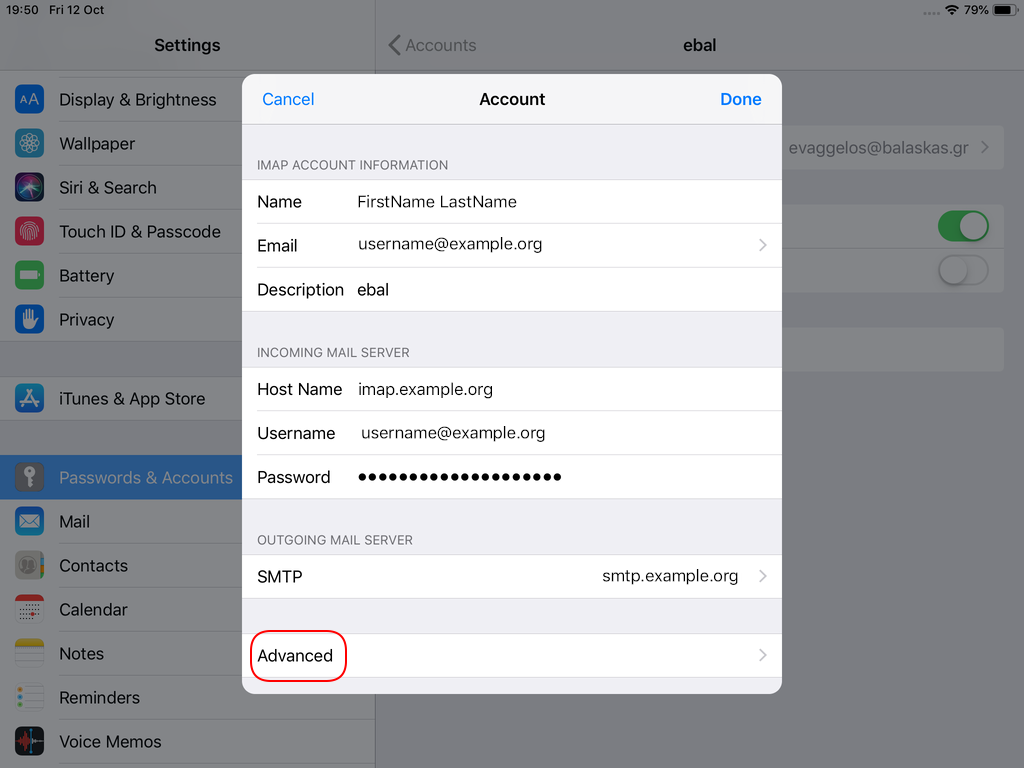
STARTTLS with Encrypted Passwords for Authentication
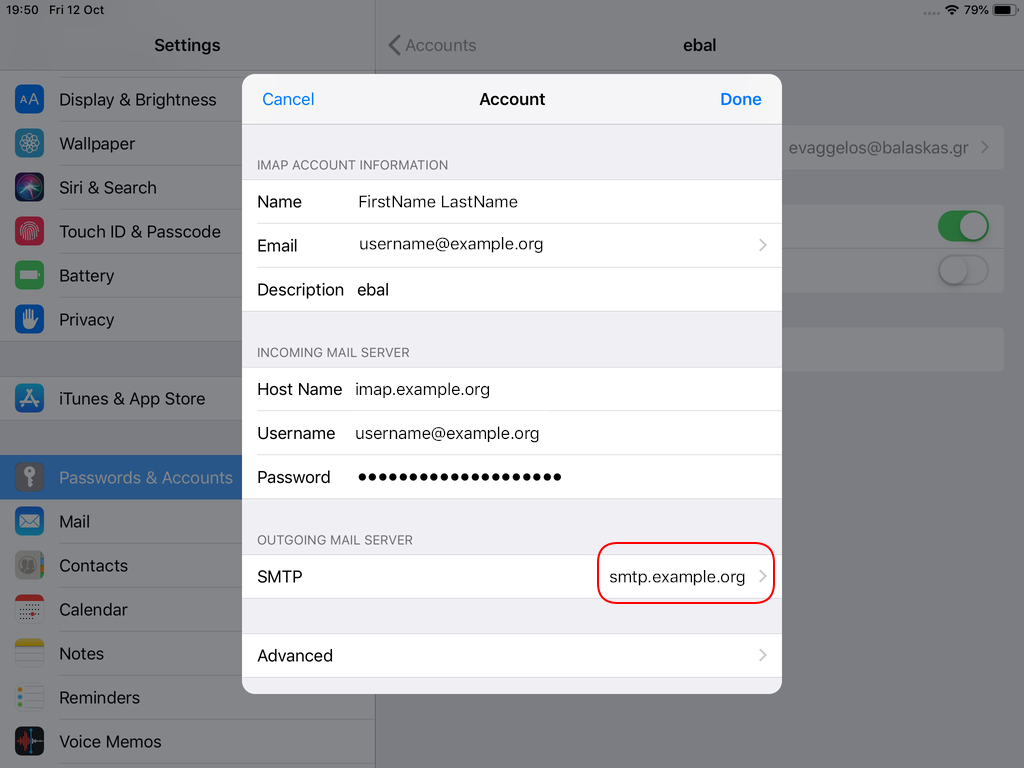
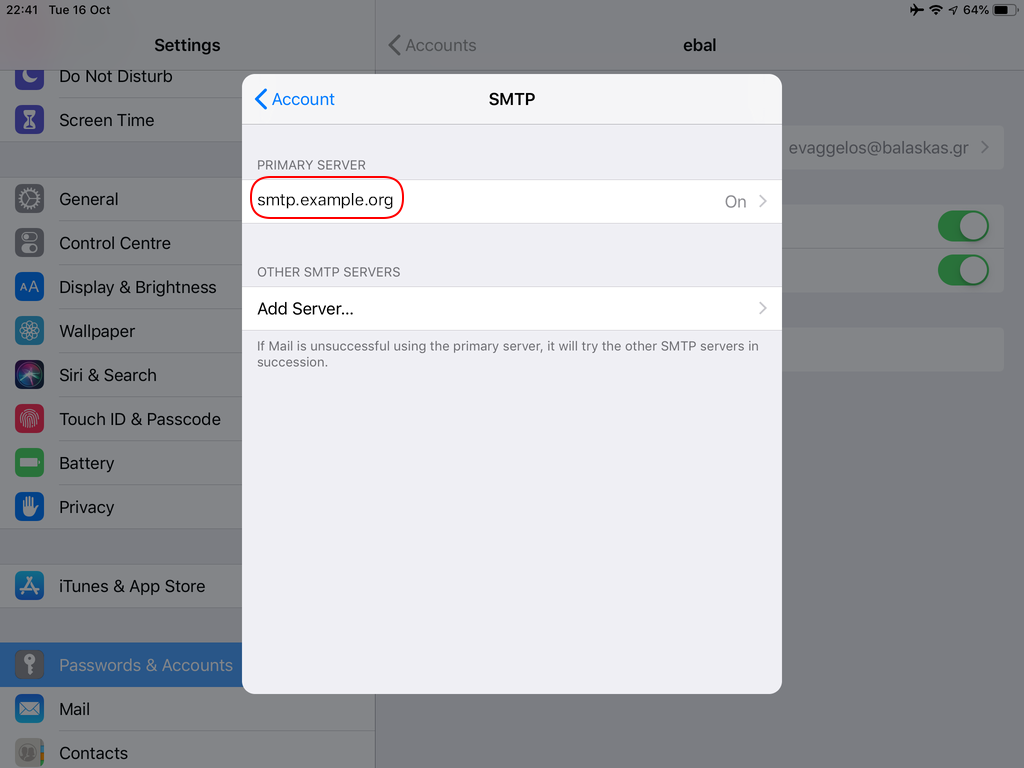
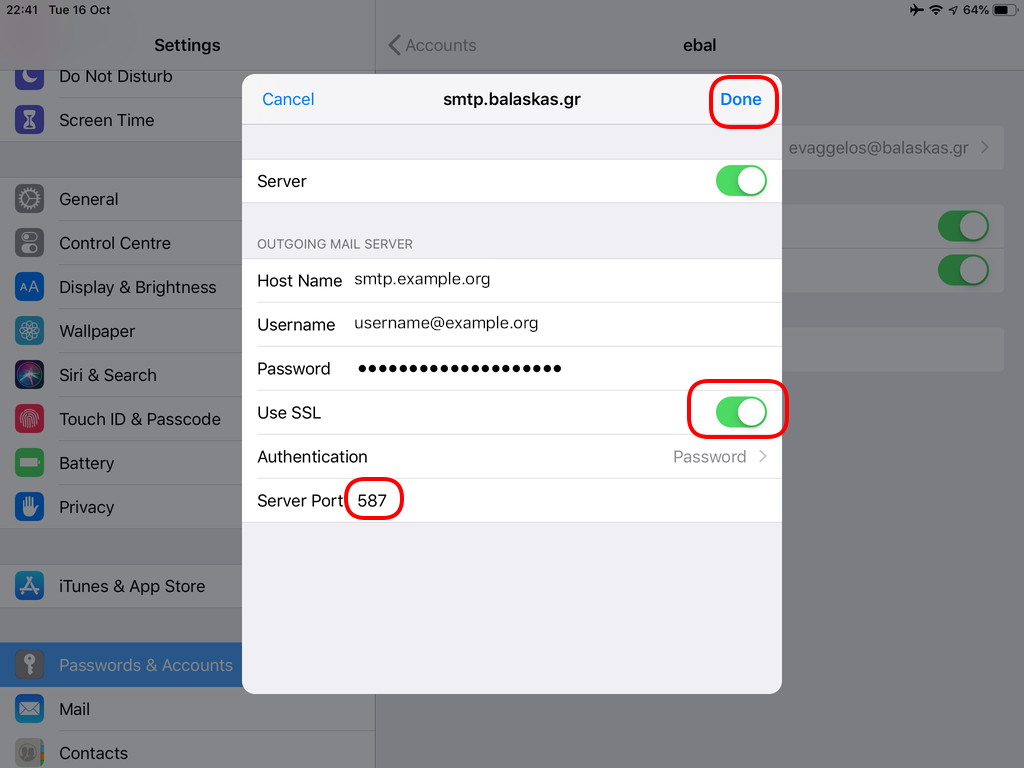
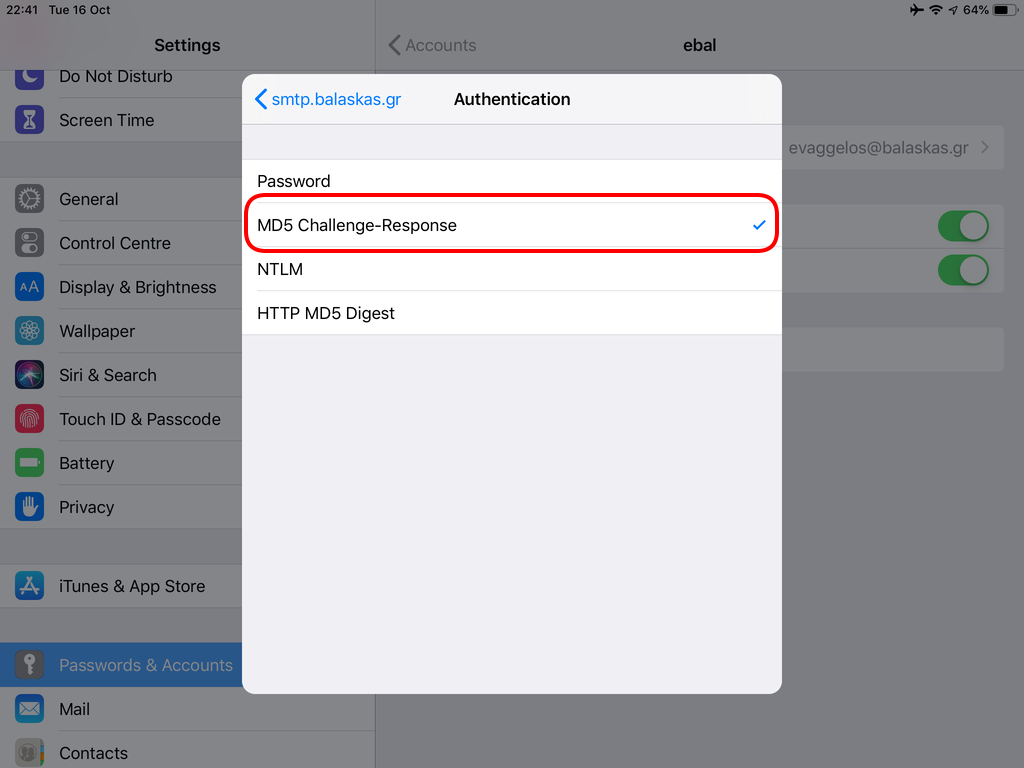
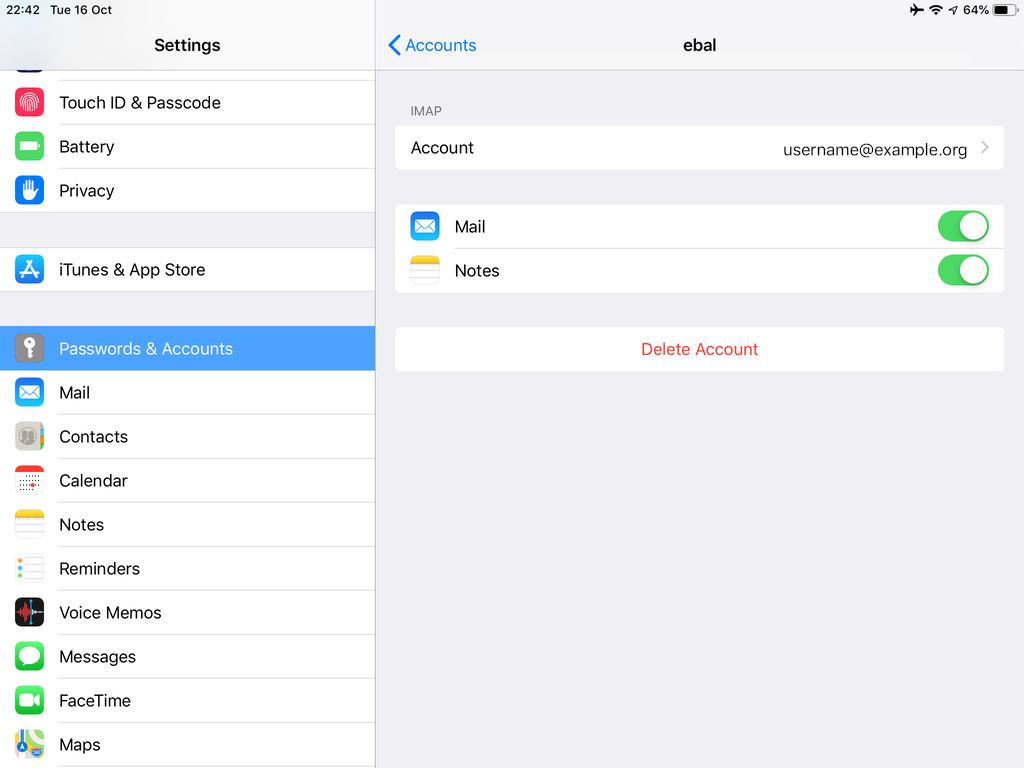
In the home-page of the iPad/iPhone we will see the Mail-Notifications have already fetch some headers.
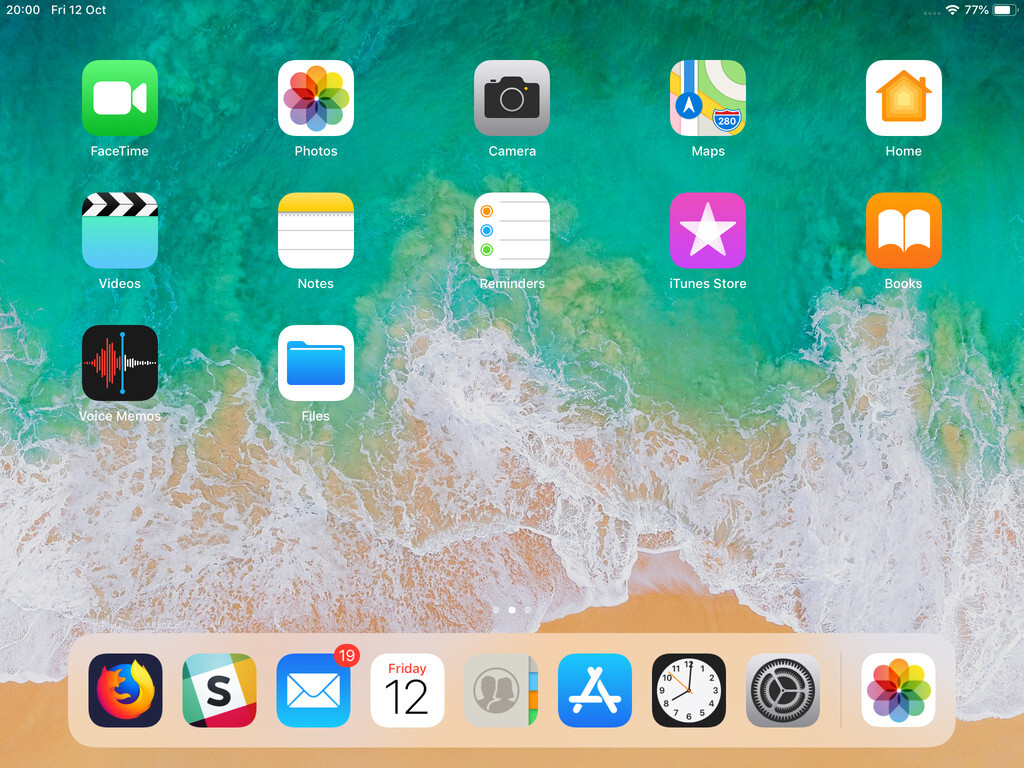
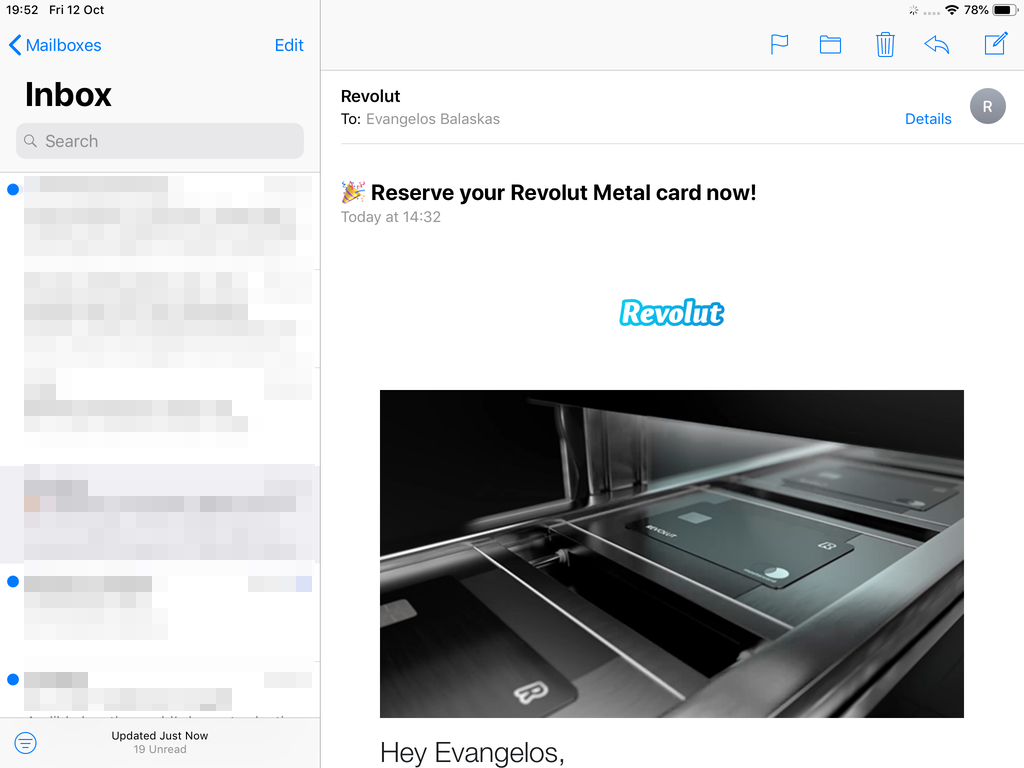
and finally, open the native mail app:
Contact Server
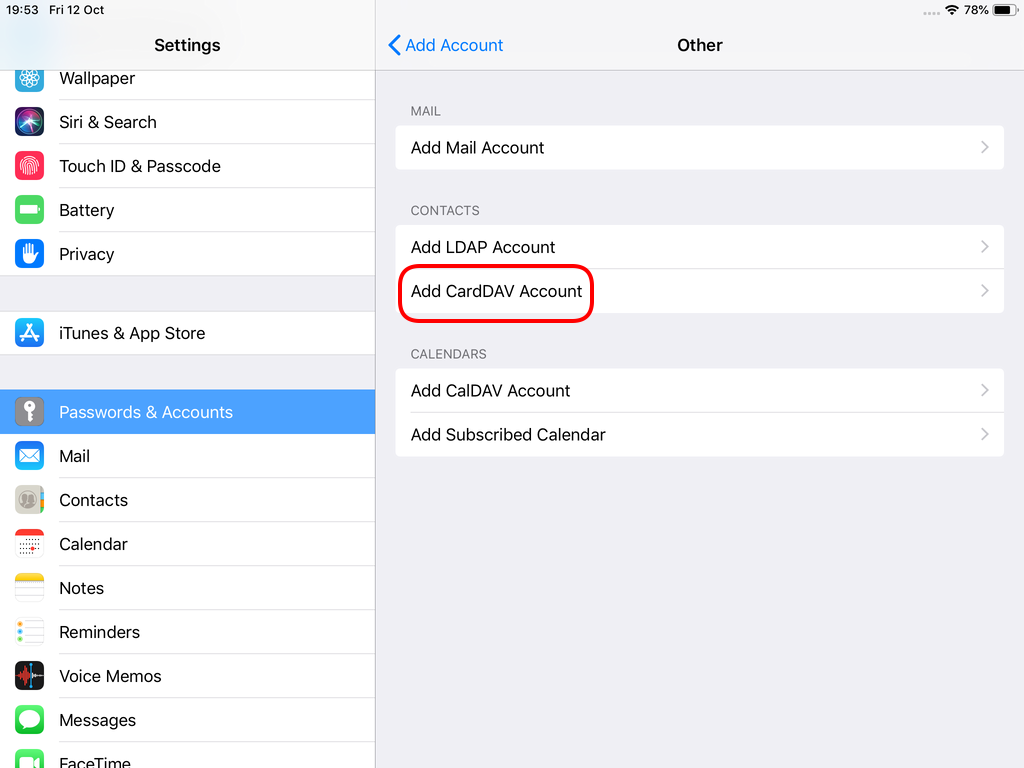
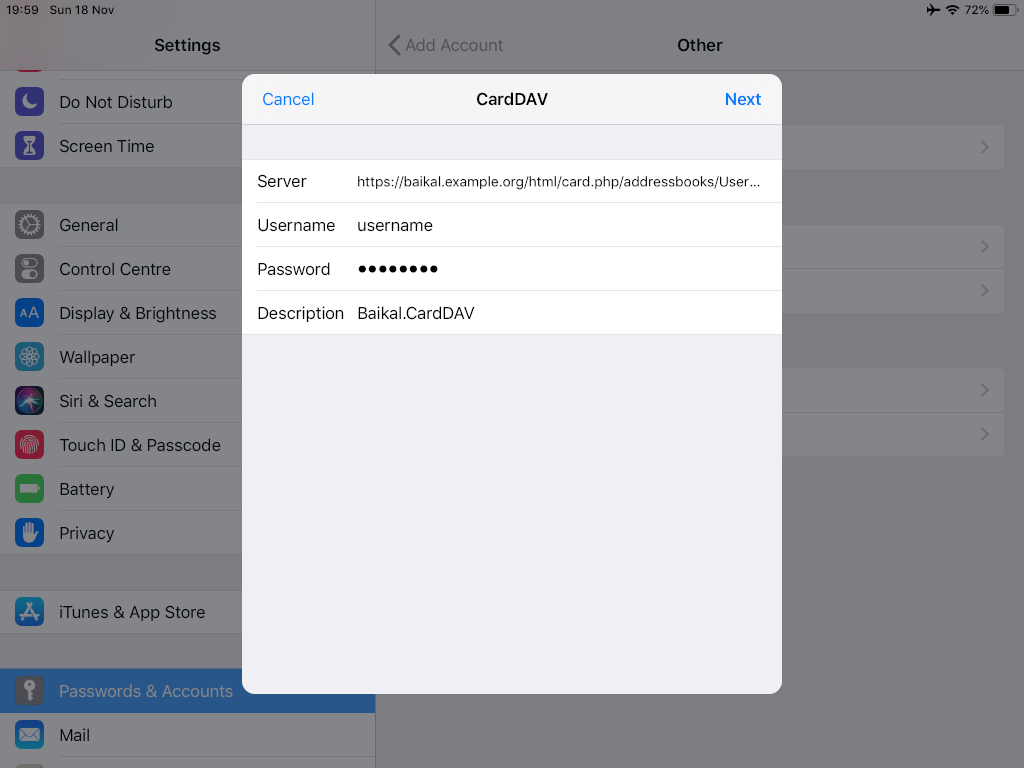
Now ready for setting up the contact account
https://baikal.baikal.example.org/html/card.php/addressbooks/Username/default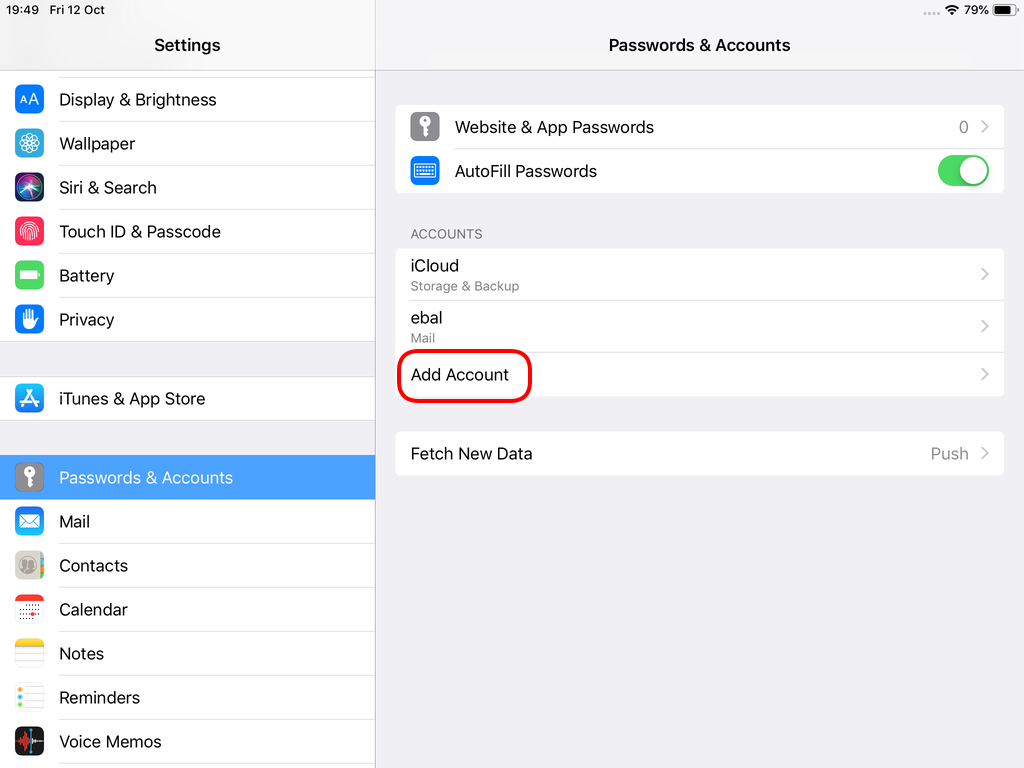
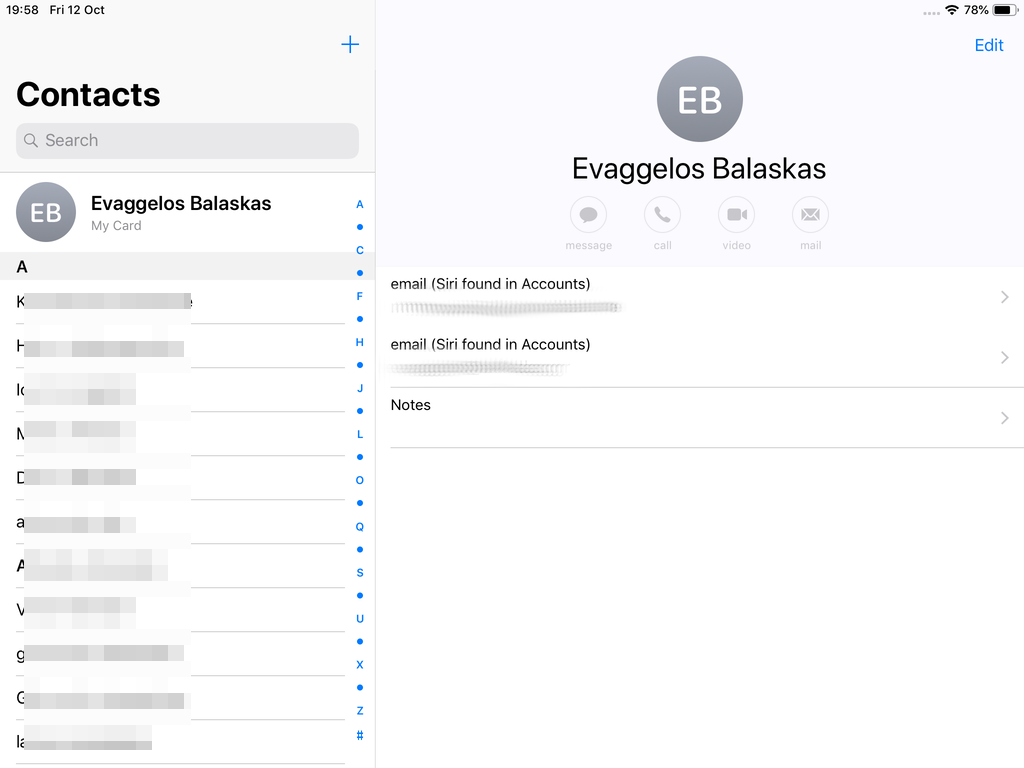
Opening Contact App:
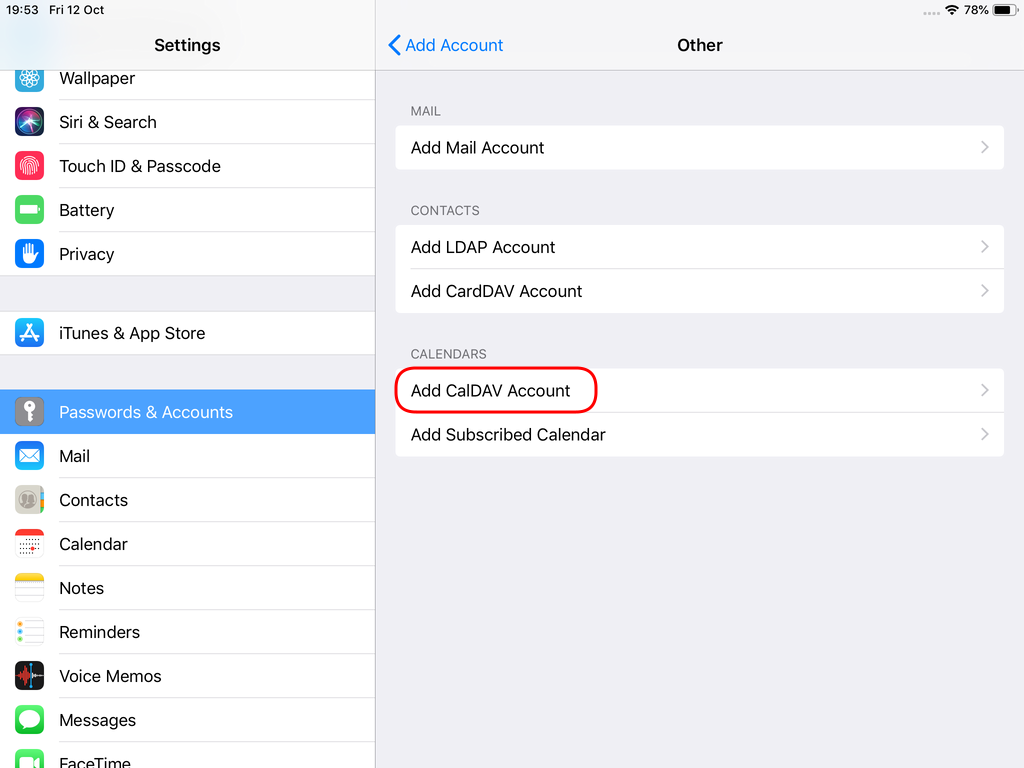
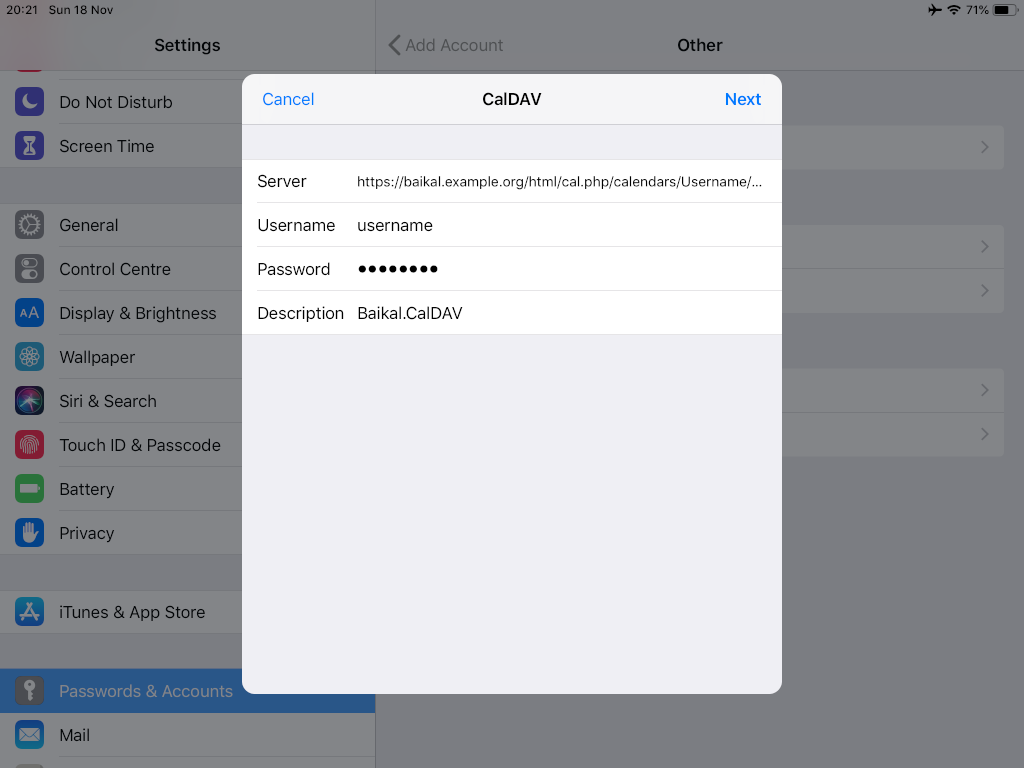
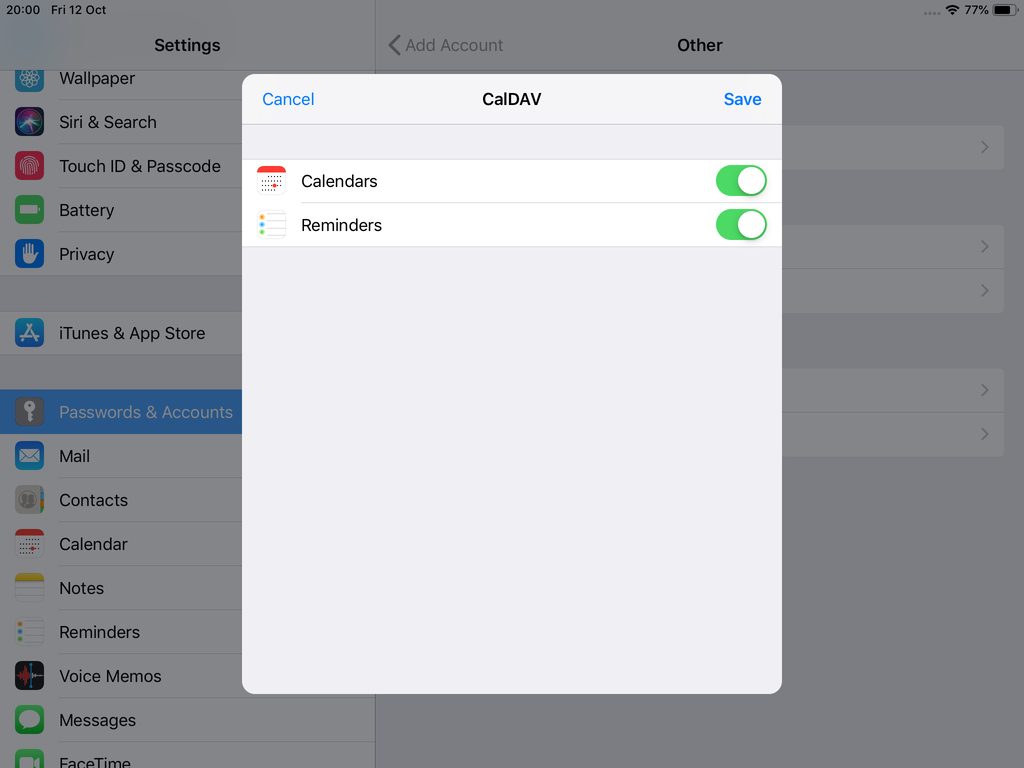
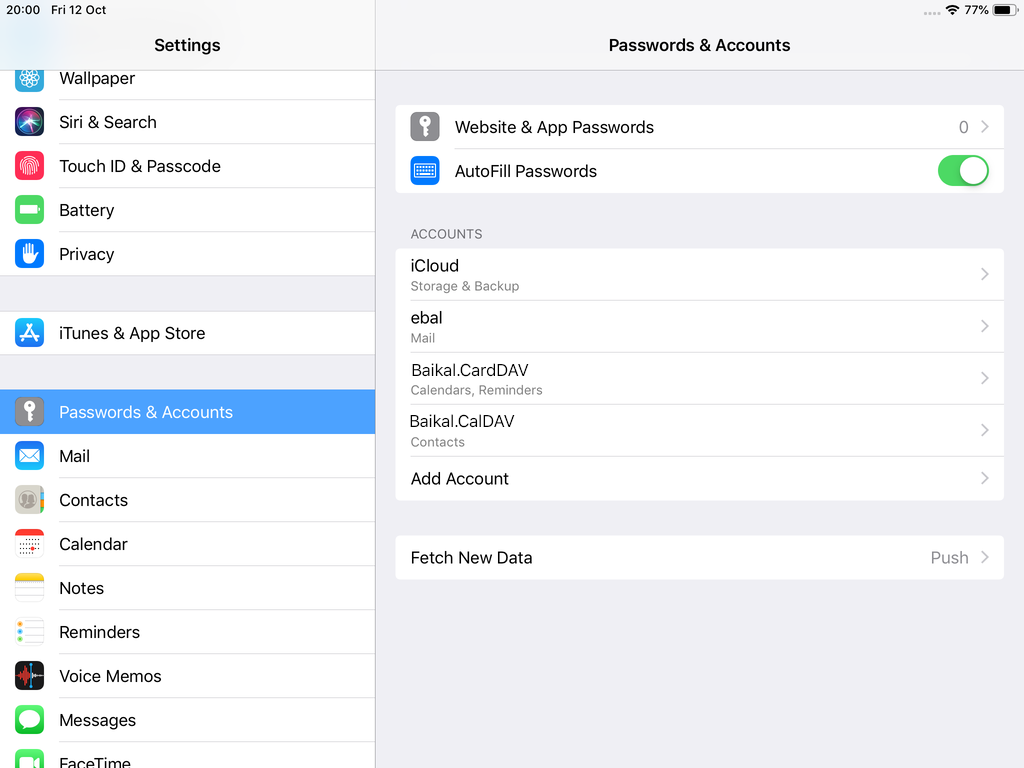
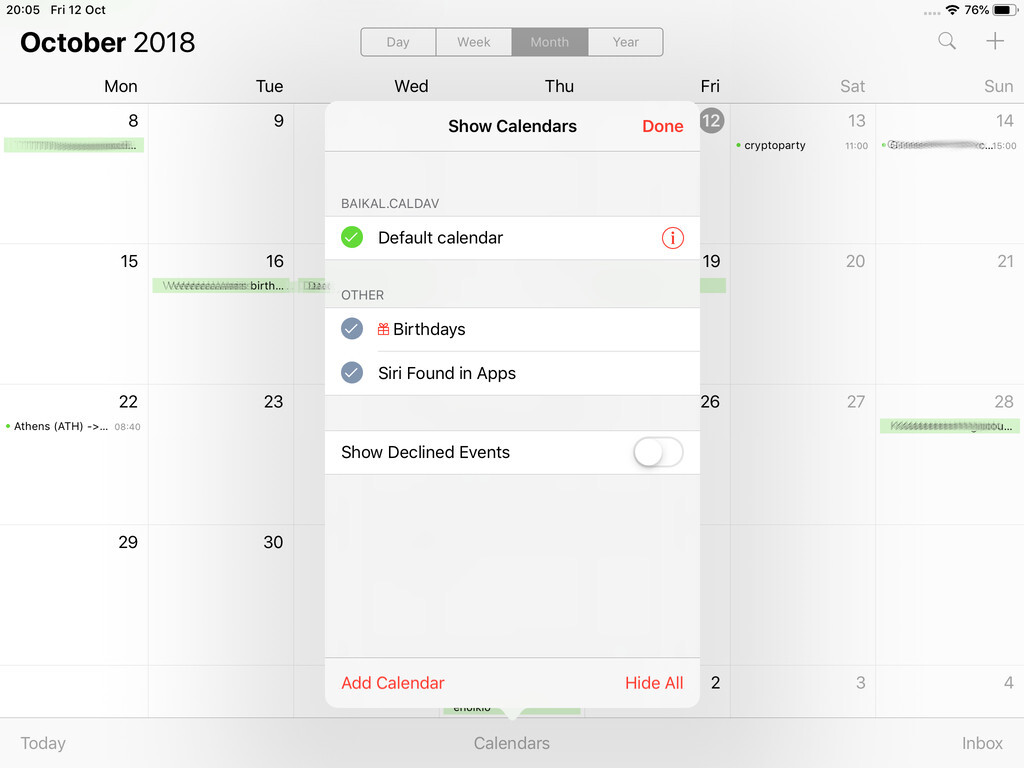
Calendar Server
https://baikal.example.org/html/cal.php/calendars/Username/default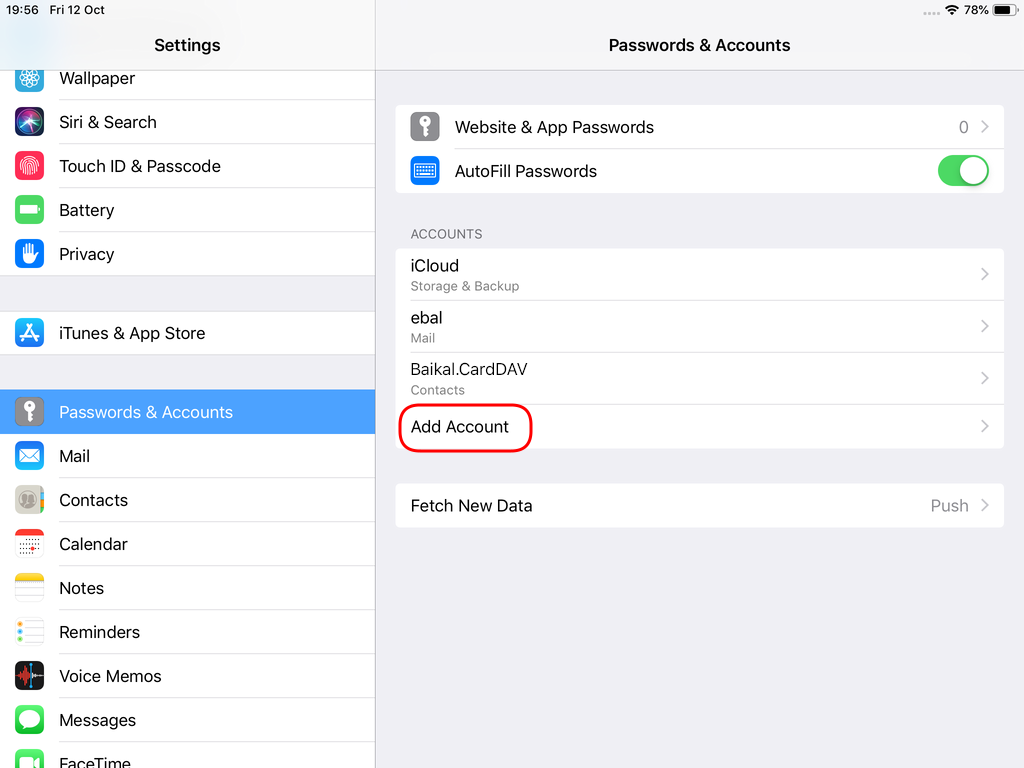
Cloud-init is the defacto multi-distribution package that handles early initialization of a cloud instance
This article is a mini-HowTo use cloud-init with centos7 in your own libvirt qemu/kvm lab, instead of using a public cloud provider.
How Cloud-init works
Josh Powers @ DebConf17
How really works?
Cloud-init has Boot Stages
- Generator
- Local
- Network
- Config
- Final
and supports modules to extend configuration and support.
Here is a brief list of modules (sorted by name):
- bootcmd
- final-message
- growpart
- keys-to-console
- locale
- migrator
- mounts
- package-update-upgrade-install
- phone-home
- power-state-change
- puppet
- resizefs
- rsyslog
- runcmd
- scripts-per-boot
- scripts-per-instance
- scripts-per-once
- scripts-user
- set_hostname
- set-passwords
- ssh
- ssh-authkey-fingerprints
- timezone
- update_etc_hosts
- update_hostname
- users-groups
- write-files
- yum-add-repo
Gist
Cloud-init example using a Generic Cloud CentOS-7 on a libvirtd qmu/kvm lab · GitHub
Generic Cloud CentOS 7
You can find a plethora of centos7 cloud images here:
Download the latest version
$ curl -LO http://cloud.centos.org/centos/7/images/CentOS-7-x86_64-GenericCloud.qcow2.xz
Uncompress file
$ xz -v --keep -d CentOS-7-x86_64-GenericCloud.qcow2.xz
Check cloud image
$ qemu-img info CentOS-7-x86_64-GenericCloud.qcow2
image: CentOS-7-x86_64-GenericCloud.qcow2
file format: qcow2
virtual size: 8.0G (8589934592 bytes)
disk size: 863M
cluster_size: 65536
Format specific information:
    compat: 0.10
    refcount bits: 16
The default image is 8G.
If you need to resize it, check below in this article.
Create metadata file
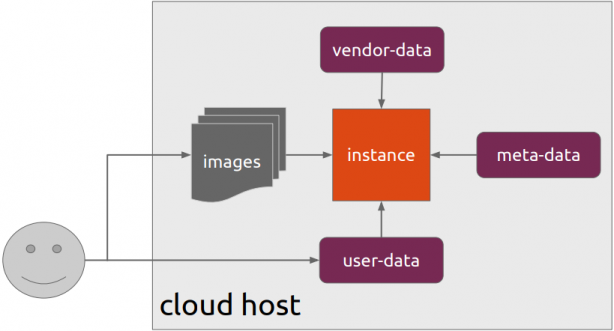
meta-data are data that comes from the cloud provider itself. In this example, I will use static network configuration.
cat > meta-data <<EOF
instance-id: testingcentos7
local-hostname: testingcentos7

network-interfaces: |
  iface eth0 inet static
  address 192.168.122.228
  network 192.168.122.0
  netmask 255.255.255.0
  broadcast 192.168.122.255
  gateway 192.168.122.1

# vim:syntax=yaml
EOF
Crete cloud-init (userdata) file
user-data are data that comes from you aka the user.
cat > user-data <<EOF
#cloud-config

# Set default user and their public ssh key
# eg. https://github.com/ebal.keys
users:
  - name: ebal
    ssh-authorized-keys:
      - `curl -s -L https://github.com/ebal.keys`
    sudo: ALL=(ALL) NOPASSWD:ALL

# Enable cloud-init modules
cloud_config_modules:
  - resolv_conf
  - runcmd
  - timezone
  - package-update-upgrade-install

# Set TimeZone
timezone: Europe/Athens

# Set DNS
manage_resolv_conf: true
resolv_conf:
  nameservers: ['9.9.9.9']

# Install packages
packages:
  - mlocate
  - vim
  - epel-release

# Update/Upgrade & Reboot if necessary
package_update: true
package_upgrade: true
package_reboot_if_required: true

# Remove cloud-init
runcmd:
  - yum -y remove cloud-init
  - updatedb

# Configure where output will go
output:
  all: ">> /var/log/cloud-init.log"

# vim:syntax=yaml
EOF
Create the cloud-init ISO
When using libvirt with qemu/kvm the most common way to pass the meta-data/user-data to cloud-init, is through an iso (cdrom).
$ genisoimage -output cloud-init.iso -volid cidata -joliet -rock user-data meta-data
or
$ mkisofs -o cloud-init.iso -V cidata -J -r user-data meta-data
Provision new virtual machine
Finally run this as root:
# virt-install
    --name centos7_test
    --memory 2048
    --vcpus 1
    --metadata description="My centos7 cloud-init test"
    --import
    --disk CentOS-7-x86_64-GenericCloud.qcow2,format=qcow2,bus=virtio
    --disk cloud-init.iso,device=cdrom
    --network bridge=virbr0,model=virtio
    --os-type=linux
    --os-variant=centos7.0
    --noautoconsole
The List of Os Variants
There is an interesting command to find out all the os variants that are being supported by libvirt in your lab:
eg. CentOS
$ osinfo-query os | grep CentOS
centos6.0  |  CentOS  6.0  |  6.0  |  http://centos.org/centos/6.0
centos6.1  |  CentOS  6.1  |  6.1  |  http://centos.org/centos/6.1
centos6.2  |  CentOS  6.2  |  6.2  |  http://centos.org/centos/6.2
centos6.3  |  CentOS  6.3  |  6.3  |  http://centos.org/centos/6.3
centos6.4  |  CentOS  6.4  |  6.4  |  http://centos.org/centos/6.4
centos6.5  |  CentOS  6.5  |  6.5  |  http://centos.org/centos/6.5
centos6.6  |  CentOS  6.6  |  6.6  |  http://centos.org/centos/6.6
centos6.7  |  CentOS  6.7  |  6.7  |  http://centos.org/centos/6.7
centos6.8  |  CentOS  6.8  |  6.8  |  http://centos.org/centos/6.8
centos6.9  |  CentOS  6.9  |  6.9  |  http://centos.org/centos/6.9
centos7.0  |  CentOS  7.0  |  7.0  |  http://centos.org/centos/7.0
DHCP
If you are not using a static network configuration scheme, then to identify the IP of your cloud instance, type:
$ virsh net-dhcp-leases default
 Expiry Time           MAC address         Protocol   IP address           Hostname   Client ID or DUID
---------------------------------------------------------------------------------------------------------
 2018-11-17 15:40:31   52:54:00:57:79:3e   ipv4       192.168.122.144/24   -          -
Resize
The easiest way to grow/resize your virtual machine is via qemu-img command:
$ qemu-img resize CentOS-7-x86_64-GenericCloud.qcow2 20G
Image resized.$ qemu-img info CentOS-7-x86_64-GenericCloud.qcow2
image: CentOS-7-x86_64-GenericCloud.qcow2
file format: qcow2
virtual size: 20G (21474836480 bytes)
disk size: 870M
cluster_size: 65536
Format specific information:
    compat: 0.10
    refcount bits: 16
You can add the below lines into your user-data file
growpart:
  mode: auto
  devices: ['/']
  ignore_growroot_disabled: false
The result:
[root@testingcentos7 ebal]# df -h /
Filesystem      Size  Used Avail Use% Mounted on
/dev/vda1        20G  870M   20G   5% /
Default cloud-init.cfg
For reference, this is the default centos7 cloud-init configuration file.
# /etc/cloud/cloud.cfg users:
- default
disable_root: 1
ssh_pwauth: 0
mount_default_fields: [~, ~, 'auto', 'defaults,nofail', '0', '2']
resize_rootfs_tmp: /dev
ssh_deletekeys: 0
ssh_genkeytypes: ~
syslog_fix_perms: ~
cloud_init_modules:
- migrator
- bootcmd
- write-files
- growpart
- resizefs
- set_hostname
- update_hostname
- update_etc_hosts
- rsyslog
- users-groups
- ssh
cloud_config_modules:
- mounts
- locale
- set-passwords
- rh_subscription
- yum-add-repo
- package-update-upgrade-install
- timezone
- puppet
- chef
- salt-minion
- mcollective
- disable-ec2-metadata
- runcmd
cloud_final_modules:
- rightscale_userdata
- scripts-per-once
- scripts-per-boot
- scripts-per-instance
- scripts-user
- ssh-authkey-fingerprints
- keys-to-console
- phone-home
- final-message
- power-state-change
system_info:
default_user:
name: centos
lock_passwd: true
gecos: Cloud User
groups: [wheel, adm, systemd-journal]
sudo: ["ALL=(ALL) NOPASSWD:ALL"]
shell: /bin/bash
distro: rhel
paths:
cloud_dir: /var/lib/cloud
templates_dir: /etc/cloud/templates
ssh_svcname: sshd
# vim:syntax=yaml